Recipes, Cooking & Art Direction: Mariana Nuño Ruiz McEnroe | Photography: Ian McEnroe |
Published: June 5, 2015
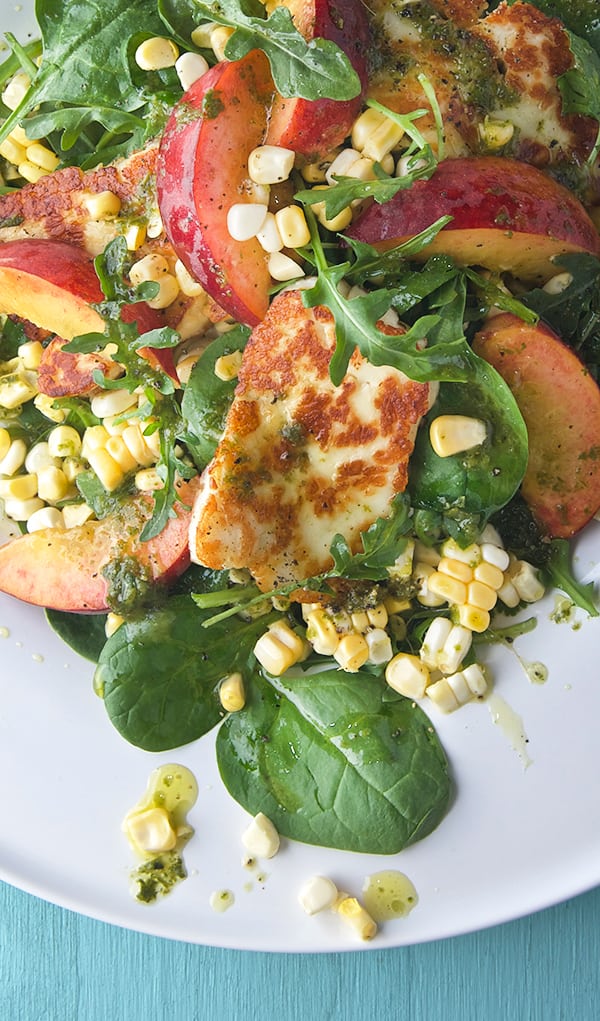
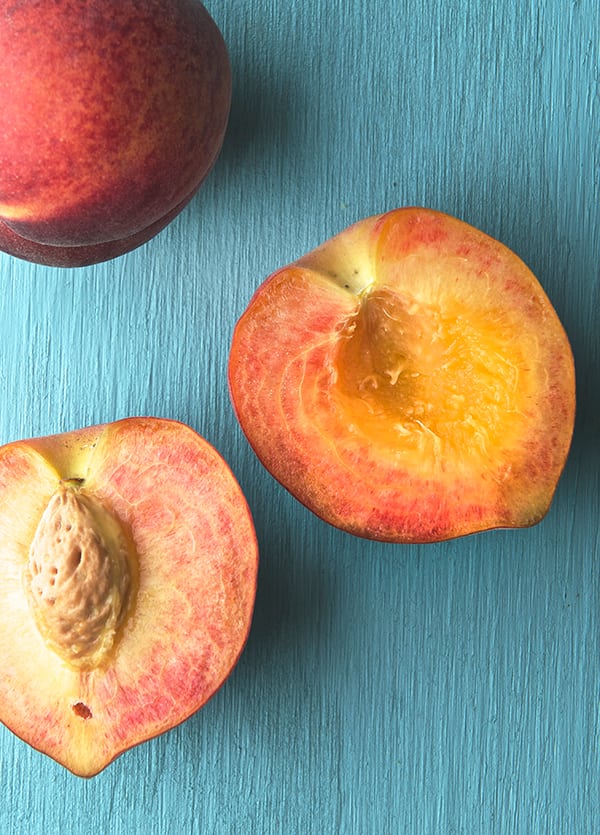
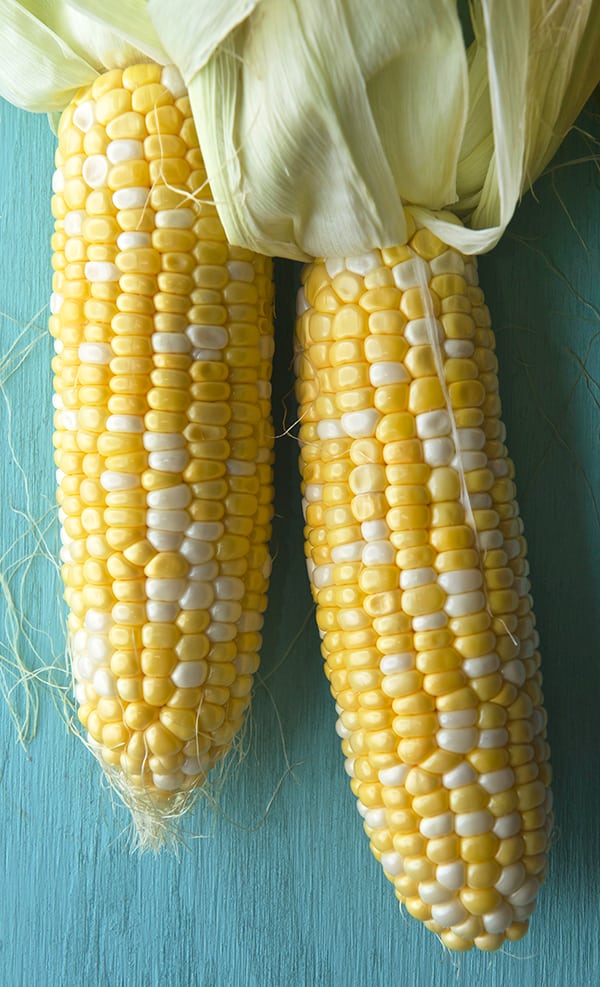
This salad sums up summer in one plate. It is the kind of salad you eat and feel so happy and satisfied, sunshine on a plate. Fresh sweet corn and juicy peach season is here in Austin and I can have this salad almost every day until the last peach. If you are like me and bought two little baskets of peaches at the market, because one did not seem enough for your peachy desires, well we are in the same boat. The good thing is that extra peaches are not a problem once you get the hang of this salad.And if you still have some peaches left over, bake a pie, make this fantastic minipeaches and cream empanadasyou have a good alibi for as long those peach baskets last you….
Let me describe you this salad. Imagine the flavor of fresh sweet corn crispy yellow kernels, in combination with juicy bright sweet tangy floral peach slices, a few pieces of pan seared golden Halloumi cheese salty, crusty outside, and creamy gooey inside, over fresh arugula and greens. All come together with a delicious sweet and tangy Lemon-Basil Vinaigrette. It is ridiculously good. It is. Because yes. All the sweet, juicy tangy, salty briny, herb flavors together, one bite of these salad you are hooked!
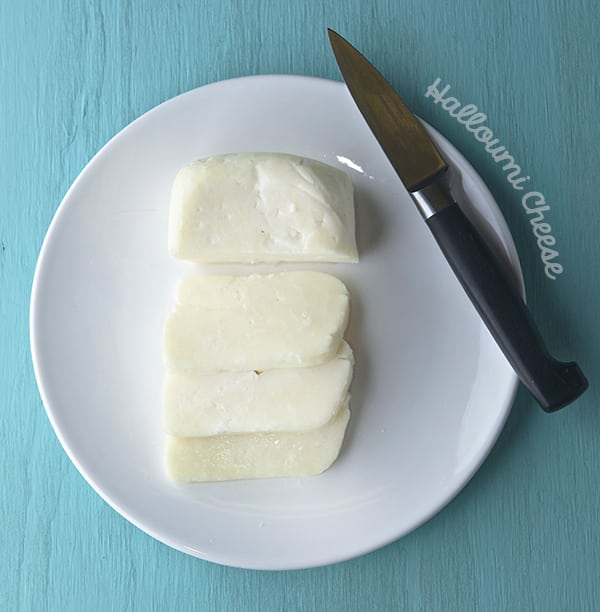
If you never had Halloumi, it is a firm brined cheese that when pan-fried or grilled holds it’s shape and gets crusty golden. It is a bit salty, and texture-wise along its warm its gooey on the inside, then becomes a bit chewie, a pleasent chewie. I bought it in this fantastic shop called Phoenicia Bakery and Deli here in Austin, Tx. It is a fabulous store. They carry foods from around the world but their emphasis is Mediterranean and Middle Eastern specialties. Cheeses, olives, pantry items, spices, preserves, teas, coffee, dry fruit, to mention a few. They also make the best freshly baked pitas in town. Not to mention they have a small menu for lunch, with great falafel, Gyros, Kafta and Shawarma. Dessert?… no problem from Pistachio Baklava to delicate pastries filled with pine nuts and rose water. And for me their fresh Feta cheese is the best in town, they have 3 different kinds, Bulgarian, French and sheep’s milk simply delicious. You have to go, it is a must…
If you are not in Austin you must try to find a specialty food shop were you can buy this delicious cheese… Explore and try something new! Get your inner peach and make this glorious Peach Sweet Corn and Halloumi Salad with Lemon Basil Vinaigrette fresh salad. Lunch, dinner or both, it travels great for a picnic on the park or to daydream about summery days at the office. All you have to do is to close your eyes and almost feel your feet on the green grass, the sun warming up your eye lids and a warm breeze asking you is it summer time yet?….Run and get peachy now! Enjoy.
Recipes, Cooking & Art Direction: Mariana Nuño Ruiz McEnroe | Photography: Ian McEnroe |
Published: May 24, 2015
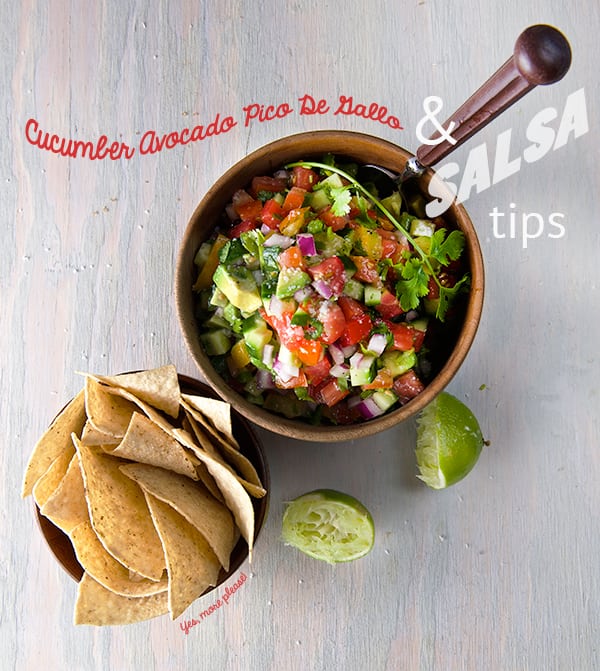
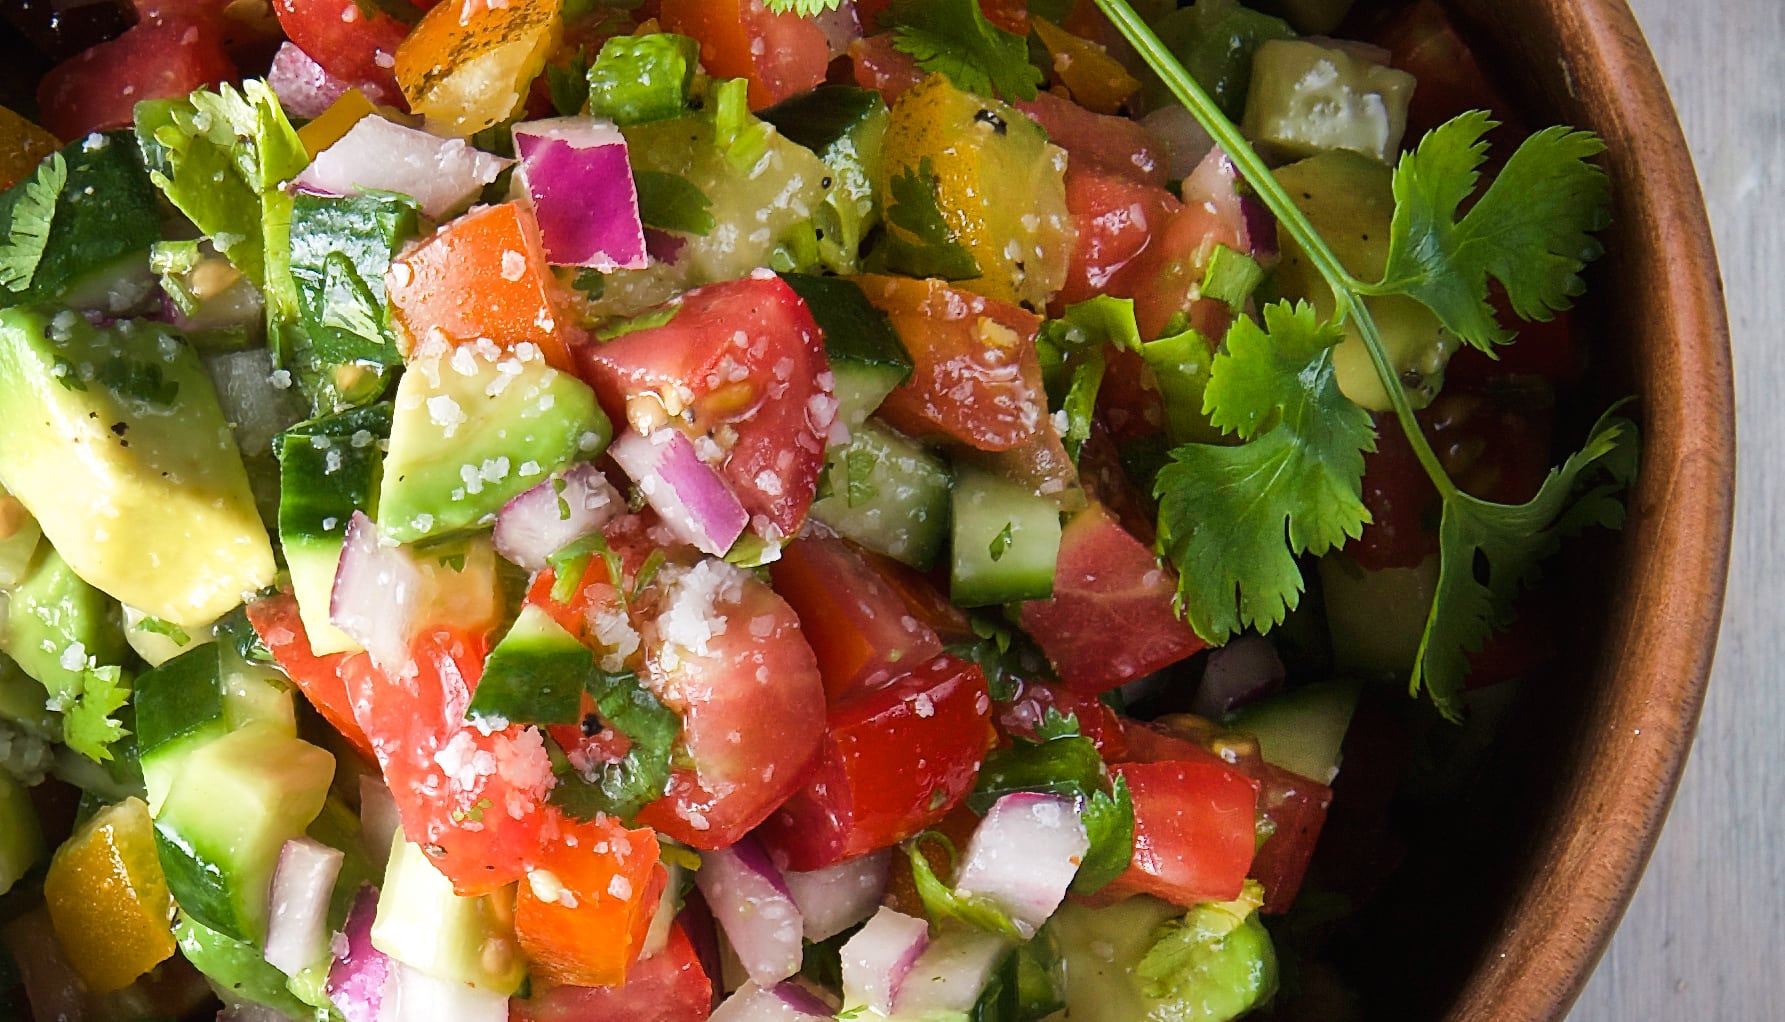
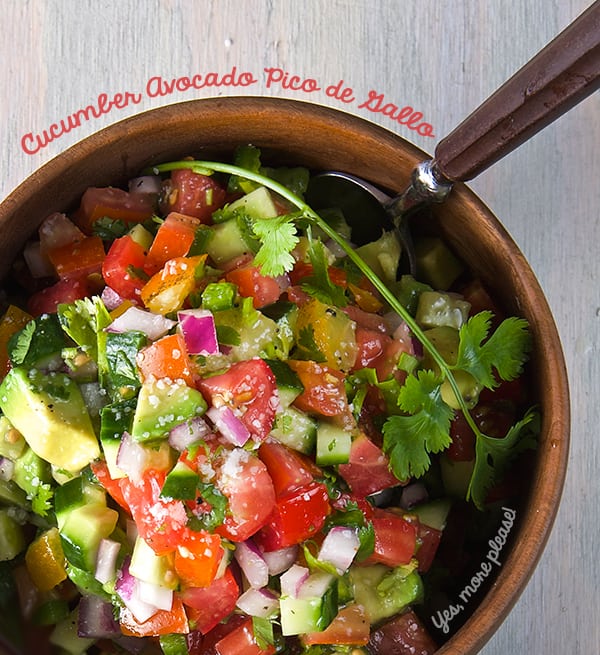
Hello friends, a quick recipe for your weekend. This is a great fresh salsa-guac! It is not a guacamole, it is not your usual Pico de Gallo, its both! The cucumber adds crunch and extra freshness and the avocado adds a bit of creamy goodness. What else could you ask for?… It is a quicky to make just what you need on a long weekend, something fresh to snack on along with some refreshing drinks, perhaps like this fabulous Texas Caipirinha…ehehm…
Besides the recipe which is so easy to make, I would love to share with you a few of my tips when making Fresh chopped Salsa fresca, mostly known here in USA as “Pico de Gallo”. Enjoy!
Sharp knife:
Everything has to begin with a sharp knife. Nothing ruins good salsa more than a dull knife. Mushy cuts do not make a salsa very appealing and ruins the texture. So, sharpen those blades, baby! Tomatoes:
Mix them up! Juliet, Cherry tomatoes, Sun golds, Lemon Boy, Roma, Heirloom, right now is the right season were there is plenty tomato goodness to choose from. My favorite Tomatoes in Austin, TX are the ones that Boggy Creek Farms produce. Click here to visit this beutiful Austin Urban Farm is one of the best. Cucumbers:
English cucumber, or Jade are my favorite since they don’t have to many seeds, thin skin, they keep their crispy texture when marinated. Red Onions:
Red onions are sharp in flavor. My advice is after dicing the onions give them a quick rinse, drain them and add them to your salsa. Rinsing them will make them milder by washing away that milky pungent liquid. You, your loved ones and your guests will appreciate the little extra care! Avocado Hass:
This kind is the creamiest of all avocados. They have a fleshier inside and small oval pit. Choose the ones that are firmer to the touch it should feel like well done steak. These level of ripeness will hold better in this kind of salsa-guac, creamy, not mushy. Dicing Jalapeños:
Rub a bit of cooking oil in your hands before cutting a jalapeño, this will protect your hands from the spicy burn. Remove seeds and vein or leave them up to how spicy you want it! A good way to know when a pepper is spicy, is to smell the pepper. Cut the pepper length wise. Smell it. If it smells like fresh-cut grass it will be very mild. But, if it smells like fresh cracked black pepper you hit the jack pot is a spicy one. Watch out! maybe you just one one jalapeño in your salsa… Limes:
Use limes, instead of lemons. They have a sharper acidity that balances great with the sweetness from the tomatoes. Sea salt:
Why Sea salt instead of Kosher? It tastes fresher and the salt crystals brighten up the salsa flavor. Fruit:
You can add other fresh fruit if you feel adventurous like Mangos, Strawberries, Green papaya, Pinneapple, Jicama, Peaches,the world is your canvas!
I hope these simple tips help you to get inspired and give a refresh spin to your salsa. Do you have any tips when making salsa? I will love to read about them.
Share them here and shoot us a comment!
Relax and have a great weekend!
Cucumber Avocado Pico de Gallo Salsa
Makes 1, 2, 3 or 4 people dance!
2 cups diced fresh tomatoes of your choice, check out my tips above.
2 cups finely chopped cucumbers
½ cup finely dice white onion
1 medium size avocado Hass chopped in small cubes
1-2 jalapeños small diced one with seeds one with out.
1 small bunch of cilantro, finely chopped
2 large juicy limes
2 good pinches of dry mexican oregano
1 teaspoon sea salt
Corn Chips… lots of them!
Preparation:
In a large bowl combine all the chopped ingredients, season with salt and add the oregano by rubbing between your fingers like if you where to snap the oregano at it. This warms up the herb and makes it into smaller pieces which flavors the salsa better. Add the lime juice toss and serve with corn chips and your fabulous Texas Caipirinha like this on the side…Enjoy!
Recipes, Cooking & Art Direction: Mariana Nuño Ruiz McEnroe | Photography: Ian McEnroe |
Published: January 3, 2015
After enjoying these days of caloric ecstasy and extravagances, it’s hard to immediately switch to the light and healthier road. It feels like you are giving a kid a candy and 5 minutes later you change that to a cucumber… it is just plain hard. All my taste buds are still in frantic mode and my serotonin levels are a roll a coaster. But Nature is wise, and perhaps knows these facts by sprouting a great Winter abundance of greens, root vegetables, cabbages and cauliflowers among other vegetables.
These are my saviors for this caloric transitional period. I need soup to warm me up and fill up my belly with out the extra filling out of my pants.. ahem.
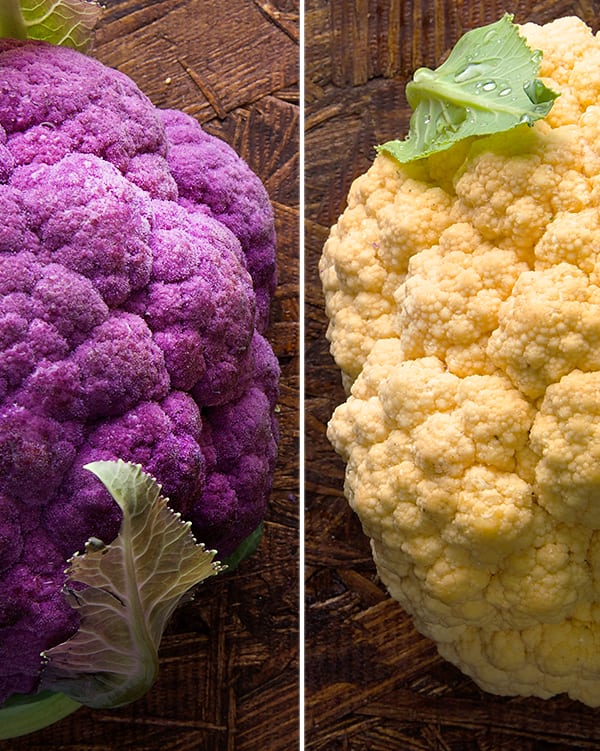
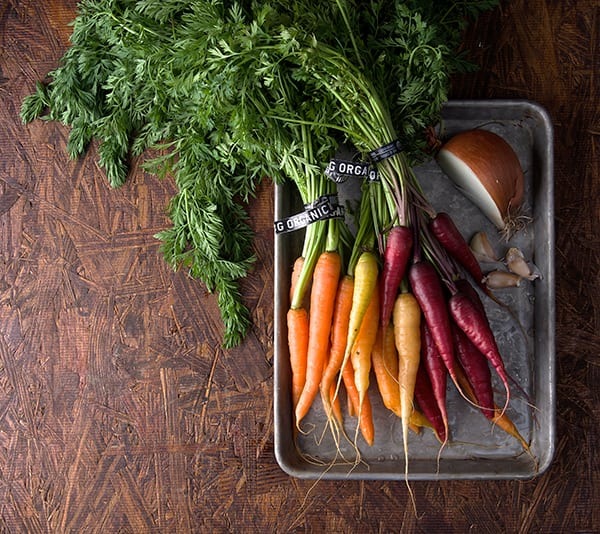
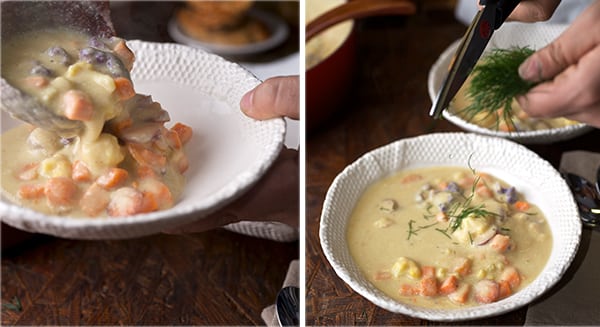
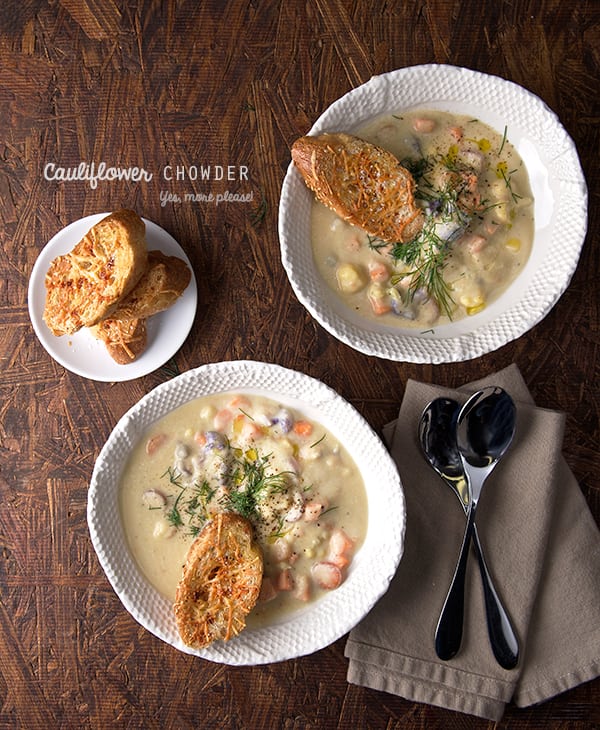
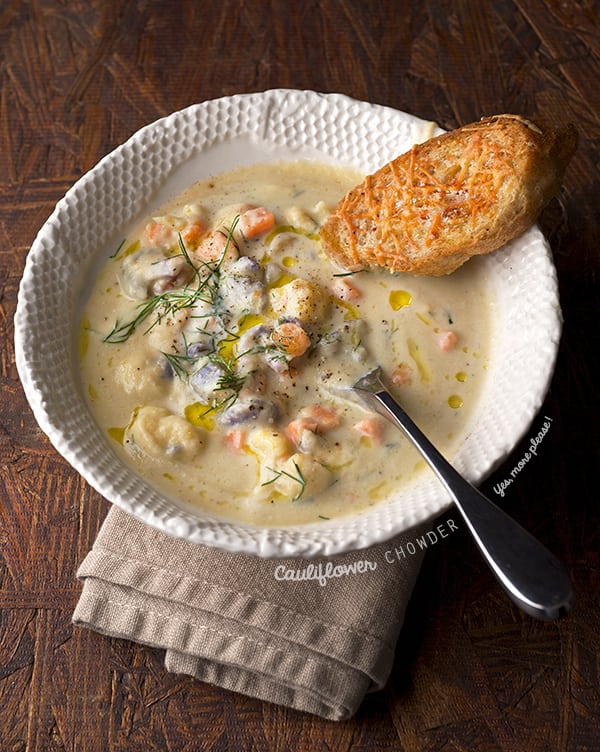
Last weekend at my farmers market I ran into these beauties, a warm yellow and a purple cauliflower, rainbow carrots, sweet potatoes and fresh dill. How can you not be inspired when you see all this colors? Soup it is, I was craving the creamy textures and luxurious caloric meals, but with no guilt. So I decided to make an all vegetable chowder using all these winter bounty.
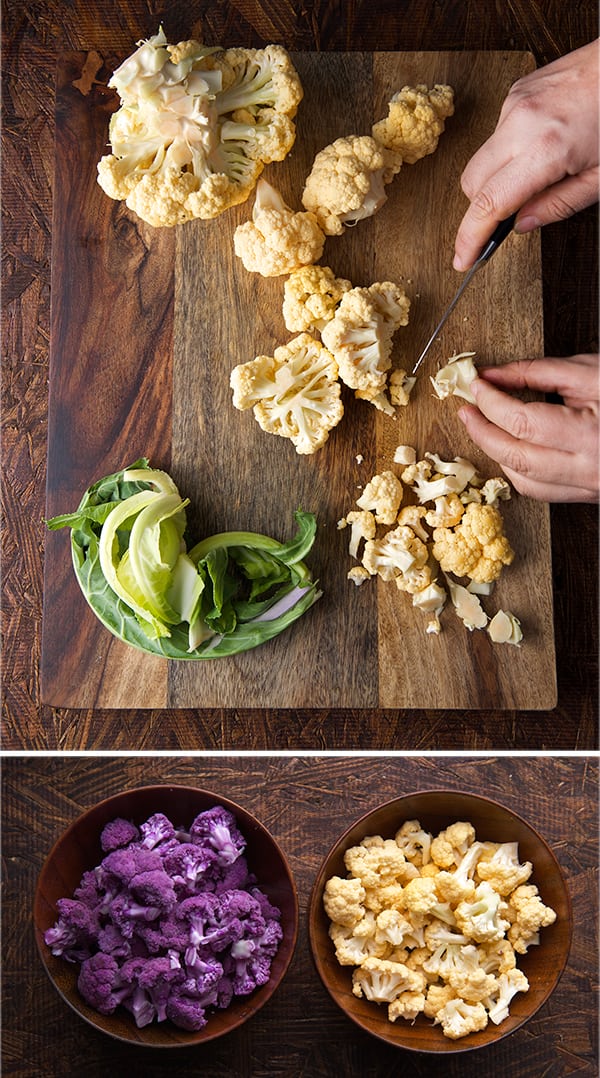
Cauliflower has a delicate flavor. When it is cooked and pureed it resembles potatoes. You would be surprised how close you can prepare it to mimic the potato. I’m sure you’ve heard of cauliflower mashed, cauliflower rice or cauliflower mac & cheese in which this humble Brassica acts like a carb-chameleon. With this premise I started my vegetable chowder by cooking and pureeing part of the cauliflower as the soup base to give that rich starchy like consistency that characterizes a chowder. I reserved some of the cauliflower into little florets which are added latter to the soup to add texture and enhance the cauliflower flavor. The extra creamy chowderiness comes from unsweetened coconut milk which gives this soup the luxurious velvety chowder texture and it adds lots of good healthy fats that are well needed at this point of the healthy road transition. Do not fear about the coconut over taking the flavor on the soup, you barely can tell is here. Carrots, sweet potatoes and onions add sweetness, texture and light flavor. Fresh dill adds a great herbal aroma to the soup and complements the cauliflower flavor in a very delicate way.
I recommend organically grown vegetables if possible. I know that’s not easy, but increasingly supermarkets are adding those options if you don’t have access to a farmer’s market. In my opinion the flavor is better and I think with a lightly seasoned dish like this one, those flavors are going to shine through.
This Cauliflower chowder will warm you up, fulfill your starchy desires, and settle down your taste buds. I would say this soup is the ticket to redemption road. Time to tame the growling carb lions…
If you want to know more about the wonderful benefits of Cauliflower, please check out this unique and complete article, written by Helen Nichols, 28 Science-Backed Health Benefits of Cauliflower Enjoy!
Cauliflower Chowder
Serves 4 or 2 hungry Vegans.
2 small or 1 medium Cauliflower heads. Any color is great about 6-7 cups of small cauliflower florets total, use organic if possible they have the best flavor.
6-7 small carrots, diced or sliced into rounds.
I used red, yellow, and orange, use what ever is freshest available at your market.
1 medium sweet potato peeled and diced.
1/2 large sweet onion
2 garlic cloves
3 tablespoons extra virgin olive oil
3 cups vegetable stock
1 – 14oz can unsweetened coconut milk/cream
1 bay leaf
1/4 teaspoon thyme
1 sprig fresh dill, or 1/4 to 1/2 teaspoon if using dry and upon your taste.
1/2 teaspoon celery salt
1/4 teaspoon smoked paprika or 2 sundry tomatoes**
6-8 good cranks of fresh black pepper
1 teaspoon Sea salt
Garnish with:
Fresh dill/not fan of dill?… Basil, Thyme, Chives, Tarragon are great substitutions.
smoked paprika
(Crostini or toast drizzled with olive oil and Parmesan cheese optional)
*I used water instead of vegetable stock, because I wanted the cauliflower flavor to come through. The first time I made this soup I used vegetable stock and I felt it masked the cauliflower flavor to much. Feel free to use whatever you prefer.
** Recently I made this soup adding 2 sundry tomatoes. It was a delicious variation, it gave the chowder a slight tint of color and deep of flavor.If using sundry tomatoes add them on step four so they can soften up before pureeing the chowder.
Preparation method:
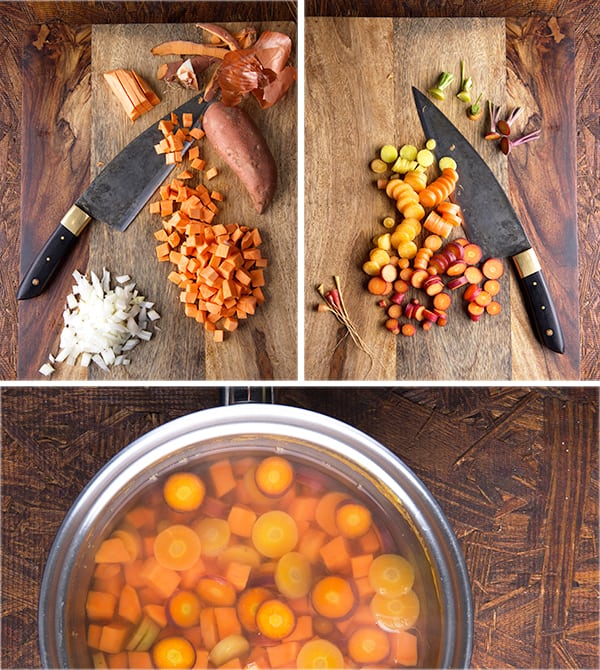
1. Chop and diced your vegetables. With a small paring knife cut the cauliflower into small florets. Reserve about 2 cups of the little florets to add to the soup at last. For this soup I used the yellow cauliflower for the soup base and the purple florets to add whole to the soup, it adds eye appeal.
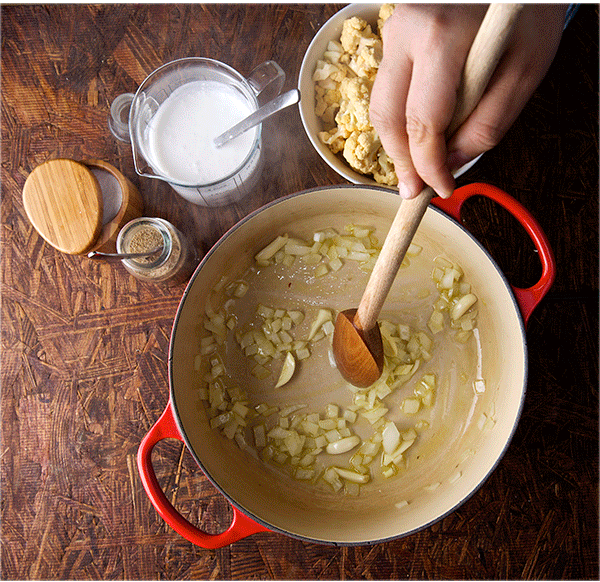
2. In a small pot, bring 4 cups of salted water to a boil. Pre-cook the diced carrots and sweet potatoes for 4-5 minutes, until al-dente, rinse with cold water. Set aside. 3. Over medium-low heat in a medium size pot, add the extra virgin olive oil, and sauté the chopped onions and garlic until translucent, season with salt and pepper. 4. Once the onions are translucent, add ¾ of the cauliflower florets. Toss and add 2 cups of vegetable stock or just enough to cover the florets. Add bay leaf, thyme, fresh sprig of dill/or dry, salt, and pepper, cover with a lid and let them cook for 7-8 minutes or until very soft and tender. Once cooked, purée them in a food processor, blender, or use an immersion blender until smooth. 5. Place this cauliflower purée back into the pot, add the coconut milk and stir well until blended. Season with celery salt, salt, paprika and black pepper. Add a bit more vegetable stock if the consistency is too thick. 6. Add the reserved mini cauliflower florets, and the pre-cooked carrots and sweet potatoes. Cover with a lid and bring to a slow simmer cook for 5 minutes. Taste and adjust the salt and pepper if necessary. Check for doneness on the vegetables; I like my vegetables on the al-dente side, not hard but not mushy. Taste them and decide if you like them softer keep cooking them for another 2-3 minutes.
Serve immediately into warm bowls, sprinkle fresh dill, a little drizzle of olive oil, salt, and fresh cracked pepper. One or two whole wheat crostinis won’t hurt right?… Enjoy!
2smallCauliflower heads,Any color is great about 6-7 cups of small cauliflower florets total, use organic if possible they have the best flavor.
6-7smallCarrots,diced or sliced into rounds.
1mediumSweet potato,peeled and diced.
1/2largeSweet oniondiced
2mediumGarlic cloves
3tablespoonsExtra virgin olive oil
3cupsVegetable stock*
114-0z canUnsweetened coconut milk/cream
1bay leaf
1/4 teaspoonthyme, dry or fresh
1sprigfresh dill,1/4 to 1/2 teaspoon if using dry upon your taste
1/2teaspoonCelery salt
1/4teaspoonSmoked Paprika or 2 sundry tomatoes
6-8cranksFresh Black pepper
1teaspoonSea Salt, or more upon your taste
Instructions
1. Chop and diced your vegetables. With a small pairing knife cut the cauliflower into small florets. Reserve about 2 cups of the little florets to add to the soup at last. For this soup I used the yellow cauliflower for the soup base and the purple florets to add whole to the soup, it adds eye appeal.
2. In a small pot, bring 4 cups of salted water to a boil. Pre-cook the diced carrots and sweet potatoes for 4-5 minutes, until al-dente, rinse with cold water. Set aside.
3. Over medium low heat in a medium size pot, add the extra virgin olive oil, and sauté the chopped onions and garlic until translucent, season with salt and pepper.
4. Once the onions are translucent, add ¾ of the cauliflower florets. Toss and add 2 cups of vegetable stock or just enough to cover the florets. Add bay leaf, thyme, fresh sprig of dill or dry, salt and pepper, cover with a lid and let them cook for 7-8 minutes or until very soft and tender. Once cooked, purée them in a food processor, blender, or use an immersion blender until smooth.
5. Place this cauliflower purée back into the pot, add the coconut milk and stir well until blended. Season with celery salt, salt, paprika and black pepper. Add a bit more vegetable stock if the consistency is to thick.
6. Add the reserved mini cauliflower florets, and the pre cooked carrots and sweet potatoes. Cover with a lid and bring to a slow simmer cook for 5 minutes. Taste and adjust the salt and pepper if necessary. Check for doneness on the vegetables; I like my vegetables on the al-dente side, not hard but not mushy. Taste them and decide if you like them softer keep cooking them for another 2-3 minutes.
*If using sundry tomatoes add them on step 4 so they can soften before pureeing the chowder.
Recipes, Cooking & Art Direction: Mariana Nuño Ruiz McEnroe | Photography: Ian McEnroe |
Published: November 24, 2014
Not your 101 Classic Thanksgiving Side dish recipes… Just 6 new side dishes to add this Thanksgiving or any up coming Holiday dinner.
I really get distracted and kind of dizzy when I see these compilations of recipes where there’s too many options. I’m indecisive by nature and these extreme multiple option posts can be overwhelming. I can’t focus. I offer one of my own this year in an effort to add variety rather than replace one of those dear Thanksgiving classics. I narrowed it down to six recipes from the blog that I would love to add to a traditional menu. Some of them are more versatile and unusual to pair with the traditional Turkey dinner but several add pleasant variation in texture or the acid note to balance the richness of traditional dishes. Sometimes “gravyness” can overwhelm us, if you know what I mean.
Something new on the table may attract attention and possibly resistance. Allow your guests to discover the dish on their own terms. This will help you avoid any tension or “pushback” because you have decided to add variation to the meal. With that in mind, I know you will enjoy these dishes and have fun preparing them. During this special meal, please remember to focus on what matters the most at the table: family, friends and being grateful for what we have.
Recipes, Cooking & Art Direction: Mariana Nuño Ruiz McEnroe | Photography: Ian McEnroe |
Published: September 24, 2014
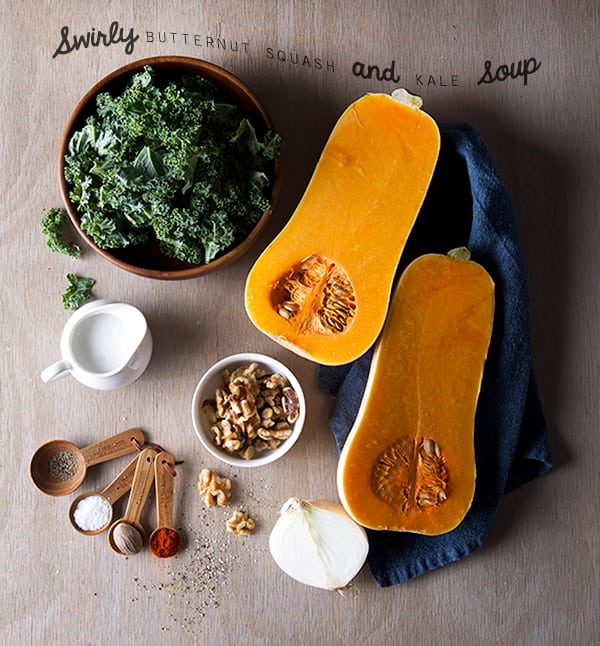
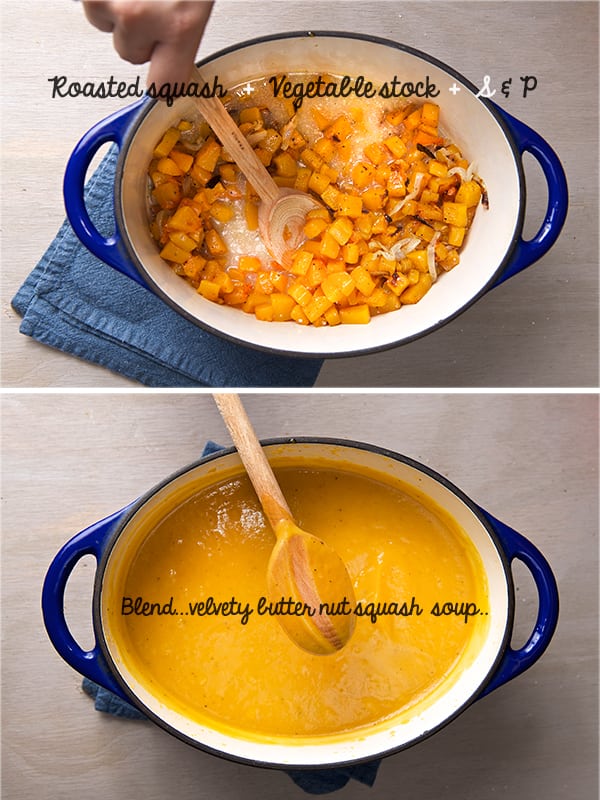
Butternut squash is my favorite squash. Autumn has arrived and I could not wait for the cold to make this soup. This nutty winter squash has the creamiest texture and tastes like a delicate pumpkin with mild citrus aroma. In my opinion Butternut squash makes the velvetiest soup in the world!…..
Now, you know how I feel about vegetable creams or pureed soups.
I do not want my squash soup to taste of chicken therefore vegetable stock is my preference. This vegan soup enhances all the pure flavors of the kale and the butternut squash by roasting them and letting those flavors stand out. I roasted the squash and steamed the kale with coconut milk to empower their own flavors.
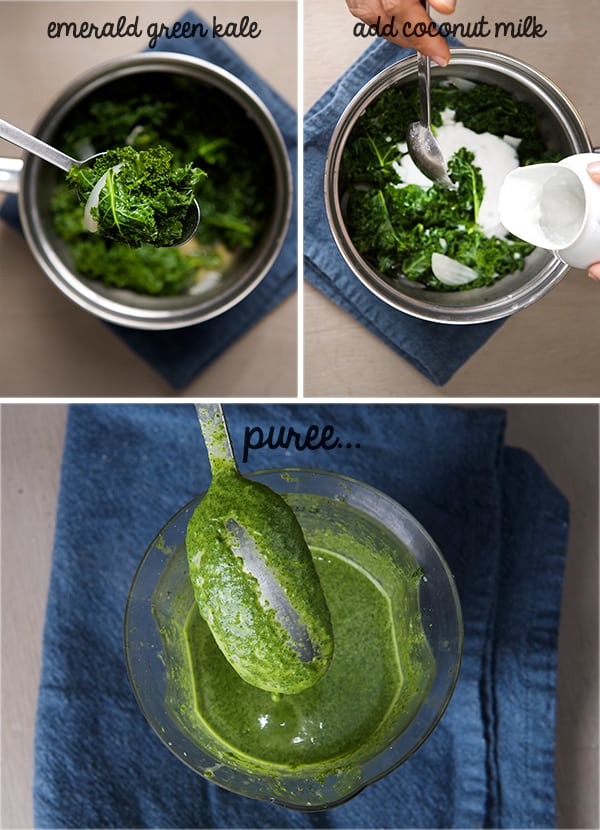
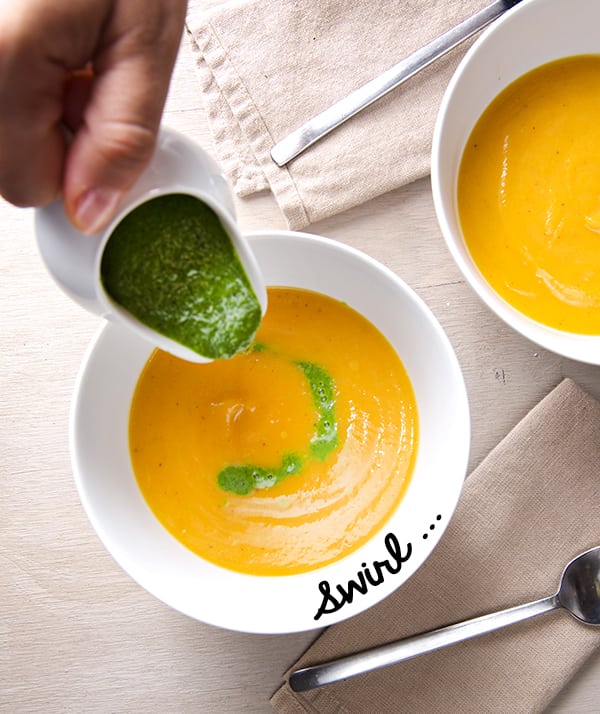
I love the fusion of flavors in soups, but for me there is nothing better that the awareness of the fusion. What do I mean by that? Well these two ingredients are in harmony but they do not mix until you take a spoonful in your mouth then you taste the delicious swirl and contrast in colors, textures, flavors, and even in temperature. The kale and coconut milk add an herbal note without being overwhelming. The velvety roasted butternut squash adds sweetness and evokes the Autumn season.
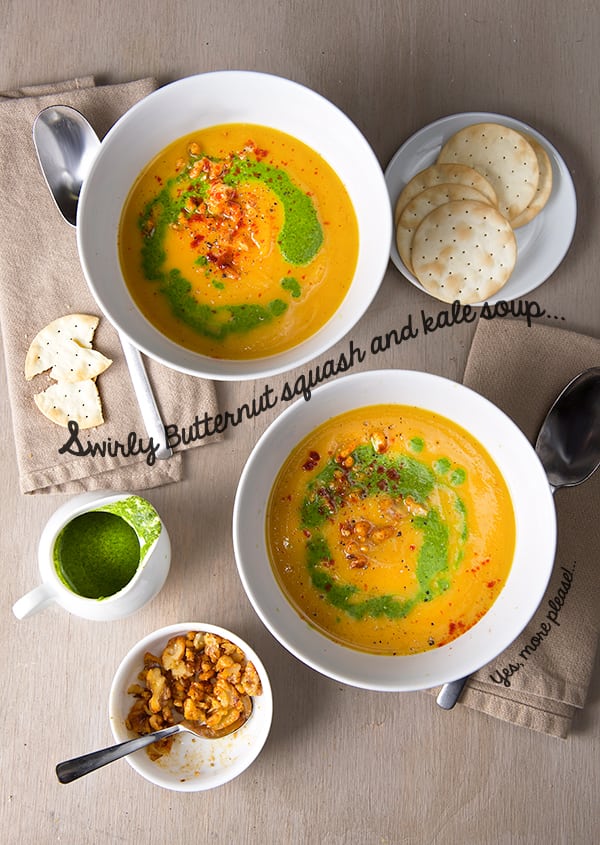
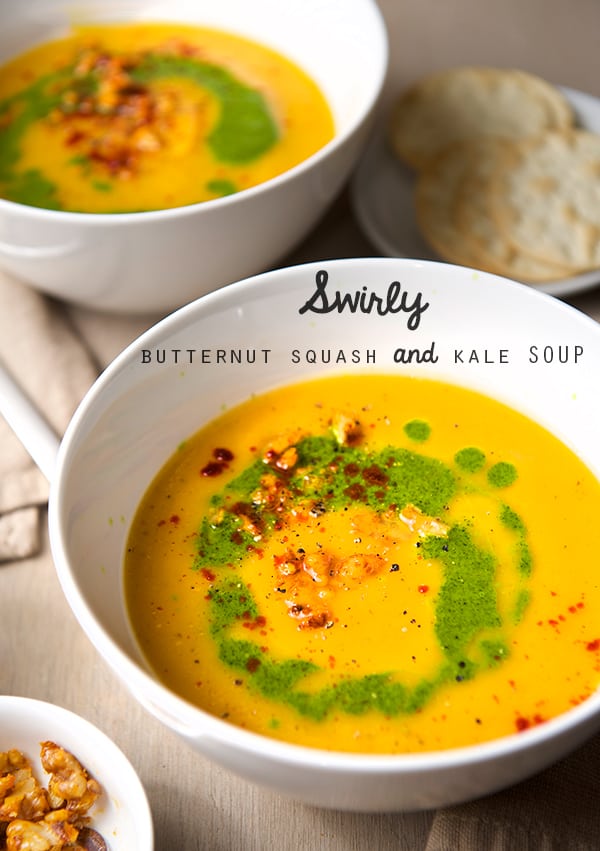
This swirly butternut squash and kale soup is fun to make its easy and it looks appetizingly gorgeous. Whether its lunch with you alone, your friends, or a family get-together this soup is easy to portion and delicious…and it happens to be vegan! Enjoy!
Swirly butternut squash and kale soup
Serves 4 bears or 2 mom and pop bears..
For the Butternut squash soup:
1 medium Butternut squash cut into cubes
½ medium size yellow or white onion
1-2 glugs of mild extra virgin olive oil
4-5 cups Vegetable stock
1 teaspoon kosher salt
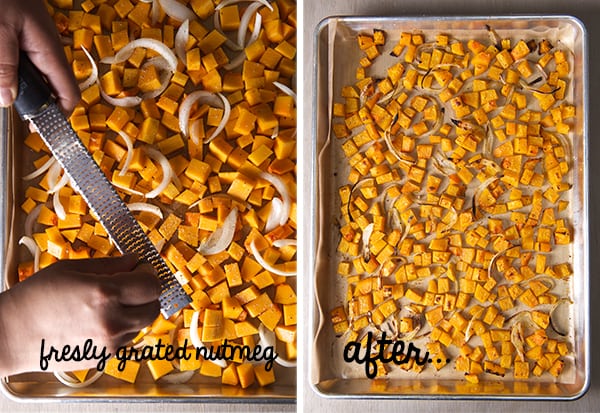
½-1 teaspoon freshly grated nutmeg (start with 1/2 teaspoon taste and add more if you like… I love it with 1 whole teaspoon!)
1 pinch of cayenne pepper (optional)
Freshly black pepper to taste.
For the Kale swirl:
8 Curly-leaf kale leaves deveined.
¼ medium yellow or white onion
¾-1 cup coconut milk
½ teaspoon kosher salt
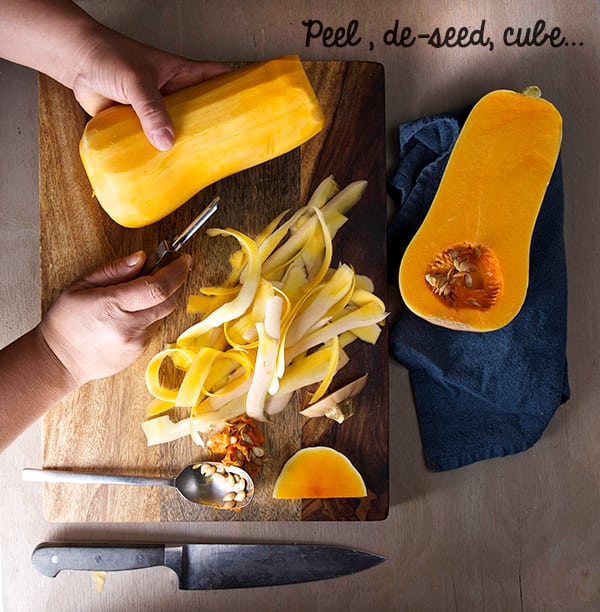
Preheat oven at 450F 1. Peel and cut into small cubes the Butternut squash. Slice the onion.
2. On a baking pan lined with aluminum foil or parchment paper, toss the Butternut squash, onions, salt pepper nutmeg and one glug of olive oil all in one layer. Roast in the oven at 425F for about 30-35 minutes, shake the pan every now and then, until the little cubes are fork tender, and toasty. 3. Remove pan from the oven, and in a medium size deep pot, add the roasted butternut squash, add the 4 cups of vegetable stock, salt, nutmeg, pepper, and puree with the help of an immersion blender, or use a regular blender. 4. Check for thickness and if needed add another cup of vegetable stock. This is up to your preference, however I like my soup with a lot of body, and therefore I usually use 4-5 cups. Feel free to add a little more if its too thick or to add some almond milk for an extra nutty flavor. 5. Let your soup warm up on a low low heat, and stir constantly.
6. For the kale swirl: in a small pot place the leafy parts of the kale, discarding the main vein.
Add the coconut milk, roughly chopped piece of onion, garlic, salt and pepper. 7. Cover the pot over a slow simmer for about 7-10 minutes until the kale feels soft, and turns bright green. You can taste a little piece to check for doneness, you want it soft and cooked but not over cooked. 8. Remove from the stove and using an immersion blender to puree the kale mixture. Adjust seasoning with salt and pepper. The consistency should be creamy and light. It should look like a deep bright emerald green.
9. Roast the walnuts, sprinkle a little smoked paprika and salt. 10. Serve 2-3 ladles of the butternut squash on each bowl and then add the kale swirl. Sprinkle some roasted walnuts, and a pinch of smoked spanish paprika for best flavor. Enjoy!
Note:Remaining soup keeps well for 3-4 days and although it diminishes in flavor, extra portions can be frozen and stored for 30 days or so; this minimizes waste if you happen to make too much or have a desire for homemade soup next time you’re too busy to cook.
Enjoy!
Music Pairing: For this recipe our dear friend Ana Ferper plays
a beautifully classic guitar melodie by J.S Bach Allemande Suite No.1
Recipes, Cooking & Art Direction: Mariana Nuño Ruiz McEnroe | Photography: Ian McEnroe |
Published: August 12, 2014
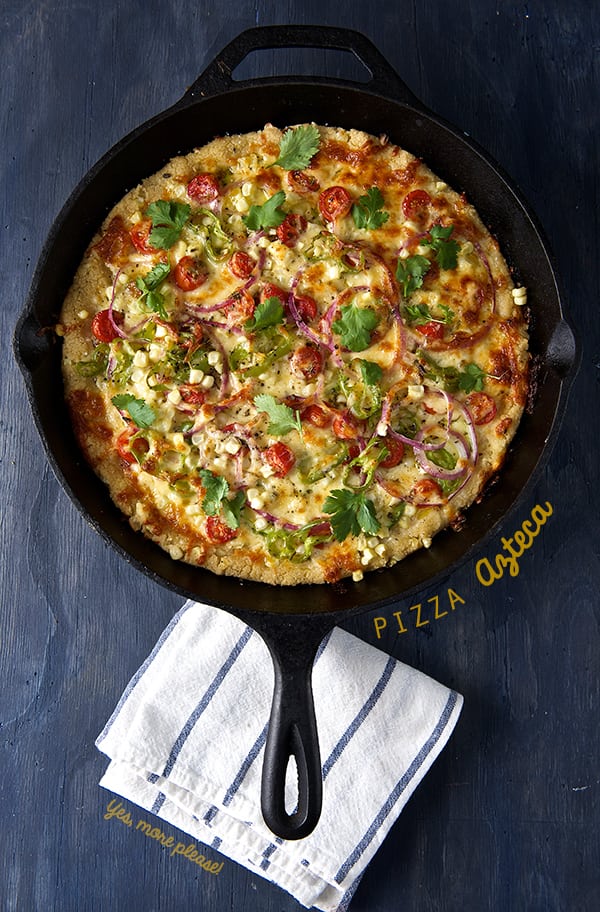
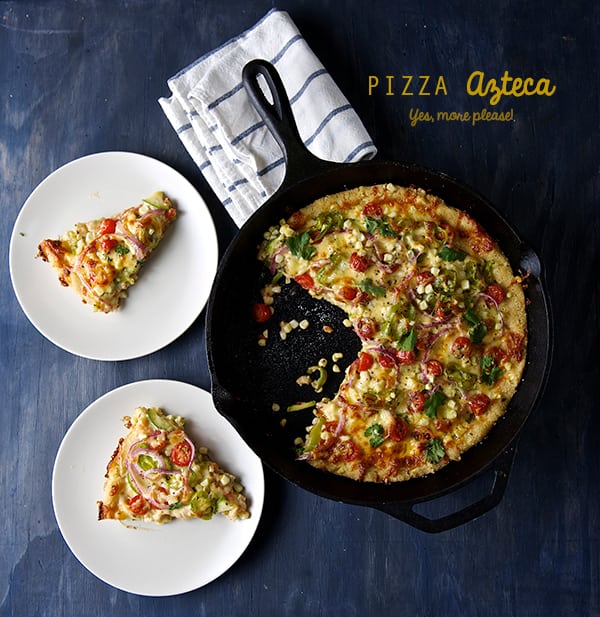
It’s a pizza!…no!
It’s a casserole!….no! It’s a tamale?!…..no!
It’s a Corn Masa Pizza Pie!….Yes!
As silly as it sounds, it is ridiculously delicious!
Call it what you like: Mexican pizza, Corn Masa pizza; Pizza Azteca-its the ultimate summer one pan wonder. This is a great quick meal solution too! To get pizza on board it takes no more than 35 minutes since the masa does not rely on yeast or waiting time to rise.
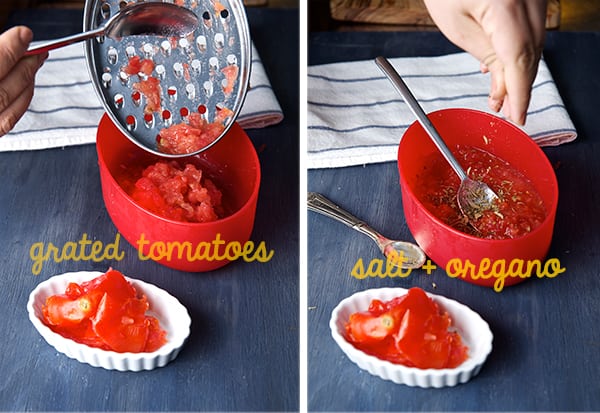
Let me describe this pizza for you… Imagine a hot cast iron pan filled with corn masa crust, when baked the bottom gets crusty with soft delicious nutty corn masa. Fresh corn kernels add texture, enhance the corn flavor and add moisture to the crust. The top layer load with summer vegetables like zucchini, fresh corn, tomatoes, red onions, hatch peppers, and loads of melty cheese layered on top. The summer vegetables pair great with the flavor of the corn masa, the oregano on the fresh quick base sauce adds the perfect herb note. I made the pizza sauce by grating some fresh tomatoes which adds extra freshness to the pizza. I baked everything on the king of pans, “the cast iron pan”.
When this pizza comes out of the oven you will be fill with warmth and happiness as you experience the comforting smell of cooked corn masa and fresh vegetables. Pizza Azteca is best served with a fresh green salad on the side and will be a sure crowd pleaser.
This Pizza Azteca is what I would offer Moctezuma on a summer afternoon… Pizza Azteca is a meal fit for kings!
Enjoy!
Pizza Azteca
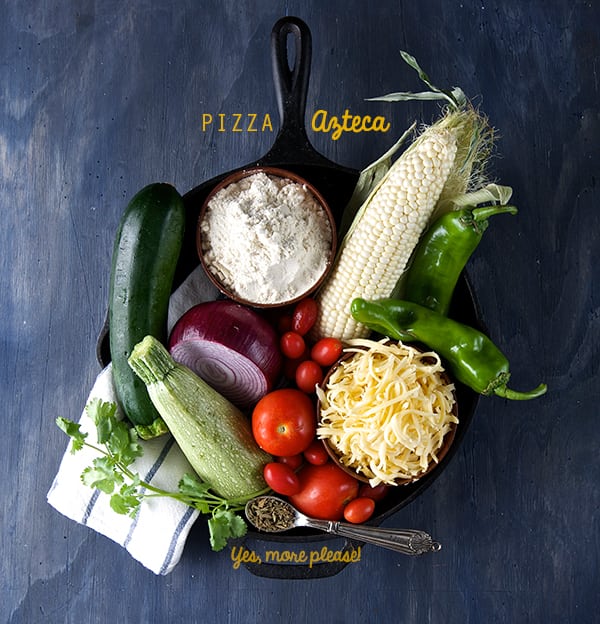
Makes 1 round 12” pizza, yields 8-10 slices.
For the crust:
2 cups corn masa- Maseca is the brand I like, if you can get fresh masa, use it! you will be in heaven.
2 to 2-1/2 cups warm water
½ teaspoon kosher salt
½ cup fresh corn kernels (white or yellow corn is ok)
For the sauce:
3 medium roma tomatoes grated
1 tablespoon tomato paste
1 teaspoon dry oregano
1 garlic clove grated
1 tablespoon extra virgin olive oil
1 teaspoon kosher salt
Fresh cracked pepper to taste
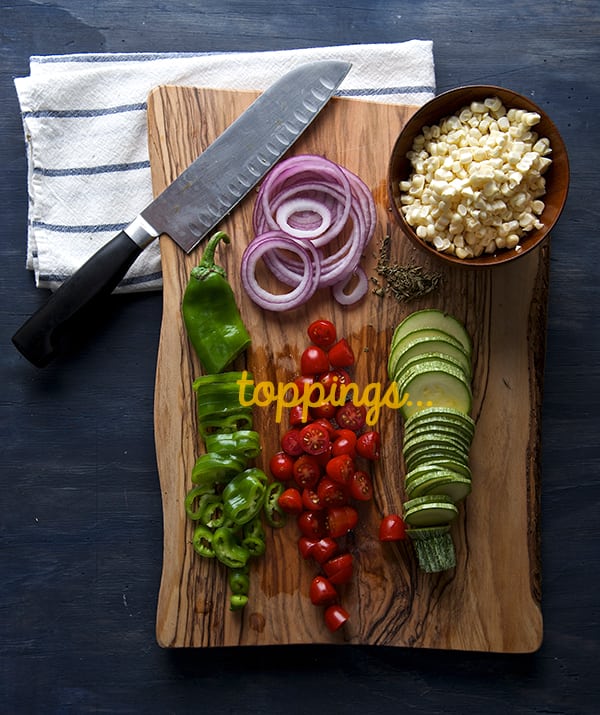
For the toppings:
1 large or 2 medium zucchini thinly sliced.
1 ear of corn worth of kernels
1 hatch pepper or substitute for 1 good pinch of red pepper flakes.
Use roasted red peppers if you do not care for spicy.
1 cup cherry, sun golds or grape tomatoes sliced in half.
2 cups of grated cheese like Adobera, Oaxaca, Gouda, Mozzarella or Monterrey jack.
Use the cheese you like the most, as long it melts and has a mild flavor so you can taste the rest of the ingredients.
Salt and pepper to taste a little extra virgin olive oil for drizzle.
Preparation:
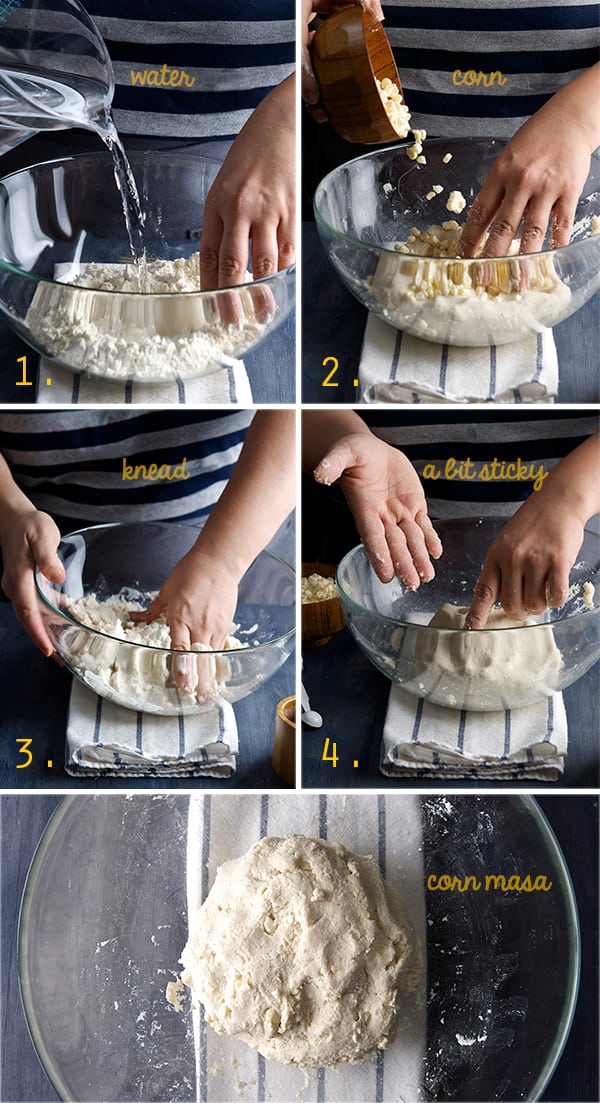
Preparing the masa:
1. Start by preparing the masa dough. Dissolve the salt into the 2 cups of warm water. 2. In a large bowl place your dry corn masa flour, make a well in the center add half of the water, and start incorporating the flour from the sides. Add corn kernels and the rest of the water. Knead for 2-3 minutes until water is well absorbed by the masa. 3. The masa should feel moist a bit sticky to the touch. You should be able to shape it into a ball and cover with plastic wrap, set aside let it rest while you prepare the rest of your vegetables. 4. Preheat Oven at 450F/ 230F
5. Prepare and slice all your vegetables, grate your cheese and prepare your tomato sauce by grating the tomatoes and adding the oregano, salt, garlic, black pepper and extra virgin olive oil. Set aside.
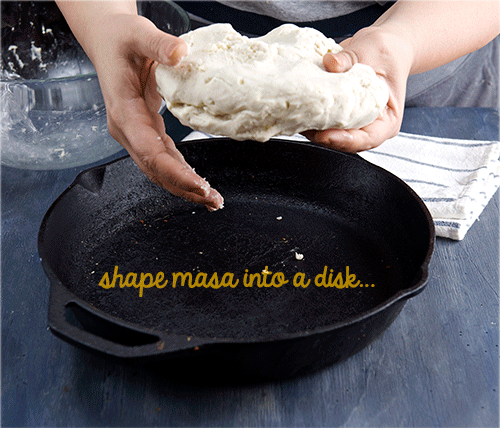
6. At this point your masa should be well hydrated and ready to shape into the cast iron pan. Using a 11-12” Cast Iron Pan place your masa dough in the center and with wet hands start by evenly shaping the masa into the pan. Create a higher rim on the edge of the pan. see photo.
Note: If your cast iron pan is well seasoned do not worry about the crust it will not stick to the pan, if not just apply some neutral oil on a napkin and grease the pan before shaping your crust.
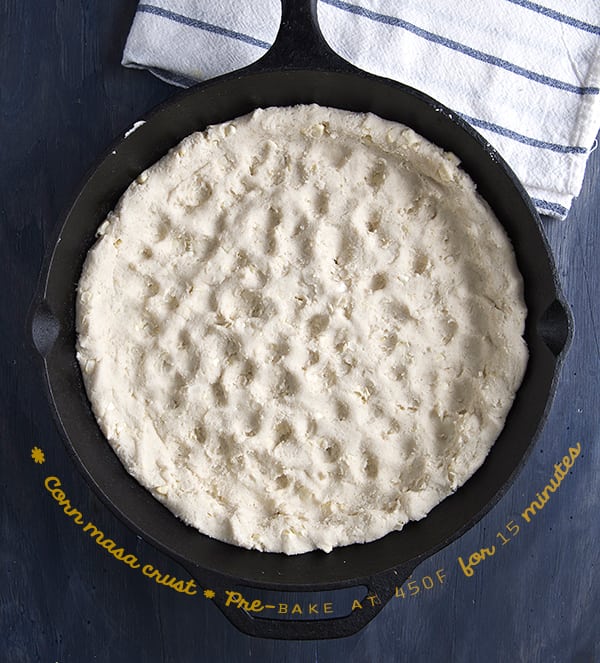
7. Once you have an even layer with a bit of a rim on the outside edges, Place skillet with the crust in the oven, on the bottom rack. Bake for 15 minutes lowering the oven temperature to 425F as soon the crust is in the oven.
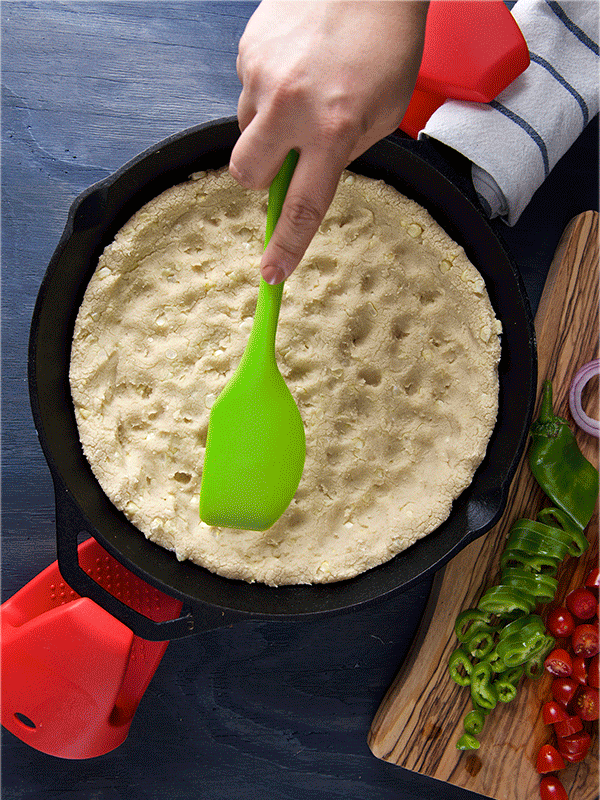
8. Carefully remove the skillet from the oven, place it on top of the stove or a metal trivet and start layering your pizza ingredients. Note: leave the pot holders into the cast iron pan handles at all times!, this will prevent you to try to grab the hot pan by mistake!…believe me I’ve been there…ouch! 9. Layer the ingredients same way you do like on a pizza, starting with tomato sauce on the bottom, half of the cheese, zucchini, corn, onions, tomatoes, peppers, and the rest of the cheese. A pinch of salt and some fresh cracked pepper. 10. Place the cast iron pan into the oven for another 20-25 minutes until cheese is melted and the pizza has some gratin golden brown blisters.
11. Remove from oven, place the pan on a trivet and wait 5 minutes to cool off a bit before cutting. Sprinkle some fresh cilantro for garnish. 12. Serve and Enjoy!
Enjoy!
Silly, silly music pairing: Brak’s Pizza Song with the Space ghost…
Recipes, Cooking & Art Direction: Mariana Nuño Ruiz McEnroe | Photography: Ian McEnroe |
Published: August 5, 2014
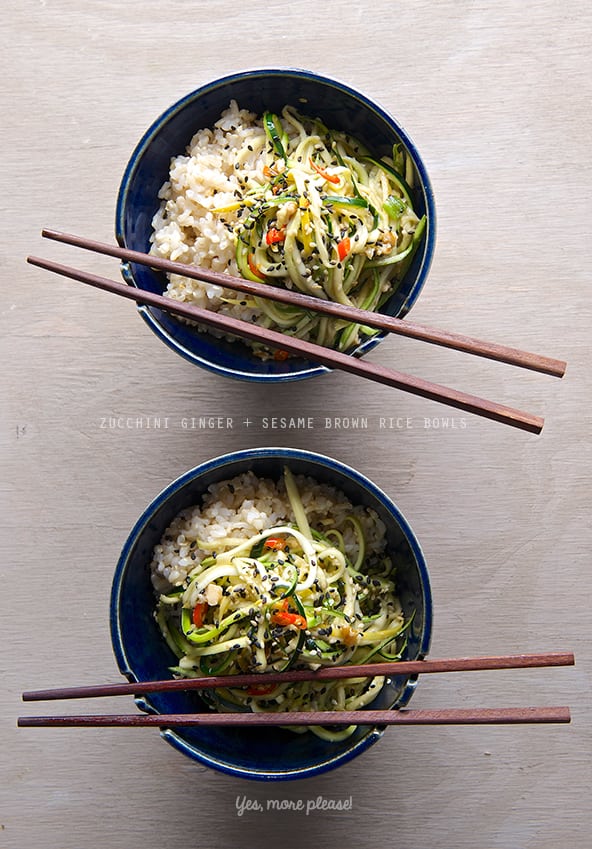
Light and refreshing is what best describes this recipe. A one bowl meal! It’s no fuss, maximum flavor, raw zucchini with a gingery-soy sauce over a nutty sesame seasoned brown rice. This Zucchini Asian flare recipe, is so light, refreshing and savory, you are going to want to eat it more than once a day.
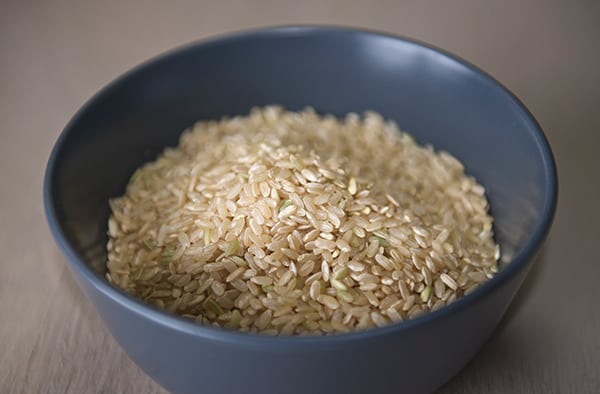
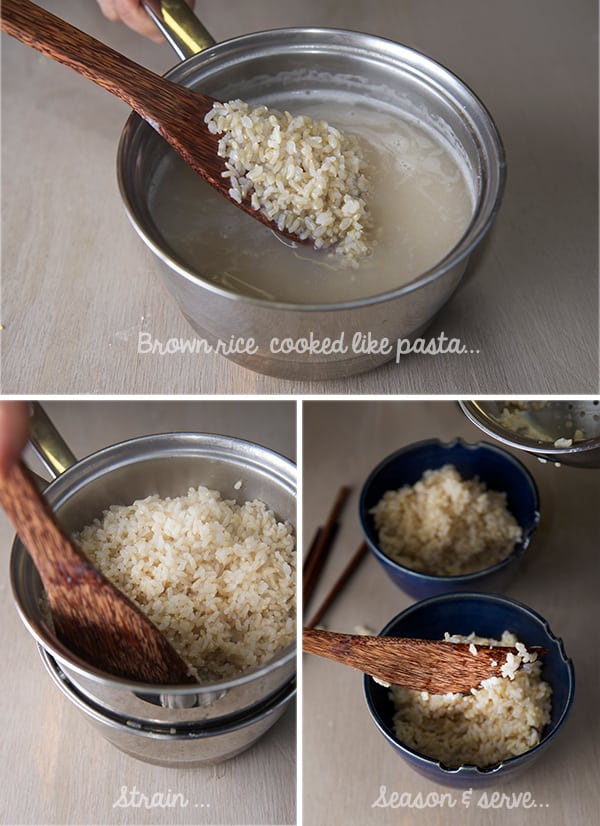
I know what Brown rice does not have a great reputation among the grains because it tends to be mushy and it can taste like cardboard… Well my friend, I have you covered on this one, you will love the quick easy method that I use. Cook the brown rice as you would cook pasta. Use a large pot with plenty of water and pinch or two of sea salt. The brown rice boils loosely for about 25-30 minutes; stir often and check for an al-dente consistency. When is up to my desired doneness I strain it and the heat of the steam dries the excess water in the brown rice, leaving you with perfectly cooked, fluffy individual grains, with great texture cooked trough and slightly al-dente.
Using this method, I cook larger batches of brown rice and use them later for a quick sautéed, salads, soups or in this case; this humble and refreshing Zucchini Ginger Brown Rice bowl.
As you can see there is hope for this misunderstood grain. I assure you once you try this method you will love brown rice again.
Enjoy the bountiful zucchini season and stay fresh!
Zucchini Ginger Brown Rice Bowls
Makes 2 meal bowls
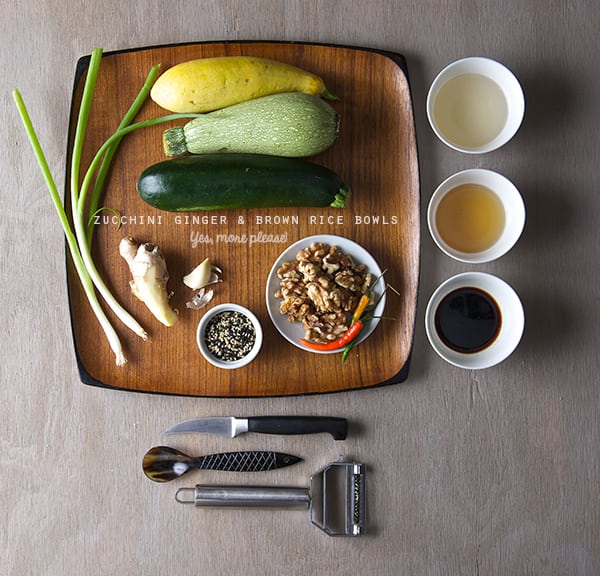
3 medium size zucchini any color is up to your preference.
1/2 cup toasted and finely chopped cashews or walnuts
2 green scallions finely chopped
1 tablespoon toasted sesame seeds (any color)
1 tablespoon of fresh grated ginger.
1 small garlic clove grated
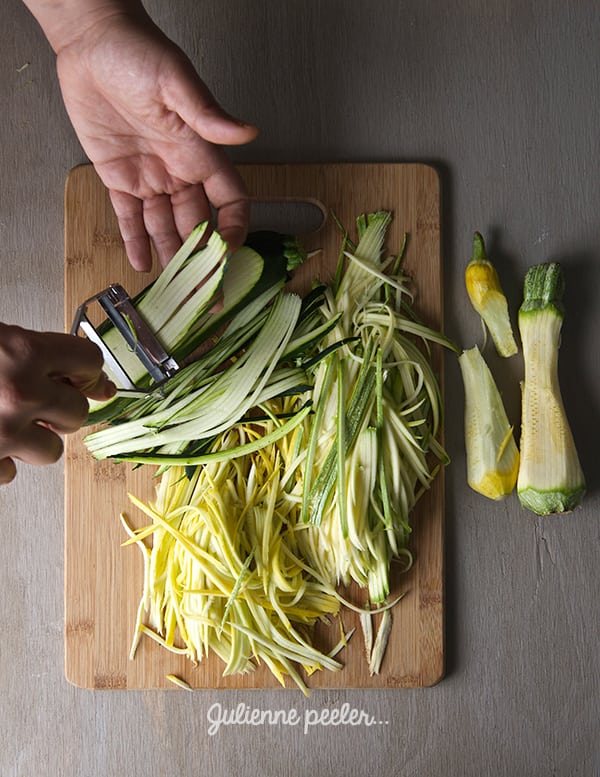
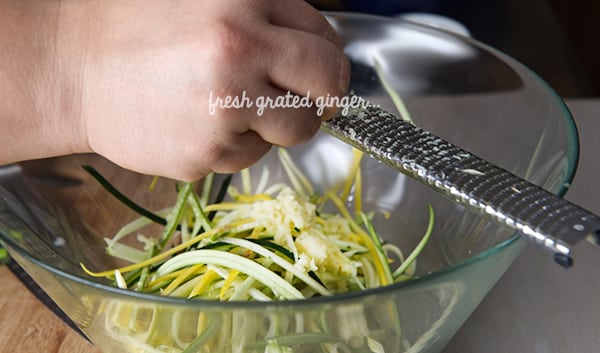
1. Bring to a boil a large pot filled with 8 cups of water and 2 good pinches of sea salt. Once is boiling add the brown rice, bring back to a boil, and then lower the temperature for a slow simmer. Simmer for about 25-30 minutes. Stirring occasionally. 2. While your rice is cooking, shred your zucchini, ~omit the seed core on the zucchinis~ I used one of my favorite uni-taskers, I absolutely adore this julienne peeler! you can get it any cooking supply store or get it on-line. Toast your walnuts, chop the scallions, grate your ginger and garlic.
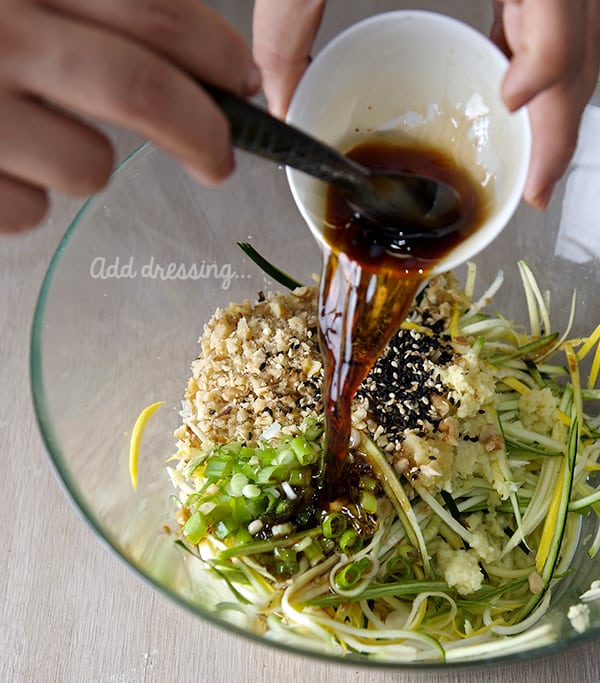
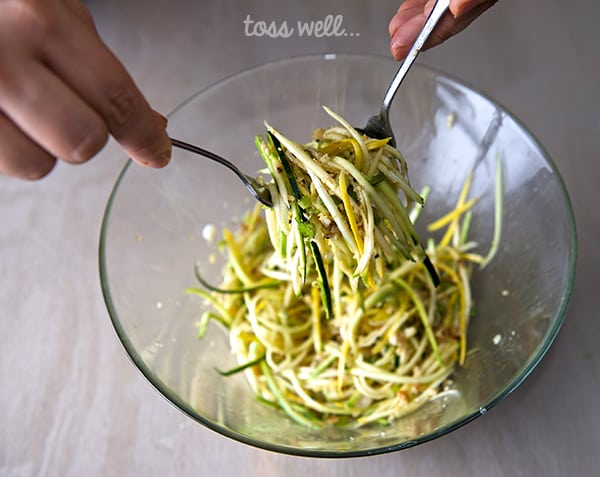
3. In a large bowl combine the shredded zucchini and one good pinch of salt, toss well and let it stand for a few minutes. This will draw out some of the excess water out of the zucchini.Toss water from bowl and place zucchini on a clean kitchen towel and gently squeeze with your hands as much water as possible. remove from towel and with your hands fluff up the shredded zoodles. This step is very important, because avoids watering down your vinaigrette. 4. In a large bowl Combine the drain shredded zucchini, finely chopped toasted walnuts, toasted sesame seeds, green scallions, grated ginger, grated garlic. 5. Combine the soy sauce, sesame seed oil, rice vinegar. Set a side you will dress your zucchini right before serving. Please check on your rice.
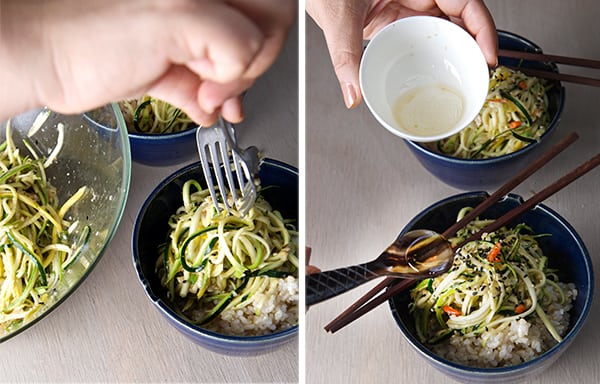
6. Check for rice doneness. I usually look for a soft but firm grain, that tastes cooked and has a god bite. Usually is around 25-30 minutes, the doneness I prefer. See the picture below.If you want to go a little further on cooking is up to your preference, give the rice another 5 minutes, re-check and taste; always taste! 7. Once your rice is cooked, with the help of a colander or a sieve, strain the rice. Allow the hot steam to dry the extra water, give it around 5-7 minutes. Once all the excess water is drained and still warm, transfer the rice into a bowl and season with the sesame oil, sesame seeds and rice vinegar toss until well combined.
8. Once your rice is seasoned, Add the Soy sauce sesame seed oil, and rice vinegar dressing to the zucchini mixture. Toss well.
9. Using two deep bowls, divide the rice and top it with the zucchini mixture. Sprinkle some extra sesame seeds and for spice maybe some Thai pepper, red pepper flakes, or some Sriracha-hot sauce! Enjoy!
Recipes, Cooking & Art Direction: Mariana Nuño Ruiz McEnroe | Photography: Ian McEnroe |
Published: June 4, 2014
Have you ever had Nopalitos? Nopalitos are traditionally used in Mexican cuisine, they are part of the cactus family, there are more species than you want to know about. The word “Nopal” comes from the Nahuatl word meaning “pads” refers to the plant shape. They are a great source of Vitamin C, minerals like magnesium, manganese, calcium,and also a great source of fiber. Besids their delicious and nutritious qualities, recent research studies have shown a positive effect on glycemic index which could be useful and a great value to add to your diet when managing diabetes or to include on your weight loss diet.
Anyhow, what you really need to know about Nopalitos and what I want to share with you is how delicious they are when prepared in a right simple manner.
Nopalitos have a bad reputation among vegetables because of their slimy and viscous flesh. However there are different ways to prepare them and a couple of tricks to avoid the slimy culinary disaster.
Like any other vegetable, Nopalitos can be boiled, steamed, sautéd, grilled or eaten raw, and there is a trick for each one of these cooking methods. Just to mention one of these tricks briefly, boiling nopalitos is the most common of all methods. When boiling Nopalitos, the trick to it is to add 4-6 tomatillo husks along with a piece of onion, a small bunch of cilantro and some sea salt in a pot of simmering water. The tomatillo husks will avoid the slimy matter. Simmer them in a pot over medium heat for about 15-20 minutes, until they change of color. Turn the heat down, and let them cool. Strain and rinse thoroughly. Combine the nopalitos with a good amount of Pico de Gallo salsa, toss and they are ready to serve. As you can see, with a little effort you can make the fastest salad of them all!
This kind of Nopalito salsa/salad is ideal to have as a side dish. You can make tacos, sprinkle some queso fresco, and even cook some of this left over salad with scrambled eggs, to prepare nopalitos egg breakfast tacos. OMG I just gave you another recipe! hehehe…
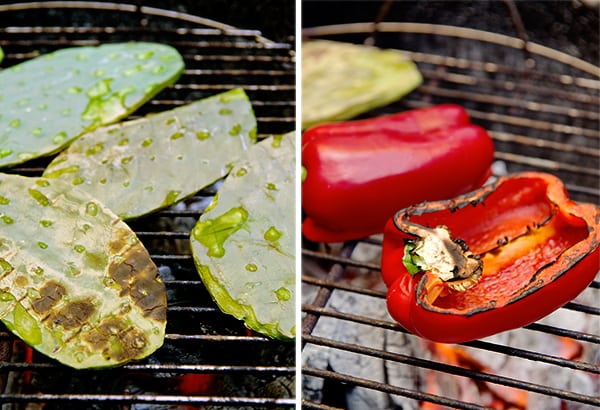
My favorite way to eat nopalitos it’s grilled. The char gives them a great flavor, firm texture and reduces the slimy texture almost to zero when you grill them. Therefore it’s one of my favorite ways of cooking them. Nopalitos when grilled, make the best tasting salad. This is definitely one of my personal favorite Mexican dishes, so simple and full of great flavors.
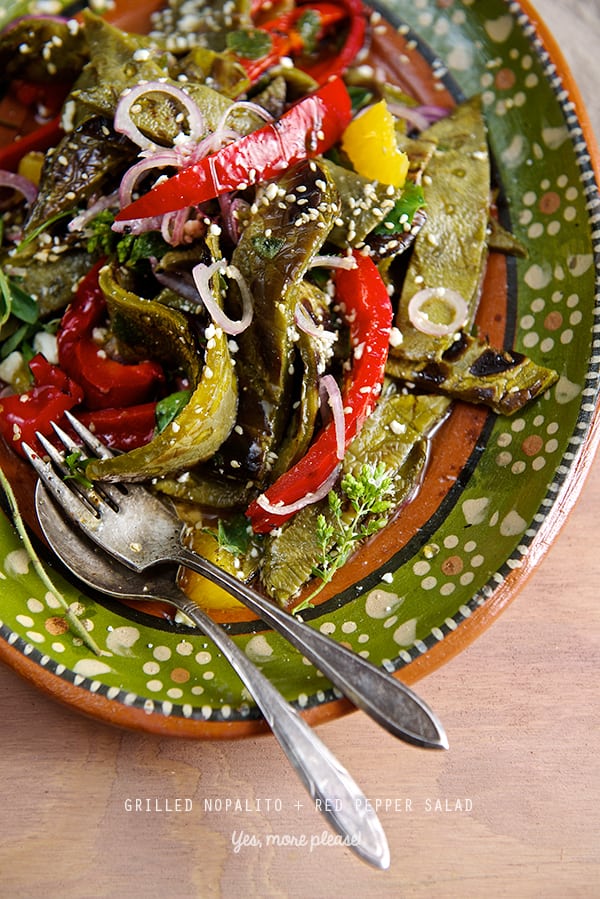
This Grilled Nopalitos and Red Bell Pepper Salad, combines simple ingredients and a crisp and tangy simple vinaigrette. As easy as it sounds it’s a great summer dish. This salad can be served as a side dish to accompany any grilled meat or fish. It can be made into vegetable medley tacos or as a vegetable complement over rice, quinoa, or whole black beans.
I hope you enjoy the recipe and give yourself the opportunity to try something new. Nopalitos salad has been in Mexican cuisine for a long time and it is too delicious to be ignored.
Give nopalitos a chance!
I would love to hear back from your culinary adventures. Remember to check our music pairings, if you are in need to shimmy while you grill…Enjoy!
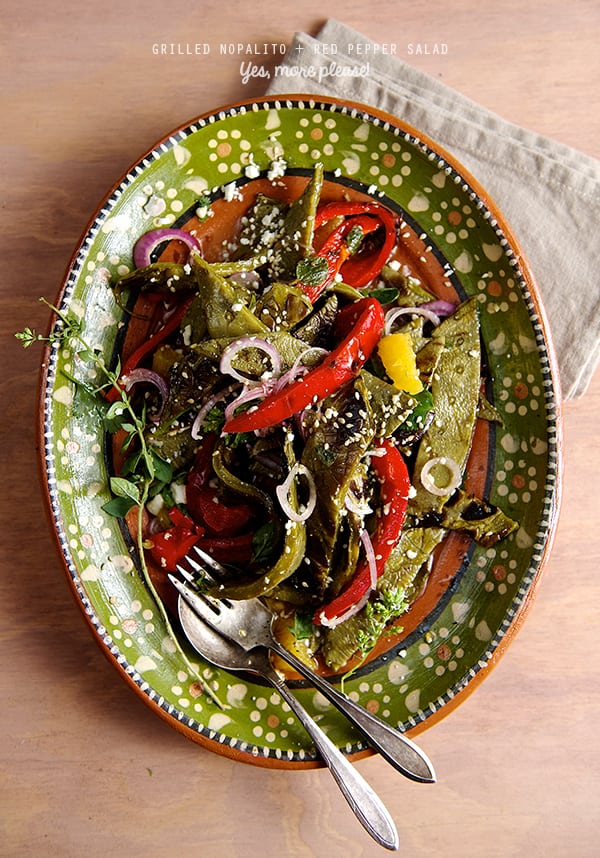
Grilled Nopalitos and Red Bell Pepper Salad.
Serves 4… or 2 hungry Vegetarian Mexicans!
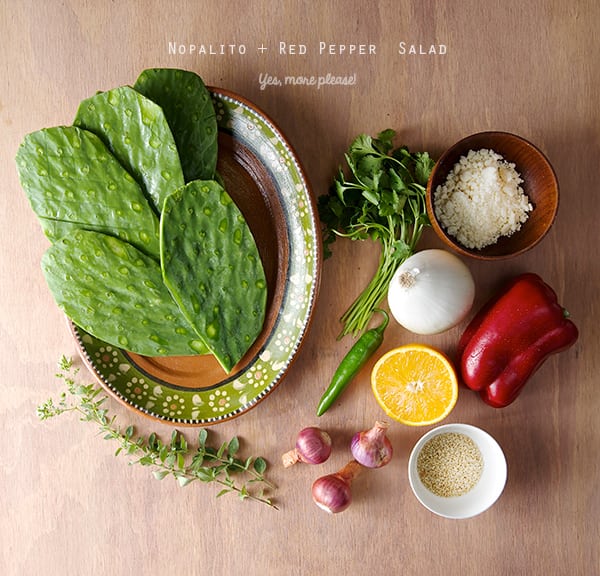
5-6 Nopalito pads, cleaned and thorn removed.*
1 large red bell pepper
3 small shallots or 1 small white onion thinly sliced.
1 small bunch cilantro (leaves only)
1 serrano pepper no-seeds finely chopped (optional)
For the vinaigrette:
1/3 cup Orange juice
2 tablespoons apple cider vinegar
4 tablespoons grape seed oil
2 tablespoons agave nectar
1 tablespoon toasted sesame seeds.
2 sprigs of fresh oregano or 1 teaspoon dry mexican oregano.
1 teaspoon sea salt.
Fresh cracked black pepper to taste.
Garnish with:
Toasted sesame seeds.
¼ cup Cotija cheese crumbled.
*Nowadays it’s very easy to find fresh Nopalitos that have been cleaned and de-thorned. If you are lucky enough to have your very own nopalito cactus plant, gear up! Use thick leather gardener gloves, a pair of tongs, and a sharp fillet knife to shave the thorns off. Rinse and wash thoroughly. Now it’s ready to use! If you live here in Texas this type of Cactus Plant is very common to find in the prairie. Have a culinary adventure! Tip: when choosing wild nopalitos: you will want to pick the medium-small size, deep green, about 1/4 inch thin or less. They look tender and have plump edges with no dry spots.These are the best tasting nopalitos and tender when cooked.
Preparation Method:
1.Wash and with a pairing knife gently score your clean nopalitos.
2.Prepare your vinaigrette by combining all the ingredients on a bowl and whisk.
3. Fire up your grill. Grill Nopalitos and red bell pepper. Grill both sides until cooked and charred.
Nopalitos turn color from bright green to a olive green when cooked. Be sure to blister them. This will add so much flavor to the salad.
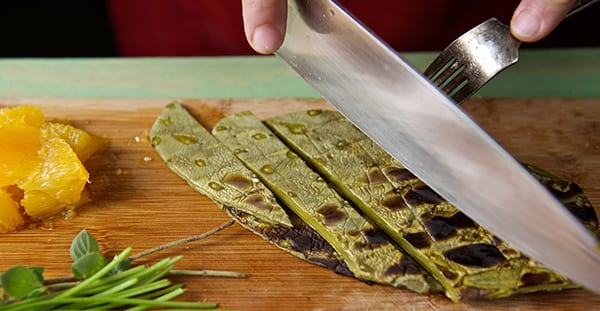
4. Slice your grilled Nopalitos into ¾” ribbon strips, slice your grilled bell peppers into a thinner strips.
5. On a platter toss all ingredients and drizzle the vinaigrette. Sprinkle some toasted sesame seeds and/or some Cotija cheese crumbled. Serve room temperature.
Special Thanks to my Aunt Paloma, who sent us this beautiful hand painted clay platter


 5. On a platter toss all ingredients and drizzle the vinaigrette. Sprinkle some toasted sesame seeds and/or some Cotija cheese crumbled. Serve room temperature.
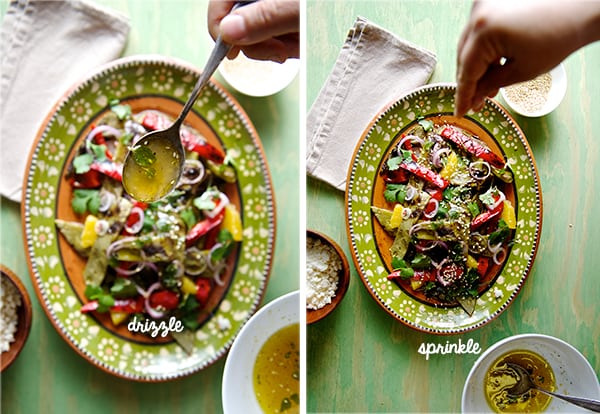