Recipes, Cooking & Art Direction: Mariana Nuño Ruiz McEnroe | Photography: Ian McEnroe |
Published: September 22, 2016
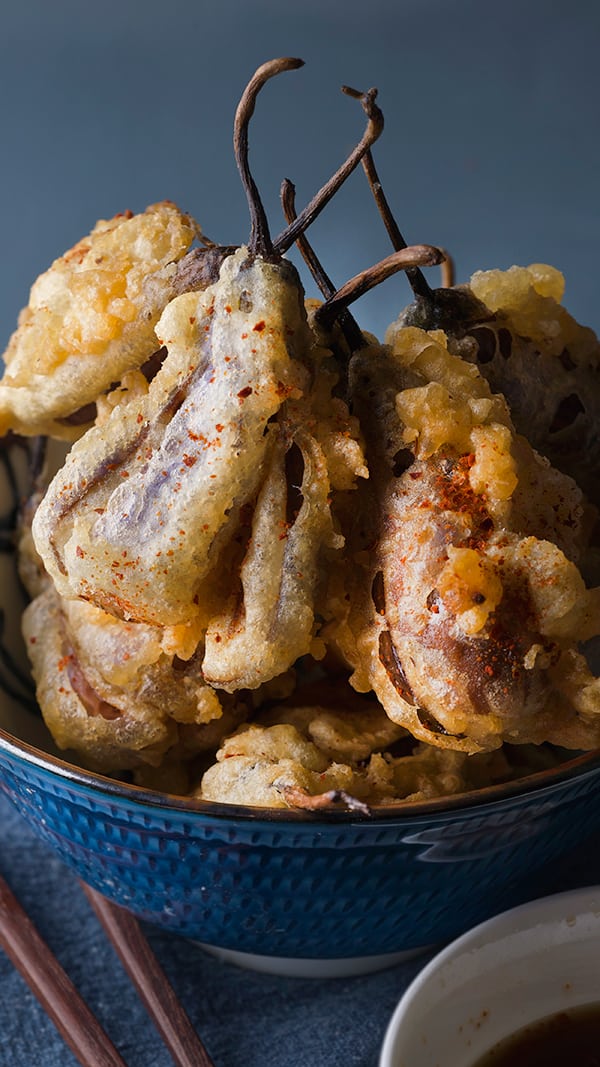
This might be the ultimate way to eat baby eggplants.
Besides the great classic recipes used for bigger eggplants, like ratatouille, caponata, Baba ghanoush, grilling, stuffing or roasting them( which I love) I feel these dainty two-three inches nightshade gems deserve a more delicate approach. I’m always looking for a contrast in texture when eating something so custardy and creamy like the way the eggplants become when they are cooked. The solution for my craving for these tender and sweet eggplants: tempura batter.
I know you have seen eggplant tempura at your favorite Japanese restaurant. They mostly use the large eggplants, which are delicious but not near as delicate in flavor as these babies. Wait until you try this dainty two bite goodness.
These Tempura baby Eggplants are an exhilarating bite. Imagine a bite that combines a light and crispy fried tempura coat with a warm custardy buttery eggplant interior. A beautiful object to be dipped on a tangy, salty, spicy, sweet sauce. Yes, all in one bite.
Are you with me? Or did you lose it at tempura coat?…
Recipes, Cooking & Art Direction: Mariana Nuño Ruiz McEnroe | Photography: Ian McEnroe |
Published: June 22, 2016
Summer is here, and that Strawberry Moon was driving everybody crazy!… Like this crazy refreshing Coconut Lime Mint Paletas will drive you crazy too. Creamy, light and tangy, not overly sweet, the addition of mint make them light and fresh.
They are a breeze to make and sooooo E A S Y!…
As Cliché as it sounds: “put the lime and the Coconut…Yes, you call me in the morning, you call me in the morning
I’ll tell you what to do if you call me in the morning… Doctor!
Woo-oo-ooh, ooh-ooh-ooh
Woo-oo-ooh, ooh-ooh-ooh
Woo-oo-ooh, ooh-ooh-ooh, ooh-ooh-ooh
Recipes, Cooking & Art Direction: Mariana Nuño Ruiz McEnroe | Photography: Ian McEnroe |
Published: October 23, 2015
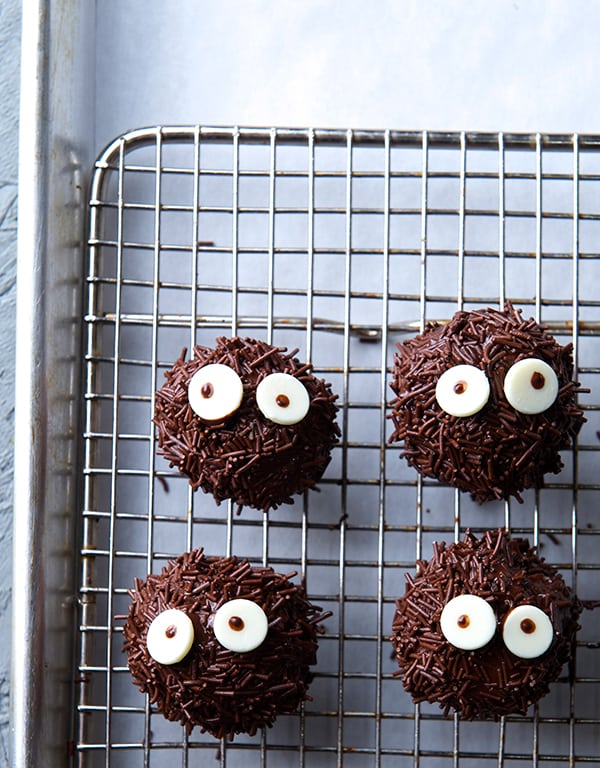
Susuwataris are my favorite creatures from the Japanese film creator, producer, screenwriter, animator, author, and Magna artist Hayao Miyasaki. He is one of my favorite people in the world (area); his imagination, and ability to create amazing stories from common daily situations always amazes me. If you have not seen his movies please do yourself a favor and watch them all. To name a few of my favorite movies from Hayao Miyasaki-Studio Ghilbli: Castle in the sky, My Neighbor Totoro, Poco Rosso, Spirited away, Howl’s Moving Castle, Ponyo, Princess Mononoke, to name a few.
Now, what are Black soots, Dust bunnies aka Susuwataris? In the first movie, Spirited Away, they appeared as lil workers in a boiler room. They have arms, legs and inquisitive eyes. They make a squeaky murmuring sounds when excited, and dissolve into powder (soot) if crushed. They are the cleansers of evil spirits.
They also appeared in the movie My Neighbor Totoro playing the role of dust balls in an abandoned house, where the main characters were moving. Susuwataris in this movie are mainly an optical illusion caused by moving quickly from light into darkness. Like the same effect at night when you turn the lights on your bedroom to go to sleep, if you quickly look into the corners, you might me able to see them. Despite their appearance, Susuwataris are good creatures in the movie, mainly they make sure that the family that is moving into the new house is composed of good people. And everybody knows that good people makes their own candy for Halloween… hehehe
Recipes, Cooking & Art Direction: Mariana Nuño Ruiz McEnroe | Photography: Ian McEnroe |
Published: July 29, 2014
“So we grew together like to a double cherry, seeming parted, but yet an union in partition, two lovely berries molded on one stem.”
― William Shakespeare, A Midsummer Night’s Dream
Before the season ends take this stone fruit so plentiful in the summertime and make it delicious and refreshing. I love frozen yogurt in all its rich flavors and smooth texture as my favorite hot weather indulgence to beat to cool off my palate. I often like to go to one of the many frozen yogurt shops and take advantage of the endless number of flavors and toppings. This is the best time of the year to prepare your own and you might be surprised that you just need a freezer and a blender or food processor to make frozen yogurt at home.
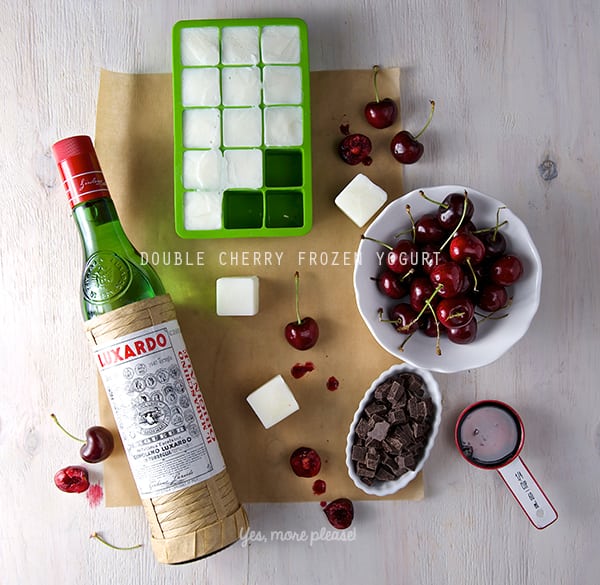
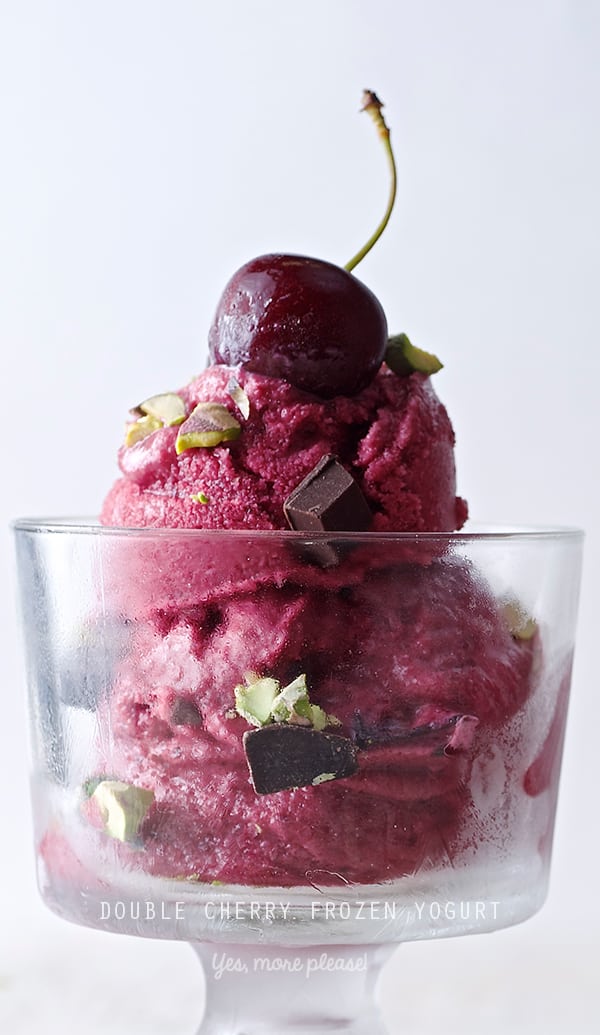
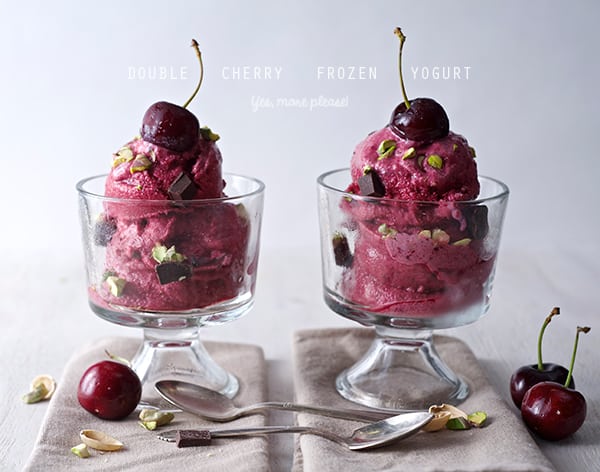
Red cherries have a sweet and tart flavor which is intense and works well for a yogurt flavor. By de-stoning several plump fresh cherries you can freeze the fruit and combine it with yogurt frozen in cube form in a blender or food processor to create a soft and creamy rich dessert. To further enhance the flavor, I added a cherry liquor of good pedigree. This becomes even more decadent with …wait for it…. dark chocolate morsels. Sorry for those of you clinging dearly to ‘simple’ because here comes the topping…nothing less than roasted and chopped pistachios. Once these have landed on top of a couple scoops of this romance you will certainly experience nothing short of Cherry Ecstasy followed by perfect summertime bliss.
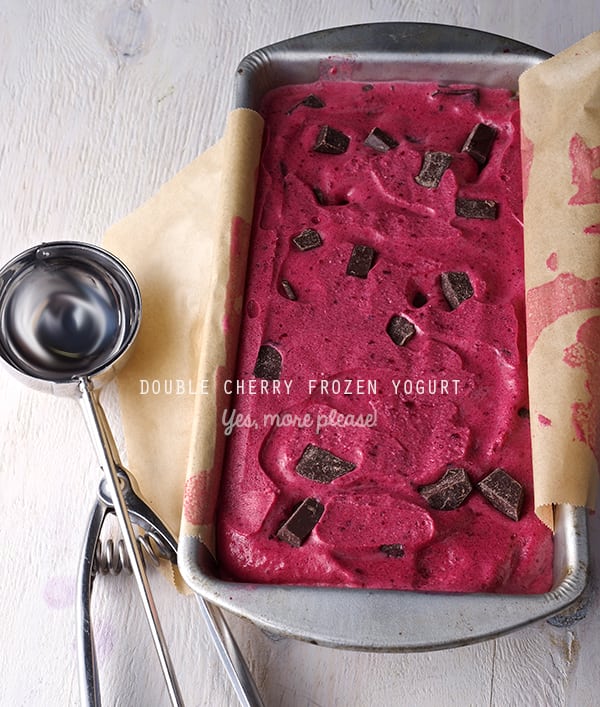
Double Cherry Frozen Yogurt
Serves 4-6 on a midsummer afternoon…
2 cups greek yogurt frozen into ice cubes tray.
1 1/2 cups fresh cherries, pitted and frozen.
1/4 cup agave nectar
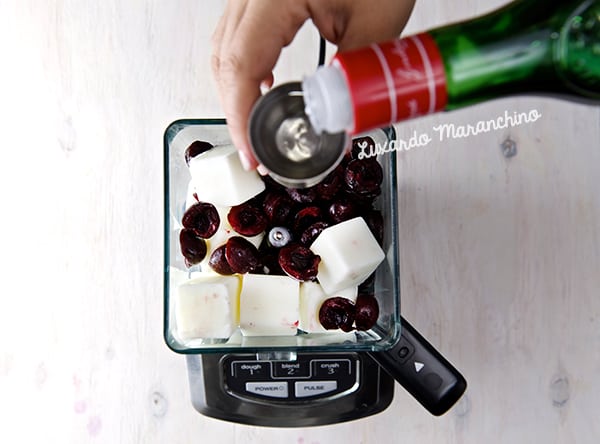
1-2 ounces LUXARDO Il Maraschino Originale
Toppings:
1/2 cup dark chocolate chunks, I used Scharffen Berger Chocolate, Fine Artisan Dark, Baking Chunks, Semisweet
1/4 cup Roasted pistachios
Preparation Method:
1. Using an ice cube tray pour the yogurt and freeze. You can do this step one day in advance. During summer time I always have yogurt ice cubes handy to make a quick frozen treat, they are life savers when you are in a snack attack mode! I like to use this rubber ice cube trays they are super easy to pull out.
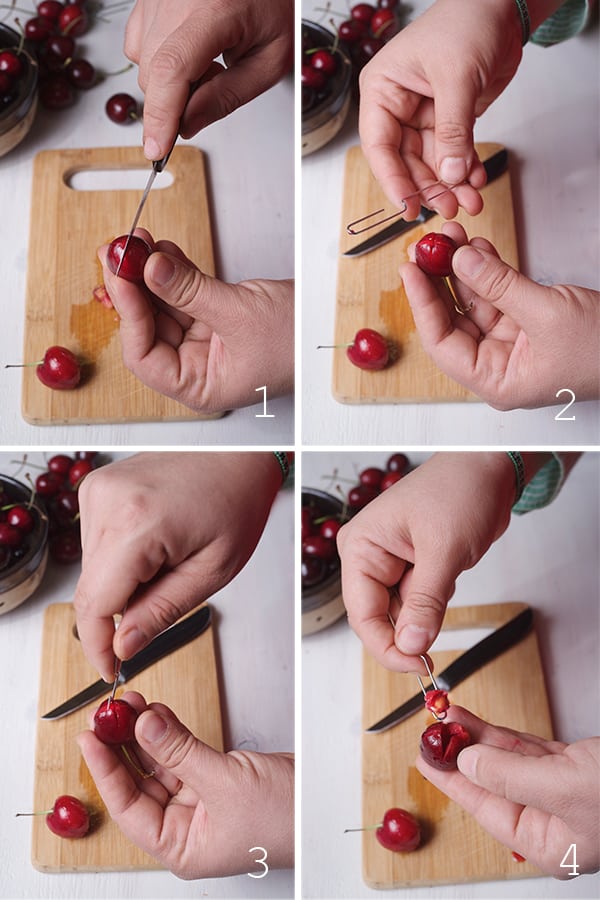
2. Cut in halves and Pitt the Cherries. If you do not own a cherry pitter I’ve heard good comments on this one, or since you are just pitting a small amount you can use my super easy “clip” method check this out:
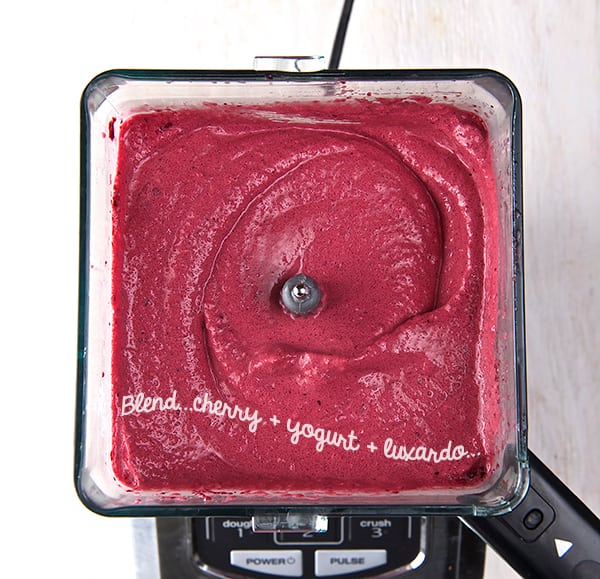
3. Once you have every frozen item you need, place the yogurt ice cubes, frozen cherries, agave, and one ounce of the LUXARDO liquor and blend well until smooth. Taste, and if you want to go ahead and add the other ounce of liquor is up to your taste. The Maranchino cherry liquor enhance the cherry flavor with some almond and honey notes, it is the perfect complement to this frozen treat. If you do not care about this liquor, just add 1/2 teaspoon of almond extract.
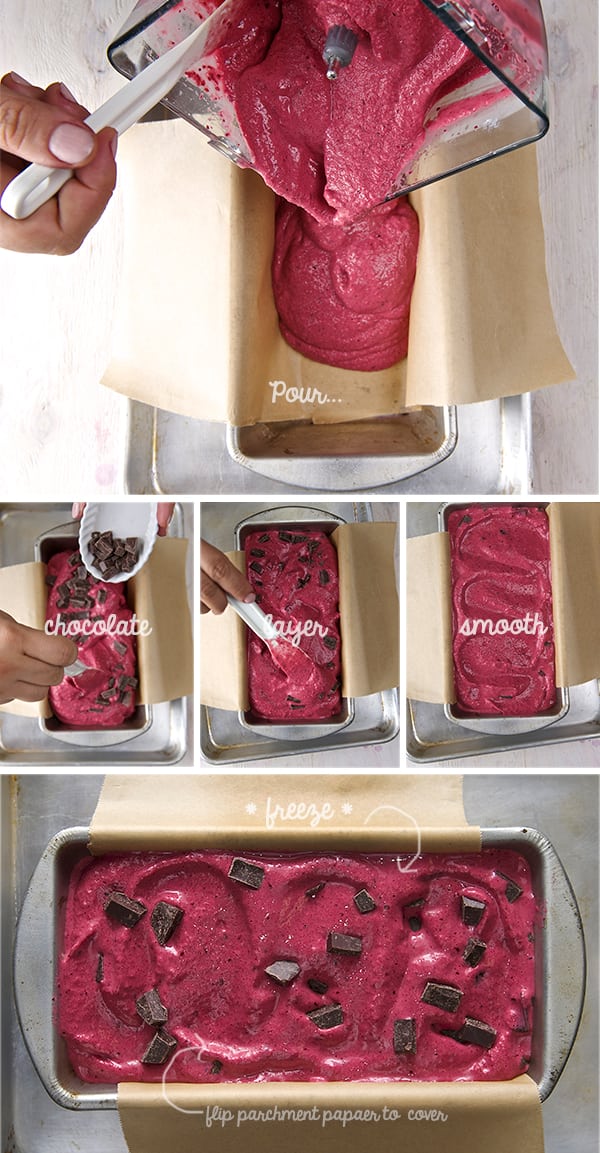
4. Line up a loaf metal pan with parchment paper and poor half of the cherry frozen yogurt, sprinkle some chocolate chunks, cover with the rest of the frozen yogurt. and cover with parchment paper making sure it makes contact with the mixture, to avoid freezer burn.
5. Place in Freezer for about 2 hours. Serve and sprinkle with some chopped roasted pistachios. Enjoy!
Recipes, Cooking & Art Direction: Mariana Nuño Ruiz McEnroe | Photography: Ian McEnroe |
Published: June 12, 2014
Not too long ago, roaming around whole foods supermarket aisles, I discovered on the shelves the magical Sir Kensington’s ketchup. Looking at me rom the wide mouth glass jar I noticed Sir Kensington’s top hat personality and I fell in love with his aristocratic moustache. That was my very first impression. But the man behind the monocle had way more to offer than just an attractive moustache. As I grabbed the jar and started to read the label my jaw just dropped, Non- GMO, 50% less sugar, 33%less sodium, and a short list of ingredients in which whole tomatoes take the first place ingredient. I was totally in love.
You all know my love affair with tomatoes, so you must know what this discovery meant to me. In my opinion this is the best ketchup I’ve had. Shortly after I discovered the whole condiment collection, mayo, chipotle mayo, spicy ketchup and their recent addition “The” Sir Kensington’s Spicy Brown Mustard. I’ve tried them all. You should, too. Period.
A condiment revolution is here! With all natural ingredients, this spicy brown mustard already has a place in the Mustard Museum with a silver medal on the 2014 world-wide competition. The distinctive spicy mustard flavor has a hint of maple syrup. I have smothered it on everything. I decided to come up with a recipe that enhanced the mustard flavor, and a tribute to Sir Kensington’s Moustache.
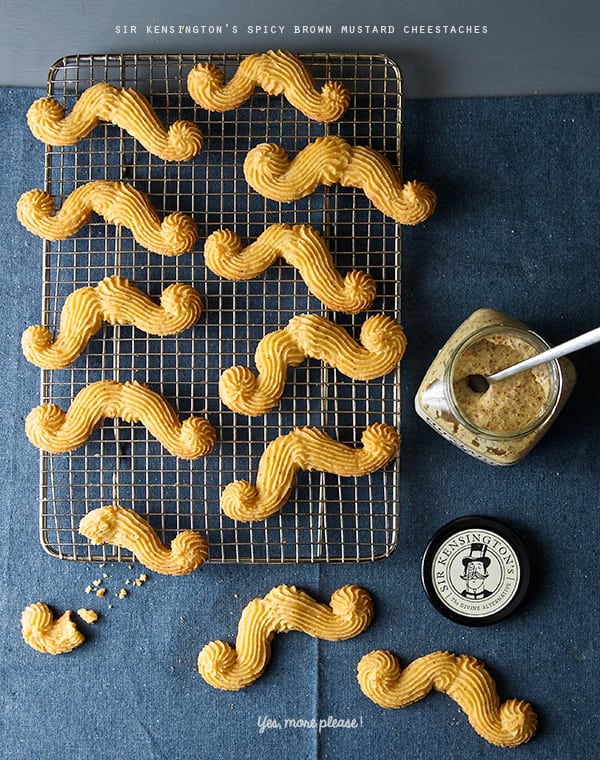
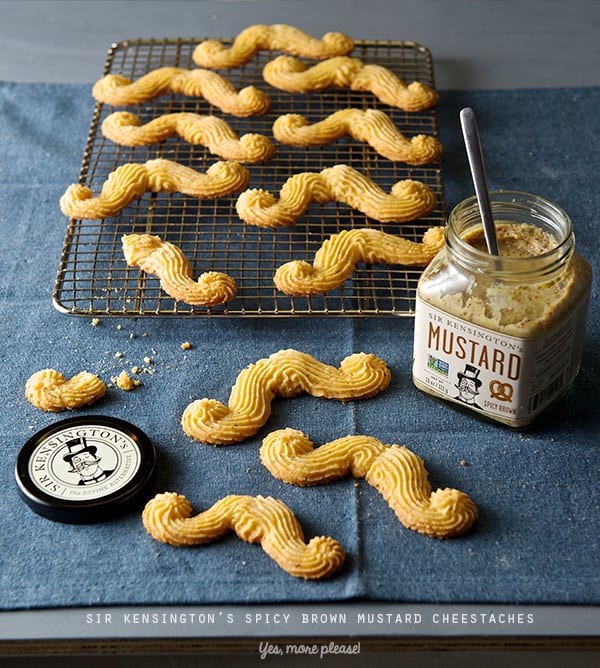
This is how this recipe was born. These cheese straws are the ‘piped’ kind you can squeeze from a piping bag or a cookie gun. Not to be confused with the twisted puff-pastry kind. These buttery, cheesy, crumbly, savory cheestaches have a spicy brown mustard kick!
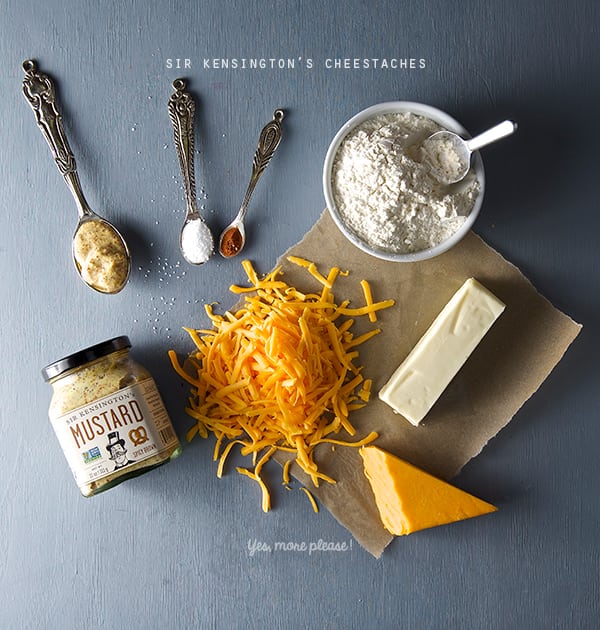
Mild cheddar pairs fantastically with this spicy brown mustard. This easy and fun to make recipe has five ingredients and the result are this cheesy and spicy, utterly delicious moustaches. Most anyone with a love for creamy cheddar cheese and spicy brown mustard will appreciate a treat like this. This fun snack is a great treat to pamper your Dad on Father’s Day. Even if your Dad does not have a mustache!
Apple juice, a cold glass of beer or a cold iced tea will be the perfect match for this Cheestaches on a summer afternoon. Top notch!
Enjoy!
Sir Kensington’s Spicy Brown Mustard Cheestaches
Makes 24 cheestaches
4 oz mild cheddar shredded and at room temperature
4 oz (1stick) unsalted butter room temperature
1 heaping Tablespoon of Sir Kensington’s Brown Spicy Mustard
1/8 teaspoon Cayenne pepper
1/2 teaspoon kosher salt
1+1/2 cups unbleached all purpose flour.
1 medium 12” piping bag
Metal decorating tip # 32 available at any craft store.
1 cookie sheet, parchment paper.
Preparation Method
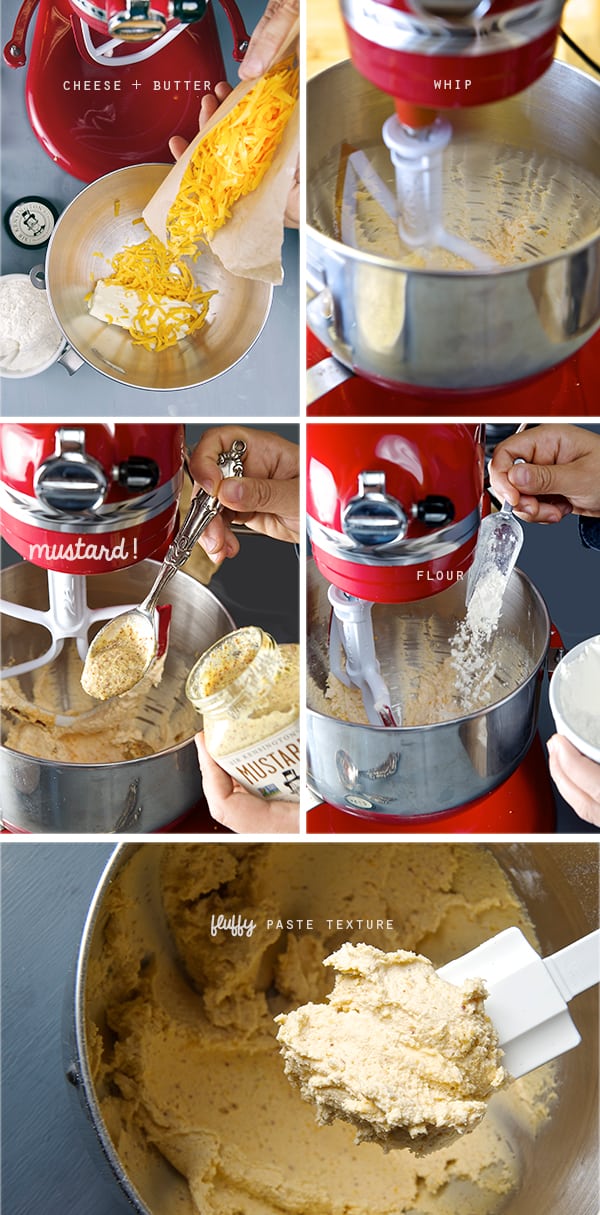
1. In the bowl of a mixer fitted with a paddle attachment, whip the butter for about 4-5 minutes until the butter looks lighter color.
2. Add the shredded cheddar cheese mix for another 3-4 minutes. until you just see small speckles of cheese and the butter is fluffy and looks whipped.
3. Stop mixer, add the spicy brown mustard, cayenne and salt. Mix until combined. 1-2 minutes.
4. Stop the mixer and add the flour in two stages, mixing on medium low until well incorporated.
5. Mix on medium high for 2 minutes. the batter should look like a paste. (if the dough is to stiff, add a bit more mustard and bout a tablespoon more of butter. whip.)
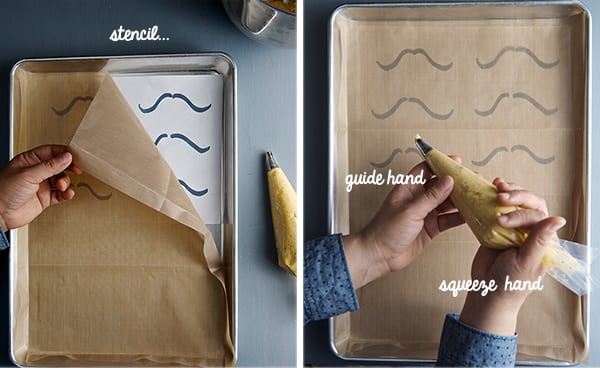
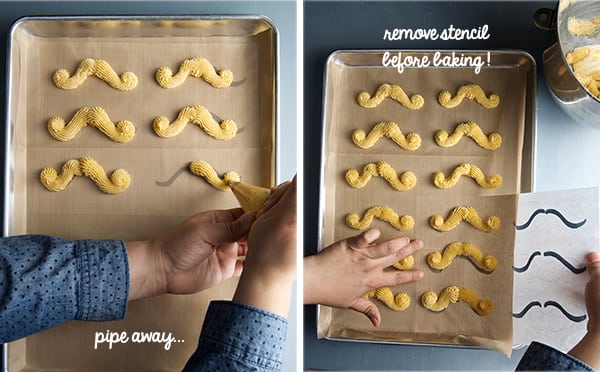
6. Prepare the piping bag, follow instructions below.
7.Line a Baking sheet with parchment paper, a silpad or reusable-parchment, mi favorite!; place the mustache stencil under the parchment.
I made a mustache stencil you can print for easy piping, you can look it up, down load it our Yes, more please! Facebook page click here to get it! Not in the mood of mustaches?.. pipe 3”- 4” stripes and bake for about 12 minutes.
8. Now the fun begins!…Pipe the cheese- mustaches follow the instructions on the picture below, but first take a quick look on my easy way to handle a piping bag.
9. Once you pipe the mustaches place the baking sheet in the refrigerator for at least 15- 25 minutes.
10. Preheat your oven at 350 F.
11. Bake cheese straws for 12-14 minutes, until the tips and base of the mustaches start looking golden brown on the edges.
12. Remove from oven, let them cool on the cooking tray for 4-5 minutes on the tray. Then with the help of a flat spatula transfer them to a cooling rack.
13. This cheese mustaches can be dipped on a bit extra of spicy brown mustard if desired for more kick. But to tell you the truth they are great as they are!..and they taste fantastic the day after.
Serve with a nice cold glass of beer or Iced Tea. Enjoy!
This recipe post was sponsored by Sir Kensington’s brand condiments and the mustard used was furnished by the good folks at Sir Kensington’s.
Recipes, Cooking & Art Direction: Mariana Nuño Ruiz McEnroe | Photography: Ian McEnroe |
Published: April 17, 2014
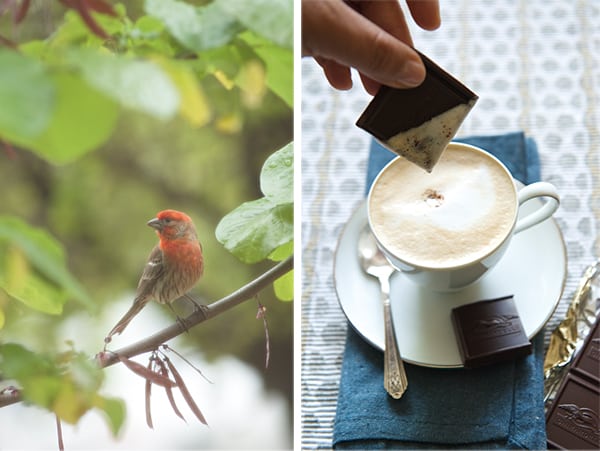
A cappuccino can rescue any morning or afternoon. Taking a break and indulging in a foamy creamy cup of coffee is like taking a bubble bath. I’m always craving something sweet in the middle of the afternoon, and this pairing does the trick for me. A warm cup of cappuccino and a piece of dark chocolate that I dunk into the coffee. The dark chocolate starts to warm up and slowly melts becoming sinfully silky. The flavor of coffee intensifies the chocolate notes as you sip it. The frothy warm milk foam creates an ethereal chocolate bite!…*sigh*
Last Sunday I sat and watched migratory birds under our small tree eating from our feeder. Ian help me set up a camera and I took photos through my front window while I had my cappucino and chocolate treat. It is often the little things that give my day something special.
For me cappuccino and dark chocolate is the perfect recipe for a little boost for a happy endorphinated afternoon…
My perfect dark chocolate pairing…
Cappuccino and dark chocolate
What about your favorite pairings?…I’d love to read you, leave us a comment! There is always a great deal of listening when it comes to chocolate…
Recipes, Cooking & Art Direction: Mariana Nuño Ruiz McEnroe | Photography: Ian McEnroe |
Published: April 13, 2014
So many carrots too little time… Its carrot bonanza season, rabbits everywhere, and have you started to turn orange yet?… Well I hope not, because this recipe is gonna drive you insane. As you know, despite all the wholesomeness I believe in, I have a weakness for a certain processed food… hot dogs…I know, its terrible isn’t it? I know every fact of how the industry introduced us into this strange tubular meat, but yet I’m still hooked.
So in the search for a less processed option, a friend told me about this place in L.A where they serve sous-vided carrots and make vegetarian hot dogs, how crazy good does that sound?
That’s when I had a revelation: How about creating a corn dog, with carrots? Kaz-zam! Done deal. I made them. No, I do not own a sous-vide machine and nor the rest of the mortal cooking souls on earth but if you do , call me we can hang out!; So I oven roasted the carrots, to give some extra flavor and also to pre-cook the carrot. I made the most basic recipe for the batter. But they needed a little extra luv. I wanted a contrast in textures, that thing you crave in a fried object, the crusty salty outside and soft inside.
To that end I added 1 part of rice flour, peas, green onions and corn kernels into the batter.
The result is crazy good!… when you deep fry these babies, they get crusty outside, soft inside, and the peas and corn kernels pop in your mouth with a burst of extra flavor. The carrot center is stellar.
Don’t be nervous about deep-frying, using the proper technique will ensure you great success. I do not deep fry food very often, so I do not own a deep fryer and I do just fine.
You can easily get great results with the following tips:
Get a thermometer for crying out loud!
They cost around $9-14 no need to break the bank and it is one of the best kitchen investments.
Buy Peanut Oil:
It is the best oil to deep fry, no saturated fats, no smells, no greasy food.
Now a days you can buy small amounts of peanut oil at the super market.
Use a heavy bottom, 6″-8″ diameter deep enamel or aluminum pot. Straight sides for easy thermometer attachment.
And remember safety always come first when dealing with hot oil.*
This carrot corn dogs are great for kiddos and vegetarian adults in need of a little indulgence, Enjoy!
Carrot Corn dogs
Makes 12-16 / 3” mini carrot corn dogs.
6-8 Long, medium thick carrots.
You will need about 12-16 of 3’” long pieces.
2 tablespoons honey
1 large egg
1/2 cup milk or unsweetened coconut milk
1 teaspoon apple cider vinegar
1 scallion finely chopped
½ cup fresh corn kernels
¼ cup fresh peas or frozen if you must.
16 oz Peanut Oil for deep-frying.
16 wooden or bamboo sticks.
Utensils:
Long tongs, deep fryer, or candy thermometer, 6”-8”diameter pot with straight walls for deep-frying, cooling rack.
Preparation Method:
1. Cut carrots into 3”- 4” long. Place them on a roasting pan, season them salt and pepper do not drizzle oil. Roast them at 400F for about 12-15 minutes.
Carrots should not be soft, al dente centers is best, since they gonna keep cooking when frying.
2. When ready, set the carrots aside let them cool completely, then proceed to insert the bamboo sticks.
3. Meantime in a medium size bowl, mix all the dry ingredients, then add all the wet ingredients, mix until well incorporated , small lumps are ok. Fold into the batter corn kernels and peas. Refrigerate for about 10-15 minutes
4. Place your chilled batter into a tall glass or jar, this will allow you to easily submerge the carrots into the batter.
5. Prepare your utensils and have everything ready, tongs, cooling rack, batter in a glass, see picture below.
6. Start heating the oil. Check the oil temperature 360-375 degrees / 185-190 Celsius.
7. Dip the carrots into the batter, one at a time, holding the carrots from the stick with tongs, carefully and slowly drop it into the hot oil.
8. Monitor the temperature, it should not drop more than 15 degrees, when placing the corn dogs.
9. Do not crowd the pan. Fry 3-4 corn dogs at the time. This will ensure you evenly golden brown and well cooked batter.
10. How to know when they are cooked and ready to come out of the oil? Corn dogs are floating, look evenly golden brown color, the bubbles around them are smaller.
11. Use tongs to take them out. Place them onto a cooling rack. Keep them warm in the oven.
12. Serve warm, with the dipping sauces, or simple ketchup and mustard. Enjoy!.
*Be aware, hot oil at this temperature can inflict a lot of pain and injury so use a back burner on your stove if possible and keep the cooking pot (and its handle) away from children. In fact, I think its best to keep younger children away from the whole process and never let the frying pot leave your attention so you can monitor the oil’s temperature and keep the food from over cooking. Deep frying this batter, or anything else, some oil is bound to spatter so use long tongs or a spider to handle the food. This will prevent you from getting burns too. Focus and be on a Zen frying mode. The reward is scrumptiously good.
Recipes, Cooking & Art Direction: Mariana Nuño Ruiz McEnroe | Photography: Ian McEnroe |
Published: February 10, 2014
This sounds so wrong, but it taste so right that you will be stumbling back for more.
Homemade marshmallows are totally different creatures than store-bought, and incredible easy to make. Despite the intimidating words ”candy thermometer” and “powdered gelatin” Hey! Its easy, easy potatoes!,
You will need to flatten some dark beer, hydrate some gelatin, boil some sugary mixture, whip the hell out of it , add a powdery cloud of confectioners sugar and let it set…it is a fun process. To finish them up, drizzle chocolate and crunchy pretzels…What’s not to like?
Making candy and these confections is fun and if there is some leftover beer you should have a little glass, to cook along with … Music? Yes, more please! I was listening to one of my favorite bands “The Squirrel Nut Zippers” . For me, this is marshmallow music and I’m sharing the link: https://www.youtube.com/watch?v=VdAt4qWvz_8
My twist in this recipe has to do with the choice of stout I used. My friend Andrea introduced me to this amazing stout from Adelbert’s “Barrel of Love”. Adelbert’s is a local brewery that produces hand-crafted Belgian style ales here in Austin,Texas. Crazy good stuff! This beer was recently released, a dark beer with chocolate and whiskey notes…kiss me now!… Wait until you try these beer marshmallows creatures…Holy Shubangwaaa!
Ok too much Blah, blah blah, let’s get started. Hands up!
I will not describe the flavor for you… be brave, be adventurous and try this… you will go bananas… it is the best way to get happy-drunk on marshmallows! Have fun.
Makes 9 large glutton size, or 120 skinny jeans size.
Technically if you use a 8×8 pan 36 pieces of 1.5×1.5 inches…
3 envelopes unflavored gelatin /approx. 21 grams (I used powder, you’re welcome to use gelatin sheets )
1 cup cold, flat beer, divided in two (I used Adelbert’s brewery “Barrel of Love”) You can use any dark stout like Guinness will be fantastic too! For Kids version: 1 cup of Miller light… not! …Use 1 cup of Cherry soda, Dr. Pepper soda, Cream of soda and use the same method of removing the gas as much as you can see step 1. Other options can be fruit juices, like apple, beet, carrot, they will taste delicious and will give a hint of color to the fluff.
2 cups granulated white sugar
1/2 cup corn syrup
2 pinches of sea salt
2 large egg whites beaten until stiff peaks.
1 teaspoon vanilla extract
To dust:
½ cup confectioners sugar
½ cup cornstarch
Toppings:
1 cup dark chocolate for melting.
3-4 tablespoons roasted salted peanuts crushed.
Salty, pretzels. (I used Snaps from Snyder’s)
1 teaspoon of sea salt.
Method:
1. Whisk the beer to flatten the beer. Remove some of the foam if necessary.
2. Lightly oil your 8×8 pan and generously dust with the confectioners sugar and cornstarch mixture. Reserve the rest for when cutting the marshmallows.
3. Using the mixing bowl of your stand mixer, place ½ cup of beer and sprinkle the 3 envelopes of gelatin powder.
4.Whisk your egg whites until stiff peaks set aside.
5. In a medium saucepan over medium high heat mix the sugar, corn syrup, and the other ½ cup of flat beer until the sugar is dissolved. At this point attach the candy thermometer to your saucepan and bring this sugary mixture to a slow boil until it reaches 240F/ 116C . Remove from heat.
6. Fitted with the whisk, start your stand mixer on the slowest speed. Being very careful, start adding the hot syrup in a low stream to incorporate with the bloomed gelatine.
7.Once you poor all the syrup,mix for 2 minutes and proceed to add the fluffy egg whites along with the vanilla extract.
8.Mix on high for about 10-12 minutes, until the mixture has double or tripled in size, it turns an off-white color, it has a nice shine to it and it holds stiff peaks.
9. At this point with the help of a spatula (lightly spray the spatula with some nonstick spray), Poor all this fluffy and highly sticky gooey goodness into your greased and powdery pan.
10. Flatten the top and allow the marshmallow to dry for at least 4-6 hours. Overnight is best. The marshmallow should fill springy and soft to the touch.
11. Once dry, over a piece of parchment paper generously dusted with powder sugar and cornstarch mixture, un-mold the marshmallow sheet with a little spatula pulling from one corner and place the big square on top of the paper. With the help of a dusted knife, pastry cutter, pizza cutter or scissors, cut your marshmallows into squares. Start by dividing them in half and then, thirds. When cutting any kind of pastry, it helps a lot start visualizing “half of the half” rather than five or six equal pieces. In this way you can end up with pretty much equal size marshmallows. Do not worry about the round edges, people is gonna eat them any way!…Although if you are going for perfect little squares just trim all the round edges to have a perfect square and then proceed to cut. (see photo below)
12. Once they are cut, place the remainder of the confectioners sugar and cornstarch mixture in a bowl and toss the squares, so every side is covered with powder to avoid sticking. Shake the excess powder, and place the marshmallows on a clean cookie rack.
13. Melt the dark chocolate, and drizzle the marshmallows, sprinkle with pretzels and crushed peanuts.
14.Eat while the chocolate is warm…its crazy good!!!


