Recipes, Cooking & Art Direction: Mariana Nuño Ruiz McEnroe | Photography: Ian McEnroe |
Published: August 24, 2016
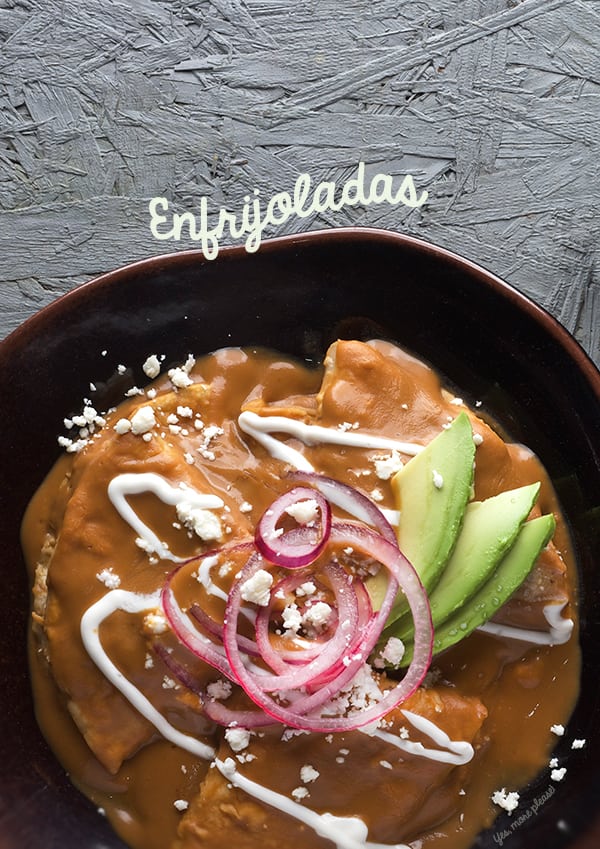
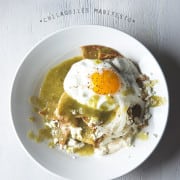
Enfrijoladas are one of the most beloved humble dishes made out of beans in Mexico. I almost can imagine some Mexican grandma in a hurry trying to make a meal with ingredients for two that will serve four or six with the beans she had. So Bad-a-bim! …she created a sauce, in order to stretch the beans, for all to eat. Aren’t these kinds of recipes the ones that everybody loves the most?…Serendipity in the kitchen can work love spells, just like this recipe.
Imagine fresh corn tortillas smothered in a smooth velvety bean sauce that has been seasoned and tinted with dry chiles. This dish features smokey anchos and a bright flavor guajillo chiles, sauteed onions and a couple of garlic cloves, all seasoned and blended to create a light and velvety bean sauce. Enfrijoladas are the cousins of enchiladas, only lighter. This velvety sauce, has a mild spice flavor, that in combination with the earthy and creamy bean texture make the most luscious bean sauce.
Recipes, Cooking & Art Direction: Mariana Nuño Ruiz McEnroe | Photography: Ian McEnroe |
Published: July 27, 2016
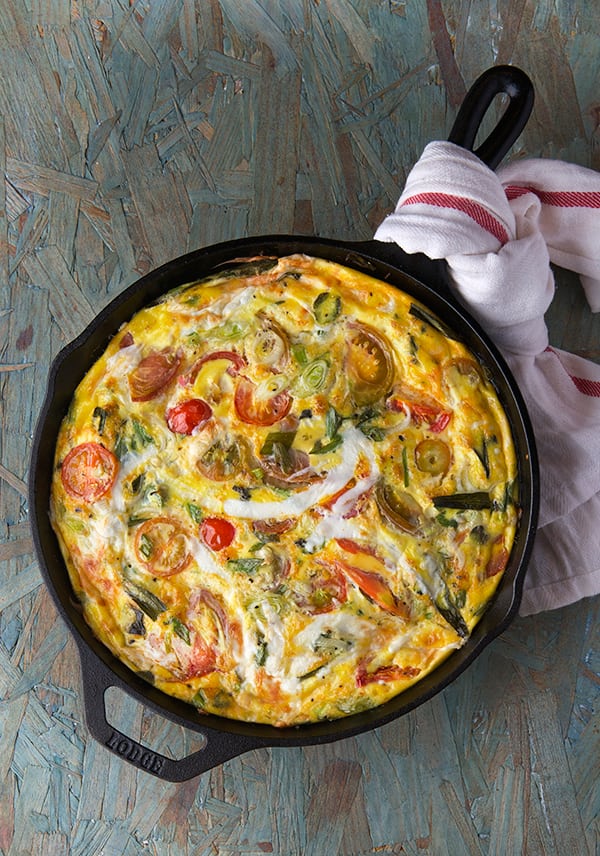
Frittatas are the best way to transform simple ingredients into a magnificent meal. It’s the goodness of pie without the crust. With their lightly crusty edges, creamy soft centers, easy comfort, and the fact that almost every ingredient can play and sing along embedded in custardy creamy eggs, frittatas are the perfect Summer companion, and this Oaxacan Frittata is the one you want this summer by your side.
This Frittata is all about the Oaxacan Jewel tomatoes I grew in my little garden. I love how the combination of custardy eggs and “Quesillo” a.k.a Oaxaca Cheese, compliment the flavor of the tomatoes with out masking them. Even when cooked, the tomatoes hold their fresh and juicy flavor. The melted strings of Oaxacan cheese along with fresh herbs and a sprinkle of flaky sea salt make this Frittata the object of my Summer affection.
Recipes, Cooking & Art Direction: Mariana Nuño Ruiz McEnroe | Photography: Ian McEnroe |
Published: June 24, 2015
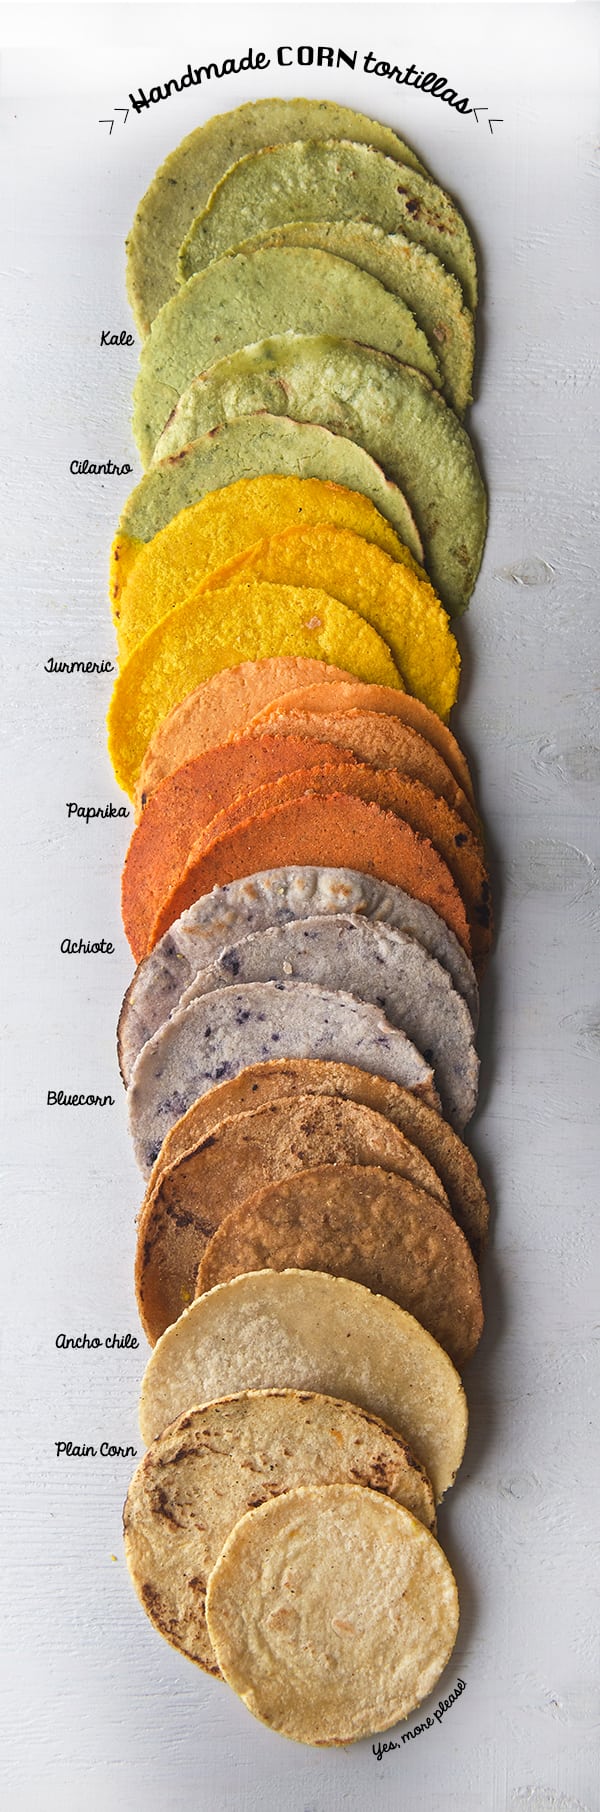
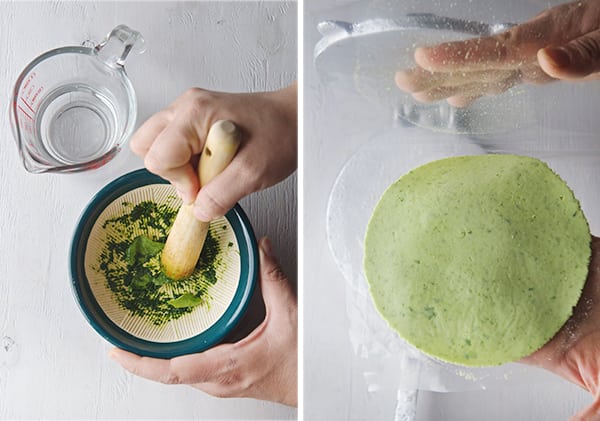
Do you want to learn how to make your own corn tortillas? Get ready! Once you go handmade, its hard to go back to the store bought. The process is fairly easy once you get the hang of it; patience, my little grasshopper, is the key. The first two are horrible, and then the magic happens and you learn from your mistake and “Bippidi-Boppidi-Boo” …your tortillas start to take shape. In the kitchen, making tortillas is one of the things I enjoy the most. Its so rewarding and in my opinion they taste so much better than machine made. Imagine the smell of warm corn filling up the kitchen and the taste of soft fresh tortillas…it has no comparison.
Making tortillas requires lots of patience and “patience”. Yes, if you have patience and a little extra time, go for it! Make them because its 100% worth it. Although I recommend you do not attempt to learn how to make them the night before if you have a big crowd to feed or a party… to do so would be a bit of a nightmare. You do need practice and like I said LOTS of patience. Tortillas don’t like people in a hurry. You have to be in a Zen tortilla mode, focus and get into the groove. It can be frustrating at the beginning. Just like pancakes usually the first one is not so good but once you get the right amount of heat and rhythm you are in tortilla mode. Soon after a heavenly bite of a soft corn homemade tortilla, this will become the best taco you ever had. Now, please follow these instructions carefully. I experimented with several proportions and these were the most successful. It is hard to make a tortilla from fresh masa, the procces is labor intensive, it takes about 2 days to make good fresh masa. From the process of nixtamalization, the grinding and the kneading. In Mexico this process is the regular norm, since tortillas are the main staple on the Mexican diet. you can find places where tortillas are made fresh everyday or the tortillerias which they are also made fresh by a machine, and people line up everyday in the middle of the day to buy fresh tortillas. It is hard to settle when you know the real flavor and texture of a tortilla, being on the states it is more common to find the pre packaged tortillas at supermarkets, which they are far in flavor and texture from the real tortillas. This recipe attempts to recreate that warm, soft, toasty corn flavor that tortillas have when just made out of the comal. Despite the fact they are made from corn Masaharina, the results are much closer to the flavor ant texture of a real mexican tortilla. On the recipe you will find variations and different brands of masaharina. I suggest to follow the instructions and try to find the brand I recommend, for best results in flavor and texture. You can easily find this brand online, if you live abroad, might be easier for you to order online.
This handmade tortillas last about 3-4 days if they are kept on a plastic bag on the refrigerator. How to Reheating next day? No problem!.. My dear 50%Scottish- 50%American husband taught his 100% Mexican wife to reheat the tortillas on the bachelor way: In a toaster. Would you believe?!!! Ha! Well I have to say that it is a very effective method. What I learned is that by sprinkle them with a little water on each side, then place one tortilla into each toaster slide, set up the toaster number 3-4 depending on the toaster and you will have the most efficient and fast reheating method for tortillas. The tortillas turn out warm and not dry. Be careful using your fingers to remove them, they get very hot. Thank you Ian, but of course for a Mexican the first choice would be a comal, or over the flame on a gas stove to heat them. This char the edges, giving them extra flavor.
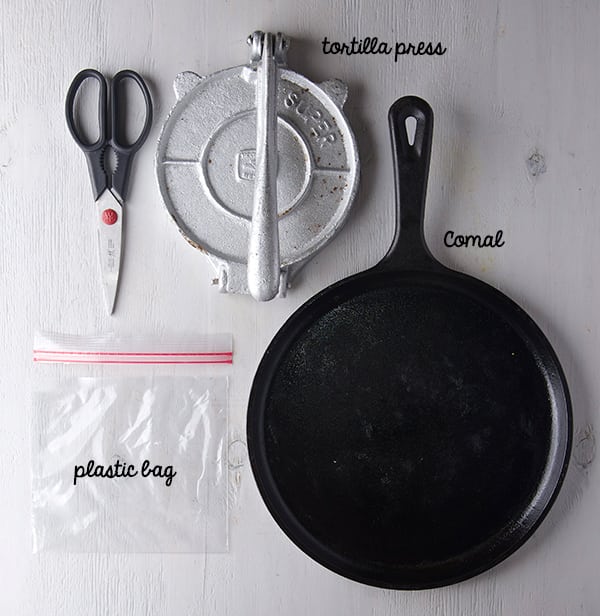
1 lbs of fresh masa* 1/2 up to 1 cup of warm water (maybe less, maybe more…) Kosher or sea salt Tortilla press 1 plastic bag (see photos below for instructions). *If you are in Austin, Tx you can buy fresh masa at the Milagro Factory on 6th st. Ask for fresh corn masa, not the one that is prepared for tamales, make sure to specify you are making tortillas. If you want to make your own masa… well that is a whole other process… I will work on that… soon : ) !
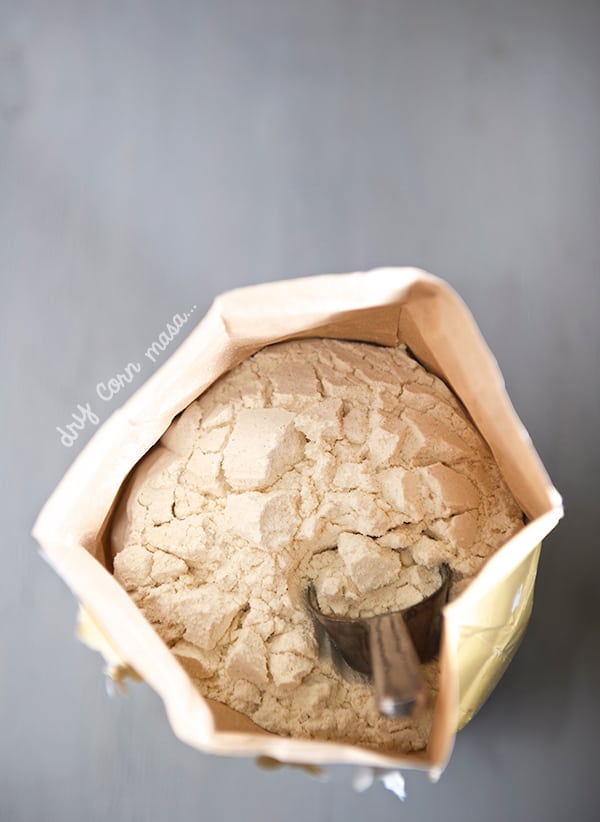
However If you don’t find fresh masa, dry masa harina is a good choice. Minsa brand, and Arrowheads Mills also offer this type of masa harina. What is special about this masa-harina? Well it is the process of Nixtamalization, which dates from the Aztecs back in 1200-1500 B.C. In this procces, dry corn kernels are soaked and cooked in an alkaline solution, made with limestone and water, which helps remove the outer hull of the grains and pre-cook the corn kernels. These corn kernels once are soaked and rinse several times, are grinded, added water, a bit of salt and transform into fresh masa. The brands I previously mentioned are dehydrated masa transformed into Masa-harina. Masa -harina its a very common alternative when there is no access or time to make fresh masa. My best advice is to check with your supermarket, in the international food aisle, today a lot of supermarkets have a “Hispanic food aisle” and if you are abroad, your best bet is to order online. I included my favorite brands at the end of this post.
From Dry Masa:
1 cup dry Masa harina*
Organic options are suggested at the end of the post, If you are using Organic dry masa harina I will recommend to use 1/2 cup minsa + 1/2 cup Organic white masa harina, for better texture and flavor.
3/4 up to 1 cups warm water
1/4 teaspoon kosher or sea salt
Use measuring cups for better results.
*I recently find out that Minsa the other leading brand for Masa harina in Mexico, Has announced their commitment and certification as a NON GMO, USDA Organic, Kosher, GF and whole grain. This means that this is the best Mexican Masa Harina you can buy. if you want to know more about it please visit their website. Minsa
Preparation:
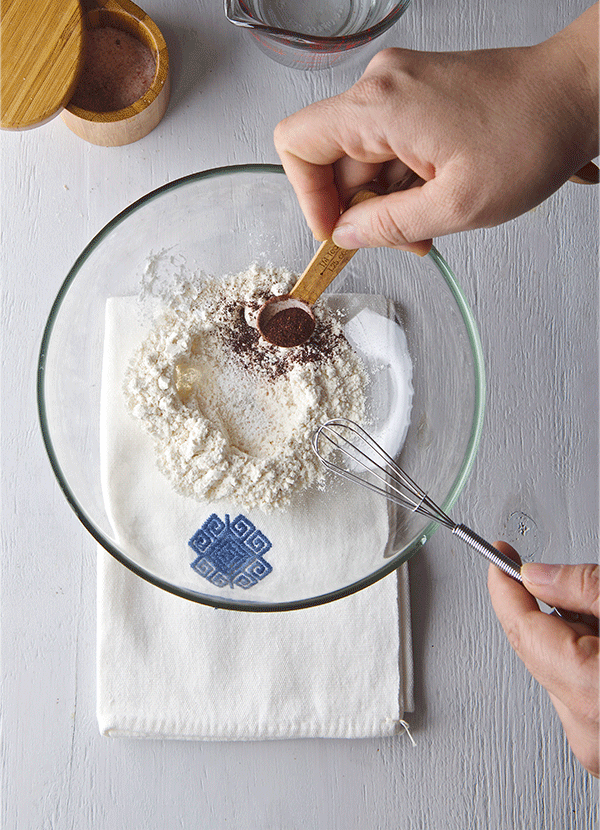
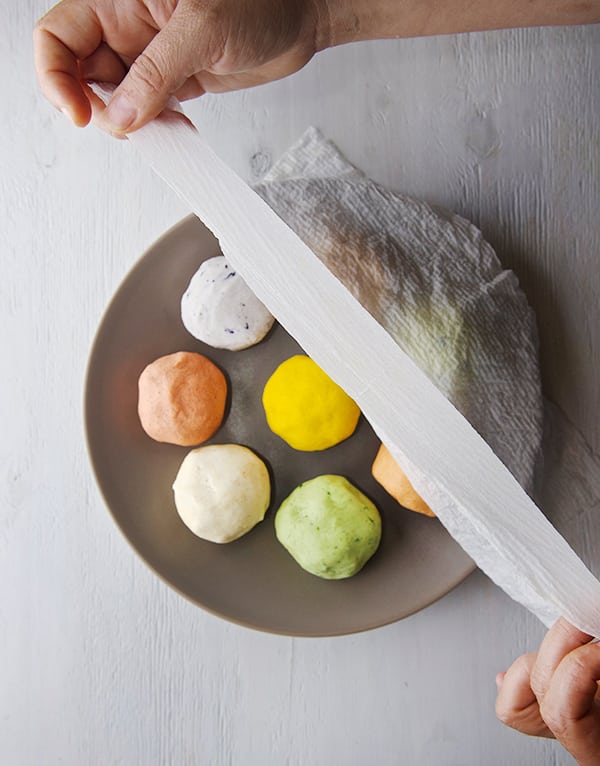
1. Start by dissolving the kosher salt into the warm water, On a large bowl place 1 cup of masa-harina, mix and make a well add the water in the center and star mixing with your hands little by little until you have a soft ball and all the flour is incorporated. Kneed for 2-3 minutes. Make a ball and cover the masa with a damp towel or plastic wrap let it rest at least 20-30 minutes, let the masa-harina re-hydrate as longer as possible. Usually after this period you need to make some adjustments. Too dry: it will start to crumble, you need to add more water. Too wet : it will be sticky on your hands you need to add a bit more masa harina
The right texture resembles a moister play-dough. It is ok for the masa to be a little humid to the touch. Making tortillas is a matter of feeling the masa, the more you make them the better you will get at it. Your masa has to be always room temperature (except if you live in Yakutsk, hehhehe), slightly warm to the touch works best.
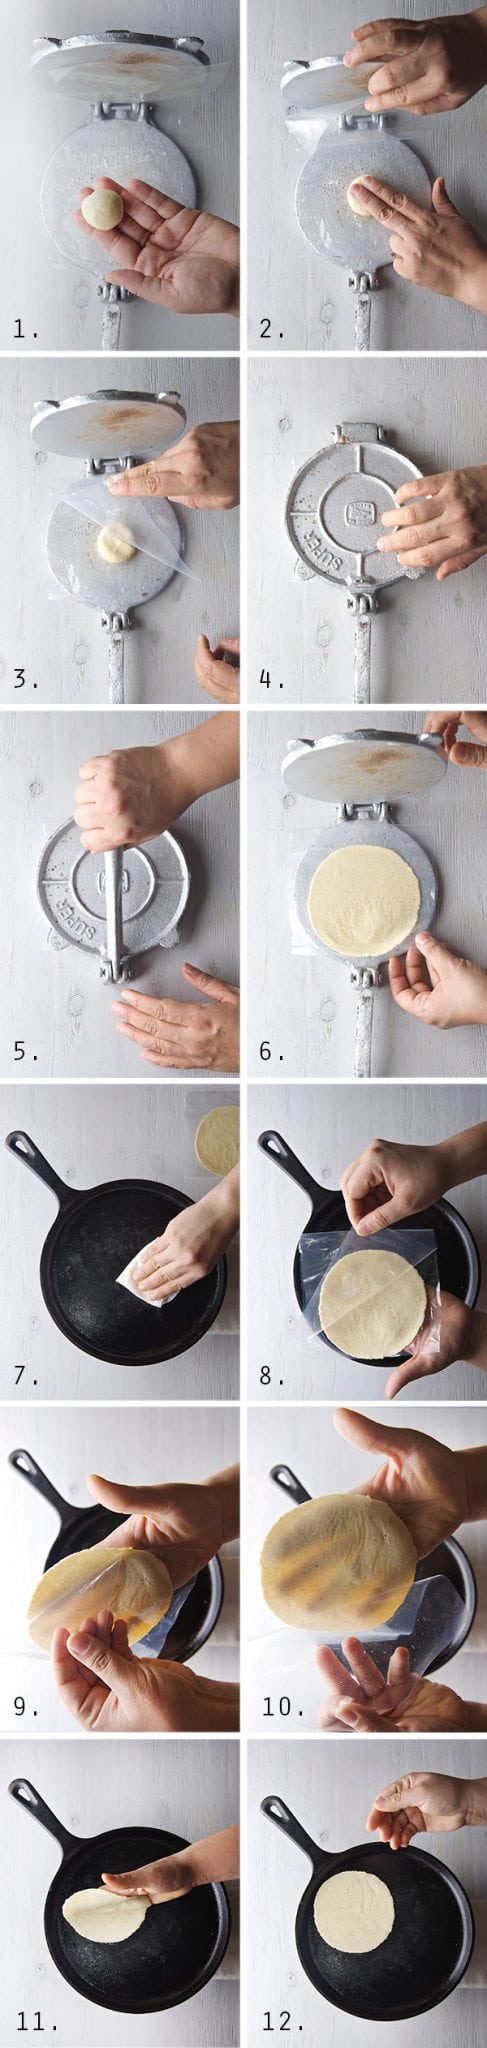
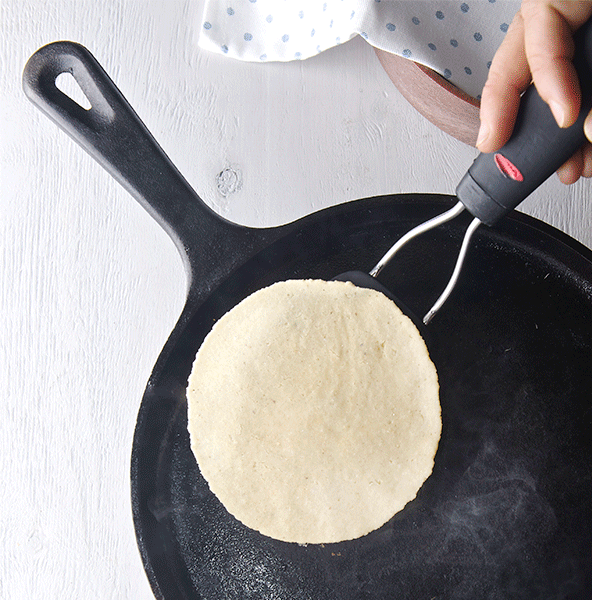
2. After 30 minutes, prepare the resealable bag, by cutting the top sealed lines of the bag and cut open the 2 sides of the bag. Now you have like a plastic folder. Open the tortilla press and put a drop of oil, then lay down the plastic. This will prevent the plastic from moving while pressing the masa. Now, Start by making 1 ½” round ball (you can use a small Ice cream scooper to help make them even size). Remember to Keep your masa covered with a piece of plastic wrap or damp towel at all times to prevent from drying out. Work with one ball of masa at a time. Now, place the masa ball in the center of the opened plastic and flatten slightly with your fingers. Fold the plastic over the masa, and fold down the metal tortilla press. Hold the handle and press down gently until the dough has spread about 4” inch diameter. Rotate the plastic and slightly press if necessary.
3. On medium-high heat, heat up a large cast iron pan, a griddle, a comal, or a teflon pan will work too. With your hand, hold the tortilla in the plastic, and carefully peel the plastic just like if you where peeling a sticker. Once one side is peeled, flip it into your writing hand and peel the rest of the plastic. As you peel allow the tortilla to rest halfway on your hand, and half hanging down. Gently lay down the tortilla on the warm skillet. Once you place it Do not try to reposition!, you just have one shot!….
4. Using a flat spatula, flip the tortilla until the edges start to release from the skillet. Once it releases easily, then its time to flip. You should not battle the flip if it does not release with ease, just give it a bit more time. Usually it takes 30-40 seconds per side, especially with these little tortillas. Once you flip you can press down a little on the edges. After you laid the tortilla on the pan, 2 flips its all it needs. The tortilla should be lightly colored and air pockets will form on the second flip. As soon as the air pockets are forming the tortillas are done. Transfer the tortilla into a tortilla warmer lined up with a clean cotton kitchen towel with a dry paper towel on the bottom to keep them moist. Keep them warm in a tortilla warmer until you finish with all the masa, working one ball at the time. Depending on size you can fit 2 or 3 on a 12″ skillet, and once you start getting a good tortilla rhythm its fun and the process goes fast and smooth.
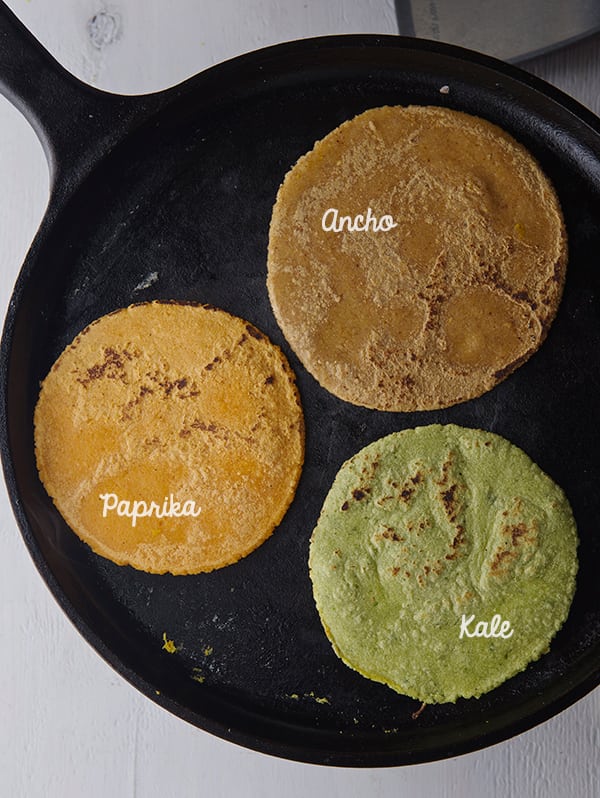
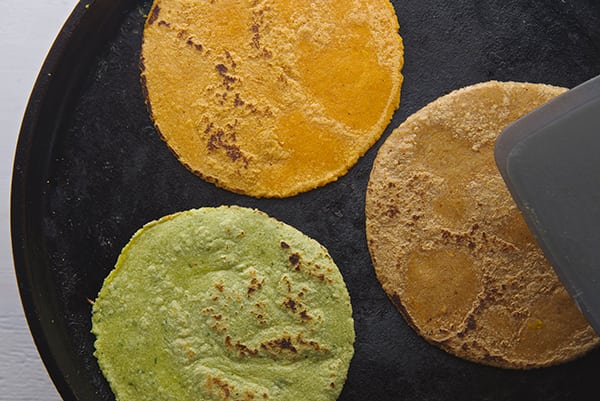
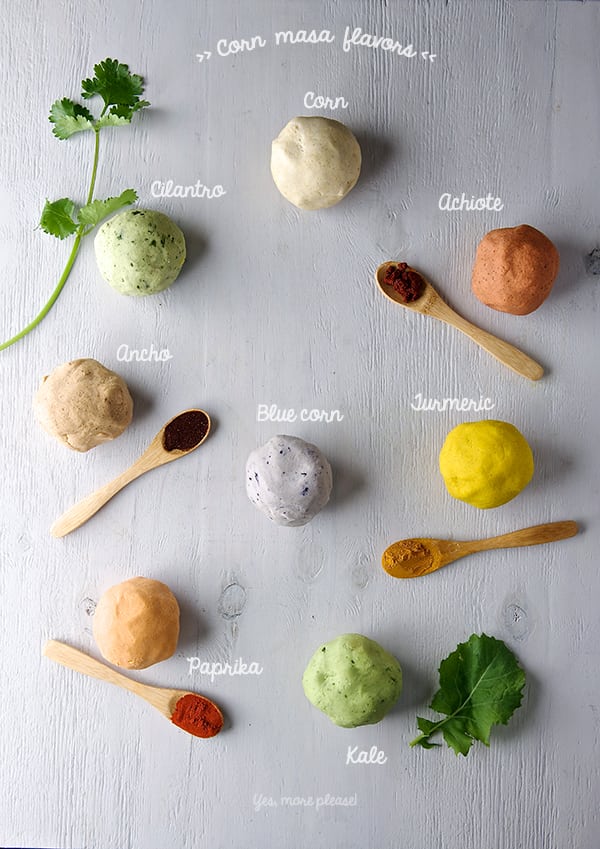
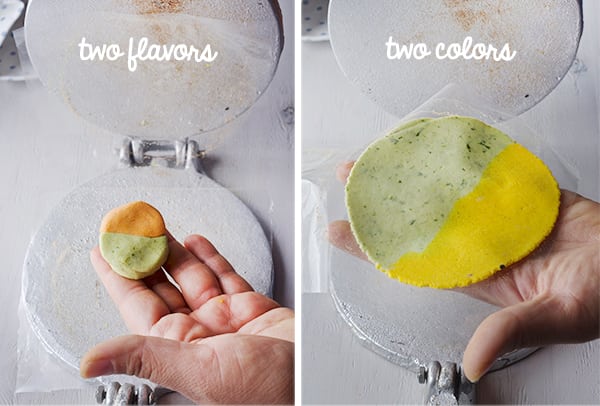
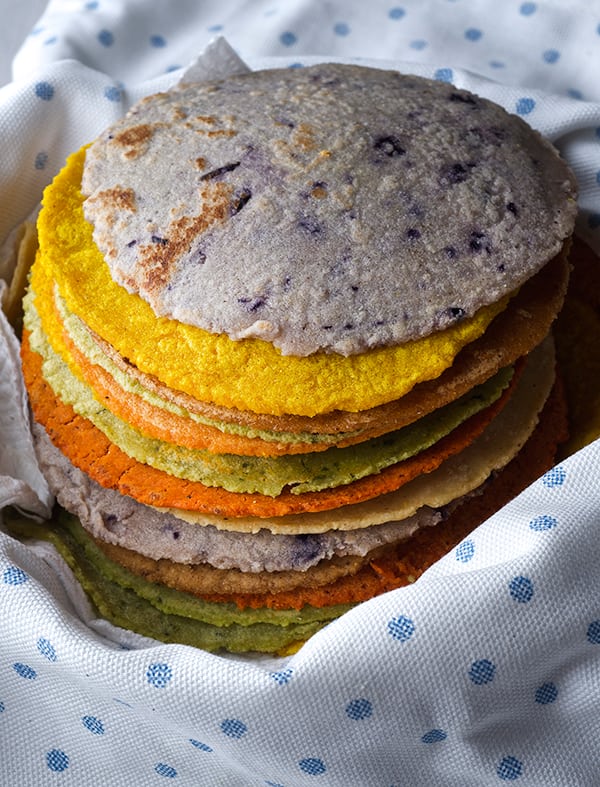
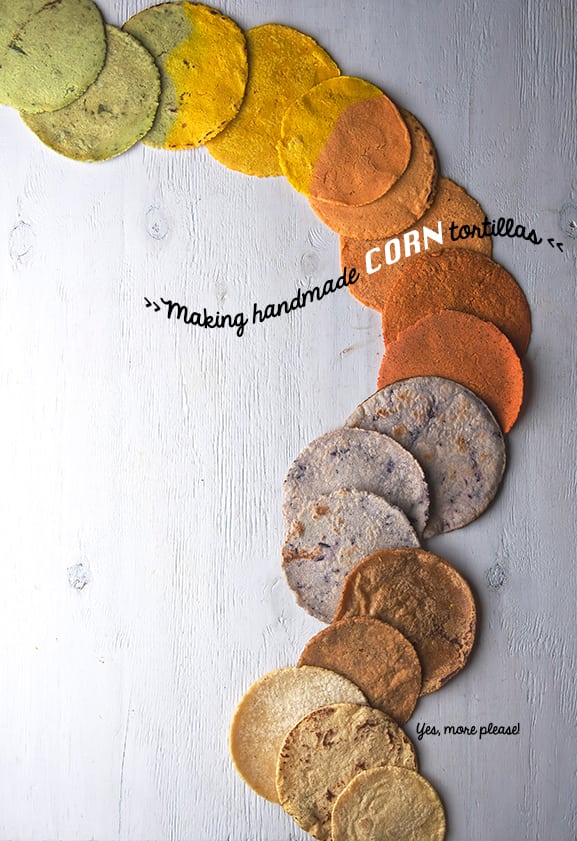
My spin for Natural Flavored and Colorful Tortillas:
Feeling a little whimsical? Why not adding an extra punch of flavor? these variations using chili powders, spices and vegetable purees help a lot, especially when you are using dry masa-harina. They are a great variation and make amazing quesadillas or any taco of your affection.
Add one of the following to the dry masa, and then proceed with the recipe, adding the water little by little, specially for the purees, you might need to add less water to the masa.
3 teaspoons Ancho powder
2 teaspoons Sweet Paprika
2 teaspoons Turmeric
2 tablespoons of Achiote paste dissolved into the meassured warm water.
5-6 sprigs of Cilantro, remove the stems and smash the cilantro in to a paste, stir into the measured warm water.
1/4 cup packed baby Kale or lacinato kale, remove hard stems and smash the leaves into a paste, (you can use a immersion blender to make the puree) stir puree into the measured water.
1 chile poblano roasted and pureed
2 carrots steamed and pureed
1 small beetsteamed and pureed
2 guajillopeppers boiled, pureed and strained to remove the seeds.
Other flavors: Tomato paste, Any other chile, like guajillo, chipotle, jalapeño, poblanos, spinach, sweet corn, sesame seeds, pumpkin seeds, Texan’s and New Mexicans : Hatch chile into the mix will be the the bomb!.
Just Follow this principles by adding a powder or a paste.
Try and play by making crazy ones with different flavors and colors, these are great for quesadillas…
Tips:
* First tortilla is always a disaster, do not get discouraged, learn from it.
* Feel the masa; t0o wet will stick to the plastic and won’t release, to0 dry, it will crack, and won’t hold together.
* Gear up! a nice heavy cast iron griddle, a Mexican tortilla press and a good old plastic bag…
* When cooking: Too hot griddle will char the tortillas with out cooking them through, too low temperature, will dry out the tortillas before they are cooked, and they won’t be pliable and soft… This temperature issue is the same when you are making pancakes, the first pancake its always a bad one until you bring the pan to the right temperature, …then you are on the right track!
* When making tortillas: Masa and tortillas don’t like to be rushed or people in a hurry. Get into your tortilla Zen mode first, once you get the tortilla rhythm you will start having fun!…and eating them too heehehe!
* Practice my little grasshopper, practice, because once you get the hang of it there is no comparison from homemade/handmade fresh tortillas than the store bought…that is a fact Jack!
The CORN Organic / Non-GMO situation:
In order to make a better quality of tortilla, I research for an organic Non-GMO Masa Harina. I found three respectable brands with a great commitment to organic and Non-GMO products:
1.Minsa Masa Harina, one of the leading brands in Mexico, has recently made a great commitment by completing all the certifications USDA organic, NON GMO, Kosher, GF, WHole Grain, and GFSI. This makes this brand my first choice when making tortillas from dry masa harina. Its now available on the USA.
2. The closest option I found is a brand named Gold Mine Natural Food.co, they sell Non-GMO, organic, BLUE masa harina. They just started to carry 1lb. bags. for a fairly good price. If you have a big corn tortilla commitment go for the 50lb. bag and share it with your friends hehheeh. Down side is you have to order on-line or ask on your nearest Whole-foods Market if they can carry in stores. Here is the link to their website.
3.Bob’s Red Mill- Masa Harina Golden Corn Flour. I tried this masa harina it has great quality and flavor, but it is made from yellow corn. The variety I’m used to is white corn, since I’m from the South of Mexico. Flavor its different, a little sweeter than the white. You can use as substitute in this recipe, adjusting the water, maybe up to 1-1/4 cups. This Flour its available on line and often found at regular supermarkets.
It is with great sadness, and concern what is happening in Mexico. The government just passed a law that will allow to GMO Corn to be grown in Mexico. This could affect more than 59 types of heirloom corn. If you would like to know more about it and take action signing a petition to revoke that law, click here for more information ad supporting this cause, Save the CORN! for more information about the cause Green Peace Mexico and ANAAthe National Assembly of Environmental Affectings.
Thank you for Caring!
Have fun!
Music Pairing: Arturo Marquez Danzon No.2 Alondra de la Parra
Recipes, Cooking & Art Direction: Mariana Nuño Ruiz McEnroe | Photography: Ian McEnroe |
Published: May 15, 2015
Chilaquiles are a Mexican classic. It has three of the most iconic ingredients: corn, chiles and herbs. There are a wide variety of chilaquiles styles. In fact, I think I have never tasted an identical version anywhere, even if I make them myself at home, every preparation is slightly different because the use of fresh ingredients, but the principle of how the dish works remains the same.
If you’ve never had chilaquiles before they seem deceptively simple to make, although significant details in the preparation make a very big difference to the final result. Sad to say, the truth is that Chilaquiles are commonly poorly made and misunderstood.
What is this Chilaquiles Manifesto all about?…
~Manifesto//: a written statement that describes the policies, goals, and opinions of a person or group~
~Chilaquil//: come from the word “Chilaquiltl” in Nahuatlt. It is of what Mexican historians refer as an “aztequismo” which are words that have their roots in Nahuatl and are used today in a modernized way. Chilaquilitl comes from the word “Chilli” that means “Chile”; and “atl”, used to mean water, and “quilitl” that refers to a combination of herbs, like a sauce. This term was also used to describe an old woven hat. With time this word acquired a connotation for describing a careless manner towards a texture~
This Chilaquiles Manifesto is my proclamation of texture, flavor and sauce. For me, that is what Chilaquiles are all about. I want to rescue the Chilaquiles reputation. Despite their “careless texture” in name’s origin, I believe the dish is all about the balance of texture, sauce, spice and attention to detail. I hope this manifesto will make you appreciate the difference between average and exceptional Chilaquiles.
The Chilaquiles Principle: Texture, Flavor, and Balance.
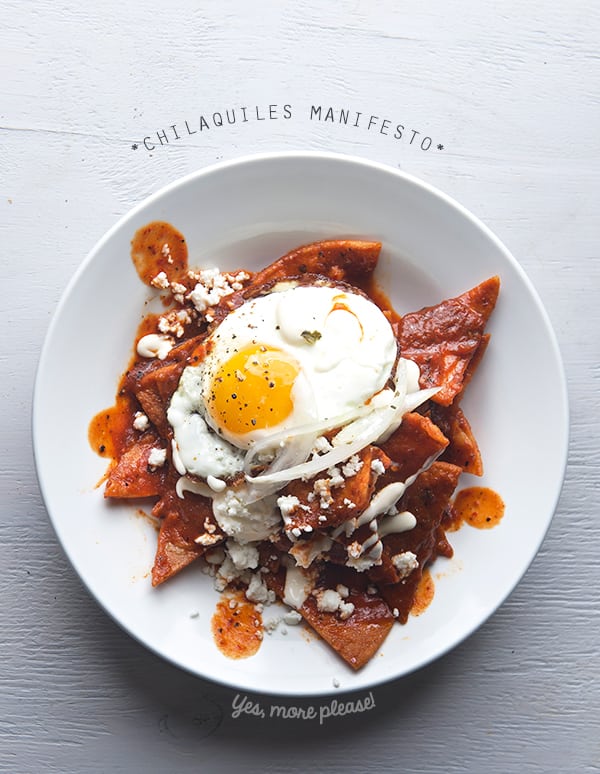
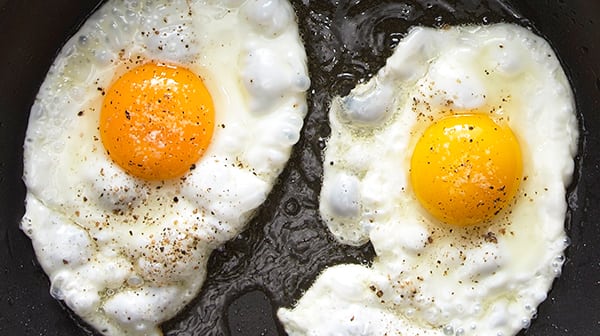
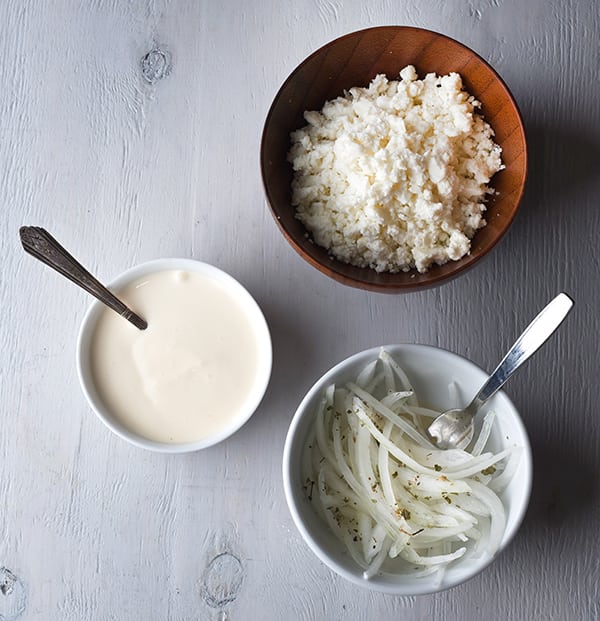
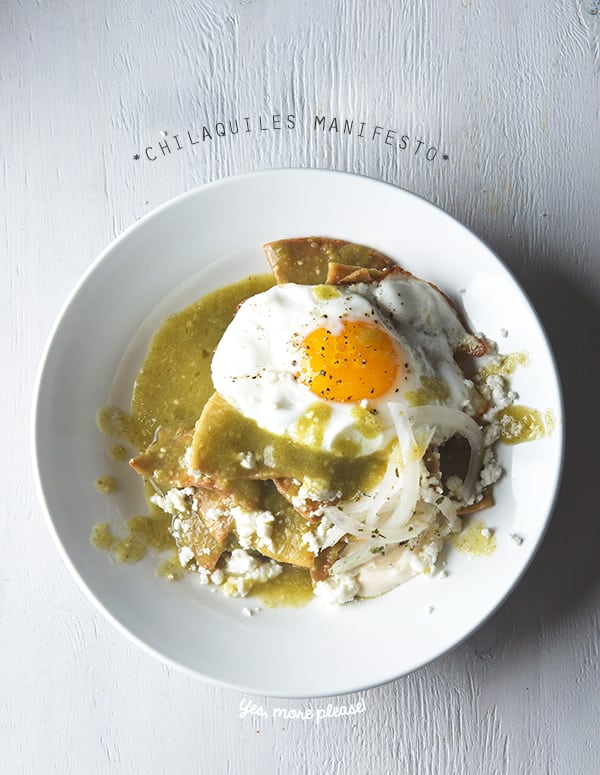
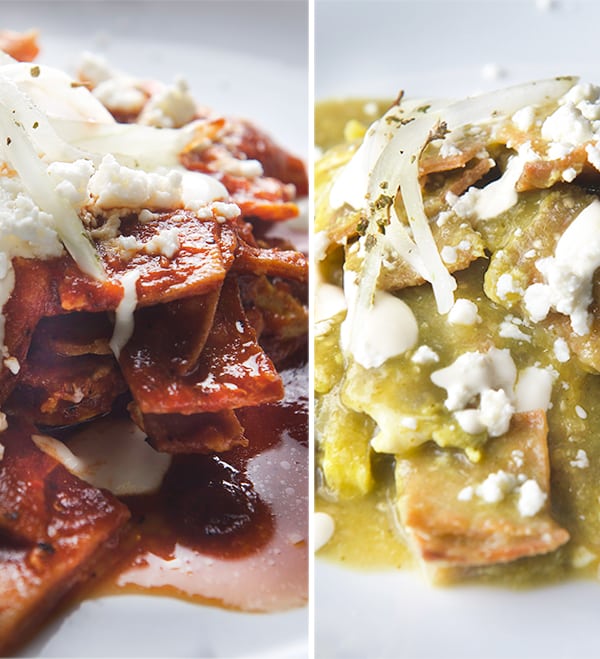
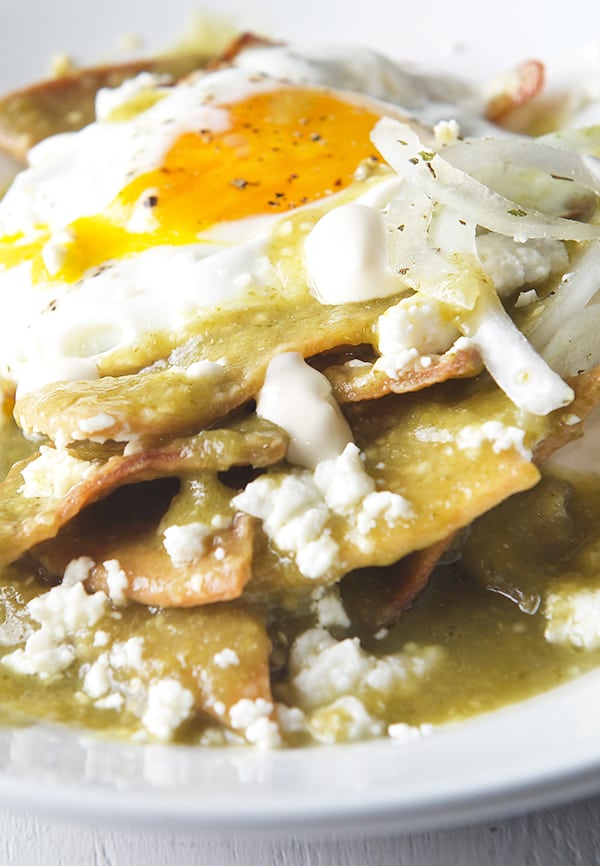
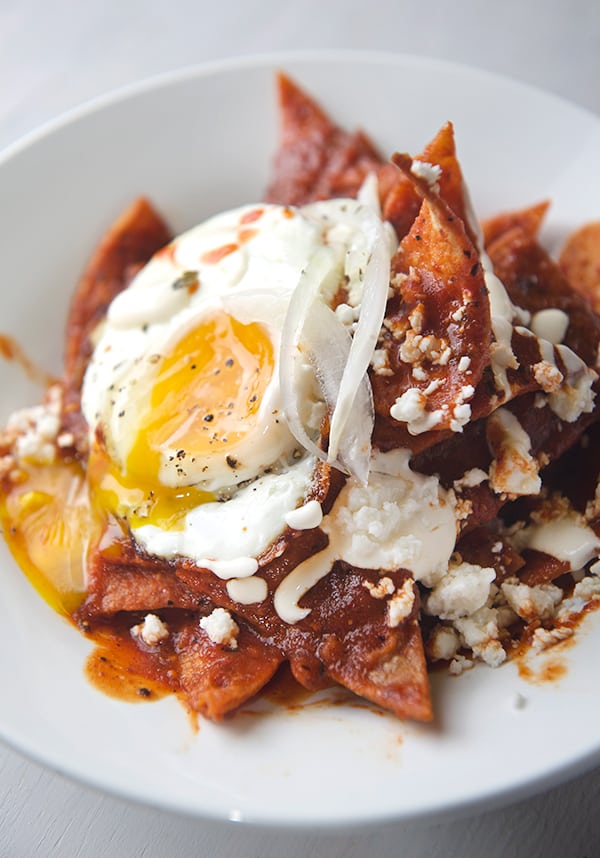
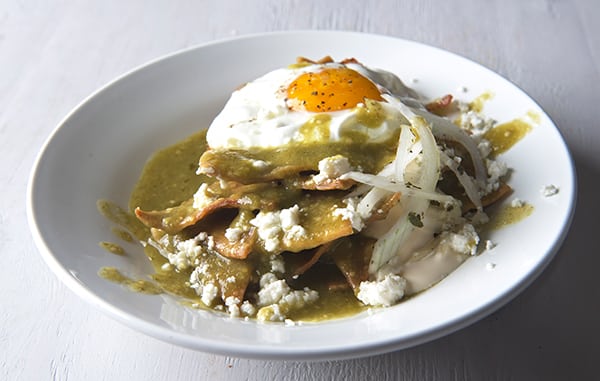
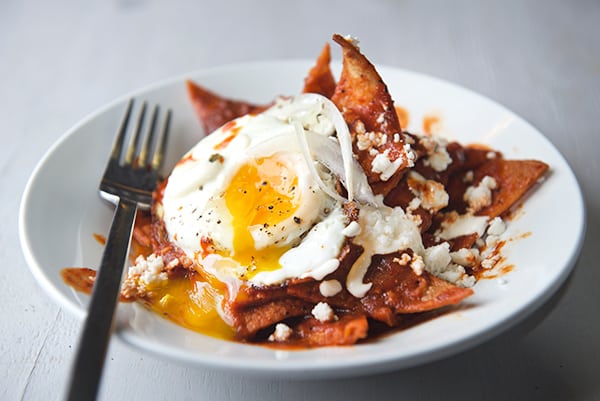
For me a good plate of Chilaquiles is the one in which the crunchy tortillas preserve some of their crunchy texture and the sauce is thick enough to cover the tortillas without weighing them down. It remains saucy and there is a bit of salsa running on the side of the plate like a little emergency puddle that get mixed into the refried beans to keep them company. The sauce can be red or green usually with a good level of pleasant spiciness, unless you have a hangover, you might ask for extra hot. Chilaquiles are most commonly eaten as a breakfast or brunch. Therefore a perfect sunny side up egg ,runny and tender, is the perfect complement to this dish. Chilaquiles must be garnished with crumbs of slightly salty queso fresco, creamy clumps of Mexican Crema (similar to Creme fraishe) that mellows the warm and spicy sauce. Top this with raw or pickled onions to add acidity and a sharp pungent of flavor every other bite. There you have it.
This is what dreamy Chilaquiles should be.
A great plate of Chilaquiles should always have the following four components:
The Sauce:
Fresh ingredients for the sauce are a must. The basic salsas are so easy to make. In my opinion, there is no comparison between the flavor of store bought compared with fresh. Freshly cooked saucy salsas thick enough to cover deep fried tortillas are the best option. Using Red Roma tomatoes, in combination with dry chiles, and or tomatillos and fresh chiles will make a huge difference, moving the sauce quality from good to Great.
Tortillas:
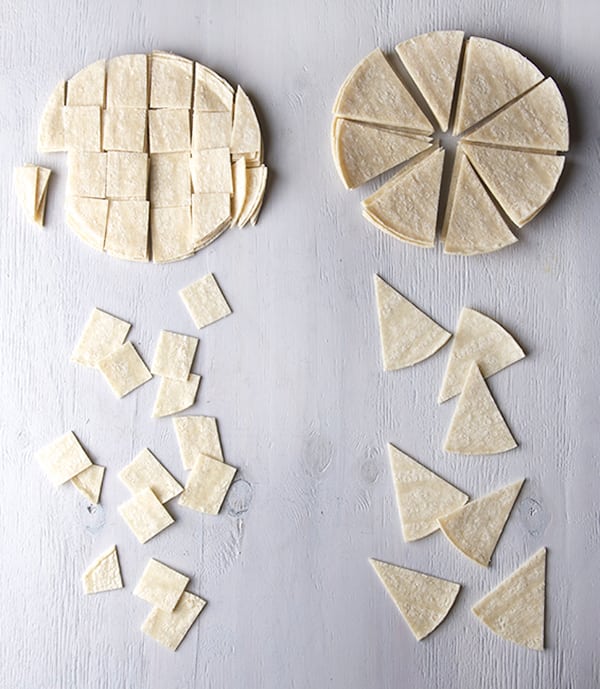
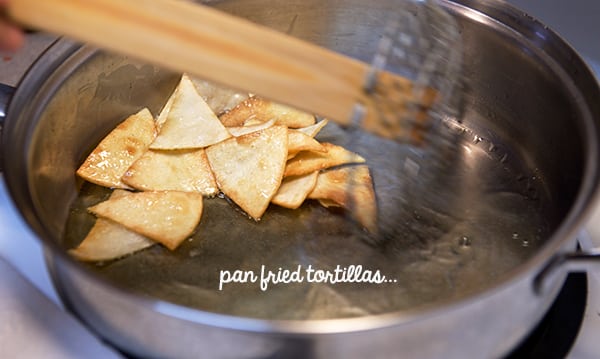
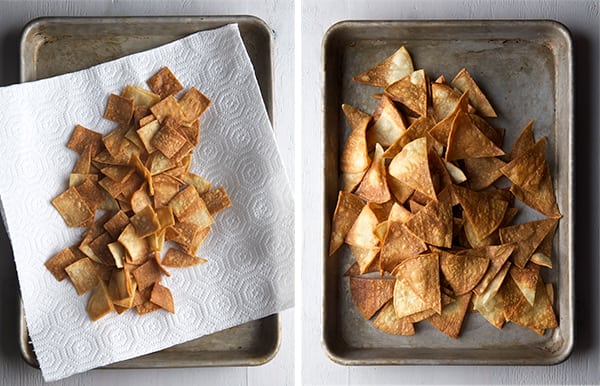
White Corn tortillas are the best option. Typically cut into a triangle shape or small squares these tend to fry more evenly. They must be pan fried the same morning, using corn oil or grape seed oil to preserve the corn flavor intact is the best bet. Use machine made tortillas for this preparation. Most handmade tortillas are too moist and have the wrong texture once fried, and besides,handmade fresh tortillas taste awesome as they are, to precious to use on chilaquiles.
The Egg:
Farm eggs, scrambled into the tortillas, or a Sunny side up eggs in my opinion are a must. Some other versions are served with shredded chicken or both. To be honest, I like mine with egg only. Leave the chicken for enchiladas.
The Accoutrements:
Mexican Crema, Crumbly Queso fresco (Please will you do me a kindness?… no melted cheese on my chilaquiles, thank you!), a side of re-fried beans are a must. And last but not least: Quick pickled onions* this give the chilaquiles a great bite and accent. *Quick pickled onions or cebollitas desflemadas: Slice onions thinly, rinse them thoroughly in cold water strain them. Place the onion slices in a little bowl add 2 tablespoons of apple cider vinegar or the juice of one lemon. Add a pinch of salt, pinch of dry oregano, toss them, set aside for 5-10minutes, or until ready to serve. I love this simple onion preparation, usually chilaquiles are served with raw onions, I think is to harsh, and for my luck I will be having onion breath for the rest of the day. With this simple quick pickled the onions are tender not overly sharp, they add a good bite and acid element to the dish. try them, you are gonna love them.
Now, lets talk about Chilaquiles styles…
For me there is an abysmal difference between average and exceptional.
In my Chilaquiles world, The Semi-Crunchy takes the first place, they are simply the best.
Three Winning Styles:
The Semi-Crunchy
This is my favorite kind of chilaquiles. The tortilla holds about 80 percent of crispiness and 20% of floppy saucy texture. Due to the perfect sauce consistency, great balance between tomato-chiles and water ratio. To achieve the perfect crunchy chilaquiles the key is to add the died tortillas into the salsa just 2-3 minutes before serving them. I layer them and top them with a ladle of the warm sauce making sure they are all covered in sauce for best results. An over easy egg on top is the way to go. You will find this preparation recipe and step by step photos ahead.
The Migas that wanted to be Chilaquiles.
These are the best option for big crowds, or for those who do not like runny eggs.(I think these kind of people are officially in the endangered category, but there’ is some population percentage out there against runny eggs). Tortillas are fried and whisked egg is added to the tortillas for a quick toss once the egg start cooking, add the sauce and turn off the pan. The egg acts like a barrier, protecting the tortilla from getting soggy, and sauce sticks to the egg keeping the egg moist and the chilaquiles juicy. It is delicious to in its own way. These are the type of Chilaquiles my Grandma used to make. You will find this preparation recipe and step by step photos ahead.
The deconstructed enchiladas
I must confess I do not like shredded chicken in my Chilaquiles. For me they are all about the sauce, tortilla and egg combination. Save the chicken for another time, this type of Quiles’ for me is equal to deconstructed enchiladas if you know what I mean…
The following options I don’t recommend, but are frequently encounter, so be aware!:
The Floppy
The cooking method is different. You fry the tortillas and then add the sauce to the pan and let the tortillas absorb some of the sauce. Because the tortillas are fried they keep their individuality but they stick to each other. The texture is soft, like eating a soggy enchilada. They tend to be on the dry side, not too saucy, therefore, a good over easy egg does wonders for this version. A good…but not great, version.
The Nachos who wanted to be Chilaquiles.
Nacho’ur best bet. These chilaquiles are just wrong. There are lots of versions out there where they serve a bunch of pre made, bagged chips with a ladle of sauce on top and they dare to call them chilaquiles. Too much crunch, lack of sauce, there is no marrying the tortilla and the sauce. Not of my affection at all to be honest with you… these are more like nachos, no bueno.
Divorced chilaquiles:
Half red, half green, for indecisive people or people who want it all. I must just say, just marry one sauce at the time. Having two sauces at the same time will not make you more content…it just confuses the flavors thereby ruining the dish…a bad marriage. Rojos o Verdes will always be the dilemma. If you and yours can’t get together on this one you may need to follow the recipes below and prepare both sauces SEPERATLEY, on different weekends, or just flip a coin.
There must be another 845, 632 more recipes out there, different chilaquiles preparations, sauces combinations, chiles, herbs, cooking methods, you name it!; I’m giving you my 2 ultimate salsas, VERDE and ROJA, you decide which one you want to prepare.
I’m also including 2 different Chilaquiles preparation styles. The Migas- that wanted to be Chilaquiles which are the ones my Grandma used to make. These are dear to my heart and I prepare them when I’m feeling a bit nostalgic.
The other style I’m sharing with you its my absolutely favorite one: The Semi-Crunchy Chilaquiles. I believe they are the ultimate cosmic flavor knock out, textural extravaganza, Chilaquiles. I must warn you, once you have this version, you will have recurrent cravings and dream about them…
So, please remember: “ Don’t just make them good…make them Awesome!”…
Enjoy, Let’s cook!
Chilaquiles Manifesto
Let’s start by Choosing and Preparing your Salsa, then choose the style of chilaquiles you want.
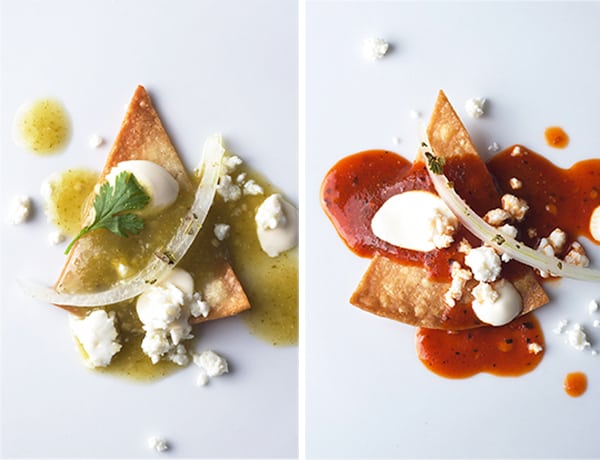
For the Salsa VERDE:
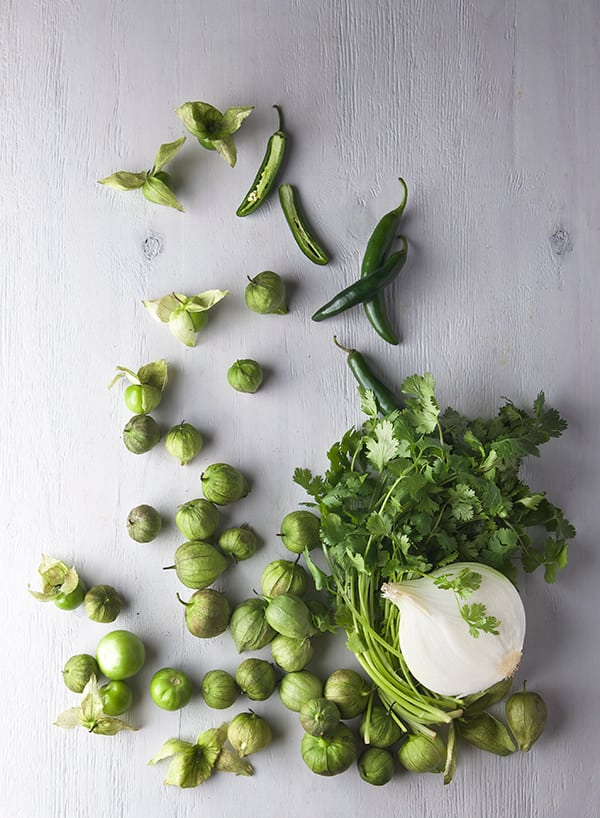
1 lbs. Tomatillos peeled and washed. I used tomatillo milpero, the smaller the tomatillos the best flavor.
½ small or ¼ medium white onion
4 Chiles Serranos or 2 large Jalapenos remove stems.
Small bunch of cilantro about 14-18 sprigs upon size.
1 teaspoon sea salt
2-3 tablespoons of the reminder oil from were the tortillas were fried.
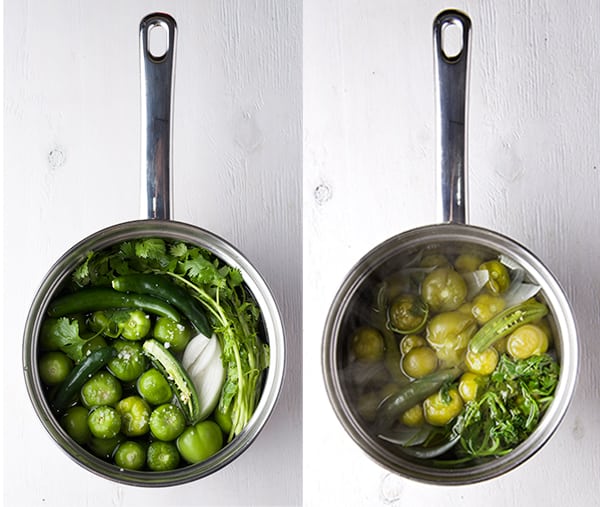
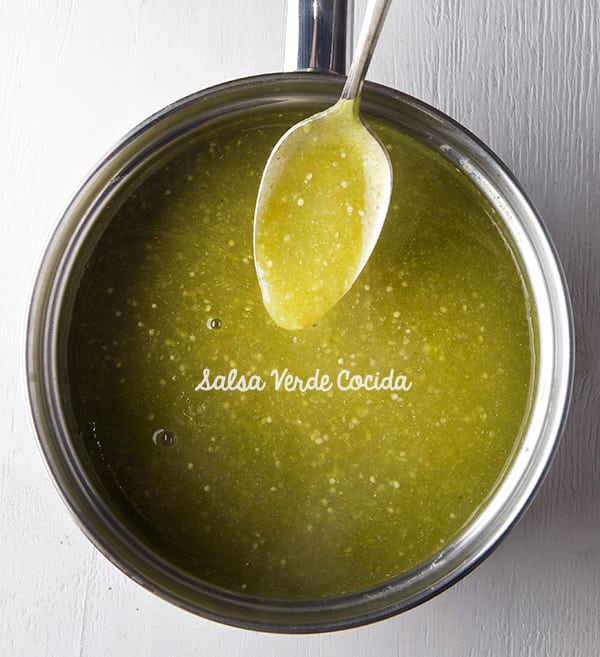
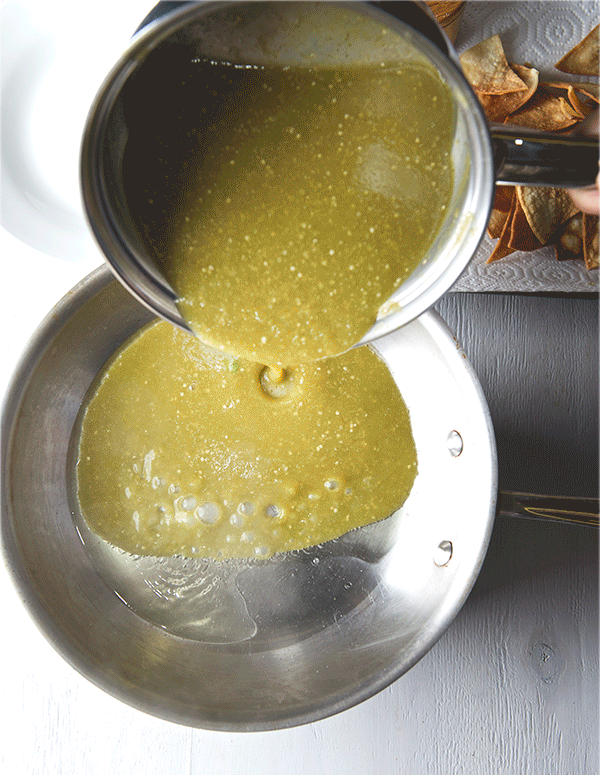
In a small-medium sauce pan place tomatillos, chiles,onion, cilantro, and barely cover with water. Place lid and simmer until they are cooked, about 12-15 minutes. Once they are cooked, remove ¾ of the liquid add salt and blend.
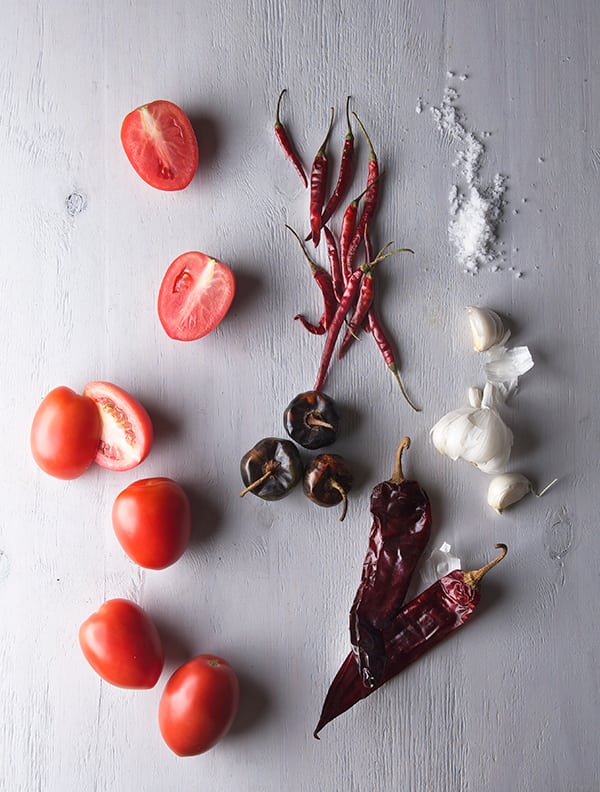
For the Salsa ROJA:
5-6 Roma Tomatoes choose the reddest and ripest for best flavor.
½ small or ¼ medium white onion
1 garlic Clove
3 dry chiles Cascabel toasted, seeds and stems removed.
8 dry chiles de Arbol toasted, stems removed.
2 dry chiles Guajillos remove seeds and stem and boil along with the tomatoes.
1 teaspoon sea salt
1 pinch of sugar
2 tablespoons of the reminder oil from were the tortillas were fried.
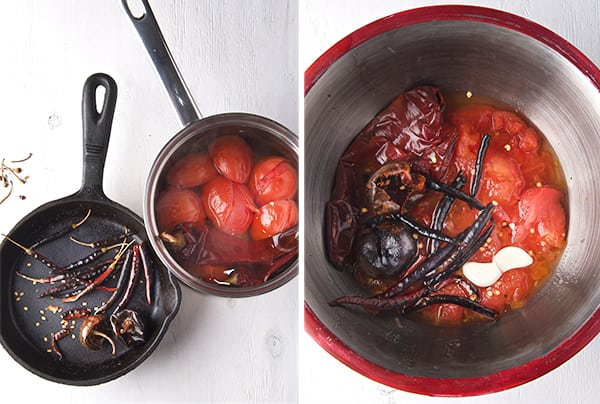
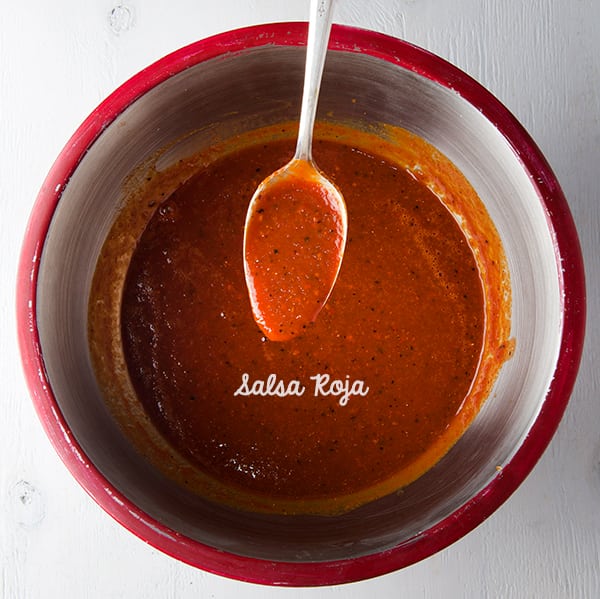
In a medium sauce pan place tomatoes, chiles guajillos,and onion. Cover with water. Cover and simmer until they are cooked, about 8-10 minutes or until a knife easily inserted. Once they are cooked, save 1-1/2 cups of the water in which they cook, toss the rest of the liquid. Remove tomato skins, add the toasted chiles, garlic, salt and blend with one cup of the reserved water until smooth. Taste and adjust water and salt if necessary. See picture for consistency.
1. The Semi-Crunchy Chilaquiles Preparation:
Hands down, my favorite ones!
Serves 4, maybe just 2 hangover creatures…
12 White Corn tortillas
Grape seed oil or Corn oil to pan fry the tortillas about 1/2 cup
(maybe less, maybe more, upon your tortillas.)
1 or 2 eggs per person, sunny side up or over easy.
Preparation:
1.Prepare one recipe of your choice of salsa VERDEor ROJA. (listed above). Set aside.
2.Cut the tortillas into triangles, separate them. Heat up a frying pan add ¾ cup of the oil wait until the oil is starting to ripple, add the tortillas in two batches and pan fry them until evenly golden light brown as possible. Remove from pan and drain them into a pan lined with a paper towel.
3.Start cooking the sunny side up or over easy eggs. Set them aside, on a tray to keep them warm. Do this just before the final step so they don’t get cold.
4.Remove the excess oil from the pan, and leave about 2 tablespoons of oil into the pan. Once the oil is hot, add the salsa VERDE or ROJA and cook for 1-2 minutes, stir constantly until bubbly. Add the tortilla triangles you just panfried and toss into the salsa for 1-2 minutes. Plate them immediately. Top with an Sunny side up egg or over easy egg. Garnish with Crema, Queso Fresco and Onions, and a side of refried beans. Enjoy!
2. Miga-Quiles a.k.a my Grandma’s Chilaquiles
Serves 4, maybe just 2 hangover creatures…
12 White Corn tortillas
Grape seed oil or Corn oil to pan fry the tortillas about 1/2 cup
(maybe less, maybe more, upon your tortillas)
You will need 6 large eggs to scramble into the tortillas
Preparation:
1.Prepare one recipe of your choice of salsa VERDE or ROJA. (listed above). Set aside.
2.Cut the tortillas into squares, separated them. Heat up a frying pan add ¾ cup of the oil wait until the oil is starting to ripple, add the tortillas and pan fry them until evenly golden brown as possible. Remove from pan and drain them into a pan lined with a paper towel.
3.Remove the excess oil from the pan, and leave about 2 tablespoons of oil. Whisk about 5-6 eggs depending on size, add the fried tortillas to the pan and then add the whisked egg, toss quickly. Once the egg start to set add the salsa VERDE or ROJA cook for 1-2 minutes tops!, remove from heat and serve immediately. Garnish with Crema, Queso Fresco and Onions, a side of refried beans. Mmmm…
This Plate of saucy carbs has been known for lifting morning moods, helping the thirsty drunken souls alleviate the hangover. It is easy to make for a lonely ranger or to size it for a Family meal. Any weekend and hazy Sunday morning can be lightened-up with a plate of these great classic Mexican dish.
Make them! I would love your feed back,
Which ones are you favorites?…
Are you a GREEN or a RED soul?
Send a comment below, I want to hear from you!!!
Chilaquiles can be served for Breakfast, or Brunch if topped with sunny side up or over easy eggs. And they can be serve for Lunch or Dinner, change the eggs for shredded rotisserie chicken. A side of refried beans its always a must.
Course
Breakfast, Brunch, Main Course
Cuisine
Mexican
Prep Time15minutes
Cook Time30minutes
Total Time45minutes
Servings4
Ingredients
1lbs.Tomatillos,I used tomatillo milpero, they have the best flavor, if you can't find this kind, choose the smallest tomatillos from the bunch.
1/2smallwhite onion
3-4Serrano chiles,fresh
1smallBunch of Cilantro
1teaspoonSea salt
2-3tablespoonsCorn, or sunflower oil, you can usethe reminder oil you use to fry the tortillas.
1-2eggs per person,sunny side up or over easy
To fry the tortillas
12White corn tortillas
1/2cupGrapeseed oil, sunflower or corn oil,to pan fry the tortillas.
Garnish with:
1/2cupQueso Fresco
1/2cupCrema Mexicana
1/2cupWhite or red onions,diced
Refried beans,its a must!
Instructions
Prepare the salsa verde:
In a small-medium sauce pan place tomatillos, chiles,onion, cilantro, and barely cover with water. Place lid and simmer until they are cooked, about 12-15 minutes. Once they are cooked, remove ¾ of the liquid add salt and blend.
Set aside.
The Semi-Crunchy Chilaquiles Preparation:
1.Prepare one recipe of your choice of salsa VERDE Set aside.
2.Cut the tortillas into triangles, separate them. Heat up a frying pan add ¾ cup of the oil wait until the oil is starting to ripple, add the tortillas in two batches and pan fry them until evenly golden light brown as possible. Remove from pan and drain them into a pan lined with a paper towel.
3.Start cooking the sunny side up or over easy eggs. Set them aside, on a tray to keep them warm. Do this just before the final step so they don’t get cold.
4.Remove the excess oil from the pan, and leave about 2 tablespoons of oil into the pan. Once the oil is hot, add the salsa VERDE and cook for 1-2 minutes, stir constantly until bubbly. Add the tortilla triangles you just panfried and toss into the salsa for 1-2 minutes. Plate them immediately. Top with an Sunny side up egg or over easy egg. Garnish with Crema, Queso Fresco and Onions, and a side of refried beans. Enjoy!
Happy cooking!
Recipe Notes
If you need a tutorial on How to make the best beans you ever had!
Chilaquiles can be served for Breakfast, or Brunch if topped with sunny side up or over easy eggs. And they can be serve for Lunch or Dinner, change the eggs for shredded rotisserie chicken. A side of refried beans its always a must.
Course
Breakfast, Brunch, Main Course
Cuisine
Mexican
Prep Time15minutes
Cook Time30minutes
Total Time45minutes
Servings4
Ingredients
For the Salsa ROJA:
5-6Roma tomatoes, choose the reddest and ripest for best flavor
1/2mediumwhite onion
1largegarlic clove
3drychiles Cascabel toasted,seeds and stems removed.
6-8drychiles de Arbol toasted,stems removed.
2drychiles Guajillo,remove seeds and stem and boil along with the tomatoes.
1teaspoonsea salt
1pinchsugar
1pinchcinnamon
2tablespoonof the reminder oil from were the tortillas were fried.
To fry the tortillas:
12White corn tortillas
1/2 -3/4cupGrapeseed oil, sunflower oil, or corn oil,to pan fry the tortillas
Garnish with:
1/2cupQueso Fresco
1/2cupCrema Mexicana
1/2cupwhite red onions,diced
Refried beans,on the side its a must!
Instructions
Prepare Salsa Roja:
In a medium sauce pan place tomatoes, chiles guajillos,and onion. Cover with water. Cover and simmer until they are cooked, about 8-10 minutes or until a knife easily inserted. Once they are cooked, save 1-1/2 cups of the water in which they cook, toss the rest of the liquid. Remove tomato skins, add the toasted chiles, garlic, salt and blend with one cup of the reserved water until smooth. Taste and adjust water and salt if necessary. See picture for consistency. Set aside.
The Semi-Crunchy Chilaquiles Preparation:
1.Prepare the salsa roja
2.Cut the tortillas into triangles, separate them. Heat up a frying pan add ¾ cup of the oil wait until the oil is starting to ripple, add the tortillas in two batches and pan fry them until evenly golden light brown as possible. Remove from pan and drain them into a pan lined with a paper towel.
3.Start cooking the sunny side up or over easy eggs. Set them aside, on a tray to keep them warm. Do this just before the final step so they don’t get cold.
4.Remove the excess oil from the pan, and leave about 2 tablespoons of oil into the pan. Once the oil is hot, add the salsa ROJA and cook for 1-2 minutes, stir constantly until bubbly. Add the tortilla triangles you just panfried and toss into the salsa for 1-2 minutes. Plate them immediately. Top with an Sunny side up egg or over easy egg. Garnish with Crema, Queso Fresco and Onions, and a side of refried beans.Enjoy!
Happy cooking!
Recipe Notes
If you need a tutorial on How to make the best beans you ever had!
Recipes, Cooking & Art Direction: Mariana Nuño Ruiz McEnroe | Photography: Ian McEnroe |
Published: January 27, 2015
Loong time no see my friends! We apologize for the post delay, we have been dealing with some household chaos. I’ve been out of order for about 10 days, rough times I’ll tell you Back issues can be really painful I heart for people who have chronic pain. Thanks to Ian and his caring I’m feeling much better these days. In the meantime I hope you had time to make all the soup and all those recipes that you wanted to make last year , but you didn’t, because you can’t, but you want to, and you will and today is a good day to start. I hear you…. all this time in bed and I wanted to cook so bad, and I couldn’t. I made an awesome 3 1/2 minute soup that tasted just like it 3 1/2 minutes of big effort and glory! For me it tasted like if it had been simmering for hours. I guess when you are sick you just want some warm comfort. Any way this smoothie made my morning one of these sicky days it just put a smile on my face it felt like I was having a healthy dessert in a glass.
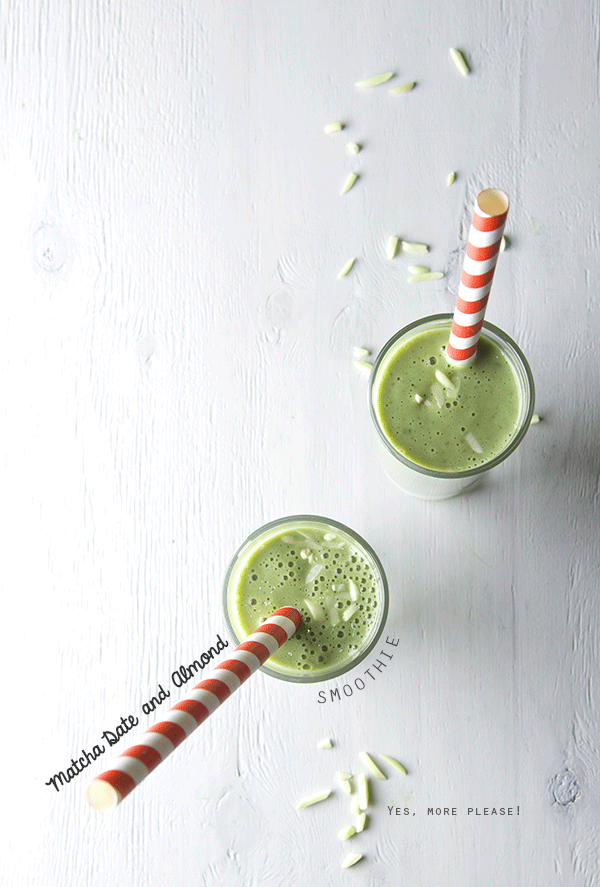
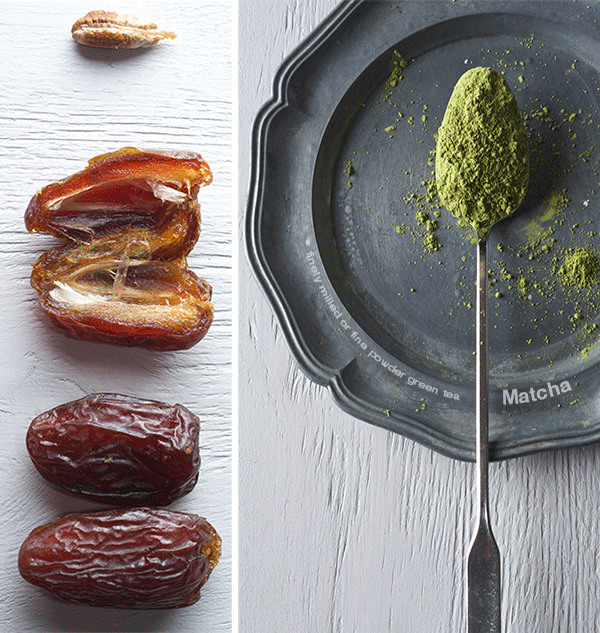
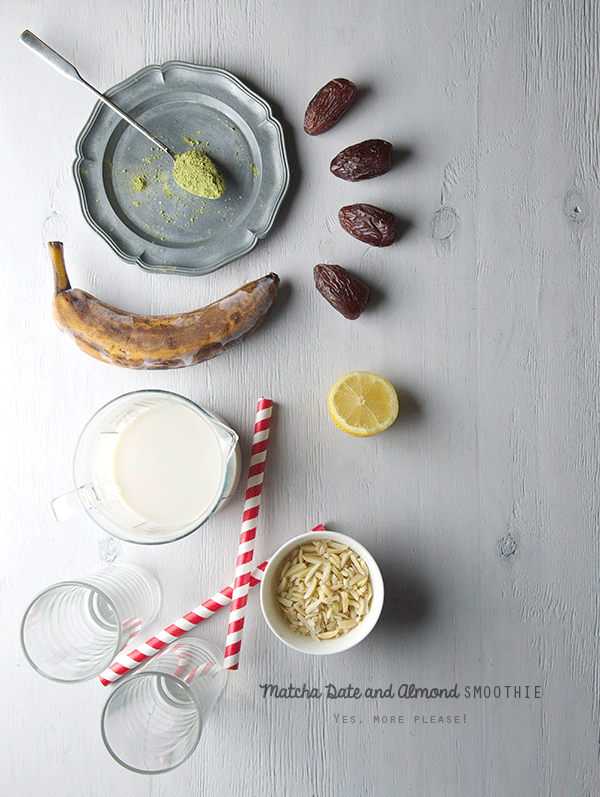
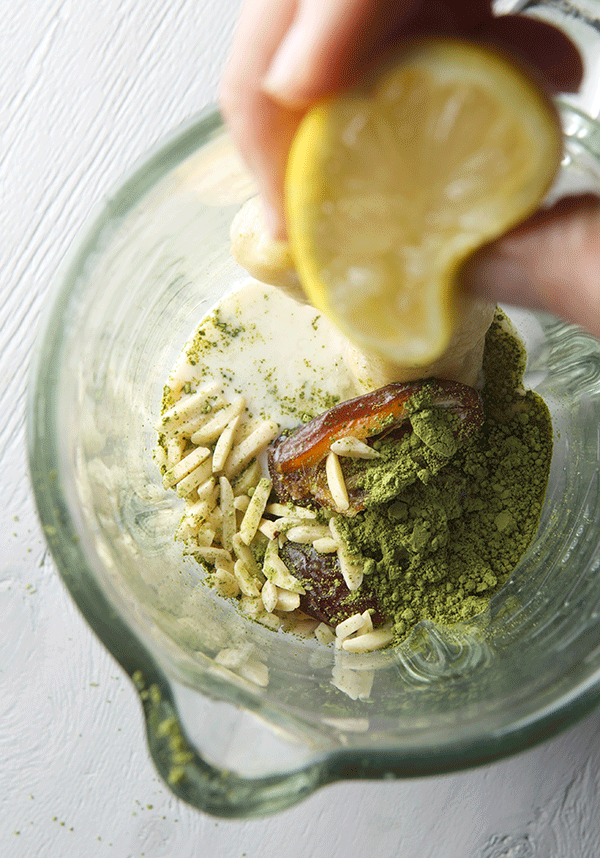
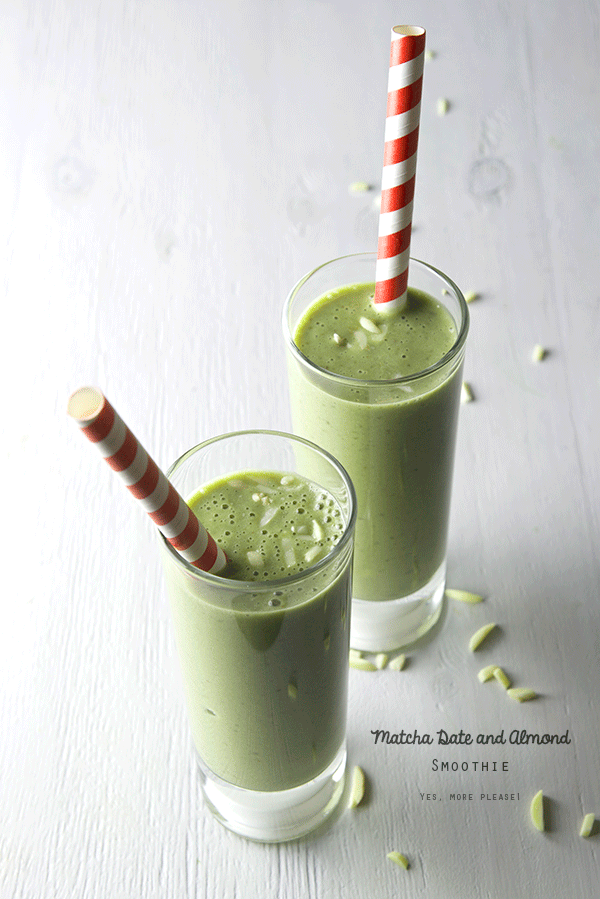
Let me tell you all about this green creamy smoothie. The matcha and dates are a combination made in heaven; the sweet caramel dates play so well with the bright intense green tea flavor. The supporting cast: the almond milk, a couple of tablespoons of almonds and of course for texture and body a frozen banana. A small squeeze of lemon to brighten all those flavors, all goes to the blender….bleeeehhtzzz, blitzzzz, a little more blitzzz blitzzz …then pour it in a chilled glass and add a straw or two if you are willing to share… Enjoy!
Matcha Date and Almond Smoothie
Makes 1 large non-sharable smoothie or two skinny glasses for a little afternoon snack.
1 cup almond milk
1 medium frozen banana peeled.
2 tablespoons slivered almonds
1 1/2 teaspoon matcha green tea powder cooking grade
2-3 medjool dates / remove the pits. Start with 2 dates and from there decide if you want it more sweet, add another date.
1 small squeeze of lemon
4-5 ice cubes
Directions:
Place all ingredients on a blender, bleeeeeeeeehhtzzz.
Pause then pulse Blitzzzz, blitzzzz just to make sure the dates are completely blend in.
Recipes, Cooking & Art Direction: Mariana Nuño Ruiz McEnroe | Photography: Ian McEnroe |
Published: January 16, 2015
Cookies for breakfast? Hell yes! That is the concept behind these cookies, because… YES.
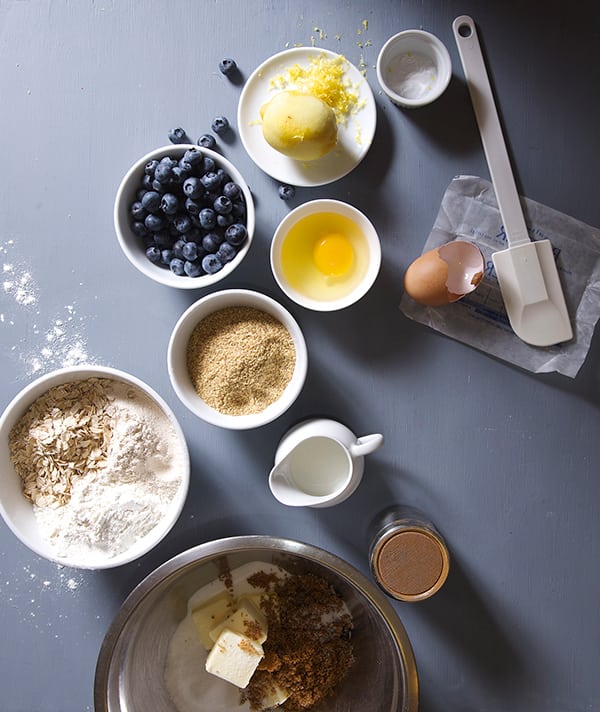
This oatmeal cookie its a little break after all that holiday cooking, prepping, and wrapping. These Blueberry Lemon Oatmeal Breakfast Cookies are just for you to indulge a morning craving, to power up your day.
Why?, because these good-hearted creatures are made with whole grain flour, oats flakes, wheat of germ, fresh blueberries, and a good punch of lemon zest…Something to lift up your morning. Lots of energy, antioxidants, fiber, and all those things that are as important as having a big smile on your face!…right?…
Can you eat this cookie instead of breakfast? Perhaps, but I recommend some protein to go along with them, like a cup of yogurt, nuts, and a cup of coffee or tea. Bake them regular size for breakfast or in a smaller bites for an afternoon snack.
Bake a batch over the weekend and power up your breakfast, whether you are preparing to take a hike, go to the park, or take down the holiday decorations…Please save some time to snuggle under a blanket, or sit on your porch with a good friend and enjoy a cookie and great cup ot tea.
Recipes, Cooking & Art Direction: Mariana Nuño Ruiz McEnroe | Photography: Ian McEnroe |
Published: December 20, 2014
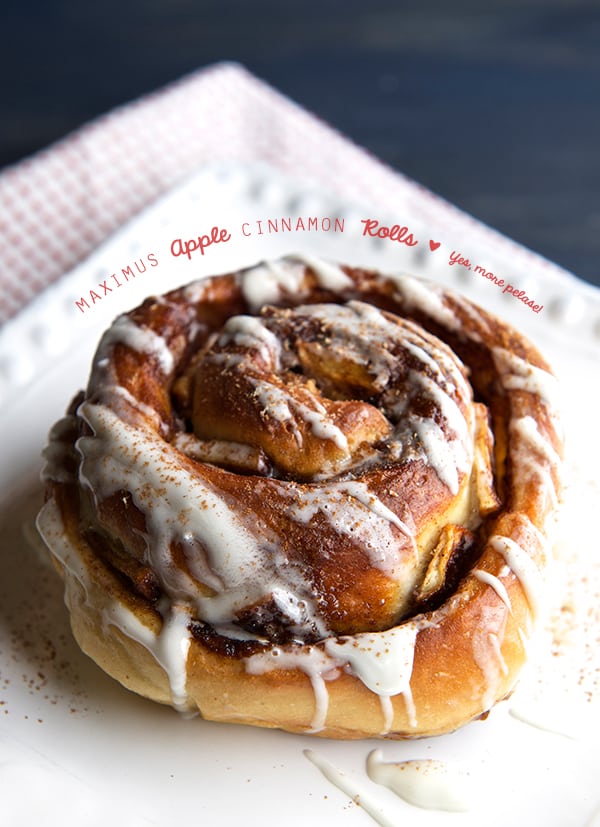
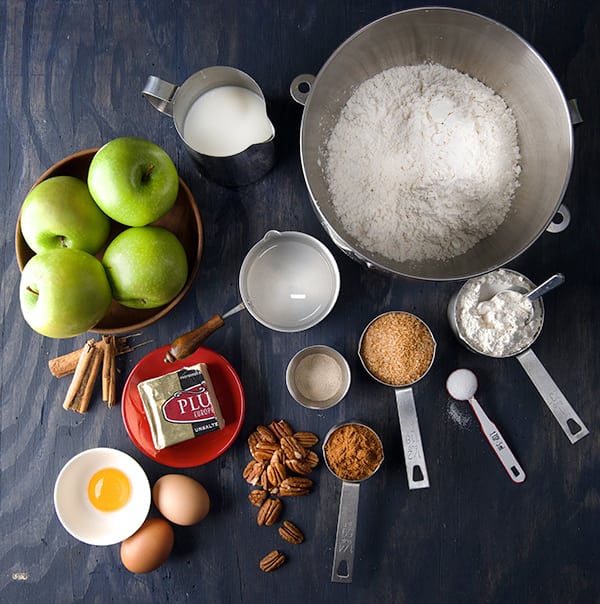
Oh! Sweet Christmas, It is that time of the year where you want to enjoy yourself in the kitchen, to give and to allow the time to go by with no remorse while indulging the guiltless pleasure of a Holiday morning…. Waaahw Wahhw Wahhw Wahhw… Rewind that… you wake up and your children are screaming “Can we open the presents?” Dog barking, Phone ringing, hubby half sleep, you are feeling cranky because you stayed up late making these rolls for breakfast… this is more like it right?, But where is the Christmas spirit?… No worries, it’s coming out of the oven in a few minutes. Make coffee, place the tray of Apple Cinnamon Rolls in the oven to warm up while you open a few presents. Twenty minutes later your house will start to smell like the north pole kitchen. Cinnamon is in the air! Drizzle the glaze, and scream “Breakfast is ready!”
I know this recipe is not the 1,2, 3 mix and done cinnamon rolls. But, why settle for less?, let’s make it AWESOME, It’s Christmas! I promise you it’s all worth it.
One bite of these rolls and you will feel how the world is merry, joyful, and your efforts so worth it when making these rolls. Time to sit, relax and enjoy!
Undoubtedly, these Maximus Apple Cinnamon Rolls with Eggnog glaze will ungrinch-ify the grinchiest Grinch.
Recipes, Cooking & Art Direction: Mariana Nuño Ruiz McEnroe | Photography: Ian McEnroe |
Published: December 6, 2014
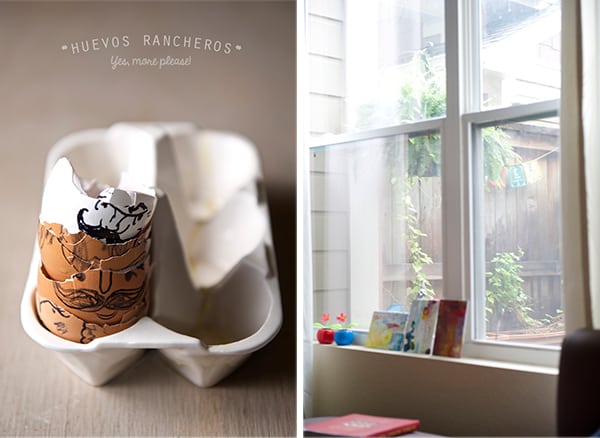
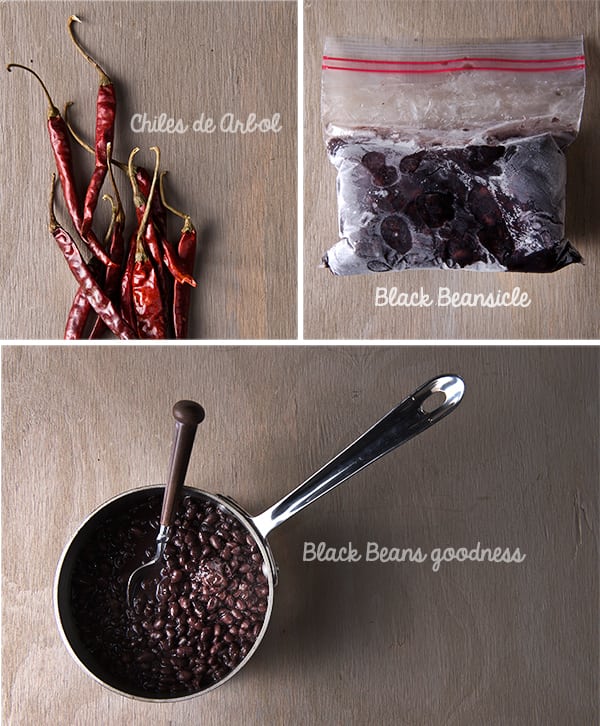
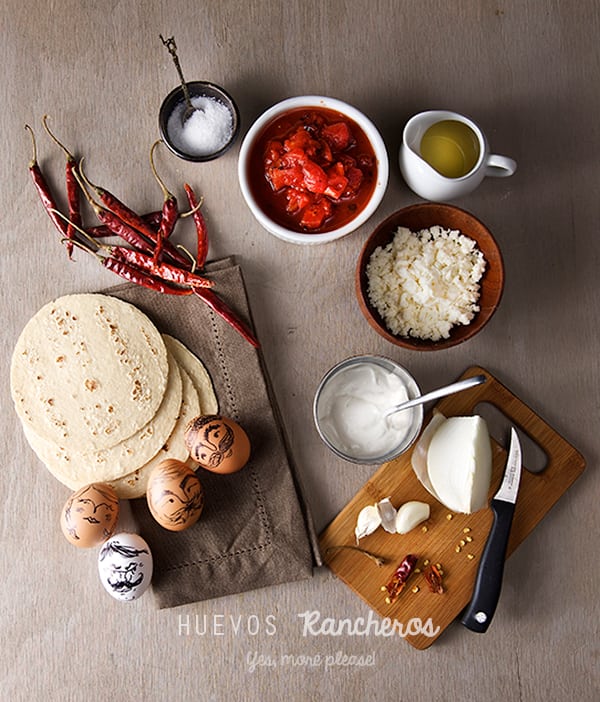
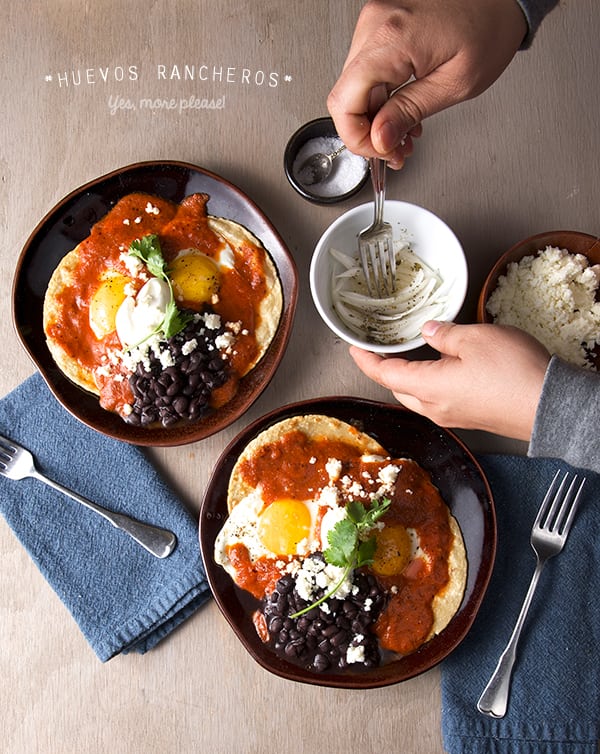
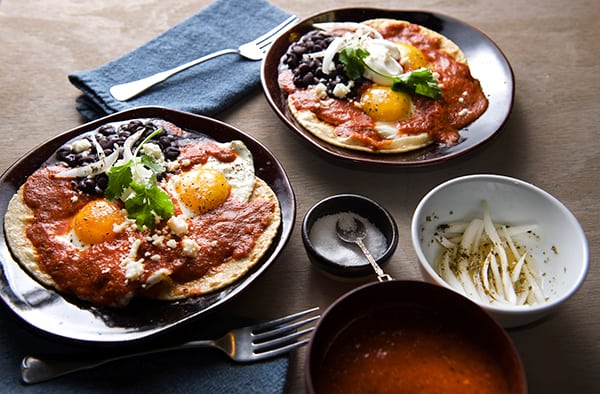
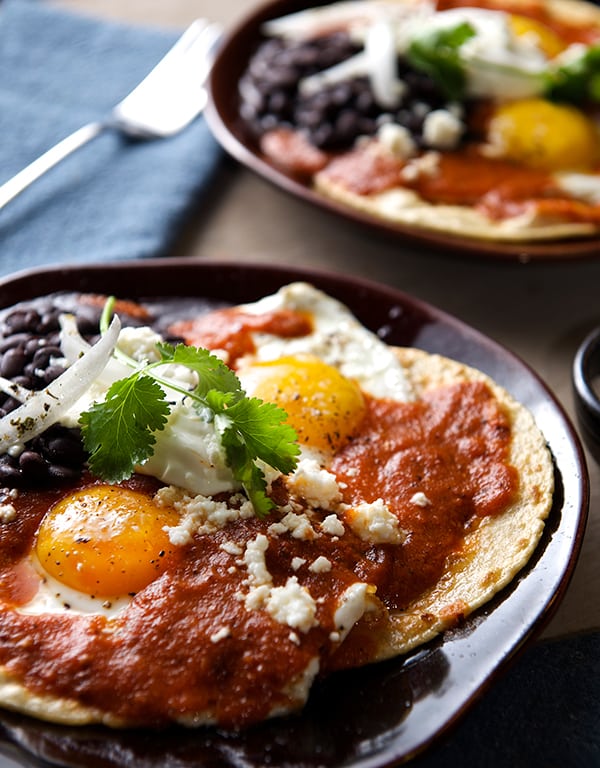
This is the perfect breakfast on a rainy weekend morning. Or a even cold snowy morning, if you live north of Texas. The origin of this dish is unknown to me yet very familiar. It’s a classic everywhere in Mexico. There are dozens of variations with different toppings and seasonings from various regions, families, grandmas, mercados, or restaurants. This is the dish in its purest form. All principles items include fried eggs, dried chiles, tomato sauce, tortillas, and that last onion section that you didn’t quite finish on Thursday. This Mexican one pan wonder is the weekend antidote when you wake up extra hungry and craving a breakfast worth making. Imagine the creamy runniness of a sunny side up egg, smothered with savory spicy warm salsa over soft fried corn tortillas, a side of black beans, crema, and queso fresco. I would wake up to that in a flash!
My Huevos Rancheros version gets a side of black beans which I prepare almost every month by cooking a large batch in a slow cooker. I make little portion bags that I freeze for quick use. It makes my life easier and tastier. Ian calls them “Beansicles”. They are very easy to defrost and use either whole or smashed when ever needed they are there for you. Now, what you need from the pantry is that forgotten can of tomatoes. Please check your refrigerator drawers for a couple of fresh ones if in season. I always have my staple dry chiles in the pantry. Dried chiles are miracle workers. I can make salsa in a flash, or spice up soups or even hot cocoa like this. Fresh chiles? Yes, please! Serranos, jalapeños, chipotles en adobo; for me all variations are delicious as long you follow the ranchero principle: simple sauce + fried egg + corn tortilla + beans = Best Huevos Rancheros. Please no melty cheese in my Rancheros, save it for a quesadilla.
One of my favorite version of Huevos Rancheros Its the one you are about to see, easy enough to prepare them before coffee, and the spicy kick to the sauce will add to your morning wake up.
Huevos Rancheros cures hangovers, rainy mornings, helps you forget weekly stress, and fuels the most ambitious of Caudillos. Its uncomplicated preparation will give you a boost of confidence and culinary accomplishment. The way I prepare them could work for bigger crowds if arranged on a large platter or for a brunch with friends or neighbors. All you have to do is learn how to fry an egg and combine 4 ingredients for a killer salsa. Enjoy!
Huevos Rancheros
Serves 1 Güerito and 1 Mexican
4 Eggs (ranchero faces drawing optional)
4 corn tortillas best kind you kind find.
Corn oil or your frying oil of preference enough to fry the eggs. about 2-3 glugs.
Salt and black pepper to taste
1 cup Black beans whole or fried is up to your preference.
For the Sauce:
1-1/2 cups roasted tomatoes I used roasted canned, if using fresh when in season you will need about 4 Roma tomatoes.
6-8 Chiles de Arbol (For amateurs please start with 3-4 chiles. When this dry chiles get toasted, the flavor profile is a bit smoky and much milder in spice, so do not fear them!)
1 garlic clove
1/8 onion
Salt and black pepper
1/8 onion slivered and rinsed*, 1/2 lime juice, one good pinch of salt, one good pinch Mexican dry oregano, combine everything on a small dish, wait for 10 minutes, serve. * I always like to rinse my onions when they gonna be eaten raw, it smooths away that sharp taste, and you will not have to brush your teeth five times before the flavor on your palate is gone.
Preparation:
1. Start by preparing all your toppings, warm up your beans, make the quick pickled onions, set a side.
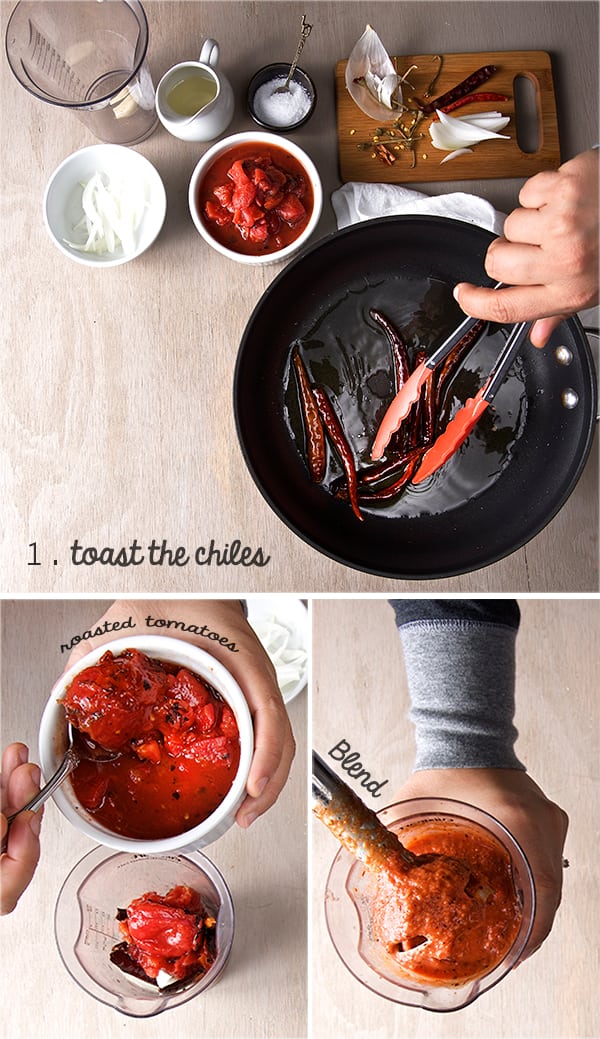
2. Remove the stems of all your dry chiles de arbol. On a medium size frying pan, (good enough o fry some sunny side up eggs) place about two glugs of Corn oil over medium high heat, add the chiles and toast them tossing often, until a deep dark red. Remove the chiles, and add 1/8 of an onion for a quick sauté. Remove the onion, turn of the pan. In a Blender or with the help of an immersion blender Combine the roasted tomatoes, the toasted chiles, one garlic clove, the sautéed onion, 1/2 cup water,salt and a bit of black pepper. Blend until smooth. Set aside.
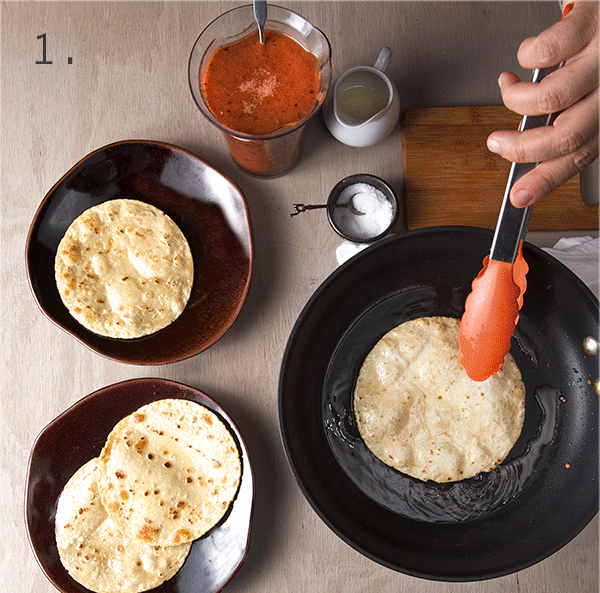
3. Warm up over medium high heat the same pan and oil you use to toast the chiles and onion. There should be plenty of oil to sauté the corn tortillas. If not enough add a bit more oil. Oil must be hot before soft frying the tortillas. Cook the tortillas in the oil one by one both sides. Tortillas should have a toasty color and they should be playable. Place the tortillas as you go into the plates; one tortilla per egg.
4. Using the same pan and oil fry your eggs. I like to fry 2 eggs at the time, so they have lots of room and the temperature of the pan does not drop. I like my eggs with a bit of crunchy edges but soft runny yolks. It’s really up to you, cook them up to your preference. Place the eggs on top of the tortillas one egg per tortilla as you go. Remember that it is important letting the pan and oil to come up to hot temperature in-between egg batches. Like I said, I like sunny side up eggs in this recipe so I do not over cook the yolks. In fact I leave them a little under done, so when I pour the warm sauce over the eggs, it will warm them up and finish the cooking to a perfect creamy runniness. Take this in consideration when your cooking your eggs.
5. Once your eggs are ready, in the same pan with the remaining oil and while it warm add the sauce. (Be careful sauce might get a bit feisty, you might end up with a polka dot pajama!). Lower the heat. Stir and season with salt and pepper. Simmer for 2-3 minutes. Sauce should be rich and at the same time lose enough to cover the eggs. If the sauce is too tick add a bit of water or chicken stock, if to loose keep reducing it.
6. Taste your sauce for seasonings and adjust if needed. Sauce your eggs with plenty of warm sauce. Place leftover sauce in a small bowl and take it to the table for an extra spoon or two.
Serve a couple of tablespoons of black beans on the side, top with queso fresco, crema, cilantro for garnish and the quick pickled onions on the side. Enjoy!
Huevos Rancheros, A great rainy weekend breakfast!
 For me a good plate of Chilaquiles is the one in which the crunchy tortillas preserve some of their crunchy texture and the sauce is thick enough to cover the tortillas without weighing them down. It remains saucy and there is a bit of salsa running on the side of the plate like a little emergency puddle that get mixed into the refried beans to keep them company. The sauce can be red or green usually with a good level of pleasant spiciness, unless you have a hangover, you might ask for extra hot. Chilaquiles are most commonly eaten as a breakfast or brunch. Therefore a perfect sunny side up egg ,runny and tender, is the perfect complement to this dish. Chilaquiles must be garnished with crumbs of slightly salty queso fresco, creamy clumps of Mexican Crema (similar to Creme fraishe) that mellows the warm and spicy sauce. Top this with raw or pickled onions to add acidity and a sharp pungent of flavor every other bite. There you have it.
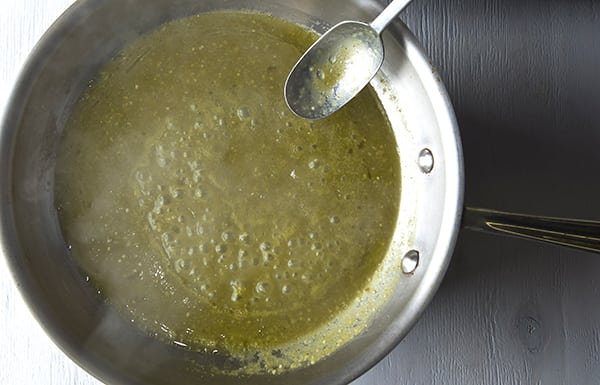


