Breakfast

Gluten free Cornbread Muffins with Poblano Peppers and Smoked Gouda

Corn-Bread-Muffins-with-Poblano-peppers-and-Smoked-Gouda-ready-to-serve-Yes,-more-please!

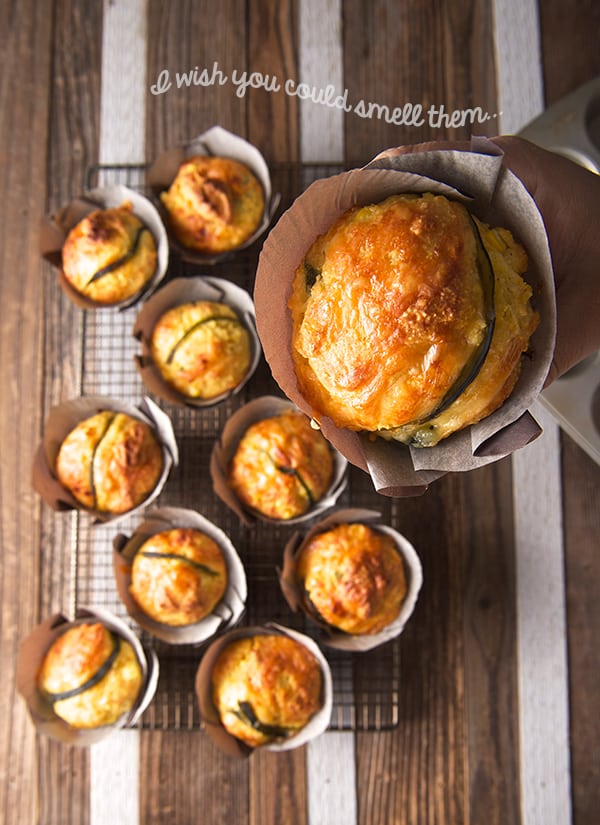
This is the time of the year when quick breads like this fill up the house with warmth and delicious comforting aromas. MAKE THEM, It’s a must.
I have had this recipe for about 25 years …from one of my grandma’s best friends. It is one of the first encounters I had with baking. My modern grandma Ana Fernanda used to make this cornbread; she used some canned goods and different chiles from the north part of Mexico including chile California a bright green chile mild in spice. Also she used Chihuahua style cheese and baked it in a big rectangular dish. By the time this corn bread hit the table it was pretty much gone, absolutely delicious.

I decided to adjust the recipe and replace the canned goods by using fresh ingredients. For me it makes such a big difference in flavor and in texture. I used corn meal instead of corn mix, and interchanged the flour for gluten-free flour mix, which gives them a lighter and fluffier texture. The recipe works great with both types of flour, whether if you are using all-purpose flour, or a gluten-free all-purpose mix.

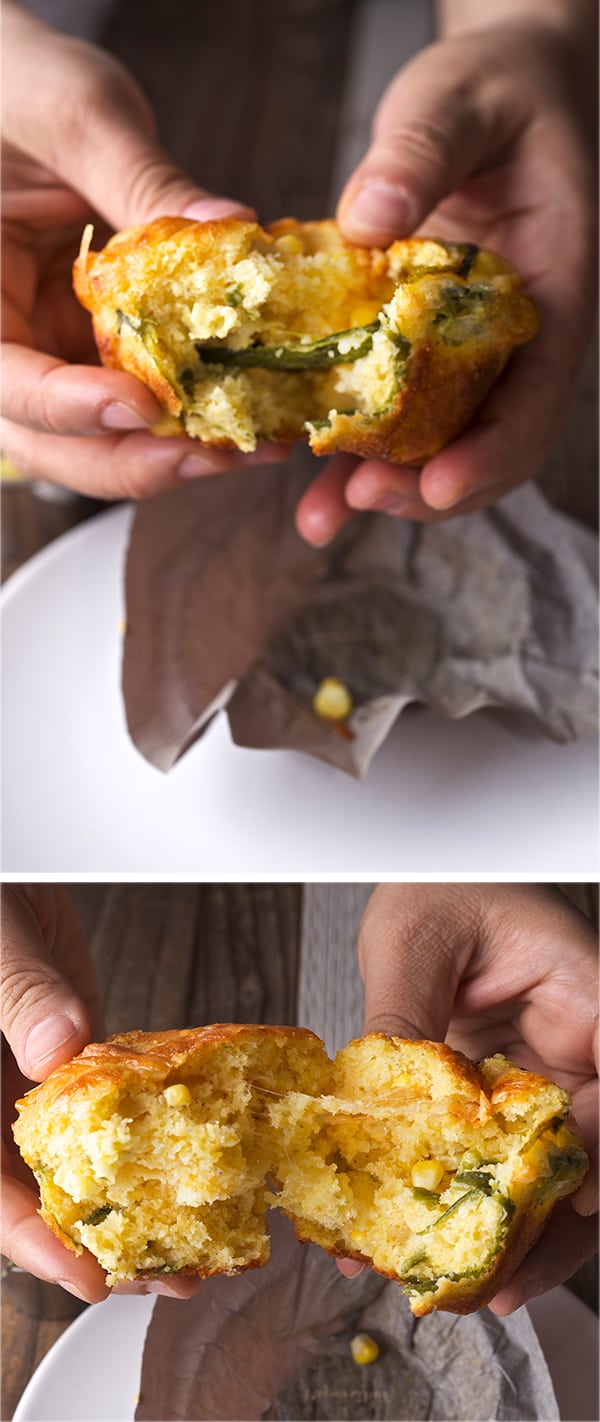
Now, instead of a big rectangular bread, I think to portion them out it’s the ticket! It cuts down the cooking time and each muffin gets an irresistible crusty top. I used Poblano peppers instead of California, Hatch chiles would be also great if you happen to have some frozen ones from this last season. Now, do not worry about the Poblanos, they are mild with just a hint of heat that play really well with the sweet corn. Instead of Chihuahua cheese, since I could not find one of a good quality and flavor, I used Smoked Gouda. Use what you like, perhaps something local, mild with good melting qualities.

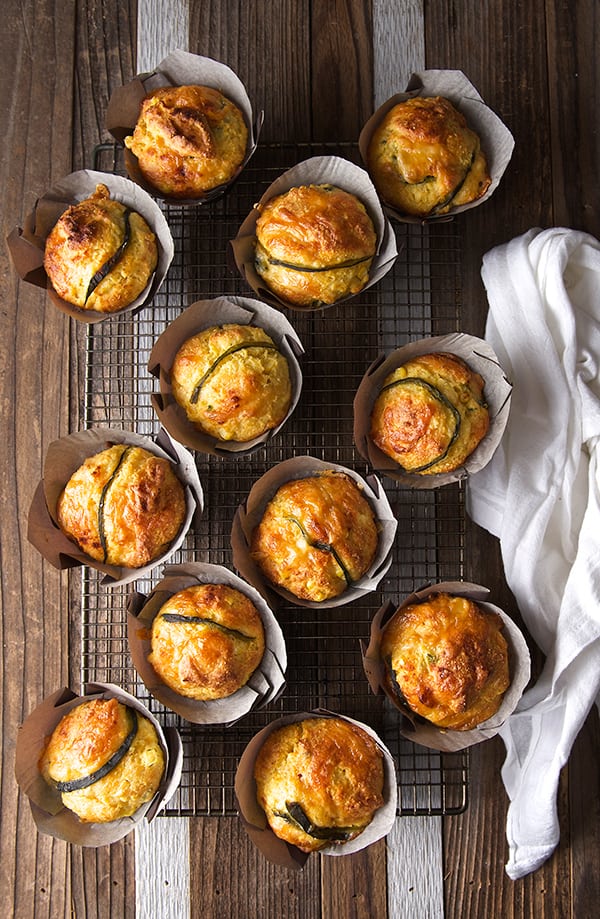
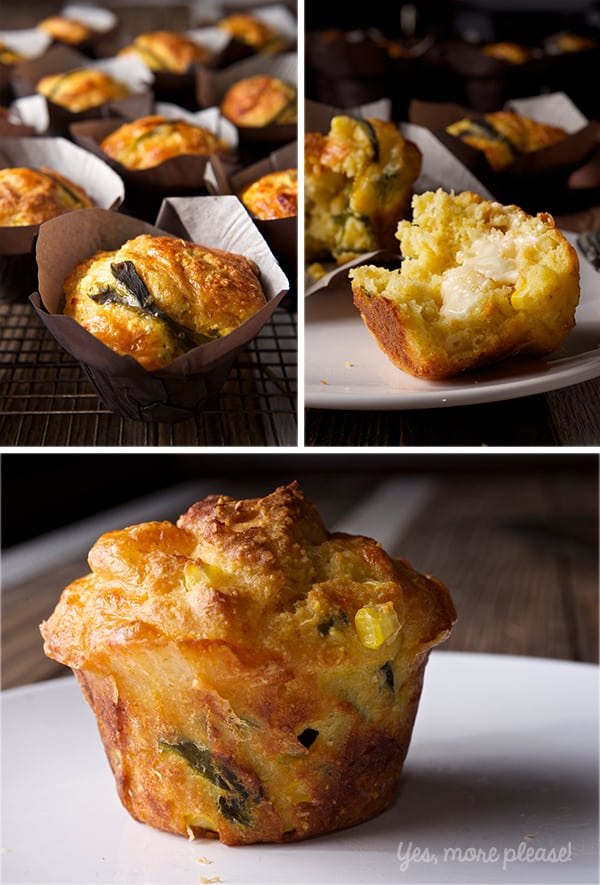
These Cornbread Muffins with Poblano peppers and Smoked Gouda will make everybody happy at the table, including your gluten-free guests, they are moist , fluffy and  flavorful, I assure you this babies can be the hit at your Thanksgiving table or any given baking night!…Or Breakfast…Ian and I split them in half, warmed them on the pan with a dash of butter and topped them with a sunny side up egg…you’ve got to love the leftovers, if there are any…

Enjoy and Happy Thanksgiving!

Corn-Bread-Muffins_ingredients

Gluten free Cornbread Muffins with Poblano Peppers and Smoked Gouda

Makes 12 muffins or one 9×13 rectangular baking dish.

1-1/2 cups organic corn meal flour *
1 cup gluten-free all-purpose flour ** Not gluten-free fan? you can use regular all-purpose flour.
2 teaspoons baking powder***
1 teaspoon plus one pinch kosher salt
4 eggs
½ cup greek yogurt
1-1/2 tablespoons honey
¾ cup corn oil. Grape seed oil, sunflower will work too.
4 tablespoons melted butter
4 small medium fresh ears of sweet corn
1 cup shredded smoked gouda cheese
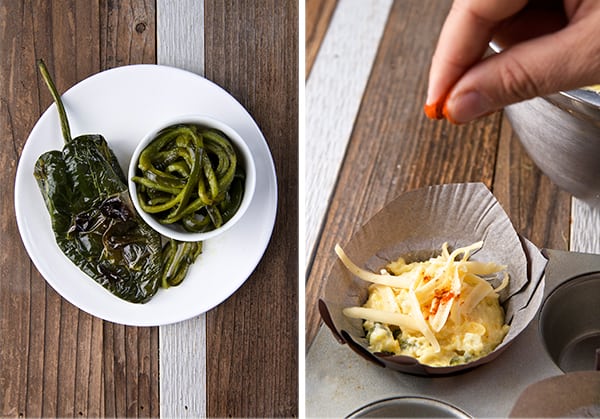
2 Poblano peppers roasted, skinned, de seeded and sliced into strips. Remember to save some strips to top the muffins!
1 pinch smoked paprika

Topping with:

½ cup shredded cheese
12 thin Poblano strips
smoked paprika to sprinkle on top
12 baking liners

*If you are in Austin, Boggy Creek Farm has the best one, Lamb’s stone ground meal, or Bob’s Red Mill for a national brand.
**The brands I prefer for gluten-free all-purpose flour: Cup4Cup, King Arthur all-purpose gluten-free mix.Not a gluten-free fan, you can use regular unbleached all-purpose flour.

*** I always use aluminum free Baking Powder.

Preparation Method:

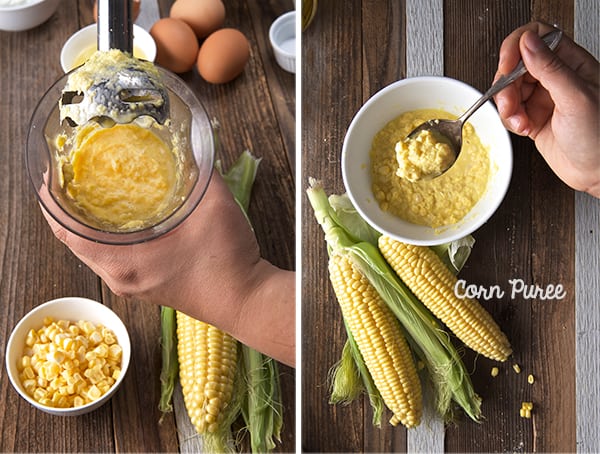
1. De-kernel 3 ears of corn and blend on the food processor or immersion hand blender, until a coarse purée. De-kernel the 4th ear of corn and add the kernels to the purée.

Corn-Bread-Muffins_Corn-puree
2. Preheat your oven at 375F. Line two muffin baking pans with the large muffin liners 6 on each pan alternating spots. (Please: Read bottom note about baking liners and baking times.)
3. In a medium size bowl mix all DRY ingredients, whisk well to incorporate. Add cheese and toss.
4. In another medium size bowl, mix all your WET ingredients, including the corn kernel purée and the poblano strips. Remember to save some poblano strips to top the muffins.

Corn-Bread-Muffins-with-Poblano-Peppers-and-Smoked-Gouda_Mixing-the-batter
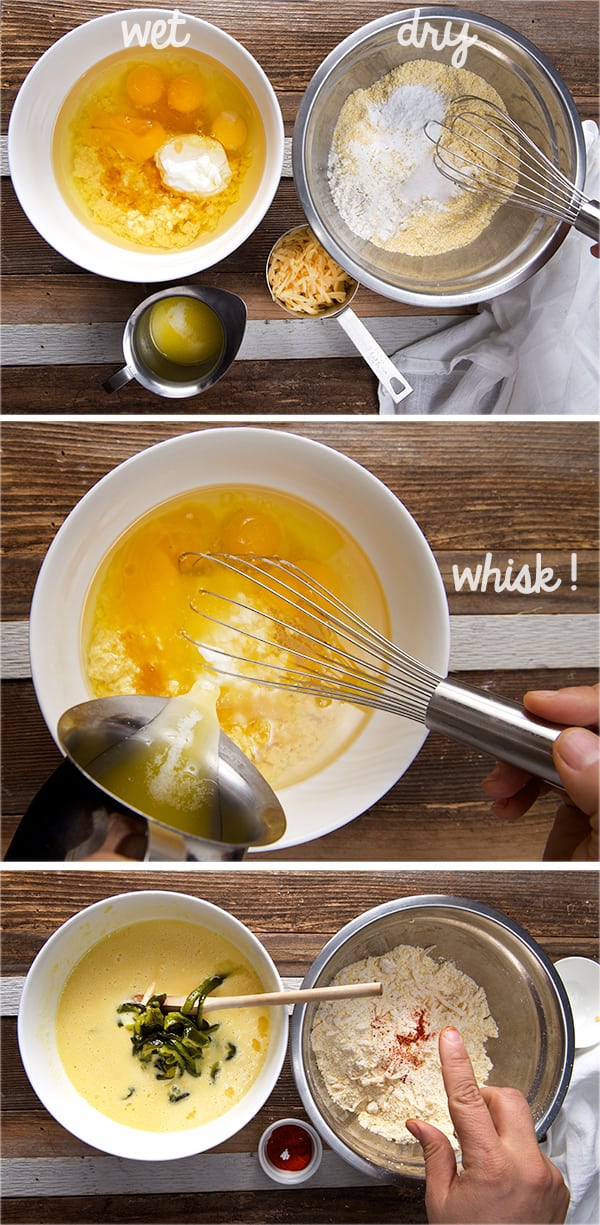
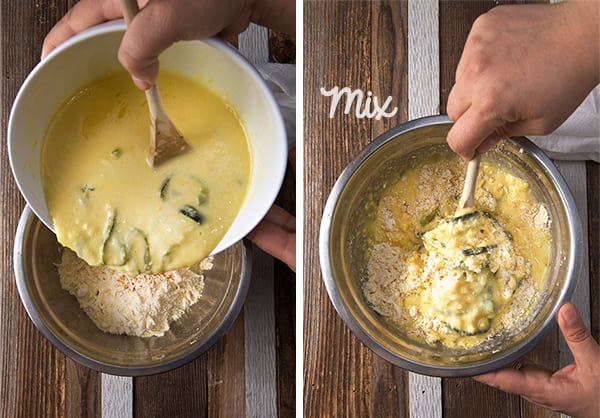
5. Combine wet ingredients into Dry with a wood spatula, until well incorporated, do not over mix.

Corn-Bread-Muffins_Mixing-wet-and-Dry-ingredients
6. Apply a little oil to a standard size Ice cream scooper, and fill each cup with a well-rounded heaping scoop of the batter. If you are using smaller cups use a leveled scoop.

Corn-Bread-Muffins-with-Poblano-Peppers-and-Smoked-Gouda_Scooping-the-muffins
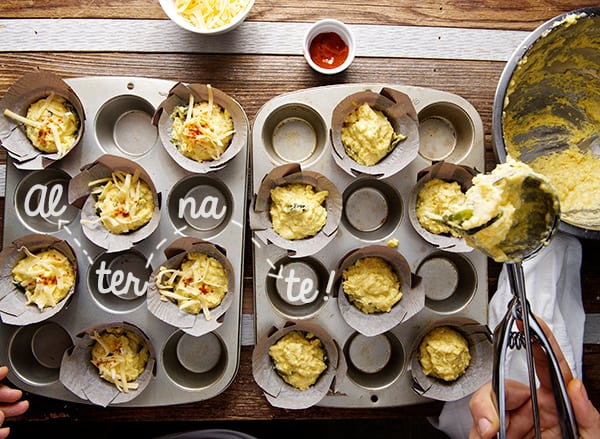
7. Sprinkle a little cheese, a poblano strip and a dash of paprika on each muffin.

Corn-Bread-Muffins-with-Poblano-peppers-and-Smoked-Gouda-cheese_toppings
8. Place them into the oven on the lower third rack and LOWER the temperature to 350F.
9. Bake at 350F for 17-20 minutes until golden brown tops and a toothpick comes out almost clean with a few crumbs. Remove from oven and wait for 1-2 minutes, remove from pan into a baking rack or a basket and take them to the table. Enjoy.

Note:
Baking liners: I used a large paper cups that overlap if you bake them to close. That’s why I alternate them, and I used two trays. I love the medium size muffins and the raised muffin tops. They take about 17-20 minutes to bake.
If you are using regular cupcake liners I would say you might have more than a dozen, since they are smaller, and they will bake faster, perhaps 12-15 minutes. So, watch out and keep an eye on them.
If you are using dark muffin pans you might have to lower down your oven temperature at 325F since the darker pans retain more heat.

Corn-Bread-Muffins-with-Poblano-peppers-and-Smoked-Gouda-Yes,-more-please!Corn-Braead-Muffins-with-Poblano-Peppers-and-Smoked-Gouda_spread-some-butter!_Yes,-more-please!

Corn-Bread-Muffins-with-Poblano-Peppers-and-Smoked-gouda-Cheese_tear-apart

Enjoy!

Music Pairing: Billie Holiday – The very thought of you

View Post or View Comments 20

Betsy’s Scottish Potato Scones

Scottish-Potatoe-Scones_ingredients~Yes,-more-please!

Scottish Potato Scones, or Potato Tatties are simply delicious clouds of light and fluffy potatoes baked in a griddle. They are especially popular in Scotland and the Isle of Man as a breakfast staple.

Ian introduced me to this simply delicious Scottish scones. The recipe has been in his family for a long time. His grandma passed the recipe onto his mother and his mother used to make them when he was a little child. Ian remembers dearly how Betsy used to make this Potato Scones for him and his siblings. Eating them with butter and strawberry jam was a delicious treat!

Based on this childhood memory we were determined to find the recipe and make them…Of course with no luck on our side, we could not find any trace of recipe, so we had to start by scratch. I think I made about 11 batches of these puppies before Ian said” that’s it”, these are the ones, these taste like the ones she used to make!…Hurray!!! I was thrilled that based on a memory of flavor, taste and texture we were able to found the recipe. We felt so happy, that  from now on we will embrace this as our Christmas breakfast.

There are many, many ways to make a Scottish Potato Scone, believe me, we tried every single ratio of potato-flour-butter. Until  Ian said: this it it! they taste just like the one’s Betsy made! (Im sure they are not as good as the ones she made, moms have their special touch, but I will keep practicing!) In this recipe case, they are a little thinner than the average ones, they have soft and light consistency, its like a pillowy thicker potato-flour tortilla, not salty, nor sweet, which makes it the ideal breakfast scone.

To make them as a whole breakfast, we decided to serve them with Ian’s fantastic creamy eggs and smoked salmon. We put a  little twist on one of our favorite breakfast recipes from Gordon Ramsey, he makes this similar creamy eggs and serve them on a toasted croissant topped with smoked salmon. what’s not to like right?… well, wait until you try this scones, I think it is a great and dainty pairing.

What we wanted to achieve with this recipe is to recreate a hearted memory. We both come from small families and sometimes is hard to get together; people are far away, work can distract.  And when it comes this time of the year, there’s always the need to create our own memories and make things that remind us that no matter what, the people we love will always be with us in memory and heart.

Every Christmas we try to make something special to remember Ian’s mother, Betsy, who left us on a Christmas Eve. She absolutely adored Christmas time, she used to find us thrifty quirky funny  presents that will make us laugh or need the un-needable! she also loved decorating and cooking for the family.  Since then, we have been making a special dish, decoration and playing music to commemorate her. We love and miss you Betsy!

This year this is our tribute to her, and we proudly wanted to share the recipe with you.
Merry Christmas!, Happy Holidays!

May this season be filled with love and great memories.
Ian and Mariana

Betsy's-Scottish-Potatoe-Scones_with-strawberry-Jam-~Yes,-more-please!

Betsy’s Scottish Potato Scones

Makes about 16 triangles, serves 4 or 2 Celtic creatures

2 medium size potato (Equivalent to 2 cups when mashed) like Maris Piper, King Edward or Yellow potato.
1 cup all purpose flour + more to dust and roll
4 oz good irish butter I used Kerrygold, or Organic Valley
1/2 teaspoon baking powder
2 healthy kosher salt pinches

Method:

1. Steam the potato, skin it, cut in cubes and with the help of a strainer or a ricer puree the potato into a medium size bowl.
2. Add Butter and mix with your hand until incorporated
3. Add Salt and Flour and mix with a wooden spatula until you feel you need to use your hands in order to get all the flour incorporated to the dough.

Scottish-Potato-Scones_Step-by-step~-Yes,-more-please!

Scottish-Potatoe-Scones_the-dough~Yes,-more-please!
4. In a lightly flour dusted surface, softly Knead the Dough in folded movements for about 2 minutes. Shape it into a ball and divide into 4 equal pieces. Roll each piece about 6” diameter and 1/8-1/4 inch thick disk. With a pizza or ravioli cutter, gently cut the disk into four pieces.

Scottish-Potato-Scones_kneading-the-dough~Yes,-more-please!
4. Warm a cast Iron Griddle using medium-low heat. Oil a paper towel and lightly grease the griddle. Place the 4 triangle Scones and cook them about 3-4 minutes per side. The way to know when to flip them is when they start forming air pockets, watch your heat, they cook better in medium low, some cast iron pans can hold a lot of heat so you might have to adjust for a lower setting during the cooking. Is kind of like Pancakes, The first batch is not so good, and after that everything cooks beautifully!
5. Serve warm.

Scottish-Potato-Scones_on-the-gridle

“Betsy’s scones where soft , light and pillowed, with a bit of chewy like a  flour tortilla”

That’s how Ian describe them.

Scottish-Potato-Scones_texture~Yes,-more-please!

Ian’s Creamy Eggs:

Serves 2

When it comes to eggs it really does makes the difference to use the best quality you can.
Organic free range , thats what we use, Smith & Smith farms, Boggy Creek Farm if you are in Austin this are ones of the best!

4 large Eggs
1-2 Tablespoons butter
A splash ah-roo of heavy cream.
Salt and fresh cracker pepper to taste.

These eggs are really easy to make, but they require all your attention, its all about stirring slowly at all times until they start to curdle. Be sure to start the eggs at last. Once you have your table set up, the scones made, plates warm, smoked salmon in the table, chives ready, coffee on the table. Yes it is this crucial you have everything ready, so you can enjoy the eggs as creamy and warm as possible, since they change their consistency as you eat them. The consistency of these eggs is like a creamy custard with small curdles of egg, soft and tender, they just melt in your mouth. Salt and pepper is added at last to prevent though egg whites.

So, -ready-; set …GO!

Method:

In a small-medium non-stick pot, over a low heat melt 1 tablespoon of butter very gently.
Add the 4 eggs and whisk gently until well incorporated.
With a wood or rubber spatula, start stirring the eggs in circles, at all times.( As if you where gently whisking)
Until they start to curdle, add the second tablespoon of butter keep stirring, remove from heat and add a small splash of the heavy cream ( keep stirring) place them back into the heat, for about 6-8 seconds, and transfer them into a warm ramekin or ceramic dish. Serve immediately Add salt and pepper to taste.

Scottish-Potato-Scones_creamy-eggs~Yes,-more-please!

Serve: Over 2 or 3 scones, a couple of tablespoons of egg and top it with the smoked salmon and chives. Enjoy!

Betsy's-Scottish-Potato-Scones_plating-~-Yes-more,-please

Betsy's_Scottish-Potatoe-Scones_withIan's-Creamy-eggs-~Yes,-more-please!

Betsy's_Scottish-Potatoe-Scones_Creamy-Eggs,-smoked-salmon-and-strawberry-Jam~Yes,-more-please!

Betsy's_Scottish-Potatoe-Scones_with-strawberry-Jam~Yes,-more-please!

Merry Christmas!!!

View Post or View Comments 0

Fennel-Shallot-Bacon & Edam Quiche

Fennel-Shallot-Bacon-&-Edam-Quiche~Yes,-more-please!Fennel-Shallot-Bacon-&-Edam-Quiche_slice-elevation

The open tart, filled with a mixture of beaten eggs, cream, cheese and pieces of bacon or any vegetable combination you can imagine, has been around since the 16th century. Despite the fact that it is a classic French dish, the word and the origins of this delicious open tart comes from Germany; from the region of West Central German dialects spoken in the French Lorraine region. The French word Quiche comes from the borrowed word “Küeche” which means cake in German.

Originally Quiche was made from bread dough but nowadays short crust or puff pastry is the best option. And that is what I’m interested in, the crust.
Short-crust is so easy to make and so much better than your frozen options that it’s almost not fair to consider the purchase of that rolled refrigerated crust from the store. For a fraction of cost and a little time you can have an amazing buttery, flaky, and grateful crust. Little handling the dough and 4 ingredients, this crust once is baked you just can feel grateful and crust proud.

The ratios given in this recipe, come from the most basic short crust principles. Four ingredients:  flour, butter, iced water and salt. You can play with almost any type of flour, in this case I used ½ whole wheat, ½ all-purpose flour. The whole wheat flour brings a very pleasant nutty flavor to the crust and of course fiber…not that it’s of major concern but lets say its better for you than the pure white flour and that’s a plus. You can substitute the butter coconut oil.

For this Quiche, I combined fennel, shallots and bacon. The fennel gives a slightly liquorice and pleasant back taste, shallots accentuate the bacon and, well, what can I say about the bacon? Everybody knows it is a cosmic ingredient. And honestly you don’t need much. A little bacon goes along way.

For me, Fennel-Shallot-Bacon & Edam Quiche works for breakfast, lunch, and dinner, Why not? It fits every meal of the day. Serve warm with a salad, or tomato soup. It taste great at room temperature and out from the refrigerator it still tastes good. Quiche will cure any gray skies, stormy weather blues, or a crummy day. Enjoy!

Fennel-Shallot-Bacon-&-Edam-Quiche_fresh-ingredients

Fennel-Shallot-Bacon & Edam Quiche

Makes 1 round 10″ by 2″ deep Quiche

Toppings:

1 medium size fennel bulb and some of the tops and steams.
1 large shallot
2 garlic cloves finely chopped
3 thick slices of smoked bacon

Egg mixture:

1 cup Edam cheese shredded
5 Large eggs room temperature
½ cup heavy cream
¼ cup milk
salt pepper

For the Crust:

1 cup all-purpose flour + a little more for rolling.
1 cup whole wheat flour
1-2 pinches of sea salt
2 sticks of butter= 1 cup, cold and cut into small squares. (Coconut oil can be used instead of butter, make sure you make little dollops and freeze them before making the crust)
1/4-2/3 cup Iced cold water.

1- 10″ ceramic-oven safe dish or a pay pan

Fennel-Shallot-Bacon-&-Edam-Quiche_crust-ingredients

Directions:

Measure all your ingredients. Place all the dry ingredients in a bowl and mix. Place the bowl in the freezer. Meantime cut your cold butter, and iced water ready to measure. Remove the bowl of dry ingredients from freezer and add the butter. With a pastry blender incorporate the butter and flour until the mixture resembles to a coarse meal, and the butter pieces are small like the size of a pea. Slowly add the cold water and carefully, with your hands, form a dough that just holds together. Be careful not to over work the dough this will give you a flakier crust. 
Once that the dough coarsely holds together, wrap your dough in plastic wrap and shape it into a disk. 
Refrigerate for at least 1 hour; you can rush it by placing into freezer for 20-25 minutes.

Fennel-Shallot-Bacon-&-Edam-Quiche_making-the-crust

Preheat Oven at 400.
In clean work surface, dusted with flour unwrap the dough let sit for a couple of minutes and roll it into a 18-20” round and about 1/4” thick. Once is rolled place it into a Quiche pan and start pushing down the inside edges to make sure the pastry dough takes the shape of the dish.
Let the edges of the pastry up to extend beyond the dish edge. Prick the crust a few times all around and blind bake in the oven for about 16-20 minutes at 400 F/  200 C.

Remove from the oven and let it cool for at least 20 minutes.

Fennel-Shallot-Bacon-&-Edam-Quiche_rolling-the-crust

Prepare your toppings:

Render the bacon pieces until crunchy, save 2 tablespoons of the bacon fat.

Finely cut your fennel I include some of the green tops and stems, shallots, garlic and shred your cheese.

In a Saute pan add the 2 tablespoons of bacon fat and a glug of olive oil, sauté the fennel, shallots,and garlic. Let it come to room temperature.

Mix, the eggs, heavy cream and milk, some salt and pepper.

Fennel-Shallot-Bacon-&-Edam-Quiche_chop-fennel

Fennel-Shallot-Bacon-&-Edam-Quiche_mise-en-place


Start assembling your Quiche:

Spread half of the cheese on the bottom of the crust, add bacon crisps,
spread the sautéed fennel and shallots. Then add the egg mixture, top with the rest of the shredded Edam cheese, top with some freshly cracked pepper.

Place into the 350F/ 180C oven and bake for 20-25 minutes until the top looks golden brown and slightly giggles in the center.

Let it cool on a rack for about 15 minutes until totally set.
Serve warm with a green salad, or tomato soup. Enjoy!

Fennel-Shallot-Bacon-&-Edam-Quiche_assamblingFennel-Shallot-Bacon-&-Edam-Quiche~yes_more_-please-slice!Fennel-Shallot-Bacon-&-Edam-Quiche_slice

View Post or View Comments 8

Cranberry Walnut Bran Muffins

Cranberry Walnut Bran Muffins_so close you can smell it!

These cranberry walnut Bran muffins are a delicious source of fiber and because of its high fiber content and wheat germ they are a great source of folic acid. They deliver approximately 14-15 carbs per muffin and loads of antioxidants from the dry fruit and nuts.
I like these muffins instead of toast for breakfast with some yogurt or fruit.  As a snack they reduce cravings for refined breads or cookies especially in the middle of the afternoon…  They give me plenty of energy and keep me very full from afer lunch until dinner.
The texture is a bit more dense than your regular muffin, but despite all the fiber content the flaxseed acts like a binder and moisten the inside giving it a soft crumb easy to eat and digest. The cinnamon adds the perfect aroma when you bake them the house smells like apple pie (with out the calories).
These muffins are so versatile; you can create any flavor combination so you won’t get bored, there are infinite combinations; like raisins & walnuts, dates& pecans, golden raisins & orange zest, cinnamon & apples, candied ginger and cashews, anchovies & peanut butter….okay, well almost anything… They are so easy and quick to make and to bake that once you have the recipe you can whip a batch of these babies in no time.
I usually bake this muffins once a month,  The recipe it’s so fast to prepare and freeze friendly if 16-18 are to many for you, you can freeze half a batch, and reheat them in the toaster oven.
So fall in love with them and start baking a batch!!!

Cranberry-Walnut-Bran-Muffins_Fiber-never-tasted-so-good!

Cranberry Walnut Bran Muffins_I love them!

Cranberry- Walnut Bran Muffins

Makes 16-18 muffins -Vegan friendly!!!

4 tablespoons ground flaxseeds
3/4 cup water
2 cups wheat bran
1 ½ cups whole wheat flour
½ cup wheat germ
1 pinch of cinnamon
¾ cup brown sugar, firmly packed
2 ½ teaspoons baking soda
1 teaspoon salt
1 cup non-dairy milk (soy, almond, coconut, rice)
1/3 cup canola oil
1 teaspoon vanilla extract
½ cup cranberries
½ cup walnuts

Sprinkle with:

1/2 cup raw sugar cane

Directions:

1.-

Preheat the oven at 400F/200C
Line with cupcake liners or lightly grease muffin tins.
Measure all your ingredients. (it helps a lot when you are baking so you don’t forget any of them! it is worth the step at least the first couple of times you are making them)

Cranberry Walnut Bran Muffins_mise en place

2.-

Whisk the flaxseed and ½ cup of water until foamy.

Cranberry Walnut Bran Muffins_whipping the ground flaxseed

3.-

Combine dry ingredients.(except for the cranberries and walnuts)
Combine wet ingredients until smooth and creamy.
Add together wet and dry until well combined (do not over mix).
Add Cranberries and walnuts fold gently.

Cranberry Walnut Bran Muffins_Dry ingredients and mixing

Cranberry Walnut Bran Muffins_muffin batter and folding the cranberries and nuts

4.-

Scoop into muffin pan, each 2/3 full and sprinkle with some raw sugar cane.
Bake for 12-15 minutes.

Cranberry Walnut Bran Muffins_scooping muffins

Cranberry-Walnut-Bran-Muffins_raw-sugar-sprinkled

5.-

Wash the dishes while they are baking….

Cranberry Walnut Bran Muffins_Wash your dishes while the muffins are in the oven!

6.-

Cool on a rack…

Cranberry Walnut Bran Muffins_muffins on cooling rack

Cranberry Walnut Bran Muffins_spread some vegqan butter

Eat them a little warm with some vegan spread…delicious!


View Post or View Comments 0

Baked eggs in Baguette + Smoked Gouda Sauce – a.k.a “Bagueggs”

Baked eggs in Baguette + Smoked Gouda Sauce - a.k.a “Bageggs”

For Ian and I, Sundays mornings are the best mornings of the week, we wake up with no schedule, we take our time to enjoy our coffee, enjoy the morning listening to music, wearing our pajamas and our biggest plan is: whats for breakfast-brunch?.

We love eggs in any shape, color, form, or cooking method, my favorite eggs are poached or baked in ramekins with cream where you can dip the crusty baguette into the yolk- creamy goodness ah!….Eureka! That’s when it hit me. Why not omit the ramekins, and cook the egg into the baguette? That’s when the “Baguegg” conquest started. We picked up the bread on sunday morning, I cut them into cylinders, remove some of the inners, spread some butter and cream inside, crack the egg and there you have it, the perfect vessel for your egg.

At the beginning I was worried about the crust becoming more like a crouton! But when they come out of the oven they where perfect. The egg and cream add the right moisture inside out so the baguette does not over crunch-iffy. The egg cooks perfectly with runny egg yolk and custardy egg whites. And to top it all off , I made a cheesy sauce with smoked gouda… Talk about indulgence….

We always eat as healthy as we possibly can during the week and save our cravings for Sunday morning. So why not indulge a little?…….After all, it is finally Sunday and life is short so enjoy the ride! Can it be Sunday soon, please?

Baked eggs in Baguette + Smoked Gouda Sauce - a.k.a “Bageggs” ~ Yes, more please!

Baked eggs in Baguette + Smoked Gouda Sauce – A.K.A “Bagueggs”

Serves 4 or 2 hungry brunchers.

1 Baguette Traditional, crusty good, artisanal quality.

4 eggs.

2 tablespoons of heavy cream.

2 tablespoons of butter.

Salt and fresh ground pepper.

For the Cheese Sauce:

1 cup Smoked gouda shredded
1/3 cup of heavy cream
1 teaspoon of butter
1 pinch cajun pepper powder
fresh cracked black pepper to taste (about ½ teaspoon)
pinch of salt.
1/4 cup of whole milk if needed to adjust the thickness of the sauce.

Beer cheese Sauce variation:

1 tablespoon of butter
2 teaspoons flour
1 cup shredded smoked Gouda cheese
1 to 1 1/2 cup Stout beer, Guinness will be best.
1/4 cup heavy cream
1 pinch of cajun pepper powder
fresh cracked black pepper to taste (about ½ teaspoon)
Salt to taste

Method:

Preheat your oven to 400 F/ 200 C

Cut the baguette into 4 pieces around 4”/ 20 cm. long and remove ¾ of the inners being careful to leave some inner bread in the bottom so the egg does not escape. Brush the inside of the baguette pieces with heavy cream and spread with a ½ tablespoon of butter. Place the baguette cylinders standing up on a baking tray lined with some parchment paper. Crack 1 egg inside of each baguette cylinder.

Bake at 400 for the first 5 minutes. Lower the heat 350 and bake for about 8-10 more minutes. Keep in mind that these cooking times work with large eggs at room temperature. You might need to adjust the recipe time, about 5 to 8 more minutes if your eggs were in the refrigerator. Keep an eye on them. The best way to know when the egg is ready, look at the whites on the top of the baguetta, they turn translucent white, and a bit shiny.YOu are looking for a simmilar donnennes of a poached egg or a soft boil egg with a runny yolk. (look at picture below.)

Bagueggs_02Baked eggs in Baguette + Smoked Gouda Sauce - a.k.a “Bageggs” ~ Yes, more please!

Baked eggs in Baguette + Smoked Gouda Sauce - a.k.a “Bageggs” close up ~ Yes, more please!

Prepare the Cheese Sauce:

While the bagueggs are in the oven, prepare the cheese sauce.

In a small saucepan heat the milk, heavy cream, butter and cajun powder until you see small bubbles on the edge of the pan, add the cheese little by little stirring slowly until all cheese is incorporated. bring down the heat to the lowest. Add pepper, salt and pepper , if it is to thick you can add a little bit of milk stir until well combined and creamy velvety consistency.

Variation: Beer cheese Sauce
In a small saucepan over medium heat, melt butter and sprinkle the flour. With a whisk combine the melted butter and flour. Cook until golden brown for about 30-45 seconds. You want to create a light roux. Once the flour slightly changed color to a light golden, lower the heat, and with the help of a whisk, promptly add the beer whisking at all time to avoid any lumps. Whisk until beer and the roux are well incorporated. Add heavy cream, whisk just until combined, let it warm up then add cheese and slowly whisk until melted. Season with a pinch of cayenne pepper, add salt and black pepper to taste. If consistency is too thick add a bit more beer… heehehe
Keep sauce warm on the lowest heat and stir often to avoid a skin on the top of the sauce.

To serve:

Remove tray from oven and using a flat spatula or tongs to transfer them to the plate. Serve each baguegg with a generous 2-3 ladles of the warm cheese sauce. Sprinkle with chives, and a few crancks of black pepper.
On the side, I like to serve them with a fresh slice of tomato and peppery arugula, it refresh and lighten every bite. a small leafy salad of greens dressed with olive oil, lemon, salt and pepper will be delicious too

Baked eggs in Baguette + Smoked Gouda Sauce - a.k.a “Bageggs” how to make the sauce- step by step~ Yes, more please!

Baked eggs in Baguette + Smoked Gouda Sauce - a.k.a “Bageggs” ~ Yes, more please!

Baked eggs in Baguette + Smoked Gouda Sauce - a.k.a “Bageggs” ~ Yes, more please! the ultimate breakfast!

 Enjoy!

Listening to:


View Post or View Comments 7

Blueberry-Orange Buckwheat Pancakes

Blue Berry Orange Buckwheat Pancakes ~ Yes, more please!

 If I have to choose between pancakes and French toast, I will choose French toast, except when it comes to Buckwheat pancakes. Everything changed the day I tried Buckwheat flour. I’m not gluten intolerant, but in the recent years I’ve noticed how much better I feel when I omit processed white flour. This is huge for me because at one point in time I was really committed to baking as a full time career; I even considered opening a business. Life takes you in mysterious ways, and my body did not like to be in a daily contact with a high content of sugars, white flour, or saturated fats. I always think of the analogy of an alcoholic opening a bar or being a bartender… not the best choice right?…So in my research, changing my habits to better quality foods and whole grains, I stumbled upon buckwheat while I was watching an episode of “No Reservations” with Anthony Bourdain. He was visiting Brittany, France (it is a great episode you should look it up).  It featured the beautiful French peninsula surrounded by the English channel, the Celtic Sea, Atlantic Ocean and the Bay of Biscay; lots of amazing scenery. Buckwheat is a staple of this region, pancakes, galettes, and crepes are made with this type of flour. If I remember well, he was served a galette and my mouth just dropped!. So there I was, trying to find Buckwheat flour and not a lot of stores carry it. I found a brand that I still buy and love: Organic and Whole Grain Bob’s Red Mill Organic Buckwheat Flour. For my friends in Mexico it is “Harina de Alforfón or Trigo Negro”( Im sure you can find it in an ecotienda or Mamá Coneja).
Despite the name, buckwheat is not wheat; not a grain but a fruit seed, It is high in Omega-6, protein, fiber, all the B vitamins, Magnasium, Potassium, Rutin and Selenium. It is easy to digest, and GLUTEN FREE!!! So if you have experienced a burst of sleepiness after eating a short stack of regular white flour pancakes, try this recipe. You will feel great and energized after eating them. No bloating, no crawling for the antacid.
Buckwheat flour makes light and fluffy pancakes with a nutty flavor that goes very well with any fruit, maple syrup, or agave nectar.  This recipe is easy. Listed below is the standard recipe followed by the vegan version, with substitutions. I hope you like it as much as I do!

Pancake abstract ~ Yes, more please!

Blueberry-Orange Buckwheat Pancakes

Makes 6-8 4” small pancakes

dry:

1 cup of buckwheat flour
2 teaspoons of Baking powder
2 tablespoons of coconut sugar
1 good pinch of kosher salt

wet:

1 cup of unsweetened coconut cream
1 egg
2 tablespoons of melted coconut oil, melted butter or a mild extra virgin olive oil.
1/2 teaspoon of vanilla extract
The zest of one whole small orange.
The squeezed juice of ½ an orange, save the other half you will need it later!
Little extra butter for the pan. (You can use soy spread if vegan)
For Vegan pancakes: substitute:
1 tablespoon of ground flax seed + 3 tablespoons of water= 1 egg
1 cup of Soy milk or Almond milk will replace the total dairy.
Other variations: Add a pinch of cinnamon and nutmeg instead of the Orange zest.

Method:

1. In a medium size bowl mix all dry ingredients. Next, whisk all wet ingredients. Proceed and mix wet and dry until well combined; small lumps in the batter are ok. THis batter is a bit on the thicker side, If is too tick feel free to add bot of  water, milk or any non-dairy free will work great.
2. In a separate bowl, rinse and dry blueberries. I usually don’t mix them into the batter, I prefer to place them individually so I can distribute them evenly.
3. Cut fresh strawberries and macerate with the juice of the other ½ orange.
4. Have your Ice cream scooper ready!. I’m a free shape pancake maker, never perfectly round!… but I find it helps portion and shape by pouring the batter with a ice cream scooper *(see picture below) , especially with this batter since its a bit thicker than regular pancake batter.
5. Over a medium heat non-stick pan, proceed and start cooking the pancakes. Add a little butter to pan, wait until bubbly and melted. Place one scoop of batter wait 10 seconds and start adding the blueberries. It takes approximately 1-2 minutes per side, when you start to see burst bubbles on the edge of the pancake is ready to flip. Continue to cook until golden brown. Proceed with the rest of the batter.

Note: Because of the darker color nature of the flour, you will have to monitor the heat a little more than normal, and do not worry if they look a little more than golden brown.

Blue Berry Orange Buckwheat Pancakes _step by step ~ Yes, more please!

Blue Berry Orange Buckwheat Pancakes_you are so fluffy!!! ~ Yes, more please!

Warm up your Maple syrup and serve with the macerated strawberries, fresh blueberries and pistachios.

I love the contrast in flavor between cooked and fresh blueberries so don’t hesitate to double up on them! 

 Can you smell the love?

Blue Berry Orange Buckwheat Pancakes ~ Yes, more please!

Sorry, but I have to say that I will never miss

the refined white flour… No More!… Enjoy!

Blue Berry Orange Buckwheat Pancakes_no bites left! ~ Yes, more please! Music Pairing: The essential-Dave Brubeck

Blueberry-Orange Buckwheat Pancakes

Makes 6-8 4” small pancakes
Course Breakfast, Brunch, dinner
Cuisine wholesome
Prep Time 15 minutes
Cook Time 25 minutes
Total Time 40 minutes
Author Mariana McEnroe

Ingredients

dry:

  • 1 cup of buckwheat flour
  • 2 teaspoons of Baking powder
  • 2 tablespoons of coconut sugar
  • 1 good pinch of kosher salt

wet:

  • 1 cup of unsweetened coconut cream
  • 1 egg
  • 2 tablespoons of melted coconut oil melted butter or a mild extra virgin olive oil.
  • 1/2 teaspoon of vanilla extract
  • The zest of one whole small orange.
  • The squeezed juice of ½ an orange save the other half you will need it later!
  • Little extra butter for the pan. You can use soy spread if vegan
  • For Vegan pancakes: substitute:
  • 1 tablespoon of ground flax seed + 3 tablespoons of water= 1 egg
  • 1 cup of Soy milk or Almond milk will replace the total dairy.
  • Other variations: Add a pinch of cinnamon and nutmeg instead of the Orange zest.

Instructions

  1. In a medium size bowl mix all dry ingredients. Next, whisk all wet ingredients. Proceed and mix wet and dry until well combined; small lumps in the batter are ok. This batter is a bit on the thicker side, If is too tick feel free to add a bit of water, milk or any non-dairy free will work great.
  2. In a separate bowl, rinse and dry blueberries. I usually don’t mix them into the batter, I prefer to place them individually so I can distribute them evenly.
  3. Cut fresh strawberries and macerate with the juice of the other ½ orange.
  4. Have your Ice cream scooper ready!. I’m a free shape pancake maker, never perfectly round!… but I find it helps portion and shape by pouring the batter with an ice cream scooper *(see picture below), especially with this batter since its a bit thicker than regular pancake batter.
  5. Over a medium heat non-stick pan, proceed and start cooking the pancakes. Add a little butter to the pan, wait until bubbly and melted. Place one scoop of batter wait 10 seconds and start adding the blueberries. It takes approximately 1-2 minutes per side when you start to see burst bubbles on the edge of the pancake is ready to flip. Continue to cook until golden brown. Proceed with the rest of the batter.
View Post or View Comments 2

Privacy Policy Contact Us Yes, more please!