Recipes, Cooking & Art Direction: Mariana Nuño Ruiz McEnroe | Photography: Ian McEnroe |
Published: January 30, 2014
Because sometimes we need some silly in our lives, and because we must decide what to do with all the bountiful goodness of root vegetables currently in season, I decided to make Root–a-touille a Ratatouille made with root vegetables.
The star of this recipe, believe it or not, is the infamous rutabaga. You can smash, roast, make chips, soup… a rutabaga so many ways…and still not to be a great fan of it. I picked up some rutabagas from the Farmers market from the folks at Johnson’s Backyard Gardens. They have fantastic organic root vegetables. https://www.jbgorganic.com
Rutabaga has a very particular flavor, a cross between a radish and a potato (and some funk ca-baggey smell). This root vegetable is from Sweden and it is the result of crossing a cabbage and a turnip. But if you use this flavor profile in your favor it compliments and harmonize well with other roots. I thought about making a variation of ratatouille, using primarily roots. It was a success! In this particular dish the rutabagas bring the whole root clan together and the funky root smell cooks away. I really believe you are going to like rutabagas after eating them in this way.
Cooking your vegetables in this ratatouille-like style is gonna make you want to eat them more often. I even made my Grandma this recipe and she thought she would not like, and she loved it!… The only objection she had? Too much rosemary. I adjusted the recipe so no worries. I hope you enjoy the recipe. It is a warm and easy to prepare casserole that your whole family will enjoy.
Root-a- touille
Serves 4 or 2 hungry vegetarian for dinner.
1 rutabaga
1 sweet potato
1-2 green zucchini
(I use the light green zucchini or “mexican” zucchini as they call it here in austin)
2-3 small red potatoes
2 tomatoes diced
1 garlic clove
½ yellow onion small diced
1 glug of Extra Virgin Olive Oil.
2-3 tablespoons of melted butter
1 teaspoon Herbs de Provence
1 sprig of thyme and rosemary.
1 glug of Extra Virgin Olive Oil.
Salt and pepper to taste.
3-4 Tablespoons grated Parmesan cheese.
Preparation:
Preheat oven at 400F/200C
1. Using a Mandolin, thinly slice the rutabaga, sweet potato, zucchini, potatoes.
(I love this japanese mandolin is easy and fun to use and clean up in a flash! next time I will make sure I have my gloves on!)
2. Quick saute in Extra Virgin Olive Oil the Onions, garlic, tomatoes, season with salt and pepper a pinch of the herbs de provence, fresh thyme and the sprig of rosemary.
3. Place this tomato saute in a gratin-stone ware or glass baking dish will work to.
4. Start layering the root slices, over the sauteed tomato-onion-garlic. Alternate the colors and different type of roots and zucchini (see photo below) and work all your way around.
5. Brush the top with the melted butter and herbs and sprinkle with the grated Parmesan cheese.
6. Bake for about 25-30 minutes, cover with foil for the first 15 minutes of baking, and remove for the last 10-15 minutes to achive a great gratin crust until golden brown.
7. Serve warm.
You can serve it as a side dish with fish, chicken or a simple soup and crusty bread for a vegetarian meal.Enjoy!
Recipes, Cooking & Art Direction: Mariana Nuño Ruiz McEnroe | Photography: Ian McEnroe |
Published: January 22, 2014
Pozole is a soup usually made with hominy, pork meat, spices and fresh garnishes that create a wonderful one bowl meal warm soup. Let’s say Pozole Is kind of the Mexican Pho. There are a couple of variations upon regions and availability of ingredients, red chiles , green tomatillos and poblanos, or just garlic and onion. There’s even not so traditional versions using chicken or turkey to make the soup a little lighter and healthier; even vegetarian versions using button mushrooms instead of meat, in my opinion all equally delicious in its own way.
Another variation on this dish would be the fresher version also known as ‘Pozolillo’, that uses fresh white corn in the cob kernels like in Michoacan and Guerrero. Which is the version I prepared.
The hominy used in Pozole is freshly made from dry kernels that are transformed into ‘nixtamal’ this process involves soaking the dry corn kernels in water and limestone to burn and cook the skin. It is an intense preparation more commonly used in the South of Mexico, Sinaloa, Jalisco, Michoacan, Guerrero, State of Mexico and Distrito Federal. While in the norther mexican states like Sonora, Monterrey, Chihuahua, the proximity with the border has a not so preferred commodity, hominy on a can which to my taste is hard to equal the good flavor from the freshly made.
Despite the regionalism, Pozole is a classic soup among mexican families, every family has its own recipe and a style; whether is white, red or green, a grandma, sister, mom or aunt who makes it; It is always a great comforting meal that brings family and friends together.
In my family, My Grandma, from my father’s side is my Pozole Guru. She will start to cook the Pozole two days in advance by soaking the dry corn-nixtamal with a bit of lime stone to lose the skins on the kernels, rinse it infinite times and slow cook it for a couple of hours. Grandma Mago used pork shoulder and very meaty pork cuts. Her Pozole was white, meaning she would not add any chiles to tint and flavor the broth, the flavor came from the cosmic union of the extremely well prepared artisanal hominy, tender pork, garlic and onion. Amazing, simply amazing.
On the other side of my family, the Pozole Guru is my Aunt Paloma, she makes the BEST Red Pozole. Absolutely delicious, she uses also pork and red chiles like ancho and guajillo which are very mild chiles that flavor the broth transforming it in this aromatic and savory broth you almost want to use a straw to drink it. Scrumptious.
As you can see I have a mayor task here, So far I’ve cooked both Pozole styles, white and red, I love them equally. And yes, it is the cook hand, what we call “sazon” that makes a dish your dish and the only way to exceed at it is practice, practice and more practice my little grasshopper.
This time I’m attempted to recreate a Pozole Verde or Pozolillo. First time I had this green gem soup was at a friend’s house she was from Michoacan. I inmediatelly fell in love.
This Pozole Verde is made with white corn kernels instead of hominy and uses tomatillo, serrano and poblano peppers to flavor the broth. What is so special about it? the broth in this Pozole Verde It’s light, fragrant, almost has a herbaceous flavor, and the green tomatillo adds a bit of a thickness to the broth without making it heavy to the palette. The corn kernels make this Pozole a great fresh taste, really unique and very achievable if you lack of a mexican Grandma, Aunt or good quality hominy.
In this recipe, I used sweet corn. Why? Well, Ian is more familiar with the corn flavor than with the hominy. Not a lot of people likes hominy and I strongly believe is because what they have tried is from a can. So what you do? What did I do?..I used what I had freshest available. This week I ran into a good corn sale at the market, it was fresh and tasted sweet, juicy and crunchy good enough to make it into a soup.
Now, I know some people will crucify-me about using sweet yellow corn but, I have to say that the variation came out tasting really good.
Do your best with what you have, use what is freshest available to you, if you find white corn this will be my first option, and if you prefer Hominy, I will encourage you to find “Rancho Gordo hominy”.
This Rancho Gordo California farm grows heirloom beans and grains, the quality and flavor resembles a lot of the hominy you can find in Mexico. Sometimes I can find them at Whole foods or Traders Joe’s. If you plan ahead of time, order them on-line. absolutely divine. http://www.ranchogordo.com/index.htm
Last option will be Juanita’s Mexican style hominy. Yes this particular brand has the best texture, and 3 ingredients, water, hominy, lime stone. Making it the best option. If can is the only option you have, this will taste good.
I used chicken one of my favorite chickens from Smith & Smith Farms, I know chicken again!!! well I do not mind when the quality of it is so good In fact, every other weekend I’ve been buying a whole chicken from this farms, there are so good I crave chicken!.. ridiculous I know…
Any how, easy recipe, one pot wonder, it keeps really well, I have not attempted to make this Pozole Verde on a crock pot, I see no reason why not you could use it. Please, if you do, let me know how it goes.
Keep warm and EAT your SOUP, do not lick the bowl, use a straw!.
Pozole Verde a.k.a. Pozolillo
Serves 4 Mexicans 6-8 Green coats.
8 cups /2Lt. chicken stock
3.5-4 lbs. Whole chicken or the meat of a roasted chicken shredded.
6-8 ears of white corn preferable or yellow corn de-kernel
2lbs green tomatillos.
3 poblano peppers remove seeds and deveined.
2-3 serrano peppers
1 large bunch cilantro
½ teaspoon mexican dry oregano
1 medium white onion
1 small head of garlic
2 teaspoons Sea Salt.
1/4 cup Corn, Sunflower or Vegetable oil
14-20 Dry chiles de Arbol- (remove stems, include seeds)
1-2 medium garlic cloves
1 pinch of sea salt.
Toast in Oil about 14-20 dry red chile de arbol, until they have this mahogany dark color, remove from heat, add 2 garlic cloves cut in half and a good pinch of sea salt. Blend all this until a coarse puree. Add a dash of dis paste when ready to eat.The heat in this sauce-paste is mild, due to the toasting of the chiles, it makes it smoky and mild heat.
Preparation:
If you are using the whole chicken:
1. In a large pot add 8 cups of water ½ medium onion, ½ teaspoon oregano, ½ head of garlic ½ bunch of cilantro, 2 bay leaf, 1/2 teaspoon dry thyme, 2 carrots, 1 sprig of celery, 2 teaspoons sea salt. Add the whole chicken, skin on, cut in pieces, for faster cooking. Bring to a slow simmer; with a ladle remove the white foam that forms as it cooks. Cook for about 35-45 minutes. Until chicken is tender.
2. Once the chicken is cooked, Remove the chicken, herbs, onion, garlic, sieve the broth.
3. Let the chicken to cool down until riches a comfortable temperature to remove the skin and shred the chicken meat. Set aside.
If you are using a Roasted Chicken:
1. Remove skin from roasted chicken and shred. Save the chicken carcasses and set aside.
2. In a large pot add 8 cups of chicken stock, ½ onion, ½ teaspoon oregano, ½ head of garlic ½ bunch of cilantro, 1-2 teaspoon salt and the chicken carcasses from the roasted chicken. Bring to a slow simmer; with a ladle remove the white foam that forms as it cooks. Cook for about 20-25 minutes. Until chicken is tender.
3. Once the chicken broth is seasoned and cooked, Remove the chicken carcasses, herbs, onion, garlic. sieve.
4. Remove the tomatillo husk, wash them and cut in halves. Cut poblano peppers in half remove the green veins, and seeds. In a blender add the tomatillos, poblano peppers, the other ½ onion, 3-4 garlic cloves, the other ½ bunch cilantro, salt, 2-3 serrano peppers. Add one serrano at a time and taste in between blending so you can measure how spicy it is. The serranos in this recipe are used to add flavor not spice, they act like black pepper. Add a little of the chicken broth from the pot to help blend all this. Blend until is pureed.
5. On a large deep pot add 1 tablespoon sunflower oil until oil is hot. Add the tomatillo blended sauce to the oil and cook for 5 minutes (careful it will splatter). Now that the sauce is sautéed, add the 8 cups of chicken stock, along with corn kernels. Bring to a slow simmer. Cook for about 25-35 minutes.The broth will change color from emerald green to a bright sage green. At this point taste to adjust for salt. Add your shredded chicken to warm through.
7. Serve piping hot and garnish with shredded lettuce, chopped onions, slices of radishes, squeeze of lime and a dollop of crema. Enjoy!
Recipes, Cooking & Art Direction: Mariana Nuño Ruiz McEnroe | Photography: Ian McEnroe |
Published: January 18, 2014
January brings the roots out. Its a fun time at the farmers market a great variety of root vegetables. What caught my attention this time were the carrots. Great variety of colors, from red, orange, yellow and pale cream color. How can you not get inspired from all this colors? So I bought a bunch of the red carrots including the greens. Carrot greens are really tasty and a great source of vitamin C, potassium, calcium and vitamin K and are also high in protein. Flavor-wise they taste a bit peppery and resemble parsley. They are also a great addition to any salad and you can make pesto or tabbouleh with them… in fact!… that might be the next recipe I will attempt. When you are buying carrots and carrot greens, make sure your source is organic. There is a bit of controversy about eating the tops or the carrot skins and other non-organic vegetables. Know your source and enjoy your carrot greens with no worries.
For me, roasting is one of the best ways to bring out the sweet flavor of the carrots. The skin gets caramelized while inside it remains tender and all the ‘carrotness’ flavor is contained in a little cute pencil shape. Delicious! For the vinaigrette I took the same spices you will use to make hummus and I mix them with some sesame oil, extra virgin olive oil, and lemon juice. This Roasted Carrot Salad with Hummus Vinaigrette Its easy to make, and very comforting. Enjoy!
Roasted Carrot Salad with Hummus Vinaigrette
Serves 2 as main course, 4 as side dish or 1 wabbit feast.
2 bunches of carrots red, orange yellow any kind will work.
½ cup carrot tops washed and leafs cut.
4 cups mustard greens washed and hand cut in pieces
½ small onion cut in slivers
½ cup garbanzos cooked.
For the Vinaigrette:
¼ cup sesame oil
¼ cup extra virgin olive oil
¼ cup apple cider vinegar
1 teaspoon agave nectar or honey
The juice and zest of half a lemon
½ teaspoon smoked paprika
½ teaspoon ground cumin
1 tablespoon toasted sesame seeds
2 tablespoons tahini
2-3 grated garlic cloves
2 good pinches of salt
Freshly ground black pepper to taste
Preparation:
Preheat the oven at 450F/230C
Wash and pad dry your carrots upon size, slice carrots in half or quarters for evenly roast.
In a baking sheet lined with parchment paper place the carrots, onions, garbanzos, drizzle a bit of olive oil and sea salt. Roast them for about 10-15 minutes or until caramelized and fork tender.
Mean time prepare your vinaigrette by simply combining all the vinaigrette ingredients in a small bowl whisk until well combined. Set aside.
Check on your carrots. If they look done they will show golden tones and edges a bit charred and fork tender.
Remove them from the oven and in the same tray toss the mustard greens and half of the vinaigrette, toss and place back in the oven for about 1-2 minutes which will slightly warm up the mustard greens.
Serve immediately and drizzle the rest of the dressing, adjust salt and pepper, squeeze more lemon, sprinkle a few more toasted sesame seeds if desired.
Serve with toasted pita bread and a dollop of yogurt on the side. Enjoy!
Recipes, Cooking & Art Direction: Mariana Nuño Ruiz McEnroe | Photography: Ian McEnroe |
Published: January 14, 2014
Citrus Season is here! I’ve been juicing, zesting, squeezing all the magic citrus kingdom; oranges, blood oranges, lemons, limes, mandarins, clementines, and Ooh the pink grapefruits! I love pink grapefruits. My mouth waters just to think of the plump and juicy semi-sweet segments. The aromatic smell and the pink flesh color; I love everything about this juicy citrus. Grapefruit it’s undoubtedly one of my favorite fruits.
I wanted to make a very simple citrus dessert using pink grapefruits, based on what I was craving. I imagined it to be a creamy and light, but not overly sweet dessert with fresh citrus, loaded floral ,and fragrant notes. Something very light on the palette…What would that be?… Yogurt Panna Cotta with Pink Grapefruit Cardamom and Pistachios.
Panna Cotta is an Italian dessert, which means cooked cream. It sounds fancier that what it is, and is way easier to prepare than what you may think so it can make in a flash. In my recipe I added some cardamom in order to bring some floral notes to the creamy mixture. If you are not to crazy about cardamom you can substitute vanilla bean, lavender or thyme. I wanted to showcase the grapefruit segments, juice, and zest, so I made a light syrup to complement the silky creamy yogurt. For crunch and texture I sprinkled some roasted salted pistachios on top as a final touch.
This Panna Cotta is quite a delicious and dainty dessert. Simple ingredients, about 10-15 minutes of preparation and a few hours in the refrigerator and voilà you have a silky, creamy, aromatic, and light to the palette dessert that will satisfy your citrus cravings. Enjoy!
Yogurt Panna Cotta with Pink Grapefruit Cardamom and Pistachios
Makes 6 – 8 ½ cup ramekins, molds, 3 oz mason jars, or “whatever suits you fancy”
2 cups Greek yogurt (2%fat is what I used)
½ cup milk
½ cup Heavy Cream (you can substitute for milk if you want a lighter version)
½ cup sugar (you can replace with agave or honey)
6-8 green cardamom pods
1 teaspoon ground cardamom seeds
1 teaspoon vanilla extract
1 teaspoon fine grapefruit zest
½ cup grapefruit juice
3 teaspoons powder un-flavored gelatine
2-3 medium large PINK grapefruits will yield about 1 cup to 1-1/4 cup grapefruit juice.
¼ cup shelled roasted salted and chopped pistachios.
For the Light syrup:
½ – ¾ cup grapefruit juice
½ cup water
the zest of one grapefruit, long thin curls*
¼ cup agave nectar or sugar.
3-4 green cardamom pods
The segments of 1 whole grapefruit.
Preparing the Grapefruits:
1. Fine zest one grapefruit Long zest one grapefruit.
If you do not have a zester, here is a good one for the fine zest; and for the long thin curls* I recommend this one like in the photo.
2. Juice one or two grapefruits until you have 1-1/4 cup juice.
3. Reserve ½ cup for the Panna Cotta and the rest for the syrup.
4. Cut the top and the bottom of one grapefruit. Following the curve of the fruit remove all the skin, leaving no skin in the flesh.
5. With a pairing knife working over a bowl to catch the juices slice in between the sections and carefully remove the grapefruit segments. Set them aside. Squeeze the remaining membrane to get all the juices out.
Preparing the Panna Cotta:
1. In a medium sauce pan over medium-low heat, warm the milk, heavy cream, yogurt, sugar, cardamom pods and ground cardamom seeds. Warm up gently until sugar dissolves, and the cardamom seeds release their aroma. About 3-5 minutes. Set a side. Add the fine grapefruit zest to the mixture and stir well.
2. In a little bowl add ½ cup of grapefruit juice and sprinkle the gelatin powder let it bloom. The juice will dissolve all the gelatin granules, absorbing all the juices, it will look like a jelly paste.
This paste will be easier to incorporate to the yogurt mixture.
3. With the help of a spoon, remove the cardamom pods from the yogurt mixture, usually they float to the top so its easy to find them. Add the juice-gelatine paste to the yogurt mixture, making sure there are no lumps.
4. If you are using individual metal molds*, lightly grease them with some vegetable oil before pouring. Pour Panna Cotta mixture all the way to top and refrigerate for at least 2 hours, or until firm but tender and springy to the touch.
*( I love these mini tin plated steel molds. I can use them for baking tarts and because they are metal they chill faster. Or you could use silicon molds like these which will work like a charm! for easy unmolding)
Preparing the Syrup:
In a medium size pot combine the ¾ cup grapefruit juice, ½ cup water, cardamom pods, grapefruit zest, agave nectar or sugar, whisk until well combined. Bring to a slow simmer and reduce by half.
Remove from heat. Set aside. When the syrup is warm to the touch add the grapefruit segments, and refrigerate. Make sure to bring to room temperature your syrup before serving, it taste better this way.
To Serve:
To un-mold the panna cotta dip the metal molds in warm water for about 1-2 minutes (be careful about not to get water into the mold). Proceed to un-mold the Panna Cotta into an individual serving plate, then turn the mold upside down and tap the back of the mold with a spoon, this will help release the panna cotta. Drizzle the Grapefruit syrup and top it with 1 or 2 grapefruit segments, sprinkle the chopped pistachios. Enjoy.
Recipes, Cooking & Art Direction: Mariana Nuño Ruiz McEnroe | Photography: Ian McEnroe |
Published: January 6, 2014
One of the dishes that can be found in almost every culture is chicken soup. Chicken dumplings, Chicken noodle soup, Mexican Caldo de Pollo, Avgolemeno (Greek) , Penicillin (Jewish), Kerala (Indian), French using aromatics and herbs, German creamy chicken and potato soup. You name it, Chicken soup is the queen of soups.
Vietnamese cuisine features one favorite chicken soup, Pho Ga Vietnamese Chicken Noodle Soup . This cosmic broth can bring the use of all your tastebuds at once. There are two styles of this soup; Pho from Hanoi- phở bắc or “Northern Pho” and Saigon Pho-phở Sài Gòn from the south, both have two ingredient variations. Pho Ga (Chicken), Pho Bo (Beef).
Hanoi Pho uses a wider noodle, lots of green onions, vinegar and spicy chilies to garnish the dish. Saigon Pho uses a thinner noodle. The broth has lots of aromatics and slightly sweeter taste. For garnish they use a wide variety of fresh herbs, soy bean sprouts, lime, and chilli “rooster sauce” (Sriracha).
Saigon style is the one I’m more familiar with. I’ve made a little variations on this recipe. Usually Chicken Pho “Pho Ga”is served with a clear broth flavored with charred onion, ginger, and coriander seeds. While the Beef version “Pho Bo” the broth has notes of cinnamon, cardamom, star anise, and of course the flavor of roasted bones intensify the broth.
I added a few more notes to my chicken broth to accent the chicken flavor and give a little more depth of flavor. I hope you enjoy it. I think it is a fantastic dish, light and great for January with its cold weather. This would be a good recipe for a weekend since it requires a couple of hours worth of preparation and cooking. Now with all the big holiday dinner parties and big calorie dishes gone, I’m craving lighter dishes with a punch of flavor and fresh herbs or vegetables, Pho Ga Vietnamese Chicken Noodle Soup is my cosmic route.
Pho Ga Vietnamese Chicken Noodle Soup
~Saigon Style~
Serves 4-vietnamese portions
For the Broth:
1 ½ medium large yellow onion
1-2 fresh ginger arms about 3 inches long (choose the plumper ones.)
1 whole chicken 3.5-4 lbs. (2-2.5 Kg)
2-3 lbs. extra chicken parts like wings, backbones, neck or any other bony chicken parts.
(if you do not have the time or prefer the short route you can buy no-salt or low sodium organic chicken stock, you will need about 32 oz which equals 1 quart jug of stock)
I cook organic chickens which I purchase locally from the good folks of Smith & Smith farms:
smithandsmithfarms.webs.com
4 quarts of water
5-7 star anise (around 30-35 picks)
10-12 cardamom pods
4-6 cloves
1 tablespoon Coriander seeds
2 sticks Saigon cinnamon
½ teaspoon whole black pepper
2 tablespoons turbinado sugar
1/4-1/2 cup fish sauce (I like this kind)
1-1/2 tablespoons sea salt
1 piece of cheese cloth and cotton string or a large tea ball.
For the Bowls:
1 1/2–2 pounds small flat rice noodles (bánh phở), dry or fresh
Cooked chicken, sliced or shredded at room temperature
1/2 yellow onion, sliced paper-thin, rinsed in cold water, soaked for 30 minutes and drained
or 1 shallot thinly sliced.
4 to 6 scallions, thinly chopped include greens
1/3 cup chopped fresh cilantro, leafy tops only
To Garnish:
4 cups soy bean sprouts
10 to 12 sprigs mint
10 to 12 sprigs Thai basil (if is not in season you can use regular)
12 to 15 fresh culantro leaves
2 or 3 Thai, serrano or jalapeño chiles, thinly sliced
2 or 3 limes, cut into wedges
“Rooster sauce”- Sriracha.
Method:
1. Rinse the ginger pieces with the skin on and cut the onions in half leaving the skins on. Place them in a cast iron pan and roast them in the oven at 450F/230C for about 15-20 minutes. Broil them for 2-3 minutes to charred the outside. If you have a gas stove, use direct flame until well charred. Set aside to cool them and peel and remove the ginger and onion skins.
2. Toast your spices, star anise, coriander, cinnamon sticks, cloves, cardamom pods, pepper until they start to release their aromas. Using a piece of cheese cloth, a linen bag or a large tea ball, make a pouch and attach this to the pot making sure the bag is immerse in the water.
3. Rinse chicken inside and out roughly with warm water. Pat it dry. In a large pot add 4 quarts water.
Add your chicken and let it simmer for 15 minutes. Clean and remove the foam that forms on the top constantly until it no longer forms .This will ensure you to have a nice clear broth. At this point add the pouch of spices, the charred onion and ginger, add sugar and fish sauce,
4. If you are using the extra chicken parts, par boil them in a separate pot for about 15 minutes. At this point toss the water, rinse the chicken parts and add them to the main pot along with the whole chicken. Bring to a slow simmer and simmer uncovered for about 25 minutes. Using a ladle remove any extra foam that might form from the chicken broth. Once that the broth is cleared, cover and simmer for at least 15more minutes.
5. Short Alternative: There are a lot of good quality organic chicken broths available at the super markets. If you prefer to use something already made my only suggestion would be to buy organic and no-salt added or low sodium so you can control the amount of salt in your broth If you are using this route , just add the 32oz. jug of chicken broth to the main chicken and water pot. Bring to a slow simmer with the whole chicken, the pouch of spices, the charred onions and ginger. Simmer uncovered for about 25 minutes. Using a ladle remove any extra foam that might form from the chicken broth. Once that the broth is cleared, cover and simmer for at least 15 more minutes.
6. At this point, the chicken is cooked it should feel firm and juicy. Use a pair of tongs to grab the chicken and transfer it to a large bowl. Rinse the chicken with cold water and drain well. Cover and set aside for 15 to 20 minutes until it is cool enough to handle. Meanwhile, keep the broth at a steady simmer.
7. When the chicken is cool enough to handle remove all the breast meat, leg and thighs keep the flesh in big pieces so it does not dry out, cover with plastic wrap, refrigerate. And remember to bring it to room temperature before assembling your noodle bowl.
8. Return carcass and all other attached parts to the stock pot and keeping in it under slow simmer. Cook the broth for at least one more hour. Adjust salt.
9. Strain the broth through a fine mesh sieve, discard the solids. Use a ladle to skim the broth if it has to much extra fat. Usually if you are using an organic chicken the fat content is way lower than chickens that had been in a faster grow diet. That’s why I will 100% recommend you to use an organic chicken which have less fat and stellar flavor! Return the broth to the stock pot and keep it at a slow simmer. At this point you should have about 4qts to 16 cups of broth left.
The broth should look translucent amber color, glistening and a bit saltier to compensate and balance the saltiness when you add the noodles.
10. Slice, chop, rise and dry your herbs and garnishes, place them in little side dishes on the table so everybody can customize their soup.
Assembling the Pho Bowls:
1. For dried noodles: cover them with hot tap water and let soak for 15 to 20 minutes, or until they are pliable and opaque. Drain in a colander.
For fresh rice noodles: untangle them, place in a colander, and rinse briefly under cold running water.
2. Slice or shred the chicken removing the meat from the leg bones, remove the skin. Set aside.
3. Warm your bowls in the oven at a low temperature make sure your bowls are oven safe. This is an extra step, but very important if its cold and you want your soup to stay warm longer when its served. I love my white authentic ceramic pho bowls they keep my soup warm!
4. In a large pot bring enough water to a boil and blanch your noodles. Strain them in a colander. And serve immediately into the bowls. (For best results follow the directions on the package. The key point is to leave them al-dente they will keep cooking in the broth when served.)
5. In a warm bowl place the blanched, strained, noodles, top with slices of chicken, sprinkle some green onions, finely sliced yellow onions or shallots, crack some fresh pepper. Add 2-3 ladles of the simmering hot broth or until the broth covers the noodles. Serve immediately and top with the extra garnishes at the table. Enjoy!!!
Recipes, Cooking & Art Direction: Mariana Nuño Ruiz McEnroe | Photography: Ian McEnroe |
Published: December 24, 2013
Scottish Potato Scones, or Potato Tatties are simply delicious clouds of light and fluffy potatoes baked in a griddle. They are especially popular in Scotland and the Isle of Man as a breakfast staple.
Ian introduced me to this simply delicious Scottish scones. The recipe has been in his family for a long time. His grandma passed the recipe onto his mother and his mother used to make them when he was a little child. Ian remembers dearly how Betsy used to make this Potato Scones for him and his siblings. Eating them with butter and strawberry jam was a delicious treat!
Based on this childhood memory we were determined to find the recipe and make them…Of course with no luck on our side, we could not find any trace of recipe, so we had to start by scratch. I think I made about 11 batches of these puppies before Ian said” that’s it”, these are the ones, these taste like the ones she used to make!…Hurray!!! I was thrilled that based on a memory of flavor, taste and texture we were able to found the recipe. We felt so happy, that from now on we will embrace this as our Christmas breakfast.
There are many, many ways to make a Scottish Potato Scone, believe me, we tried every single ratio of potato-flour-butter. Until Ian said: this it it! they taste just like the one’s Betsy made! (Im sure they are not as good as the ones she made, moms have their special touch, but I will keep practicing!) In this recipe case, they are a little thinner than the average ones, they have soft and light consistency, its like a pillowy thicker potato-flour tortilla, not salty, nor sweet, which makes it the ideal breakfast scone.
To make them as a whole breakfast, we decided to serve them with Ian’s fantastic creamy eggs and smoked salmon. We put a little twist on one of our favorite breakfast recipes from Gordon Ramsey, he makes this similar creamy eggs and serve them on a toasted croissant topped with smoked salmon. what’s not to like right?… well, wait until you try this scones, I think it is a great and dainty pairing.
What we wanted to achieve with this recipe is to recreate a hearted memory. We both come from small families and sometimes is hard to get together; people are far away, work can distract. And when it comes this time of the year, there’s always the need to create our own memories and make things that remind us that no matter what, the people we love will always be with us in memory and heart.
Every Christmas we try to make something special to remember Ian’s mother, Betsy, who left us on a Christmas Eve. She absolutely adored Christmas time, she used to find us thrifty quirky funny presents that will make us laugh or need the un-needable! she also loved decorating and cooking for the family. Since then, we have been making a special dish, decoration and playing music to commemorate her. We love and miss you Betsy!
This year this is our tribute to her, and we proudly wanted to share the recipe with you.
Merry Christmas!, Happy Holidays!
May this season be filled with love and great memories.
Ian and Mariana
Betsy’s Scottish Potato Scones
Makes about 16 triangles, serves 4 or 2 Celtic creatures
2 medium size potato (Equivalent to 2 cups when mashed) like Maris Piper, King Edward or Yellow potato.
1 cup all purpose flour + more to dust and roll
4 oz good irish butter I used Kerrygold, or Organic Valley
1/2 teaspoon baking powder
2 healthy kosher salt pinches
Method:
1. Steam the potato, skin it, cut in cubes and with the help of a strainer or a ricer puree the potato into a medium size bowl.
2. Add Butter and mix with your hand until incorporated
3. Add Salt and Flour and mix with a wooden spatula until you feel you need to use your hands in order to get all the flour incorporated to the dough.
4. In a lightly flour dusted surface, softly Knead the Dough in folded movements for about 2 minutes. Shape it into a ball and divide into 4 equal pieces. Roll each piece about 6” diameter and 1/8-1/4 inch thick disk. With a pizza or ravioli cutter, gently cut the disk into four pieces.
4. Warm a cast Iron Griddle using medium-low heat. Oil a paper towel and lightly grease the griddle. Place the 4 triangle Scones and cook them about 3-4 minutes per side. The way to know when to flip them is when they start forming air pockets, watch your heat, they cook better in medium low, some cast iron pans can hold a lot of heat so you might have to adjust for a lower setting during the cooking. Is kind of like Pancakes, The first batch is not so good, and after that everything cooks beautifully!
5. Serve warm.
“Betsy’s scones where soft , light and pillowed, with a bit of chewy like a flour tortilla”
…That’s how Ian describe them.
Ian’s Creamy Eggs:
Serves 2
When it comes to eggs it really does makes the difference to use the best quality you can.
Organic free range , thats what we use, Smith & Smith farms, Boggy Creek Farm if you are in Austin this are ones of the best!
4 large Eggs
1-2 Tablespoons butter
A splash ah-roo of heavy cream.
Salt and fresh cracker pepper to taste.
These eggs are really easy to make, but they require all your attention, its all about stirring slowly at all times until they start to curdle. Be sure to start the eggs at last. Once you have your table set up, the scones made, plates warm, smoked salmon in the table, chives ready, coffee on the table. Yes it is this crucial you have everything ready, so you can enjoy the eggs as creamy and warm as possible, since they change their consistency as you eat them. The consistency of these eggs is like a creamy custard with small curdles of egg, soft and tender, they just melt in your mouth. Salt and pepper is added at last to prevent though egg whites.
So, -ready-; set …GO!
Method:
In a small-medium non-stick pot, over a low heat melt 1 tablespoon of butter very gently.
Add the 4 eggs and whisk gently until well incorporated.
With a wood or rubber spatula, start stirring the eggs in circles, at all times.( As if you where gently whisking)
Until they start to curdle, add the second tablespoon of butter keep stirring, remove from heat and add a small splash of the heavy cream ( keep stirring) place them back into the heat, for about 6-8 seconds, and transfer them into a warm ramekin or ceramic dish. Serve immediately Add salt and pepper to taste.
Serve: Over 2 or 3 scones, a couple of tablespoons of egg and top it with the smoked salmon and chives. Enjoy!
Recipes, Cooking & Art Direction: Mariana Nuño Ruiz McEnroe | Photography: Ian McEnroe |
Published: December 22, 2013
Here comes Santa! When you bake cookies expect anyone to come around them: kids, gnomes, reindeer, elves, gremlins, dogs, cats, ants, aunts grandpa’s, grandmas, fuzzy teenagers, obnoxious neighbors, you name it! Everybody loves cookies…And since its Christmas lets share some cookie love!
Here is my recipe for Ginger Men. Why whole wheat? I love the nutty flavor that this flour gives to the ginger cookie. Not a fan of whole wheat?… You can substitute white flour but you might have to adjust and add ½ to 1 cup more flour.
I love to make these cookies because the house smells so good and kicks up your Christmas Spirit.
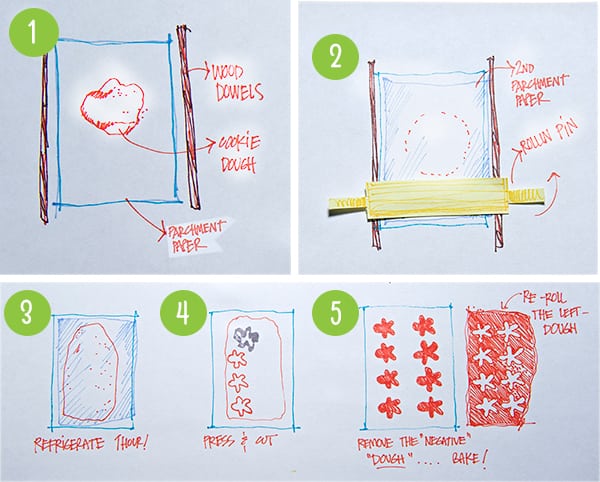
I owe you the photo steps, Ian has had an overload of work and for me, it its a bit hard to shoot with floury hands, so I made some drawings to illustrate a couple of steps. If you have any questions please send me a comment I will guide you.
I’m certain that these cookies are so easy to prepare you’ll have no trouble at all!
Enjoy!
Whole Wheat Ginger Men Cookies
Makes 2-3 dozen depending on the size of your cookie cutter.
4 cups whole wheat flour ( I used King Arthur 100% organic whole wheat flour)
1 teaspoon baking soda
1/2 teaspoon baking powder
1 teaspoon kosher salt
¾ cup Butter
¾ cup organic blackstrap molasses
¾ cup brown sugar
1. In a medium size bowl whisk together flour, salt and baking soda. 2. In a medium-sized pot, over medium heat, melt butter, molasses, brown sugar and all the spices until well combined. Set aside and let the mixture cool down. 3. Once this mixture has cooled down whisk in the eggs one at a time. 4. Add the flour mixture one cup at a time and incorporate with a spatula in folding movements until well combined do not over mix. 5. Divide the dough in two and place each half of the dough into a cookie sheet lined with parchment paper. Flatten as much as you can and shape into a rectangle, and then place a second piece of parchment paper on top. Follow the next steps before chilling.
Now, in my opinion, the best technique to use is from Martha Stewart. No doubt, she is the queen of cookies right? What is this technique about?,basically you roll the dough before chilling, about 1/4”inch between two pieces of parchment paper. It helps using two wood dowels along the sides to ensure an even thickness of the dough slab.
This technique is great, because not only will speed up the process of chilling the dough to about 1 hour, it also leaves you with 2 or 3 cookie dough slabs ready to cut. I love this simple trick, because it saves you the step of having to deal with rolling a cold hard dough. Once you roll the dough in between the parchment papers, just transfer this sandwich into a cookie sheet.These simple step make it so much easy to transport back and forth from the refrigerator or the freezer to chill the dough.
After 1 hour, Remove from fridge and peel the top parchment paper and start pressing your cookie shapes. Remove the negative dough space. This will leave you with a tray ready to bake, no need to deal with misshaped cookies or trying to transfer them as you cut. Its so easy! check this lil drawings it might help…
Preheat your oven to 350 degrees.
Bake for 7-10 minutes. Bigger cookies might need 10-12.
Remove cookies from the oven and let them cool on the sheet for 2 minutes before transferring them to a wire rack to cool completely before icing.
Something to consider: When choosing a cookie cutter try to avoid intricate shapes or in the case of this Ginger man use a Ginger man with an evenly shaped figure so the cookies bake more evenly.
Icing:
1 cup powdered sugar
¼ teaspoon lemon juice
1-1/2 teaspoon meringue powder or dry egg whites.
Mix the powdered sugar and meringue powder together.Add the lemon juice to this mixture and whisk well until slightly pasty. At this point you can divide the icing and add a little food coloring. I like to use natural colorings like this kind.
If the icing is too thin, add more powdered sugar, if it’s too thick add a drop of lemon juice.
Use a piping Bag, or squeeze bottles to decorate.
~ Have fun! ~
Music pairing: Santa Claus is coming to town-Ella Fitzgerald
Recipes, Cooking & Art Direction: Mariana Nuño Ruiz McEnroe | Photography: Ian McEnroe |
Published: December 19, 2013
Quick Fire Recipe, this is a delicious warm drink ; “Atole “it does not have an exact translation, this drink dates from the pre-columbian times. Moctezuma used to drink it sweetened with honey. The best way I can describe it is a warm cozy, slightly sweet and fruity light porridge. The consistency of atole varies anywhere from almost porridge-like to a thin, pourable drink.
It is made with milk, sugar, piloncillo or honey, fresh fruit, cinnamon and a little bit of cornstarch or masa. Other fruit variations can be: strawberries, blackberries, plums, mango, grounded pecans, cocoa powder, or simple vanilla. I love this Guava and Cinnamon Atole, it is warm and the fruit makes this drink simply delicious. I hope you like it as much as I do, Enjoy!
Guava and Cinnamon Atole
Serves 2 cups
2 Cups of Milk (you can use coconut milk, almond, soy, rice it will taste fantastic!)
1/2 cup water
4-6 Guavas fresh (You can use frozen or buy a guava juice concentrate)
2 cinnamon sticks
2 Tablespoons turbinado or raw sugar
2 tablespoons Corn starch disolver in 1/4 cup of cold water.
Preparation:
1. Cut and remove the seeds of the guavas and boil them in a small sauce pan with enough water to cover them, add a stick of cinnamon and cook them until fork tender. pure the guavas.
2. In a medium pot warm the milk, 1/2 cup water, cinnamon stick add the sugar until dissolve.(watch your pot at all times-do not let it boil!)
3.Once that the milk is warm add the guava pure, stir until well incorporated, and add the cornstarch dissolved in cold water little at the time and stirring the milk at all times until it thickens a bit. let it come to a soft simmer.


 One of the dishes that can be found in almost every culture is chicken soup. Chicken dumplings, Chicken noodle soup, Mexican Caldo de Pollo, Avgolemeno (Greek) , Penicillin (Jewish), Kerala (Indian), French using aromatics and herbs, German creamy chicken and potato soup. You name it, Chicken soup is the queen of soups.


