Recipes, Cooking & Art Direction: Mariana Nuño Ruiz McEnroe | Photography: Ian McEnroe |
Published: March 20, 2014
Wicked! Is how I describe this creamy dressing. Avocados the natural butter of the fruit kingdom, and coconut milk make a fantastic duo. Lemon Zest, Lemon juice, salt pepper and herbs is all you need.
You have to try this dressing, forget about that white stuff you have been dumping on your salads and make this spectacular dressing on a blink of an eye!
I used this avocado-coconut dressing over a Boston Lettuce, thats what I found on my farmers market incredible fresh and so beautiful that I could not resist to bring it home with me. I’ve included step by step photos of a 4 step easy method to leaf and separate with out bruising this gorgeous and delicate Boston lettuce, I really believe you gonna find this method a keeper for your vegetable techniques.
Avococo dressing drizzle liberally, over lettuce, carrots, fish chicken, your hiking boots, it’s delicious everywhere!…Celebrate and be green green green Spring time is here!
Avococo Salad Dressing
Makes about 2-2.5 cups of dressing, it stays good for about 4 days, avoid plastic, save it in a glass jar with an air tight lid.
1 medium size ripe avocado
1 to 1-1/2 cup coconut milk (depending on avocado size and preferred consistency)
4 tablespoons good extra virgin olive oil.
2 tablespoons rice vinegar
the juice and zest of a lemon
1 teaspoon agave nectar
1 garlic clove
6-8 sprigs of parsley, basil, or cilantro. (use only the leaves)
1 teaspoon dry dill
1 teaspoon sea salt
1/2 teaspoon of fresh black pepper.
Preparation:
Place all ingredients on a blender or on a glass of an immersion blender, puree until smooth and desired thickness. If needed, adjust thickness by adding a bit more coconut milk.
Keep it on a glass jar with an air tight lid, it will keep for about 4 -5 days.
How to wash and de-leaf a Boston lettuce?…
Wash:
Holding the head of lettuce upside down, submerge the lettuce into a big bowl with iced water and shake a few times. Leave the lettuce floating for a few minutes to allow the little dirt particles to sink to the bottom. Remove from water, shake several times, and live it air dry upside down over a clean kitchen towel. Shake 2- 3 more times to make sure all water is out. Then proceed to de-leaft.
De- leaf the lettuce:
1. Run a pairing knife around the back of the stem.
2. Gently pull the core of the stem.
3. Hold the head of lettuce in your hands and place your thumbs in the center, gently pull apart.
4. With a small lettuce, like this one, half will make a great portion, if bigger, arrange and divide leaves in 4 portions.
Recipes, Cooking & Art Direction: Mariana Nuño Ruiz McEnroe | Photography: Ian McEnroe |
Published: March 15, 2014
I think I have a new bread love; Irish Soda Bread, the traditional kind. I remember trying some version of sweet Irish Bread with raisins and caraway seeds but honestly it was not remarkable at all.
So I did my research and gave myself some time to bake a couple of loaves. I experimented with different types of flour, combining them and using different ratios, like buckwheat flour, rye, whole wheat, oatmeal and regular all-purpose flour. Some of the recipes I used called for egg, and butter others called for oil an buttermilk, some sugar and toppings, like currants, rains caraway seeds…Oh my! There are many varieties.
What I learned by making all these recipes and by reading the origin of the bread is that less is more.
The loaves kept becoming denser and denser as I played with the egg- butter and butter milk ratios and were not great in flavor. So I decided to start eliminating ingredients and get a bit closer to the more traditional 4 ingredient loaves. The last loaf I made using whole wheat flour, oatmeal flour and Guinness beer was spot on, supremo! This is the recipe I’m sharing with you today.
This bread is one of the easiest and quickest breads you can make. No need of proofing time, no kneading and the result is a tender crumbly bread that resembles a light biscuit. The bread bakes in about 40-45 minutes, so in less than an hour you have freshly made bread! How’s that? What is not to like about this bread, after knowing all this good attributes?!
I will recommend this bread to be a side for soup, great for breakfast with some butter and jam. And of course it goes well with some cheese and beer. I made a compound butter with garlic and scallion that goes perfect if you are just having a simple beer snack or accompaniment for a more robust dinner.
Enjoy!
Irish Stout Soda Bread
Makes 1 – 8″ round loaf
1- ½ cups whole wheat flour (I used unbleached white whole wheat flour King Arthur’s)
1-½ cups oatmeal flour (I used Bob’s red mill)
1 teaspoon Baking Soda
¾ teaspoon salt
¾ cup buttermilk or ¾ cup milk +1 teaspoon of apple cider vinegar
¾ cup dark stout Guinness
Preparation:
1. Preheat the oven at 375 F/ 190 C and place the oven rack in the first third of the oven.
2. Combine all the dry ingredients in a medium bowl, make a well in the center.
3. In the center of the well, add the butter milk and the stout.
4. With a wooden spatula, combine all the ingredients until you have a rough dough.
5. Turn the dough onto a lightly floured surface and shape it into a ball. No kneading required.
6. Bake on a pizza stone a cast iron pan or a baking sheet; place the ball in the center and with a sharp knife make a cross in the center
7. Bake for 35-40 minutes. Checking for doneness: the bottom of the bread looks golden brown heavy crusted and it should sounds hollow when tapping the bread. Place on a cooling rack. wait at least 25 minutes to cut. Enjoy!
Compound Scallion, garlic and Parsley Butter:
1 stick of butter (room temperature)
3 scallions including the green parts chopped
1 tablespoon of parsley chopped
1 garlic cloves grated
1-2 good pinches of sea salt
Preparation:
1. In a food processor combine all the ingredients and pulse 4-5 times until well combined, and the butter looks a little green.
2. cut a piece of parchment paper or plastic wrap and make a butter cylinder, tighten the edges by twisting them opposite ways.
3. Refrigerate until it holds its shape or live it room temperature to use as creamy bread spread.
Recipes, Cooking & Art Direction: Mariana Nuño Ruiz McEnroe | Photography: Ian McEnroe |
Published: March 11, 2014
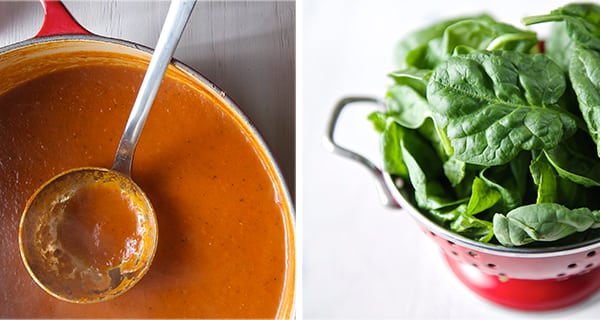
Is it Spring time yet?!!!…Well the thermometer is still going up and down like mad in Austin. And since yesterday was on the chilly side, I was craving tomato soup. I know I have to wait at least one more season to get great tomatoes at the farmers market. In the meantime what do you do when it seems only greens are in season?
So I had to improvise. I had two routes:
1. Try buy the best tomatoes I could find at the supermarket, roast them and enhance them…the problem with this solution, (even if it sounds the most viable route) is when you are truly committed to getting fresh organic produce you go to the supermarket and often the tomatoes look good but since your can’t sample them you get a lot of variation in flavor and sweetness. In my experience and in my opinion they often look better than they taste when out of season.
2. The short easy route: to buy a can of roasted organic tomatoes…
Well, sometimes you just have to use a salvation can when tomatoes are not in season and your frozen tomatoes are gone! If I know something for sure it is that I will learn how to can tomatoes for this coming season… fortunately there are plenty of options in canned tomatoes: from organic, no salt added, and no preservatives, (and in the case of Muir Glen, among others, no BPA’s if that concerns you , check this product list) I find these canned options to have a more consistent quality if I can’t get them in season.
So I bought a can of tomatoes to satisfy my tomato soup craving. And here’s where I put my twist on things. I enhanced it with some dried herbs,sun-dried tomatoes, and aromatics. The result was scrumptious. It was good ‘ol tomato soup to warm us up on these strange cold March days. I added dried basil, a pinch of thyme, garlic, shallots and sun-dried tomatoes, plus a little Balsamic vinegar to balance the soup’s sweetness. I also added some sautéed spinach and mozzarella Ciliegine (cherry size mozzarella balls) as toppings before broiling in the oven. It turned out amazingly good. It reminded me of a caprese salad in soup form!.. I hope you like it as much as we did! And stay warm!
Caprese Tomato Spinach Soup
Serves 4
1 can (28 0z.) Organic Fire Roasted Tomatoes (I usedMuir Glen organic) this is a must! the fire roasted tomatoes give all the flavor to the soup.
3-4 cups water or vegetable stock …start with 3, then add more to desired consistency.
2-3 glugs extra virgin olive oil
5-7 Sun dried tomatoes, chopped.
2 small shallots finely chopped
1 medium garlic clove thinly sliced
½ teaspoon dry basil
1 good pinch dry thyme
1 large bay leaf
½ teaspoon celery salt
1-1/2 teaspoons sea salt
½ teaspoon freshly ground black pepper
2 teaspoons balsamic vinegar
Toppings:
6-8 hand fulls of spinach
1 shallot
Extra virgin olive oil to saute
Salt and black pepper to taste.
Fresh Mozzarella Ciliegine (if you can not find the Ciliegine, you can cut the mozzarella into small cubes)
Preparation:
1. In a medium soup pot over medium heat, warm up the extra virgin olive oil. Add in the chopped shallots, garlic, sun dried tomatoes, bay leaf saute for 3-4 minutes. 2. Add the dry basil, thyme salt and black pepper, saute for another minute. 3. Add the can of crushed fire roasted tomatoes, and cook for 2-3 minutes on medium. 4. Add the water, stir until well incorporated, cover with a lid and reduce the heat to low, simmer for 6-8 minutes. With animmersion blender puree the soup. ( I love this gadget in the kitchen, it is so practical and easy to puree your soup on the same pot!)
5. Once its pureed, add the Balsamic vinegar, taste, adjust salt and pepper if necessary. Bring to slow simmer, turn off the heat, cover with a lid and keep it warm. 6. Quick Saute the spinach in a skillet over medium -high heat, heat up some olive oil, add shallots, garlic and saute for 15 seconds then add the spinach and toss until they are partially wilted, and coated with the hot oil, add salt and pepper. Set a side.
7. Using oven friendly soup bowls, scoop 2-3 ladles of tomato soup, add some of the sauteed spinach and top with the mozzarella buccatinis. 8. Place bowls onto a baking sheet and broil the soups for about 4-5 minutes, or until cheese is melted and slightly crust. Be careful to watch them so they don’t burn.
9. Serve with some toasted ciabatta or crusty bread slices and rub some garlic on the bread for extra flavor… Enjoy!
Caprese Tomato Spinach Soup
Music Pairing: Frank Sinatra, “Fly me to the moon”
128oz canOrganic Fire Roasted Tomatoes,I used Muir Glen organic) this is a must! the fire roasted tomatoes give all the flavor to the soup.
3-4cupswater or vegetable stock,start with 3, then add more to desired consistency.
2glugsextra virgin olive oil
5-7Sun dried tomatoes,chopped
1mediumgarlic clove,thinly sliced
1/2teaspoondry basil,if fresh use about 5-6 leaves
1good pinchdry thyme
1largebay leaf
1/2teaspooncelery salt
1-1/2teaspoonsea salt
1/2teaspoonblack pepper,freshly ground
2teaspoonsbalsamic Vinegar
Toppings:
6-8handfullsfresh spinach
1shallot,thinly sliced
extra virgin olive oil to sautee the spinach
Salt and black pepper to taste
Fresh Mozzarella Ciliegine,or frsh mozzarella cut into small cubes
Instructions
1. In a medium soup pot over medium heat, warm up the extra virgin olive oil. Add in the chopped shallots, garlic, sun dried tomatoes, bay leaf saute for 3-4 minutes.
2. Add the dry basil, thyme salt and black pepper, saute for another minute.
3. Add the can of crushed fire roasted tomatoes, and cook for 2-3 minutes on medium.
4. Add the water, stir until well incorporated, cover with a lid and reduce the heat to low, simmer for 6-8 minutes. With an immersion blender puree the soup. ( I love this gadget in the kitchen, it is so practical and easy to puree your soup on the same pot!)
5. Once its pureed, add the Balsamic vinegar, taste, adjust salt and pepper if necessary. Bring to slow simmer, turn off the heat, cover with a lid and keep it warm.
6. Quick Saute the spinach in a skillet over medium -high heat, heat up some olive oil, add shallots, garlic and saute for 15 seconds then add the spinach and toss until they are partially wilted, and coated with the hot oil, add salt and pepper. Set a side.
7. Using oven friendly soup bowls, scoop 2-3 ladles of tomato soup, add some of the sauteed spinach and top with the mozzarella buccatinis.
8. Place bowls onto a baking sheet and broil the soups for about 4-5 minutes, or until cheese is melted and slightly crust. Be careful to watch them so they don’t burn.
Serve with some toasted ciabatta or crusty bread slices and rub some garlic on the bread for extra flavor… Enjoy!
Recipes, Cooking & Art Direction: Mariana Nuño Ruiz McEnroe | Photography: Ian McEnroe |
Published: March 4, 2014
I must confess that I have a weakness for Korean BBQ… I don’t always cook at home. When we decide to go out, Korean BBQ is on the top of our list. I am amused by all the fresh ingredients that are cooked before your eyes. The orchestrated arrangement of little dishes with fermented vegetables, salty sweet, sour, spicy crunchy, juicy, is a circus of textures, temperatures, flavors and aromas. All my senses are awake.
One of my favorite side dishes would be the the Pajeon or Korean pancake. A savory light pancake, made with eggs, rice flour, flour, scallions-green onions. All sorts of variations can be made, including beef, pork, sea food, shell fish, kimchi…Oh! the kimchi.. My favorite.
With this Korean pancake in mind and a little help of the current abundant green leafy season, I thought about making a lighter all veggie version using one of my favorite seasonal greens…“RainbowChard” this colorful happy leafy green, is a close relative of the beet family, delivers 3 major vitamins A, K and C. Loaded with phytochemicals rainbow chard is one of the healthiest, most beautiful, and tasty vegetables I know. Flavorwise, I would describe it as a cross between baby spinach with a bit of sweet beet background. Texturewise, the leaves are way softer than kale which makes it a bit more pleasant to eat raw or quick sautéed. Rainbow chard has it all, flavor, texture, and color.
Inspired by all these great leafy green qualities, I was almost in a rush to attempt to make an all veggie Rainbow Chard Korean Pancake. The result was fantastic, the rainbow chard’s sweetness and texture are a good match for this light savory pancake. The charred scallions, green garlic and the spicy jalapeño kick in combination with the rice vinegar dipping sauce for the perfect savory pancake match.
Once again I proved to myself that cooking with fresh ingredients is not only a great nutrition and a healthy value. It inspires me and it’s a feast for the eyes!. That for me makes it even more appetizing…Enjoy!
Rainbow Chard Korean Pancake
Makes 2- 9” round savory pancakes
½ cup unbleached-all purpose flour or gluten free flour like all-purpose King Arthur like this
½ cup stone ground rice flour (I used Bob’s Red Mill)
1 egg or 1 tablespoon of ground flax seed + 3 tablespoons of water= 1 egg
2 teaspoons grapeseed oil, canola oil, or any neutral oil. And a little extra oil to pan fry the pancakes.
1 teaspoon roasted sesame oil
pinch of salt
pinch of white pepper
¾ -1 cup water
6-8 rainbow chard leaves
4 scallions
1 garlic clove or 3 green garlic shoots
1-2 red or green jalapeno or red thai chili
2 tablespoons sesame seeds
extra oil for pan fry the pancakes
Rice vinegar dipping sauce:
1 tablespoon rice vinegar
1 tablespoon water
1 teaspoon soy sauce
1 teaspoon agave nectar
a pinch of red dry chili flakes or a teaspoon of sambal sauce
Preparation method:
1. In a medium size bowl, mix the flours, egg, vegetable oil, sesame oil salt, pepper and water, whisk well until a smooth batter that resembles a loose pancake batter. Set a side to rest.
2. Chop all your vegetables, scallions and jalapenos on a bias. Make a roulade of rainbow chard leaves and chop them into a chiffonade, chop rainbow chard stalks into matchstick size.
3. On a cast iron or nonstick skillet over medium-high heat drizzle some oil, and arrange a layer or vegetables, starting with the jalapenos, rainbow chard matchsticks, scallions, green garlic and rainbow chard chiffonade. Sprinkle some sesame seeds and promptly ladle half of the batter , spreading it out evenly into a circle.
4. Reduce the heat to medium and cook until the bottom is golden brown, a few areas will have a bit of char which is perfectly fine. Cook for about 5 minutes per side.
5. The “flipping matter”… you can use Julia’s Child encouraging words “flip it with conviction!!!”, or you can use a plate to flip the pancake upside down and then return it to the pan, to finish cooking…both methods work great!
6. Once both sides are cooked, transfer to a warm plate and repeat the process with the remaining ingredients.
7. In a large platter, cut into triangles and serve warm with the rice vinegar dipping sauce.
Variations: You can add shrimp, small tofu squares, carrots, squash, kimchi!!!
Hey! the pancake is you canvas, have fun and enjoy!
Recipes, Cooking & Art Direction: Mariana Nuño Ruiz McEnroe | Photography: Ian McEnroe |
Published: February 22, 2014
Have you ever tried farro before? Farro is a handsome Italian whole grain with a great tan color, a nutty and slightly sweet flavor. Farro’s texture is firm with a bit of a chew. An early variety of hard wheat, farro has been around for more than 10,000 years. It was originally grown in Tuscany, Italy and nowadays you can find great organic farms here in U.S that now cultivate this “ancient” new grain.
Farro has a number of nutritional advantages over other grains. It is a complex carb which makes it far more nutritious than white rice. It is higher in protein than regular durum wheat and higher in fiber in comparison to many other grains. It is rich in Vitamin B complex, A, C, E and rich in Magnesium. Due to it’s low gluten content is easier to digest and to make it even better: it has a low glycemic index. As you can see Farro is not just a handsome whole grain. Farro is smart and a gentleman too.
I strongly believe that farro should be the new super grain. I would say I prefer farro over quinoa. There are different varieties of farro and the one I recommend to try first is farro perlato. It cooks in the same way as white rice. 2:1 ratio, 2 cups of water, 1 cup of farro perlato and in 20-25 minutes is perfectly cooked a bit al-dente and each grain separated which it makes it fantastic to sprinkle on salads or as a whole dinner like in this recipe. If you have more time and you are craving more fiber, choose a wholesome farro, soak it overnight and it cooks for about 45-1 hour… (but not my favorite choice, look for perlato!)
For this recipe I cooked the farro with some garlic and tossed it with extra virgin olive oil, lemon salt and smokey hot paprika. To top it off… a poached egg… And that farro dinner was amazing. I know you will love it and I would love to hear some feedback after you have dinner with this Italian grain…This recipe is definitely comforting and effortless.
Warm Farro, asparagus and poach egg… makes a great brunch, lunch or dinner.
Warm Farro Asparagus and Poached Egg
Serves 2 with some left over farro to sprinkle over your next green salad.
1 Cup Farro Perlato (Bluebird Grain Farms, Bob’s Red Mill Natural foods)
2 cups water
2 garlic cloves
1 teaspoon salt
1 glug of extra virgin olive oil
½-1 teaspoon Smoked Hot Spanish Paprika. (upon you preference, start with ½ , check on flavor)
8-12 asparagus (the thiner the better, pencil asparagus work great , they are tender and less fibrous)
1 glug of extra virgin olive oil
1 Lemon (the zest and the juice)
Salt and Pepper
1. In a medium size pot bring 2 cups of water to boil along with two garlic cloves. Add the Farro and a pinch of salt. Reduce heat to medium-low and cook for 20-25 minutes. Or follow directions on package otherwise.
2. Meantime, wash your asparagus, cut the ends, and with a vegetable peeler make thin ribbons. In a medium size bowl toss the asparagus with salt, pepper, extra virgin olive oil lemon zest and lemon juice.set aside.
3. When Farro is cooked, turn off the heat remove the garlic cloves and Season the Farro by adding a glug of extra virgin olive oil, salt, pepper, the Smoked Hot Spanish Paprika, lemon zest and a squeeze of lemon juice. Toss and cover with a lid to keep warm.
How To poach eggs:
It is certain that poached eggs take a bit of patience and timing, but I assure you that eggs meant to be poached. Practice helps, and if you follow this easy method you will be an expert poacher in no time. The reward makes it worth trying.
1.In a small pot bring about 6 cups of water into a simmer. Add 1 teaspoon of salt, 1 tablespoon of white vinegar.
2. Crack one egg at a time onto a small ramekin or a small cup (this with help you to drop the egg into the water more easily)
3. With a Wooden spatula, create a water whirlpool and drop the egg into the center of the whirlpool. This will help to contain the shape of the egg-white into a pillowy egg goodness.
4. Turn down the heat to low
5. Let it swim into the water for about 2-3 minutes if the egg was room temperature. If the egg was in the refrigerator, it might take about 4-5 minutes.
4. With a slotted spoon carefully remove the egg from the water, and place it into a warm ramekin with a bit of tepid water, while you proceed to poach the next egg.
Note: if you are not trilled about the poaching your eggs, over easy eggs will work to! There is no rules in here, this is just pure cooking inspiration!
5. Plate a generous amount of warm farro and top it with the asparagus ribbon salad.
6. Carefully Place the warm poached egg on top.
7. Drizzle some extra virgin olive oil, sprinkle some toasted hazelnuts, sea salt, fresh cracked pepper and a pinch of Smoked Hot Spanish Paprika. Enjoy!
If you want to know more about Farro, check this articles:
Recipes, Cooking & Art Direction: Mariana Nuño Ruiz McEnroe | Photography: Ian McEnroe |
Published: February 15, 2014
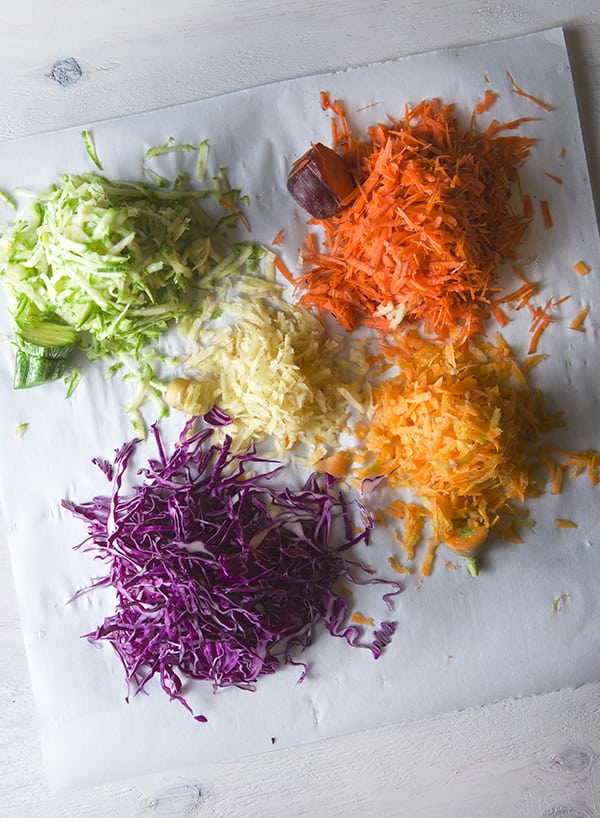
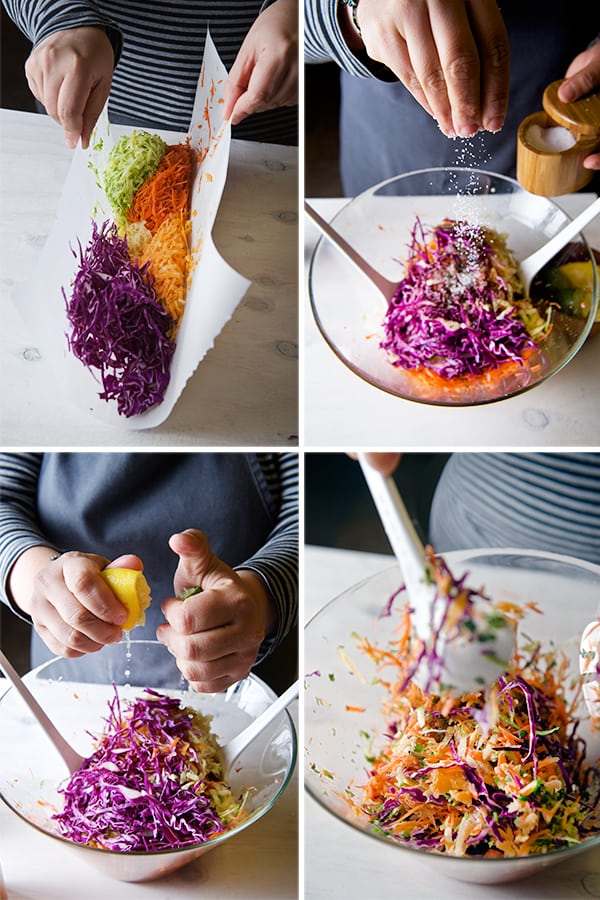
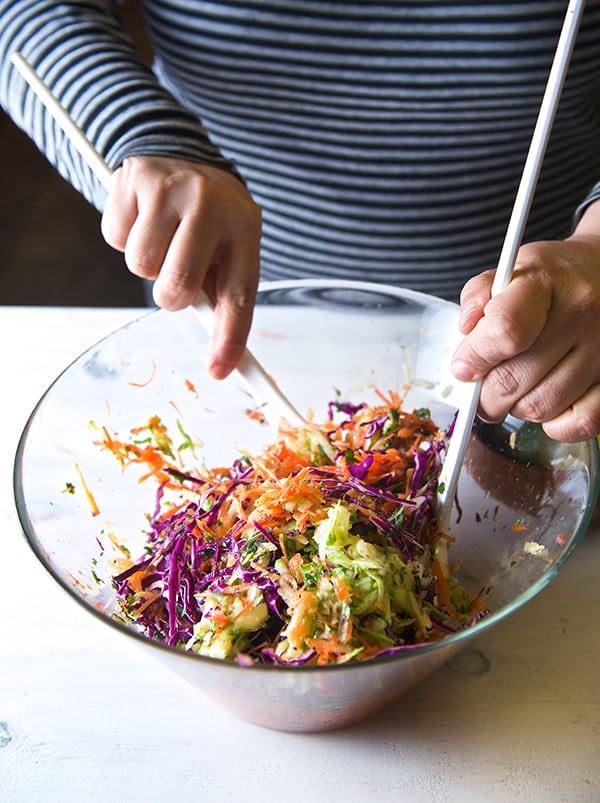
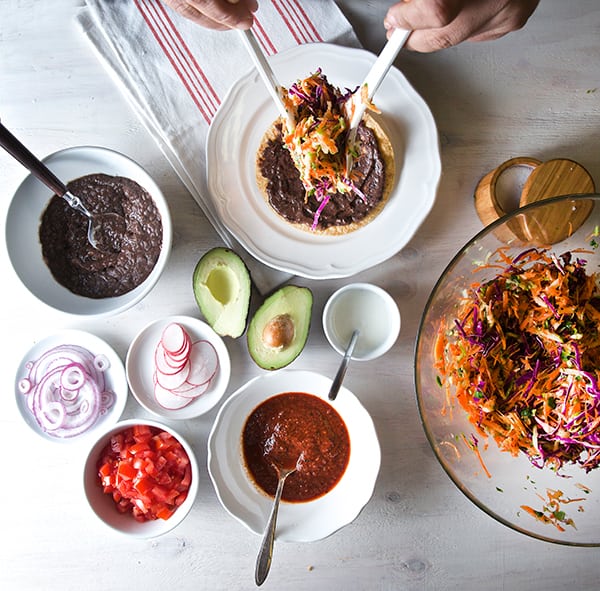
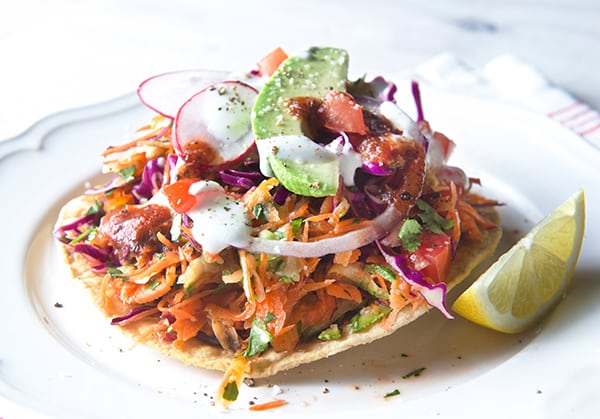
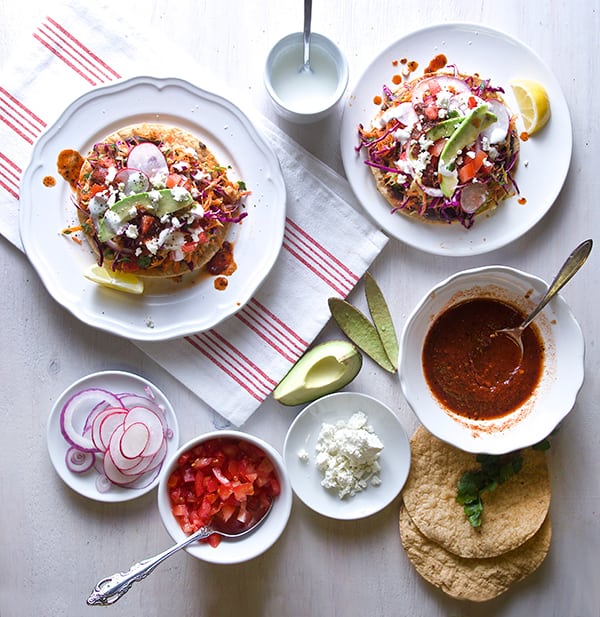
Is it Spring time yet?… I think we are almost there. This Raw Veggie Tostadas scream welcome spring!, Spring is about renewal, everything in nature starts again, a new cycle that makes me feel like eating fresh,crunchy root vegetables. There is an abundance of them right now, lots of cabbage, carrots, radishes at the farmers market. For me is time to set aside the roasting pans, lets eat them raw. Raw vegetables have an earthy and unique flavor, they are juicy and sweet. I’ve learned to loved them when I shred them, it is so easy to eat them raw and when you combine them in a salad they are also so attractive to the eye and all together make a crunchy symphony texture, simply amazing.
This recipe screams “easy”, you can whip this up for a week dinner or an easy-laid back weekend lunch. This recipe its one of my favorites, Ian and I used to have them almost once a week for our veggie night or our MM, Meat-less Monday. Have fun and enjoy!
Raw Veggie Tostadas
Makes 4-6 Tostadas
Ingredients:
6 tostada shells*
(Baked or Milagro brand if you are her in Austin, definitely the best..)
1 cup of black beans cooked and smashed
4 shredded carrots…any color any variety.
2 shredded mexican zucchini (light green kind preferable)
¼ head of red cabbage, shredded
2-3 tablespoons finely chopped cilantro
1 lime
1 lemon
2 tablespoons Extra Virgin Olive Oil
1/2 – 1 teaspoon sea salt (upon your taste)
fresh ground black pepper to taste
Garnish with:
2 tomatoes diced or in slices
4 thinly slices of red onion
1 avocado
3 tablespoons of greek plain yogurt + 1-2 tablespoon of milk + pinch of salt.
Whisk until well combined, to create a lighter creamy sauce. (for vegan options use tofu yogurt)
2 Tablespoons queso fresco or feta cheese crumbled or small diced firm tofu.
Red Roasted Tomato Salsa(recipe follows)
Red Roasted Tomato Salsa:
2-3 medium size tomatoes roasted and peeled.
6-8 toasted chiles de arbol.
2 toasted chiles cascabel (remove seeds)
1 medium garlic clove
1 teaspoon sea salt
Place all the ingredients in the food processor, until well blended, add a little warm water if needed for consistency. The salsa should reassemble a lose puree.
Preparation method:
1. Warm up the beans, you can use refried beans if you like. 2. In a large bowl, combine carrots, zucchini, cabbage, cilantro, the juice of lime, lemon, salt and pepper to taste, toss well.
3. Make your Salsa…I made this Salsa Roja Asada click for recipe here. 4. Prepare your garnishes. 5. Assemble the tostadas, spread a light coat of beans on the tostada (this will be your glue!) and then a generous amount of the vegetable concoction. Top with slices of onion, avocado, drizzle some of the yogurt sauce, and some salsa. Serve immediately. Enjoy!
Have you had your rainbow today?
Cook with music! Music always sets the mood for cooking, My music pairing for this recipe:
Recipes, Cooking & Art Direction: Mariana Nuño Ruiz McEnroe | Photography: Ian McEnroe |
Published: February 10, 2014
This sounds so wrong, but it taste so right that you will be stumbling back for more.
Homemade marshmallows are totally different creatures than store-bought, and incredible easy to make. Despite the intimidating words ”candy thermometer” and “powdered gelatin” Hey! Its easy, easy potatoes!,
You will need to flatten some dark beer, hydrate some gelatin, boil some sugary mixture, whip the hell out of it , add a powdery cloud of confectioners sugar and let it set…it is a fun process. To finish them up, drizzle chocolate and crunchy pretzels…What’s not to like?
Making candy and these confections is fun and if there is some leftover beer you should have a little glass, to cook along with … Music? Yes, more please! I was listening to one of my favorite bands “The Squirrel Nut Zippers” . For me, this is marshmallow music and I’m sharing the link: https://www.youtube.com/watch?v=VdAt4qWvz_8
My twist in this recipe has to do with the choice of stout I used. My friend Andrea introduced me to this amazing stout from Adelbert’s “Barrel of Love”. Adelbert’s is a local brewery that produces hand-crafted Belgian style ales here in Austin,Texas. Crazy good stuff! This beer was recently released, a dark beer with chocolate and whiskey notes…kiss me now!… Wait until you try these beer marshmallows creatures…Holy Shubangwaaa!
Ok too much Blah, blah blah, let’s get started. Hands up!
I will not describe the flavor for you… be brave, be adventurous and try this… you will go bananas… it is the best way to get happy-drunk on marshmallows! Have fun.
Makes 9 large glutton size, or 120 skinny jeans size.
Technically if you use a 8×8 pan 36 pieces of 1.5×1.5 inches…
3 envelopes unflavored gelatin /approx. 21 grams (I used powder, you’re welcome to use gelatin sheets )
1 cup cold, flat beer, divided in two (I used Adelbert’s brewery “Barrel of Love”) You can use any dark stout like Guinness will be fantastic too! For Kids version: 1 cup of Miller light… not! …Use 1 cup of Cherry soda, Dr. Pepper soda, Cream of soda and use the same method of removing the gas as much as you can see step 1. Other options can be fruit juices, like apple, beet, carrot, they will taste delicious and will give a hint of color to the fluff.
2 cups granulated white sugar
1/2 cup corn syrup
2 pinches of sea salt
2 large egg whites beaten until stiff peaks.
1 teaspoon vanilla extract
To dust:
½ cup confectioners sugar
½ cup cornstarch
Toppings:
1 cup dark chocolate for melting.
3-4 tablespoons roasted salted peanuts crushed.
Salty, pretzels. (I used Snaps from Snyder’s)
1 teaspoon of sea salt.
Method:
1. Whisk the beer to flatten the beer. Remove some of the foam if necessary.
2. Lightly oil your 8×8 pan and generously dust with the confectioners sugar and cornstarch mixture. Reserve the rest for when cutting the marshmallows.
3. Using the mixing bowl of your stand mixer, place ½ cup of beer and sprinkle the 3 envelopes of gelatin powder.
4.Whisk your egg whites until stiff peaks set aside.
5. In a medium saucepan over medium high heat mix the sugar, corn syrup, and the other ½ cup of flat beer until the sugar is dissolved. At this point attach the candy thermometer to your saucepan and bring this sugary mixture to a slow boil until it reaches 240F/ 116C . Remove from heat.
6. Fitted with the whisk, start your stand mixer on the slowest speed. Being very careful, start adding the hot syrup in a low stream to incorporate with the bloomed gelatine.
7.Once you poor all the syrup,mix for 2 minutes and proceed to add the fluffy egg whites along with the vanilla extract.
8.Mix on high for about 10-12 minutes, until the mixture has double or tripled in size, it turns an off-white color, it has a nice shine to it and it holds stiff peaks.
9. At this point with the help of a spatula (lightly spray the spatula with some nonstick spray), Poor all this fluffy and highly sticky gooey goodness into your greased and powdery pan.
10. Flatten the top and allow the marshmallow to dry for at least 4-6 hours. Overnight is best. The marshmallow should fill springy and soft to the touch.
11. Once dry, over a piece of parchment paper generously dusted with powder sugar and cornstarch mixture, un-mold the marshmallow sheet with a little spatula pulling from one corner and place the big square on top of the paper. With the help of a dusted knife, pastry cutter, pizza cutter or scissors, cut your marshmallows into squares. Start by dividing them in half and then, thirds. When cutting any kind of pastry, it helps a lot start visualizing “half of the half” rather than five or six equal pieces. In this way you can end up with pretty much equal size marshmallows. Do not worry about the round edges, people is gonna eat them any way!…Although if you are going for perfect little squares just trim all the round edges to have a perfect square and then proceed to cut. (see photo below)
12. Once they are cut, place the remainder of the confectioners sugar and cornstarch mixture in a bowl and toss the squares, so every side is covered with powder to avoid sticking. Shake the excess powder, and place the marshmallows on a clean cookie rack.
13. Melt the dark chocolate, and drizzle the marshmallows, sprinkle with pretzels and crushed peanuts.
14.Eat while the chocolate is warm…its crazy good!!!
Recipes, Cooking & Art Direction: Mariana Nuño Ruiz McEnroe | Photography: Ian McEnroe |
Published: February 5, 2014
One of Ian’s greatest discoveries at my little Sunday Farmers Market, at Muller here in Austin, it’s Kiskadee Chocolates. Ian was wandering around the market and ran into this amazing hot cocoa drink. He got a sample for me and when I drank it! Immediately I was deeply in love with the chocolate elixir drink. So the next weekend I walked to the market and I had the opportunity to meet the owner, Laura Atlas, who happens to be my neighbor as well! That’s what I call luck!. We went for a walk and she told me her story.
She started her business after tasting handcrafted chocolate truffles given to her by her husband on their anniversary; that’s how her chocolate making journey began. She handcrafts chocolate bars, cacao nibs, and her recent addition to her fantastic quality chocolate collection: “The Baking Chocolate Bar” of 85% cacao and uses very little sugar. Her chocolate is organic, from single-sourced cacao from the Dominican Republic. The variety is called “La Red”. The farmers who grow the beans are part of a co-op called Guaconejo. If you would like to know more about the co-op: http://www.raakachocolate.com/pages/cacao-origin-profile-la-red-guaconejo-dominican-republic.
Laura shows a great passion for her chocolate and you can taste the fantastic chocolate products at the Cedar Park and Mueller Market, In.gredients, Frofoyo…I totally recommend you to meet her at the farmers market, she can tell you all about her journey and you can taste and learn how to make a delicious chocolate drink.
As you can tell I really loved the chocolate. I been working on this recipe for about two weeks now.
I wanted to create a great a brownie bite showcasing the flavor profile of this unique chocolate baking bar. The results…Kiskadee chocolate is on my top favorites on my chocolate list. The chocolate profile flavor its remarkable, it’s a dark chocolate that has intensity and great aroma. It finishes clean and feathery light, with a fruity natural sweetness. What to do with this lingot of chocolate gold?… Brownies.
I love brownies in small doses (yeah, right). I made these decadent little Cherry and Cacao nibs brownie bites pairing the chocolate with fresh cherries, to bringing out the fruity natural notes on the kiskadee baking chocolate. I added some cocoa nibs for extra crunch and texture contrast. These brownies are right in the middle, not overly fudg-y not too cake-y. I baked them in a mini-cupcake pan, they bake so beautifully, if you are a brownie edge lover, you are gonna love this mini brownies, they get a nice crust all around, and a soft fudge center. I find they have a great balance and 2 or 3 bites will beyond satisfy your chocolate craving. You are gonna love them.
Remember when baking use the best ingredients, good organic eggs, great butter and if you can not have access to this chocolate, search what is your best possible option beyond the supermarket limitations. (A few of my favorite suggestions for amazing baking chocolate will be: El Rey, Cacao Barry, Valor, Valrhona, Scharffen Berger. in that order.)
I hope you enjoy them as much as Ian and I did…they are gone now, sharing with friends was great. Enjoy!
Cherry and Cacao Nibs Brownies
Makes 24 brownie bites.
24 Fresh red Cherries pitted and steams on
1 large metal paper clip (see the super easy instruction photos below)
¼ cup Dark Rum *optional
½ cup unsalted butter= 1 stick of butter
6 oz. bitter sweet baking chocolate (El Rey, or Valrhona would be in my top favorites.)
1 tablespoon of ground cacao nibs
½ cup turbinado sugar
½ cup white sugar
3 eggs
1 teaspoon vanilla bean paste or vanilla extract
5-6 drops almond extract
½ cup unbleached-all purpose flour, sifted after measuring.
2 pinches of sea salt.
1-2 tablespoons cacao nibs
Preparation method:
How to Pitt a cherry?
It is extremely easy, you just need a paper clip, yes you read well a large paper clip, unfolded, cut a little cross on the back of the cherry, insert the clip hook, gently twist, and the pit is out!no need of a fancy equipment…unless you own a cherry tree then buy one.
Soak the pitted cherries in a little dark rum or kirsch, while you prepare the brownie batter.
Preheat oven at:
325F/165C if is a dark metal non stick pan, if you have a light metal pan bake at 350F/175C
In a metal bowl over a double boiler melt butter and chopped baking chocolate. Be carefully, that the metal bowl do not touch the water, to prevent scorching the chocolate.
Once the chocolate and butter are almost melted remove from heat and stir until smooth.
Add both kinds of sugars into the chocolate mixture, vanilla and almond extract. With the help of a spatula mix well.
Add eggs one a at a time until well incorporated.
At last add the sifted flour and salt in folding movements until well incorporated, do not over mix.
Grease pan with soft butter and dust with cocoa powder, to prevent brownies from sticking.
Using a small ice cream scoop, scoop 1 load of the brownie batter into each mold.
Top with cherry pressing half way through the batter. (See photo below) Sprinkle some cacao nibs.
Bake for 12-15 minutes or until a toothpick comes out with a few sticky cooked crumbs.
Remove from the oven and let them cool for a few minutes in the pan. Once they have cool down slightly, remove carefully from pan with the help of a small spatula, press and twist to release them intact.
Cool them in a wire rack. Serve room temperature or slightly warm. Dust with confectioners sugar.
Enjoy!
Notes: If you are more into brownie squares, this recipe will make an 8×8 square, use a ceramic or glass dish for best results, lining the bottom with parchment paper and living enough parchment paper hanging on the sides for easy pulling. Bake time: 22-25 minutes check the center, if is not done give it another 2-3 minutes.


 Is it Spring time yet?!!!…Well the thermometer is still going up and down like mad in Austin. And since yesterday was on the chilly side, I was craving tomato soup. I know I have to wait at least one more season to get great tomatoes at the farmers market. In the meantime what do you do when it seems only greens are in season?


 Caprese Tomato Spinach Soup

 I must confess that I have a weakness for Korean BBQ… I don’t always cook at home. When we decide to go out, Korean BBQ is on the top of our list. I am amused by all the fresh ingredients that are cooked before your eyes. The orchestrated arrangement of little dishes with fermented vegetables, salty sweet, sour, spicy crunchy, juicy, is a circus of textures, temperatures, flavors and aromas. All my senses are awake.


 One of Ian’s greatest discoveries at my little Sunday Farmers Market, at Muller here in Austin, it’s Kiskadee Chocolates. Ian was wandering around the market and ran into this amazing hot cocoa drink. He got a sample for me and when I drank it! Immediately I was deeply in love with the chocolate elixir drink. So the next weekend I walked to the market and I had the opportunity to meet the owner, Laura Atlas, who happens to be my neighbor as well! That’s what I call luck!. We went for a walk and she told me her story.


