Jalapeño and Bacon Meatloaf

Jalapeno-Bacon_Meatloaf_Yes,-more-please!_i

If you are a meat lover, carnivore, bacon-ator, you just clicked on this post at the right moment and the right time. This is for you baby!…
As you know, every now and then, we do appreciate and love meat. Not too often, but when we do, we tend to go all-out; a big steak, a visit to Franklin’s BBQ, pork tacos. I’m telling you, Texas all the way. On this occasion, the meat craving translated into the form of meatloaf!

I asked Ian what would you like for dinner he answered: “not carrots”, so I said ‘be more specific’, he said “Meatloaf”.. Meatloaf it is!… I’ll do anything for love. (and please do not even relate to “that” Marvin Lee Aday song… I won’t do that.) I think this is the second time in my life that I’ve made meatloaf …and it was not too shabby, shall I say.

Meatloaf is pure comfort food, classic Americana recipe. There might be a million meatloaf recipes out there, the same as in Mexico for beans! Every family has their own recipe and spin, technique, breadcrumbs, no bread crumbs, beef, bison, ground turkey, ~ a mix ~ spices, ketchup, brown sugar, baked cover uncovered uff! lots of ways…

I did my research, and rescued the common thread of ingredients. I came up with a pretty good contender. This meatloaf put a big smile on Ian’s face.

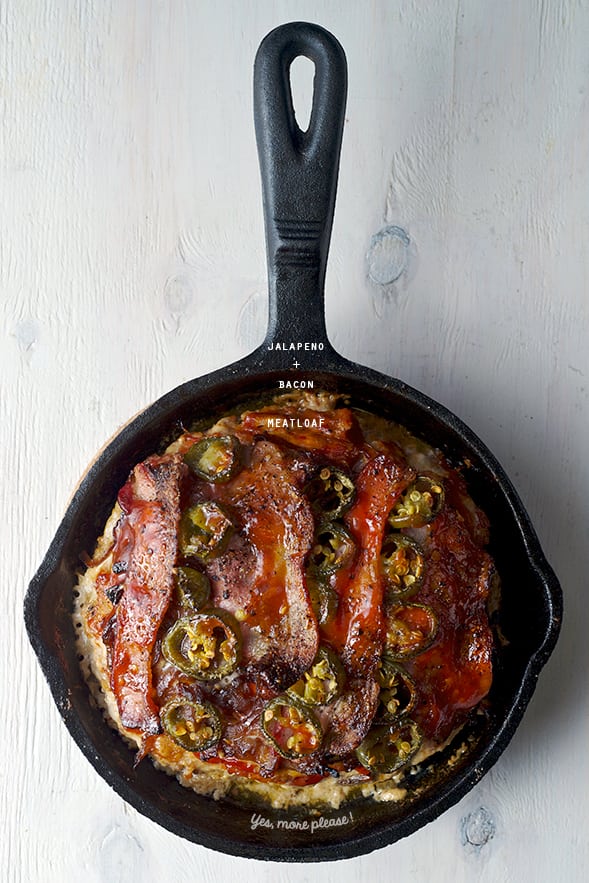
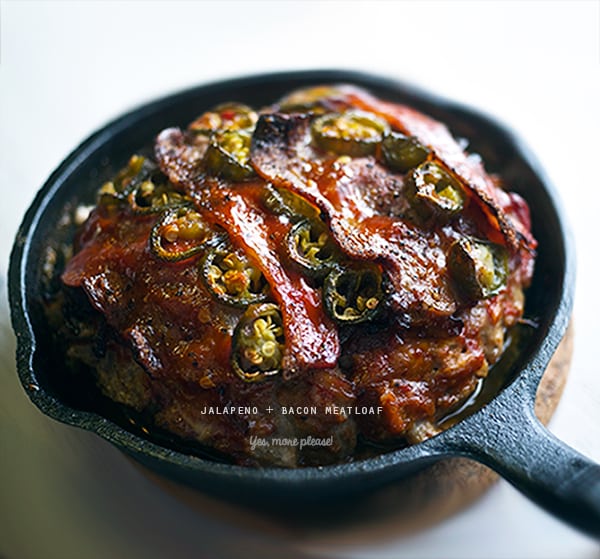
Since we are just two I decided to make a small one, using my little cast iron pan. I fell in love with the way the meatloaf turned out. Crusty bottom and edges, caramelized top, really moist and great soft crumb.
I’ve learned that meatloaf left overs translate into meatloaf sandwiches and hey that sounds glorious… but we are trying to balance the act here. Maybe next time I will just make this mini meat loaf for the sake of sandwiches…are you still with me?…great!

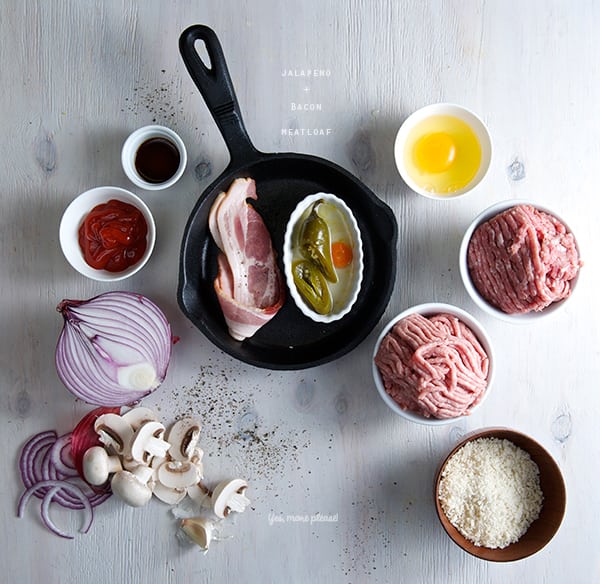
For this baby Jalapeño and Bacon Meatloaf I used red onions, bottom mushrooms, panko breadcrumbs, and yes a dash of that “W”sauce. I used half ground lean turkey and half ground lean pork. My little spin: I added a bit of jalapeño pepper vinegar to the meat mixture and I topped it with bacon, slices of jalapeño, fresh cracked black pepper, and the classic ketchup-mustard-honey~instead of brown sugar~ and a little jalapeño vinegar to loosen up the glaze. I baked and served it all in the same little pan. The way this little pan is awesome! It works like a charm, bakes evenly gives the meatloaf a bit of crust on the edges and bottom and best of all it’s ready in 25-30 minutes… to die for… Meat it up!, Enjoy.

Jalapeno-meatloaf_ingredients

Jalapeño and Bacon Meatloaf

Serves 4 or two hungry caveman.

For the meatloaf:

8 oz of ground 85% lean pork
8 oz of ground 90% lean turkey
1 egg
1/3 cup panko breadcrumbs or almond flour will work great for those GF souls.
¼ cup chopped red onions
1 cup chopped or sliced mushrooms up to preference.
1 tablespoon ketchup
1 teaspoon Dijon mustard
1 garlic clove grated
1 tablespoon jalapeño vinegar
1 tablespoon Worcestershire sauce
1 teaspoon kosher salt
6-8 good cranks of freshly cracked black pepper

For the glaze:

1/3 cup ketchup
1 teaspoon Dijon mustard
2 dashes of Worcestershire sauce.
1-2 teaspoon of honey

Toppings for the meatloaf:
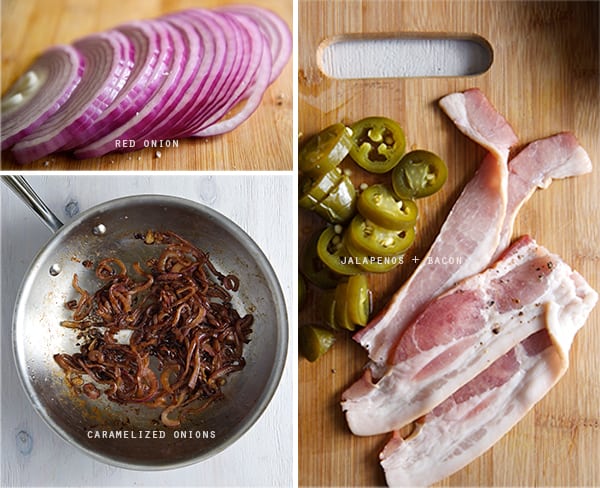
Caramelized onions
2 slices thick bacon.
2 pickled jalapeños sliced in thick wheels
Fresh cracked pepper.


Preparation method:

1. Start by caramelizing the onions. Slice them about 1/8 inch or thicker, place them in a pan with 1 tablespoon of olive oil, a splash of apple cider vinegar and a pinch of salt over medium heat, toss and then lower the temperature until they look soft, but hold their shape, and they have a mahogany color just like this:

Jalapano_Bacon-Meatloaf_toppings,-caramelized-onions,-jalapenos-and-bacon

2. In a large bowl combine the 2 kinds of ground meat, egg, bread crumbs, chopped red onions, sliced mushrooms, ketchup, Dijon mustard, jalapeño vinegar, grated garlic, salt and black pepper. Mix until well combined and forms a ball. (look picture below)

Jalapeno-Bacon_Meatloaf_Mixing-the-meat
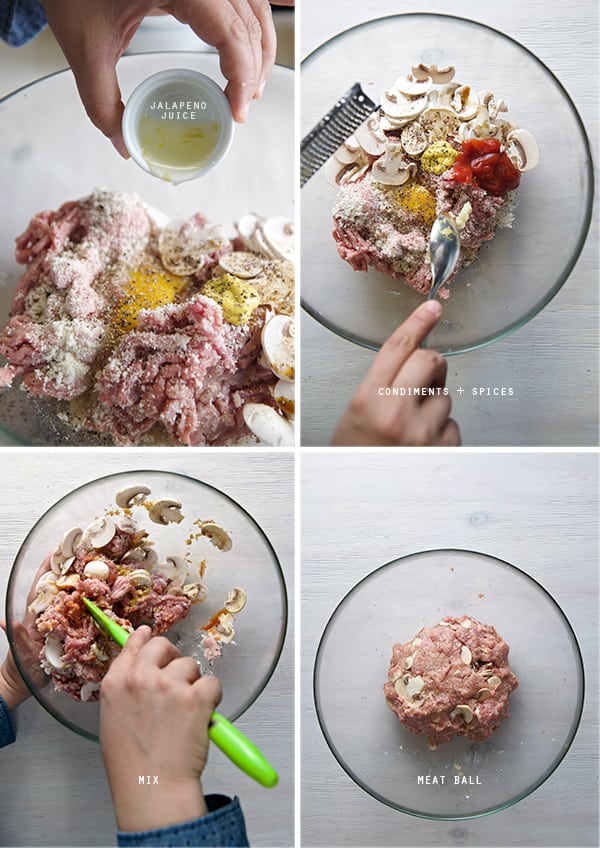
3. Place the meat mixture into a 7″ cast iron pan , creating a slightly domed center.
4. Apply some of the glaze top with caramelized onions.
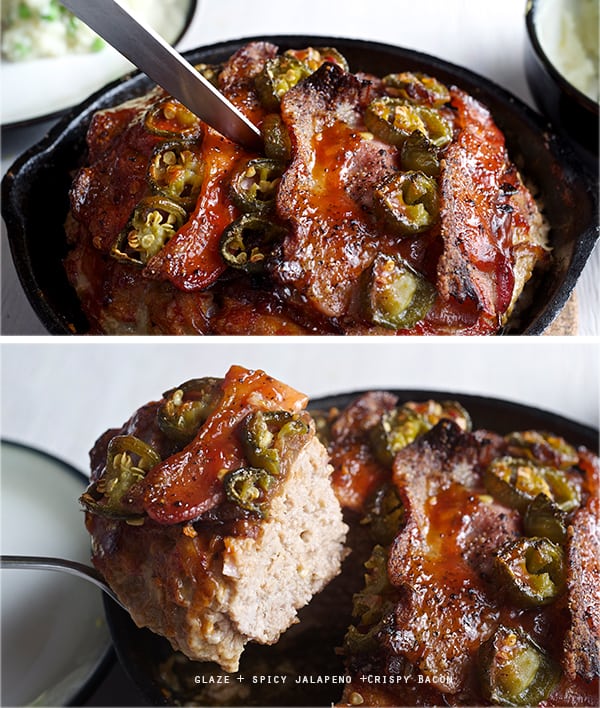
5. Cut the slices of bacon in half so you end with 4 short slices. Place one slice across the meatloaf and alternate with one row of the jalapeño slices, until your meatloaf is cover with all the bacon and jalapeño peppers. (see picture below)

Jalapeno-_Bacon-Meatloaf_placing-the-topings
6. Bake at 375 on the lower 1/3 of the oven, uncovered.
7. Check in 25 minutes and apply the rest of the glaze on top, bake for another 5 minutes.
8. At this point your meat loaf is cooked, you can broil the top for a couple of minutes to crisp up the bacon.
9. Using a trivet, take the meatloaf to the table and serve! Enjoy.

Jalapeno_Bacon_Meatloaf_Yes,-moreplease!


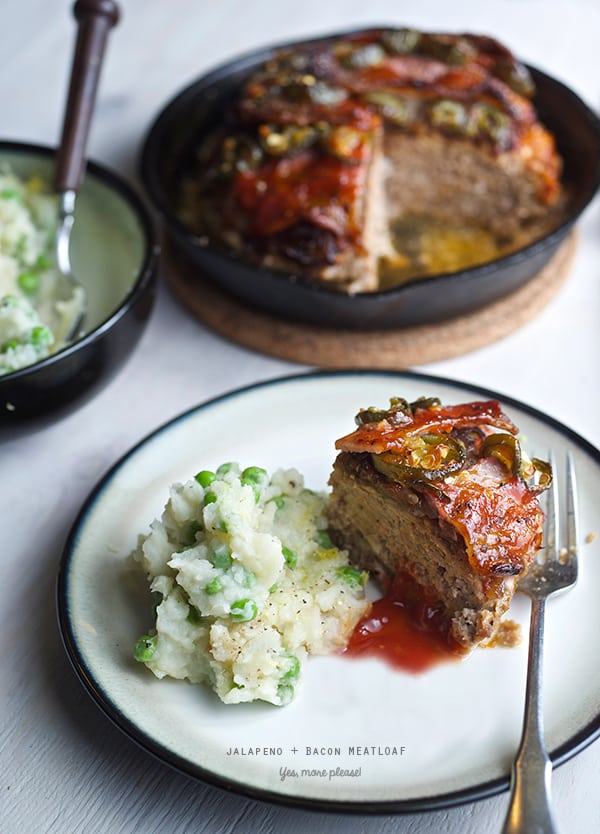
I served the meatloaf with this lemony mashed potatoes and peas  and a green salad on the side.

This was a great comforting meal, Enjoy!

Lemony-Mashed-Potatoes-+-Peas_Yes,-more-please!

Lemony mashed Potatoes and Peas

Serves 2

2 small potatoes, skin on, cut in cubes. I used yellow wax potatoes, I love how creamy they are when smashed.
1/2 cup peas
¼ cup milk or reserve water from the potatoes.
2 tablespoons olive oil + a little more to drizzle.
the zest of 1 lemon
Salt and fresh black pepper to taste.

Preparation:

1. In a pot with enough water, boil the potatoes until tender. Drain and smash.
2. Add olive oil, peas, lemon zest, milk salt and cracked pepper.
3. Mix until peas are bright green but snappy and warm through. sprinkle some lemon zest, extra virgin olive oil salt and pepper.
4. Serve immediately.

Jalapeno-Bacon-Meatloaf_sides-of-lemon-potatoe-peas-smashed_Yes,-more-please!Jalapeno-Bacon-Meatloaf_with-a-side-of-lemon-potatoe-peas-smashed-dinner-is-served_Yes,-more-please!

 Enjoy!

Music Pairing: Pixis – La la Love You

View Post or View Comments 5

Red Charred Salsa

Salsa-Roja-Asada_Ingredients

It seems like magic to me how with just a few ingredients you can achieve a whole lot of attitude, an incredible amount of deep of flavor, and spice. I’ve seen lots of recipes calling for way more trouble and ingredients than this one and they do not end up tasting half as good. This recipe has only four ingredients.

What makes this salsa dance?…It’s all about the cooking method. Slow charred tomatoes, toasted dry chiles and a lot of arm work make this salsa like no other you’ve ever had.

If you have the time to disconnect for a bit and make this recipe the old fashioned way, you will find the salsa bright center of the universe. What is the difference between blenders, food processors and immersion blenders versus mortars or pestles? Well its in the name. All a blender does well is as its name describes; it blends, which leaves more whole seeds in the salsa than you might wish for. Now, let’s talk about mortars-molcajetes. For me, there is a tremendous amount of nostalgia in using a mortar/molcajete because the act of using a stone vessel is a whole different experience in the kitchen. It relaxes me and makes me conscience of the transformation of the ingredients and therefore I savor the whole process. Besides the romantic aspect, the difference I see between blenders and Mortars is that mortars pulverize the seeds, as you smash them against the stone adding extra flavor to the salsa. The stone adds flavor to the sauce and you are able to enjoy the earthy aromas when smashing the garlic and the sea salt, the toasted chiles, the smell of the fruity tomatoes as the consistency of the salsa changes. I would recommend you try to make the salsa this way for the simple pleasure of it.

Salsa-Roja-Asada_Molcajetes&modern-blenders

I know nowadays we all are creatures of convenience; if you are not as romantic as me about the whole traditional process~ Hey! Food processor or immersion blender are my weapons of choice. They get the job done in a fraction of a second and get you ready to enjoy the salsa in less that 5 pulses. Best of all is that with this recipe you can still achieve a great deal of flavor by using them.

Flavor wise this salsa has a smokey background and medium moderate spiciness. Please don’t be scared about the amount of chiles. Dry chiles when toasted, become smokey and very pleasantly pungent. Combining these kinds of chiles balances the act. Chile de arbol brings the spicy note and chile cascabel adds deep, color and character. The charred tomatoes and the garlic make this salsa extra savory. Fresh onion and chopped cilantro add a bit of fresh texture that makes the salsa irresistible to eat with chips.

Despite your method of choice, I assure you this red charred salsa will make you dance. It is a staple at our house I make a batch every other week. It keeps really well in the refrigerator for up to ten days.
It is quite a versatile salsa. I use it to top ranchero eggs, breakfast tacos, pork loin, carne asada, beans, bean soup, shrimp, whole fish (like red snapper), and if you add more tomatoes it is a great salsa to use in chilaquiles rojos. And of course its great with chips and salsa a good pilsner beer for spicy little snack. Enjoy!

Salsa-Roja-Asada_Yes,-more-please!

Red Charred Salsa

Makes 4 cups

3 medium large tomatoes about 4”round is what I used.
(like Better boy, Big Beef, Bush big boy. Any juicy, meaty tomato with high acidity content work best)
8-10 dry chiles de arbol
3-4 dry chile cascabel
2 medium garlic cloves, peeled
1-1 1/2 teaspoon sea salt
water

Garnish with:

½ medium size red onion and small bunch of cilantro, finelly choped

Preparation

1. In a cast iron pan or “comal” toast the chiles at medium heat, turning them constantly using a wood paddle. Once they look evenly toasted and showing an intense dark red remove the pan from fire and let them cool a bit until easy to handle. Remove chile stems.

2. Using the same cast iron pan, place tomatoes upside down, set the heat over medium, cover them with a lid to apply some pressure on them so heat will cook them more evenly. Turn them upside up and keep rotating them until well blistered, charred skins and they look cook through. About 8-10 minutes.
Once the tomatoes are charred and cooked set them aside until easy enough to handle. Remove skin, and with a paring knife remove the core of the tomatoes.

3. If making salsa in the food processor or blender:
Place tomatoes, garlic, sea salt, and toasted chiles in blender or food processor and pulse until coarsley or smooth blend. Add a little water if needed. Taste and adjust for salt if needed.

4. If making salsa in the molcajete or mortar:
Place garlic cloves and sea salt in the mortar, smash until pureed. Add toasted chiles 2 at the time and smash until a coarse paste, make sure you smash almost all the chile seeds. If you need more traction add a pinch of sea salt. Once you have a paste, add one tomato at the time into the mortar and smash until well combined. Repeat until you add all 3 tomatoes. Taste and adjust for salt and salsa consistency. This is entirely up to you. Add a bit of water at a time, until you feel is the right consistency for you.

Salsa-Roja-Asada_Toasting-chilesSalsa-Roja-Asada_grinding-chilesSalsa-Roja-Asada_Grounding_chilesSalsa-Roja-Asada_chilie-pasteSalsa-Roja-Asada_detail-smashed-seedsSalsa-Roja-Asada_Chard-tomatoesSalsa-Roja-Asada_grinding-the-tomatoesSalsa-roja-Asada_Yes,-more-please_spicy!

Red Charred Salsa

Top with fine diced onion and cilantro, serve at room temperature,

along with chips and a nice cold beer. Eat with abandon!

Salsa-Roja-Asada_Yes,-more-please!_chips+salsa+lime+beer

View Post or View Comments 5

Upside down Carrot+Coconut+Ginger Cake

Upside-down-carrot--coconut-ginger-cake~Yes,-more-please!

Lately everything in my world seems upside-down, but the little wacky moments in everyday life can be fun. Being playful in the kitchen is my kind of fun. And boy, if this cake screams upside-down, I’m seeing life straight up now!~
After making the Leek and Potato Tarte tatin, a light bulb turned on in my head and crisscrossed with the idea of a carrot cake. What if I apply almost the same concept of a pineapple cake to the carrot cake? Without hesitation I made ½ of a recipe, and it turned into a delicious unexpected result. I placed the carrots on the bottom of the pan and used coconut butter instead of regular butter to create a coating. I added some honey and turbinado sugar which caramelized beautifully on the bottom. Adding some freshly ground ginger was the final touch; fragrant with a spicy lemony note.
I think Ian looked at me funny when I told him I was baking an upside-down carrot cake. He probably though I was crazy…and then when he saw the cake, he just smiled and understood, and when he tried it he asked: “When are we shooting this?”… So I guess he liked it!
The cake is mildly sweet. The caramelized carrots add the sweetness and texture to this scrumptious cake, without being overly sweet. It is more of a coffee cake than the classic carrot cake with cream cheese icing, (which I adore) but, in this case, the no frosting makes the idea of baking and eating cake for breakfast more…manageable…*hehehe*

This recipe I wrote is for a small 6” cake, since is just Ian and I it is more than plenty. You can easily double it and bake a 9”-10”. for bigger crowds. This upside down carrot+coconut+ginger cake  will make a fantastic bake good for brunch or a simple delicious birthday.  I’m really hopping you enjoy this recipe, shoot us a comment, we’d love to hear from you!

Upsidedown-Carrot-cake-ingredients

Upside down Carrot Cake

Makes 1- 6” cake, serves 4-6

Dry:

1 cup all-purpose flour
½ teaspoon baking soda
½ teaspoon baking powder
1 teaspoon cinnamon
½ teaspoon nutmeg
¼ teaspoon ground clove
½ cup shredded carrots
¼ cup shredded coconut
¼ cup roasted Macadamia nuts, roughly chopped

Wet:

1 tablespoon freshly ground ginger
¾ cup turbinado sugar
½ cup safflower oil
2 eggs

For the bottom of the cake pan:

4 tablespoons solid extra virgin coconut oil  I used this kind or butter if you prefer
3 tablespoons turbinado sugar
4 tablespoons honey
1-1 1/2 cups of long shredded carrots
¼ cup shredded coconut
½ tablespoon freshly ground ginger
¼ cup roasted macadamia nuts halves or whole.

Preparation:

Preheat oven at 350F /176 C

1. Shred your carrots, This julienne peeler is one of my favorite tools, it is so easy to use, so much fun and time saver. Makes the julienne a dream!

Upsidedown-carrot-cake_juliane-peeler

Prepare the mold:

1. In a 6”x 4”tall pan, spread an even thick coat of the solid coconut oil.
Thinly grease the sides of the pan as well.
2. Scatter evenly the sugar and honey
3. Layer the shredded carrots evenly
4. Sprinkle the roasted macadamia nuts halves
5. Sprinkle the shredded coconut in an even layer.
6. Set aside in a cool place

Upside-down-carrot-cake_assambling-the-cake
7. In a medium size bowl whisk together all the dry ingredients.
8. Add the ½ cup shredded carrots, shredded coconut, and roasted macadamia nuts.
9. In a small size bowl whisk first oil, sugar and ginger, then add the eggs one at a time and whisk until well combined.
10. With a spatula, mix wet ingredients into dry ingredients until well combined.

Upside-down-carrot-cake_-mix!
11. Poor the batter on top of the carrot layer, and bake for about 30-35 minutes. Until a toothpick in the center comes up clean.

Upside-down-carrot-cake_bake-time
12. Cool on a rack for 20 minutes and un-mold the cake before its completely cool.
Knife… Ready, set go!… first slice is mine!…Enjoy!

Upside-down-carrot-cake_-cake-reveled!-Recovered

Upsidedown-Carrot-cake-caramelized-carrots

Upside-down-carrot-cake_Yes,-more-please!

Upside-down-carrto-cake_Yes,-more-please!-slice

~Scrumptious~


View Post or View Comments 7

Leek+Potato+ Goat Cheese Tarte Tatin

Leek-potato-goat-cheese-Tarte-tatin~Yes,-more-please!
What is a Tarte tatin anyway?.. Basically its an upside down pie. Why would you want to make an upside down pie?..In a word, caramelization. It’s not only the easiest pie-tart you will make, it’s also one of the tastiest. Leeks, green onions, and potatoes are in season. Inspired by the classic of classics Vichyssoise soup, I gave my little spin using the same ingredients I transformed them in to a leek and potato tarte tine that it tastes equally delicious warm or at room temperature.

I used a mix of whole wheat and white flour, to give the crust a nutty flavor and added some thyme, to flavor the crust. Super easy to prepare. The flavors of the leeks, and potatoes shine together,the leeks mellow out the onion flavor and became buttery complementing the potatoes. the little addition of honey adds a little sweet note, fresh cracked pepper , salt and butter is all this tart needs.
Top it all off with the king of fresh cheeses: goat cheese and a little drizzle of extra virgin olive oil.

I made it for dinner with a great green salad and orange slices on the side… The next day we had leftovers for breakfast with a sunny side up egg on the side… Choose your weapon, this is a killer recipe..enjoy!

Leek-Tarte-tatin_ingredients

Leek+Potato+ Goat Cheese Tarte Tatin

Makes 1- 10” round tarte tine

3-4 Leeks upon diameter and length.
4- 6 Small red potatoes or yellow wax potatoes thinly sliced.
1 tablespoon honey
1 glug extra virgin olive oil
4 tablespoons butter
Salt + Pepper to taste

1 dough recipe follow  below

Garnish with:

Liberally amounts of Goat Cheese (until you yodel-adle-eedle-idle-odle!)
Drizzle of extra virgin olive oil
Fresh Thyme
Adjust Salt and Pepper

Preparation Method:

How to wash your Leeks, a leeky matter…

Leek-Tarte-tartin_how-to-wash-them

Leeks are bulbs like onions, the part we are eating is the bulb that is under the soil and believe it on not, this is the cleanest. The part of the plant that sprouts out of the soil that’s were the trouble is. That’s where all the sand sneaks in and there is nothing worse than when you are eating a leek, than to crunch those little particles of sand. Until I understood the anatomy of this vegetable, I couldn’t make sense of how to clean it.
Infinite inner layers, like an onion in a tube form is where the sand goes. Depending on how are you cut them there are different washing methods.
In this case, I removed almost all the green leafy part. As my friend Arin said, “Don’t get greedy!’ The greener parts look pretty but they tend to be more fibrous. Leave those parts to make vegetable stock. Slice in 1”-2” rounds removing the tops.(see picture below)
The parts that are closer to the leafy greens are the ones that needed the most care and to wash the rest are fine. I just submerge the greenest slices and press a little under the running water. I slice them and place them in paper towels that absorb the extra water. Once this procedure is out of your way the fun part begins. Preparing the dough!

For the Dough:

Makes 1- 10″ round  crust

¾ cup unbleached all purpose flour
¾ cup whole wheat flour
2-3 thyme sprigs
½ teaspoon salt
1 stick = 4 oz unsalted butter, cold and cut into small squares.
4 to 6 tablespoons iced water

How to make the crust:

Measure all your ingredients, and place all the dry ingredients in a bowl and mix. Place bowl in the freezer. Meantime cut your cold butter, and iced water ready to measure. Remove the bowl of dry ingredients from freezer and add the butter. Add the thyme. With a pastry Blender incorporate the butter and flour until the mixture resembles to a coarse meal, and the butter pieces are small like the size of a pea. Slowly add the cold water and carefully with your hands form a dough that just holds together. Do not over work the dough. Once that the dough barely holds together cut a piece of plastic wrap and place your dough. Wrap it and shape it into a disk.
Refrigerate for at least 1 hour or 15-20 minutes on the freezer. If you plan ahead you can make the dough the night before.

Leek-Tarte-tartin_making-the-dough

Assembling the tart:

1. In a 9-10” skillet with rounded edges, melt 4 tablespoons of butter, add a glug of extra virgin olive oil, drizzle the honey, sprinkle the sea salt and freshly ground pepper.
2. Place an even and tight layer of leeks, and top this with a layer of the thinly slices of potato.
Sprinkle some salt and pepper.

Leek,-potatoe-goatcheese-Assambling-tarte-tartin
3. Once your dough is chilled, roll it out into a 10” circle 1/4” inch thick.

Leek,-potatoe-goatcheese-roll-the-dough
4. Cover the inside of the skillet with the dough, and tuck the edges.(see picture)
5. With a small pairing knife make 4 incisions. Bake at 425F/ 220C for about 25-30 minutes on the first 1/3 of the oven rack. until the top is golden brown.

Leek-tarte-tartin_how-to-place-the-dough
6. Remove from the oven, and cool the tarte tine for about 10-15 minutes.
7. With the help of a round plater, cover the skillet and wrap it with a kitchen towel. Flip.
Flip it with conviction, As Julia Childs said! (you can try to make the voice, some times this works best…)

Leek-Tarte-tatin_how-to-flip!

Leek-potato-goat-cheese-Tarte-tatin_Yes,-more-please!

Leek-potato-goat-cheese-Tarte-tatin_slice,-ready-to-eat

The leeks should be perfectly cooked, but not mushy, they hold their shape, they have this beautiful yellowish green color, the butter has done it’s magic. It should glisten…
Sprinkle some kosher salt, pepper, drizzle some extra virgin olive oil, and fresh thyme.

Enjoy!

Leek-potato-goat-cheese-Tarte-tatin_slice-Yes,-more-please!


View Post or View Comments 15

My perfect dark chocolate pairing

My-perfect-Pairing-Dark-chocolate_Yes,-more-please!

A cappuccino can rescue any morning or afternoon. Taking a break and indulging in a foamy creamy cup of coffee is like taking a bubble bath. I’m always craving something sweet in the middle of the afternoon, and this pairing does the trick for me. A warm cup of cappuccino and a piece of dark chocolate that I dunk into the coffee. The dark chocolate starts to warm up and slowly melts becoming sinfully silky. The flavor of coffee intensifies the chocolate notes as you sip it. The frothy warm milk foam creates an ethereal chocolate bite!…*sigh*

Last Sunday I sat and watched migratory birds under our small tree eating from our feeder. Ian help me set up a camera and I took photos through my front window while I had my cappucino and chocolate treat. It is often the little things that give my day something special.
For me cappuccino and dark chocolate is the perfect recipe for a little boost for a happy endorphinated afternoon…

My perfect Ghirardelli Intense Dark Chocolate~Yes,-more-please!

My perfect dark chocolate pairing…

Cappuccino and dark chocolate

What about your favorite pairings?…I’d love to read you, leave us a comment!
There is always a great deal of listening when it comes to chocolate…

View Post or View Comments 0

Carrot Corn dogs

Carrot-Corn-dogs-ingredients
So many carrots too little time… Its carrot bonanza season, rabbits everywhere, and have you started to turn orange yet?… Well I hope not, because this recipe is gonna drive you insane. As you know, despite all the wholesomeness I believe in, I have a weakness for a certain processed food… hot dogs…I know,  its terrible isn’t it? I know every fact of how the industry introduced us into this strange tubular meat, but yet I’m still hooked.
So in the search for a less processed option, a friend told me about this place in L.A where they serve sous-vided carrots and make vegetarian hot dogs, how crazy good does that sound?
That’s when I had a revelation: How about creating a corn dog, with carrots? Kaz-zam! Done deal. I made them. No, I do not own a sous-vide machine and nor the rest of the mortal cooking souls on earth but if you do , call me we can hang out!; So I oven roasted the carrots, to give some extra flavor and also to pre-cook the carrot. I made the most basic recipe for the batter. But they needed a little extra luv. I wanted a contrast in textures, that thing you crave in a fried object, the crusty salty outside and soft inside.
To that end I added 1 part of rice flour, peas, green onions and corn kernels into the batter.
The result is crazy good!… when you deep fry these babies, they get crusty outside, soft inside, and the peas and corn kernels pop in your mouth with a burst of extra flavor. The carrot center is stellar.
Don’t be nervous about deep-frying,  using the proper technique will ensure you  great success. I do not deep fry food very often, so I do not own a deep fryer and I do just fine.
You can easily get great results with the following tips:
Get a thermometer for crying out loud!
They cost around $9-14  no need to break the bank and it is one of the best kitchen investments.
Buy Peanut Oil:
It is the best oil to deep fry, no saturated fats, no smells, no greasy food.
Now a days you can buy small amounts of peanut oil at the super market.
Use a heavy bottom,  6″-8″ diameter deep enamel or aluminum pot. Straight sides for easy thermometer attachment.
And remember safety always come first when dealing with hot oil.*

This carrot corn dogs are great for kiddos and vegetarian adults in need of a little indulgence, Enjoy!

Carrot-Corndog-bite~Yes,-more-please!

Carrot Corn dogs

Makes 12-16 / 3” mini carrot corn dogs.

6-8 Long, medium thick carrots.
You will need about 12-16 of  3’” long pieces.

For the batter:

½ cup yellow corn flour
(I used Larry’s Corn Meal, from organic/non-gmo Coyote Creek Mill corn)
½ cup all-purpose flour
¼ cup stone ground rice flour
2 tablespoons baking powder
½ teaspoon baking soda
1 teaspoon sweet paprika
¼ teaspoon salt

2 tablespoons honey
1 large egg
1/2 cup milk or unsweetened coconut milk
1 teaspoon apple cider vinegar

1 scallion finely chopped
½ cup  fresh corn kernels
¼ cup fresh peas or frozen if you must.

16 oz Peanut Oil for deep-frying.
16 wooden or bamboo sticks.

Utensils:

Long tongs, deep fryer, or candy thermometer, 6”-8”diameter pot  with straight walls for deep-frying, cooling rack.

Preparation Method:

1. Cut carrots into 3”- 4” long. Place them on a roasting pan, season them salt and pepper do not drizzle oil. Roast them at 400F for about 12-15 minutes.
Carrots should not be soft, al dente centers is best, since they gonna keep cooking when frying.

2. When ready, set the carrots aside let them cool completely, then proceed to insert the bamboo sticks.

3. Meantime in a medium size bowl, mix all the dry ingredients, then add all the wet ingredients, mix until well incorporated , small lumps are ok. Fold into the batter corn kernels and peas. Refrigerate for about 10-15 minutes

Carrot-Corndog

4. Place your chilled batter into a tall glass or jar, this will allow you to easily submerge the carrots into the batter.

5. Prepare your utensils and have everything ready, tongs, cooling rack, batter in a glass, see picture below.

Carrot-Corn-dogs_set-up

6.  Start  heating the oil. Check the oil temperature 360-375 degrees / 185-190 Celsius.
7. Dip the carrots into the batter, one at a time, holding the carrots from the stick with tongs, carefully and slowly drop it into the hot oil.
8. Monitor the temperature, it should not drop more than 15 degrees, when placing the corn dogs.
9. Do not crowd the pan. Fry 3-4 corn dogs at the time. This will ensure you evenly  golden brown  and well cooked batter.
10. How to know when they are cooked and ready to come out of the oil?  Corn dogs are floating, look evenly golden brown color, the bubbles around them are smaller.
11. Use tongs to take them out. Place them onto a cooling rack. Keep them warm in the oven.
12. Serve warm, with the dipping sauces, or simple ketchup and mustard. Enjoy!.

Carrot-Corn-dogs_1,2,3,4-stepsCarrot-Corndog-cooling-rack

Dipping Sauces:

Curry Ketchup:

¼ cup Ketchup + 1/4 teaspoon yellow curry + ¼ teaspoon rice vinegar = Mix.

Honey Mustard:

2 Tablespoons Honey + 2 Tablespoons Whole grain mustard + 1 teaspoon yellow mustard = Mix.

Dill Yogurt:

¼ teaspoon dry dill + plain greek yogurt + ¼ teaspoon celery salt = Mix.

Carrot-Corndog-dipping-saucesCarrot-Corndog~Yes,-more-please!

Watch out wacky wabbits!

*Be aware, hot oil at this temperature can inflict a lot of pain and injury so use a back burner on your stove if possible and keep the cooking pot (and its handle) away from children. In fact, I think its best to keep younger children away from the whole process and never let the frying pot leave your attention so you can monitor the oil’s temperature and keep the food from over cooking. Deep frying this batter, or anything else, some oil is bound to spatter so use long tongs or a spider to handle the food. This will prevent you from getting burns too. Focus and be on a Zen frying mode. The reward is  scrumptiously good.

View Post or View Comments 2

Sweet Potato Salad

Sweet-Potatoe-Salad_ingredients

It takes a lot to be a sweet potato…to be more precise 95 days. Along with plenty of ground space and long warm days; they grow best in an imperfect soil. Sweet potatoes grow fast. Deer, japanese beetles, and many other insects love to nibble on their sweet leaves causing light damage to the plant. However, sweet potatoes are so vigorous that they usually outgrow foliage pest problems. When they are ready to harvest, they need to be cured 10 days after they have been cut to develop their sweetness. In late summer, Sweet potatoes often produce flowers that resemble those of morning glory, the ones that are blue and look like a phonograph.

When I learned about the life of a sweet potato, it reminded me of my life.
I, like the sweet potatoes, have grown on an imperfect soil, raised from a divorced parents I grew up in a not so perfect family. It takes a lot to be complete and to develop your persona considering this circumstances. I grew up fast. And just like sweet potatoes I’ve been vigorously fighting life problems and circumstances that in most cases have allowed me to grow new foliage. Both of my parents have helped me in being who I am today and for that I’m infinitely grateful for every bit of it.

Now, for quite a while, I’ve been trying to find my so called “purpose” utilizing my passions and skills. Eight months ago, after a long stretch of unfulfilling jobs, I decided to start this cooking blog with Ian, my husband. Finally I felt I could cultivate the life I was meant to be pursue. And we have. We post, we photo shoot, we write, we share, we eat, we laugh and listen to music, we’ve seen the blog grow and will keep it coming!.

To Ian who often I call “My sweet potatoe” some days is hard to harvest,
but always sweet when I’m with you.

I made this salad thinking of him enjoying the process and watching this blog bloom.

Thank you to all our family, friends and readers for your time, comments and support. You, reading the blog, making the recipes sharing and commenting that’s what keep us going. Enjoy!

Sweet-Potatoe-Salad_ready-to-eat!

Sweet Potato Salad

Serves 4-6

3-4 medium size sweet potatoes.
1 medium size red bell pepper dice into cubes
1 english cucumber with skin small diced
½ cup celery into small dice, including the leafy parts
½ cup red onion
1 tablespoon of roughly chopped capers
3 tablespoons of fresh mexican mint -yerbabuena chiffonade* see picture below.
(if using spermint, or mint use a little less since the flavor is a bit stronger.)

Sweet-Potatoe-Salad_mint-chifonade

For the vinaigrette:

6 tablespoons of good quality extra virgin Olive Oil I used
3 tablespoos rice vinegar
2 tablespoons lemon juice
¼ cup of fresh mandarin juice or orange juice
1 teaspoon dry or fresh dill
1 garlic clove grated
1 teaspoon salt
1 teaspoon fresh cracked pepper

Preparation:

1. Wash, peel, cut into cubes and boil the sweet potatoes. Cook until firm or al-dente.
When cooked drain and rinse with cold water to stop the cooking process. Live them air dry.
2. Dice, cut, shifonade all the rest of the vegetables and combine them all in a bowl.
3. Wisk all the vinagrette ingredients.
4. Combine the vinaigrette, cooked sweet potatoes and the rest of the vegetables.
Toss until well combined. Serve.
5. This salad taste great if you make it ahead of time. Serve at room temperature.

Sweet-Potatoe-salad_vinaigrette

Sweet-potatoe-Salad_assamblingSweet-Potatoe-Salad-Yes,-more-please!


View Post or View Comments 6

Pizza Primavera

PIZZA-PRIMAVERA-~Yes,more-please!

Pizza Primavera is a celebration of Spring! Using all the tender, sweet, crisp and fresh vegetables that the season gives us and inspired by all those beautiful shapes, colors, and textures this pizza has a refreshing taste of renewal. For me renewal translates as experimenting and trying ingredients and flavors that come with the new season.

Recently I’ve been experimenting with different gluten free flours, like oatmeal, brown rice, potato starch, tapioca, garbanzo, and quinoa. The fact that lately a lot of people have been diagnosed with a gluten intolerant condition means more are in need of extending their cooking horizons. Even if you don’t have gluten intolerance you should try this for its variation in flavor and texture.

Recently I baked an Irish Soda bread using 1/2-1/2 whole wheat and oat meal flour, which gave to the bread so much flavor than regular all purpose flour. That got me excited and I started to experiment with the not so easy task to come up with a gluten free pizza dough. For this pizza crust I experimented with different ratios, of brown rice flour, tapioca, potato and millet flour. The results were delicious and flavorful. However it ended up a bit overpriced for what a pizza dough should cost. I used 3-4 different types of flours each one had a mission to give the right texture to the crust, great achivement, but not very practical. So in my quest for a more reasonable option I stumbled upon a great mix, Bob Red Mill Gluten Free Organic Pizza Dough. I read the ingredients and to my surprise this mix is based on almost the same combination of 4 different flours I was trying to combine. The difference: I bought one bag. This simplifies the whole process for a fraction of the cost, and in my case pantry space. (I have a tiny pantry). 

Next, I gave myself the task to make this crust using this mix… and it was great!. Flavor and texture were spot on. When trying new things you have to see with new eyes, and tastebuds. The texture of a regular crust has a certain chewiness for which gluten is the responsible. When you have no gluten, other textures and flavor come to replace that chew factor. This crust has a lovely light texture, great flavor, and crunch, with a tender bite, making it easy to love. The tender light crusty and crunchy crust is the perfect canvas for the sweet delicate Spring vegetables. The mix is ready in 5 minutes and it does not requires kneading. Proofing time is 20 minutes and it bakes in 12 minutes total. It’s fun to make and I loved trying something new. This crust is a keeper!

For this Pizza Primavera, pre-roasting the vegetables is a must. They add extra flavor deep to the pizza. I love to leave the carrots al-dente, they add a bit extra crunch and texture to the pizza. Cheese?…my advice: go light on the cheese you want to be able to taste the vegetables. I chose a smoked provolone to balance the sweetness on the roasted vegetables. You must try this pizza, I assure you, you will fall in love with it. Give your self the chance to explore and renew your taste buds, perhaps for your next dinner party or get together… and have fun welcoming Spring!

Pizza-Primavera_Ingredients

Pizza Primavera

A pizza with spring vegetables and a delicious gluten free crust…

Makes 4 – 8”  pizzas

Vegetables:

12-16 small spring carrots cut in half.

2-3 bunches thin sweet green beans cut on a bias.

2 cups Sliced Cauliflower florets.

½ cup fresh peas

1 cup cherry or grape tomatoes halved

For the caramelized onions:

1 large red onion thinly sliced

a glug of extra virgin olive oil

2 tablespoons of balsamic vinegar

a pinch of salt and fresh cracked pepper.

For the sauce:

2 cups roasted crushed tomato sauce.

2 grated garlic

2 tablespoons extra virgin olive oil

Salt and pepper to taste.

2-4 sprigs of fresh herbs, like oregano, rosemary or basil.

Cheese:

3 cups grated smoked provolone cheese or tofu for  a vegan option.

Grated parmigiano regiano cheese.

Pizza crust:

1 package of Bob’s Red Mill Gluten Free pizza Dough

(The mix includes an envelope of dry active yeast, how awesome is that!)

1-1/2 warm water

2 eggs or 2 tablespoons of flaxseeds and 8 tablespoons of water for vegan option.

Follow the instructions on the package.


Gadgets and utensils:

Pizza peel: It’s a must!, its so much fun to use and since it has a long handle keeps you safe from the oven heat. (I like this wood kind)

Pizza Stone or  Saltillo tile*

You can use a cookie sheet or a metal round pizza tray that will work too. I recommend, if you are a pizza lover, a pizza stone or the Saltillo tile, are a great investment. The crust gets a fantastic  color, and it gets crunchier when is cooked onto a stone surface.

*How or where to get a Saltillo tile? 
At your local home improvement store. You must make sure its and unglazed quarry tile.Usually the name is Saltillo tile, from the region in Mexico. They come in two sizes, I prefer the 11×11. Usually you can fit 4 into your oven, if you are planing to make a big pizza, For us 1 or 2 tiles are enough. A smaller size pizza like an 8” will cook great and evenly onto an 11x 11. The magic of these tiles is that you can use them in the oven and over the grill, if you feel like you want a grilled pizza, this works like a charm, price-wise we paid around 1-3 dollars per tile. This is a good solution if you don’t happen to have a pizza stone. And regarding durability: we’ve been using the same tile for six years!

To prepare the tiles for baking: Presoak them in water the day before, and let them air dry. Once they are totally dry they are ready to use. Be careful not to heat them wet to avoid cracking and of course let them cool before removing them from the oven or cleaning them.Pizza-utencils

Preparation Method:

Preheat your over at 450F/ 232C

Place your pizza stone or Saltillo tile into the oven to start warming up.

(This step is crucial, to get a great crusty crust, the hotter the surface the crustier it will get.)

Pizza dough:

Start by making your pizza dough. Follow the instructions on the package, I did not use the mixer, I used a wood spatula and kneaded by hand for a bout 2 minutes. Divide the dough in 4 equal parts, pre shape into 4 balls, cover with plastic wrap and let it proof at rom temperature for about 20 minutes.

Pizza-Primavera_Making-the-dough

While your dough is resting, prepare your toppings:

  1. In a sheet pan, lined with some parchment paper, place the carrots, cauliflower and green beans, drizzle with a bit of olive oil salt pepper and roast at 450 F for about 5-7 minutes. The vegetables should look not completely roasted, as they will continuously cook when placed on the pizza. You want the vegetables, tender with a bite.
  2. Meantime in a saute pan add a glug of extra virgin olive oil and the red onions and saute on medium heat for about 5 minutes, add some salt and pepper. Reduce the heat to low and add about 2 tablespoons of balsamic vinegar. Leave them on low heat tossing occasional for about 15 minutes or until tender and caramelized. (see picture below)
  3. Mix all your sauce ingredients, adjust salt and pepper, and warm for a few minutes to marry the flavors.
  4. Cut your tomatoes, grate the cheese, season your sauce, pre-roasted vegetables, have everything ready to have fun topping your pizza!

Pizza-primavera_mise-in-place

The making!

  1. Crank up the oven temperature to 500F. This gets the crust crunchy when it cooks on the hot pizza stone.
  2. Add a generous amount of corn meal onto the pizza peel. Apply some extra virgin olive oil in your hands and take one portion of pizza dough. Shape it into a disk and place it in the middle of the pizza peel. With the tip of your fingers, starting from the center out gently massage and start flatten and shape the dough into an 8-9” disk. (see picture below)
  3. Pizza-Primavera_-Shaping-the-pizza-dough
  4. Once you have the 8-9”round pizza dough, make sure its lose, by gently shaking the pizza peel in horizontal motion. The dough should scoot around easily.
  5. Place the pizza peel onto the pizza stone. Gently shake the wood peel back an gently forward to slide the pizza crust onto the pizza stone. See picture below. Be as quick as you can so the oven does not loose temperature.
  6. Immediately close oven door. And adjust oven temperature to 450.Bake crust for 5-7 minutes until slightly golden brown.
  7. Pizza-Primavera_-in-the-oven
  8. With the help of the pizza peel remove the crust from the oven and proceed to place the toppings.
  9. Start with a thin layer of tomato sauce, and place the roasted carrots and veggies along the radius of the pizza crust. Add the caramelized onions, top with grated cheese, and sprinkle fresh herbs.
  10. Place the pizza back into the oven for another 7-8 minutes, or until the cheese is melted and it has some color. With the help of the peel pull out the pizza into a wood board. Let it rest for 1-2 minutes, and proceed to cut. You can use a pizza cutter or a chef’s knife.
  11. Pizza-Primavera_Assambling-the-pizzaPizza-Primavera-sliced~Yes,-more-please!

Serve immediately.

 Top with arugula, a drizzle of extra virgin olive oil, squeeze of lemon salt and pepper…

Enjoy! 

Pizza-Primavera_slices~Yes,-more-please!

View Post or View Comments 8

Privacy Policy Contact Us Yes, more please!