Salads & Vegetables

Grilled Nopalitos and Red Bell Pepper Salad

Grilled-Nopalitos+RED-Pepper-Salad

Have you ever had Nopalitos? Nopalitos are traditionally used in Mexican cuisine, they are part of the cactus family, there are more species than you want to know about. The word “Nopal” comes from the Nahuatl word meaning “pads” refers to the plant shape. They are a great source of Vitamin C, minerals like magnesium, manganese, calcium,and  also a great source of fiber. Besids their delicious and nutritious qualities, recent research studies have shown a positive effect on glycemic index which could be useful and a great value to add to your diet when managing diabetes or to include on your weight loss diet.

Anyhow, what you really need to know about Nopalitos and what I want to share with you is how delicious they are when prepared in a right simple manner.

Nopalitos have a bad reputation among vegetables because of their slimy and viscous flesh. However there are different ways to prepare them and a couple of tricks to avoid the slimy culinary disaster.

Like any other vegetable, Nopalitos can be boiled, steamed, sautéd, grilled or eaten raw, and there is a trick for each one of these cooking methods. Just to mention one of these tricks briefly, boiling nopalitos is the most common of all methods. When boiling Nopalitos, the trick to it is to add 4-6 tomatillo husks along with a piece of onion, a small bunch of cilantro and some sea salt in a pot of simmering water. The tomatillo husks will avoid the slimy matter. Simmer them in a pot over medium heat  for about 15-20 minutes, until they change of color. Turn the heat down, and  let them cool.  Strain and rinse thoroughly. Combine the nopalitos with a good amount of Pico de Gallo salsa, toss and they are ready to serve. As you can see, with a little effort you can make the fastest salad of them all!

This kind of Nopalito salsa/salad is ideal to have as a side dish. You can make tacos, sprinkle some queso fresco, and  even cook some of this left over salad with scrambled eggs, to prepare nopalitos egg breakfast tacos. OMG I just gave you another recipe! hehehe…

My favorite way to eat nopalitos it’s grilled. The char gives them a great flavor, firm texture and reduces the slimy texture almost to zero when you grill them. Therefore it’s one of my favorite ways of cooking them. Nopalitos when grilled, make the best tasting salad. This is definitely one of my personal favorite Mexican dishes, so simple and full of great flavors.

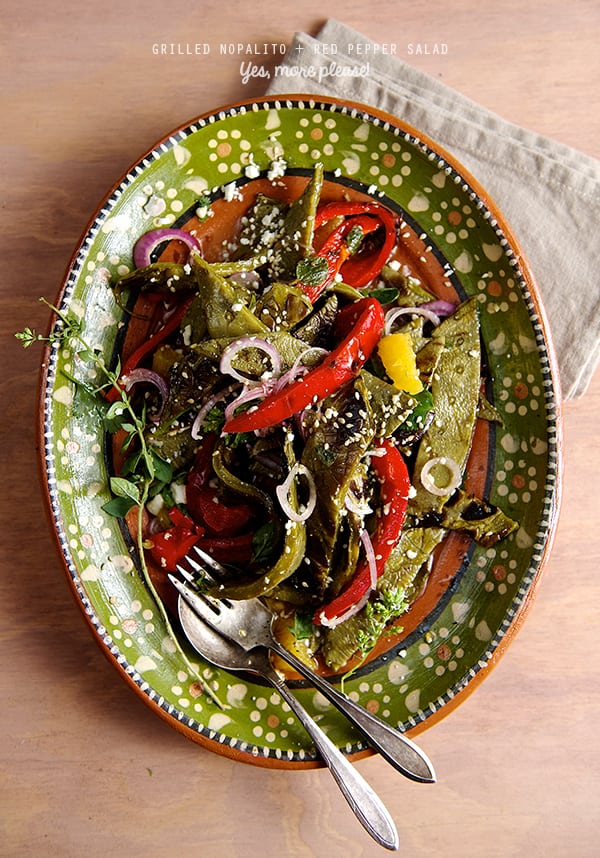
This Grilled Nopalitos and Red Bell Pepper Salad, combines simple ingredients and a crisp and tangy simple vinaigrette. As easy as it sounds it’s a great summer dish. This salad can be served as a side dish to accompany any grilled meat or fish. It can be made into vegetable medley tacos or as a vegetable complement over rice, quinoa, or whole black beans.

I hope you enjoy the recipe and give yourself the opportunity to try something new. Nopalitos salad has been in Mexican cuisine for a long time and it is too delicious to be ignored.

Give nopalitos a chance!

I would love to hear back from your culinary adventures. Remember to check our music pairings, if you are in need to shimmy while you grill…Enjoy!

Nopalito-Salad_Ingredients_Yes,-more-please!

Grilled Nopalitos and Red Bell Pepper Salad.

Serves 4… or 2 hungry Vegetarian Mexicans!

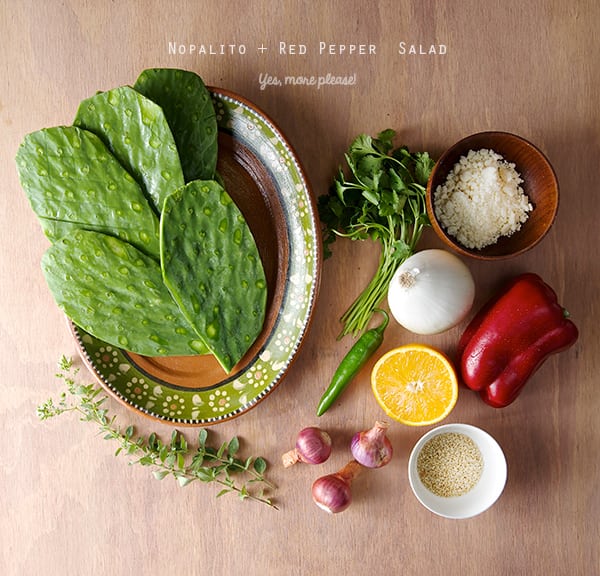
5-6 Nopalito pads, cleaned and thorn removed.*
1 large red bell pepper
3 small shallots or 1 small white onion thinly sliced.
1 small bunch cilantro (leaves only)
1 serrano pepper no-seeds finely chopped (optional)

For the vinaigrette:

1/3 cup Orange juice
2 tablespoons apple cider vinegar
4 tablespoons grape seed oil
2 tablespoons agave nectar
1 tablespoon toasted sesame seeds.
2 sprigs of fresh oregano or 1 teaspoon dry mexican oregano.
1 teaspoon sea salt.
Fresh cracked black pepper to taste.

Garnish with:

Toasted sesame seeds.
¼ cup Cotija cheese crumbled.

*Nowadays it’s very easy to find fresh Nopalitos that have been cleaned and de-thorned. If you are lucky enough to have your very own nopalito cactus plant, gear up! Use thick leather gardener gloves, a pair of tongs, and a  sharp fillet knife to shave the thorns off. Rinse and wash thoroughly. Now it’s ready to use!
If you live here in Texas this type of Cactus Plant is very common to find in the prairie. Have a culinary adventure!
Tip: when choosing wild nopalitos: you will want to pick the medium-small size, deep green, about 1/4 inch thin or less. They look tender and have plump edges with no dry spots.These are the best tasting nopalitos and tender when cooked.

Preparation Method:

1.Wash and with a pairing knife gently score your clean nopalitos.
2.Prepare your vinaigrette by combining all the ingredients on a bowl and whisk.

Nopalito+Red-Pepper-Salad_vinaigrette+redpeppers

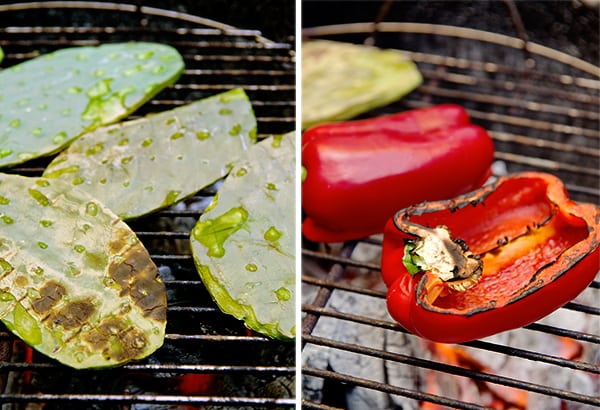
3. Fire up your grill. Grill Nopalitos and red bell pepper. Grill both sides until cooked and charred.
Nopalitos turn color from bright green to a olive green when cooked. Be sure to blister them. This will add so much flavor to the salad.

Nopalito-+-Red-pepper-Salad_grilled

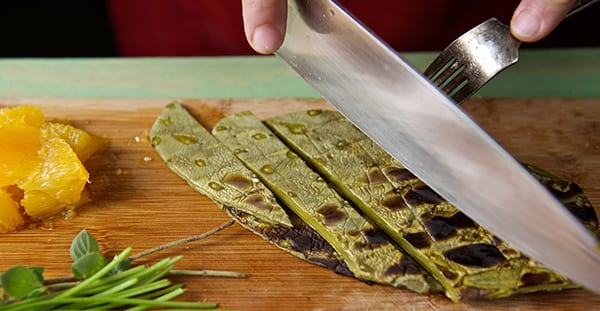
4. Slice your grilled Nopalitos into ¾” ribbon strips, slice your grilled bell peppers into a thinner strips.

Nopalitos+RED-Pepper-Salad_nopalito-ribbon-slices 
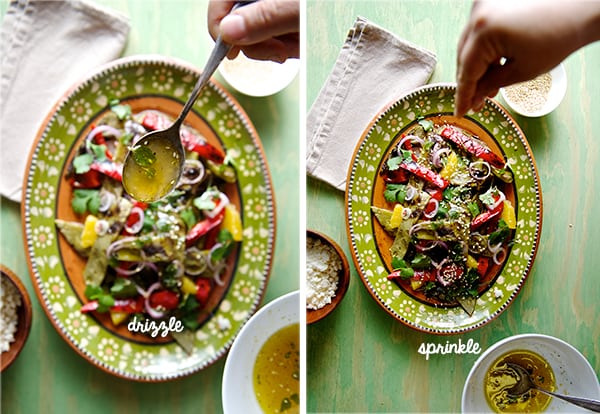
5. On a platter toss all ingredients and drizzle the vinaigrette. Sprinkle some toasted sesame seeds and/or some Cotija cheese crumbled. Serve room temperature.

Nopalitos+RED-Pepper-Salad_assambling_Yes-more-please!

Nopalitos+RED-Pepper-Salad_Yes-more-please!

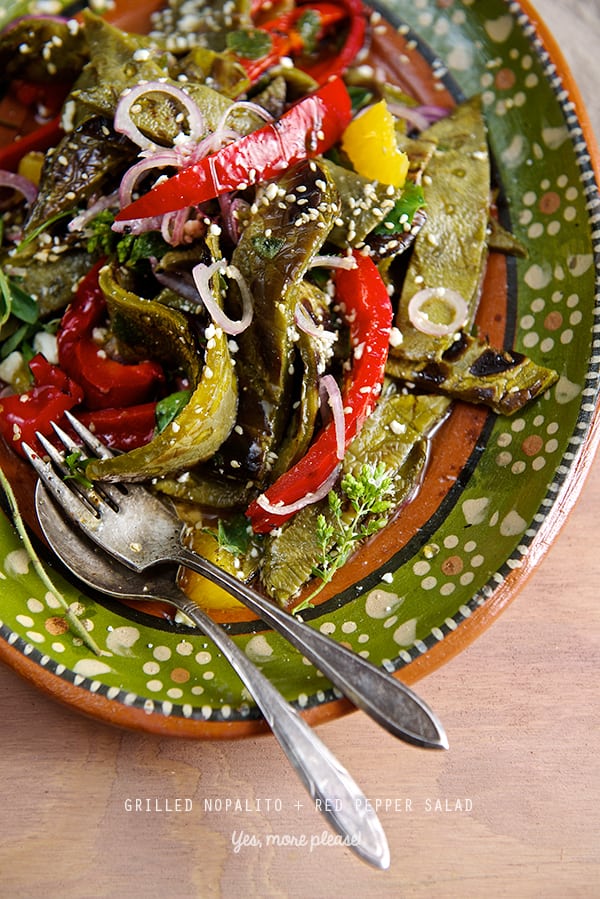
Special Thanks to my Aunt Paloma,  who sent us this beautiful hand painted clay platter

from Guadalajara Jalisco, Mexico. XoXo 

Best, Ian & Mariana.

Music Pairing: John Lennon – Give Peace a Chance

View Post or View Comments 0

Vegan-mato a Vegetable Cocktail

Vegan-mato-veg-cocktail-Yes,-more-please!-drink-your-veggies-in-a-fun-way!

Need some veggies in your life? Let’s veg-out!, I mean Veg-in, Vegan-mato is a vegetable cocktail that delivers a fun way to drink and eat your vegetables. Let’s  throw a party in a glass!
Sometimes you just need something that boost your inner health and some vegetable motivation in liquid form is the way to go. Not sure what to do with left overs veggies of the week? juice it up!
This Vegan-mato is waiting for you, perfect summer power drink, made with fresh vegetables, all natural, extremely flavorful and fun to make.

It can’t be easier than to throw all the veggies on a food processor, season, squeeze some lime juice, sea salt, a little hot sauce kick, some ice, a straw and some extra veggies to munch and crunch.

This Vegetable-non alcoholic cocktail is one of the best ways to drink you veggies.

Have a great weekend…Enjoy!

Do you need an umbrella to go with this cocktail? Perhaps, perhaps, perhaps…
Check our music gallery for our music-recipe pairings…

VEGANMATO_VEGCOCKTAIL_ingredients_Yes_moreplease

Vegan-mato a Vegetable Cocktail

Serves 2 large mugs or 4 short glasses.

4 Roma tomatoes
3 large carrots
1 medium orange peeled
2-3 small cucumbers
1 spinach handful
2 large celery stalks including the leafy tops (celery leafy tops are a great source of magnesium do not waste them! Drink them, include them on your salads.)
1 sprig of parsley
1 green onion
2 inches of fresh ginger

Season with:

the juice of 2 limes
2 teaspoons soy sauce
1 teaspoon sea salt
1 pinch of celery salt
2 pinches of freshly ground black pepper
1 teaspoon of spicy brown mustard
2, 3, 4 dashes of your favorite hot sauce.

Garnish with:

2 bamboo skewers
Celery stalks
Martini Olives, jumbo pepper stuffed olives or Jalapeno stuffed olives.
Pickles
Fresh cucumber wedges
Cherry tomatoes
Radishes and chopped capers

Some extra sea salt and a half of lime to cover the rim of the mug.

Note: It is very important to me to make emphasis on how important it is to buy organic produce when juicing. Flavor, nutritional value is superb when organic vegetables are used; believe me you don’t want to be drinking pesticides. Please take this in consideration…

Vegan-mato_extract-the-juices_Yes,-moreplease!

Directions:

1. Chill your Mugs, by placing them on the freezer.
2. Wash and cut the hard ends of vegetables.
3. With the help of an electric juicer, juice all your vegetables first and add the orange last. The juicy orange will help to clean up all bits of vegetable flavor on your juicer.
4. To this juice, add the soy sauce, sea salt, pepper, spicy brown mustard, a few dashes of hot sauce, and the juice of two limes. WHISK!!! until well combined. Taste to adjust the flavor.

Vegan-mato_a-Veg-cocktail_squeeze-the-limes!

Veganmato_vegcocktail-party-Yes,-more-please!

Veganmato_vegcocktail-party-Yes,-more-please!
5. Make your vegetable skewers, using what ever you prefer for garnish, cherry tomatoes, radishes,caper-berries, olives, pickles the limit is your imagination.
6. Take the mugs out of the freezer, rub some lemon on the rim and dip it in salt. Add lots of ice.
7. Add your celery stalk, a garnish skewer, a straw, umbrella, sandals, a sunny porch and some great music check our music pairings here!

Sip-crunch-munch-repeat_Vegan-mato_Yes,-more-please!

Cooking music Pairing: Guardians of the Galaxy- Awesome Mix Vol. 1


View Post or View Comments 2

Sweet Potato Salad

Sweet-Potatoe-Salad_ingredients

It takes a lot to be a sweet potato…to be more precise 95 days. Along with plenty of ground space and long warm days; they grow best in an imperfect soil. Sweet potatoes grow fast. Deer, japanese beetles, and many other insects love to nibble on their sweet leaves causing light damage to the plant. However, sweet potatoes are so vigorous that they usually outgrow foliage pest problems. When they are ready to harvest, they need to be cured 10 days after they have been cut to develop their sweetness. In late summer, Sweet potatoes often produce flowers that resemble those of morning glory, the ones that are blue and look like a phonograph.

When I learned about the life of a sweet potato, it reminded me of my life.
I, like the sweet potatoes, have grown on an imperfect soil, raised from a divorced parents I grew up in a not so perfect family. It takes a lot to be complete and to develop your persona considering this circumstances. I grew up fast. And just like sweet potatoes I’ve been vigorously fighting life problems and circumstances that in most cases have allowed me to grow new foliage. Both of my parents have helped me in being who I am today and for that I’m infinitely grateful for every bit of it.

Now, for quite a while, I’ve been trying to find my so called “purpose” utilizing my passions and skills. Eight months ago, after a long stretch of unfulfilling jobs, I decided to start this cooking blog with Ian, my husband. Finally I felt I could cultivate the life I was meant to be pursue. And we have. We post, we photo shoot, we write, we share, we eat, we laugh and listen to music, we’ve seen the blog grow and will keep it coming!.

To Ian who often I call “My sweet potatoe” some days is hard to harvest,
but always sweet when I’m with you.

I made this salad thinking of him enjoying the process and watching this blog bloom.

Thank you to all our family, friends and readers for your time, comments and support. You, reading the blog, making the recipes sharing and commenting that’s what keep us going. Enjoy!

Sweet-Potatoe-Salad_ready-to-eat!

Sweet Potato Salad

Serves 4-6

3-4 medium size sweet potatoes.
1 medium size red bell pepper dice into cubes
1 english cucumber with skin small diced
½ cup celery into small dice, including the leafy parts
½ cup red onion
1 tablespoon of roughly chopped capers
3 tablespoons of fresh mexican mint -yerbabuena chiffonade* see picture below.
(if using spermint, or mint use a little less since the flavor is a bit stronger.)

Sweet-Potatoe-Salad_mint-chifonade

For the vinaigrette:

6 tablespoons of good quality extra virgin Olive Oil I used
3 tablespoos rice vinegar
2 tablespoons lemon juice
¼ cup of fresh mandarin juice or orange juice
1 teaspoon dry or fresh dill
1 garlic clove grated
1 teaspoon salt
1 teaspoon fresh cracked pepper

Preparation:

1. Wash, peel, cut into cubes and boil the sweet potatoes. Cook until firm or al-dente.
When cooked drain and rinse with cold water to stop the cooking process. Live them air dry.
2. Dice, cut, shifonade all the rest of the vegetables and combine them all in a bowl.
3. Wisk all the vinagrette ingredients.
4. Combine the vinaigrette, cooked sweet potatoes and the rest of the vegetables.
Toss until well combined. Serve.
5. This salad taste great if you make it ahead of time. Serve at room temperature.

Sweet-Potatoe-salad_vinaigrette

Sweet-potatoe-Salad_assamblingSweet-Potatoe-Salad-Yes,-more-please!


View Post or View Comments 6

Avococo Salad Dressing

Avocado-Dressing-ingredients

Wicked! Is how I describe this creamy dressing. Avocados the natural butter of the fruit kingdom, and coconut milk make a fantastic duo. Lemon Zest, Lemon juice, salt pepper and herbs is all you need.

You have to try this dressing, forget about that white stuff you have been dumping on your salads and make this spectacular dressing on a blink of an eye!

I used this avocado-coconut dressing over a Boston Lettuce, thats what I found on my farmers market incredible fresh and so beautiful that I could not resist to bring it home with me. I’ve included step by step photos of a 4 step easy method to leaf and separate with out bruising this gorgeous and delicate Boston lettuce, I really believe you gonna find this method a keeper for your vegetable techniques.

Avococo dressing drizzle liberally, over lettuce, carrots, fish chicken, your hiking boots, it’s delicious everywhere!…Celebrate and be green green green Spring time is here!

Avococo-salad-Dressing~Yes,-more-please!

Avococo Salad Dressing

Makes about 2-2.5 cups of dressing, it stays good for about 4 days, avoid plastic, save it in a glass jar with an air tight lid.

1 medium size ripe avocado
1 to 1-1/2 cup coconut milk (depending on avocado size and preferred consistency)
4 tablespoons good extra virgin olive oil.
2 tablespoons rice vinegar
the juice and zest of a lemon
1 teaspoon agave nectar
1  garlic clove
6-8 sprigs of parsley, basil, or cilantro. (use only the leaves)
1 teaspoon dry dill
1 teaspoon sea salt
1/2 teaspoon of fresh black pepper.

Preparation:

Place all ingredients on a blender or on a glass of an immersion blender, puree until smooth and desired thickness. If needed, adjust thickness by adding a bit more coconut milk.
Keep it on a glass jar with an air tight lid, it will keep for about 4 -5 days.

Avocado-Dressing-all-ingredients-to-the-blender!

How to wash and de-leaf a Boston lettuce?…

Wash:

Holding the head of lettuce upside down, submerge the lettuce into a big bowl with iced water and shake a few times. Leave the lettuce floating for a few minutes to allow the little dirt particles to sink to the bottom. Remove from water, shake several times, and live it air dry upside down over a clean kitchen towel. Shake 2- 3 more times to make sure all water is out. Then proceed to de-leaft.

De- leaf the lettuce:

1. Run a pairing knife around the back of the stem.
2. Gently pull the core of the stem.
3. Hold the head of lettuce in your hands and place your thumbs in the center, gently pull apart.
4. With a small lettuce, like this one, half will make a great portion, if bigger, arrange and divide leaves in 4 portions.

How-to-leaf-a-boston-Lettuce~Yes, more please!

Dress your lettuce and Enjoy!

Avocado-Dressing-Boston-Lettuce-~Yes,-more-please!Avocado-Dressing-Boston-salad~Yes,-more-please!

 Avococo Salad Dressing, Yes, more please!


View Post or View Comments 0

Raw Veggie Tostadas

Raw-Veggie-Tostadas_Ingredients~Yes,-more-please!

Is it Spring time yet?… I think we are almost there. This Raw Veggie Tostadas scream welcome spring!, Spring is about renewal, everything in nature starts again, a new cycle that makes me feel like eating fresh,crunchy root vegetables. There is an abundance of them right now, lots of cabbage, carrots, radishes at the farmers market. For me is time to set aside the roasting pans, lets eat them raw. Raw vegetables have an earthy and unique flavor, they are juicy and sweet. I’ve learned to loved them when I shred them, it is so easy to eat them raw and when you combine them in a salad they are also so attractive to the eye and all together make a crunchy symphony texture, simply amazing.
This recipe screams “easy”, you can whip this up for a week dinner or an easy-laid back weekend lunch.  This recipe its one of my favorites, Ian and I used to have them almost once a week for our veggie night or our MM, Meat-less Monday. Have fun and enjoy!

Raw-Veggie-Tostadas_shreded-veggies~Yes,-more-please!

Raw Veggie Tostadas

Makes 4-6 Tostadas

Ingredients:

6 tostada shells*
(Baked or Milagro brand if you are her in Austin, definitely the best..)
1 cup of black beans cooked and smashed
4 shredded carrots…any color any variety.
2 shredded mexican zucchini (light green kind preferable)
¼ head of red cabbage, shredded
2-3 tablespoons finely chopped cilantro
1 lime
1 lemon
2 tablespoons Extra Virgin Olive Oil
1/2 – 1 teaspoon sea salt (upon your taste)
fresh ground black pepper to taste

Garnish with:

2 tomatoes diced or in slices
4 thinly slices of red onion
1 avocado
3 tablespoons of greek plain yogurt + 1-2 tablespoon of milk + pinch of salt.
Whisk until well combined, to create a lighter creamy sauce. (for vegan options use tofu yogurt)
2 Tablespoons queso fresco or  feta cheese crumbled or  small diced firm tofu.
Red Roasted Tomato Salsa(recipe follows)

Red Roasted Tomato Salsa:

2-3 medium size tomatoes roasted and peeled.
6-8 toasted chiles de arbol.
2 toasted chiles cascabel (remove seeds)
1 medium garlic clove
1 teaspoon sea salt
Place all the ingredients in the food processor, until well blended, add a little warm water if needed for consistency. The salsa should reassemble a lose puree.

Preparation method:

1. Warm up the beans, you can use refried beans if you like.
2. In a large bowl, combine carrots, zucchini, cabbage, cilantro, the juice of lime, lemon, salt and pepper to taste, toss well.

Raw-Veggie-Tostadas_tossing-the-veggies-~Yes,-more,-please

Raw-Veggie-Tostadas-healthy-refreshin-and-delicious-recipe-Yes,-more-please!

3. Make your Salsa…I made this Salsa Roja Asada click for recipe here.
4. Prepare your garnishes.
5. Assemble the tostadas, spread a light coat of beans on the tostada (this will be your glue!) and then a generous amount of the vegetable concoction. Top with slices of onion, avocado, drizzle some of the yogurt sauce, and some salsa. Serve immediately. Enjoy!Raw-Veggie-Tostadas_assambling-the-veggies-~Yes,-more,-please

Raw-veggie-Tostadas_topings`Yes,-more-please!

Raw-Veggie-Tostadas-~Yes,-more,-please

Raw-Veggie-Tostadas-healthy-and-delicious_Yes,-more-please!

Have you had your rainbow today?

Cook with music! Music always sets the mood for cooking, My music pairing for this recipe:


View Post or View Comments 2

Root-a–touille a Ratatouille made with root vegetables

 Root-a-touille_ingredients-~-Yes,-more-please!

Because sometimes we need some silly in our lives, and because we must decide what to do with all the bountiful goodness of root vegetables currently in season, I decided to make Root–a-touille a Ratatouille made with root vegetables.

The star of this recipe, believe it or not, is the infamous rutabaga. You can smash, roast, make chips, soup… a rutabaga so many ways…and still not to be a great fan of it. I picked up some rutabagas from the Farmers market from the folks at Johnson’s Backyard Gardens. They have fantastic organic root vegetables. https://www.jbgorganic.com
Rutabaga has a very particular flavor, a cross between a radish and a potato (and some funk ca-baggey smell). This root vegetable is from Sweden and it is the result of crossing a cabbage and a turnip. But if you use this flavor profile in your favor it compliments and harmonize well with other roots. I thought about making a variation of ratatouille, using primarily roots. It was a success! In this particular dish the rutabagas bring the whole root clan together and the funky root smell cooks away. I really believe you are going to like rutabagas after eating them in this way.

Cooking your vegetables in this ratatouille-like style is gonna make you want to eat them more often. I even made my Grandma this recipe and she thought she would not like, and she loved it!… The only objection she had? Too much rosemary. I adjusted the recipe so no worries. I hope you enjoy the recipe. It is a warm and easy to prepare casserole that your whole family will enjoy.

Root-a-touille-Rutabaga&Herb-ButterRoot-a-touille-layers-of-gratin-root-vegetables~Yes,-more-please!

Root-a- touille

Serves 4 or 2 hungry vegetarian for dinner.

1 rutabaga
1 sweet potato
1-2 green zucchini
(I use the light green zucchini or “mexican” zucchini as they call it here in austin)
2-3 small red potatoes

2 tomatoes diced
1 garlic clove
½ yellow onion small diced
1 glug of Extra Virgin Olive Oil.

2-3 tablespoons of melted butter
1 teaspoon Herbs de Provence
1 sprig of thyme and rosemary.
1 glug of Extra Virgin Olive Oil.
Salt and pepper to taste.

3-4 Tablespoons grated Parmesan cheese.

Preparation:

Preheat oven at 400F/200C

1. Using a Mandolin, thinly slice the rutabaga, sweet potato, zucchini, potatoes.
(I love this japanese mandolin is easy and fun  to use and clean up in a flash! next time I will make sure I have my gloves on!)

Root-a-touille--Slicing-Mandolin
2. Quick saute in Extra Virgin Olive Oil the Onions, garlic, tomatoes, season with salt and pepper a pinch of the herbs de provence, fresh thyme and the sprig of rosemary.
3. Place this tomato saute in a gratin-stone ware or glass baking dish will work to.
4. Start layering the root slices, over the sauteed tomato-onion-garlic. Alternate the colors and different type of roots and zucchini (see photo below) and work all your way around.

Root-a-touille-Assambling~-Yes,-more-please!
5. Brush the top with the melted butter and herbs and sprinkle with the grated Parmesan cheese.

Root-a-touille-parmessan-and-butter-gratin,-ready-for-the-oven
6. Bake for about 25-30 minutes, cover with foil for the first 15 minutes of baking, and remove for the last 10-15 minutes to achive a great gratin crust until golden brown.
7. Serve warm.
You can serve it as a side dish with fish, chicken or a simple soup and crusty bread for a vegetarian meal.Enjoy!

Root-a-touille~Yes,-more-please!Root-a-touille-warm-roots-gratin~Yes,-more-please!

Enjoy!

View Post or View Comments 10

Roasted Carrot Salad with Hummus Vinaigrette

Roasted-Carrot-Salad-with-Hummus-Vinaigrette_red,-orange-and-yellow-Carrots

January brings the roots out. Its a fun time at the farmers market a great variety of root vegetables. What caught my attention this time were the carrots. Great variety of colors, from red, orange, yellow and pale cream color. How can you not get inspired from all this colors? So I bought a bunch of the red carrots including the greens. Carrot greens are really tasty and a great source of vitamin C, potassium, calcium and vitamin K and are also high in protein. Flavor-wise they taste a bit peppery and resemble parsley. They are also a great addition to any salad and you can make pesto or tabbouleh with them… in fact!… that might be the next recipe I will attempt. When you are buying carrots and carrot greens, make sure your source is organic. There is a bit of controversy about eating the tops or the carrot skins and other non-organic vegetables. Know your source and enjoy your carrot greens with no worries.

For me, roasting is one of the best ways to bring out the sweet flavor of the carrots. The skin gets caramelized while inside it remains tender and all the ‘carrotness’ flavor is contained in a little cute pencil shape. Delicious! For the vinaigrette I took the same spices you will use to make hummus and I mix them with some sesame oil, extra virgin olive oil, and lemon juice. This Roasted Carrot Salad with Hummus Vinaigrette Its easy to make, and very comforting. Enjoy!

Roasted-Carrot-Salad-with-Hummus-Vinaigrette--carrots,-mustard-greens,-carrot-greens~-Yes,-more-please!Roasted-Carrot-Salad-with-Hummus-Vinaigrette~-warm-salad-for-the-winter

Roasted Carrot Salad with Hummus Vinaigrette

Serves 2 as main course, 4 as side dish or 1 wabbit feast.

2 bunches of carrots red, orange yellow any kind will work.
½ cup carrot tops washed and leafs cut.
4 cups mustard greens washed and hand cut in pieces
½ small onion cut in slivers
½ cup garbanzos cooked.

For the Vinaigrette:

¼ cup sesame oil
¼ cup extra virgin olive oil
¼ cup apple cider vinegar
1 teaspoon agave nectar or honey
The juice and zest of half a lemon
½ teaspoon smoked paprika
½ teaspoon ground cumin
1 tablespoon toasted sesame seeds
2 tablespoons tahini
2-3 grated garlic cloves
2 good pinches of salt
Freshly ground black pepper to taste

Preparation:

Preheat the oven at 450F/230C
Wash and pad dry your carrots upon size, slice carrots in half or quarters for evenly roast.
In a baking sheet lined with parchment paper place the carrots, onions, garbanzos, drizzle a bit of olive oil and sea salt. Roast them for about 10-15 minutes or until caramelized and fork tender.

Roasted-Carrot-Salad-with-Hummus-Vinaigrette_red,-orange,-yellow-carrots

Mean time prepare your vinaigrette by simply combining all the vinaigrette ingredients in a small bowl whisk until well combined. Set aside.

Check on your carrots. If they look done they will show golden tones and edges a bit charred and fork tender.

Roasted-Carrot-Salad-with-Hummus-Vinaigrette_roasted-carrots~Yes,-more-please!

Remove them from the oven and in the same tray toss the mustard greens and half of the vinaigrette, toss and place back in the oven for about 1-2 minutes which will slightly warm up the mustard greens.

Roasted-Carrot-Salad-with-Hummus-Vinaigrette_tossing-the-salad

Serve immediately and drizzle the rest of the dressing, adjust salt and pepper, squeeze more lemon, sprinkle a few more toasted sesame seeds if desired.

Serve with toasted pita bread and a dollop of yogurt on the side. Enjoy!

Roasted-Carrot-Salad-with-Hummus-Vinaigrette~ready-to-serve

Roasted-Carrot-Salad-with-Hummus-Vinaigrette-~Yes,-more-please!

Scrumptious!

View Post or View Comments 4

Warm Acorn Squash Salad

Acorn-Squash-Warm-Salad_ingredients

Full winter here in Austin! Yeah!!! I love cold weather and with it the delicious and comforting warm salads.
This scrumptious Warm Acorn Squash Salad is a great dish to keep up with the winter calories. If you know what I mean… I’m saving calories to spend them at Christmas… hehehe

Imagine a roasted wedge of acorn squash, topped with baby spinach watercress, green apples, toasted nuts, creamy goat cheese drizzled with a slightly warm lime-ginger-ancho chilli vinaigrette… super easy, and comforting. This recipe will make you crave salad in the winter.

So, keep warm and I hope you fall in love with this easy and healthy dinner. Enjoy

Acorn-Squash-warm-salad~Yes,-more-please!

Warm Acorn Squash Salad

Serves 4

1 acorn squash cut in 4 pieces
4 cups spinach
2 cups watercress
1 granny smith apple cut in long match sticks or similar.
¼ cup toasted chopped pecans
¼ cup salted toasted pumpkin seeds (pepitas)
4-6 oz goat cheese

For the warm vinaigrette:

2 Tablespoons Extra Virgin Olive Oil
2 Tablespoons Agave nectar
1 teaspoon ancho chilli powder
2 teaspoons freshly grated ginger
The zest and juice of one lime
½ teaspoon salt

Preparation:

1. Place the 4 acorn squash segments in a baking sheet lined with parchment or aluminum foil, salt and pepper, Roast at 450F for about 25-30 minutes, checking half way thru, rotate the pan. And bake until fork tender.

Acorn-squash-warm-salad_roasted-acorn 2. In a salad bowl combine, the spinach, watercress, cut apples, toasted pecans, toasted pumpkin seeds.

Acor-Squash-warm-salad_match-sticks-apples

3.To make the vinaigrette:
Slightly warm the Extra Virgin Olive Oil (warm to the touch). Add agave nectar, ancho chili, ginger, lemon zest, lemon juice and ½ teaspoon of kosher salt, whisk until well combined. Or place all this ingredients into a small clean glass jar and shake. The warm oil will marry the flavors and develop the aromas, as well to cozy up your greens.

Acorn-squash-warm-salad_making-the-dressing

4. Once the Acorn squash is roasted, toss the salad with some of the dressing, and top each acorn squash wedge with the salad.
5. Crumble some goat cheese and drizzle a little more of the vinaigrette.Enjoy!

Acorn-Squash-Warm-Salad_dressing-up-the-salad!

Acorn-Squash-Warm-Salad~Yes,-more-please!-delish

Acorn-Squash-Warm-Salad_above-your-expectations!

Warm Acorn Squash Salad…warm up!~

View Post or View Comments 5

Privacy Policy Contact Us Yes, more please!