Chilaquiles are a Mexican classic. It has three of the most iconic ingredients: corn, chiles and herbs. There are a wide variety of chilaquiles styles. In fact, I think I have never tasted an identical version anywhere, even if I make them myself at home, every preparation is slightly different because the use of fresh ingredients, but the principle of how the dish works remains the same.
If you’ve never had chilaquiles before they seem deceptively simple to make, although significant details in the preparation make a very big difference to the final result. Sad to say, the truth is that Chilaquiles are commonly poorly made and misunderstood.
What is this Chilaquiles Manifesto all about?…
~Manifesto//: a written statement that describes the policies, goals, and opinions of a person or group~
~Chilaquil//: come from the word “Chilaquiltl” in Nahuatlt. It is of what Mexican historians refer as an “aztequismo” which are words that have their roots in Nahuatl and are used today in a modernized way. Chilaquilitl comes from the word “Chilli” that means “Chile”; and “atl”, used to mean water, and “quilitl” that refers to a combination of herbs, like a sauce. This term was also used to describe an old woven hat. With time this word acquired a connotation for describing a careless manner towards a texture~
This Chilaquiles Manifesto is my proclamation of texture, flavor and sauce. For me, that is what Chilaquiles are all about. I want to rescue the Chilaquiles reputation. Despite their “careless texture” in name’s origin, I believe the dish is all about the balance of texture, sauce, spice and attention to detail. I hope this manifesto will make you appreciate the difference between average and exceptional Chilaquiles.
The Chilaquiles Principle: Texture, Flavor, and Balance.
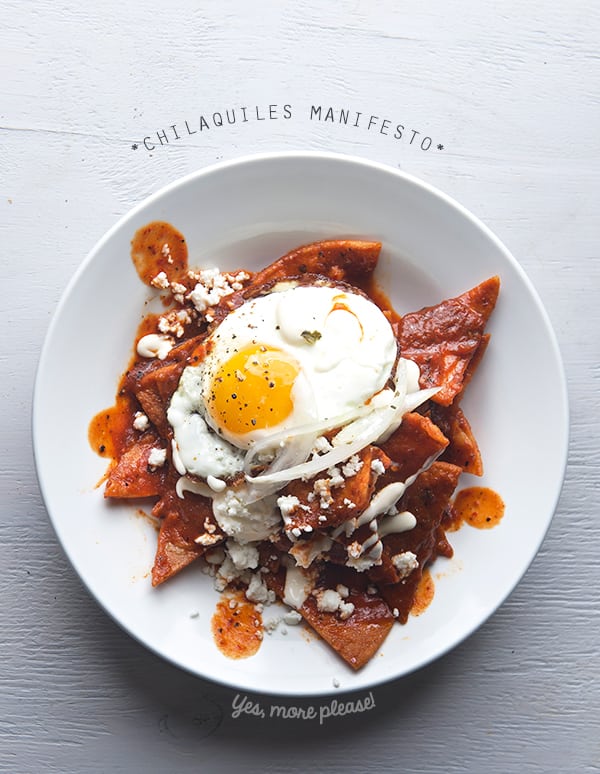
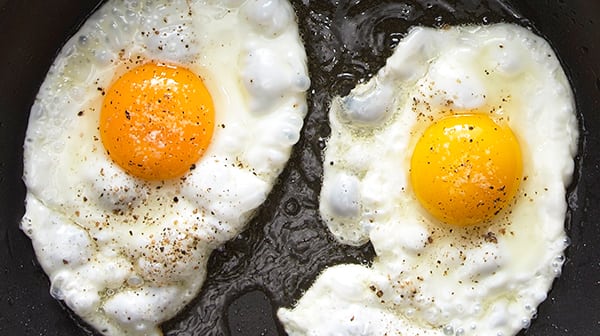
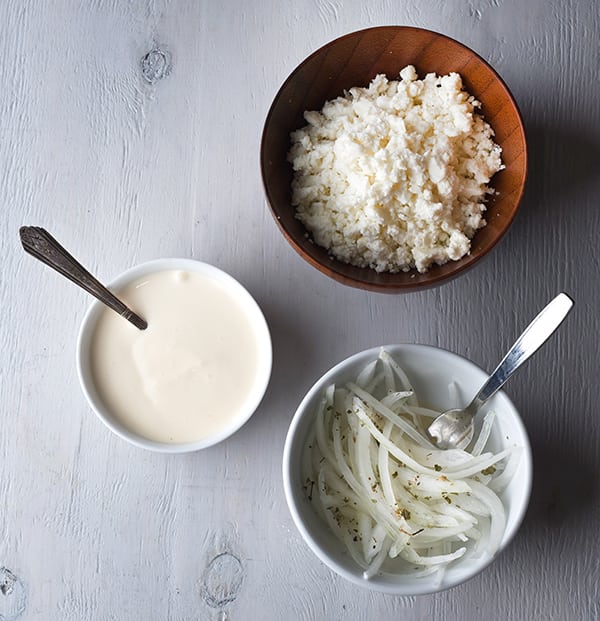
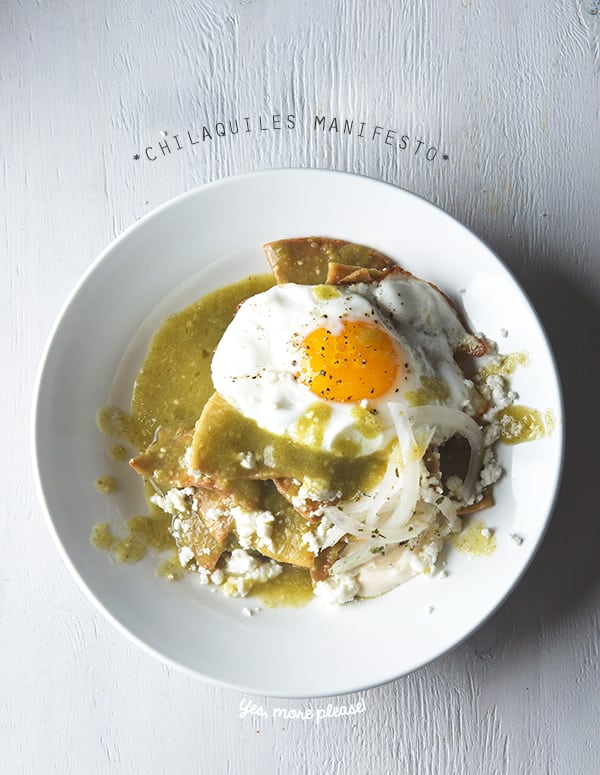
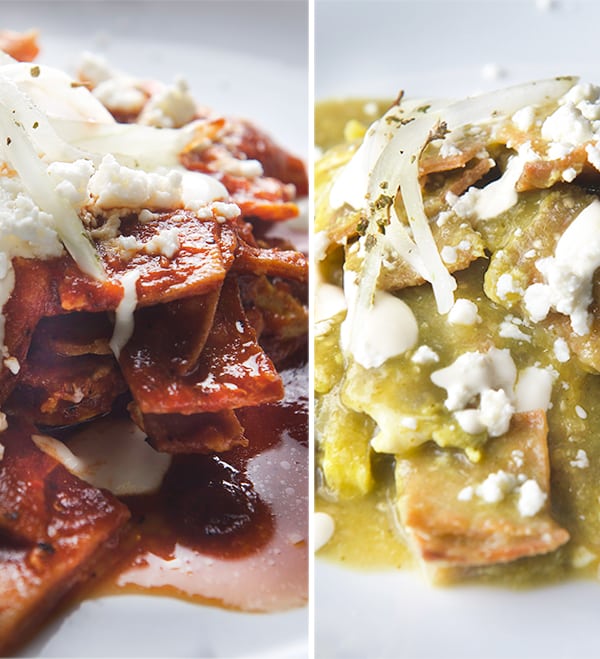
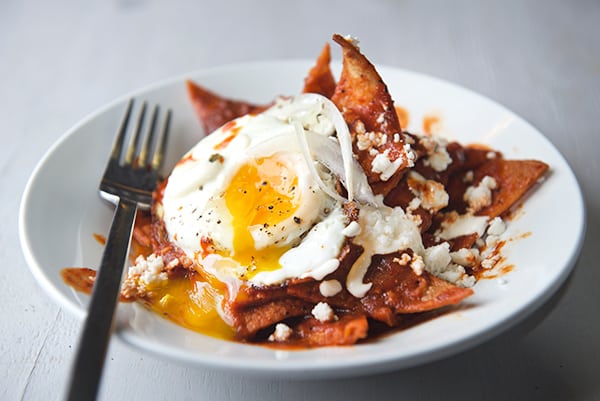
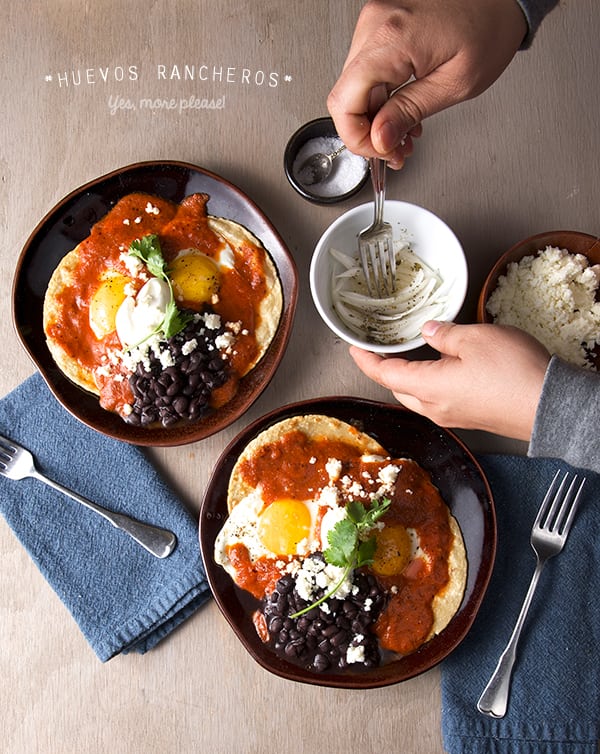
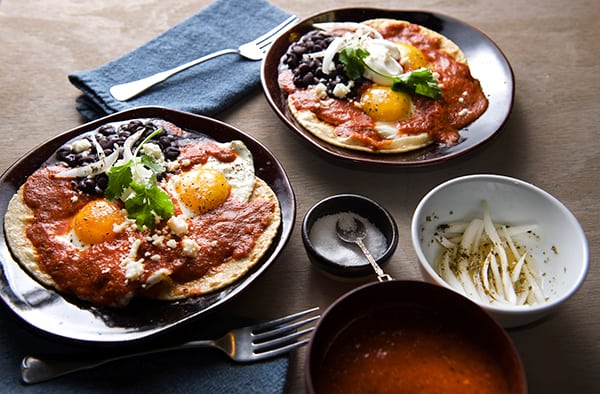
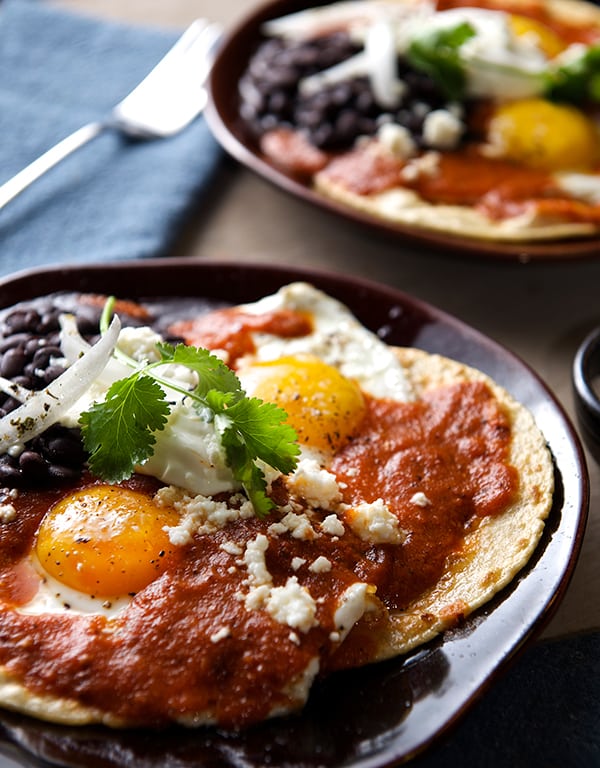
 For me a good plate of Chilaquiles is the one in which the crunchy tortillas preserve some of their crunchy texture and the sauce is thick enough to cover the tortillas without weighing them down. It remains saucy and there is a bit of salsa running on the side of the plate like a little emergency puddle that get mixed into the refried beans to keep them company. The sauce can be red or green usually with a good level of pleasant spiciness, unless you have a hangover, you might ask for extra hot. Chilaquiles are most commonly eaten as a breakfast or brunch. Therefore a perfect sunny side up egg ,runny and tender, is the perfect complement to this dish. Chilaquiles must be garnished with crumbs of slightly salty queso fresco, creamy clumps of Mexican Crema (similar to Creme fraishe) that mellows the warm and spicy sauce. Top this with raw or pickled onions to add acidity and a sharp pungent of flavor every other bite. There you have it.
This is what dreamy Chilaquiles should be.
A great plate of Chilaquiles should always have the following four components:
The Sauce:
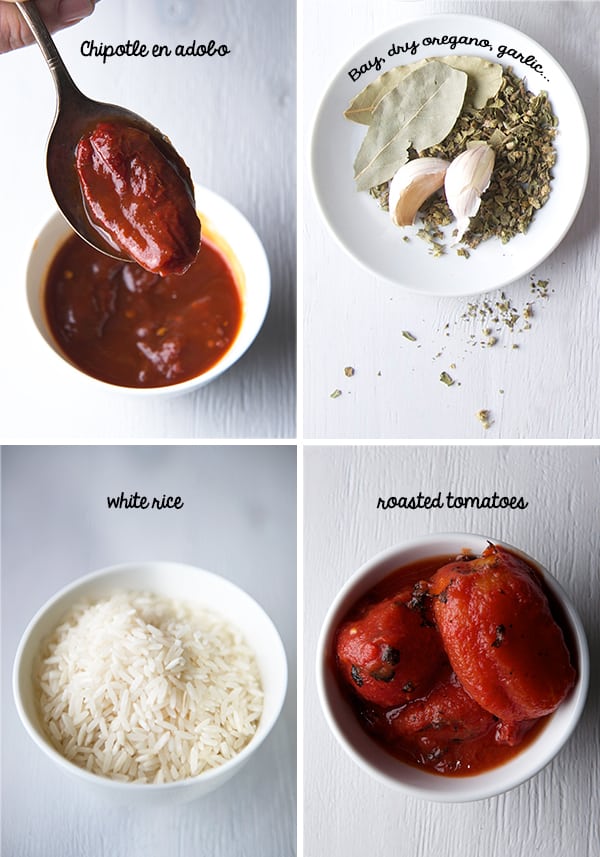
Fresh ingredients for the sauce are a must. The basic salsas are so easy to make. In my opinion, there is no comparison between the flavor of store bought compared with fresh. Freshly cooked saucy salsas thick enough to cover deep fried tortillas are the best option. Using Red Roma tomatoes, in combination with dry chiles, and or tomatillos and fresh chiles will make a huge difference, moving the sauce quality from good to Great.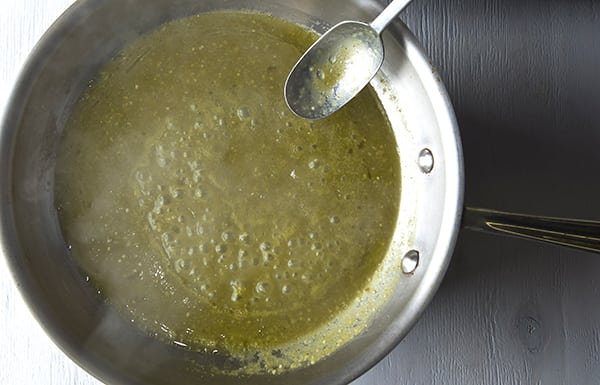

Tortillas:
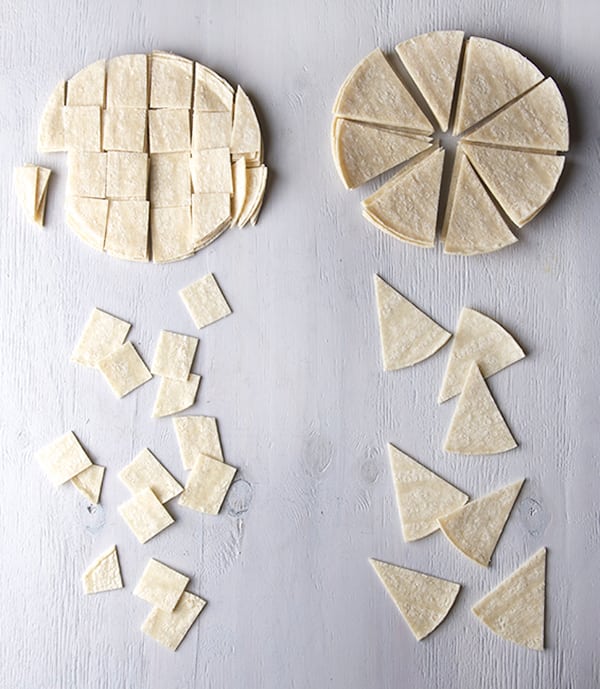
White Corn tortillas are the best option. Typically cut into a triangle shape or small squares these tend to fry more evenly. They must be pan fried the same morning, using corn oil or grape seed oil to preserve the corn flavor intact is the best bet. Use machine made tortillas for this preparation. Most handmade tortillas are too moist and have the wrong texture once fried, and besides,handmade fresh tortillas taste awesome as they are, to precious to use on chilaquiles.
The Egg:
Farm eggs, scrambled into the tortillas, or a Sunny side up eggs in my opinion are a must. Some other versions are served with shredded chicken or both. To be honest, I like mine with egg only. Leave the chicken for enchiladas.
The Accoutrements:
Mexican Crema, Crumbly Queso fresco (Please will you do me a kindness?… no melted cheese on my chilaquiles, thank you!), a side of re-fried beans are a must. And last but not least: Quick pickled onions* this give the chilaquiles a great bite and accent.
*Quick pickled onions or cebollitas desflemadas: Slice onions thinly, rinse them thoroughly in cold water strain them. Place the onion slices in a little bowl add 2 tablespoons of apple cider vinegar or the juice of one lemon. Add a pinch of salt, pinch of dry oregano, toss them, set aside for 5-10minutes, or until ready to serve. I love this simple onion preparation, usually chilaquiles are served with raw onions, I think is to harsh, and for my luck I will be having onion breath for the rest of the day. With this simple quick pickled the onions are tender not overly sharp, they add a good bite and acid element to the dish. try them, you are gonna love them.
Now, lets talk about Chilaquiles styles…
For me there is an abysmal difference between average and exceptional.
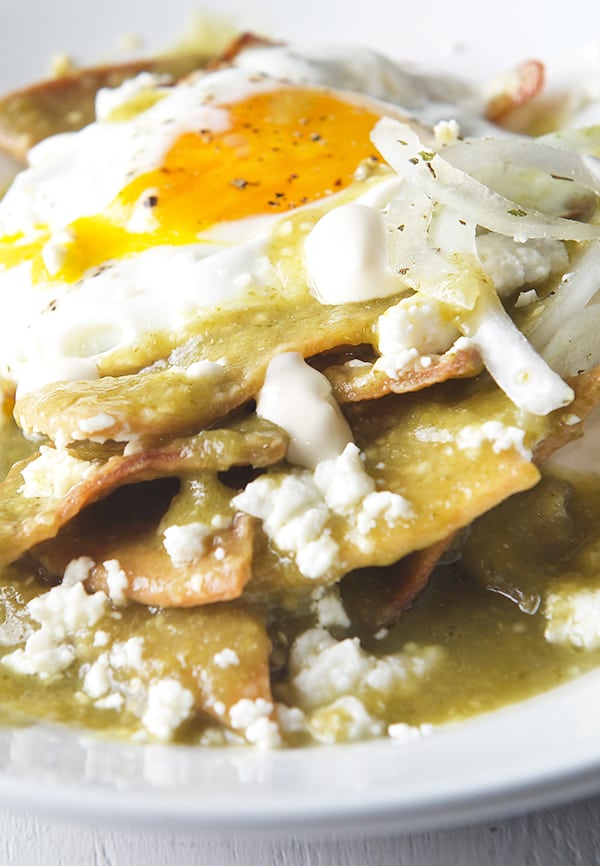
In my Chilaquiles world, The Semi-Crunchy takes the first place, they are simply the best.
Three Winning Styles:
The Semi-Crunchy
This is my favorite kind of chilaquiles. The tortilla holds about 80 percent of crispiness and 20% of floppy saucy texture. Due to the perfect sauce consistency, great balance between tomato-chiles and water ratio. To achieve the perfect crunchy chilaquiles the key is to add the died tortillas into the salsa just 2-3 minutes before serving them. I layer them and top them with a ladle of the warm sauce making sure they are all covered in sauce for best results. An over easy egg on top is the way to go. You will find this preparation recipe and step by step photos ahead.
The Migas that wanted to be Chilaquiles.
These are the best option for big crowds, or for those who do not like runny eggs.(I think these kind of people are officially in the endangered category, but there’ is some population percentage out there against runny eggs). Tortillas are fried and whisked egg is added to the tortillas for a quick toss once the egg start cooking, add the sauce and turn off the pan. The egg acts like a barrier, protecting the tortilla from getting soggy, and sauce sticks to the egg keeping the egg moist and the chilaquiles juicy. It is delicious to in its own way. These are the type of Chilaquiles my Grandma used to make. You will find this preparation recipe and step by step photos ahead.
The deconstructed enchiladas
I must confess I do not like shredded chicken in my Chilaquiles. For me they are all about the sauce, tortilla and egg combination. Save the chicken for another time, this type of Quiles’ for me is equal to deconstructed enchiladas if you know what I mean…
The following options I don’t recommend, but are frequently encounter, so be aware!:
The Floppy
The cooking method is different. You fry the tortillas and then add the sauce to the pan and let the tortillas absorb some of the sauce. Because the tortillas are fried they keep their individuality but they stick to each other. The texture is soft, like eating a soggy enchilada. They tend to be on the dry side, not too saucy, therefore, a good over easy egg does wonders for this version. A good…but not great, version.
The Nachos who wanted to be Chilaquiles.
Nacho’ur best bet. These chilaquiles are just wrong. There are lots of versions out there where they serve a bunch of pre made, bagged chips with a ladle of sauce on top and they dare to call them chilaquiles. Too much crunch, lack of sauce, there is no marrying the tortilla and the sauce. Not of my affection at all to be honest with you… these are more like nachos, no bueno.
Divorced chilaquiles:
Half red, half green, for indecisive people or people who want it all. I must just say, just marry one sauce at the time. Having two sauces at the same time will not make you more content…it just confuses the flavors thereby ruining the dish…a bad marriage. Rojos o Verdes will always be the dilemma. If you and yours can’t get together on this one you may need to follow the recipes below and prepare both sauces SEPERATLEY, on different weekends, or just flip a coin.
There must be another 845, 632 more recipes out there, different chilaquiles preparations, sauces combinations, chiles, herbs, cooking methods, you name it!; I’m giving you my 2 ultimate salsas, VERDE and ROJA, you decide which one you want to prepare.
I’m also including 2 different Chilaquiles preparation styles. The Migas- that wanted to be Chilaquiles which are the ones my Grandma used to make. These are dear to my heart and I prepare them when I’m feeling a bit nostalgic.
The other style I’m sharing with you its my absolutely favorite one: The Semi-Crunchy Chilaquiles. I believe they are the ultimate cosmic flavor knock out, textural extravaganza, Chilaquiles. I must warn you, once you have this version, you will have recurrent cravings and dream about them…
So, please remember: “ Don’t just make them good…make them Awesome!”…
Enjoy, Let’s cook!
Chilaquiles Manifesto
Let’s start by Choosing and Preparing your Salsa, then choose the style of chilaquiles you want.
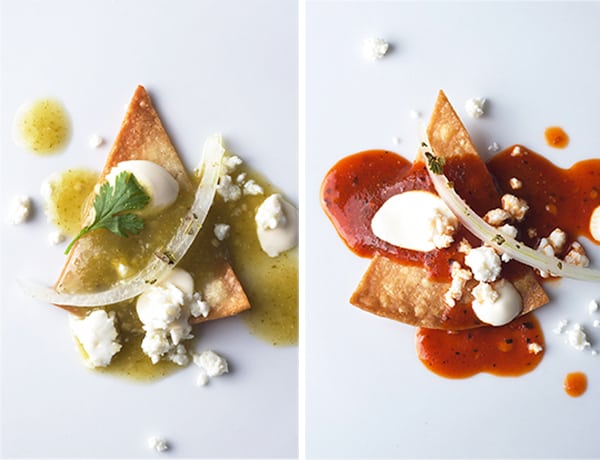
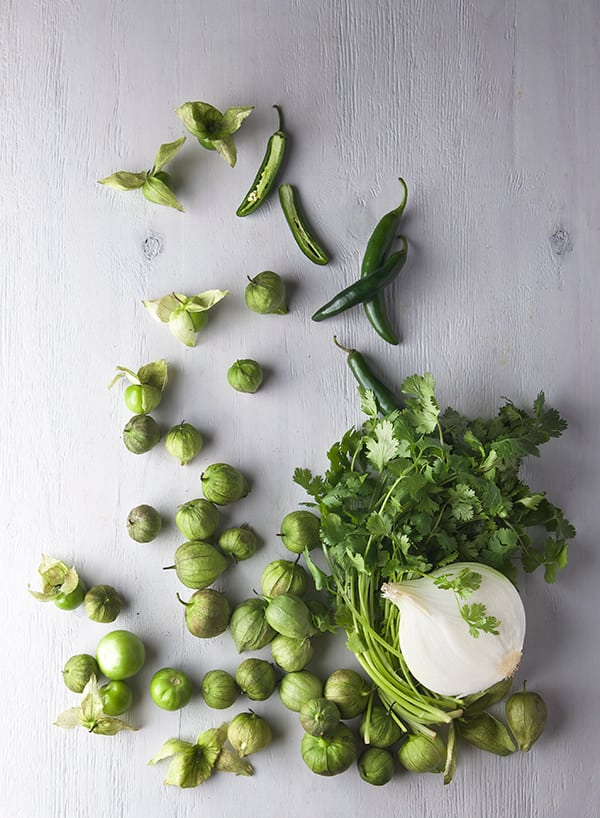
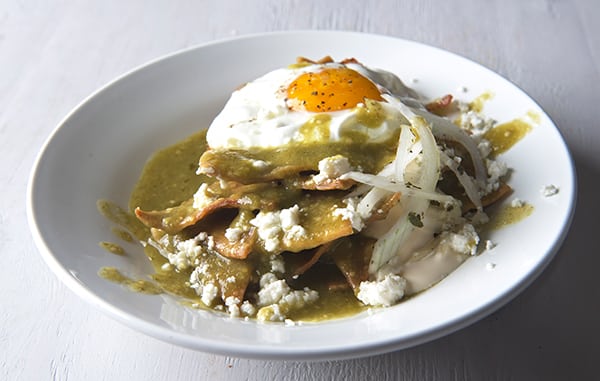
For the Salsa VERDE:
1 lbs. Tomatillos peeled and washed. I used tomatillo milpero, the smaller the tomatillos the best flavor.
½ small or ¼ medium white onion
4 Chiles Serranos or 2 large Jalapenos remove stems.
Small bunch of cilantro about 14-18 sprigs upon size.
1 teaspoon sea salt
2-3 tablespoons of the reminder oil from were the tortillas were fried.
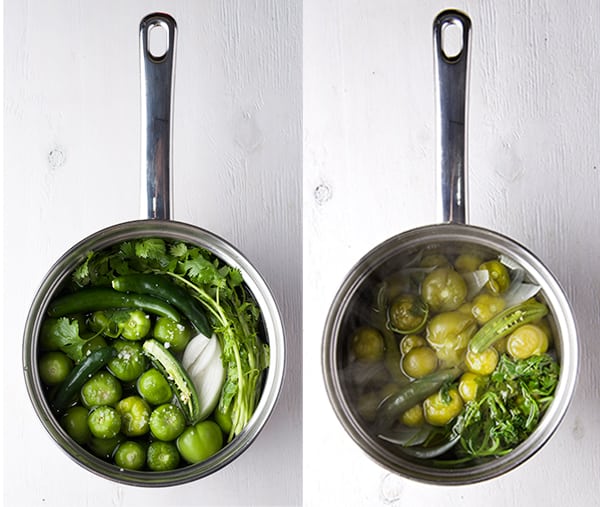
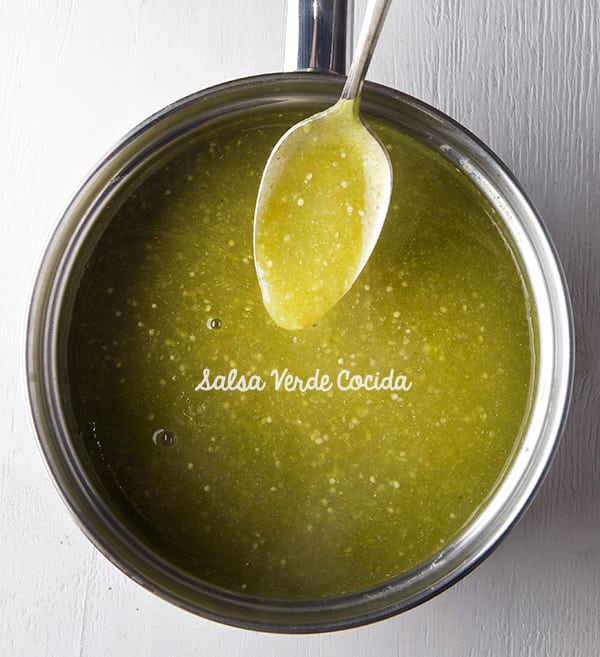
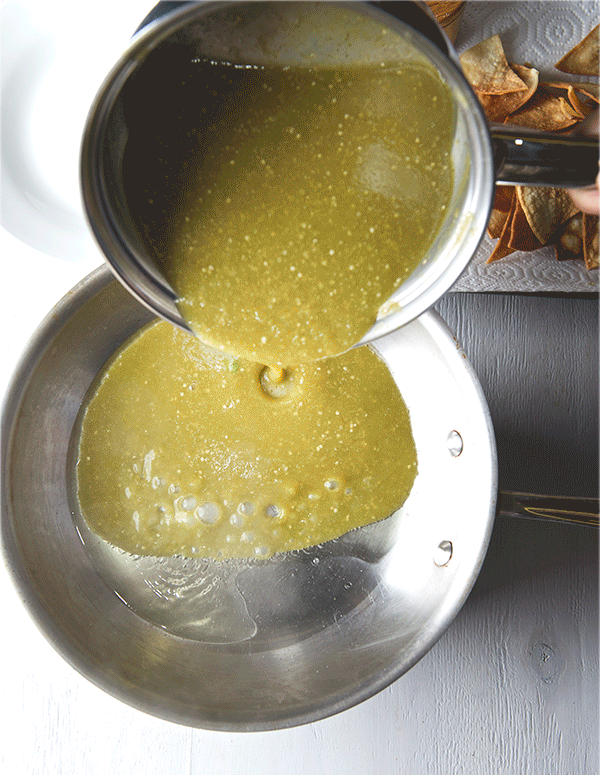
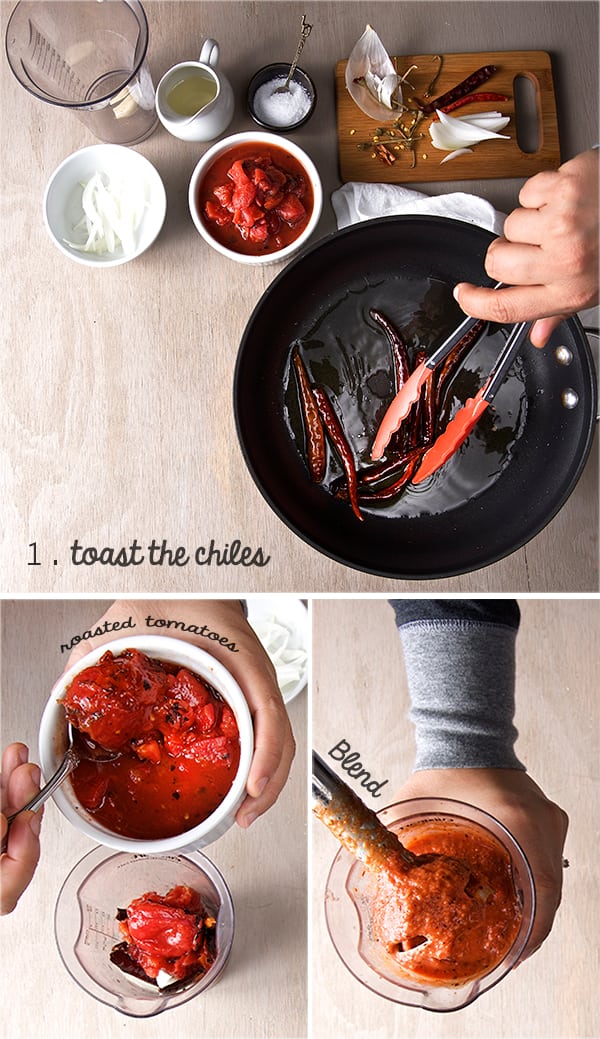
In a small-medium sauce pan place tomatillos, chiles,onion, cilantro, and barely cover with water. Place lid and simmer until they are cooked, about 12-15 minutes. Once they are cooked, remove ¾ of the liquid add salt and blend.
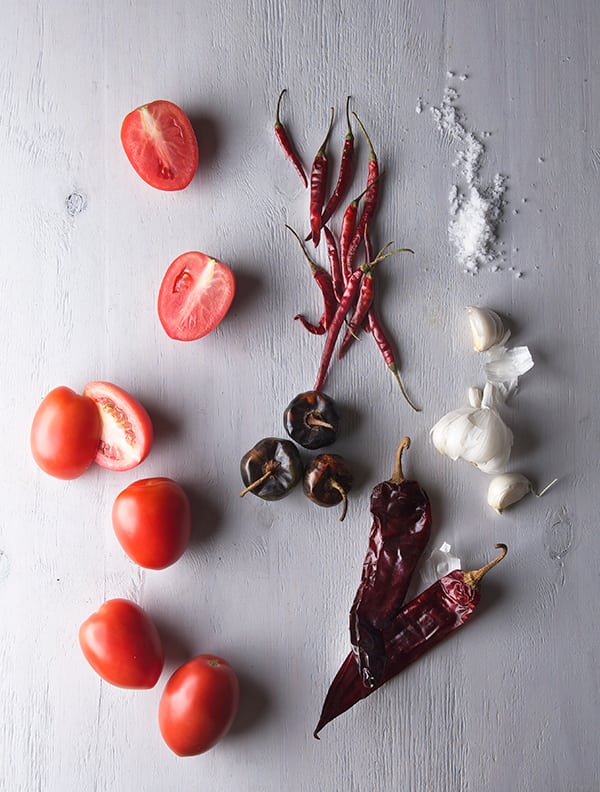
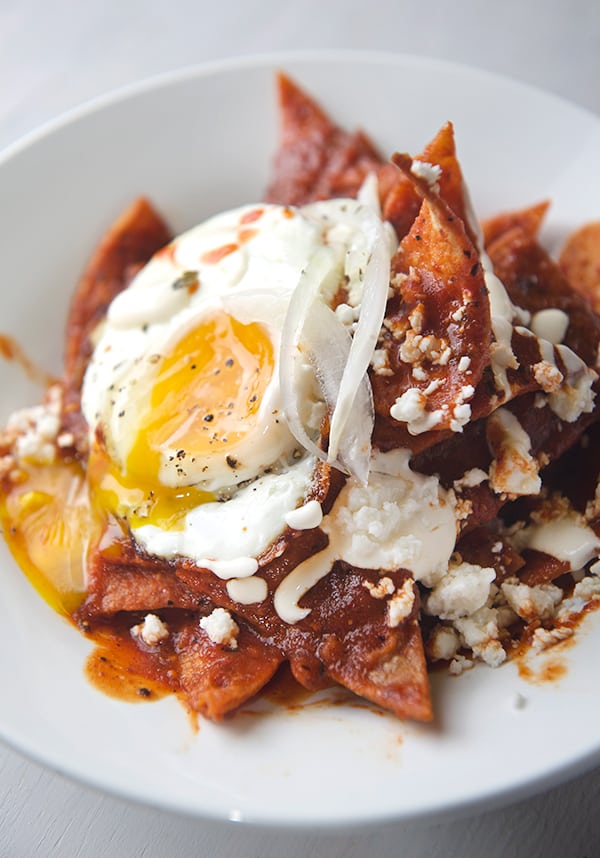
For the Salsa ROJA:
5-6 Roma Tomatoes choose the reddest and ripest for best flavor.
½ small or ¼ medium white onion
1 garlic Clove
3 dry chiles Cascabel toasted, seeds and stems removed.
8 dry chiles de Arbol toasted, stems removed.
2 dry chiles Guajillos remove seeds and stem and boil along with the tomatoes.
1 teaspoon sea salt
1 pinch of sugar
2 tablespoons of the reminder oil from were the tortillas were fried.
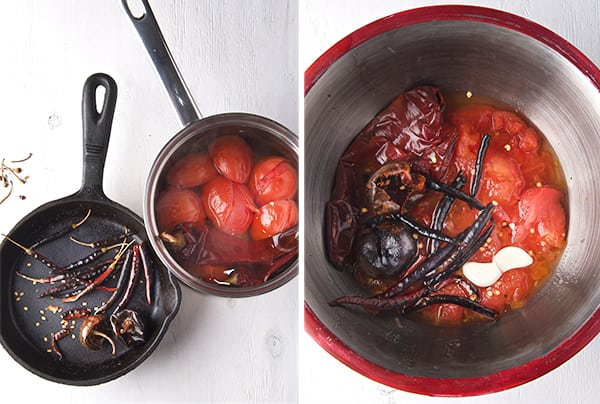
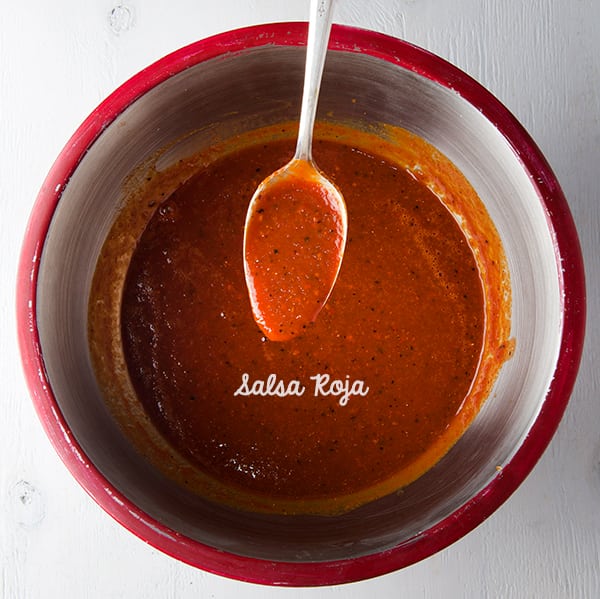
In a medium sauce pan place tomatoes, chiles guajillos,and onion. Cover with water. Cover and simmer until they are cooked, about 8-10 minutes or until a knife easily inserted. Once they are cooked, save 1-1/2 cups of the water in which they cook, toss the rest of the liquid. Remove tomato skins, add the toasted chiles, garlic, salt and blend with one cup of the reserved water until smooth. Taste and adjust water and salt if necessary. See picture for consistency.
1. The Semi-Crunchy Chilaquiles Preparation:
Hands down, my favorite ones!
Serves 4, maybe just 2 hangover creatures…
12 White Corn tortillas
Grape seed oil or Corn oil to pan fry the tortillas about 1/2 cup
(maybe less, maybe more, upon your tortillas.)
1 or 2 eggs per person, sunny side up or over easy.
Preparation:
1.Prepare one recipe of your choice of salsa VERDE or ROJA. (listed above). Set aside.
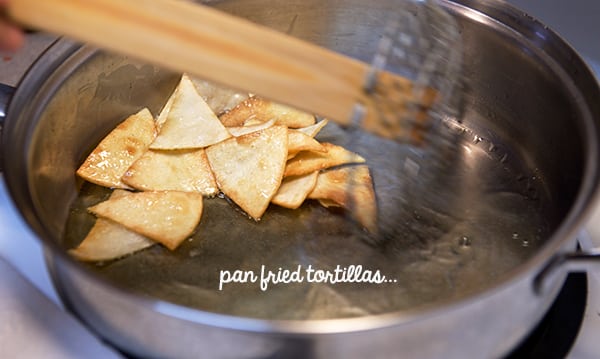
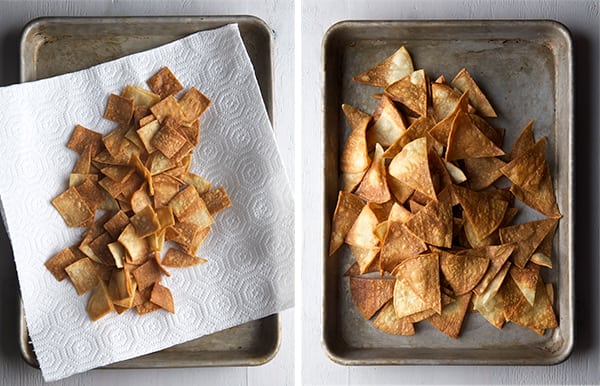
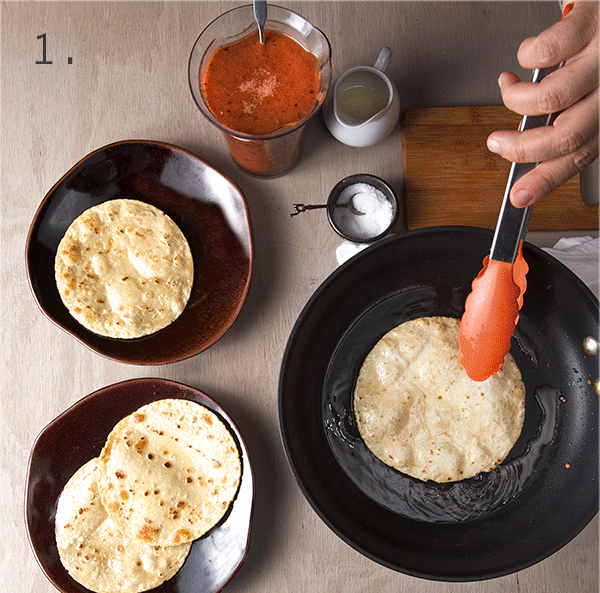
2.Cut the tortillas into triangles, separate them. Heat up a frying pan add ¾ cup of the oil wait until the oil is starting to ripple, add the tortillas in two batches and pan fry them until evenly golden light brown as possible. Remove from pan and drain them into a pan lined with a paper towel.
3.Start cooking the sunny side up or over easy eggs. Set them aside, on a tray to keep them warm. Do this just before the final step so they don’t get cold.
4.Remove the excess oil from the pan, and leave about 2 tablespoons of oil into the pan. Once the oil is hot, add the salsa VERDE or ROJA and cook for 1-2 minutes, stir constantly until bubbly. Add the tortilla triangles you just panfried and toss into the salsa for 1-2 minutes. Plate them immediately. Top with an Sunny side up egg or over easy egg. Garnish with Crema, Queso Fresco and Onions, and a side of refried beans. Enjoy!
2. Miga-Quiles a.k.a my Grandma’s Chilaquiles
Serves 4, maybe just 2 hangover creatures…
12 White Corn tortillas
Grape seed oil or Corn oil to pan fry the tortillas about 1/2 cup
(maybe less, maybe more, upon your tortillas)
You will need 6 large eggs to scramble into the tortillas
Preparation:
1.Prepare one recipe of your choice of salsa VERDE or ROJA. (listed above). Set aside.
2.Cut the tortillas into squares, separated them. Heat up a frying pan add ¾ cup of the oil wait until the oil is starting to ripple, add the tortillas and pan fry them until evenly golden brown as possible. Remove from pan and drain them into a pan lined with a paper towel.
3.Remove the excess oil from the pan, and leave about 2 tablespoons of oil. Whisk about 5-6 eggs depending on size, add the fried tortillas to the pan and then add the whisked egg, toss quickly. Once the egg start to set add the salsa VERDE or ROJA cook for 1-2 minutes tops!, remove from heat and serve immediately. Garnish with Crema, Queso Fresco and Onions, a side of refried beans. Mmmm…

This Plate of saucy carbs has been known for lifting morning moods, helping the thirsty drunken souls alleviate the hangover. It is easy to make for a lonely ranger or to size it for a Family meal. Any weekend and hazy Sunday morning can be lightened-up with a plate of these great classic Mexican dish.
Make them! I would love your feed back,
Which ones are you favorites?…
Are you a GREEN or a RED soul?
Send a comment below, I want to hear from you!!!

Chilaquiles VERDES
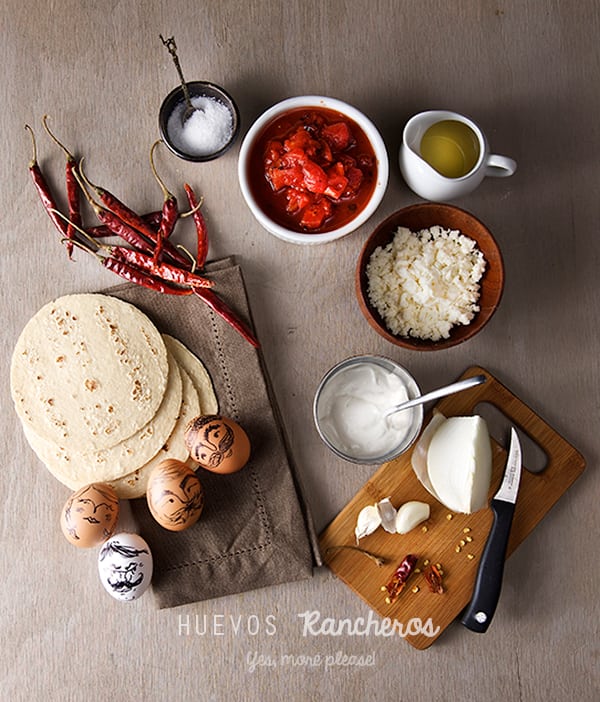
Chilaquiles can be served for Breakfast, or Brunch if topped with sunny side up or over easy eggs. And they can be serve for Lunch or Dinner, change the eggs for shredded rotisserie chicken. A side of refried beans its always a must.
Ingredients
- 1 lbs. Tomatillos, I used tomatillo milpero, they have the best flavor, if you can't find this kind, choose the smallest tomatillos from the bunch.
- 1/2 small white onion
- 3-4 Serrano chiles, fresh
- 1 small Bunch of Cilantro
- 1 teaspoon Sea salt
- 2-3 tablespoons Corn, or sunflower oil, you can use the reminder oil you use to fry the tortillas.
- 1-2 eggs per person, sunny side up or over easy
To fry the tortillas
- 12 White corn tortillas
- 1/2 cup Grapeseed oil, sunflower or corn oil, to pan fry the tortillas.
Garnish with:
- 1/2 cup Queso Fresco
- 1/2 cup Crema Mexicana
- 1/2 cup White or red onions, diced
- Refried beans, its a must!
Instructions
-
Prepare the salsa verde:
In a small-medium sauce pan place tomatillos, chiles,onion, cilantro, and barely cover with water. Place lid and simmer until they are cooked, about 12-15 minutes. Once they are cooked, remove ¾ of the liquid add salt and blend.
Set aside.
The Semi-Crunchy Chilaquiles Preparation:
1.Prepare one recipe of your choice of salsa VERDE Set aside.
2.Cut the tortillas into triangles, separate them. Heat up a frying pan add ¾ cup of the oil wait until the oil is starting to ripple, add the tortillas in two batches and pan fry them until evenly golden light brown as possible. Remove from pan and drain them into a pan lined with a paper towel.
3.Start cooking the sunny side up or over easy eggs. Set them aside, on a tray to keep them warm. Do this just before the final step so they don’t get cold.
4.Remove the excess oil from the pan, and leave about 2 tablespoons of oil into the pan. Once the oil is hot, add the salsa VERDE and cook for 1-2 minutes, stir constantly until bubbly. Add the tortilla triangles you just panfried and toss into the salsa for 1-2 minutes. Plate them immediately. Top with an Sunny side up egg or over easy egg. Garnish with Crema, Queso Fresco and Onions, and a side of refried beans. Enjoy!
Happy cooking!
Recipe Notes
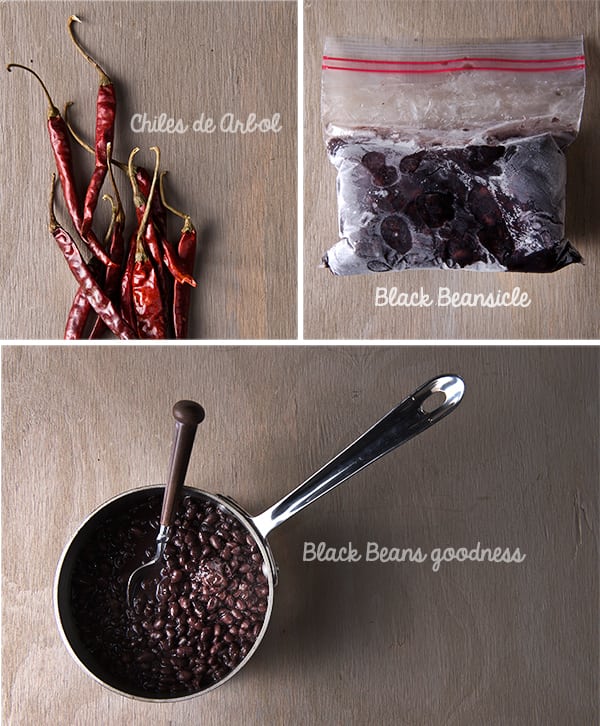
If you need a tutorial on How to make the best beans you ever had!
Check our recipe: Mexican Beans Manifesto

Chilaquiles ROJOS
Chilaquiles can be served for Breakfast, or Brunch if topped with sunny side up or over easy eggs. And they can be serve for Lunch or Dinner, change the eggs for shredded rotisserie chicken. A side of refried beans its always a must.
Ingredients
For the Salsa ROJA:
- 5-6 Roma tomatoes, choose the reddest and ripest for best flavor
- 1/2 medium white onion
- 1 large garlic clove
- 3 dry chiles Cascabel toasted, seeds and stems removed.
- 6-8 dry chiles de Arbol toasted, stems removed.
- 2 dry chiles Guajillo, remove seeds and stem and boil along with the tomatoes.
- 1 teaspoon sea salt
- 1 pinch sugar
- 1 pinch cinnamon
- 2 tablespoon of the reminder oil from were the tortillas were fried.
To fry the tortillas:
- 12 White corn tortillas
- 1/2 -3/4 cup Grapeseed oil, sunflower oil, or corn oil, to pan fry the tortillas
Garnish with:
- 1/2 cup Queso Fresco
- 1/2 cup Crema Mexicana
- 1/2 cup white red onions, diced
- Refried beans, on the side its a must!
Instructions
-
Prepare Salsa Roja:
In a medium sauce pan place tomatoes, chiles guajillos,and onion. Cover with water. Cover and simmer until they are cooked, about 8-10 minutes or until a knife easily inserted. Once they are cooked, save 1-1/2 cups of the water in which they cook, toss the rest of the liquid. Remove tomato skins, add the toasted chiles, garlic, salt and blend with one cup of the reserved water until smooth. Taste and adjust water and salt if necessary. See picture for consistency. Set aside.
The Semi-Crunchy Chilaquiles Preparation:
1.Prepare the salsa roja
2.Cut the tortillas into triangles, separate them. Heat up a frying pan add ¾ cup of the oil wait until the oil is starting to ripple, add the tortillas in two batches and pan fry them until evenly golden light brown as possible. Remove from pan and drain them into a pan lined with a paper towel.
3.Start cooking the sunny side up or over easy eggs. Set them aside, on a tray to keep them warm. Do this just before the final step so they don’t get cold.
4.Remove the excess oil from the pan, and leave about 2 tablespoons of oil into the pan. Once the oil is hot, add the salsa ROJA and cook for 1-2 minutes, stir constantly until bubbly. Add the tortilla triangles you just panfried and toss into the salsa for 1-2 minutes. Plate them immediately. Top with an Sunny side up egg or over easy egg. Garnish with Crema, Queso Fresco and Onions, and a side of refried beans.Enjoy!
Happy cooking!
Recipe Notes
If you need a tutorial on How to make the best beans you ever had!
Check this link: Mexican Beans Manifesto
Cooking Music Pairing: Danzon No.2 Artuto Marquez
Conducted by: Gustavo Dudamel
https://youtu.be/PA7vEIj6Lzk


