Recipes, Cooking & Art Direction: Mariana Nuño Ruiz McEnroe | Photography: Ian McEnroe |
Published: November 14, 2014
Cold weather, soups and blankets. The time has come and I’m setting you up with the most delicious Mexican mushroom soup. I was planning to make cream of mushrooms since one of my friends asked me for a recipe I made many years ago when I was a student in Guadalajara. (Rosi, if you are reading this please make this soup I think you’re gonna love it more than the cream of mushroom…although the cream of mushroom recipe is in your e-mail by now.)
As usual my brain went in multiple directions when I was at the market. I saw the epazote, smelled it and immediately thought of the Pasilla peppers I had at home. Suddenly it evoked the smells and flavors the recipe which were in my head and I could almost taste this delicious mushroom soup.
As you can see it has nothing to do with the cream of mushrooms I had plan to made, but I have to say that when I trust my instincts and let go, a wonderful recipe arises. I think when the soup was ready, it knock me down it tasted so good and it is so easy to make.
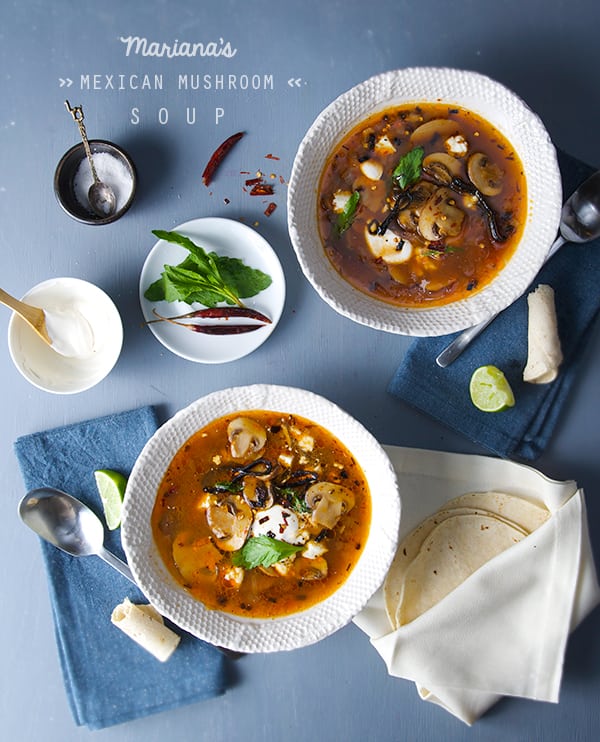
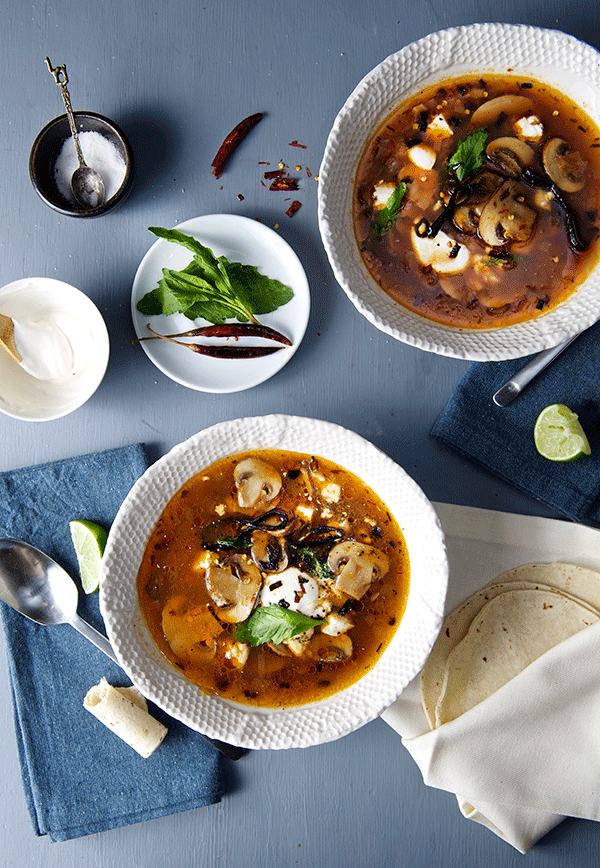
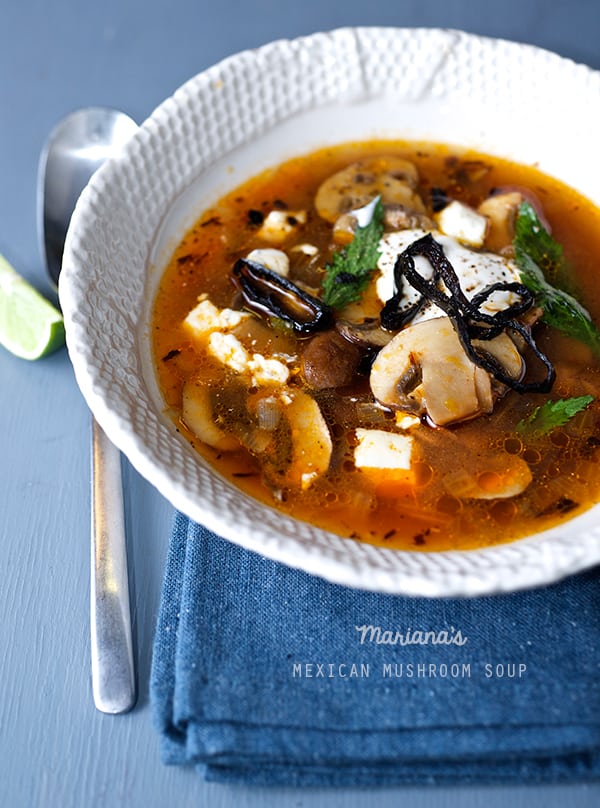
Warm and earthy yet light at the same time, this mushroom soup has the distinct flavor of the Pasilla peppers which tint the broth with a mahogany color and a faint spice. The Cremini mushrooms’ heartiness shine through along with the epazote licorice-minty flavor. The corn masa rue gives the broth a nutty corn flavor and great consistency.
To top it off, I recommend a bit of fresh crema or a dollop of plain greek yogurt which can be added along with some queso panela or queso fresco. For a Vegan version, you can add tofu squares, and a bit of unsweetened coconut cream. If you are looking for a soup that will warm you up with a friendly calorie count this Mariana’s Mexican Mushroom Soup might be just what you where waiting for… Mmm!!!
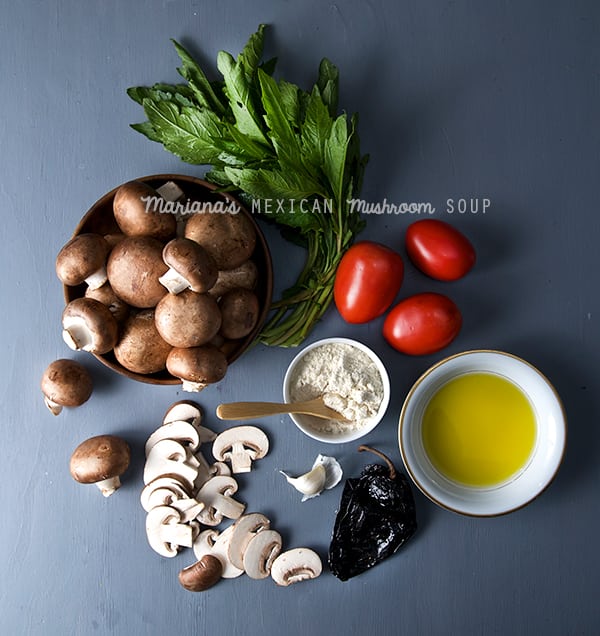
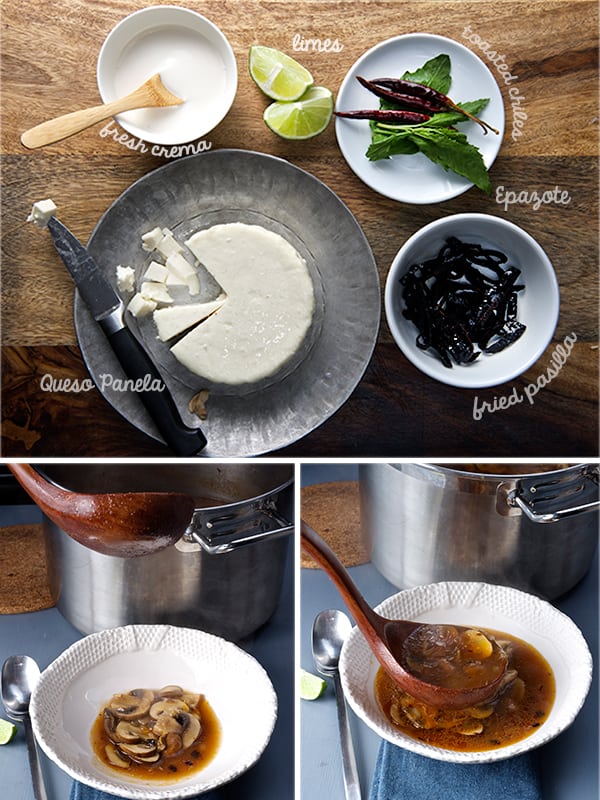
1 lb cremini mushrooms, clean and medium thin sliced.
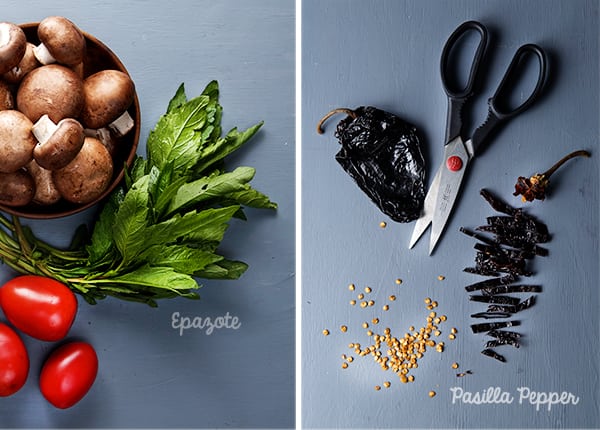
1 large or 2 small dried pasilla chile seedless and cut with scissors
1 tablespoon corn masa-harina “Maseca”
½ medium white onion small diced
1 medium garlic clove finely diced
4 roma tomatoes
4 cups chicken, beef or vegetable stock
1 glug corn oil or extra virgin olive oil (what ever flavor you prefer)
2 sprigs of epazote (if you are using Mexican epazote, use just one)
Sea salt to taste.
2-3 cranks of Fresh Black Pepper
Garnish with:
Fresh Mexican crema, crème fraîche or plain greek yogurt
Queso Panela or queso fresco
Fresh epazote
1. Cut a little cross on the bottom of each tomato. In a small pot boil your tomatoes until soft. Remove the skins. Reserve one cup of the boiling water and blend them until smooth. Set aside. 2. Remove the stem of the chile pasilla and shake to remove all the seeds and core.With the help of kitchen scissors slice the chile pasilla into an 1/8” inch thin strips.
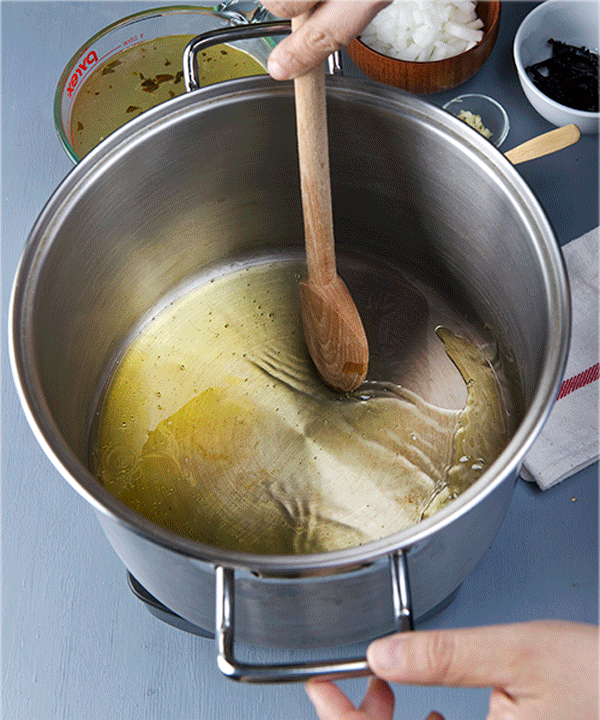
3. Have everything ready beside your stove to start the soup. 4. In a medium large soup pot, over medium high heat add the oil, wait until warms up and then add the pasilla strips. Toss with a wood spoon for 1-2 minutes until they start looking crispy and they release their flavor. After 2 minutes the color of the oil is orange. Remove the crispy rings from oil and reserve them for garnish. 5. Lower the heat to medium and add 1 tablespoon of the corn-masa harina and stir until slightly golden brown. Add the diced onions and garlic, toss for 1-2 minutes, add the tomato pure, toss and season salt and pepper, bring to a boil. 6. Add the chicken stock, and the epazote sprig. Bring to a boil and then simmer for 5 minutes. Add the cremini Mushrooms and crush some of the fried pasilla reserved. Bring to a slow simmer, cover and cook for 15-20 minutes until the mushrooms are tender and the broth has a richer consistency.
7. Taste for salt and pepper. Turn down the heat and let the soup rest for 10 minutes. 8. Meantime prepare your garnishes. Warm up some corn tortillas, serve the soup and garnish with crema, queso panela o fresco, some of the crispy pasilla rings, fresh epazote, and Warm up!
Note: If you are the spicy soul like me, toast some chile de arbol with a little bit of oil and crush some of this spicy chile on top… mmm spicy!
Warm up!
Note: Now that I think about it.. it will be delicious if you add some kale or swiss chard, even baby spinach…at the end of the preparation…yum!
Recipes, Cooking & Art Direction: Mariana Nuño Ruiz McEnroe | Photography: Ian McEnroe |
Published: September 10, 2014
This makes for a versatile dish: appetizer, summer dinner, or lunch; place it in any part of a summer’s day. If you just want something lighter, easy, and extremely tasty, with a little Mexican flair, this is your recipe to go!.
Forget for a bit about the tired guacamole and chips or ceviche. I know they are delicious, but this is going to turn on your appetizer-snack light bulb. There are so many other ingredients in Mexican cuisine, and so many fusions that can take place, that this dish stroked me last night and it was a delicious dinner…Yes, yes we had this for dinner, along with a couple of pomegranate Margaritas…if you want the recipe for them leave me a comment and I will post it next week…
Let me introduce you to my version of Mexican Tuna Sashimi. In Mexico there is a kind of sashimi preparation named Agua chile. Agua Chile is a quick appetizer in which shrimp, octopus, are partially cooked in lime juice and a fresh serrano pepper and a couple of dashes of a well known dark sauce seasoning starting with “M” are added. It is ridiculously simple and delicious.
With this Agua chile dish in mind and Masaharu Morimoto whispering in my ear: “Tuna Sashimi”~
I fused a couple of ideas and created this scrumptious appetizer, summer lunch, Desperate Housewives re-runs, or foodie football game night.
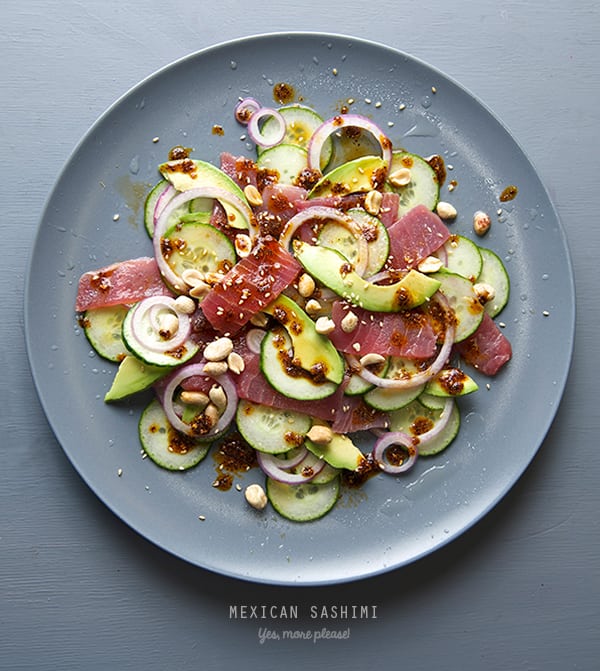
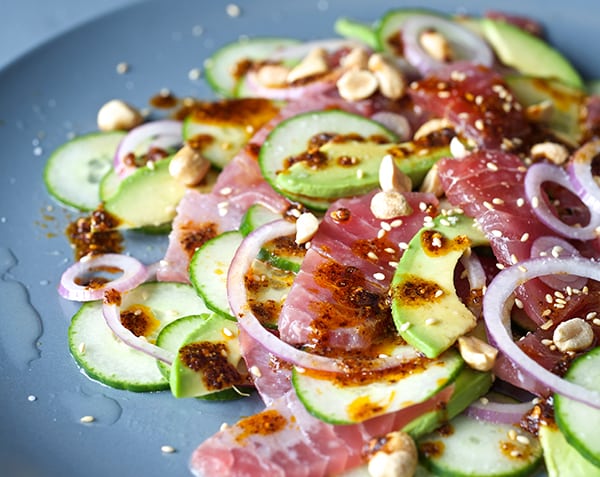
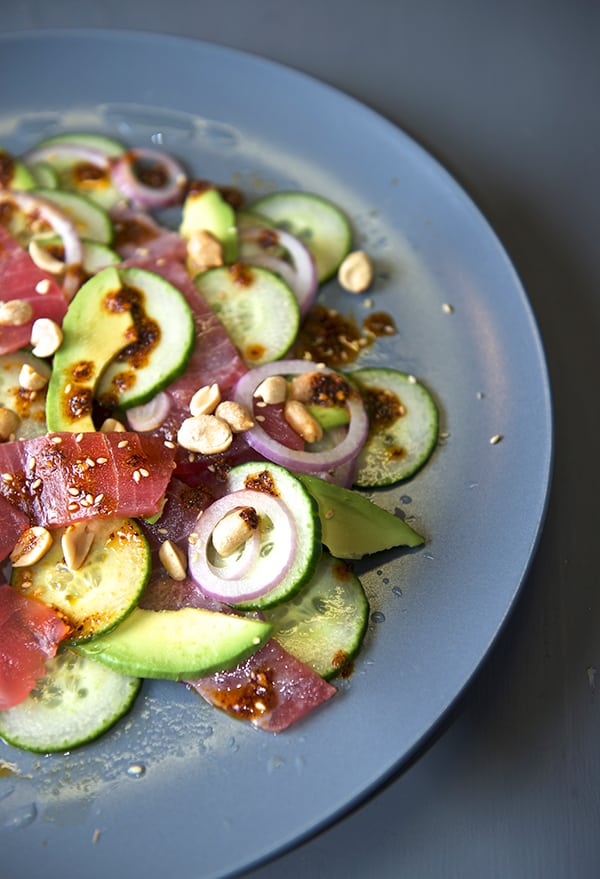
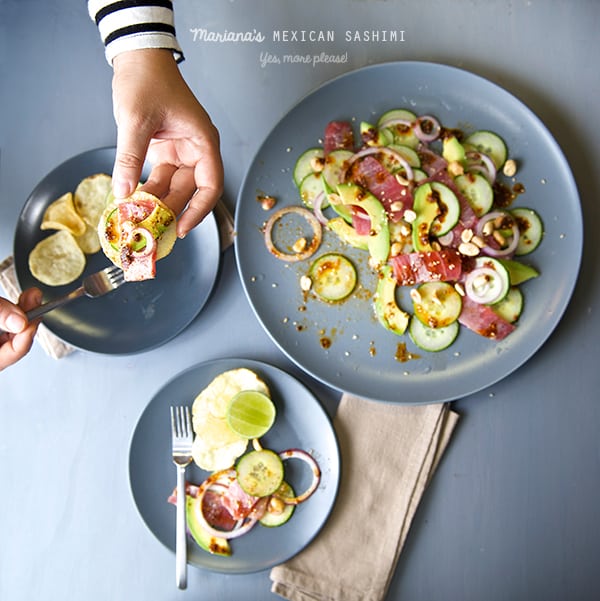
For the recipe sushi grade tuna, a crisp English cucumber, creamy avocado, red onion, lemon juice, soy sauce are plated and combined with my weapon of choice: a red toasted chile de arbol oil sauce. To add some fun and crunch factor, Kettle potato chips or some salty crispy rice chips are delicious on the side to complement the ingredients in this crazy adventure.
The result is a cosmic bite that takes you to Japan and back to play at a mariachi band! Please, you must try this. Share and repeat.
You will find your self craving this appetizer often. Just like we now do…
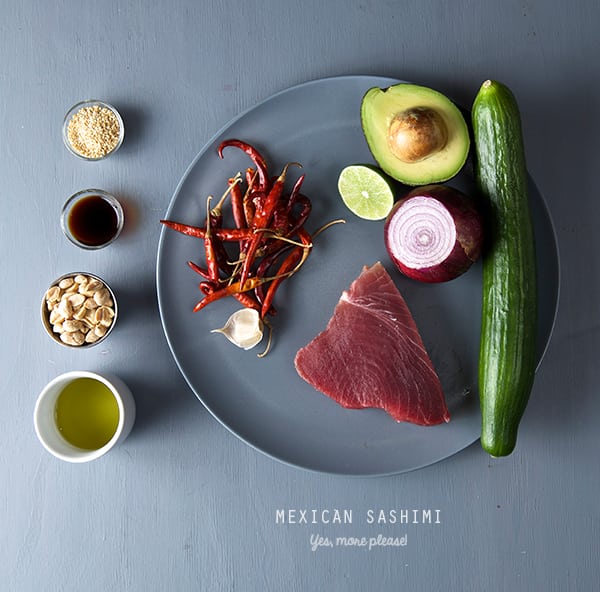
Mariana’s Mexican Tuna Sashimi
Serves 2 or 4.
½ lb tuna steak, sashimi quality, from sustainable sources, ask your fishmonger for best available.
½ English cucumber thinly sliced
½ small red onion thinly sliced
½ Mexican Hass avocado
1 lemon
1-2 teaspoons mirin
2 teaspoons tamari sauce or soy sauce
For the Chile de Arbol oil-sauce :
12 dry Chiles de Arbol remove stems if any.
1 garlic clove
2 good pinches of sea salt
¼ cup grape seed oil
1 teaspoon toasted sesame seeds.
Garnish with:
2 tablespoons unsalted roasted peanuts
toasted golden sesame seeds.
Preparation:
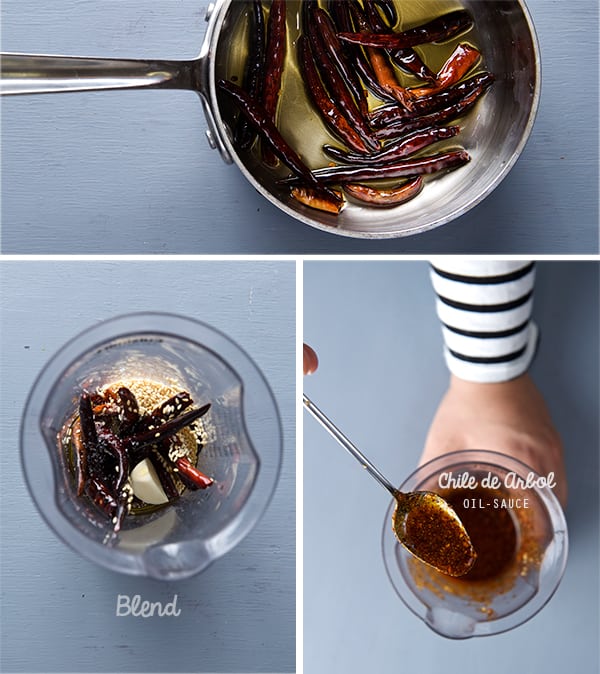
1. First make the sauce. In a small pot heat up the oil and chiles on medium-low, until the chiles are deep dark red, almost black. Set aside and let it cool. Once its cooled down blend the chiles, the oil, sesame seeds, garlic, and salt until you have thick chili oil. Feel free to add a bit more oil if it is too thick. Set aside.
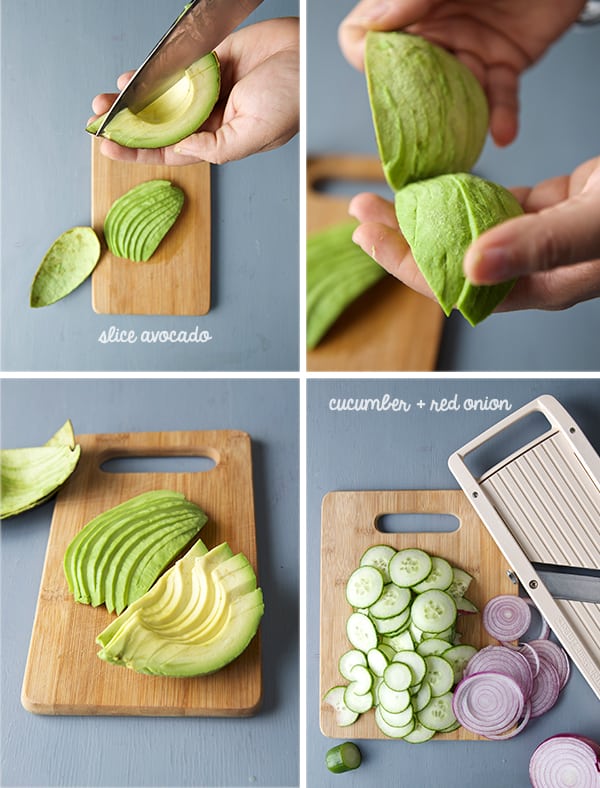
2. Now, place your tuna steak in the freezer for about 10 minutes before slicing, this way it will slice easily. I usually set up a timer so I don’t forget its there and you end up with a tuna lollipop! 3. Meantime, with a Mandolin or a sharp knife, thinly slice: cucumber, red onion, avocado.
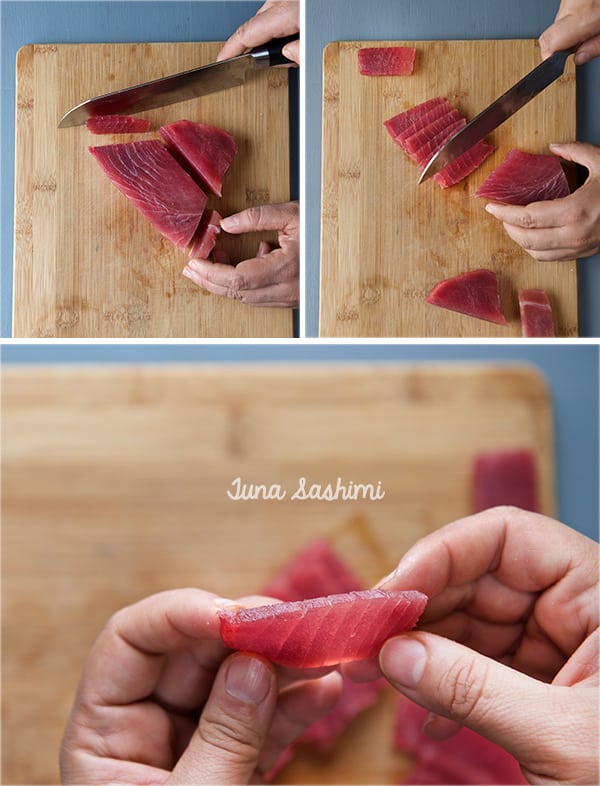
4. Remove the tuna from freezer and slice with the sharpest knives you have. It can be a filet knife, a fish knife, if you own a sashimi knife you are my idol!… Me, I used what I was confident would make a great thin slices, My Santoku knife…I know a lot of people will be reading this and they would want to hang my neck for this… The only person that I could feel I need to apologize to is Masaharo Morimoto… “sorry Chef… I had to”
So yes, using my sharp confidence knife I proceed to slice my tuna steak. It is very important you follow the picture below, on how you cut your tuna steak to avoid a tuna massacre.
There is just a few points to follow:
– Cut the tip of the triangle that is separated by a silver tissue.
– remove the opposite tip of the triangle, the one that looks darker in color and it almost have no visible grain. This is the most tender and delicious part of the tuna steak, its the little corner that it is closer to the vertebra, therefore its tender. Save it to make two special bites if you want.
– Once you remove the two tips, your tuna steak will look more like a rectangular shape.
– Start slicing your tuna from the shortest side of the rectangular shape. Making sure you use just one slide motion on your knife like if you are cutting air. Sway the knife to get the cleanest cut possible.
5. Now the fun part begins, layering the flavors. In a large plate or platter, start layering the cucumber slices, onion, avocado and tuna. Squeeze some lime juice, soy sauce, mirin, sesame seeds, and little drops of the chili oil. Start another layer, until you finish with your vegetables and tuna.
Note: You will have lots of chile de arbol oil left. You can use it on stir fried dishes, shrimp, fish, or save it in a air-tight container in the refrigerator and it will be good for at least 4 weeks.
6. To finish up sprinkle the roughly chopped roasted peanuts on top of the plated items, grab you kettle potato chips, a nice pomegranate margarita, or any drink of your choice, sake, Japanese or Mexican beer will work too!
And enjoy!
Recipes, Cooking & Art Direction: Mariana Nuño Ruiz McEnroe | Photography: Ian McEnroe |
Published: September 3, 2014
The state of Yucatán is located in Southeast Mexico right at the tip of a peninsula and is mostly tropical forest. It is the location of important ancient Mayan cities like Chichen Itza, Izamal, Motul, Mayapan, Ek’Balam and Ichcaanzihoo, which now make up the modern city of Mérida. A tropical forest is filled with an abundance of living species including: Toucans, Guacamayas, Papagayos, Garzas, hummingbirds, serpents, crocodiles, wild boar, porcupines, changos iguanas, squirrels, armadillos, reindeer, and jaguars. All kinds of insects inhabit the forest from ants and wild bees to lightning bugs and mosquitos, all living together in a beautiful fertile land.
Nine thousand years ago this was the land that the Mayan choose to develop their civilization. A paradise of abundance of colors, nature, spices, and rainforest; all your senses are awaken in this land.
It is in the Yucatán where an important culinary fusion took place after the Spanish conquest: Spanish and Mayan cuisine. It is a belief that the people of Yucatán were the first Native Americans that tried the pork meat.
This fusion of cuisines gave origin to a New World cuisine, the Mestizo. These dishes which derive part of their origin from prehispanic ingredients, condiments and techniques were fused with the new ingredients from the old continent. Items like pork, spices, citrus, and different cooking techniques came together to create this New World cuisine.
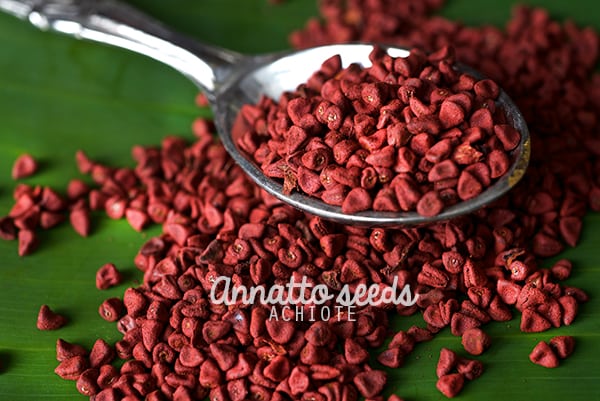
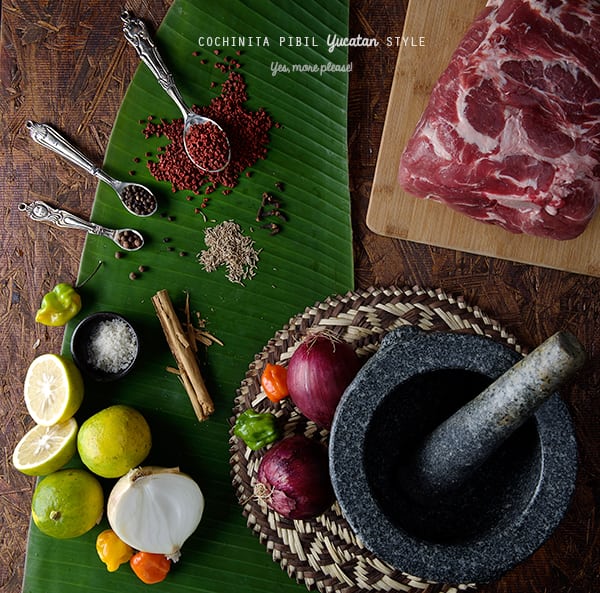
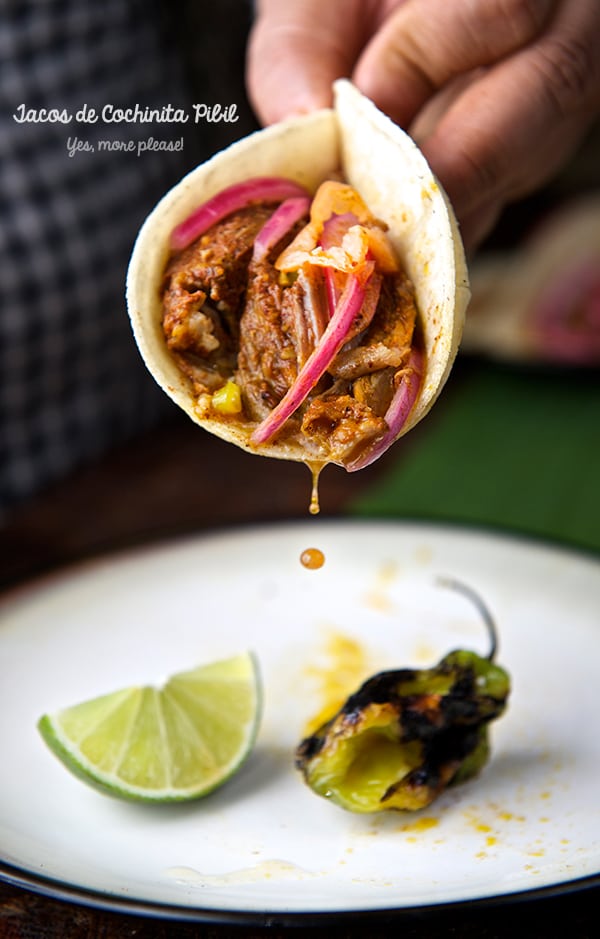
Cochinita Pibil is one of the most renowned dishes in Yucatán. Its name comes from Cochinita = suckling pig or small pig, and Pibil in Mayan means “under the ground” referring to the cooking method that the Mayan developed. It is one of the dishes that I like the most from that region. It is really amusing and fun to prepare. There are two ingredients in this recipe that give character and its particular flavor: Annatto seeds and Bitter oranges. You might have to go on an adventure to find them, although now its easier than ever with all the specialized condiment stores and supermarkets with special sections for ethnic foods. Annatto seeds grow on the tropical forest of a little tree that gives a heart shaped fruit with spiky hairs.When the fruit is fully mature, it splits open revealing the beautiful red seeds. Besides having a culinary purpose, annatto seeds are also used for pigments and food coloring.
Cochinita Pibil is such a rewarding dish. A little love and effort go a long way. First, you work on a rub-marinade for the pork, marinate it overnight or for as long as twenty-four hours. Then make a pork bundle of banana leaves and bake it in the oven or in an outdoor charcoal pit for 3.5 to 4 hours. If you wish you can go all the way and bury it in the ground which is the traditional method. My recipe is more adapted for house or grill cooking. If you want to go with the traditional method send me an e-mail along with and invitation and I will help you cook it! : )
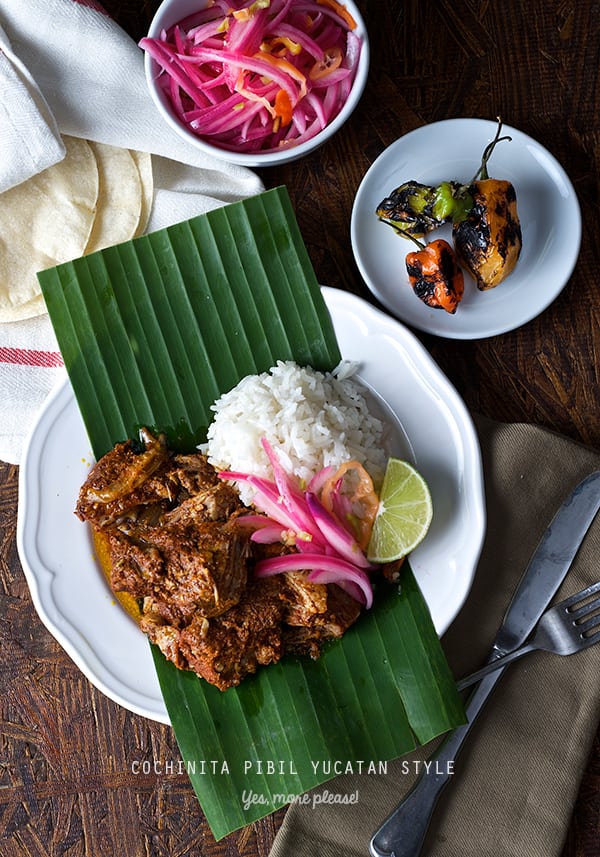
The best way to describe this Cochinita Pibil is addictive. The tangy oranges, the floral annatto seeds and the two types of pepper corns marry the rich pork flavor transforming the pork into the best succulent pork with an extraordinary flavor and tender texture. The pork remains moist from the Banana leaves pocket that keep the pork bundle warm and juicy. The banana leaves perfume the dish giving it an intangible unique quality.
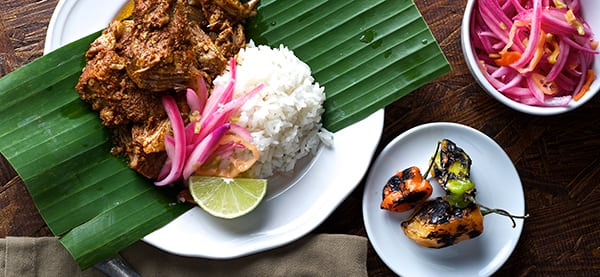
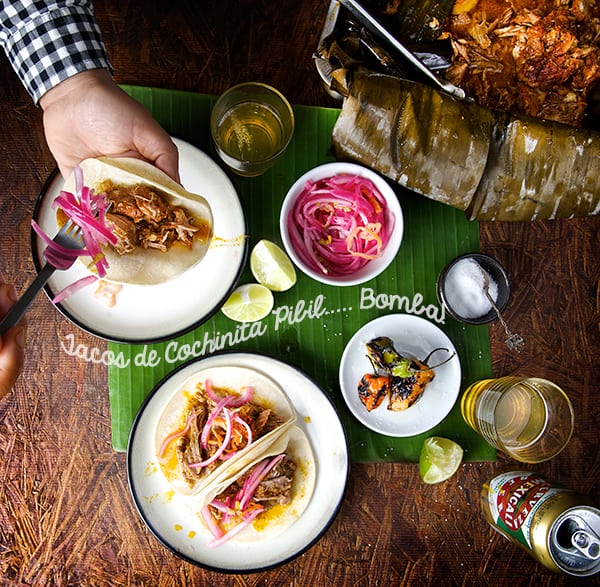
Cochinita Pibil is traditionally served with garlic rice and black beans, in tacos, or tortas.
Other delicious dish preparations could be as a stuffing for enchiladas, poblano chiles or empanadas. For me I think is best on its own, with corn tortillas on the side, hand made if possible.
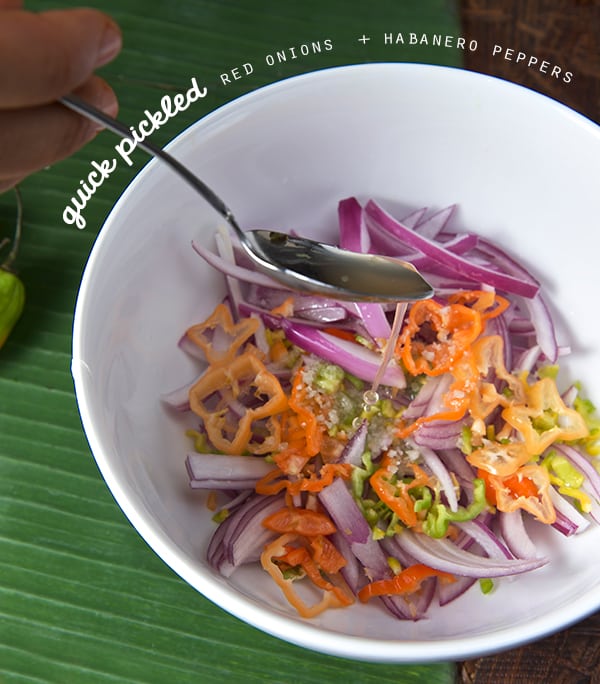
Quick pickled red onions with fresh habanero peppers and a grilled habanero pepper sauce on the side, a cold Mexican pilsner beer are Cochinita Pibil’s best companions… the way its served in Yucatán, the best juicy pork on the planet!
I know you’re gonna love this recipe as much as I do…. ask Ian!…Enjoy!
Cochinita Pibil Yucatan Style
Serves 6 Yucatecos, and 6-8 pork taco lovers.
8lbs.Pork butt or pork shoulder cut into large 3”x 4”cubes approx. Pork butt tends to shrink a lot because of its fat content, always calculate at least 2 or 3 more pounds of what you think you will need. In this recipe 8 pounds, yields about 5-6 net pounds of pork meat.
2 white onions sliced on thin wedges.
For the marinade:
6 tablespoons annatto seeds*
1 tablespoon whole black pepper
8-10 whole All spice peppercorns (upon size small=10 medium-large=8)
6 whole cloves
2 teaspoons cumin seeds
2″ stick Mexican cinnamon
1/2 teaspoon Mexican oregano
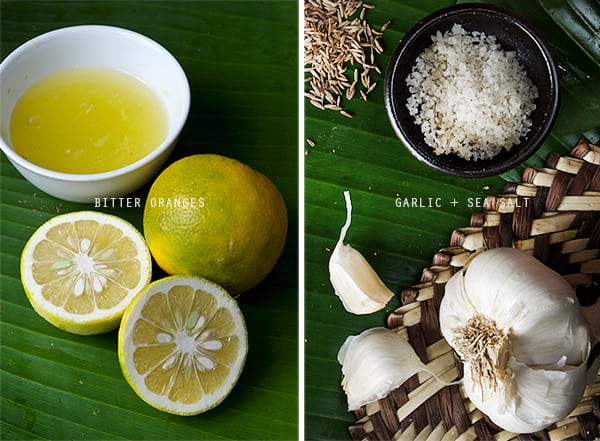
12 garlic cloves
1 Habanero chile de-seeded
1 tablespoon sea salt.
1- 1/2 cup of bitter oranges juice. Bitter oranges have a sour bitter flavor, highly acidic which complement and tenderize the meat.How to recognize them?
They have green and yellow rough skins, picture above.
(If you can’t find this kind of oranges, substitute for 1 cup orange juice and 1/2 cup white vinegar)
For the quick pickled red Onions:
2 medium red onions, sliced in thin wedges
4-5 Habanero peppers, thinly sliced or diced.
Juice of 1 lime
1/2 cup white or pineapple vinegar
1 teaspoon kosher salt
You will need the following to cook your Cochinita Pibil:
5-6 Banana Leaves
Heavy duty Foil paper
16″x13″ Ennamel, clay or stainless steel roasting pan
Note:
If you cannot get annatto seeds, you can substitute for achiote paste. It is not the same flavor, I really prefer to go with the seeds the flavor and the aroma is so much better. If you use the paste, use 3/4 of the paste bar, and use only 1/2 the amount of salt on the recipe. The same with the rest of the spices, If you can get them whole the spices taste so much better. Why? Well once the spices are grounded the oils inside the seeds that give the aroma and flavor, start to oxidize,losing their intensity of flavor and aroma.
Preparation Method:
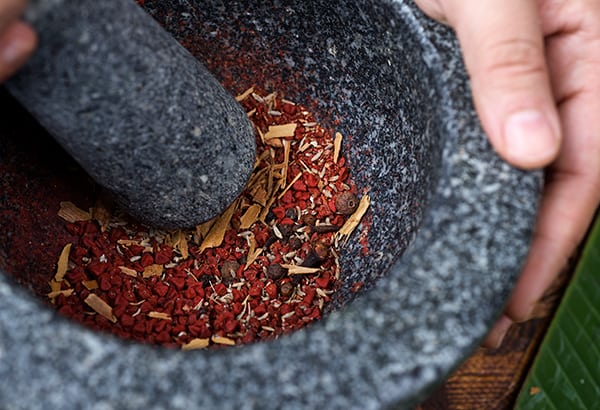
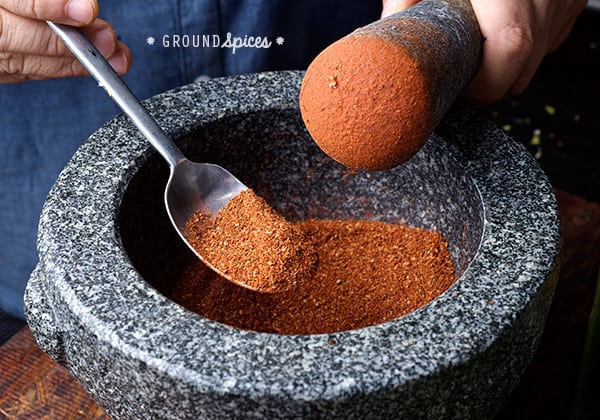
1. Cut the pork into 3”x 4” cubes, set aside. 2. Grind the annatto seeds, black pepper, allspice, cinnamon, cloves, cumin seeds, oregano until powdered. You can use a stone mortar to pulverize the seeds or a coffee grinder. I do recommend fresh spices whole rather than powdered because the whole seeds retain much of their oils and are more fragrant. Since we are making all by scratch, it is worth the extra effort!
I do prefer to use a mortar, is more fun and the aroma of the spices while you grind them is amazing… if you are not so romantic like me..hehehe a coffee grinder will work, just remember that once you use it for spices, just use it for that purpose.
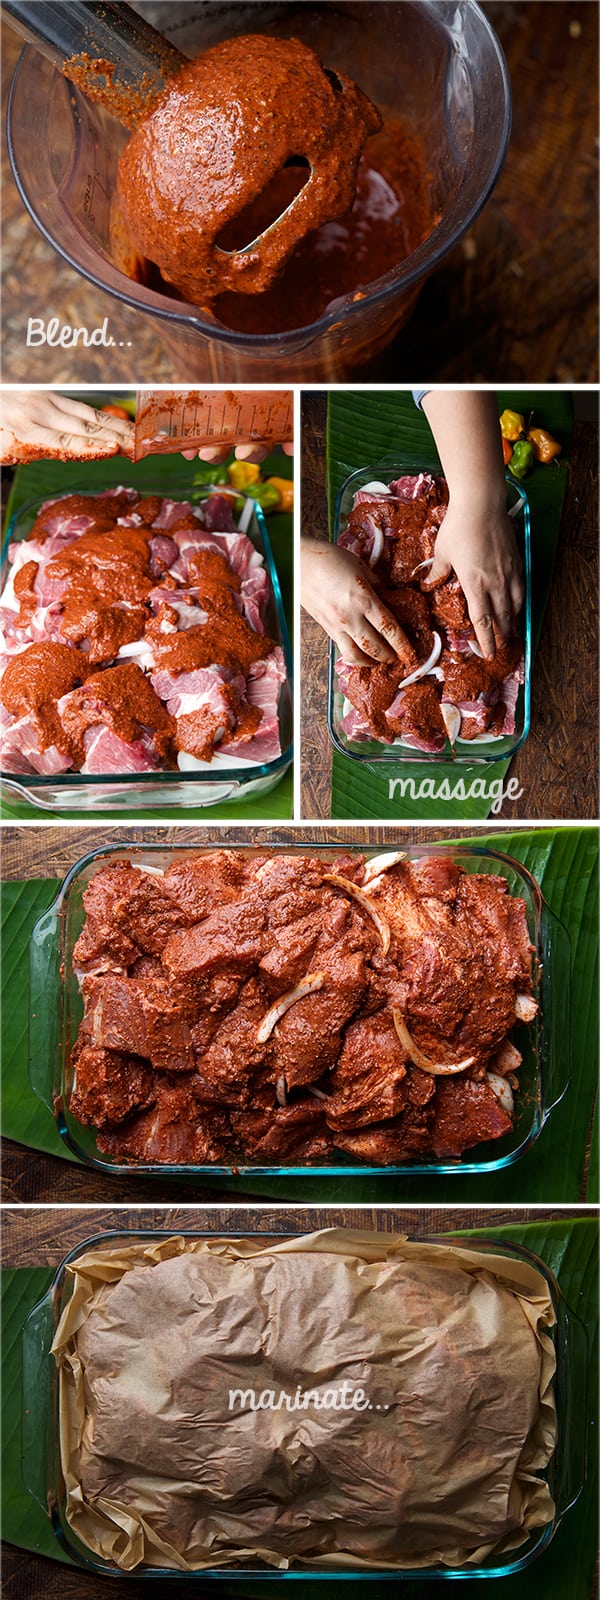
3. In a blender combine the garlic cloves, Habanero chiles, sea salt and orange juice. Blend. 4. In a glass container place the pork and all the blended marinade, massage the pork pieces until well covered. Cover with parchment paper and plastic wrap. Refrigerate, let it rest over night.
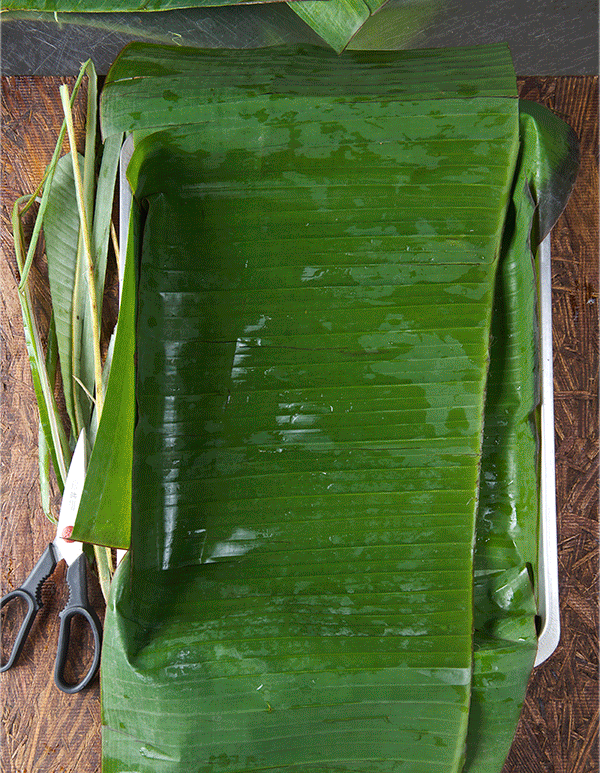
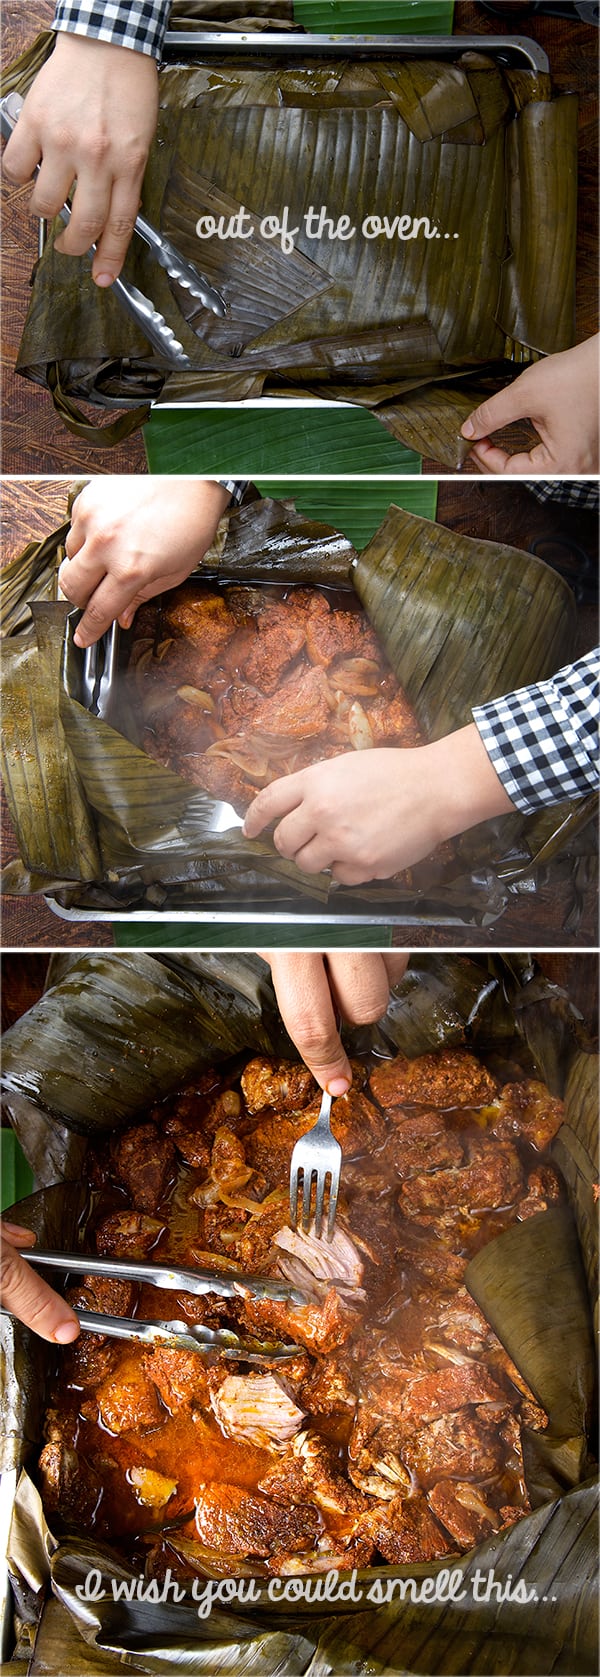
5. Next day remove your pork out of the fridge while you prepare the pan. You want the marinated pork not to be refrigerator cold when you place it in the oven. This allows the meat to cook more evenly and it will be more tender. 6. Move your oven rack to the lowest position in your oven. Preheat the oven at 325 F/160C Place the banana leaves inside the oven for 5-7 minutes.Afterwards they should be a little warm which will make them more pliable. With scissors cut off the banana leaves hard middle rib edge. 7. In a large roasting pan line the banana leaves in both directions, overlapping half way the leaves and placing them cross ways until you can not longer see the bottom of the pan. Place some banana leaves pieces on each corner to ensure there is no leaks.Leave the over hanging leaves, these will help us to make the bundle. 8. On top of the banana leaves place a layer of thin onion wedges and the marinated pork meat in the roasting pan. Add the marinate juices and cover with the over hanging banana leaf. You want to make a pork bundle. Make sure is all fully wrapped up. Take a look at the following images for visual directions. 9. Cover the entire pan bundle with aluminum foil. Tighten the edges fully to seal and contain the heat and moisture. Place the pot into the oven (or the just warm charcoal embers outside in a pit or carefully monitored grill) for 2.30 to 3.30 hours.
10. Pull the cochinita out of the oven and before uncovering it, let it rest for at least 30 minutes. 11. While your pork is resting, prepare your pickled onions by thinly slicing red onions and habbanero peppers. Slightly warm up the vinegar, and add the salt and lime juice to the onions. cover and leave them at room temperature, until the Cochinita is ready. The onions will became hot pink, and the vinegar will have the flavor of the spicy habaneros. Set up the table, get yourself a nice cold Mexican beer to drink.
12.Unveil the Cochinita Pibil and with the help of two forks shreed the pork into smaller pieces, let the pork absorb those juices from the pan. The pork should be fork tender, juicy, moist…fragrant! the smell will fill your kitchen. You will almost hear the toucan screaming and the Mayan Jaguars slinking around behind you (watch out)… Time to eat!… Enjoy!
This Cochinita Pibil is best served with a side of white fluffy garlic rice, and black beans. Tacos are always a great option. corn or flour, what ever rocks your boat. Enjoy!
Serve with Rice…or
Make the most amazing Cochinita Pibil Tacos!
Viva Mexico!…Enjoy!
Bomba! Con esta cara de lec y esta figura de pec te juro preciosa eshpet que te puedo hacer jesmec!…
8lbs.Pork butt or pork shoulder,cut into large 3”x 4”cubes. Pork butt tends to shrink a lot because of its fat content, always calculate at least 2 or 3 more pounds of what you think you will need. In this recipe 8 pounds, yields about 5-6 net pounds of pork meat.
2mediumwhite onions,sliced on thin wedges
For the marinade:
6tablespoonsannatto seeds
1tablespoonwhole black pepper
8-10wholeall spice peppercons, aka pimienta gorda,upon s small=10 medium-large=8
8wholecloves
1tablespooncumin seeds
2"stickMexican Cinnamon
12largegarlic cloves
1habanero chiles,de-seeded
1-1/2tablespoonsea salt
1-1/2cupsbitter oranges juice,Bitter oranges have a sour bitter flavor, highly acidic which complement and tenderize the meat. If you can’t find this kind of oranges, substitute for 1 cup orange juice and 1/2 cup white vinegar.
For the Quick Pickled Onions:
2mediumred onions,sliced in thin wedges
3-4Habanero peppers,thinly sliced or diced.
1Lime,the juice
1/2cupwhite vinegar or pineapple vinegar
1teaspoonkosher salt
You will need the following to cook your Cochinita Pibil in:
5-6largeBanana Leaves
Heavy duty foil paper
16"x 13"Ennamel, clay or stainless steel roasting pan
Instructions
1. Cut the pork into 3”x 3” cubes, set aside.
2. Grind the annatto seeds, black pepper, allspice, cinnamon, cloves, cumin seeds, oregano until powdered. You can use a stone mortar to pulverize the seeds or a coffee grinder. I do recommend fresh spices whole rather than powdered because the whole seeds retain much of their oils and are more fragrant. Since we are making all by scratch, it is worth the extra effort!
I do prefer to use a mortar, is more fun and the aroma of the spices while you grind them is amazing… if you are not so romantic like me..hehehe a coffee grinder will work, just remember that once you use it for spices, just use it for that purpose.
3. In a blender combine the garlic cloves, Habanero chiles, sea salt and orange juice. Blend.
4. In a glass container place the pork and all the blended marinade, massage the pork pieces until well covered. Cover with parchment paper and plastic wrap. Refrigerate, let it rest over night.
5. Next day remove your pork out of the fridge while you prepare the pan. You want the marinated pork not to be refrigerator cold when you place it in the oven. This allows the meat to cook more evenly and it will be more tender.
6. Move your oven rack to the lowest position in your oven. Preheat the oven at 325 F/160C Place the banana leaves inside the oven for 5-7 minutes.Afterwards they should be a little warm which will make them more pliable. With scissors cut off the banana leaves hard middle rib edge.
7. In a large roasting pan line the banana leaves in both directions, overlapping half way the leaves and placing them cross ways until you can not longer see the bottom of the pan. Place some banana leaves pieces on each corner to ensure there is no leaks.Leave the over hanging leaves, these will help us to make the bundle.
8. On top of the banana leaves place a layer of thin onion wedges and the marinated pork meat in the roasting pan. Add the marinate juices and cover with the over hanging banana leaf. You want to make a pork bundle. Make sure is all fully wrapped up. Take a look at the following images for visual directions.
9. Cover the entire pan bundle with aluminum foil. Tighten the edges fully to seal and contain the heat and moisture. Place the pot into the oven (or the just warm charcoal embers outside in a pit or carefully monitored grill) for 3.5 to 4 hours.
10. Pull the cochinita out of the oven and before uncovering it, let it rest for at least 30 minutes.
11. While your pork is resting, prepare your pickled onions by thinly slicing red onions and habbanero peppers. Slightly warm up the vinegar, and add the salt and lime juice to the onions. cover and leave them at room temperature, until the Cochinita is ready. The onions will became hot pink, and the vinegar will have the flavor of the spicy habaneros. Set up the table, get yourself a nice cold Mexican beer to drink.
12. Unveil the Cochinita Pibil and with the help of two forks shreed the pork into smaller pieces, let the pork absorb those juices from the pan. The pork should be fork tender, juicy, moist…fragrant! the smell will fill your kitchen. You will almost hear the toucan screaming and the Mayan Jaguars slinking around behind you (watch out)… Time to eat!… Enjoy!
This Cochinita Pibil is best served with a side of white fluffy garlic rice, and black beans. Tacos are always a great option. corn or flour, what ever rocks your boat. Enjoy!
Recipes, Cooking & Art Direction: Mariana Nuño Ruiz McEnroe | Photography: Ian McEnroe |
Published: August 12, 2014
It’s a pizza!…no!
It’s a casserole!….no! It’s a tamale?!…..no!
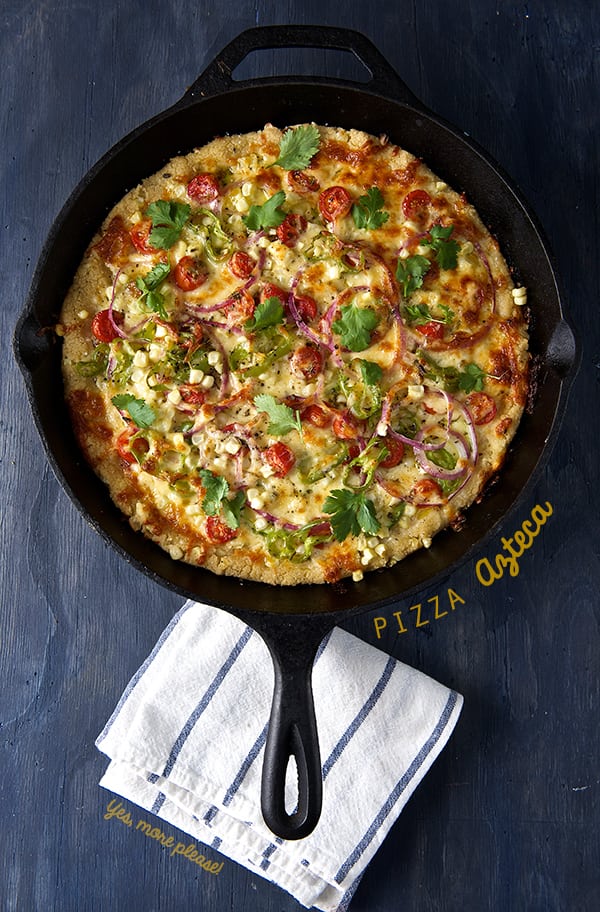
It’s a Corn Masa Pizza Pie!….Yes!
As silly as it sounds, it is ridiculously delicious!
Call it what you like: Mexican pizza, Corn Masa pizza; Pizza Azteca-its the ultimate summer one pan wonder. This is a great quick meal solution too! To get pizza on board it takes no more than 35 minutes since the masa does not rely on yeast or waiting time to rise.
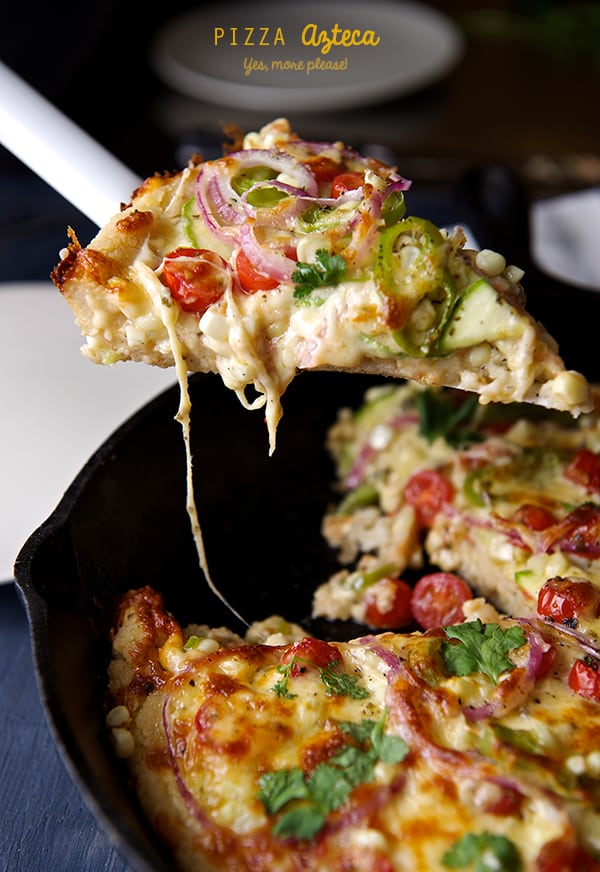
Let me describe this pizza for you… Imagine a hot cast iron pan filled with corn masa crust, when baked the bottom gets crusty with soft delicious nutty corn masa. Fresh corn kernels add texture, enhance the corn flavor and add moisture to the crust. The top layer load with summer vegetables like zucchini, fresh corn, tomatoes, red onions, hatch peppers, and loads of melty cheese layered on top. The summer vegetables pair great with the flavor of the corn masa, the oregano on the fresh quick base sauce adds the perfect herb note. I made the pizza sauce by grating some fresh tomatoes which adds extra freshness to the pizza. I baked everything on the king of pans, “the cast iron pan”.
When this pizza comes out of the oven you will be fill with warmth and happiness as you experience the comforting smell of cooked corn masa and fresh vegetables. Pizza Azteca is best served with a fresh green salad on the side and will be a sure crowd pleaser.
This Pizza Azteca is what I would offer Moctezuma on a summer afternoon… Pizza Azteca is a meal fit for kings!
Enjoy!
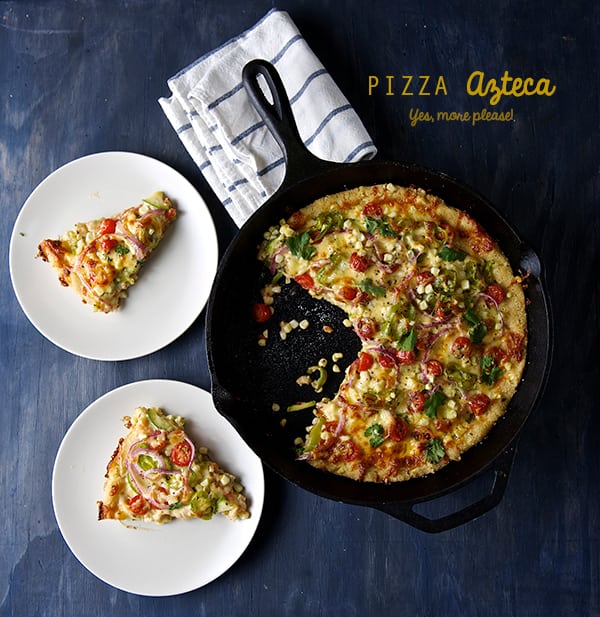
Pizza Azteca
Makes 1 round 12” pizza, yields 8-10 slices.
For the crust:
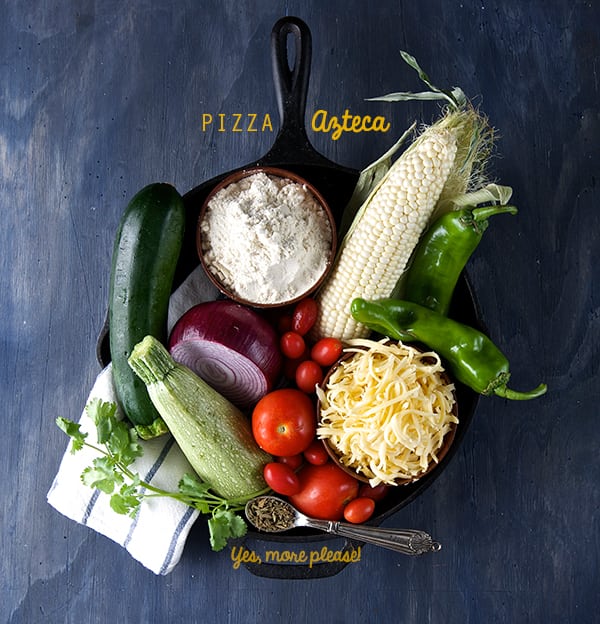
2 cups corn masa- Maseca is the brand I like, if you can get fresh masa, use it! you will be in heaven.
2 to 2-1/2 cups warm water
½ teaspoon kosher salt
½ cup fresh corn kernels (white or yellow corn is ok)
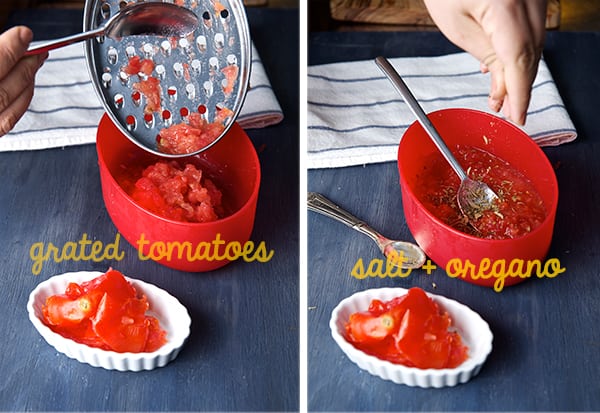
For the sauce:
3 medium roma tomatoes grated
1 tablespoon tomato paste
1 teaspoon dry oregano
1 garlic clove grated
1 tablespoon extra virgin olive oil
1 teaspoon kosher salt
Fresh cracked pepper to taste
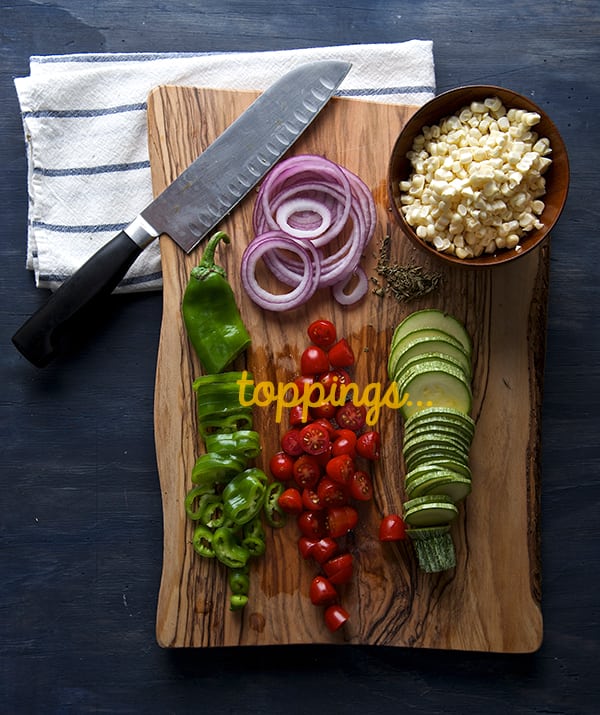
For the toppings:
1 large or 2 medium zucchini thinly sliced.
1 ear of corn worth of kernels
1 hatch pepper or substitute for 1 good pinch of red pepper flakes.
Use roasted red peppers if you do not care for spicy.
1 cup cherry, sun golds or grape tomatoes sliced in half.
2 cups of grated cheese like Adobera, Oaxaca, Gouda, Mozzarella or Monterrey jack.
Use the cheese you like the most, as long it melts and has a mild flavor so you can taste the rest of the ingredients.
Salt and pepper to taste a little extra virgin olive oil for drizzle.
Preparation:
Preparing the masa:
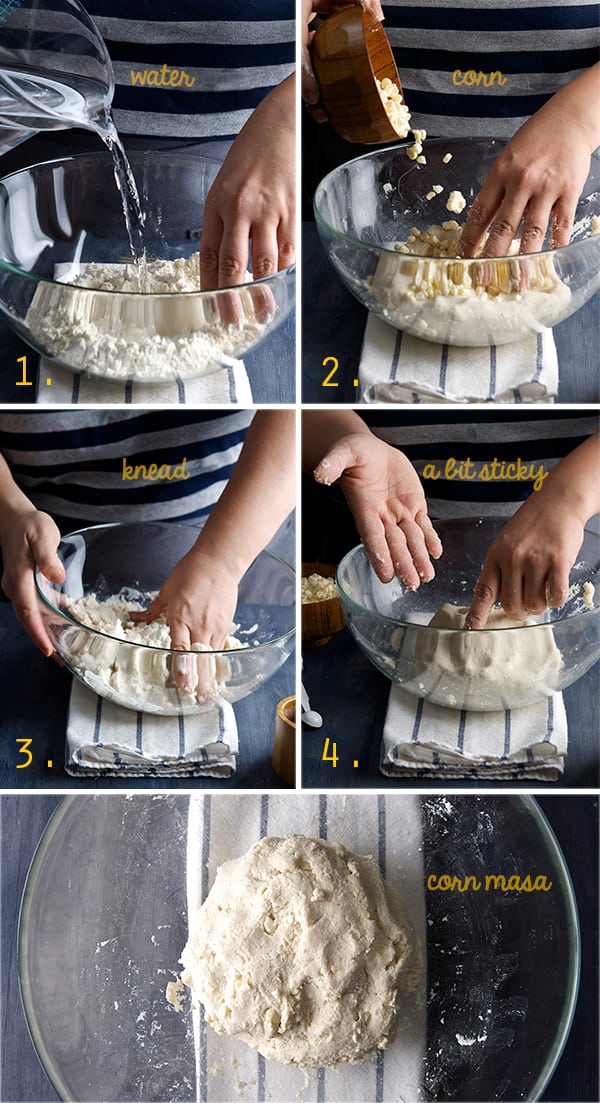
1. Start by preparing the masa dough. Dissolve the salt into the 2 cups of warm water. 2. In a large bowl place your dry corn masa flour, make a well in the center add half of the water, and start incorporating the flour from the sides. Add corn kernels and the rest of the water. Knead for 2-3 minutes until water is well absorbed by the masa. 3. The masa should feel moist a bit sticky to the touch. You should be able to shape it into a ball and cover with plastic wrap, set aside let it rest while you prepare the rest of your vegetables. 4. Preheat Oven at 450F/ 230F
5. Prepare and slice all your vegetables, grate your cheese and prepare your tomato sauce by grating the tomatoes and adding the oregano, salt, garlic, black pepper and extra virgin olive oil. Set aside.
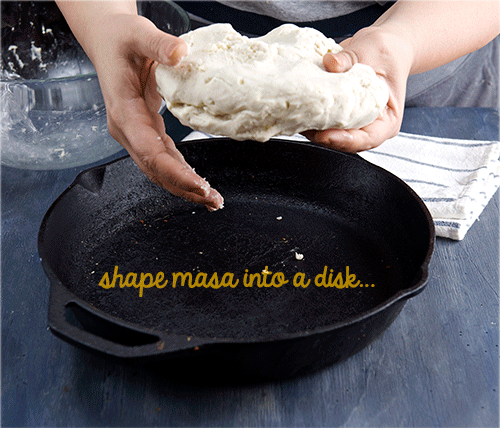
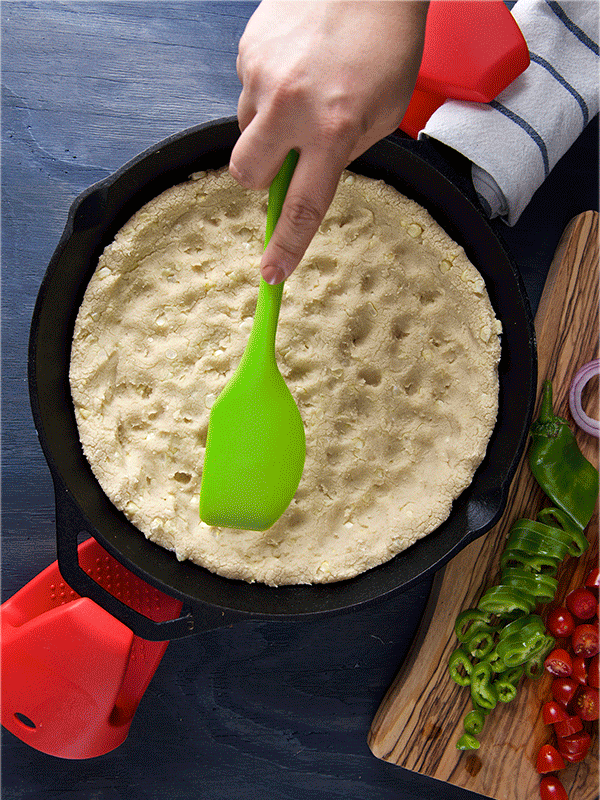
6. At this point your masa should be well hydrated and ready to shape into the cast iron pan. Using a 11-12” Cast Iron Pan place your masa dough in the center and with wet hands start by evenly shaping the masa into the pan. Create a higher rim on the edge of the pan. see photo.
Note: If your cast iron pan is well seasoned do not worry about the crust it will not stick to the pan, if not just apply some neutral oil on a napkin and grease the pan before shaping your crust.
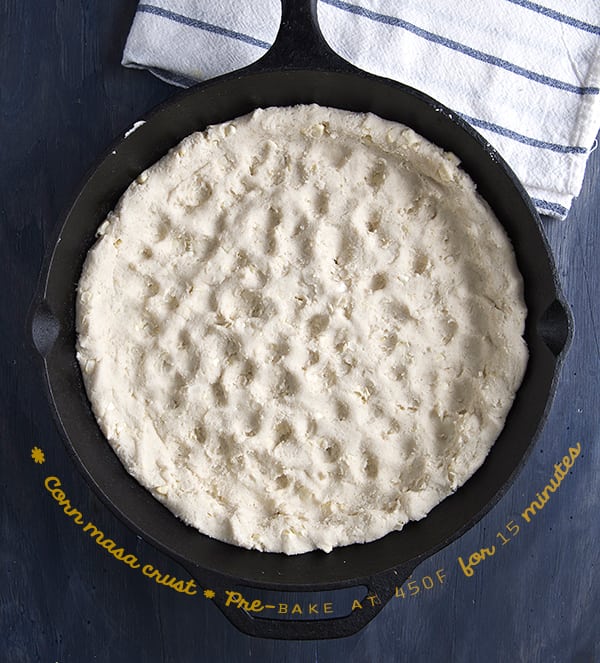
7. Once you have an even layer with a bit of a rim on the outside edges, Place skillet with the crust in the oven, on the bottom rack. Bake for 15 minutes lowering the oven temperature to 425F as soon the crust is in the oven.
8. Carefully remove the skillet from the oven, place it on top of the stove or a metal trivet and start layering your pizza ingredients. Note: leave the pot holders into the cast iron pan handles at all times!, this will prevent you to try to grab the hot pan by mistake!…believe me I’ve been there…ouch! 9. Layer the ingredients same way you do like on a pizza, starting with tomato sauce on the bottom, half of the cheese, zucchini, corn, onions, tomatoes, peppers, and the rest of the cheese. A pinch of salt and some fresh cracked pepper. 10. Place the cast iron pan into the oven for another 20-25 minutes until cheese is melted and the pizza has some gratin golden brown blisters.
11. Remove from oven, place the pan on a trivet and wait 5 minutes to cool off a bit before cutting. Sprinkle some fresh cilantro for garnish. 12. Serve and Enjoy!
Enjoy!
Silly, silly music pairing: Brak’s Pizza Song with the Space ghost…
Recipes, Cooking & Art Direction: Mariana Nuño Ruiz McEnroe | Photography: Ian McEnroe |
Published: July 22, 2014
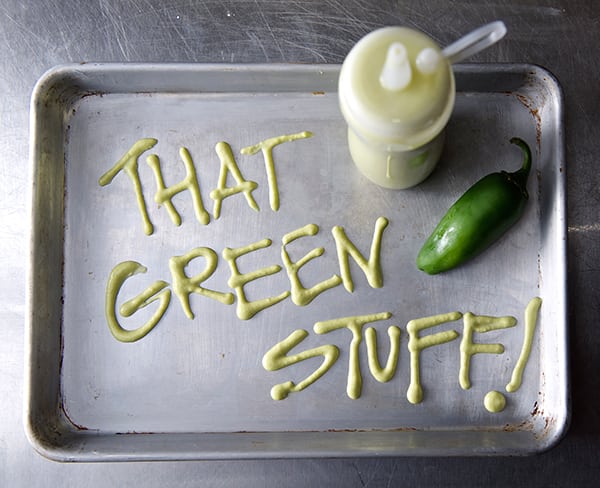
I know you’ve seen and tasted this creamy, spicy, light green sauce at taco stands, Mexican and Tex Mex restaurants here in Texas. This creamy green sauce is incredibly good and addictive. It’s tangy and spicy profile is irresistible. Why “green stuff” ? Its ingredients are a mystery when you taste it. The creamy texture makes you believe it has avocado or maybe some sort of cream or mayonnaise. I’ve tried to make this sauce many times with no success, until now. I even tried to buy this sauce at a super market chain here in Austin that started to sell it. After trying this supermarket version with its whopping thirty-one ingredients which did not even taste or resemble the creamy tangy spicy “green stuff sauce”.
Determined to make my own, I decided to take action and start my research. This traditional Mexican salsa was not easy to figure out, although I had sampled it many times in my life in Mexico, a very common condiment for tacos, and street food. My first encounter with this sauce was in Baja at a fish taco stand. I experimented with 3 or 4 recipes that I was given by different taco stands and restaurants. I had to eat a lot of tacos in order to get the flavors and ingredients correct or to even attempt to ask how it was made. Such are the sacrifices I make for my readers…Oh well.
After asking a few different sources, I learned the principle of how the creamy sauce was made and to my shock and surprise I discovered that this green creamy sauce is made with just five ingredients! Not a single drop of dairy, cream or avocado is used. Now my mission was figuring out the amounts. It knew it was going to be a matter of trial and error. I started to play with the five ingredients: Fresh Jalapenos, Onion, Garlic, Corn Oil and Salt . I combined them in the most sensible way possible. I attempted to recreate the recipe about three or four times by adjusting the spicy and creamy taste I had in my memory.
I tried different methods like roasting, pan frying, blistering, and boiling the chiles as referenced by my sources. Finally on the final attempt I got it! The green creamy sauce is here before your eyes and I’m sharing it with you with no edits. Easy as 1-2-3-4 steps and five ingredients.
You can make this epic sauce for a fraction of the cost and a thousand times greater in flavor in a blink of an eye. Bettter news yet, it is good for all my Vegan friends, because there is not a single drop of dairy in it.
What can you use this sauce on? EVERYTHING, from ANY taco(on fish tacos..amazing!), carne asada, fish, pork, lamb, roasted chicken, tofu, quesadillas, eggs, sandwiches, burgers, chips, roasted veggies, BAKED SWEET POTATOE FRIES (did I said, baked sweet potato fries?), roasted potatoes, pizza, hot-dogs, you can even combine this sauce with some sour cream and transform it into a dip for chips.. you name it.
Go wild!…I’m in total love with it and so glad I can share it with you. I hope you fall for it too!
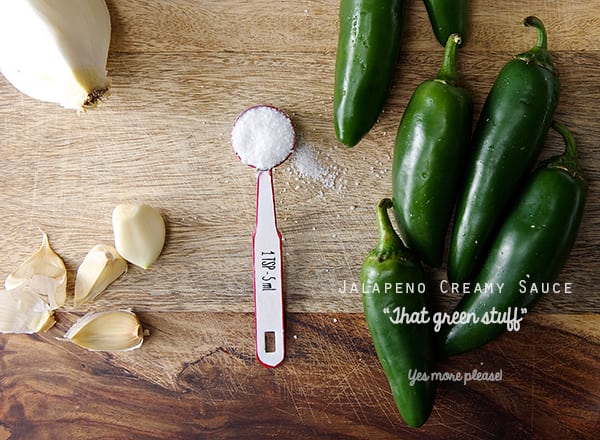
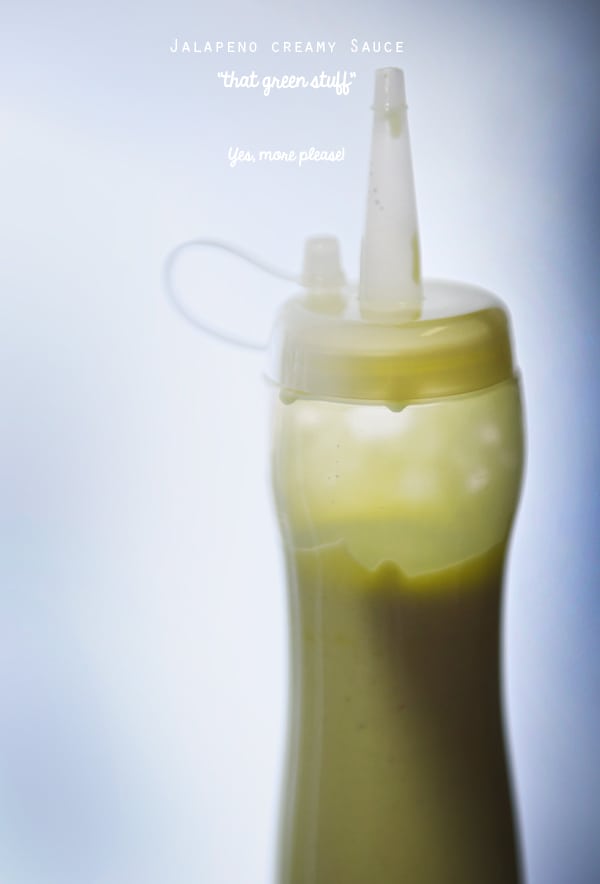
Jalapeno Creamy Sauce “That Green stuff”
Makes about 2 – 2-1/2 cups.
6 large fresh Jalapeño chiles. Mine weighed about 7 oz / 200 gr. give it or take.. you can make it half a pound why not!
¼ of a large yellow onion
2 large garlic cloves
½ to 3/4 of a cup corn oil, grapeseed oil, sunflower oil or extra virgin olive oil, or a combination of two.
1 teaspoon kosher salt
Note: depending on how spicy are your chiles, adjust using a little splash of apple cider vinegar to brighten up the flavor. Remember you can use any other chile you prefer, like Serranos, Poblanos, Habaneros, Bell peppers, Anaheims, Gueros, California, Hatch… or a combination of them!
Preparation Method:
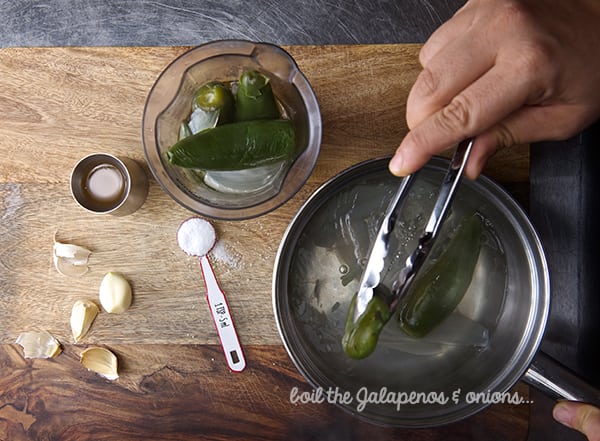
1. In a small pot bring water to a boil, enough water to cover the chiles and piece of onion. Simmer the jalapenos and onions for about 15-20 minutes until they change in color and are fork tender, but not mushy. Carfuly remove stems after they cool down a bit and strain some of the excess water.
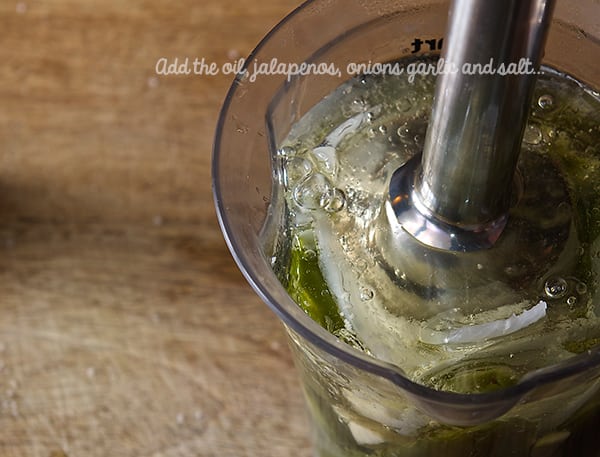
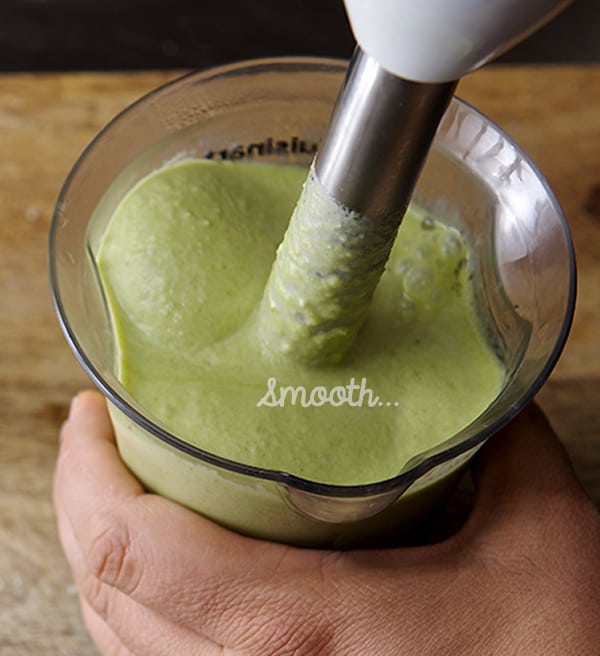
2. Using an immersion blender, a food processor or a regular blender, combine the corn oil, garlic cloves, strained jalapeños onions and salt.
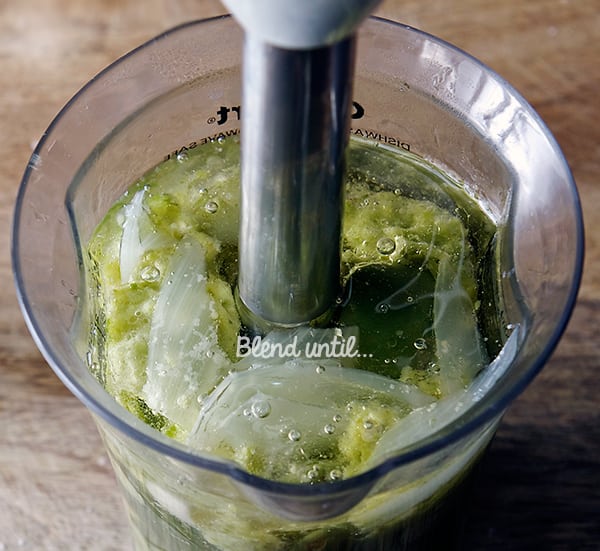
3. Blend until smooth and creamy, about 3-4 minutes using an inversion blender, about 5-6 minutes on a blender or food processor, until it looks frothy, creamy and pale green.
4. Taste for salt, adjust if necessary. Transfer to a squeeze bottle, and refrigerate. It will last for about a week… If you can contain your self!…. Enjoy!
Warning and Notes:
*This sauce is really spicy when is warm. Please, do not panic, once the sauce cools down and its refrigerated, the extra spiciness will settle and will have a comfortable mild bright spicy flavor.
**If sauce is to thick add bit of the water in which the jalapeños were cooked, or a dash of apple cider vinegar. It always its more lose when recently made, once its refrigerated it tends to congeal, just give it a couple of nice shakes and it will be alright.
Keep in the refrigerator. It last about 2 weeks… if you are lucky!
6 Jalapenos too much for you?…
Substitute 3 jalapeños for 1 large or 2 small poblano peppers, remove seeds and veins. Add a teaspoon of apple cider vinegar to brighten up the flavor. Blend, Enjoy!
1/2-3/4cupCorn Oil, Sunflower oil, OR Grape seed oil
1teaspoonKosher or sea salt
Instructions
1. In a small pot bring water to a boil, enough water to cover the chiles and piece of onion. Simmer the jalapenos and onions for about 15-20 minutes until they change in color and are fork tender, but not mushy. Carfuly remove stems after they cool down a bit and strain some of the excess water.
2. Using an immersion blender, a food processor or a regular blender, combine the corn oil, garlic cloves, strained jalapeños onions and salt.
3. Blend until smooth and creamy, about 3-4 minutes using an inversion blender, about 5-6 minutes on a blender or food processor, until it looks frothy, creamy and pale green.
4. Taste for salt, adjust if necessary. Transfer to a squeeze bottle, and refrigerate. It will last for about a week… If you can contain your self!…. Enjoy!
Recipe Notes
Warning and Notes:
*This sauce is really spicy when is warm. Please, do not panic, once the sauce cools down and its refrigerated, the extra spiciness will settle and will have a comfortable mild bright spicy flavor.
**If sauce is to thick add bit of the water in which the jalapeños were cooked, or a dash of apple cider vinegar. It always its more lose when recently made, once its refrigerated it tends to congeal, just give it a couple of nice shakes and it will be alright.
Keep in the refrigerator. It last about 2 weeks… if you are lucky!
6 Jalapenos too much for you?… Substitute 3 jalapeños for 1 large or 2 small poblano peppers, remove seeds and veins. Add a teaspoon of apple cider vinegar to brighten up the flavor. Blend, Enjoy!
***Depending on how spicy are your chiles, adjust using a little splash of apple cider vinegar to brighten up the flavor. Remember you can use any other chiles you prefer, like Serranos, Poblanos, Habaneros, Bell peppers, Anaheims, Gueros, California, Hatch… or a combination of them!
Recipes, Cooking & Art Direction: Mariana Nuño Ruiz McEnroe | Photography: Ian McEnroe |
Published: July 18, 2014
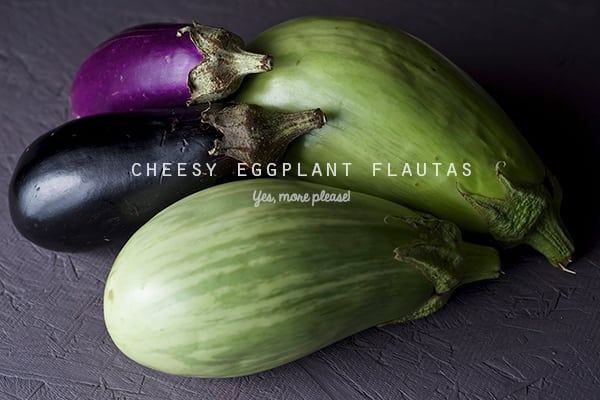
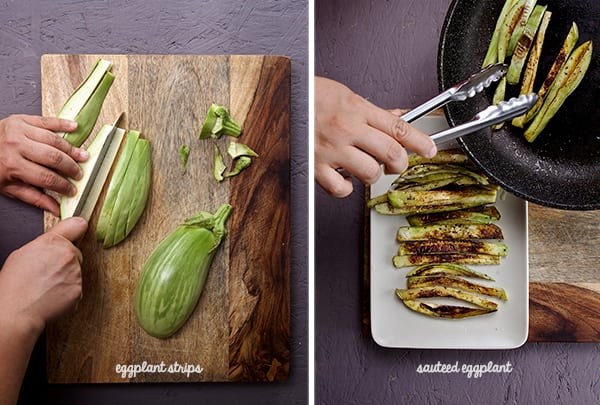
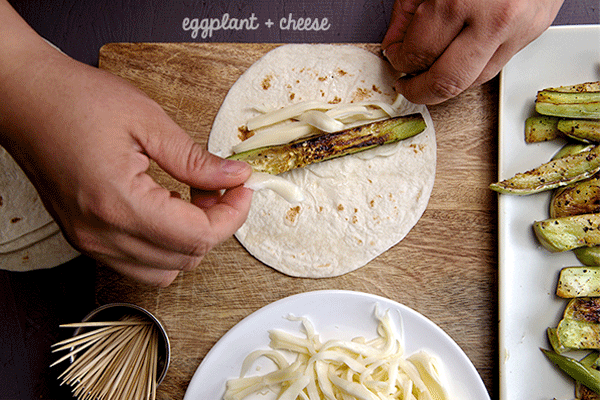
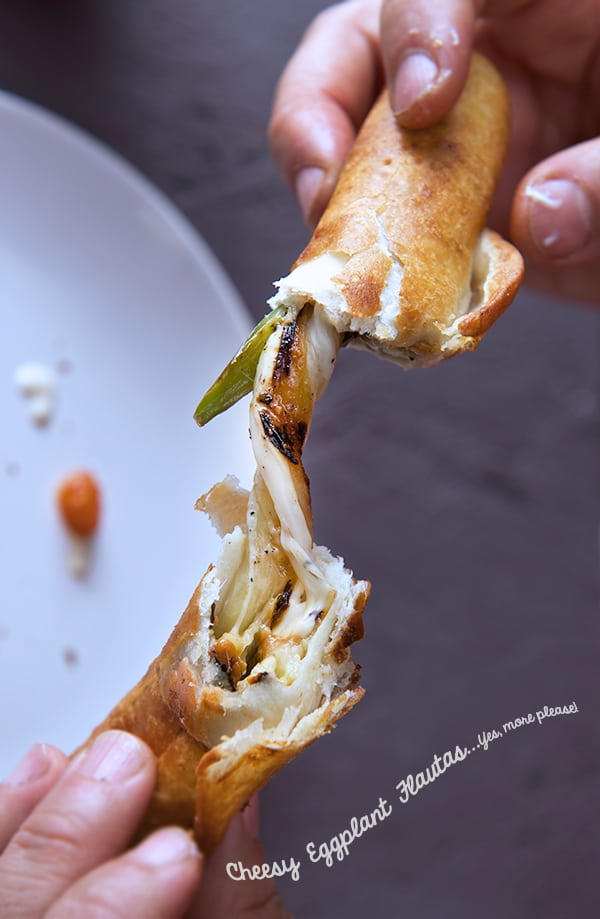
Roll e’m up, folks! These Flautas ~a.k.a~ rolled tacos are scrumptious! They are filled with quickly sauteed eggplant and a strip of Oaxaca stringy cheese in a thin flour tortilla. THis recipe is quite different from your regular eggplant recipes. The eggplant marries to the cheese inside of the crunchy warm rolled-up flour tortilla, making the filling into utterly creamy vegetable goodness.
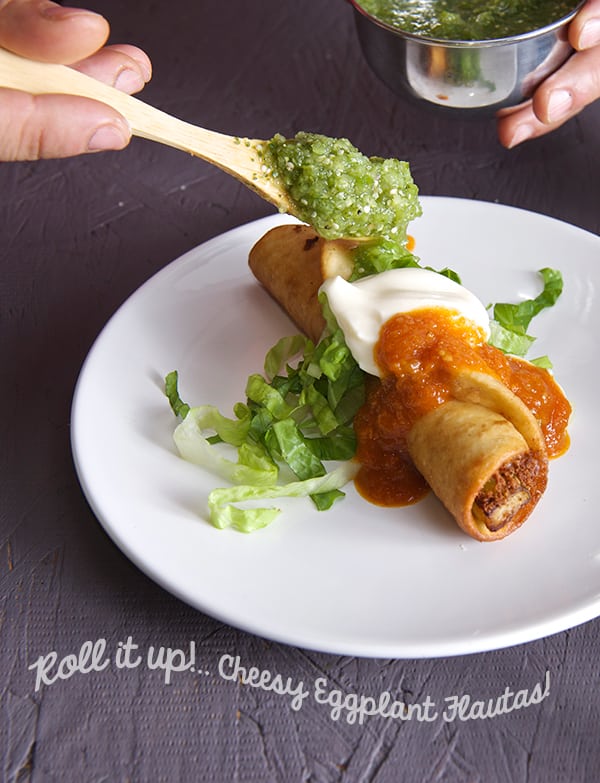
They are best served on a bed of crisp fresh lettuce, drizzled with some liquid sour cream or Mexican cream. You can make my fabulous Tomato-Cinnamon sauce for dipping it is slightly spicy and sweet, the cinnamon warms up the tomato flavor is a match made in heaven with the eggplant. A Salsa Verde also works divine… you choose, or make them both, why not?!
I struggle to find a great variety of quick dishes for eggplant. Cheesy Eggplant Flautas are a great way to utilize those extra eggplants and a fun vegetable option that makes for a great, simple and delicious entree.
Don’t feel like frying?…then brush the rolled flautas with some vegetable oil and bake them!…
Now, get those eggplants rolling. Have fun!
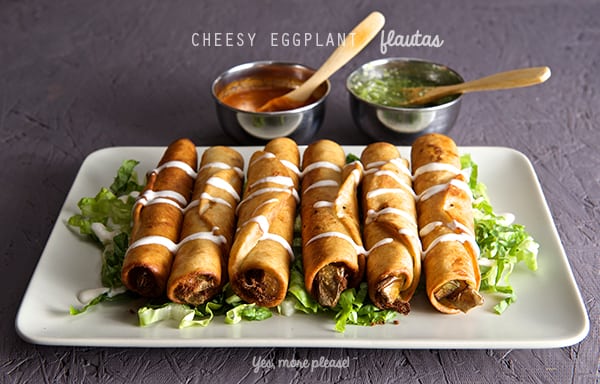
Cheesy Eggplant Flautas
Makes 8 Flautas
1 large eggplant cut into thick strips.
½ pound of Oaxaca cheese.
8 thin flour tortillas
4 cups of corn oil for frying.
1-2 cups of finely shredded Romain lettuce.
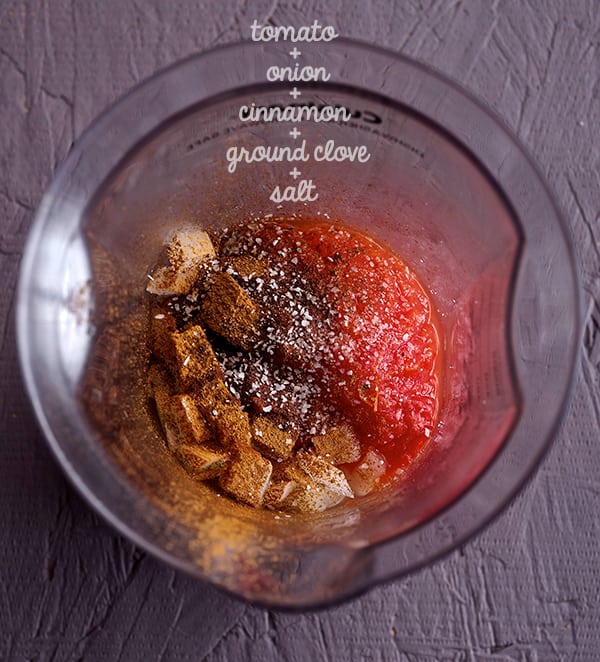
For the Tomato – Cinnamon salsa:
1 large red tomato such as red prudence or 2 Roma tomatoes will do too.
¼ cup fine diced sweet onion.
1 pinch of ground clove
1 pinch red pepper flakes or one dry chile de arbol
½ teaspoon ground cinnamon.
½ teaspoon salt
½ teaspoon sugar
1 tablespoon of apple cider vinegar
1 small glug of grape seed oil or mild olive oil.
2. Boil the tomato and puree it. 3. In a small pot add oil and saute the onions until soft and translucent. 4. Add the spices and salt stir until well combined and fragrant. 5. Add the tomato puree and the sugar and cook for 3-5 minutes. 6. Turn off the heat and add the apple cider vinegar, adjust seasonings.
Make the Flautas: 1. Saute the thick eggplant stripes using a little olive oil, season salt and pepper. Set aside.
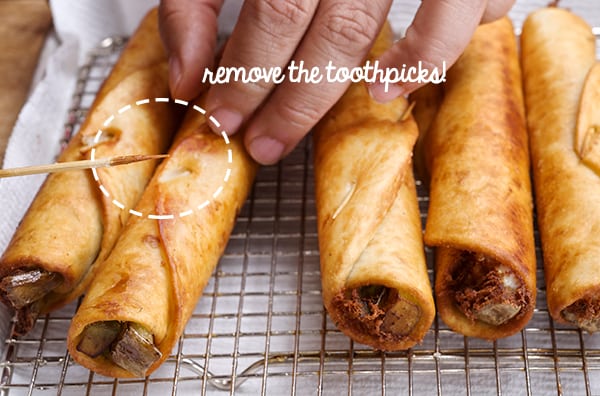
2. String the cheese into a thinner stripes. 3. Slightly warm up the flour tortillas, place one or 2 eggplant stripes and some cheese strings roll it tightly and secure the end with a wooden toothpick. Proceed with the rest.
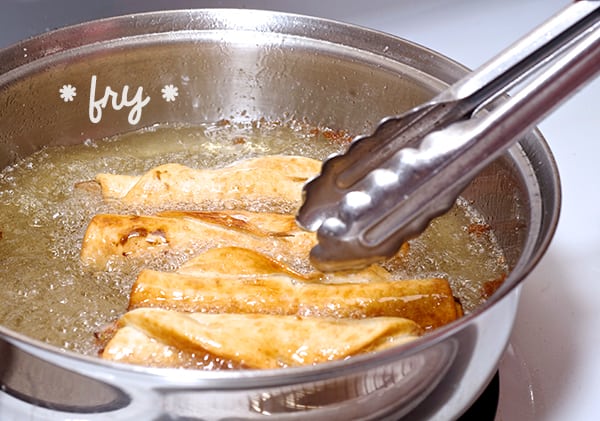
4. In a medium size heavy bottom pan add the 4 cups of oil and warm up until your thermometer reaches between 350-375 degrees. NOTE: Take care while frying to avoid any skin contact with hot oil. Watch the pan and carefully monitor the temperature. Avoid all distractions since these flautas cook very quickly. 5. Fry the flautas until evenly golden brown around 2-3 minutes or less. Watch them at all times.
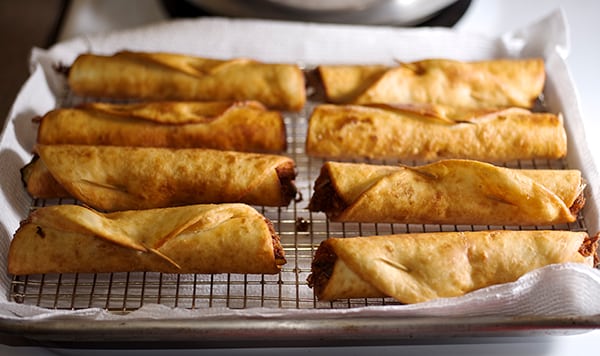
6. Pull them out on a cooling wire rack
7. Serve immediately on a bed of lettuce, drizzle the crema, dip into the salsa roja or verde…. bite, dip-bite-repeat. Enjoy!
Recipes, Cooking & Art Direction: Mariana Nuño Ruiz McEnroe | Photography: Ian McEnroe |
Published: July 6, 2014
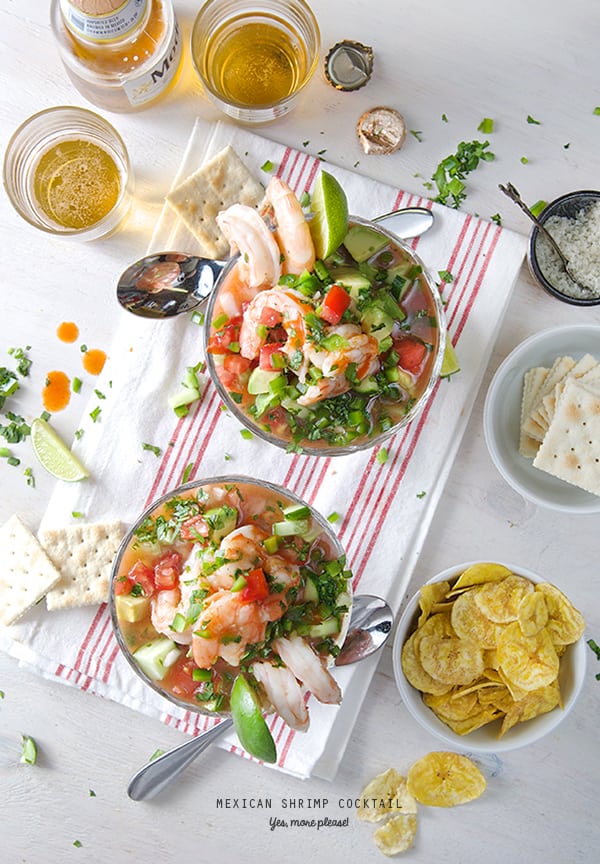
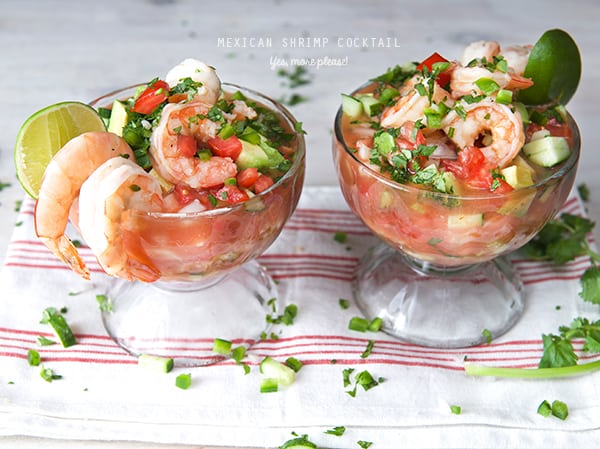
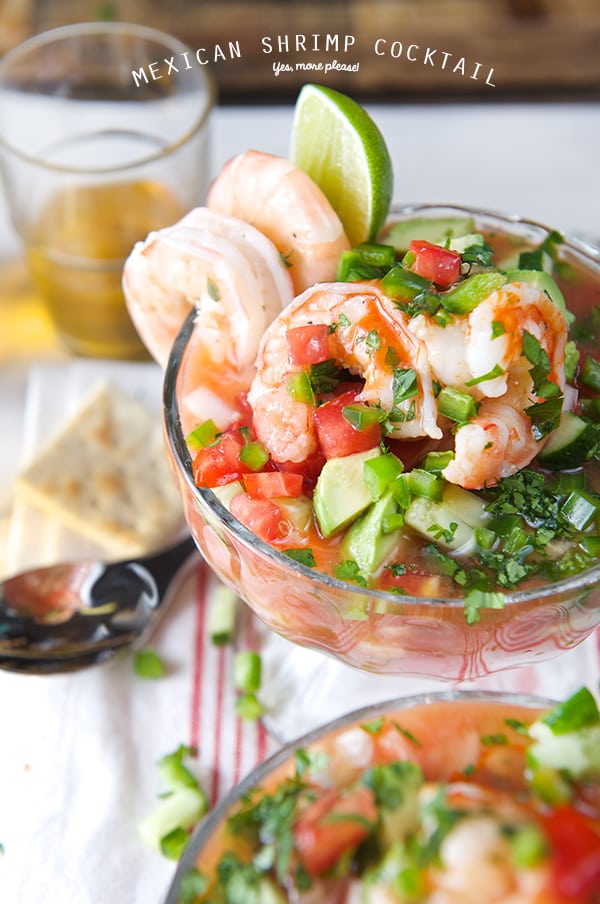
Hold your horses! Hide the children! What you are about to see is food rated “R” at its best! My Mexican Shrimp Cocktail is to die for. Fresh, delicious, and savory; it’s the perfect simple light meal for a hot summer afternoon. This juicy cold and light savory cocktail is a meal in itself. What makes it Mexican style? Well the whole combination of vegetables, accoutrement, and the cold broth. It’s a savory broth made with shrimp shells and seasoned with fresh orange and lime juice, ketchup, and some dashes of hot sauce. The result is this light fresh savory broth that goes incredibly well with the shrimp. In my opinion there’s no need to buy those bottled clam juices when you can get the most natural flavor out of your shrimp!
This Mexican Shrimp Cocktail is an entrée rather than an appetizer with a dipping sauce as served in the States. In Mexico, this cocktail is typically served on the coastal cities as an iconic refreshing staple and a must have if you are spending your day on the beach. In the city, shrimp cocktail is widely known as the number one ‘hangover elixir.’
There are many variations in which more than one shellfish is added to this concoction. Common ingredients include octopus, clams, oysters, baby scallops. It is called “Vuelve a la vida” which translates to “come back to life” because its invigorating attributes. That, I can not guarantee, however I assure you that it will refresh and invigorate you on a summer afternoon. In my case, I just love the simplicity of flavors and the way the shrimp skins cooked as a base produce a magic broth with depth and character!
Prepare this dreamy cocktail for yourself ! You can make it in advance, since it is served cold on chilled glasses. For parties you can serve it with all the vegetable accoutrement on the side which allows your guests to customize their own. Keep it ice-cold at all times. It is truly a great summer crowd pleaser. Enjoy!
I can assure you this recipe will be part of your repertoire for many years to come.
Happy Summer, Enjoy!
Mexican Shrimp Cocktail
Serrves 2 sailors 4 mermaids
This cocktail is light and refreshing, it can serve two as a meal or four to six as an appetizer. This recipe can easily be doubled or tripled upon family size, or a friendly party crowd.
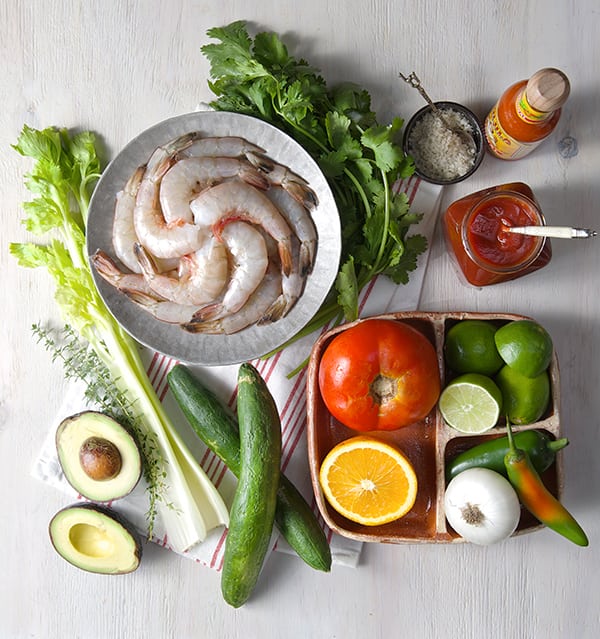
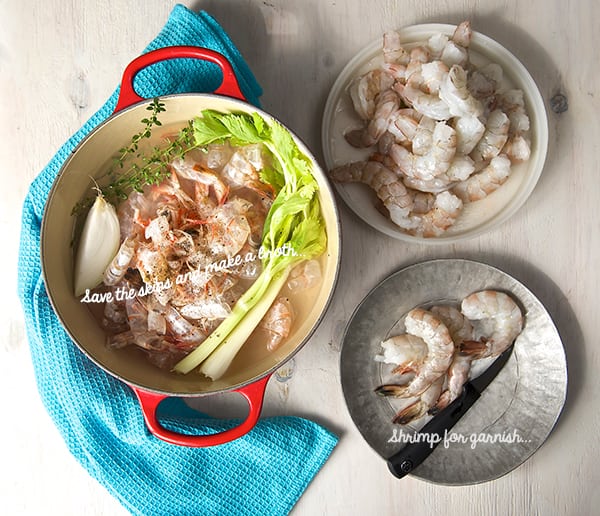
1 – ½ lbs. Jumbo or medium large shrimp, peeled save the skinsand deveined.
For the shrimp stock:
The reserved skins from the shrimp.
2 celery stalks
¼ wedge of a white onion.
2-3 sprigs of fresh thyme
1/2 teaspoon Sea salt
¼ teaspoon black pepper
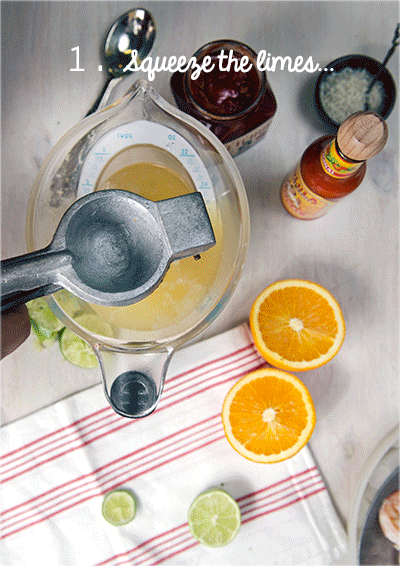
Seasonings for the cold cocktail broth:
The juice of one small Valencia orange
3 large limes + 1 or 2 more to garnish.
¼-1/2 cup ketchup sauce
A few dashes of your favorite Mexican Bottled Hot Sauce, I prefer Cholula, Valentina or Huichol.
Prepare cocktail with:
2 roma tomatoes, small diced
1 small white or purple onion, small diced
1 medium cucumber seedless such as jade or English cucumber, small diced.
¼ cup finely chopped cilantro
1 chile Serrano or Jalapeno with seeds.
1 small Hass avocado
Serve with:
Saltine crackers or Tostadas
Plantain Chips
And a really cold light Mexican beer (I prefer Modelo Especial or Victoria oh yeah!)
Preparation Method:
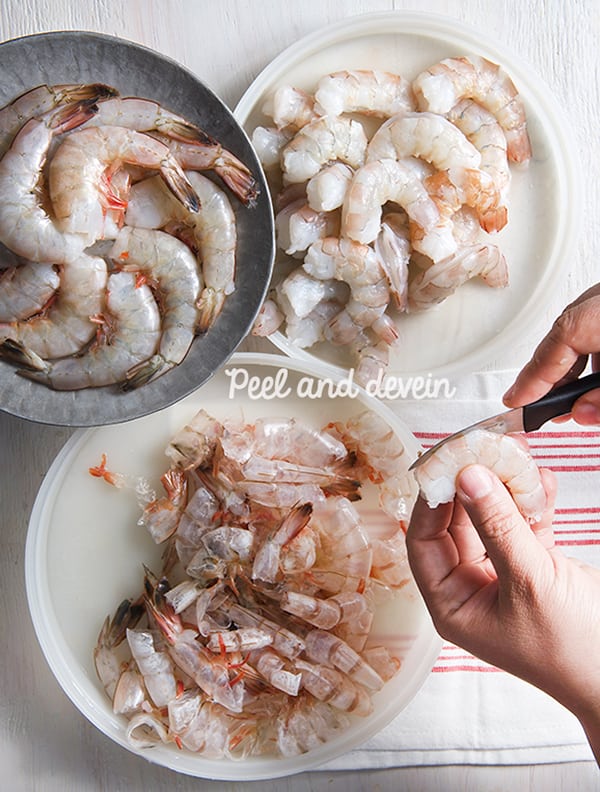
1. Place two glass serving bowls in the freezer. (Mason jars, or glass mugs will work too.) 2. Peel and de-vein the shrimp, reserve the skins and leave 4-6 unpeeled, tail-on shrimp for garnish. 3. In a non-reactive pan place the shrimp skins, along with the celery stalks, onion wedge, thyme, a pinch of sea salt and some cracked black pepper. Add 3 cups of water and simmer for about 15- 20 minutes.
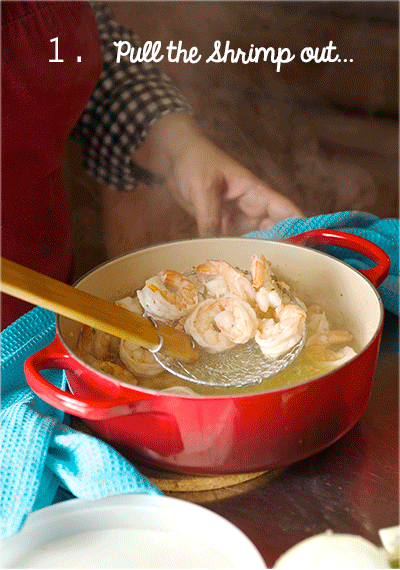
4. Meantime, prepare all your vegetable accoutrement. Dice and chop the tomato, cucumber, onion, serrano or jalapeno peppers, limes, avocado and cilantro. Set aside. 5. Check on your broth. With a slotted spoon, remove the skins and all the vegetables from the broth. Add the peeled and deveined shrimp to the hot broth and simmer the shrimp for about 2-3 minutes or until they change color and curl up.~Shrimp cook very fast so be attentive! You do not want rubbery overcooked shrimp!~
6. With a slotted spoon, pull out the shrimp a little before you think they are ready. They will keep cooking with their residual heat. Place the shrimp on a plate with ice underneath. (see picture below). 7. Fill a bowl halfway with ice and place a metal or glass bowl on top of the ice. Place a fine sieve on top of the bowl and drain the broth. With a wooden spoon, start whisking to cool off the broth until the temperature of the broth feels fresh and cooler.
8. You should have around 2 to 2-1/2 cups of broth left, transfer the broth into a liquid measuring cup if you have more than 2 ½ cups discard the extra broth. 9. Start seasoning the broth. Squeeze the juice of 3 limes, the juice of 1 small Valencia Orange, add Ketchup (I used my favorite: Sir Kensington’s spicy ketchup!) add a couple of dashes of hot sauce, the sea salt, and whisk. Taste and adjust flavor for salt or pepper.
10. Pull out the frozen glass serving bowls and start arranging your cocktail. Start by layering the ingredients and add the seasoned broth at the end. No rules here! You can add as much or as little veggies as you want. Avocado is a must, highly necessary!, A little extra squeeze of lime juice, sprinkle some cilantro and an extra dash of hot sauce…Prepare for the stampede!.. you are gonna love it. Enjoy!
Refreshing, light this Mexican cocktail its perfect for a pool party or a weekend of leisure at home. remember to have a very very cold beer, Ceveza bien fria! Enjoy!
Course
Brunch, Lunch, Main Course
Cuisine
Mexican
Prep Time30minutes
Cook Time12minutes
Total Time42minutes
Servings4sailors or 4 mermaids
Ingredients
1-1/2ibs.Jumbo Shrimp, peeled, save the peels and deveined
For the shrimp stock:
2celery stalks
2-3sprigsfresh thyme
1/4wedge of a white onion.
1/4teaspoonblack pepper
1/2teaspoonsea salt
Seasonings for the cocktail broth:
1the juice of one small Valencia orange
3largelimes,plus 1 or 2 more to garnish.
1/4-1/2cupketchup sauce
A few dashes of your favorite Mexican Bottled Hot Sauce, I prefer Cholula, Valentina or Huichol.
Garnish with:
2roma tomatoessmall diced
1smallwhite or red onion,small diced
1mediumcucumber, such as jade or English cucumber.small diced
1/4cupCilantro,finely chopped
1-2Chiles Serranos or jalapeño,finely chopped
1smallHass avocado
Serve with:
Saltine crackers or Tostadas
Plantain Chips
And a really cold light Mexican beer (I prefer Modelo Especial or Victoria oh yeah!)
Instructions
1. Place two glass serving bowls in the freezer. (Mason jars, or glass mugs will work too.)
2. Peel and de-vein the shrimp, reserve the skins and leave 4-6 unpeeled, tail-on shrimp for garnish.
3. In a non-reactive pan place the shrimp skins, along with the celery stalks, onion wedge, thyme, a pinch of sea salt and some cracked black pepper. Add 3 cups of water and simmer for about 15- 20 minutes.
4. Meantime, prepare all your vegetable accoutrement. Dice and chop the tomato, cucumber, onion, serrano or jalapeno peppers, limes, avocado and cilantro. Set aside.
5. Check on your broth. With a slotted spoon, remove the skins and all the vegetables from the broth. Add the peeled and deveined shrimp to the hot broth and simmer the shrimp for about 2-3 minutes or until they change color and curl up.~Shrimp cook very fast so be attentive! You do not want rubbery overcooked shrimp!~
6. With a slotted spoon, pull out the shrimp a little before you think they are ready. They will keep cooking with their residual heat. Place the shrimp on a plate with ice underneath. (see picture below).
7. Fill a bowl halfway with ice and place a metal or glass bowl on top of the ice. Place a fine sieve on top of the bowl and drain the broth. With a wooden spoon, start whisking to cool off the broth until the temperature of the broth feels fresh and cooler.
8. You should have around 2 to 2-1/2 cups of broth left, transfer the broth into a liquid measuring cup if you have more than 2 ½ cups discard the extra broth.
9. Start seasoning the broth. Squeeze the juice of 3 limes, the juice of 1 small Valencia Orange, add Ketchup (I used my favorite: Sir Kensington’s spicy ketchup!) add a couple of dashes of hot sauce, the sea salt, and whisk. Taste and adjust flavor for salt or pepper.
Pull out the frozen glass serving bowls and start arranging your cocktail. Start by layering the ingredients and add the seasoned broth at the end. No rules here! You can add as much or as little veggies as you want. Avocado is a must, highly necessary!, A little extra squeeze of lime juice, sprinkle some cilantro and an extra dash of hot sauce…Prepare for the stampede!.. you are gonna love it. Enjoy!
Recipes, Cooking & Art Direction: Mariana Nuño Ruiz McEnroe | Photography: Ian McEnroe |
Published: June 4, 2014
Have you ever had Nopalitos? Nopalitos are traditionally used in Mexican cuisine, they are part of the cactus family, there are more species than you want to know about. The word “Nopal” comes from the Nahuatl word meaning “pads” refers to the plant shape. They are a great source of Vitamin C, minerals like magnesium, manganese, calcium,and also a great source of fiber. Besids their delicious and nutritious qualities, recent research studies have shown a positive effect on glycemic index which could be useful and a great value to add to your diet when managing diabetes or to include on your weight loss diet.
Anyhow, what you really need to know about Nopalitos and what I want to share with you is how delicious they are when prepared in a right simple manner.
Nopalitos have a bad reputation among vegetables because of their slimy and viscous flesh. However there are different ways to prepare them and a couple of tricks to avoid the slimy culinary disaster.
Like any other vegetable, Nopalitos can be boiled, steamed, sautéd, grilled or eaten raw, and there is a trick for each one of these cooking methods. Just to mention one of these tricks briefly, boiling nopalitos is the most common of all methods. When boiling Nopalitos, the trick to it is to add 4-6 tomatillo husks along with a piece of onion, a small bunch of cilantro and some sea salt in a pot of simmering water. The tomatillo husks will avoid the slimy matter. Simmer them in a pot over medium heat for about 15-20 minutes, until they change of color. Turn the heat down, and let them cool. Strain and rinse thoroughly. Combine the nopalitos with a good amount of Pico de Gallo salsa, toss and they are ready to serve. As you can see, with a little effort you can make the fastest salad of them all!
This kind of Nopalito salsa/salad is ideal to have as a side dish. You can make tacos, sprinkle some queso fresco, and even cook some of this left over salad with scrambled eggs, to prepare nopalitos egg breakfast tacos. OMG I just gave you another recipe! hehehe…
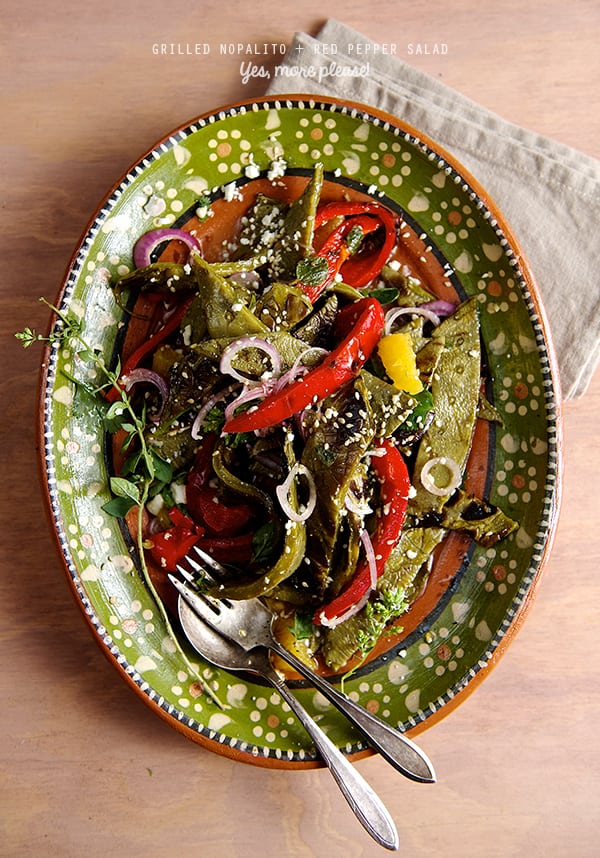
My favorite way to eat nopalitos it’s grilled. The char gives them a great flavor, firm texture and reduces the slimy texture almost to zero when you grill them. Therefore it’s one of my favorite ways of cooking them. Nopalitos when grilled, make the best tasting salad. This is definitely one of my personal favorite Mexican dishes, so simple and full of great flavors.
This Grilled Nopalitos and Red Bell Pepper Salad, combines simple ingredients and a crisp and tangy simple vinaigrette. As easy as it sounds it’s a great summer dish. This salad can be served as a side dish to accompany any grilled meat or fish. It can be made into vegetable medley tacos or as a vegetable complement over rice, quinoa, or whole black beans.
I hope you enjoy the recipe and give yourself the opportunity to try something new. Nopalitos salad has been in Mexican cuisine for a long time and it is too delicious to be ignored.
Give nopalitos a chance!
I would love to hear back from your culinary adventures. Remember to check our music pairings, if you are in need to shimmy while you grill…Enjoy!
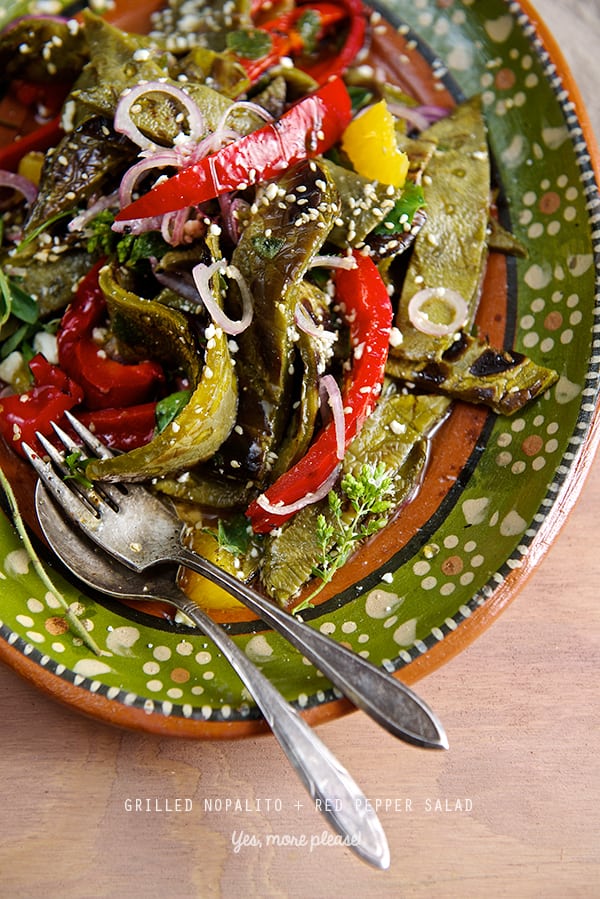
Grilled Nopalitos and Red Bell Pepper Salad.
Serves 4… or 2 hungry Vegetarian Mexicans!
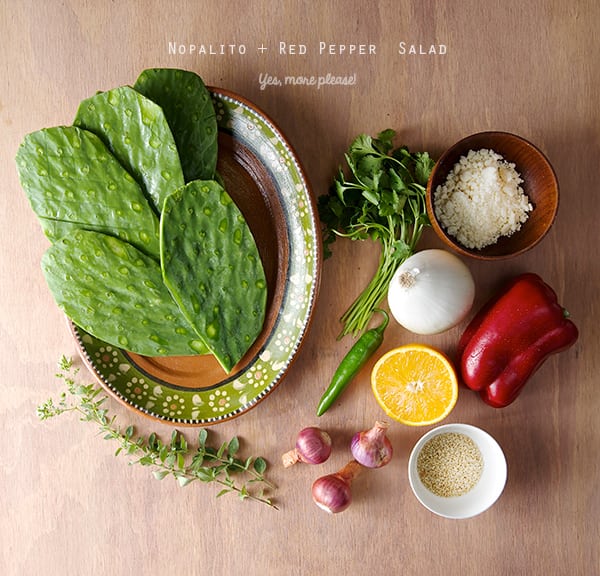
5-6 Nopalito pads, cleaned and thorn removed.*
1 large red bell pepper
3 small shallots or 1 small white onion thinly sliced.
1 small bunch cilantro (leaves only)
1 serrano pepper no-seeds finely chopped (optional)
For the vinaigrette:
1/3 cup Orange juice
2 tablespoons apple cider vinegar
4 tablespoons grape seed oil
2 tablespoons agave nectar
1 tablespoon toasted sesame seeds.
2 sprigs of fresh oregano or 1 teaspoon dry mexican oregano.
1 teaspoon sea salt.
Fresh cracked black pepper to taste.
Garnish with:
Toasted sesame seeds.
¼ cup Cotija cheese crumbled.
*Nowadays it’s very easy to find fresh Nopalitos that have been cleaned and de-thorned. If you are lucky enough to have your very own nopalito cactus plant, gear up! Use thick leather gardener gloves, a pair of tongs, and a sharp fillet knife to shave the thorns off. Rinse and wash thoroughly. Now it’s ready to use! If you live here in Texas this type of Cactus Plant is very common to find in the prairie. Have a culinary adventure! Tip: when choosing wild nopalitos: you will want to pick the medium-small size, deep green, about 1/4 inch thin or less. They look tender and have plump edges with no dry spots.These are the best tasting nopalitos and tender when cooked.
Preparation Method:
1.Wash and with a pairing knife gently score your clean nopalitos.
2.Prepare your vinaigrette by combining all the ingredients on a bowl and whisk.
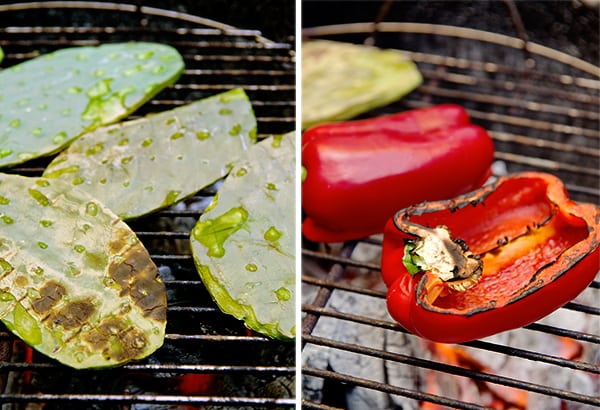
3. Fire up your grill. Grill Nopalitos and red bell pepper. Grill both sides until cooked and charred.
Nopalitos turn color from bright green to a olive green when cooked. Be sure to blister them. This will add so much flavor to the salad.
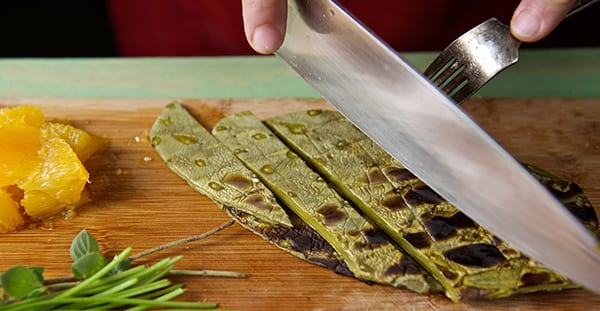
4. Slice your grilled Nopalitos into ¾” ribbon strips, slice your grilled bell peppers into a thinner strips.
5. On a platter toss all ingredients and drizzle the vinaigrette. Sprinkle some toasted sesame seeds and/or some Cotija cheese crumbled. Serve room temperature.
Special Thanks to my Aunt Paloma, who sent us this beautiful hand painted clay platter


 5. On a platter toss all ingredients and drizzle the vinaigrette. Sprinkle some toasted sesame seeds and/or some Cotija cheese crumbled. Serve room temperature.
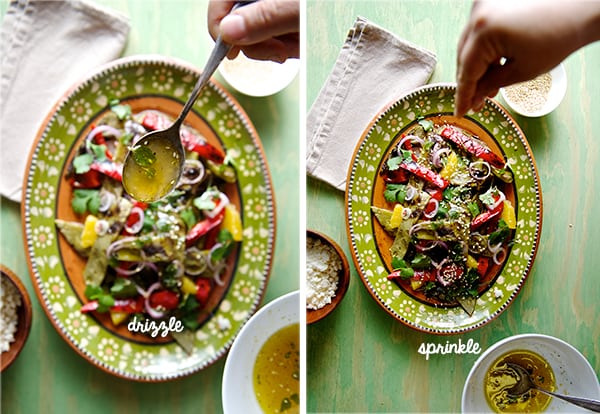