Lunch

Pizza Primavera

PIZZA-PRIMAVERA-~Yes,more-please!

Pizza Primavera is a celebration of Spring! Using all the tender, sweet, crisp and fresh vegetables that the season gives us and inspired by all those beautiful shapes, colors, and textures this pizza has a refreshing taste of renewal. For me renewal translates as experimenting and trying ingredients and flavors that come with the new season.

Recently I’ve been experimenting with different gluten free flours, like oatmeal, brown rice, potato starch, tapioca, garbanzo, and quinoa. The fact that lately a lot of people have been diagnosed with a gluten intolerant condition means more are in need of extending their cooking horizons. Even if you don’t have gluten intolerance you should try this for its variation in flavor and texture.

Recently I baked an Irish Soda bread using 1/2-1/2 whole wheat and oat meal flour, which gave to the bread so much flavor than regular all purpose flour. That got me excited and I started to experiment with the not so easy task to come up with a gluten free pizza dough. For this pizza crust I experimented with different ratios, of brown rice flour, tapioca, potato and millet flour. The results were delicious and flavorful. However it ended up a bit overpriced for what a pizza dough should cost. I used 3-4 different types of flours each one had a mission to give the right texture to the crust, great achivement, but not very practical. So in my quest for a more reasonable option I stumbled upon a great mix, Bob Red Mill Gluten Free Organic Pizza Dough. I read the ingredients and to my surprise this mix is based on almost the same combination of 4 different flours I was trying to combine. The difference: I bought one bag. This simplifies the whole process for a fraction of the cost, and in my case pantry space. (I have a tiny pantry). 

Next, I gave myself the task to make this crust using this mix… and it was great!. Flavor and texture were spot on. When trying new things you have to see with new eyes, and tastebuds. The texture of a regular crust has a certain chewiness for which gluten is the responsible. When you have no gluten, other textures and flavor come to replace that chew factor. This crust has a lovely light texture, great flavor, and crunch, with a tender bite, making it easy to love. The tender light crusty and crunchy crust is the perfect canvas for the sweet delicate Spring vegetables. The mix is ready in 5 minutes and it does not requires kneading. Proofing time is 20 minutes and it bakes in 12 minutes total. It’s fun to make and I loved trying something new. This crust is a keeper!

For this Pizza Primavera, pre-roasting the vegetables is a must. They add extra flavor deep to the pizza. I love to leave the carrots al-dente, they add a bit extra crunch and texture to the pizza. Cheese?…my advice: go light on the cheese you want to be able to taste the vegetables. I chose a smoked provolone to balance the sweetness on the roasted vegetables. You must try this pizza, I assure you, you will fall in love with it. Give your self the chance to explore and renew your taste buds, perhaps for your next dinner party or get together… and have fun welcoming Spring!
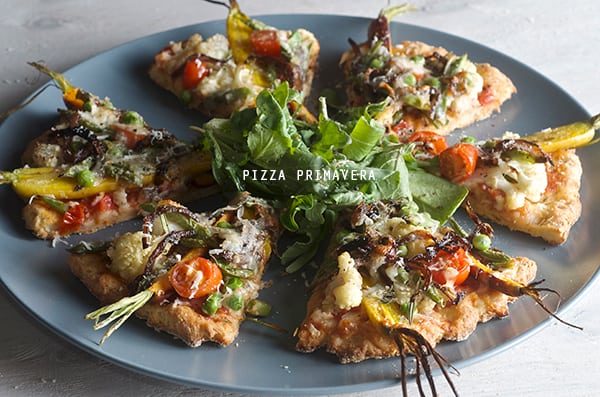
Pizza-Primavera_Ingredients

Pizza Primavera

A pizza with spring vegetables and a delicious gluten free crust…

Makes 4 – 8”  pizzas

Vegetables:

12-16 small spring carrots cut in half.

2-3 bunches thin sweet green beans cut on a bias.

2 cups Sliced Cauliflower florets.

½ cup fresh peas

1 cup cherry or grape tomatoes halved

For the caramelized onions:

1 large red onion thinly sliced

a glug of extra virgin olive oil

2 tablespoons of balsamic vinegar

a pinch of salt and fresh cracked pepper.

For the sauce:

2 cups roasted crushed tomato sauce.

2 grated garlic

2 tablespoons extra virgin olive oil

Salt and pepper to taste.

2-4 sprigs of fresh herbs, like oregano, rosemary or basil.

Cheese:

3 cups grated smoked provolone cheese or tofu for  a vegan option.

Grated parmigiano regiano cheese.

Pizza crust:

1 package of Bob’s Red Mill Gluten Free pizza Dough

(The mix includes an envelope of dry active yeast, how awesome is that!)

1-1/2 warm water

2 eggs or 2 tablespoons of flaxseeds and 8 tablespoons of water for vegan option.

Follow the instructions on the package.


Gadgets and utensils:

Pizza peel: It’s a must!, its so much fun to use and since it has a long handle keeps you safe from the oven heat. (I like this wood kind)

Pizza Stone or  Saltillo tile*

You can use a cookie sheet or a metal round pizza tray that will work too. I recommend, if you are a pizza lover, a pizza stone or the Saltillo tile, are a great investment. The crust gets a fantastic  color, and it gets crunchier when is cooked onto a stone surface.

*How or where to get a Saltillo tile? 
At your local home improvement store. You must make sure its and unglazed quarry tile.Usually the name is Saltillo tile, from the region in Mexico. They come in two sizes, I prefer the 11×11. Usually you can fit 4 into your oven, if you are planing to make a big pizza, For us 1 or 2 tiles are enough. A smaller size pizza like an 8” will cook great and evenly onto an 11x 11. The magic of these tiles is that you can use them in the oven and over the grill, if you feel like you want a grilled pizza, this works like a charm, price-wise we paid around 1-3 dollars per tile. This is a good solution if you don’t happen to have a pizza stone. And regarding durability: we’ve been using the same tile for six years!

To prepare the tiles for baking: Presoak them in water the day before, and let them air dry. Once they are totally dry they are ready to use. Be careful not to heat them wet to avoid cracking and of course let them cool before removing them from the oven or cleaning them.Pizza-utencils

Preparation Method:

Preheat your over at 450F/ 232C

Place your pizza stone or Saltillo tile into the oven to start warming up.

(This step is crucial, to get a great crusty crust, the hotter the surface the crustier it will get.)

Pizza dough:

Start by making your pizza dough. Follow the instructions on the package, I did not use the mixer, I used a wood spatula and kneaded by hand for a bout 2 minutes. Divide the dough in 4 equal parts, pre shape into 4 balls, cover with plastic wrap and let it proof at rom temperature for about 20 minutes.

Pizza-Primavera_Making-the-dough

While your dough is resting, prepare your toppings:

  1. In a sheet pan, lined with some parchment paper, place the carrots, cauliflower and green beans, drizzle with a bit of olive oil salt pepper and roast at 450 F for about 5-7 minutes. The vegetables should look not completely roasted, as they will continuously cook when placed on the pizza. You want the vegetables, tender with a bite.
  2. Meantime in a saute pan add a glug of extra virgin olive oil and the red onions and saute on medium heat for about 5 minutes, add some salt and pepper. Reduce the heat to low and add about 2 tablespoons of balsamic vinegar. Leave them on low heat tossing occasional for about 15 minutes or until tender and caramelized. (see picture below)
  3. Mix all your sauce ingredients, adjust salt and pepper, and warm for a few minutes to marry the flavors.
  4. Cut your tomatoes, grate the cheese, season your sauce, pre-roasted vegetables, have everything ready to have fun topping your pizza!

Pizza-primavera_mise-in-place

The making!

  1. Crank up the oven temperature to 500F. This gets the crust crunchy when it cooks on the hot pizza stone.
  2. Add a generous amount of corn meal onto the pizza peel. Apply some extra virgin olive oil in your hands and take one portion of pizza dough. Shape it into a disk and place it in the middle of the pizza peel. With the tip of your fingers, starting from the center out gently massage and start flatten and shape the dough into an 8-9” disk. (see picture below)
  3. Pizza-Primavera_-Shaping-the-pizza-dough
  4. Once you have the 8-9”round pizza dough, make sure its lose, by gently shaking the pizza peel in horizontal motion. The dough should scoot around easily.
  5. Place the pizza peel onto the pizza stone. Gently shake the wood peel back an gently forward to slide the pizza crust onto the pizza stone. See picture below. Be as quick as you can so the oven does not loose temperature.
  6. Immediately close oven door. And adjust oven temperature to 450.Bake crust for 5-7 minutes until slightly golden brown.
  7. Pizza-Primavera_-in-the-oven
  8. With the help of the pizza peel remove the crust from the oven and proceed to place the toppings.
  9. Start with a thin layer of tomato sauce, and place the roasted carrots and veggies along the radius of the pizza crust. Add the caramelized onions, top with grated cheese, and sprinkle fresh herbs.
  10. Place the pizza back into the oven for another 7-8 minutes, or until the cheese is melted and it has some color. With the help of the peel pull out the pizza into a wood board. Let it rest for 1-2 minutes, and proceed to cut. You can use a pizza cutter or a chef’s knife.
  11. Pizza-Primavera_Assambling-the-pizzaPizza-Primavera-sliced~Yes,-more-please!

Serve immediately.

 Top with arugula, a drizzle of extra virgin olive oil, squeeze of lemon salt and pepper…

Enjoy! 

Pizza-Primavera_slices~Yes,-more-please!

View Post or View Comments 8

Rainbow Chard Korean Pancake

Rainbowchard-Korean-Pancakes_ingredientsI must confess that I have a weakness for Korean BBQ… I don’t always cook at home. When we decide to go out, Korean BBQ is on the top of our list. I am amused by all the fresh ingredients that are cooked before your eyes.  The orchestrated arrangement of little dishes with fermented vegetables, salty sweet, sour, spicy crunchy, juicy, is a circus of textures, temperatures, flavors and aromas. All my senses are awake.
One of my favorite side dishes would be the the Pajeon or Korean pancake. A savory light pancake, made with eggs, rice flour, flour, scallions-green onions. All sorts of variations can be made, including beef, pork, sea food, shell fish, kimchi…Oh! the kimchi.. My favorite.

With this Korean pancake in mind and a little help of the current abundant green leafy season, I thought about making a lighter all veggie version using one of my favorite seasonal greens…“Rainbow Chard” this colorful happy leafy green, is a close relative of the beet family, delivers 3 major vitamins A, K and C. Loaded with phytochemicals rainbow chard is one of the healthiest, most beautiful, and tasty vegetables I know. Flavorwise, I would describe it as a cross between baby spinach with a bit of sweet beet background. Texturewise, the leaves are way softer than kale which makes it a bit more pleasant to eat raw or quick sautéed. Rainbow chard has it all, flavor, texture, and color.

Inspired by all these great leafy green qualities, I was almost in a rush to attempt to make an all veggie Rainbow Chard Korean Pancake. The result was fantastic, the rainbow chard’s sweetness and texture are a good match for this light savory pancake. The charred scallions, green garlic and the spicy jalapeño kick in combination with the rice vinegar dipping sauce for the perfect savory pancake match.

Once again I proved to myself that cooking with fresh ingredients is not only a great nutrition and a healthy value. It inspires me and it’s a feast for the eyes!. That for me makes it even more appetizing…Enjoy!Rainbowchard-Korean-Pancakes-ready-to-serve~Yes,-more-please!

Rainbow Chard Korean Pancake

Makes 2- 9” round savory pancakes

½ cup unbleached-all purpose flour or gluten free flour like all-purpose King Arthur like this
½ cup stone ground rice flour (I used Bob’s Red Mill)
1 egg or 1 tablespoon of ground flax seed + 3 tablespoons of water= 1 egg
2 teaspoons grapeseed oil, canola oil, or any neutral oil. And a little extra oil to pan fry the pancakes.
1 teaspoon roasted sesame oil
pinch of salt
pinch of white pepper
¾ -1 cup water

6-8 rainbow chard leaves
4 scallions
1 garlic clove or 3 green garlic shoots
1-2 red or green jalapeno or red thai chili
2 tablespoons sesame seeds

extra oil for pan fry the pancakes

Rice vinegar dipping sauce:

1 tablespoon rice vinegar
1 tablespoon water
1 teaspoon soy sauce
1 teaspoon agave nectar
a pinch of red dry chili flakes or a teaspoon of sambal sauce

Preparation method:

1. In a medium size bowl, mix the flours, egg, vegetable oil, sesame oil salt, pepper and water, whisk well until a smooth batter that resembles  a loose pancake batter. Set a side to rest.
2. Chop all your vegetables, scallions and jalapenos on a bias. Make a roulade of rainbow chard leaves and chop them into a chiffonade, chop rainbow chard stalks into matchstick size.

Rainbow-Chard-Korean-PancakesRainbowchard-Korean-Pancakes-vegetables~Yes,-more-please!

3. On a cast iron or nonstick skillet over medium-high heat drizzle some oil, and arrange a layer or vegetables, starting with the jalapenos, rainbow chard matchsticks, scallions, green garlic and rainbow chard chiffonade. Sprinkle some sesame seeds and promptly ladle half of the batter , spreading it out evenly into a circle.
4. Reduce the heat to medium and cook until the bottom is golden brown, a few areas will have a bit of char which is perfectly fine. Cook for about 5 minutes per side.

Rainbow-Chard-Korean-Pancake-Steps
5. The “flipping matter”… you can use Julia’s Child encouraging words “flip it with conviction!!!”, or you can use a plate to flip the pancake upside down and then return it to the pan, to finish cooking…both methods work great!

Rainbow-Chard-Korean-Pancake--flip-a-rooh
6. Once both sides are cooked, transfer to a warm plate and repeat the process with the remaining ingredients.

7. In a large platter, cut into triangles and serve warm with the rice vinegar dipping sauce.

Rainbowchard-Korean-Pancakes-cutting-the-pancake~Yes,-more-please!

Rainbowchard-Korean-Pancakes-bite!~Yes,-more-please!

Rainbowchard-Korean-Pancakes-ready-to-eat~Yes,-more-please!

Variations: You can add shrimp, small tofu squares, carrots, squash, kimchi!!!
Hey! the pancake is you canvas, have fun and enjoy!


View Post or View Comments 9

Raw Veggie Tostadas

Raw-Veggie-Tostadas_Ingredients~Yes,-more-please!

Is it Spring time yet?… I think we are almost there. This Raw Veggie Tostadas scream welcome spring!, Spring is about renewal, everything in nature starts again, a new cycle that makes me feel like eating fresh,crunchy root vegetables. There is an abundance of them right now, lots of cabbage, carrots, radishes at the farmers market. For me is time to set aside the roasting pans, lets eat them raw. Raw vegetables have an earthy and unique flavor, they are juicy and sweet. I’ve learned to loved them when I shred them, it is so easy to eat them raw and when you combine them in a salad they are also so attractive to the eye and all together make a crunchy symphony texture, simply amazing.
This recipe screams “easy”, you can whip this up for a week dinner or an easy-laid back weekend lunch.  This recipe its one of my favorites, Ian and I used to have them almost once a week for our veggie night or our MM, Meat-less Monday. Have fun and enjoy!

Raw-Veggie-Tostadas_shreded-veggies~Yes,-more-please!

Raw Veggie Tostadas

Makes 4-6 Tostadas

Ingredients:

6 tostada shells*
(Baked or Milagro brand if you are her in Austin, definitely the best..)
1 cup of black beans cooked and smashed
4 shredded carrots…any color any variety.
2 shredded mexican zucchini (light green kind preferable)
¼ head of red cabbage, shredded
2-3 tablespoons finely chopped cilantro
1 lime
1 lemon
2 tablespoons Extra Virgin Olive Oil
1/2 – 1 teaspoon sea salt (upon your taste)
fresh ground black pepper to taste

Garnish with:

2 tomatoes diced or in slices
4 thinly slices of red onion
1 avocado
3 tablespoons of greek plain yogurt + 1-2 tablespoon of milk + pinch of salt.
Whisk until well combined, to create a lighter creamy sauce. (for vegan options use tofu yogurt)
2 Tablespoons queso fresco or  feta cheese crumbled or  small diced firm tofu.
Red Roasted Tomato Salsa(recipe follows)

Red Roasted Tomato Salsa:

2-3 medium size tomatoes roasted and peeled.
6-8 toasted chiles de arbol.
2 toasted chiles cascabel (remove seeds)
1 medium garlic clove
1 teaspoon sea salt
Place all the ingredients in the food processor, until well blended, add a little warm water if needed for consistency. The salsa should reassemble a lose puree.

Preparation method:

1. Warm up the beans, you can use refried beans if you like.
2. In a large bowl, combine carrots, zucchini, cabbage, cilantro, the juice of lime, lemon, salt and pepper to taste, toss well.

Raw-Veggie-Tostadas_tossing-the-veggies-~Yes,-more,-please

Raw-Veggie-Tostadas-healthy-refreshin-and-delicious-recipe-Yes,-more-please!

3. Make your Salsa…I made this Salsa Roja Asada click for recipe here.
4. Prepare your garnishes.
5. Assemble the tostadas, spread a light coat of beans on the tostada (this will be your glue!) and then a generous amount of the vegetable concoction. Top with slices of onion, avocado, drizzle some of the yogurt sauce, and some salsa. Serve immediately. Enjoy!Raw-Veggie-Tostadas_assambling-the-veggies-~Yes,-more,-please

Raw-veggie-Tostadas_topings`Yes,-more-please!

Raw-Veggie-Tostadas-~Yes,-more,-please

Raw-Veggie-Tostadas-healthy-and-delicious_Yes,-more-please!

Have you had your rainbow today?

Cook with music! Music always sets the mood for cooking, My music pairing for this recipe:


View Post or View Comments 2

Roasted Carrot Salad with Hummus Vinaigrette

Roasted-Carrot-Salad-with-Hummus-Vinaigrette_red,-orange-and-yellow-Carrots

January brings the roots out. Its a fun time at the farmers market a great variety of root vegetables. What caught my attention this time were the carrots. Great variety of colors, from red, orange, yellow and pale cream color. How can you not get inspired from all this colors? So I bought a bunch of the red carrots including the greens. Carrot greens are really tasty and a great source of vitamin C, potassium, calcium and vitamin K and are also high in protein. Flavor-wise they taste a bit peppery and resemble parsley. They are also a great addition to any salad and you can make pesto or tabbouleh with them… in fact!… that might be the next recipe I will attempt. When you are buying carrots and carrot greens, make sure your source is organic. There is a bit of controversy about eating the tops or the carrot skins and other non-organic vegetables. Know your source and enjoy your carrot greens with no worries.

For me, roasting is one of the best ways to bring out the sweet flavor of the carrots. The skin gets caramelized while inside it remains tender and all the ‘carrotness’ flavor is contained in a little cute pencil shape. Delicious! For the vinaigrette I took the same spices you will use to make hummus and I mix them with some sesame oil, extra virgin olive oil, and lemon juice. This Roasted Carrot Salad with Hummus Vinaigrette Its easy to make, and very comforting. Enjoy!

Roasted-Carrot-Salad-with-Hummus-Vinaigrette--carrots,-mustard-greens,-carrot-greens~-Yes,-more-please!Roasted-Carrot-Salad-with-Hummus-Vinaigrette~-warm-salad-for-the-winter

Roasted Carrot Salad with Hummus Vinaigrette

Serves 2 as main course, 4 as side dish or 1 wabbit feast.

2 bunches of carrots red, orange yellow any kind will work.
½ cup carrot tops washed and leafs cut.
4 cups mustard greens washed and hand cut in pieces
½ small onion cut in slivers
½ cup garbanzos cooked.

For the Vinaigrette:

¼ cup sesame oil
¼ cup extra virgin olive oil
¼ cup apple cider vinegar
1 teaspoon agave nectar or honey
The juice and zest of half a lemon
½ teaspoon smoked paprika
½ teaspoon ground cumin
1 tablespoon toasted sesame seeds
2 tablespoons tahini
2-3 grated garlic cloves
2 good pinches of salt
Freshly ground black pepper to taste

Preparation:

Preheat the oven at 450F/230C
Wash and pad dry your carrots upon size, slice carrots in half or quarters for evenly roast.
In a baking sheet lined with parchment paper place the carrots, onions, garbanzos, drizzle a bit of olive oil and sea salt. Roast them for about 10-15 minutes or until caramelized and fork tender.

Roasted-Carrot-Salad-with-Hummus-Vinaigrette_red,-orange,-yellow-carrots

Mean time prepare your vinaigrette by simply combining all the vinaigrette ingredients in a small bowl whisk until well combined. Set aside.

Check on your carrots. If they look done they will show golden tones and edges a bit charred and fork tender.

Roasted-Carrot-Salad-with-Hummus-Vinaigrette_roasted-carrots~Yes,-more-please!

Remove them from the oven and in the same tray toss the mustard greens and half of the vinaigrette, toss and place back in the oven for about 1-2 minutes which will slightly warm up the mustard greens.

Roasted-Carrot-Salad-with-Hummus-Vinaigrette_tossing-the-salad

Serve immediately and drizzle the rest of the dressing, adjust salt and pepper, squeeze more lemon, sprinkle a few more toasted sesame seeds if desired.

Serve with toasted pita bread and a dollop of yogurt on the side. Enjoy!

Roasted-Carrot-Salad-with-Hummus-Vinaigrette~ready-to-serve

Roasted-Carrot-Salad-with-Hummus-Vinaigrette-~Yes,-more-please!

Scrumptious!

View Post or View Comments 4

Sweet Potato Kale and Quinoa Fritters

Kale-Sweet potatoe-and-Quinoa-FrittersKale-Sweet-potatoe-and-Quinoa-Fritters-cooked-quinoa

So many Kale… so little time… root vegetables, pumpkins, sweet potatoes, all kinds of potatoes, carrots; an Autumn cornucopia is here and with it Thanksgiving. So gear up! I will be posting side dish appetizers, entrees, and everything with the potential of being on your Thanksgiving table… I think it’s great to add new dishes to the traditional menu, or revamp old recipes. And even if you are not a Thanksgiving celebration type, this seasonal produce is what you will enjoy preparing, whether it’s lunch, or dinner or a simple snak-petizer like this Sweet Potato Kale and Quinoa Fritters.

These little fritters are scrumptiously good. Loaded with vitamins and flavor, this little patties that have a crispy exterior and a soft creamy interior. The quinoa adds texture and a little crunch. Call them patties, fritters, creatures; you’re gonna love them. They taste equally good when they are warm or room temperature.
They make for a fabulous appetizer, side dish, or if you make them bigger. Two of these patties can be your lunch or sensible dinner with a salad on the side.

Kale-Sweetpotatoe-and-Quinoa-Fritters_platter-ready-to-eat!

Sweet Potato Kale and Quinoa Fritters

Makes 18-20 / 2”mini patties or 6 / 3.5” side patties

1 large or 2 medium sweet potatoes steamed and pureed. Makes about 3 cups
2 cups cooked Quinoa, you can use red quinoa if you prefer. Approximately 1 cup of uncooked quinoa yields 2.25 cups when cooked.
2 cups kale finely chopped.  I used Lacinto kale, a.k.a. Dinosaur Kale but, any flat kind kale will work.
2 eggs (vegan: substitute 2 tablespoons ground flaxseed + 3 tablespoons of water)
½ cup panko or any kind of plain breadcrumbs. If you have gluten allergies, ground old fashion oats or almond meal will work.
3 teaspoons cornstarch. If using the almond meal add one extra teaspoon.
1 teaspoon grated ginger
1 good pinch paprika or smoked paprika
1 teaspoon freshly ground black pepper
1 teaspoon kosher salt

4-6 tablespoons grapeseed oil, peanut oil, or coconut oil to pan fry them.

*See note for an alternative cooking method on the bottom of the post…

For the dipping sauce:

¼ cup Greek yogurt
1 teaspoon freshly grated ginger
pinch of kosher salt
pinch of black pepper

In a small cup mix all ingredients and chill.

Hot sauce of your preference. I highly recommend Sriracha Sauce.

Directions:

1.-

Devein the Kale, make it into a tight roll and chop chiffonade style.

Kale-Sweetpotatoe-and-Quinoa-Fritters_Deveining-and-chiffonade-Kale-

2.-

In a medium size bowl, place all ingredients and mix well.

Kale-Sweetpotatoe-and-Quinoa-Fritters_Mixing-ingredients

3.-

In a medium size pan heat up about 4-6 tablespoons of grape seed oil, peanut oil or coconut oil.
With a small Ice cream scooper scoop about 6 patties into the pan and slightly flatten the tops.
Cook for about 3-4 minutes on each side or until golden brown.

 Kale-Sweet potatoe-and-Quinoa-Fritters_pan frying

4.-

Cool them on a rack.
Serve warm or at room temperature, with the ginger sauce on the side and some hot sauce of your preference. I highly recommend Sriracha…I love it….Enjoy!

Kale-Sweetpotatoe-and-Quinoa-Fritters_-fritters-resting-on-cooling-rack

Kale-Sweet potatoe-and-Quinoa-Fritters-delicious!

Kale-Sweet potatoe-and-Quinoa-Fritters_delicious-texture

Enjoy!!!

 *Note:  Many people have asked me about baking these fritters. It never occurred to me to bake a fritter… So I made a batch and baked half and fried half to see the differences in flavor and texture. Here is the veredict:

Baked Version:

I Baked them at 375F on a sheet pan lined with parchment. I brushed each patty with some grape seed oil and baked for 15-20 minutes flipping them half way.

The results:  Texture is more firm and they hold up more like a patty, where the inside is a little more dense. They do not remind me a fritter at all since they have no crispy outside texture.

Pan Fried: 

Well you see the results, they really do not absorb a lot of oil, I love love the contrast in textures, crispy caramelized outside, and creamy less thight inside. For me this is fritter.

I like them both in their own category… but a fritter its a fritter!

5 from 1 vote
Print

Sweet Potato Kale and Quinoa Fritters

www.yes-moreplease.com

They make for a fabulous appetizer, side dish, or if you make them bigger. Two of these patties can be your lunch or sensible dinner with a salad on the side.

Course Appetizer, Breakfast, Brunch, Lunch, Main Course, Side Dish
Cuisine Healthy, wholesome
Prep Time 20 minutes
Cook Time 30 minutes
Total Time 50 minutes

Ingredients

  • 3 cups Sweet potato, about 1 large-2 medium potatoes, stemmed and pureed.
  • 2 cups Quinoa, cooked
  • 2 cups Lacinato-Dino Kale, chopped chiffonade
  • 2 Eggs
  • 3 teaspoons Cornstarch
  • 1/2 cup Panko Japanese style breadcrumbs, or any kind of plain bread crumbs. If you have gluten allergies, ground old fashion oats or almond meal will work.
  • 1 teaspoon fresh ginger, grated
  • 1 pinch smoked paprika
  • 1 teaspoon fresh ground black pepper
  • 1 teaspoon kosher salt
  • 4-6 tablespoons grape seed oil, or coconut oil, to pan fry them

Dipping Sauce:

  • 1/4 cup Greek yogurt
  • 1 teaspoon freshly grated ginger
  • 1 pinch salt
  • 1 pinch black pepper
  • Sriracha Sauce, to taste.

Instructions

  1. 1. Devein the Kale, make it into a tight roll and chop chiffonade style.

    2. In a medium size bowl, place all ingredients and mix well.

    3. In a medium size pan heat up about 4-6 tablespoons of grape seed oil, peanut oil or coconut oil. With a small Ice cream scooper scoop about 6 patties into the pan and slightly flatten the tops. Cook for about 3-4 minutes on each side or until golden brown.

    4.Cool them on a rack.

    5. Mix all ingredients of the dipping sauce on a small bowl.

    Serve fritters while warm or at room temperature, with the ginger sauce on the side and some hot sauce of your preference. I highly recommend Sriracha…I love it….Enjoy!

    Happy cooking!


Recipe Notes


Music Pairing: Perhaps Perhaps Perhaps by Cake


View Post or View Comments 106

Roasted Pumpkin-Poblano Soup

Warm and velvety and with a hint of roasted sweetness….It is inevitable to succumb to the cliche of pumpkin soup. I assure you there are 1,000 recipes out there with all different combinations spices, creamy, vegan, vegetarian…This version is my humble version of the Roasted pumpkin-poblano soup.

For the past few years, I’ve been making my vegetable soups under one principle: “do not add chicken stock”. Yes, it is that simple. I don’t want, under any circumstance, my broccoli soup to taste like chicken (or my potatoes, carrots, or any vegetable to taste like the bird). I want to savor the flavor of the vegetable. It is certainly a challenge to follow this principle because our inner chicken stock flavored souls desperately want to add more “depth of flavor”. For me, this is totally wrong. The way I make my vegetable soups are by enhancing the vegetables using different cooking methods like roasting, grilling, braising; all these cooking methods bring out the vegetable qualities, enhance the sweetness and flavor concentration to the soup. And yes, at times just a little help from other vegetable friends can harmonize the flavor.

Pumpkin has a delicate flavor so it is easy to mask, yet easier to harmonize. I love roasting or braizing. In this case, I chose to roast the pumpkin and add some caramelized sweet onions to bring out the sweet and earthy flavor of the pumpkin. Roasted poblanos, charred sweet corn, and some tortilla crisps play perfectly in this soup and add contrast in texture. With no doubt, it is one of my favorite soups to make, so easy and comforting. It freezes well if you want to store it for a quick-thaw meal and I just can tell you that after the photo shooting this soup was our good comforting dinner…

Roasted_Pumpkin_soup_ roasting&pureeRoasted_Pumpkin-Poblano_Soup_puree

Roasting pumpkin is easy and so rewarding, I love the way the house smells, it’s a welcoming to fall. When getting ready for the pumpkin season, I usually pick 2 small pumpkins the size of a volley-ball or smaller. They are easier to cut in half and they cook faster than the bigger ones. Once I cut them in half, I scrape all the inner seeds, save them for feature roasting if I feel like-, and I place the pumpkin halves flat side down on a full sheet tray covered with foil rubbed with some oil to avoid from sticking. I bake them on the lower rack in the oven at high-temperature 450F for 25-35 minutes or until a paring knife inserts easily through the skin. Remove them from oven and let them cool off. Using a spoon I scrape all the pumpkin ~this is my favorite part so I don’t have to peel the pumpkin, which is hard and lots of work~.  Once I scrape all pumpkin into a bowl, I use my handy-dandy immersion blender to puree the pumpkin. About each pumpkin half yields 1 to 1.5 cups or puree depending on the size of the pumpkin, then I make little reusable bags with 1 or 2 cups of the puree depending on the recipes I want to make, and freeze. 2 pumpkins is usually all the pumpkin I need and I’m ready for the season! Click on this link to check a How to roast a pumpkin tutorial with step by step photos and how to make a delicious pumpkin seed snack!

Roasted Pumpkin-Poblano soup

Serves 2 hungry persons as the main dish for dinner or 4 starter soups.

2 cups roasted pumpkin purée (I do prefer natural and roasting my own, you will need about 1 small pumpkin the size of a softball. You can use canned, about 2- 8oz cans, but it is definitely not my favorite option)
4 cups water
1 small sweet yellow onion caramelized
1 tablespoon butter
1 tablespoon olive oil
1 teaspoon salt
1/2 teaspoon white pepper
1/4 -1/2 teaspoon grated nutmeg

Garnish with:

2 poblanos roasted, skin, devein and cut into strips
1 cup of charred corn kernels, about 1-2 ears of corn depending on size
¼ cup of Mexican cream or Greek yogurt, If using Greek yogurt dilute with a bit of water and add a pinch of salt.
2 corn tortillas, thinly cut into strips, baked or fried

Roasted_Pumpkin-Poblano_Soup_Garnish-Toppings

Directions:

Over medium-high heat using a heavy bottom soup pot, place the oil the onions and a pinch of salt. Cook until they are soft and translucent. Lower the heat and keep on cooking until deep golden brown and caramelized.
Add pumpkin puree, water salt, pepper nutmeg. With the help of an immersion blender blend the soup until smooth.Let it simmer until bubbly hot. Adjust the liquids and salt if needed, for desired consistency and taste. At last, right before serving, add the tablespoon of butter and stir until melted and incorporated.

Roasted_Pumpkin_Poblano_Soup_caramelized onions-fried tortilla strips

Serve warm in a soup bowl and garnish with the warm poblanos, charred corn, and thinly fried tortilla strips.
You can add a dollop of Greek yogurt or a swirl of cream.

For vegan:

Use: vegan butter and replace cream swirl with any soy or coconut or almond based cream.

Roasted_Pumpkin-Poblano_Soup_serving presentation

Music Pairing: The smashing Pumpkins, Tonight, Tonight


Roasted Pumpkin-Poblano Soup

Warm up with this cozy Mexican spin on a fall pumpkin soup!

Course Soup
Cuisine Mexican
Prep Time 35 minutes
Cook Time 20 minutes
Total Time 55 minutes
Servings 4 people
Author Mariana McEnroe

Ingredients

  • 2 cups roasted pumpkin purée I do prefer natural and roasting my own, you will need about 1 small pumpkin the size of a softball. You can use canned, about 2- 8oz cans, but it is definitely not my favorite option
  • 4 cups water or vegetable stock
  • 1 small sweet onion, caramelized
  • 1 tablesspoon butter
  • 1 tablespoon extra virgin olive oil
  • 1 teaspoon sea salt
  • 1/2 teaspoon white pepper
  • 1/4 -1/2 teaspoon grated nutmeg

Garnish with:

  • 2 large roasted poblanos, skin, deveined and cut into strips
  • 1 cup charred corn kernels, about 2 small ears of corn depending on size
  • 1/4 cup Greek yogurt, diluted with some milk or water and pinch of salt
  • 2 pieces corn tortillas, thinly cut into strips, baked or fried.

Instructions

  1. Over medium-high heat in a soup pot, place the oil the onions and a pinch of salt. Cook until they are soft and translucent. Lower the heat and let them become brown and caramelized. About 7-8 minutes.

    Add pumpkin puree, water/or/vegetable stock, salt, white pepper, nutmeg. Let it simmer until bubbly hot. Adjust the liquids for desired consistency. 

    At last, add the tablespoon of butter and stir until melted and incorporated.

    Serve warm in a soup bowl and garnish with the poblanos, charred corn, and thinly fried tortilla strips.

    You can add a dollop of Greek yogurt or a swirl of Mexican crema. Enjoy!


View Post or View Comments 4

Kale and Lentil Salad with Honey- Mustard Vinaigrette

Kale and Lentil Salad with Honey- Mustard Vinaigrette_kale purple leaf

Feeling blue?…Have some greens!. Kale is the number one power green, full of nutrients and rich in flavor.
If you wonder what the color green should taste like… it tastes just like kale.
It’s high percentage in Beta carotene, Vitamin K, vitamin A, Vitamin C, manganese, iron, potassium, calcium and fiber, make it the king of the greens. The season for this green is Autumn and Winter.
Kale salad will lift up your mood and give you plenty of energy through out the day.
There is Curly Kale, Dino Kale, Premier, Redboar, Siberian, Walking stick kale, Red russian, Kamome red, *sight and I assure you I’m missing more varieties, this are just a few of the ones I know and I’ve tried.
I remember the first time I tried Kale it was a bit intimidating, I felt like I was eating some prehistorical plant; it is a bit hard to chew when is raw and most of the varieties develop their nutrients and are easier to digest when they are steamed.
I’ve tried different cooking methods, some favorites of mine: Curly and Dino kale make great baked chips, Kamome is great for steaming it holds its shape beautifully, and the Redbor Kale I love it in salads like this because it adds great texture, I usually cut it or tier it in small pieces because is easier to chew, the vinaigrette helps to tenderize the leafy texture and what is great is that kale will not wilt when you add the vinaigrette.
Kale and Lentil Salad with Honey- Mustard Vinaigrette is a nutritious  and delicious combination. Kale, lentils, walnuts for some crunch is just what you need to boost your energy. This salad Makes a great Lunch or a light dinner side dish.

Kale and lentil salad with honey mustard vinaigrette_red kale

Kale and Lentil Salad with Honey- Mustard Vinaigrette_healthy and delicious

Kale and Lentil Salad with Honey- Mustard Vinaigrette.

Serves 4

4 cups of Redbor kale (washed and pad dry) ( you can use Dino Kale )
2-3 cups of cooked green lentils*
1 small red onion finely chopped
1 red bell pepper finely diced
1/4 cup chopped walnuts
1 tablespoon of finely chopped parsley
A couple of tablespoons of Bulgarian Feta cheese

Honey- Mustard vinaigrette

2 teaspoons of whole grain mustard
2 tablespoons Extra virgin Olive oil
¼ cup rice vinegar
3 tablespoons of honey or ambar agave nectar.
the juice and zest of ½ lime or lemon.
Fresh ground pepper to taste.

*How to cook Lentils?

These green Lentils are best cook in lots of salted water, just like pasta. Bring water to a boil add 1 generous teaspoon of kosher salt and a Bay leaf. Add the lentils, bring back to a boil and cook for 5 minutes, then lower the heat to low and gentle simmer you barely want to see little bubbles on the top. Cook for another 15-20 minutes with no lid. after 15 minutes check on doneness. I like mine al-dente, specially for a salad like this, I want them with a bite. So I usually remove from heat at 15 minutes and cover them for another 10 minutes. Strain them and let them air dry for a few minutes on a single layer in flat tray.  I usually serve this salad with barely warm lentils, I love the texture and comfort.

Directions:

Start by removing the stems of the kale leaves and breaking the pieces into small bite size. In a small bowl whisk the vinaigrette ingredients. In a platter, layer the kale, lentils, chopped onions, red bell pepper, parsley and walnuts. Drizzle over the mustard vinaigrette. Mix and top it all with crumbled feta cheese.
Serve the salad at room temperature. It is also great in a pita with some Greek yogurt or served in avocado halves!!!Kale-and-Lentil-Salad-with-Honey--Mustard-Vinaigrette_ingredients-layout

Kale and Lentil Salad with Honey- Mustard Vinaigrette_vegetarian_healthy dinner

Kale-and-lentil-salad-with-honey-mustard-vinaigrette_Yes,-more-please!

Enjoy!

Music Pairing: Don’t Worry be happy – Bob Marley

View Post or View Comments 2

Dos Lunas Grilled Cheese & Plum Chutney Sandwich

Dos-Lunas-Grilled-Cheese-&-Plum-Chutney-Sandwich_Delicious-cheese_Yes,-more-please!

Red juicy plums got me in trouble this time. I saw them at the market and when I grabbed them I could feel the juicy flesh of the fruit. I bought some and ate 3 on the way home, and then I went back to the market and bought some more. I think too many… so what to do with an extra pound of plums? “Chutney!”, I open my fridge what else did I have available? Oh! Yes, jalapenos! No matter what, I always have fresh jalapenos in my fridge.. (ask Ian) A little spicy green chile will always save you and kick up the flavor of any meal. I had some ginger (not too shabby) some cinnamon (great spice and aromatic) I was not even thinking about it when I realized I was already making the chutney… My mouth waters.. Juicy and sweet red plums chunks, a hint of spice from the jalapeno, aromatic cinnamon and fresh ginger to brighten up the flavor! The kitchen smelled like a sinful geisha wardrobe. (oops rewind that!) It smelled great, so I had to try it… where? In what? With what?… On a melted ham and cheese sandwich! Oh yes my friends, a sinful combination. One more time, before my eyes something so simple can become so ridiculously good.

Although, to be honest the major protagonist of this sandwich act, is the Classico cheese from Dos Lunas.

I first sampled Dos Lunas cheese at our local farmer’s market and I loved it from the start. Its made by a local artisan cheese maker named Joaquin Avellan, a Venezuelan transplant who missed his families’ cheese so much he began to make his own here in Texas. He makes several varieties from local UNPASTUERIZED cow’s milk. This allows his cheese a greater complexity of flavor which is normally ruined by heat when the milk is pasteurized. Due to regulations, unpasteurized cheese can only be sold in the US after being aged two months, hence Dos Lunas (Two Moons).

I chose his ‘Classico” cheese for this recipe because of its melting qualities and particular flavor. This cheese  has some nutty notes and taste like the grass in Schulenburg, Tx where 60 happy cows produce the milks that this amazing cheese is made off. Its creaminess greatly complements the plum chutney and smokey salty ham. This cheese Its also great as a stand alone to eat all on its own. If you’re curious about picking up some of this ‘Classico cheese’, follow the link at the end of this entry.

This delicious spicy plum chutney over melted Dos Lunas Classico cheese piled on some thinly sliced smoked ham on sprouted wheat bread will send you over the moon…or two.

Dos-Lunas-Grilled-Cheese-&-Plum-Chutney-Sandwich_warm-Gridle-ready-to-eat!_Yes,-more-please!

Dos Lunas Grilled Cheese & Plum Chutney Sandwich.

Makes 2

4 tablespoons of Red Plum, jalapeno chutney Enough cheese to make you smile!…I used Dos Lunas Classico it melts beautifully!, if you are not in Austin, Texas, you can use: Emmental, Swiss or Baby Swiss.

4 thin slices of smoked ham or Bavarian ham.

4 bread slices ( I used 7 seeds-sprouted whole wheat bread)

2-4 tablespoons of butter.

Vegans & Vegetarians: You can use any firm tofu, it will be fantastic if you saute the tofu to give extra crust. And shredded carrots with a little bit of sea salt to substitute the ham.

Use any Vegan margarine spread or coconut oil to give the bread a crusty top, It will be a fantastic sandwich!

Dos Lunas Grilled Cheese & Plum Chutney Sandwich_Red_Plums-bowl

Red Plum – Jalapeno & Ginger Chutney

Makes 2-3 cups

8-12 ripe Red plumps pitted and cut in quarters and eights.
¼ cup sugar (mascabado, or raw)
6 tablespoons of agave nectar
1 teaspoon of olive oil
1-2 small diced jalapenos
1-2 teaspoons of fresh grated ginger
1 teaspoon apple cider vinegar
1 stick of mexican cinnamon
A dash of ground clove.

Making the chutney:

Over medium high heat in a stainless steel pan place the plums, sugar, agave and cinnamon stick. Let the plums warm trough about 4-5 minutes. Once that the sugar and agave start looking bubbly, add the grated ginger, diced jalapenos, cider vinegar, olive oil and the dash of clove. Let simmer for about 5-6 minutes, until the juices look translucent and some of the plums have started to get soft and you can smash them easily with a spoon. Turn off the heat and set aside.

Dos Lunas Grilled Cheese & Plum Chutney Sandwich_Red_Plumps_halved

Ginger-+Jalapeno+Plum-Chutney_Yes,-more-please!

Dos-Lunas-Grilled-Cheese-&-Plum-Chutney-Sandwich_Red-Plum-chutney

Built your sandwich:

Spread butter one side of the two bread slices and place in hot griddle or pan. Build your sandwich on one slice starting with the ham, then 2 tablespoons of the chutney then cover with sliced Dos Lunas cheese. Toast the bread slices in the pan for 2-3 minutes until the buttered side gets color. Then place the pan under the broiler for about 2-3 minutes. Finally top the melted cheese and other ingredients with the plain toasted slice to create your sandwich. Eat while very warm!!! A nice glass of beer or milk will go great…enjoy.   To learn more about Dos Lunas and how to get some of their cheese:  www.doslunascheese.com Dos-Lunas-Grilled-Cheese-&-Plum-Chutney-Sandwich_triangles_Yes,-more-please!

Dos-Lunas-Grilled-Cheese-&-Plum-Chutney-Sandwich_Melted-cheese-craving

To learn more about Dos Lunas and how to get some of their cheese:  www.doslunascheese.com

The cheese used in this recipe was donated by Dos Lunas Cheese….Thank you Joaquin!


View Post or View Comments 3

Privacy Policy Contact Us Yes, more please!