Lunch

Mariana’s Mexican Tuna Sashimi

Mexican-Sashimi-Yes,-more-please!

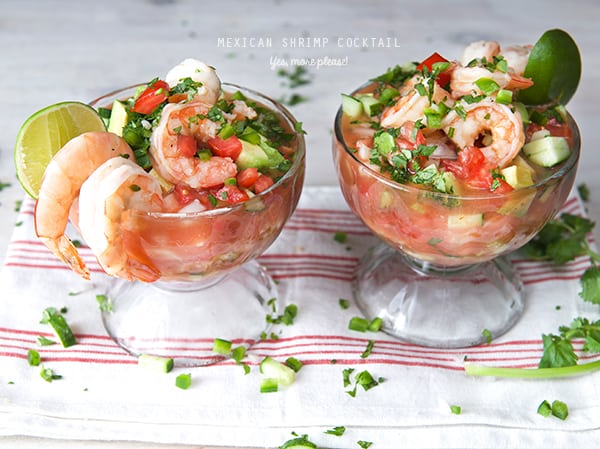
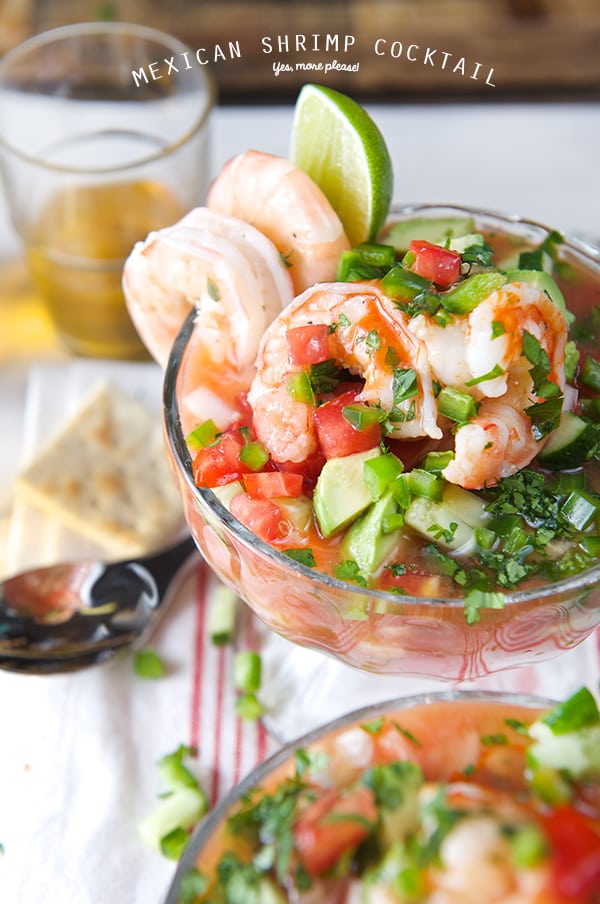
This makes for a versatile dish: appetizer, summer dinner, or lunch; place it in any part of a summer’s day. If you just want something lighter, easy, and extremely tasty, with a little Mexican flair, this is your recipe to go!.

Forget for a bit about the tired guacamole and chips or ceviche. I know they are delicious, but this is going to turn on your appetizer-snack light bulb. There are so many other ingredients in Mexican cuisine, and so many fusions that can take place, that this dish stroked me last night and it was a delicious dinner…Yes, yes we had this for dinner, along with a couple of pomegranate Margaritas…if you want the recipe for them leave me a comment and I will post it next week…

Let me introduce you to my version of Mexican Tuna Sashimi. In Mexico there is a kind of sashimi preparation named Agua chile. Agua Chile is a quick appetizer in which shrimp, octopus, are partially cooked in lime juice and a fresh serrano pepper and a couple of dashes of a well known dark sauce seasoning starting with “M” are added. It is ridiculously simple and delicious.

With this Agua chile dish in mind and Masaharu Morimoto whispering in my ear: “Tuna Sashimi”~
I fused a couple of ideas and created this scrumptious appetizer, summer lunch, Desperate Housewives re-runs, or foodie football game night.

Mexican-Sashimi-ready-to-eat!

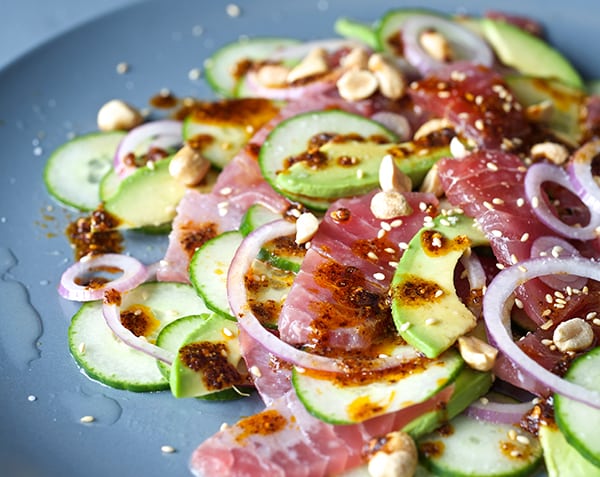
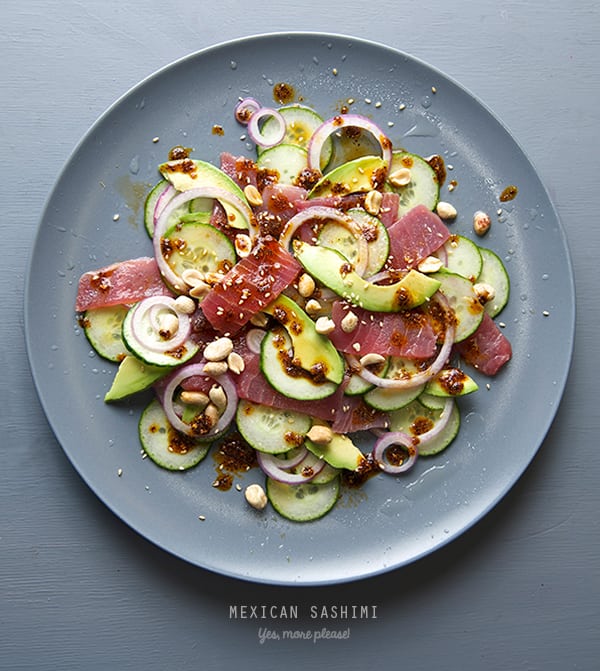
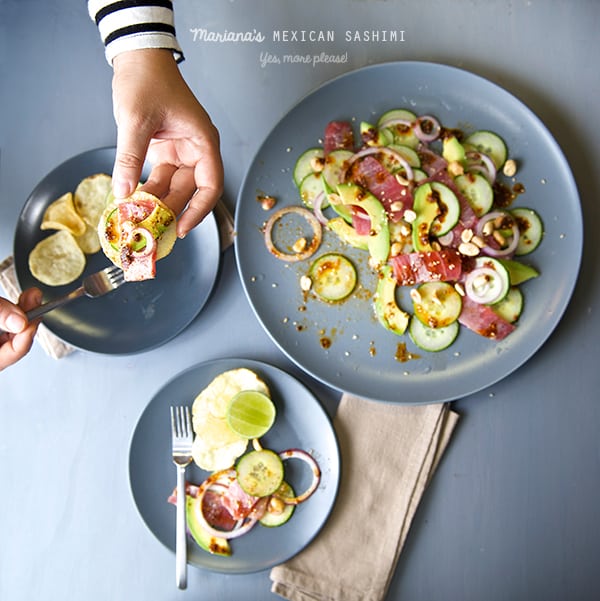
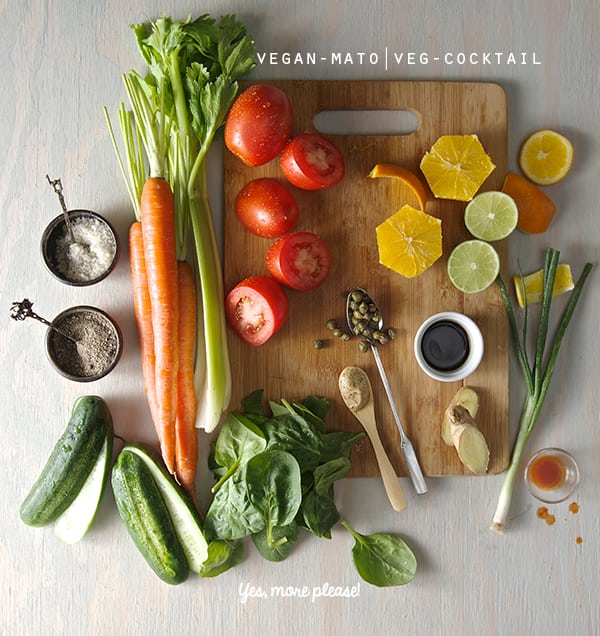
For the recipe sushi grade tuna, a crisp English cucumber, creamy avocado, red onion, lemon juice, soy sauce are plated and combined with my weapon of choice: a red toasted chile de arbol oil sauce. To add some fun and crunch factor, Kettle potato chips or some salty crispy rice chips are delicious on the side to complement the ingredients in this crazy adventure.

The result is a cosmic bite that takes you to Japan and back to play at a mariachi band! Please, you must try this. Share and repeat.

You will find your self craving this appetizer often. Just like we now do…

Mexican-Sashimi_Ingredients

Mariana’s Mexican Tuna Sashimi

Serves 2 or 4.

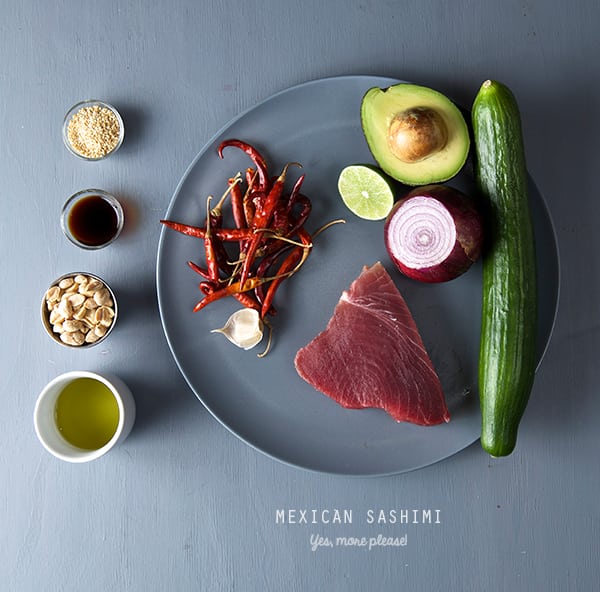
½ lb tuna steak, sashimi quality, from sustainable sources, ask your fishmonger for best available.
½ English cucumber thinly sliced
½ small red onion thinly sliced
½ Mexican Hass avocado
1 lemon
1-2 teaspoons mirin
2 teaspoons tamari sauce or soy sauce

For the Chile de Arbol oil-sauce :

12 dry Chiles de Arbol remove stems if any.
1 garlic clove
2 good pinches of sea salt
¼ cup grape seed oil
1 teaspoon toasted sesame seeds.

Garnish with:

2 tablespoons unsalted roasted peanuts
toasted golden sesame seeds.

Preparation:

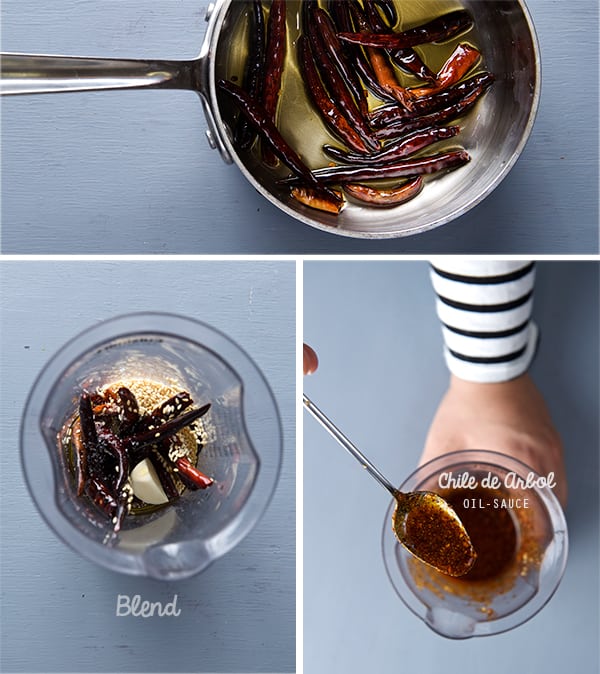
1. First make the sauce. In a small pot heat up the oil and chiles on medium-low, until the chiles are deep dark red, almost black. Set aside and let it cool. Once its cooled down blend the chiles, the oil, sesame seeds, garlic, and salt until you have thick chili oil. Feel free to add a bit more oil if it is too thick. Set aside.

Mexican-Sashimi_toasted-arbol-salsa
2. Now, place your tuna steak in the freezer for about 10 minutes before slicing, this way it will slice easily. I usually set up a timer so I don’t forget its there and you end up with a tuna lollipop!
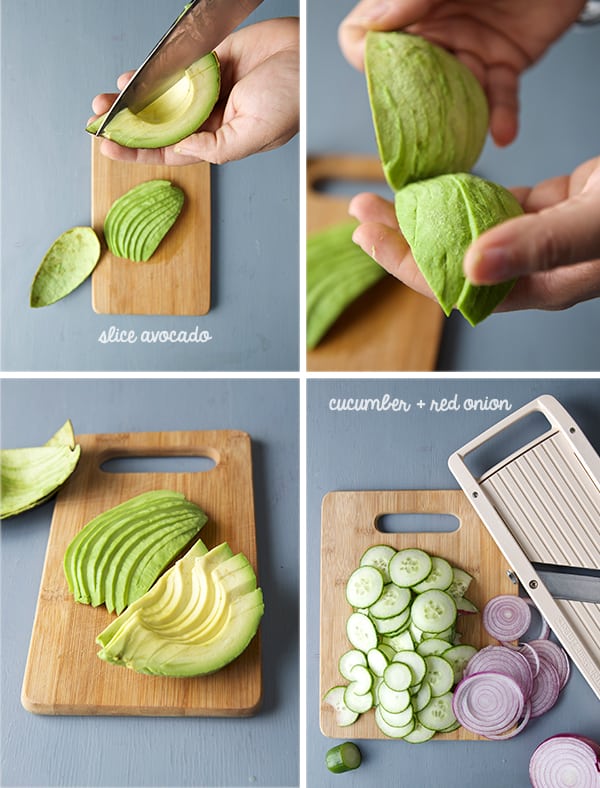
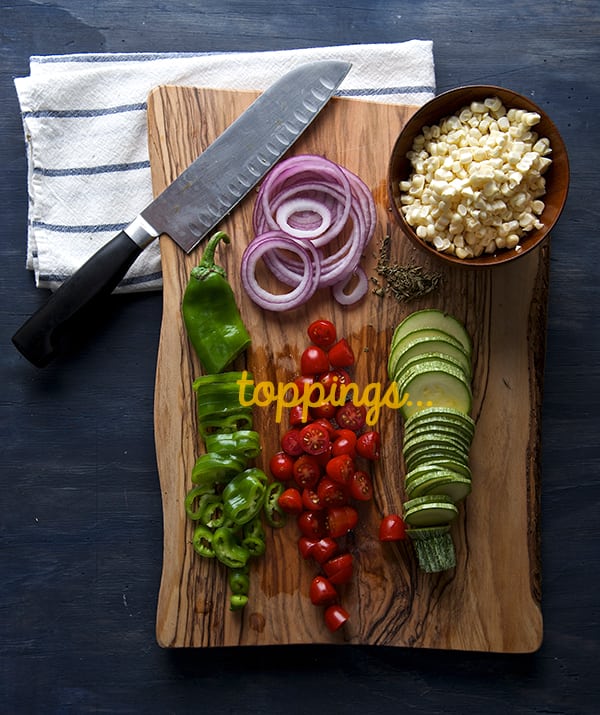
3. Meantime, with a Mandolin or a sharp knife, thinly slice: cucumber, red onion, avocado.

Mexican-Sashimi_Slicing_avocado,-cucumber,-red-onion
4. Remove the tuna from freezer and slice with the sharpest knives you have. It can be a filet knife, a fish knife, if you own a sashimi knife you are my idol!… Me, I used what I was confident would make a great thin slices, My Santoku knife…I know a lot of people will be reading this and they would want to hang my neck for this… The only person that I could feel I need to apologize to is Masaharo Morimoto… “sorry Chef… I had to”
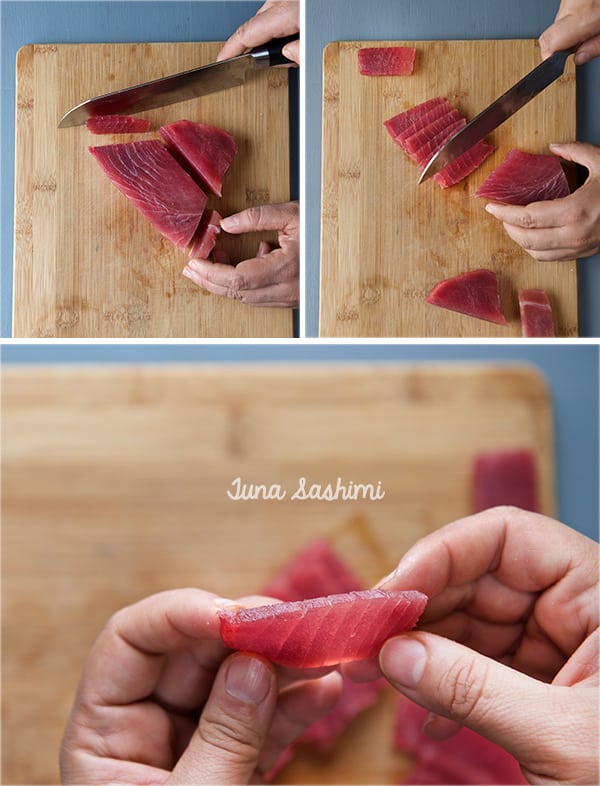
So yes, using my sharp confidence knife I proceed to slice my tuna steak. It is very important you follow the picture below, on how you cut your tuna steak to avoid a tuna massacre.
There is just a few points to follow:
– Cut the tip of the triangle that is separated by a silver tissue.
– remove the opposite tip of the triangle, the one that looks darker in color and it almost have no visible grain. This is the most tender and delicious part of the tuna steak, its the little corner that it is closer to the vertebra, therefore its tender. Save it to make two special bites if you want.
– Once you remove the two tips, your tuna steak will look more like a rectangular shape.
– Start slicing your tuna from the shortest side of the rectangular shape. Making sure you use just one slide motion on your knife like if you are cutting air. Sway the knife to get the cleanest cut possible.

Mexican-Sashimi-Slicing-Tuna
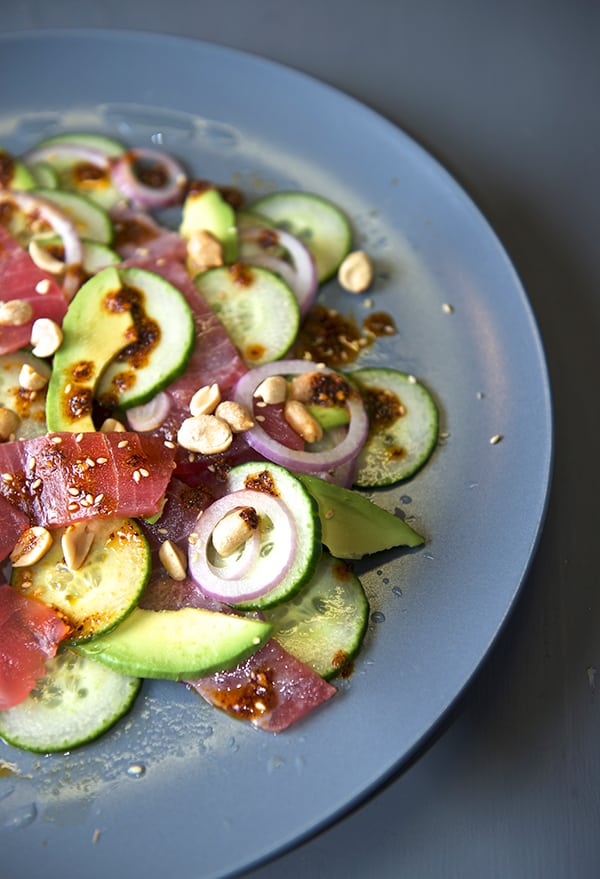
5. Now the fun part begins, layering the flavors. In a large plate or platter, start layering the cucumber slices, onion, avocado and tuna. Squeeze some lime juice, soy sauce, mirin, sesame seeds, and little drops of the chili oil. Start another layer, until you finish with your vegetables and tuna.

Mexican-Sashimi_Fun-platting

Note: You will have lots of chile de arbol oil left. You can use it on stir fried dishes, shrimp, fish, or save it in a air-tight container in the refrigerator and it will be good for at least 4 weeks.

6. To finish up sprinkle the roughly chopped roasted peanuts on top of the plated items, grab you kettle potato chips, a nice pomegranate margarita, or any drink of your choice, sake, Japanese or Mexican beer will work too!
And enjoy!

Mexican-Sashimi-tuna-agua-chile

Mariana's-Mexican-Sashimi_Yes,-more-please!

Enjoy!

Music Pairing: Mucha Muchacha by Esquivel

View Post or View Comments 6

Pizza Azteca

Pizza-Azteca_Yes,-more-please!

It’s a pizza!…no!
It’s a casserole!….no! It’s a tamale?!…..no!
It’s a Corn Masa Pizza Pie!….Yes!
As silly as it sounds, it is ridiculously delicious!
Call it what you like: Mexican pizza, Corn Masa pizza; Pizza Azteca-its the ultimate summer one pan wonder. This is a great quick meal solution too! To get pizza on board it takes no more than 35 minutes since the masa does not rely on yeast or waiting time to rise.
Let me describe this pizza for you… Imagine a hot cast iron pan filled with corn masa crust, when baked the bottom gets crusty with soft delicious nutty corn masa. Fresh corn kernels add texture, enhance the corn flavor and add moisture to the crust. The top layer load with summer vegetables like zucchini, fresh corn, tomatoes, red onions, hatch peppers, and loads of melty cheese layered on top. The summer vegetables pair great with the flavor of the corn masa, the oregano on the fresh quick base sauce adds the perfect herb note. I made the pizza sauce by grating some fresh tomatoes which adds extra freshness to the pizza. I baked everything on the king of pans, “the cast iron pan”.

When this pizza comes out of the oven you will be fill with warmth and happiness as you experience the comforting smell of cooked corn masa and fresh vegetables. Pizza Azteca is best served with a fresh green salad on the side and will be a sure crowd pleaser.

This Pizza Azteca is what I would offer Moctezuma on a summer afternoon… Pizza Azteca is a meal fit for kings!

Enjoy!

Pizza-Azteca_Yes,-more-please!_ingredients

Pizza Azteca

Makes 1 round 12” pizza, yields 8-10 slices.

For the crust:

2 cups corn masa- Maseca is the brand I like, if you can get fresh masa, use it! you will be in heaven.
2 to 2-1/2 cups warm water
½ teaspoon kosher salt
½ cup fresh corn kernels (white or yellow corn is ok)

For the sauce:

3 medium roma tomatoes grated
1 tablespoon tomato paste
1 teaspoon dry oregano
1 garlic clove grated
1 tablespoon extra virgin olive oil
1 teaspoon kosher salt
Fresh cracked pepper to taste

For the toppings:

1 large or 2 medium zucchini thinly sliced.
1 ear of corn worth of kernels
1 hatch pepper or substitute for 1 good pinch of red pepper flakes.
Use roasted red peppers if you do not care for spicy.
1 cup cherry, sun golds or grape tomatoes sliced in half.
2 cups of grated cheese like Adobera, Oaxaca, Gouda, Mozzarella or Monterrey jack.
Use the cheese you like the most, as long it melts and has a mild flavor so you can taste the rest of the ingredients.
Salt and pepper to taste a little extra virgin olive oil for drizzle.

Preparation:

Preparing the masa:

1. Start by preparing the masa dough. Dissolve the salt into the 2 cups of warm water.
2. In a large bowl place your dry corn masa flour, make a well in the center add half of the water, and start incorporating the flour from the sides. Add corn kernels and the rest of the water. Knead for 2-3 minutes until water is well absorbed by the masa.
3. The masa should feel moist a bit sticky to the touch. You should be able to shape it into a ball and cover with plastic wrap, set aside let it rest while you prepare the rest of your vegetables.
4. Preheat Oven at 450F/ 230F

Pizza-Azteca_how-to-make-the-crust
5. Prepare and slice all your vegetables, grate your cheese and prepare your tomato sauce by grating the tomatoes and adding the oregano, salt, garlic, black pepper and extra virgin olive oil. Set aside.

Pizza-azteca_ingredients

Pizza-azteca_Sauce
6. At this point your masa should be well hydrated and ready to shape into the cast iron pan. Using a 11-12” Cast Iron Pan place your masa dough in the center and with wet hands start by evenly shaping the masa into the pan. Create a  higher rim on the edge of the pan. see photo.

Note: If your cast iron pan is well seasoned do not worry about the crust it will not stick to the pan, if not just apply some neutral oil on a napkin and grease the pan before shaping your crust.

7. Once you have an even layer with a bit of a rim on the outside edges, Place skillet with the crust in the oven, on the bottom rack. Bake for 15 minutes lowering the oven temperature to 425F as soon the crust is in the oven.

Pizza-Azteca_Pizza-crust

Pizza-Azteca,pre-bake-crust
8. Carefully remove the skillet from the oven, place it on top of the stove or a metal trivet and start layering your pizza ingredients. Note: leave the pot holders into the cast iron pan handles at all times!, this will prevent you to try to grab the hot pan by mistake!…believe me I’ve been there…ouch!
9. Layer the ingredients same way you do like on a pizza, starting with tomato sauce on the bottom, half of the cheese, zucchini, corn, onions, tomatoes, peppers, and the rest of the cheese. A pinch of salt and some fresh cracked pepper.
10. Place the cast iron pan into the oven for another 20-25 minutes until cheese is melted and the pizza has some gratin golden brown blisters.

Pizza-Azteca_layers
11. Remove from oven, place the pan on a trivet and wait 5 minutes to cool off a bit before cutting. Sprinkle some fresh cilantro for garnish.
12. Serve and Enjoy!


Pizza-Azteca,-ready-to-serve_slice

Pizza-Azteca,-Yes,-more-please!_slice

Enjoy!

Silly, silly music pairing: Brak’s Pizza Song with the Space ghost…

View Post or View Comments 13

Zucchini Ginger Brown Rice Bowls

Zucchini-Ginger-Brown-Rice-bowls_ready-to-serve-Yes,-more-please!

Light and refreshing is what best describes this recipe. A one bowl meal! It’s no fuss, maximum flavor, raw zucchini with a gingery-soy sauce over a nutty sesame seasoned brown rice. This Zucchini Asian flare recipe, is so light, refreshing and savory, you are going to want to eat it more than once a day.
I know what Brown rice does not have a great reputation among the grains because it tends to be mushy and it can taste like cardboard… Well my friend, I have you covered on this one, you will love the quick easy method that I use. Cook the brown rice as you would cook pasta. Use  a large pot with plenty of water and pinch or two of sea salt. The brown rice boils loosely for about 25-30 minutes; stir often and check for an al-dente consistency. When is up to my desired doneness I strain it and the heat of the steam dries the excess water in the brown rice,  leaving you with perfectly cooked,  fluffy individual grains, with great texture cooked trough and slightly  al-dente.

Using this method, I cook larger batches of brown rice and use them later for a quick sautéed, salads, soups or in this case; this humble and refreshing Zucchini Ginger Brown Rice bowl.

As you can see there is hope for this misunderstood grain. I assure you once you try this method you will love brown rice again.

Enjoy the bountiful zucchini season and stay fresh!

Zucchini-Ginger-Brown-Rice-bowls_ingredientsZucchini-Ginger-Brown-Rice-bowls_short-grain-brown-rice

Zucchini Ginger Brown Rice Bowls

Makes 2 meal bowls

3 medium size zucchini any color is up to your preference.
1/2 cup toasted and finely chopped cashews or walnuts
2 green scallions finely chopped
1 tablespoon toasted sesame seeds (any color)
1 tablespoon of fresh grated ginger.
1 small garlic clove grated

For the dressing:

1 Tablespoon soy sauce
2 Tablespoons sesame seed oil
2 Tablespoon Rice Vinegar

For the rice:

1 cup short grain brown rice
8 cups of water
2 pinches of salt.

Season the rice with:

1 Tablespoon sesame seed oil
1 Tablespoon sesame seeds
2 Tablespoons seasoned rice vinegar.

Preparation Method:

1. Bring to a boil a large pot filled with 8 cups of water and 2 good pinches of sea salt. Once is boiling add the brown rice, bring back to a boil, and then lower the temperature for a slow simmer. Simmer for about 25-30 minutes. Stirring occasionally.
2. While your rice is cooking, shred your zucchini, ~omit the seed core on the zucchinis~ I used one of my favorite uni-taskers, I absolutely adore this julienne peeler! you can get it any cooking supply store or get it on-line. Toast your walnuts, chop the scallions, grate your ginger and garlic.

Zucchini-Ginger-Brown-Rice-bowls_julienne-peeler
3. In a large bowl combine the shredded zucchini and one good pinch of salt, toss well and let it stand for a few minutes. This will draw out some of the excess water out of the zucchini.Toss water from bowl and place zucchini on a clean kitchen towel and gently squeeze with your hands as much water as possible. remove from towel and with your hands fluff up the shredded zoodles. This step is very important, because avoids watering down your vinaigrette.
4. In a large bowl Combine the drain shredded zucchini, finely chopped toasted walnuts, toasted sesame seeds, green scallions, grated ginger, grated garlic.
5. Combine the soy sauce, sesame seed oil, rice vinegar. Set a side you will dress your zucchini right before serving. Please check on your rice.

Zucchini-Ginger-Brown-Rice-bowls_fresh-grated-ginger
6. Check for rice doneness. I usually look for a soft but firm grain, that tastes cooked and has a god bite. Usually is around 25-30 minutes, the doneness I prefer. See the picture below.If you want to go a little further on cooking is up to your preference, give the rice another 5 minutes, re-check and taste; always taste!
7. Once your rice is cooked, with the help of a colander or a sieve, strain the rice. Allow the hot steam to dry the extra water, give it around 5-7 minutes. Once all the excess water is drained and still warm, transfer the rice into a bowl and season with the sesame oil, sesame seeds and rice vinegar toss until well combined.

Zucchini-Ginger-Brown-Rice-bowls_how-to-cook-brown-rice
8. Once your rice is seasoned, Add the Soy sauce sesame seed oil, and rice vinegar dressing to the zucchini mixture. Toss well.

Zucchini-Ginger-Brown-Rice-bowls_add-dressing

Zucchini-Ginger-Brown-Rice-bowls_tosswell
9. Using two deep bowls, divide the rice and top it with the zucchini mixture. Sprinkle some extra sesame seeds and for spice maybe some Thai pepper, red pepper flakes, or some Sriracha-hot sauce! Enjoy!

Zucchini-Ginger-Brown-Rice-bowls_assambling-the-bowls

Zucchini-Ginger-Brown-Rice-bowls_ready-to-servel

Fresh, light, easy lunch or dinner…

Music Pairing: Nanobots – They Might be Giants


View Post or View Comments 3

VENISON BURGER (a.k.a Burgersaurus Venison-Rex)

Venison-Burger_Burgersaurus-Venison-Rex_Yes,-more-please!burger

I must say that some times is not about reinventing the wheel it’s just about perfecting it.

That’s what this recipe-non recipe is all about.

Just look at it! Isn’t it gorgeous?…It’s not only very attractive, it’s packed with amazing flavor.
It’s my dream burger…*sigh*

Like I said, this recipe is about making a burger in the better way possible. What makes this burger special? The HOW to.

The big question I asked myself when starting this recipe: What’s in a classic burger and how can I make it better when I’m at home?

The quest started and this are my requisites for a “mo betta! burger”…

1. Great Buns: A bun that holds your burger, but lifts and hugs her like a koala hugs a tree, like a bra that lifts and push beautifully. Do yourself a favor, toast your buns makes a big difference. I used buttermilk buns.
2. Tomato: Instead of using a wimpy thin mushy tomato slice…How about a luscious thick slice of a juicy, meaty, heirloom tomato goddess. Why settle for a flavorless tomato right?
3. Onion: Onion place a great role on the burger it adds that bite that contrast between the sweet ketchup, sharp salty mustard and plays so well the crunchy juicy roll in it. So I will go with red onion. Besides being sharp adds color, and visual appeal. Note: Be kind to your guests and family members by rinsing the onion slices.
4. Lettuce: this leafy green is not only for decoration and color, the lettuce play an important role on the burger, adds a crisp bite, where the meaty fatty molecules from the patty and bacon expand and maximize the flavor.
5. Bacon: You love bacon, I love Bacon, we love bacon, everybody loves bacon.“Love is all you need”
6. Condiments: For me, a burger is not complete without the trilogy: mustard, mayo, ketchup. My absolute favorite condiments: Sir Kensington’s.
7. Pickle: Always the best Burger co-pilot will be the Pickle. I love Thomas Keller’s recipe for sweet quick refrigerator pickles. Check it out if you want to make your own.
8. Cheese: Mild Cheddar, or Colby that’s what I prefer on my burger, it has enough character, but does not overwhelm the burger.
9. The PATTY: Let’s talk about meat. Classic Burger mix usually mixes a fatty cut for flavor and moisture and a leaner cut for yield, shape and texture. What ever is your choice of meats make sure you are using 80% of the leaner cut to 20% fatty cut. Blends that I recommend: Sirloin and Chuck steak, Turkey and Pork, Lamb and Sirloin, Venison and Pork.
In this case to indulge we had ground Venison, provided by our good friend Marc “the hunter” he was very generous and share with us his fabulous ground Venison. I know is hard to get this precious meat, but if you are in Texas you are blessed. There are many places you can easily buy some of this delicious meat. I added some links at the end of this post for your convenience. The delicate meaty venison flavor is worth going the extra mile on this burger.

There are a couple of tricks I’ve learned, to improve and make the best moist, airy and flavorful patty, here they go:

Shaping:

When mixing your ground meat do not over work it. Use forks to “fluffen”the meat morsels to incorporate the ingredients. Shape the patties, but don’t compress. Think of tenderly thoughts when making the rounds, you just want the meat to stay together with out pressing to hard. What ever you do please, do not treat your meat mixture like play doh.
Make an indentation in the middle, it works like a charm. Your patties will cook more evenly, with no bump in the middle. A totally acquired method to the hump madness, thank you Rachel!. After I shape my patties, I place them in a tray lined up with some parchment paper and put them in the freezer for about 10-12 minutes. This chill helps the patty to hold its shape better when is time to cook them…watch out though, you don’t want to go to far and freeze them!

When cooking the patties:

Your pan, grill or griddle has to be screaming hot to create a nice crust and sear! The sear will keep the patty moist on the inside while giving a crusty crust on the outside.
Please respect the patty!, once you place it into the pan, do not move it, no poking or pressing down with a spatula! You are just squeezing out the juices… be gentle and patient.
Turn the patty just once. This will ensure you’ll have a moist inside and no though interior.
Hold your seasoning horses! Try Salt and Black Pepper. For me this is enough. I want my patty to taste like meat to the max!… the rest of the accoutrements come later.
Last but not least, listen to good music while you cook, have fun, be ready for a great burger love, and make it awesome.
Any way friends, this is my version os a crazy good homemade burger…fries?.. that’s a whole other chapter. Meantime, keep yourself busy with this VENISON BURGER (a.k.a Burgersaurus Venison-Rex).

Venison-Burger-Yes,-more-please!

Venison-Burger_ingredients

VENISON BURGER (a.k.a Burgersaurus Venison-Rex)

Makes 4 Burgersaurus

For the Patties:

14 oz Ground Venison
6 oz Ground Pork 80%-20%
2 egg yolks
Salt and pepper to taste.

4 Buttermilk Buns (I used Whole Foods brand they are fantastic!)
a little butter to toast your buns.

Accoutrements:

1 Large Heirloom tomato.
4 thick slices of red onion rinsed and pat dry.
6-8 leaves of Romain, Iceberg or your favorite kind.
8 thin slices of crisp bacon
4 slices of mild cheddar cheese or Colby-cheddar

Condiments:

Mayo, Mustard, Ketchup, Pickles.

Venison-Burger_condiments

Preparation Method:

1. Prepare all your lettuce, tomato and onion slices. Gather all your condiments and spread spatulas.
2. Crisp up your bacon. Reserve 1 tablespoon of the bacon fat.
3. Cut your buns and spread some butter, have them ready when the time comes to toast them.

Venison-Burger-Accoutrements

Venison-Burger_bun
4. Prepare your meat, In a chilled bowl combine the ground venison, ground pork, 2 egg yolks and the tablespoon of reserved bacon fat. Using to forks combine all the ingredients, remember not to over work the mixture. Venison is a very lean meat, therefore I’ve added some egg yolks and a little bacon fat to keep them moist.
5. Line up a tray with parchment paper and divide your ground mixture into 4 and shape your patties, be gentle and do not compress. Place them on the tray and make a concave indentation in the middle (see photo below). Place them on the freezer for 10-12 minutes.

Vison-Bruger_how-to-make-a-burger-patty

6. On a screaming hot griddle, cast iron skillet or grill place your patties at least 1-2 inches apart. Remember, do not crowd the pan, use a bigger skillet, and place one patty at a time. Wait for about 1 minute interval between placing the next patty into the pan to give a chance to the pan to bring the temperature up to screaming hot.
7. Each patty will take around 3-4 minutes the first side. Flip them until you can see that brown crust is formed.Once you flip them, place the cheese slice on top. It will take a little less time like 2-3 minutes to finish cooking. Venison cooks faster than meat, check your burgers at all time, adjusting the temperature if they are browning to fast. If you are using other mix of meat please adjust the cooking time maybe by adding an extra 1 or 2 more minutes upon how well done you want your burger.

Venison-burger_cook-your-burgers

8. Once they are ready place them aside and let them rest for a bit. Meantime toast your buns. I spread a thin layer of some good old butter, and toasted on a medium hot skillet until they look like this…Venison-Burger_toast-your-buns

9. Time to assemble:
Now do you remember that Math rule that goes “Changing the order of the factors does not change the product” When building a Burger for me the order of factors DOES change the product. The condiments for me are the glue, I use them like so, between layers to hold the burger. Here is how I start:
Apply mayo on the bottom of the toasted bun, then tomato slice, patty, bacon, onion , ketchup, lettuce, spread some mustard on the top bun. Press a little, pickle on the side to munch on every other bite…done! Please, do what ever you want to do, do not listen to me on this one, this is just the way I like it!

Venison-Burger_Burgersaurus-Venison-Rex_Yes,-more-please!

Home made Burger = mo betta!

Music Pairing: Getting Better – The Beatles

Special thanks to Marc Swendner 

for sharing with us his awesome ground venison.

Thank you Marc!!

Where to get Venison in Austin?

http://www.brokenarrowranch.com/Shop/

http://hudsonmeatmarket.com

http://johnnygbutcherblock.com

View Post or View Comments 4

Cheesy Eggplant Flautas

Cheesy-Eggplant-Flautas_Yes,-more-please!-scrumptious

Roll e’m up, folks! These Flautas ~a.k.a~ rolled tacos are scrumptious! They are filled with quickly sauteed eggplant and a strip of Oaxaca stringy cheese in a thin flour tortilla. THis recipe is quite different from your regular eggplant recipes. The eggplant marries to the cheese inside of the crunchy warm rolled-up flour tortilla, making the filling into utterly creamy vegetable goodness.
They are best served on a bed of crisp fresh lettuce, drizzled with some liquid sour cream or Mexican cream. You can make my fabulous Tomato-Cinnamon sauce for dipping it is slightly spicy and sweet, the cinnamon warms up the tomato flavor is a match made in heaven with the eggplant. A Salsa Verde  also works divine… you choose, or make them both, why not?!

I struggle to find a great variety of quick dishes for eggplant. Cheesy Eggplant Flautas are a great way to utilize those extra eggplants and a fun vegetable option that makes for a great, simple and delicious entree.

Don’t feel like frying?…then brush the rolled flautas with some vegetable oil and bake them!…

Now, get those eggplants rolling. Have fun!

Cheesy-Eggplant-Flautas_EggplantsCheesy-Eggplant-Flautas_ingredients

Cheesy Eggplant Flautas

Makes 8 Flautas

1 large eggplant cut into thick strips.
½ pound of Oaxaca cheese.
8 thin flour tortillas
4 cups of corn oil for frying.
1-2 cups of finely shredded Romain lettuce.

For the Tomato – Cinnamon salsa:

1 large red tomato such as red prudence or 2 Roma tomatoes will do too.
¼ cup fine diced sweet onion.
1 pinch of ground clove
1 pinch red pepper flakes or one dry chile de arbol
½ teaspoon ground cinnamon.
½ teaspoon salt
½ teaspoon sugar
1 tablespoon of apple cider vinegar
1 small glug of grape seed oil or mild olive oil.

For the Salsa Verde click here

Preparation Method:

1. Make the Salsa

Cheesy-Eggplant-Flautas_tomatoe&cinnamon-salt
2. Boil the tomato and puree it.
3. In a small pot add oil and saute the onions until soft and translucent.
4. Add the spices and salt stir until well combined and fragrant.
5. Add the tomato puree and the sugar and cook for 3-5 minutes.
6. Turn off the heat and add the apple cider vinegar, adjust seasonings.

Make the Flautas:
1. Saute the thick eggplant stripes using a little olive oil, season salt and pepper. Set aside.

Cheesy-Eggplant-Flautas_eggplant-sauteed
2. String the cheese into a thinner stripes.
3. Slightly warm up the flour tortillas, place one or 2 eggplant stripes and some cheese strings roll it tightly and secure the end with a wooden toothpick. Proceed with the rest.

Cheesy-Eggplant-Flautas_rolling
4.  In a medium size heavy bottom pan add the 4 cups of oil and warm up until your thermometer reaches between 350-375 degrees.
NOTE: Take care while frying to avoid any skin contact with hot oil. Watch the pan and carefully monitor the temperature. Avoid all distractions since these flautas cook very quickly.
5. Fry the flautas until evenly golden brown around 2-3 minutes or less. Watch them at all times.

Cheesy-Eggplant-Flautas_fry
6. Pull them out on a cooling wire rack

Cheesy-Eggplant-Flautas_golden-brownCheesy-Eggplant-Flautas_remove-the-toothpick
7. Serve immediately on a bed of lettuce, drizzle the crema, dip into the salsa roja or verde…. bite, dip-bite-repeat. Enjoy!

Cheesy-Eggplant-Flautas-Yes-more-please!

Cheesy-Eggplant-Flautas-melted-cheese-creamy-eggplant-Yes-more-please!


Cheesy-Eggplant-Flautas_Yes,-more-please!

Where did I get this amazing Eggplants?…

At my favorite Urban Farm in Austin: Boggy Creek Farm

Hurry up and get yours before they are gone!

Cheesy-Eggplant-Flautas_Green-Eggplants-Boggy-Creek-Farm

Music Pairing: Tina Turner – Proud Mary

View Post or View Comments 4

Mexican Shrimp Cocktail


Mexican-Shrimp-Cocktail_Yes,-more-please!

Hold your horses! Hide the children! What you are about to see is food rated “R” at its best! My Mexican Shrimp Cocktail is to die for. Fresh, delicious, and savory; it’s the perfect simple light meal for a hot summer afternoon. This juicy cold and light savory cocktail is a meal in itself. What makes it Mexican style? Well the whole combination of vegetables, accoutrement, and the cold broth. It’s a savory broth made with shrimp shells and seasoned with fresh orange and lime juice, ketchup, and some dashes of hot sauce. The result is this light fresh savory broth that goes incredibly well with the shrimp. In my opinion there’s no need to buy those bottled clam juices when you can get the most natural flavor out of your shrimp!
This Mexican Shrimp Cocktail is an entrée rather than an appetizer with a dipping sauce as served in the States. In Mexico, this cocktail is typically served on the coastal cities as an iconic refreshing staple and a must have if you are spending your day on the beach. In the city, shrimp cocktail is widely known as the number one ‘hangover elixir.’
There are many variations in which more than one shellfish is added to this concoction. Common ingredients include octopus, clams, oysters, baby scallops. It is called “Vuelve a la vida” which translates to “come back to life” because its invigorating attributes. That, I can not guarantee, however I assure you that it will refresh and invigorate you on a summer afternoon. In my case, I just love the simplicity of flavors and the way the shrimp skins cooked as a base produce a magic broth with depth and character!

Prepare this dreamy cocktail for yourself ! You can make it in advance, since it is served cold on chilled glasses. For parties you can serve it with all the vegetable accoutrement on the side which allows your guests to customize their own. Keep it ice-cold at all times. It is truly a great summer crowd pleaser. Enjoy!

I can assure you this recipe will be part of your repertoire for many years to come.
Happy Summer, Enjoy!

Mexican-Shrimp-Cocktail_ingredients

Mexican Shrimp Cocktail

Serrves 2 sailors 4 mermaids

This cocktail is light and refreshing, it can serve two as a meal or four to six as an appetizer. This recipe can easily be doubled or tripled upon family size, or a friendly party crowd.

1 – ½ lbs. Jumbo or medium large shrimp, peeled save the skins and deveined.

For the shrimp stock:
The reserved skins from the shrimp.
2 celery stalks
¼ wedge of a white onion.
2-3 sprigs of fresh thyme
1/2 teaspoon Sea salt
¼ teaspoon black pepper

Seasonings for the cold cocktail broth:
The juice of one small Valencia orange
3 large limes + 1 or 2 more to garnish.
¼-1/2 cup ketchup sauce
A few dashes of your favorite Mexican Bottled Hot Sauce, I prefer Cholula, Valentina or Huichol.

Prepare cocktail with:
2 roma tomatoes, small diced
1 small white or purple onion, small diced
1 medium cucumber seedless such as jade or English cucumber, small diced. 
¼ cup finely chopped cilantro
1 chile Serrano or Jalapeno with seeds.
1 small Hass avocado

Serve with:
Saltine crackers or Tostadas
Plantain Chips
And a really cold light Mexican beer (I prefer Modelo Especial or Victoria oh yeah!)

Preparation Method:

1. Place two glass serving bowls in the freezer. (Mason jars, or glass mugs will work too.)
2. Peel and de-vein the shrimp, reserve the skins and leave 4-6 unpeeled, tail-on shrimp for garnish.Mexican-Shrimp-Cocktail_peel-and-devein-the-shrimp
3. In a non-reactive pan place the shrimp skins, along with the celery stalks, onion wedge, thyme, a pinch of sea salt and some cracked black pepper. Add 3 cups of water and simmer for about 15- 20 minutes.

Mexican-Shrimp-Cocktail_save-the-skins-to-make-a-broth
4. Meantime, prepare all your vegetable accoutrement. Dice and chop the tomato, cucumber, onion, serrano or jalapeno peppers, limes, avocado and cilantro. Set aside.
5. Check on your broth. With a slotted spoon, remove the skins and all the vegetables from the broth. Add the peeled and deveined shrimp to the hot broth and simmer the shrimp for about 2-3 minutes or until they change color and curl up.~Shrimp cook very fast so be attentive! You do not want rubbery overcooked shrimp!~

Mexican-shrimp-cocktail_how-to-boil-shrimp-
6. With a slotted spoon, pull out the shrimp a little before you think they are ready. They will keep cooking with their residual heat. Place the shrimp on a plate with ice underneath. (see picture below).
7. Fill a bowl halfway with ice and place a metal or glass bowl on top of the ice. Place a fine sieve on top of the bowl and drain the broth. With a wooden spoon, start whisking to cool off the broth until the temperature of the broth feels fresh and cooler.

Mexican-Shrimp-Cocktail_cooling-the-broth
8. You should have around 2 to 2-1/2 cups of broth left, transfer the broth into a liquid measuring cup if you have more than 2 ½ cups discard the extra broth.
9. Start seasoning the broth. Squeeze the juice of 3 limes, the juice of 1 small Valencia Orange, add Ketchup (I used my favorite: Sir Kensington’s spicy ketchup!) add a couple of dashes of hot sauce, the sea salt, and whisk. Taste and adjust flavor for salt or pepper.

Mexican-Shrimp-Cocktail_Season-the-broth
10. Pull out the frozen glass serving bowls and start arranging your cocktail. Start by layering the ingredients and add the seasoned broth at the end. No rules here! You can add as much or as little veggies as you want. Avocado is a must, highly necessary!, A little extra squeeze of lime juice, sprinkle some cilantro and an extra dash of hot sauce…Prepare for the stampede!.. you are gonna love it. Enjoy!
Mexican-Shrimp-Cocktail_ready-to-serve!Mexican-Shrimp-Cocktail_authentic

You know you want it!

Mexican Shrimp Cocktail

www.yes-moreplease.com

Refreshing, light this Mexican cocktail its perfect for a pool party or a weekend of leisure at home. remember to have a very very cold beer, Ceveza bien fria! Enjoy!

Course Brunch, Lunch, Main Course
Cuisine Mexican
Prep Time 30 minutes
Cook Time 12 minutes
Total Time 42 minutes
Servings 4 sailors or 4 mermaids

Ingredients

  • 1-1/2 ibs. Jumbo Shrimp, peeled, save the peels and deveined

For the shrimp stock:

  • 2 celery stalks
  • 2-3 sprigs fresh thyme
  • 1/4 wedge of a white onion.
  • 1/4 teaspoon black pepper
  • 1/2 teaspoon sea salt

Seasonings for the cocktail broth:

  • 1 the juice of one small Valencia orange
  • 3 large limes, plus 1 or 2 more to garnish.
  • 1/4-1/2 cup ketchup sauce
  • A few dashes of your favorite Mexican Bottled Hot Sauce, I prefer Cholula, Valentina or Huichol.

Garnish with:

  • 2 roma tomatoes small diced
  • 1 small white or red onion, small diced
  • 1 medium cucumber, such as jade or English cucumber. small diced
  • 1/4 cup Cilantro, finely chopped
  • 1-2 Chiles Serranos or jalapeño, finely chopped
  • 1 small Hass avocado

Serve with:

  • Saltine crackers or Tostadas
  • Plantain Chips
  • And a really cold light Mexican beer (I prefer Modelo Especial or Victoria oh yeah!)

Instructions

  1. 1. Place two glass serving bowls in the freezer. (Mason jars, or glass mugs will work too.)

    2. Peel and de-vein the shrimp, reserve the skins and leave 4-6 unpeeled, tail-on shrimp for garnish.

    3. In a non-reactive pan place the shrimp skins, along with the celery stalks, onion wedge, thyme, a pinch of sea salt and some cracked black pepper. Add 3 cups of water and simmer for about 15- 20 minutes.

    4. Meantime, prepare all your vegetable accoutrement. Dice and chop the tomato, cucumber, onion, serrano or jalapeno peppers, limes, avocado and cilantro. Set aside.

    5. Check on your broth. With a slotted spoon, remove the skins and all the vegetables from the broth. Add the peeled and deveined shrimp to the hot broth and simmer the shrimp for about 2-3 minutes or until they change color and curl up.~Shrimp cook very fast so be attentive! You do not want rubbery overcooked shrimp!~

    6. With a slotted spoon, pull out the shrimp a little before you think they are ready. They will keep cooking with their residual heat. Place the shrimp on a plate with ice underneath. (see picture below).

    7. Fill a bowl halfway with ice and place a metal or glass bowl on top of the ice. Place a fine sieve on top of the bowl and drain the broth. With a wooden spoon, start whisking to cool off the broth until the temperature of the broth feels fresh and cooler.

    8. You should have around 2 to 2-1/2 cups of broth left, transfer the broth into a liquid measuring cup if you have more than 2 ½ cups discard the extra broth.

    9. Start seasoning the broth. Squeeze the juice of 3 limes, the juice of 1 small Valencia Orange, add Ketchup (I used my favorite: Sir Kensington’s spicy ketchup!) add a couple of dashes of hot sauce, the sea salt, and whisk. Taste and adjust flavor for salt or pepper.

    Pull out the frozen glass serving bowls and start arranging your cocktail. Start by layering the ingredients and add the seasoned broth at the end. No rules here! You can add as much or as little veggies as you want. Avocado is a must, highly necessary!, A little extra squeeze of lime juice, sprinkle some cilantro and an extra dash of hot sauce…Prepare for the stampede!.. you are gonna love it. Enjoy!

    Happy Cooking!

Music Pairing: Vereda Tropical-Esquivel


View Post or View Comments 10

Vegan-mato a Vegetable Cocktail

Vegan-mato-veg-cocktail-Yes,-more-please!-drink-your-veggies-in-a-fun-way!

Need some veggies in your life? Let’s veg-out!, I mean Veg-in, Vegan-mato is a vegetable cocktail that delivers a fun way to drink and eat your vegetables. Let’s  throw a party in a glass!
Sometimes you just need something that boost your inner health and some vegetable motivation in liquid form is the way to go. Not sure what to do with left overs veggies of the week? juice it up!
This Vegan-mato is waiting for you, perfect summer power drink, made with fresh vegetables, all natural, extremely flavorful and fun to make.

It can’t be easier than to throw all the veggies on a food processor, season, squeeze some lime juice, sea salt, a little hot sauce kick, some ice, a straw and some extra veggies to munch and crunch.

This Vegetable-non alcoholic cocktail is one of the best ways to drink you veggies.

Have a great weekend…Enjoy!

Do you need an umbrella to go with this cocktail? Perhaps, perhaps, perhaps…
Check our music gallery for our music-recipe pairings…

VEGANMATO_VEGCOCKTAIL_ingredients_Yes_moreplease

Vegan-mato a Vegetable Cocktail

Serves 2 large mugs or 4 short glasses.

4 Roma tomatoes
3 large carrots
1 medium orange peeled
2-3 small cucumbers
1 spinach handful
2 large celery stalks including the leafy tops (celery leafy tops are a great source of magnesium do not waste them! Drink them, include them on your salads.)
1 sprig of parsley
1 green onion
2 inches of fresh ginger

Season with:

the juice of 2 limes
2 teaspoons soy sauce
1 teaspoon sea salt
1 pinch of celery salt
2 pinches of freshly ground black pepper
1 teaspoon of spicy brown mustard
2, 3, 4 dashes of your favorite hot sauce.

Garnish with:

2 bamboo skewers
Celery stalks
Martini Olives, jumbo pepper stuffed olives or Jalapeno stuffed olives.
Pickles
Fresh cucumber wedges
Cherry tomatoes
Radishes and chopped capers

Some extra sea salt and a half of lime to cover the rim of the mug.

Note: It is very important to me to make emphasis on how important it is to buy organic produce when juicing. Flavor, nutritional value is superb when organic vegetables are used; believe me you don’t want to be drinking pesticides. Please take this in consideration…

Vegan-mato_extract-the-juices_Yes,-moreplease!

Directions:

1. Chill your Mugs, by placing them on the freezer.
2. Wash and cut the hard ends of vegetables.
3. With the help of an electric juicer, juice all your vegetables first and add the orange last. The juicy orange will help to clean up all bits of vegetable flavor on your juicer.
4. To this juice, add the soy sauce, sea salt, pepper, spicy brown mustard, a few dashes of hot sauce, and the juice of two limes. WHISK!!! until well combined. Taste to adjust the flavor.

Vegan-mato_a-Veg-cocktail_squeeze-the-limes!

Veganmato_vegcocktail-party-Yes,-more-please!

Veganmato_vegcocktail-party-Yes,-more-please!
5. Make your vegetable skewers, using what ever you prefer for garnish, cherry tomatoes, radishes,caper-berries, olives, pickles the limit is your imagination.
6. Take the mugs out of the freezer, rub some lemon on the rim and dip it in salt. Add lots of ice.
7. Add your celery stalk, a garnish skewer, a straw, umbrella, sandals, a sunny porch and some great music check our music pairings here!

Sip-crunch-munch-repeat_Vegan-mato_Yes,-more-please!

Cooking music Pairing: Guardians of the Galaxy- Awesome Mix Vol. 1


View Post or View Comments 2

Deviled Shrimp Camarones a la Diabla

Devil-Shrimp_Camarones-a-la-Diabla_spicy-hot!!!

Calling all the brave spicy souls! Are you there? … If you are one of them, keep reading because your ride to spicy heaven is here. Deviled Shrimp Camarones a la Diabla!
Why “a La Diabla” well because this recipe is *SPICY*, as in ~shzsshzzsshz~ that noise that your mouth makes when your mouth salivates, when your tongue tingle and sweats and you have rosy checks and almost start cursing HELL YES! Spicy shrimp It is a pleasurable torture… are you still with me?

This is a classic Mexican seafood dish. Where does it come from? Nobody knows. I’ve been Mexican all my life ~hehe~ and I do not know the origin of this dish. Go figure!. What I do know is that you can find Camarones a La Diabla on any menu of a seafront restaurant all along the coastal perimeter of the Mexican Republic. There are some rumors about the origin of this recipe comes from Sinaloa but it’s not unanimously agreed upon. Anyway, we Mexicans love any kind of spicy pledge.

In this recipe you are your own executioner as we say in Mexico. You “punish yourself” with the amount of spiciness you add. This recipe is for brave people, unless you want to end up eating tomato garlic sauce. Be brave-Be bold.

I balanced the spice by adding some orange juice to give a citrus background note and a more pleasurable spicy flavor. If you follow the recipe as it is written you will end up with spicy shrimp that makes you want more without being overwhelmed in fire. (I am brave, but I don’t want Ian to have a spicy comma, he almost has a Mexican palette when it comes to spicy foods…but still there’s some homework to do).

This recipe is one of my Mom’s favorite ~hi Mom!~ thinking of her wishing she was here on Mothers Day, sending her all the visual and shrimp love I can. This is for you Yoli!

She is one of the bravest women I know, I admire her and love her dearly. And oh my! spicy as she can be!..And sometimes like all Moms, a pleasurable torture!
I just love you so much shorty! Thank you for being such an awesome Lady, Happy Mother’s Day to all the spicy Moms out there.

Thinking of you Yoli…Enjoy!

Shrimp-a-la-Diabla_ingredients

Deviled Shrimp Camarones a la Diabla

Serves 4 spicy brave souls

2 lbs. Medium size Shrimp. I used Gulf shrimp, skin off, tale on and deveined.
6 tablespoons of butter
1 good glug of extra virgin olive oil
½ cup white onion finely diced
8-10 garlic cloves finely chopped
¼ cup tomato paste
1/2- ¾ cup freshly squeeze orange juice (approx 1 large juicy sweet orange, if your orange is to sweet, please add 1 teaspoon of white or rice vinegar)
1 teaspoon orange zest.
½ cup Cholula sauce
¼ cup Valentina or Huichol hot sauce
2 chiles chipotles in adobo sauce pureed
(you can buy the 2 oz little cans they work great for this recipe)
Salt and black pepper to taste.

* If you are not feeling so brave, reduce the Cholula sauce by half, omit the Valentina hot sauce, and use just one chipotle.

For the Garlic- Butter Rice:

White garlic rice
Serves 4 or 2 sailors.

1 cup white rice
2 tablespoons butter
1 glug of extra virgin olive oil
2 large garlic cloves cut in halves
1 bay leaf
1 teaspoon salt
2 cups chicken stock or water

Preparation method:

In a medium size pot over medium heat melt butter and oil, add the rice, garlic cloves and bay leaf.
Stir constantly until the rice is to slightly toasted, (it will turn off white slightly golden) see picture below.

Add the 2 cups of water. Cover the pot with a lid until the water rich to a rolling boil.
At this point-set the temperature to low with the lid on. (my advise for good rice, do not look at it do not stir it, do not keep poking it or removing the lid. Rice is a lonely cooker. He likes to bloom in private. So set your timer at 20 minutes and go and peel the shrimp… hehehe)

Deviled-Shrimp_Camarones-a-la-Diabla_White-rice

* 25 min. later…Check your rice. Has the timer gone of? When it does just taste a little bit for doneness and make sure all the water has evaporated. If not give it 5 more minutes, then turn off the heat and leave the rice covered on the stove to keep it warm. Once you are ready to serve it, with a fork, please fluff the rice. It makes it airy and light…

Fluff-the-rice-please!

Let’s talk about shrimp…

Skin on or skin of /head on head of.. that’s the dilemma!…
Is totally up to you! You are in charge of this decision. It’s up to which mood are you and flavor profile. Head on is a delicacy! makes the sauce a bit creamier and intense sea flavor. Also and most important,  the shrimp skins add tons off flavor to the sauce.With this said, not a lot of people likes this shrimp intensity and the heads can be a bit intimidating,  those big black shrimpy eyes looking at you, bring the sun glasses please!…In my opinion,  I find skin on is fun and messy, a whole different adventure. But again my friend, you decide on your mood an make your call.

This time I choose skin off and head off (since this recipe is thinking of you mom, I know this is the way you like them!)…so while my rice is cooking I started by peeling the shrimp.
I leave the tales on they look so good and devein them with a little pairing knife run it onto the back of the shrimp and remove the black vein under the running water.

Devil-Shrimp_Camarones-a-la-Diabla_hot!!!

Cooking the shrimp:

1. In a heavy bottom pot, over medium heat melt the butter, add a glug of extra virgin olive oil. Once the butter is bubbling add the finely chopped onions and garlic. Saute for 3-4 minutes until a bit translucent.
Add shrimp and cook for about 3-4 minutes until they start to curl but still look a bit translucent. At this point take out the shrimp into a bowl, set a side.

2.At this point you will have some butter, olive oil, garlic, onions and some shrimp juices in the pot. Add the tomato paste cook for 1-2 minutes. Add the Orange juice, the zest and all the chilli sauces. Mix until well combined. Cook for 3-4 minutes, adjust for salt and black pepper. Taste for acidity. If is to sweet add a bit of vinegar. If is to spicy you are on the right track. this is the moment to adjust the sauce.

3. Add the shrimp to the sauce, until well combined and toss and cook for another 2-3 minutes. It really does not take longer for shrimp to cook, you do not want over cook, pasty, grainy shrimp…yikes!, so watch out!.

A2_Deviled-Shrimp_Camarones-a-la-Diabla_-Yes,-more-please!-

 I which you could smell this … insanely good, butter, garlic, spices, uff!

(Where are you Mom???!!!)

Shrimp-ala-Diabla_Ready-and-spicy_Yes,-more-please!

Shrimp-a-la-Diabla_Amaroines-a-la-diabla,-Yes,-more-please!

Time to Eat!, serve a generous amount of rice and your shrimp a la diabla on the side with

enough sauce to cover them, a green salad with a simple dressed with lemon salt and olive oil.

Shrimp-ala-Diabla_Ready-and-spicy-brave-souls_Yes,-more-please!


Be brave ~Shhz ha, Sshz ha shhzzha~ Enjoy!

Cooking Music Paring: Peggy Lee-Fever

https://youtu.be/X7_k_0dKknA


Deviled Shrimp Camarones a la Diabla

www.yes-moreplease.com

A dreamy spicy shrimp, serve with fluffy garlic rice, and a green refreshing salad.

Course Main Course
Cuisine Mexican
Prep Time 20 minutes
Cook Time 25 minutes
Total Time 45 minutes
Servings 4 little devils

Ingredients

  • 2 lbs. medium size Shrimp, I used Gulf shrimp, skin off, tale on and deveined.
  • 6 tablespoons Butter
  • 1 glug Extra Virgin Olive Oil
  • 1/2 cup white onion, diced
  • 8 large garlic cloves, finely choped
  • 1/4 cup tomato paste
  • 1/2 cup Cholula hot sauce*
  • 1/4 cup Valentina or Huichol hot sauce
  • 2 chiles chipotles in adobo sauce pureed, you can buy the 2 oz little cans they work great for this recipe
  • 1/2 -3/4 cup freshly squeeze orange juice, about 1 large juicy orange, if your orange is too sweet add 1 teaspoon of vinegar.
  • 1 teaspoon orange zezt
  • 1 teaspoon sea salt, to taste
  • 1/4 teaspoon fresh black pepper, to taste

For the garlic-butter-rice:

  • 1 cup long grain rice
  • 2 tablespoons butter
  • 1 tablespoon extra virgin olive oil
  • 2-4 large garlic cloves, cut in halves
  • 1 medium bay leaf
  • 1 teaspoon salt
  • 2 cups chicken stock, or water

Instructions


  1. Prepare the Rice:

    1. In a medium size pot over medium heat melt butter and oil, add the rice, garlic cloves and bay leaf. Stir constantly until the rice is to slightly toasted, it will turn off white slightly golden.

    2. Add the 2 cups of water. Cover the pot with a lid until the water rich to a rolling boil. At this point-set the temperature to low with the lid on. (my advise for good rice, do not look at it do not stir it, do not keep poking it or removing the lid. Rice is a lonely cooker. He likes to bloom in private. So set your timer at 20 minutes and go and peel the shrimp… hehehe)

    * 25 min. later…Check your rice. Has the timer gone of? When it does just taste a little bit for doneness and make sure all the water has evaporated. If not give it 5 more minutes, then turn off the heat and leave the rice covered on the stove to keep it warm. Once you are ready to serve it, with a fork, please fluff the rice. It makes it airy and light…

    Cooking the shrimp:

    1. In a heavy bottom pot, over medium heat melt the butter, add a glug of extra virgin olive oil. Once the butter is bubbling add the finely chopped onions and garlic. Saute for 3-4 minutes until a bit translucent.

    2. Add shrimp and cook for about 3-4 minutes until they start to curl but still look a bit translucent. At this point take out the shrimp into a bowl, set a side.

    3. At this point you will have some butter, olive oil, garlic, onions and some shrimp juices in the pot. Add the tomato paste cook for 1-2 minutes. Add the Orange juice, the zest and the chilli sauce. Mix until well combined. Cook for 3-4 minutes, adjust for salt and black pepper. Taste for acidity. If is to sweet add a bit of vinegar. If is to spicy you are on the right track. this is the moment to adjust the sauce.

    4. Add the shrimp to the sauce, until well combined and toss and cook for another 2-3 minutes. It really does not take longer for shrimp to cook, you do not want over cook, pasty, grainy shrimp…yikes, so watch out!. Enjoy!

View Post or View Comments 6

Privacy Policy Contact Us Yes, more please!