Lunch

Salmon Sliders with yogurt-cucumber-dill sauce

salmon-sliders-with-yogurt-cucumber-dill-sauceyes-more-please

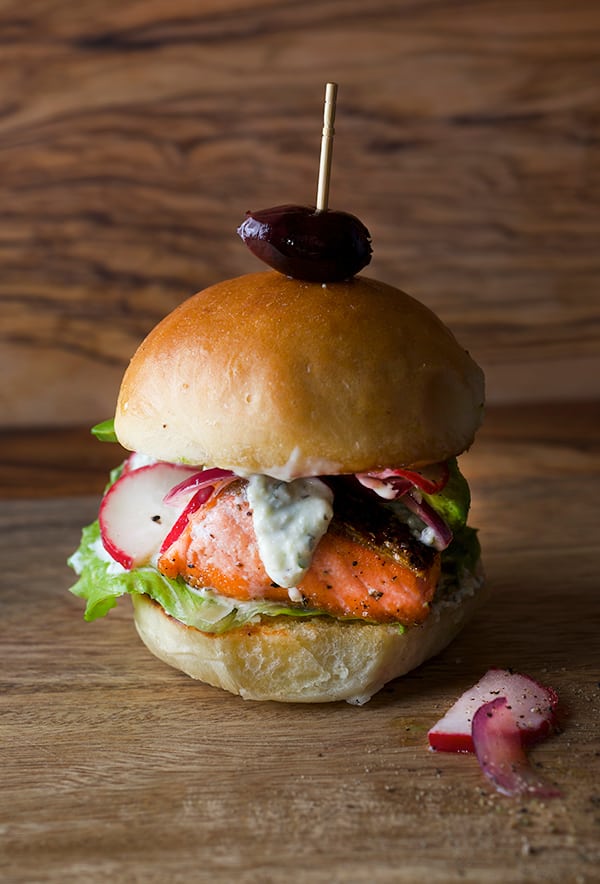
The title says it all, Salmon Sliders… what’s not to like about a small handmade bun filled with seared salmon and topped with yogurt, cucumber, dill sauce? That’s what I call a healthy way to have my buns. This recipe is great for entertaining, pool parties, or a late brunch. They taste great room temperature or right out of the oven.
Making the buns might sound very elaborate, well it’s not! 45 minutes, so easy you will love to make them. You do have to plan ahead of time, but like I said the results are incredible, 100 % worth it to make them. These mini buns are so light and flavorful you are not gonna want to use store-bought any more…
It is so relaxing to knead the dough by hand and enjoy the process. While the dough is proofing you can finish up the prepping for the burgers and in less than you think you will have the best sliders ever. Baking this babies one day before will work too…the beauty of slow cooking.
The buns recipe make about 12-14 mini buns, feel free to combine sizes, I made 2 -5”inches diameter and 8-3”mini buns. I wrapped the extra buns in plastic wrap and freeze them I think the will be good for about 4 to 6 weeks on the freezer, for future Salmon Sliders.
I hope you enjoy making them as much as I did! Have fun.

Salmon Sliders with yogurt-cucumber-dill sauce_delicious mini burgers

Salmon Sliders with yogurt-cucumber-dill sauce

To make 4- 8 mini sliders

1 – 2 pound Salmon fillets cut into 2”x 4” pieces or the best size you can(see picture below)
Path them dry and salt and pepper them both sides right before cooking.
1 recipe of Mini slider buns ( see below)
½ red onion
4-6 Radishes
2 tablespoons of rice vinegar , salt and pepper to taste
1 ripe avocado in slices
3-4 Lettuce leaves
¼ cup Kalamata Olives
6-8 Long bamboo skewers

For the yogurt sauce:

1 cup Greek yogurt
½ English or pickling cucumber
1 tablespoon of dry dill or 2 tablespoons of fresh.
½ teaspoon fresh ground pepper
¼ teaspoon sea salt
¼ teaspoon celery salt
1 small garlic clove
the zest of one yellow lemon
Place everything on a blender or using a hand blender purée into well combined. Keep it chilled.

Salmon Sliders with yogurt-cucumber-dill sauce_ yogurth sauce ingredientsSalmon Sliders with yogurt-cucumber-dill sauce_making yougurt sauce

Slider Buns

Makes 12-14 / 3”- mini buns

½ cup luke water
½ cup luke warm whole milk
1 tablespoon active dry-yeast
2 tablespoons of sugar
1 teaspoon kosher salt
1 large egg room temperature
3 tablespoons of sunflower oil (butter, coconut oil, extra virgin olive oil are good substitutions)
3 1/2 cups unbleached all purpose flour
2 tablespoons of butter

Directions:

1. In a Large metal bowl pour the warm water.Sprinkle the active dry-yeast and sugar. Let it stand for 5 minutes until yeast is dissolved.
2.In a medium size bowl combine the luke warm milk, egg, oil, salt whisk well. Add this mixture to the yeast and combine.
3.Add the flour to this mixture one cup at the time while mixing with your hand or in a stand mixer fitted with a dough hook. Knead for 3 minutes until mostly combined.
4. Place the dough ball into a surface dusted with flour and start kneading it with your hands against the counter in folding movements for about 5-8 minutes min. The dough ball should look smooth and soft. (I’ve find the hand method works best. you can tell when the dough is ready by feeling it and the warmth of your hands helps develop the yeast.)
5.Proceed to shape the dough into a ball, and divide into 12-14 pieces. Shape each piece into a ball. Start by forming a tight ball with each piece using your hand like a scoop against the counter, making circular movements. Place them about 2-3 inches apart into a baking sheet lined with parchment paper giving them enough room for proofing. Cover with a clean cotton kitchen towel and let them rise for about 30 minutes.
6. Preheat the oven 400F/200C
7.Once they have doubled in size, brush them with egg wash and sprinkle some sesame seeds. If you don’t care for sesame seeds, just brush them with butter or olive oil.
8.Place baking sheet on the middle rack of your oven and bake the buns for about 12-14 minutes or until deep golden brown tops and bottom.

Your kitchen by now smells like heaven!!!
Pull them out of the oven let them rest for 2-3 minutes on the tray and then transfer them into a cooling rack.Salmon Sliders with yogurt-cucumber-dill sauce_Homemade buns

To Assemble:

On a very hot skillet sauté the Salmon fillets about 2-3 minutes per side leaving the centers slightly pink. Set them aside.
Thinly slice the red onion and radishes and combine them in a small bowl adding a little rice vinegar salt and pepper.
Cut the slider buns in half and slightly toast them , start assembling the sliders.
Place the bottom bun , lettuce , salmon , yogurt –cucumber-dill sauce, radishes and onions place the bun top and with a long skewer passing and olive through it and secure the mini buns…. Time to eat!
*Assembling the sliders in this order will prevent the bun to get soggy. Always use the lettuce as bun protector.

Salmon Sliders with yogurt-cucumber-dill sauce_seared-salmonSalmon Sliders with yogurt-cucumber-dill sauce_building your salmon sliderSalmon Sliders with yogurt-cucumber-dill sauce_toppingssalmon-sliders-healthy-burger-yes-more-please

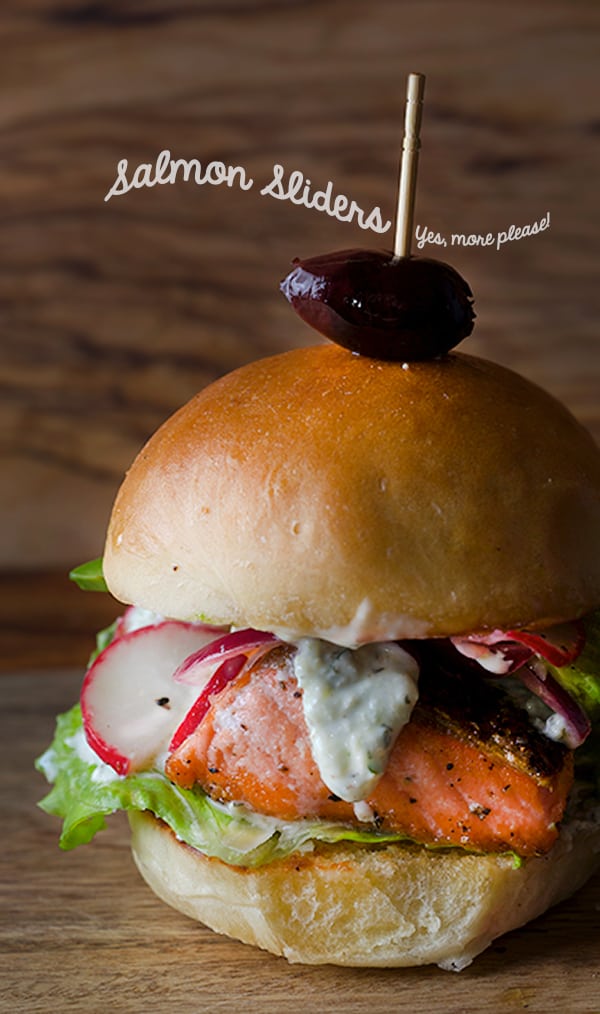
Salmon Sliders with yogurt-cucumber-dill sauce ~ Yes, more please!


View Post or View Comments 7

Panzanella Melon Salad

Panzanella Melon Salad ~ ingredients, Yes, more please!
My mouth waters for this Tuscan Salad! If we go back to the 16th century the Italian poet Bronzino, he praises the onions with oil and vinegar served with toast. Later on, when the tomatoes arrived to Europe, they were incorporated into the salad with other ingredients like cucumbers and capers. I’m not a food historian but it is of great interest and curiosity to know where food comes from, and the origin of dishes throughout history. Knowing these facts can sometimes lead you through perfecting a recipe, or re-inventing it. In this case I need to reinforce it because bread, onions, oil and vinegar simply are not gonna do it for me.

Many different versions of this traditional Panzanella Italian Salad can be made. From the type of bread, tomatoes, cucumbers, capers, onions, and a simple vinaigrette. One of the keys is goods Extra Virgin Olive Oil and Red wine vinegar. Playing a little bit with the sweet and savory notes,  I added Cantaloupe melon for sweetness and some prosciutto for a salty meaty note.

This would be just the thing for a summer picnic; something to combine all the flavors of the season. I like this salad texture and contrast, and that every bite has a different flavor depending upon what you pick with your fork. All these flavors on your palette produce a very savory and mouth-watering experience. Imagine, the crusty bread cubes absorb the juices from the tomatoes and the vinaigrette; that combined with the crunch of the onions, salty olives, juicy tomatoes and sweet cantaloupe with cracked pepper… the result, I just want the shade of a tall tree to dine under and my bread to be older. I hope you like my version of my version of Panzanella Melon Salad…Enjoy!

Panzanella Melon Salad ~ served, Yes, more please!

Panzanella Melon Salad_perfect summer brunch!  ~ Yes, more please!

Panzanella Melon Salad

Serves 4

½ loaf day old Italian or French crusty bread.

1 cup cherry tomatoes

1-2 small tomatoes cut into cubes

1 cup English cucumber into cubes

1-2 cups Cantaloupe Melon cut into cubes

½ red onion cut into slivers.

½ cup green Castelvetrano olives.

Arugula (optional)

6-8 Basil leaves

1 cup of bite size (bocconcini) Mozzarella or regular size cut into bite size cubes.

6 -8 Prosciutto slices

1/3 cup good quality fresh extra virgin olive oil.

1/4 cup red wine vinegar.

Fine sea salt and freshly ground black pepper to taste.

Method:

Start by cutting the bread into bite size cubes. If your bread is not a day old you can toast it in the oven at 350 F/175 C for 3-5 minutes. In a big salad bowl whisk the olive oil, red wine vinegar salt and pepper. Add the onions, tomatoes, cucumber, mozzarella olives and bread toss them lightly. Let the salad absorb the flavors for 15-30 minutes. Before serving, toss the salad and tear and sprinkle the basil leaves and prosciutto over the top. It’s best to serve this salad room temperature with a chilled glass of white wine…I hope you like it as much as I do.

When serving, drizzle some balsamic vinegar for sweetness.

*For a Vegan or Vegetarian Version, you can omit the prosciutto and mozzarella. Instead add some roasted red bell peppers it will be a great complement.

Panzanella Melon Salad _dicing bread-~ Yes, more please!

Panzanella Melon Salad-mouth watering flavors and textures!

Panzanella Melon Salad have some wine! ~ Yes, more please!

 Mouth watering Salad for the sumer…Enjoy!


View Post or View Comments 1

Sauteed Broccolini & Lemon Quinoa

Sauteed Broccolini & Lemon Quinoa_Yes,more please!

After the weekend taco indulgence, I’m craving Green! Green! Green!
Broccolini it is a Hybrid between Broccoli and Kai-Lan commonly known by the name of Chinese Broccoli. Broccolini inherited the best part of the broccoli, the little mini flowery tops and the long steams of the Kai-Lan.
The flavor profile is like eating broccoli and asparagus at the same time!. Sweet broccoli and crunchy yet delicate and full of tender green flavor. The best way to cook it is with absolutely no doubt sauteing. A high temperature quick saute turns it bright green, the heat cooks the tops and the steams stay a bit crunchy. What do I have on my produce basket tonight?… cherry tomatoes,lemons, and garlic. In the pantry I have some roasted almonds and quinoa. I ran out of Parmigiano but I had some Manchego cheese and it worked great, nutty and creamy with the quinoa. On the side green salad…I think this will make a great light and comforting dinner for tonight…a piece of fish or chicken on the side will go fantastic too…for us, sauteed broccoloni and lemon quinoa-vegetable night is enough…

Sauteed Broccolini & Lemon Quinoa_cutting steems

Sauteed-Broccolini-&-Lemon-Quinoa_healthy-and-delicious_Yes,more-please!

Sauteed Broccolini and Lemon Quinoa

Serves 2 for dinner or 4 as a side dish

1 Broccolini Bunch
1 cup of cherry tomatoes
4 tablespoons of extra virgin olive oil
1 tablespoon of butter (or soy butter if vegan)
3 cloves of garlic
The juice and the zest of one lemon.
Salt and Black pepper to taste

1 cup of Quinoa
1 garlic clove
The zest of one lemon
2 cups of water
salt

Garnish with:

Roasted Almonds chopped
Manchego or Parmesan cheese shavings or even crumbled Feta cheese will work too.*
Squeeze some lime juice right before serving.adjust salt and pepper.
*eliminate the cheese if you are Vegan.

Directions:

Quinoa cooks just like rice, is 2-1 ratio. In a medium size pot bring the water to boil add the garlic cut in half add the salt . Once water is boiling add the quinoa, lower the temperature to medium, and cook for about 18-22 minutes, at this point add the lemon zest and cover with a lid remove from stove and let it cook with the residual heat.

To avoid the blanching step, cut the broccolini stems in half-length wise (see photo above*). Heat up a large saute pan, add the extra virgin olive oil and add the broccolini. Toss and within 2 minutes, add the garlic, salt and pepper. Wait 1 minute, add the cherry tomatoes, lemon zest and squeeze some lemon juice. Keep moving the pan and toss the vegetables around. Once the tomatoes look like they are going to burst remove from fire add the tablespoon of butter, and toss. Fluff your quinoa with a fork, drizzle a little olive oil add salt and pepper to your taste. Promptly, on a large platter, serve the cooked quinoa topped with the sautéed broccolini and chopped roasted almonds, Manchego or Parmesan cheese shavings. Adjust with salt and pepper squeeze some lemon and drizzle a little more extra virgin olive oil to finish the dish.

Sauteed Broccolini & Lemon Quinoa_fluffy quinoa

Sauteed-Broccolini-&-Lemon-Quinoa_shaving-manchego

Sauteed Broccolini & Lemon Quinoa_healthy and delicious


View Post or View Comments 1

Summer Soba Noodles

Summer Soba Noodles_healthy and delicious

Lusciously light noodles, that’s my description for this dish. Cold soba noodles are a popular summer dish in Japan. The Japanese people are very wise by eating like this; light, savory, vegetable based; a good way to stay cool. The traditional way to serve them is without toppings; just the delicate flavor of the noodle with some dipping sauce on the side. You dip them as you go.
In my version I decided to give the dish a little kick and add some fresh vegetables and tofu. We usually have this for lunch or a light summery dinner. The combination of fresh crunchy vegetables, sweet-savory sauce and creamy tofu cubes, pairs really well with the tender noodle. The preparation could not be easier, and if we measure preparation time versus rewarding flavors it is a winner.
If you think this dish looks complicated, don’t worry, its easy to make. To save you some prep time I recommend you invest on a little kitchen gadget: get yourself a julienne peeler. It is one of my favorite tools. Its fun, easy to use, and easy to clean. You can use this peeler for any other vegetable or fruit. One of the best kitchen gadgets to have. Let’s cook!

Summer Soba Noodles_ sauce ingredientsSummer Soba Noodles_ ingredientsSummer Soba Noodles_Yes,more please!

Summer Soba Noodles

Serves 2-4

3-6  Soba noodle bundles approximately 1 bundle per person. I recommend you to get the Japanese kind. You can get them at any Asian specialty aisle of a supermarket…
2-4  green onions/scallions, finely sliced
2  carrots, shredded, julienned or grated
1  seedless English cucumber, julienned or thinly sliced
1  avocado
1/4-1/2 cup  unshelled and cooked edamame beans, optional
1 block of extra firm Tofu, remove the excess water patting it with paper towels and cut into small cubes

For the sauce:

3  tablespoons soy sauce.
3  tablespoons seasoned rice vinegar
2  tablespoons sesame oil + one extra tablespoon for finishing
2  tablespoons of honey or agave nectar
1  tablespoon brown sugar
1  tablespoon grated fresh ginger
1  garlic clove grated
the juice and the zest of one small orange

In a bowl Whisk all the ingredients. Reserve 1/3 of the sauce to marinate the tofu squares.

Garnish with:

Thai Basil to garnish
Black or gold sesame seeds
1 red Thai or Serrano chili, thinly sliced

Directions:

1. Start by making your sauce. Place all its ingredients in a bowl and whisk. Set aside 1/3 of the sauce and marinate the tofu. While the tofu is absorbing all the flavors, proceed to cut and prepare your vegetables and garnishes.

2. Bring a large pot of water up to a boil. Unlike regular pasta, you do not need to salt the water. Once the water is boiling place the noodles and monitor constantly, using a pasta spoon to prevent the noodles sticking. Bring the water up to simmering. Do not let it boil. Follow the instructions in the package, taste, it should have some elasticity to it. Usually takes around 4-5 minutes because they cook through quickly . Keep an eye on them to avoid over cooking. When the pasta is ready drain the noodles into a colander. Immediately return them to the pot and fill the pot with cold water. Leave the water running into the pot a bit until the noodles cool down. Gently with your hands rinse the noodles in threads.*( see picture below) until they feel less starchy. Drain them again into a colander and allow them to drain. You can transfer them to a bamboo mat, to remove the excess water.

Summer Soba Noodles_How to prepare soba noodles

3.  In a non-stick pan proceed to saute the marinated tofu until golden brown. A little scorching doesn’t hurt either.
In a large bowl season the noodles with a tablespoon of sesame oil and add sesame seeds.

Summer Soba Noodles_Sautee_marinated_Tofu

4. Divide all noodles evenly into 2 or 4 bowls, garnish with the Juliane carrots, cucumbers, avocado, sautéed tofu, edamame, red chilli.
Serve a small sauce bowl per person for extra dipping the noodles.

Summer Soba Noodles_for two

~Enjoy!~

Music Pairing: Pizzicato Five: Twiggy Twiggy

Summer Soba Noodles

Serves 2-4
Course Brunch, dinner, Lunch
Cuisine Japanese
Prep Time 20 minutes
Cook Time 10 minutes
Total Time 30 minutes
Servings 4

Ingredients

  • 3-6 Soba noodle bundles approximately 1 bundle per person I recommend you to get the Japanese kind. You can get them at any Asian specialty aisle of a supermarket
  • 2-4 green onions/chives – finely sliced
  • 2 carrots shredded, julienne or grated
  • 1 seedless cucumber julienne or thinly sliced
  • ½ avocado
  • 1/4-1/2 cup unshelled and cooked edamame beans optional
  • 1 block of extra firm Tofu remove the excess water patting it with paper towels and cut into small cubes.

For the sauce:

  • 3 tablespoons soy sauce.
  • 3 tablespoons seasoned rice vinegar
  • 2 tablespoons sesame oil + one extra tablespoon for finishing.
  • 2 tablespoons of honey or agave nectar.
  • 1 tablespoon brown sugar
  • 1 tablespoon grated fresh ginger
  • 1 garlic clove grated
  • the juice and the zest of one small orange.

Garnish with:

  • Thai Basil to garnish
  • Black or gold sesame seeds
  • 1 Red chili thinly sliced

Instructions

  1. In a bowl whisk all the sauce ingredients. Reserve 1/3 of the sauce to marinate the tofu squares.
  2. Start by making your sauce. Place all its ingredients in a bowl and whisk. Set aside 1/3 of the sauce and marinate the tofu. While the tofu is absorbing all the flavors, proceed to cut and prepare your vegetables and garnishes.
  3. Bring a large pot of water up to a boil. Unlike regular pasta, you do not need to salt the water. Once the water is boiling place the noodles and monitor constantly, using a pasta spoon to prevent the noodles sticking. Bring the water up to simmering. Do not let it boil. Follow the instructions in the package, taste, it should have some elasticity to it. Usually takes around 4-5 minutes because they cook through quickly. Keep an eye on them to avoid overcooking. When the pasta is ready drain the noodles into a colander. Immediately return them to the pot and fill the pot with cold water. Leave the water running into the pot a bit until the noodles cool down. Gently with your hands rinse the noodles in threads.*( see picture below) until they feel less starchy. Drain them again in a colander and allow them to drain. You can transfer them to a bamboo mat, to remove the excess water.
  4. In a non-stick pan proceed to saute the marinated tofu until golden brown. A little scorching on the edges adds great flavor.

  5. In a large bowl season the noodles with a tablespoon of sesame oil and the sesame seeds.

  6. Divide all noodles evenly into 2 or 4 bowls, garnish with the Juliane carrots, cucumbers, avocado, sautéed tofu, edamame, red chili.
  7. Serve a small sauce bowl per person for extra dipping the noodles. Enjoy!
View Post or View Comments 1

Cauliflower Ceviche

Cauliflower Ceviche_Tostada ready to eat!

The full summer weather is here! Austin, Texas is burning hot! 101-106 Fahrenheit. With this kind of summer temperatures, I can’t even conceive the idea of “grilling”. Can you imagine being outside with 101 on the thermometer in front of a grill trying to light up the charcoal?…Not my cup of tea I prefer the tundra if you ask me. But well these weather conditions fire up the indoors freshly made meals; light, crisp and lots of veggie action.

Cauliflower-Ceviche_cauliflower-florets

I tried to make this ceviche once in my years of college, not so good; it was really mushy and flavorless… but I loved the concept of using the beloved Cauliflower. Cauliflower is the vegetable everybody loves now because of its versatile flavor. It is evident that Cauliflower has a love affair with butter and cream. Mashed cauliflower can replace a good pile of mashed potatoes, cauliflower gratin, cauliflower chowder, griller, roasted, among my favorites. But what I crave in a Summery hot day is something light easy to digest, fresh and no oven or a long cooking time required.

So with this said, I revamped the cauliflower ceviche recipe from my College years by adding diced crunchy vegetables, steaming the cauliflower and lots of good fresh and dry herbs plus a punch of citrus goodness to add extra flavor. That acid, salty umami note that just makes your mouth water, as soon you start reading the recipe…

Cauliflower Ceviche is a great summery meal, for Vegetarian, Vegans and Carnivorus that won’t even care about the difference once they have the first bite!

Margaritas on the side?…Yes, please!…Enjoy!

Cauliflower-Ceviche_ingredients_Yes,-more-please!

Cauliflower Ceviche

Serves 4

1 Cauliflower head, medium size. Remove the core and small diced florets.

Small diced:

2 carrots
1 tomato
½ medium size red onion
2 green onions including the green part.
1 cucumber seedless
1 long celery stalk
1 habanero, or 1 jalapeno, or 1 serrano. (Remove the seeds for a less spicy version.)
2 Tablespoons of finely chopped fresh cilantro
2 Tablespoons of finely chopped fresh parsley
2-3 pinches of dried oregano

The juice of:

2 Limes
1 Lemon
The juice and zest of ½ Orange
2 tablespoon apple cider vinegar
4 tablespoons Extra Virgin Olive Oil
1 teaspoon celery salt
1 teaspoon of  sea salt
Black crushed pepper to taste.

Garnish with:

Radishes, Avocado Slices, Pumpkin seeds, Ketchup,( weird but delicious, it adds some sweet and tangy note)
Cholula hot Sauce, Limes. Serve with Tostadas or crackers.

Directions:

In a medium size pot steam the small diced Cauliflower florets until al-dente, for about 3-5 minutes. Remove from steamer place them on a tray in one single layer and let them cool off. Mean time chop all the vegetables. Place them on a big salad bowl, add the herbs, extra virgin olive oil, the citrus juices and S&P, toss well.  Once the cauliflower florets have cool down, add them to the mix, toss well and let it marinate for 20-45 minutes. Taste and adjust salt and pepper if necessary. Serve with tostadas or crackers, avocado Slices, radish slices, and toasted pepitas (pumpkin seeds), and a dash of your favorite hot sauce…

Cauliflower-Ceviche-Summer-Vegetarian-Vegan-Bliss_-Yes,-more,-please!

Refreshing, Vegetarian Ceviche, Enjoy!

Music Pairing: Mini Skirt, ESQUIVEL- Metropole Orkest

Cauliflower Ceviche

Serves 4-6
Course Brunch, Lunch, Main Course
Cuisine FUSION, Mexican, wholesome
Prep Time 30 minutes
Cook Time 10 minutes
Total Time 40 minutes
Author Mariana McEnroe

Ingredients

  • 1 Cauliflower head medium size. Remove the core and small diced florets.

Small diced:

  • 2 carrots
  • 1 to mato
  • ½ medium size red onion
  • 2 green onions including the green part.
  • 1 cucumber seedless
  • 1 long celery stalk
  • 1 habanero or 1 jalapeno, or 1 serrano. (Remove the seeds for a less spicy version.)
  • 2 Tablespoons of finely chopped fresh cilantro
  • 2 Tablespoons of finely chopped fresh parsley
  • 2-3 pinches of dried oregano

The juice of:

  • 2 Limes
  • 1 Lemon
  • The juice and zest of ½ Orange
  • 2 tablespoon apple cider vinegar
  • 4 tablespoons Extra Virgin Olive Oil
  • 1 teaspoon celery salt
  • 1 teaspoon of sea salt
  • Black crushed pepper to taste.

Garnish with:

  • Radishes Avocado Slices, Pumpkin seeds, Ketchup,( weird but delicious, it adds some sweet and tangy note)
  • Cholula hot Sauce Limes. Serve with Tostadas or crackers.

Instructions

Directions:

  1. In a medium size pot steam the small diced Cauliflower florets until al-dente, for about 3-5 minutes. Remove from steamer place them on a tray in one single layer and let them cool off. Mean time chop all the vegetables. Place them on a big salad bowl, add the herbs, extra virgin olive oil, the citrus juices and S&P, toss well. Once the cauliflower florets have cool down, add them to the mix, toss well and let it marinate for 20-45 minutes. Taste and adjust salt and pepper if necessary. Serve with tostadas or crackers, avocado Slices, radish slices, and toasted pepitas (pumpkin seeds), and a dash of your favorite hot sauce…
View Post or View Comments 3

Gazpacho Andaluz … recipe from a Sevillian chef!

I had the fortune to travel to Spain in company of my Grandma Ana, she is an 80 years young Lady a globetrotter and highly energized with an incredible charisma. You can imagine what a trip I had with her! … it was one of the best experiences of my life. We traveled for two weeks, starting from Madrid, clockwise all around the country from Segovia, Valladolid, Burgos, Vitória, Bilbao, San Sebastián, Pamplona, Zaragoza, Barcelona, Tarragona, Valencia, Granada, Costa del Sol, Gibraltar, Sevilla , Toledo…Yes! This lady traveled for the 7th time to Spain, just for the pleasure of it and decided to take me along with her… I said it was about time grandma! Lol!…

We had very diverse food, a little sample from the different regions. Seville is a beautiful city and the Gazpacho Andaluz stole my heart. It was simply fresh, smooth, light, true to its tomato nature. Me being from Mexico and have studied culinary arts, I have had lots of different versions of Gazpacho, and frankly the mind of my palette always connected it to eating salsa with a missing ingredient!(oops I said it!). It had to be in Seville where I discovered the real deal… good place to be right?.

My grandma and I were having lunch at the hotel and of course I asked for Gazpacho as an appetizer. When I had the first spoonful I was hooked. Smooth, velvety, sweet, acid, fresh tomato flavored cold soup with little crunchy pieces (tropezones) of diced seedless cucumbers, bell peppers , white onion, seedless tomato, white bread, drizzled with a fantastic Extra Virgin Olive Oil from the region. I finished my bowl cleaning it with a piece of bread as is good manners in Spain; and before the next course, I apologized to my grandma and I had to get up from the table. I could not wait to talk to the person who had made this cosmic cold soup. Who made the Gazpacho I asked the waitress?… “Chef Fernando”he replied…

Chef Fernando was really friendly and share the recipe with me, I also I asked his secret to such a smooth velvety texture, He said “mucha maquina” meaning lots of time on the food blender, or food processor, he explained me that by blending it long enough it will marry the flavors and give the right consistency. Well now this is one of my favorite dishes to make in summer during tomato season. You have to have good quality tomatoes there’s no way around. I’m sure you have access to a good Farmer Market in your city, go the extra mile to get them fresh, is worth it.

Gazpacho 01

Gazpacho Andaluz

Recipe adapted by the Good Samaritan Fernando the Sevillian chef.

Serves 4 or 2 good-hearted Sevillians!

Ingredients:

2 small day old demi-baguettes or one small ciabatta bread
1.5lbs of ripe tomatoes skinned and (seeded optional)
10-15 Cherry and Gold tomatoes cut in halves.
1 Jade Cucumber (English cucumber is best if you are using regular cucumber remove the seeds it will work fine.)
1 green bell pepper
3 cloves of garlic
3 Tablespoons of Sherry Vinegar
½ cup of good fresh quality Extra Virgin Olive Oil.
½ teaspoon sea salt
1 pinch of white or black pepper
My spin: 1 sprig of fresh thyme and fresh oregano
Garnish:
Cherry and Gold tomatoes
Diced bell peppers
Finely slivered white onion
Slices or diced cucumber
Fresh thyme
Ciabatta bread toasted
Sea Salt, Extra Virgin Olive Oil to taste.
*(Cubes of ham, diced hard boil egg is also good variation).

Method:

First, break bread into pieces, and let it soak with about ¼ of a cup of water.( About 20.min.).In the mean time prepare the Tomato Concasse, this is a great french technique to skin the tomatoes (and is really easy and fast). Next get ready with medium size pot of boiling water and a bowl with cold ice water. With a paring knife, make a shallow cross on the back of the tomato. Blanch the tomato for about 20-30 seconds. (Depending if you store your tomatoes on the refrigerator, or at room temperature). Quickly shock the tomato in the ice water bowl to stop the cooking process. And proceed with the rest. Remove them from ice bath and with a paring knife remove the skin from the bottom cross of the tomato. It is so easy you will want to do this every time.

Cut the tomatoes in quarters and remove seeds. In a food processor or blender, place the tomatoes, cucumber, bell pepper, soaking bread garlic, herbs, sea salt, vinegar, and Extra Virgin Olive Oil. Add a little water for desired consistency, and just like Chef Fernando said “Mucha Maquina” Blend it throughly.
If you find it not to smooth you can pass the soup through a fine sieve. Refrigerate soup for about 30-45 min. Serve cold with garnishes on the side so each person can customize their soup. Enjoy!

Tomato-Concasse_steps

Gazpacho Andaluz_Gazpacho texture_mucha maquina! ~ Yes, more please!

Gazpacho-closeup-velvety

Gazpacho-Andaluz,-Garnishes_

Gazpacho Andaluz, the greatest cold soup…Ole! ~

Enjoy!

Music Pairing: Paco de Lucia, Manolo Sanlucar- Sevillana a Dos Guitarras

https://youtu.be/K9FfOpBaK0I

Gazpacho Andaluz

Recipe adapted by the Good Samaritan Fernando the Sevillian chef. Serves 4 or 2 good-hearted Sevillians!
Course Brunch, Soup
Cuisine Spain
Prep Time 20 minutes
Cook Time 20 minutes
Total Time 40 minutes
Author Mariana McEnroe

Ingredients

  • 2 small day old demi-baguettes or one small ciabatta bread
  • 1.5 lbs of ripe tomatoes skinned and seeded optional
  • 10-15 Cherry and Gold tomatoes cut in halves.
  • 1 Jade Cucumber English cucumber is best if you are using regular cucumber remove the seeds it will work fine.
  • 1 green bell pepper
  • 3 cloves of garlic
  • 3 Tablespoons of Sherry Vinegar
  • ½ cup of good fresh quality Extra Virgin Olive Oil.
  • ½ teaspoon sea salt
  • 1 pinch of white or black pepper
  • My spin: 1 sprig of fresh thyme and fresh oregano

Garnish:

  • Cherry and Gold tomatoes
  • Diced bell peppers
  • Finely slivered white onion
  • Slices or diced cucumber
  • Fresh thyme
  • Ciabatta bread toasted
  • Sea Salt Extra Virgin Olive Oil to taste.
  • * Cubes of ham, diced hard boil egg is also good variation.

Instructions

  1. First, break bread into pieces, and let it soak with about ¼ of a cup of water.( About 20.min.).In the mean time prepare the Tomato Concasse, this is a great french technique to skin the tomatoes (and is really easy and fast). Next get ready with medium size pot of boiling water and a bowl with cold ice water. With a paring knife, make a shallow cross on the back of the tomato. Blanch the tomato for about 20-30 seconds. (Depending if you store your tomatoes on the refrigerator, or at room temperature). Quickly shock the tomato in the ice water bowl to stop the cooking process. And proceed with the rest. Remove them from ice bath and with a paring knife remove the skin from the bottom cross of the tomato. It is so easy you will want to do this every time.
  2. Cut the tomatoes in quarters and remove seeds. In a food processor or blender, place the tomatoes, cucumber, bell pepper, soaking bread garlic, herbs, sea salt, vinegar, and Extra Virgin Olive Oil. Add a little water for desired consistency, and just like Chef Fernando said “Mucha Maquina” Blend it throughly.
  3. If you find it not to smooth you can pass the soup through a fine sieve. Refrigerate soup for about 30-45 min. Serve cold with garnishes on the side so each person can customize their soup. Enjoy!


View Post or View Comments 4

Privacy Policy Contact Us Yes, more please!