Brunch

Chilaquiles Manifesto

Chilaquiles_Manifesto_Chilaquiles-Rojos_Yes,-more-please!

Chilaquiles are a Mexican classic. It has three of the most iconic ingredients: corn, chiles and herbs. There are a wide variety of chilaquiles styles. In fact, I think I have never tasted an identical version anywhere, even if I make them myself at home, every preparation is slightly different because the use of fresh ingredients, but the principle of how the dish works remains the same.

If you’ve never had chilaquiles before they seem deceptively simple to make, although significant details in the preparation make a very big difference to the final result. Sad to say, the truth is that Chilaquiles are commonly poorly made and misunderstood.

What is this Chilaquiles Manifesto all about?…

~Manifesto//: a written statement that describes the policies, goals, and opinions of a person or group~

~Chilaquil//: come from the word “Chilaquiltl” in Nahuatlt. It is of what Mexican historians refer as an “aztequismo” which are words that have their roots in Nahuatl and are used today in a modernized way. Chilaquilitl comes from the word “Chilli” that means “Chile”; and “atl”, used to mean water, and “quilitl” that refers to a combination of herbs, like a sauce. This term was also used to describe an old woven hat. With time this word acquired a connotation for describing a careless manner towards a texture~
This Chilaquiles Manifesto is my proclamation of texture, flavor and sauce. For me, that is what Chilaquiles are all about. I want to rescue the Chilaquiles reputation. Despite their “careless texture” in name’s origin, I believe the dish is all about the balance of texture, sauce, spice and attention to detail. I hope this manifesto will make you appreciate the difference between average and exceptional Chilaquiles.

The Chilaquiles Principle: Texture, Flavor, and Balance.
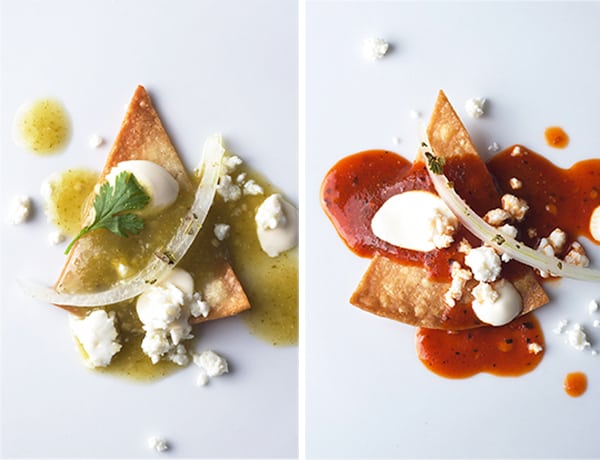
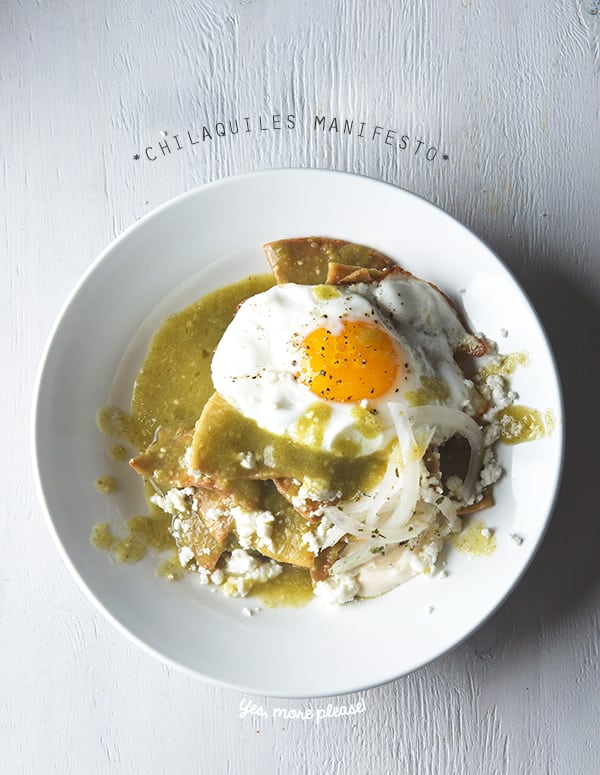
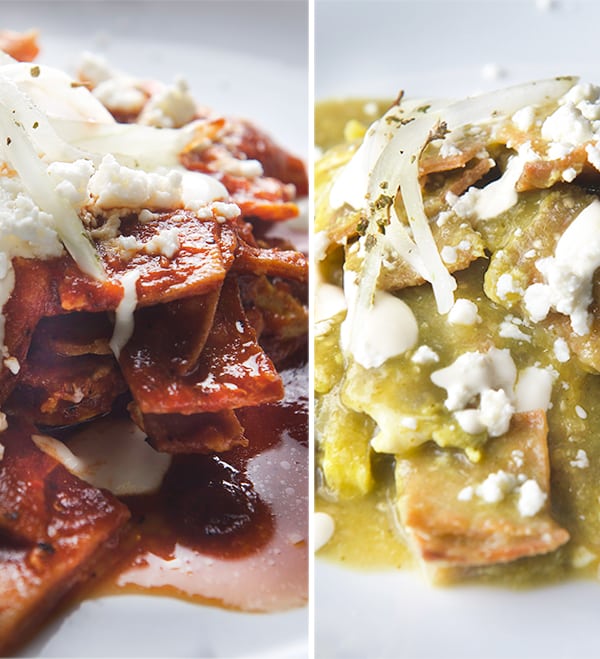
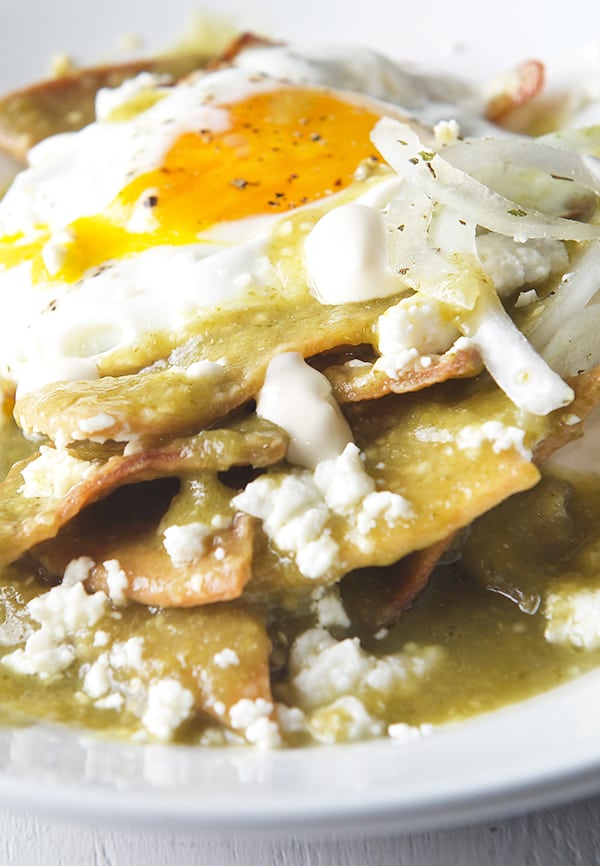
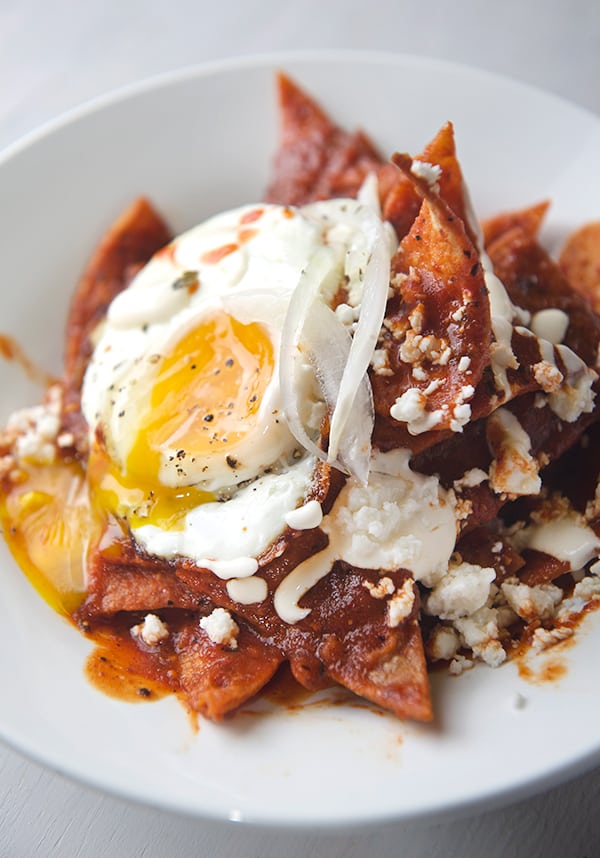
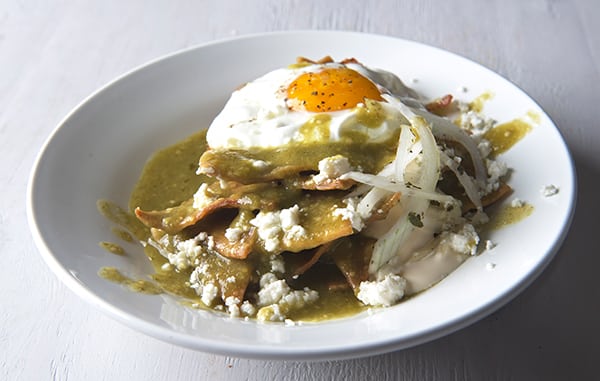
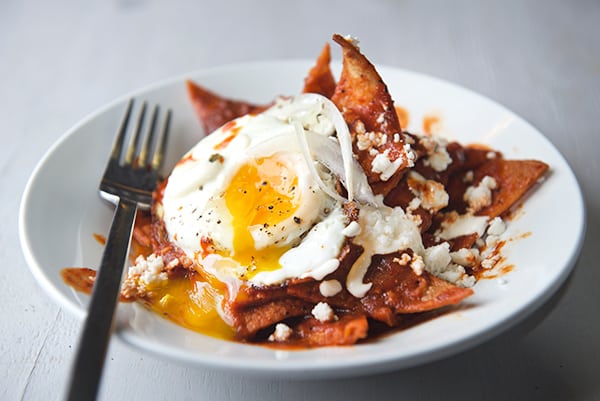
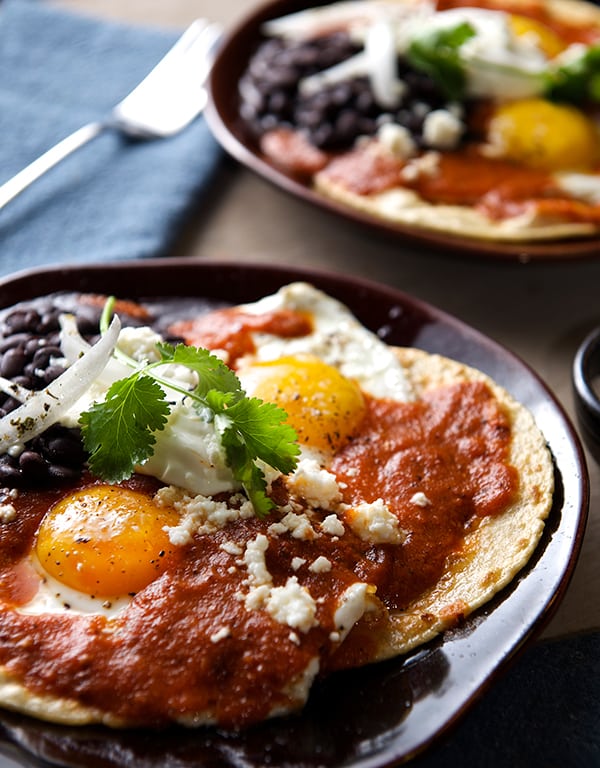
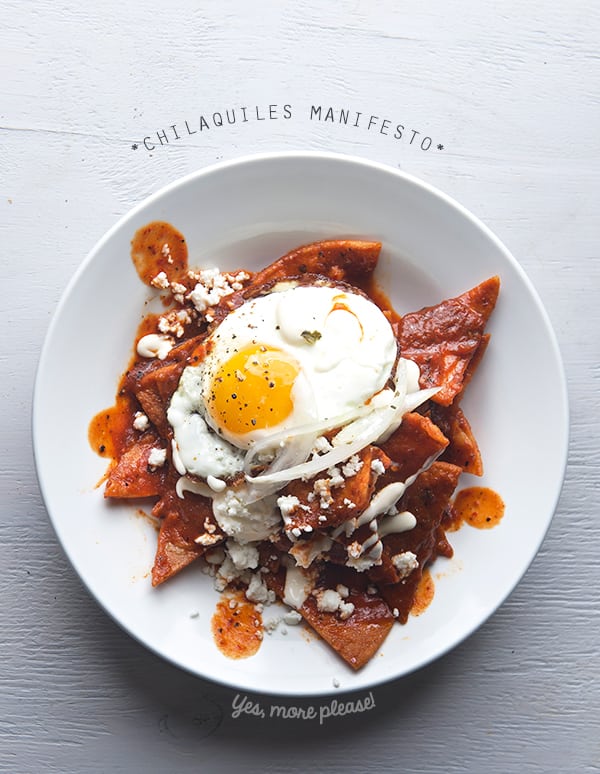
CHilaquiles-Verdes-o--Rojos--Yes,-more-please! For me a good plate of Chilaquiles is the one in which the crunchy tortillas preserve some of their crunchy texture and the sauce is thick enough to cover the tortillas without weighing them down. It remains saucy and there is a bit of salsa running on the side of the plate like a little emergency puddle that get mixed into the refried beans to keep them company. The sauce can be red or green usually with a good level of pleasant spiciness, unless you have a hangover, you might ask for extra hot. Chilaquiles are most commonly eaten as a breakfast or brunch. Therefore a perfect sunny side up egg ,runny and tender, is the perfect complement to this dish. Chilaquiles must be garnished with crumbs of slightly salty queso fresco, creamy clumps of Mexican Crema (similar to Creme fraishe) that mellows the warm and spicy sauce. Top this with raw or pickled onions to add acidity and a sharp pungent of flavor every other bite. There you have it.

This is what dreamy Chilaquiles should be.

A great plate of Chilaquiles should always have the following four components:

The Sauce:

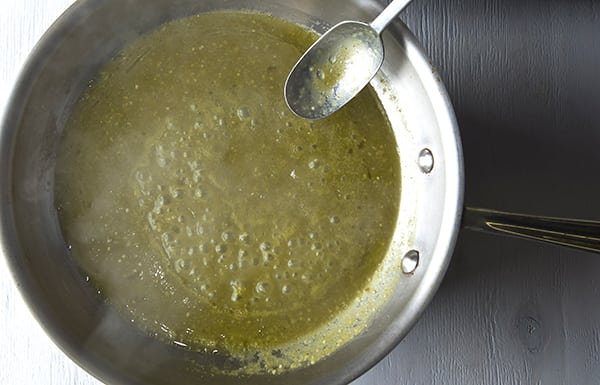
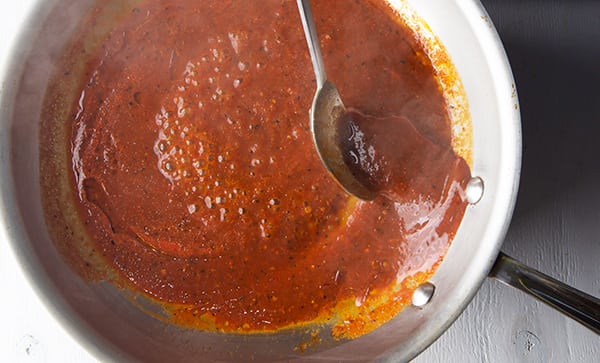
Fresh ingredients for the sauce are a must. The basic salsas are so easy to make. In my opinion, there is no comparison between the flavor of store bought compared with fresh. Freshly cooked saucy salsas thick enough to cover deep fried tortillas are the best option. Using Red Roma tomatoes, in combination with dry chiles, and or tomatillos and fresh chiles will make a huge difference, moving the sauce quality from good to Great.Chilaquiles_Manifesto_Chilaquiles-Salsa-Verde_Yes,-more-please!
Chilaquiles_Manifesto_Chilaquiles-Salsa-Roja_Yes,-more-please!

Tortillas:

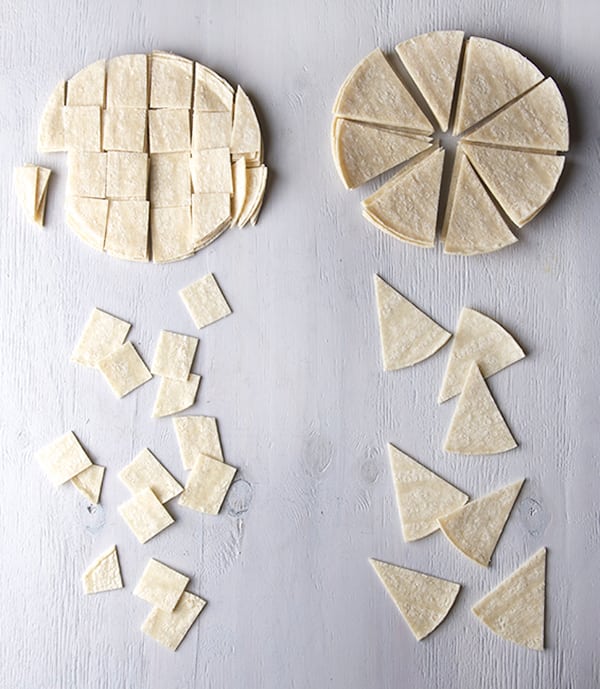
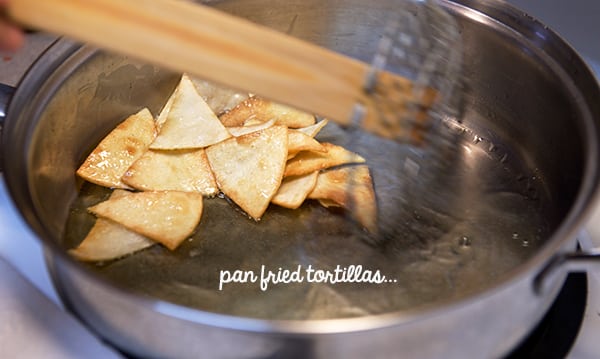
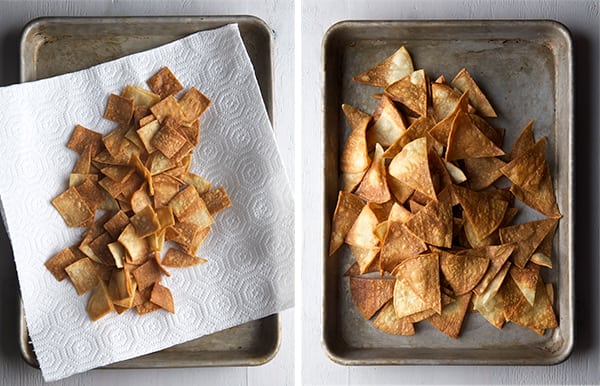
White Corn tortillas are the best option. Typically cut into a triangle shape or small squares these tend to fry more evenly. They must be pan fried the same morning, using corn oil or grape seed oil to preserve the corn flavor intact is the best bet. Use machine made tortillas for this preparation. Most handmade tortillas are too moist and have the wrong texture once fried, and besides,handmade fresh tortillas taste awesome as they are, to precious to use on chilaquiles.
Chilaquiles-Manifesto_Tortilla-shapes_-chilaquilesChilaquiles-Manifesto_Pan-fried-tortillas-for-chilaquiles
Chilaquiles-Manifesto_fried-tortillas-for-chilaquiles

The Egg:

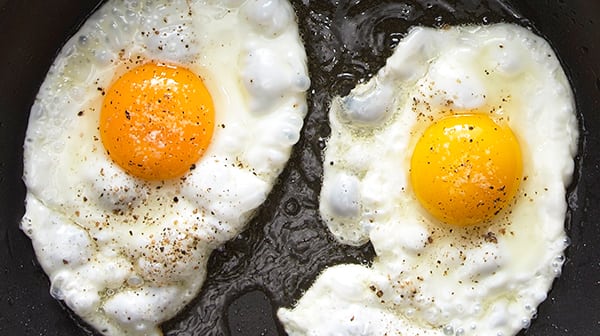
Farm eggs, scrambled into the tortillas, or a Sunny side up eggs in my opinion are a must. Some other versions are served with shredded chicken or both. To be honest, I like mine with egg only. Leave the chicken for enchiladas.
Chilaquiles_Manifesto_huevos

The Accoutrements:

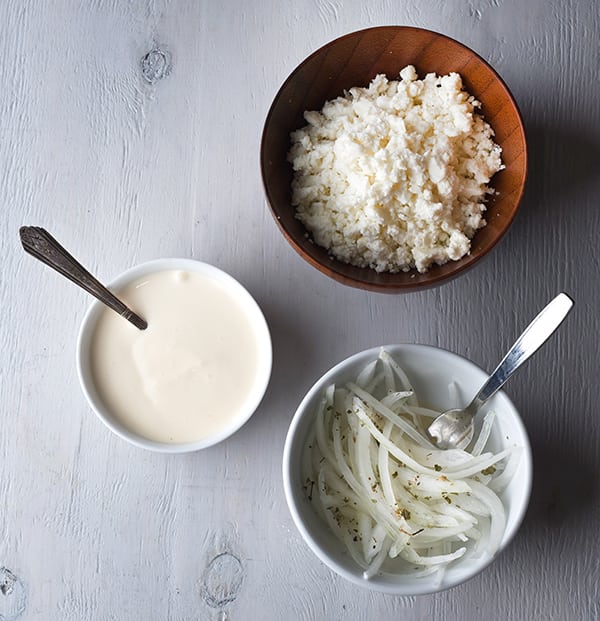
Mexican Crema, Crumbly Queso fresco (Please will you do me a kindness?… no melted cheese on my chilaquiles, thank you!), a side of re-fried beans are a must. And last but not least: Quick pickled onions* this give the chilaquiles a great bite and accent.
*Quick pickled onions or cebollitas desflemadas: Slice onions thinly, rinse them thoroughly in cold water strain them. Place the onion slices in a little bowl add 2 tablespoons of apple cider vinegar or the juice of one lemon. Add a pinch of salt, pinch of dry oregano, toss them, set aside for 5-10minutes, or until ready to serve. I love this simple onion preparation, usually chilaquiles are served with raw onions, I think is to harsh, and for my luck I will be having onion breath for the rest of the day. With this simple quick pickled the onions are tender not overly sharp, they add a good bite and acid element to the dish. try them, you are gonna love them.

Chilaquiles-Manifesto_Chilaquiles-accoutrements_-toppings_Yes,-more-please!

Now, lets talk about Chilaquiles styles…

For me there is an abysmal difference between average and exceptional.
In my Chilaquiles world, The Semi-Crunchy takes the first place, they are simply the best.

Three Winning Styles:

The Semi-Crunchy
This is my favorite kind of chilaquiles. The tortilla holds about 80 percent of crispiness and 20% of floppy saucy texture. Due to the perfect sauce consistency, great balance between tomato-chiles and water ratio. To achieve the perfect crunchy chilaquiles the key is to add the died tortillas into the salsa just 2-3 minutes before serving them. I layer them and top them with a ladle of the warm sauce making sure they are all covered in sauce for best results. An over easy egg on top is the way to go. You will find this preparation recipe and step by step photos ahead.

The Migas that wanted to be Chilaquiles.
These are the best option for big crowds, or for those who do not like runny eggs.(I think these kind of people are officially in the endangered category, but there’ is some population percentage out there against runny eggs). Tortillas are fried and whisked egg is added to the tortillas for a quick toss once the egg start cooking, add the sauce and turn off the pan. The egg acts like a barrier, protecting the tortilla from getting soggy, and sauce sticks to the egg keeping the egg moist and the chilaquiles juicy. It is delicious to in its own way. These are the type of Chilaquiles my Grandma used to make. You will find this preparation recipe and step by step photos ahead.

The deconstructed enchiladas
I must confess I do not like shredded chicken in my Chilaquiles. For me they are all about the sauce, tortilla and egg combination. Save the chicken for another time, this type of Quiles’ for me is equal to deconstructed enchiladas if you know what I mean…

The following options I don’t recommend, but are frequently encounter, so be aware!:

The Floppy
The cooking method is different. You fry the tortillas and then add the sauce to the pan and let the tortillas absorb some of the sauce. Because the tortillas are fried they keep their individuality but they stick to each other. The texture is soft, like eating a soggy enchilada. They tend to be on the dry side, not too saucy, therefore, a good over easy egg does wonders for this version. A good…but not great, version.

The Nachos who wanted to be Chilaquiles.
Nacho’ur best bet. These chilaquiles are just wrong. There are lots of versions out there where they serve a bunch of pre made, bagged chips with a ladle of sauce on top and they dare to call them chilaquiles. Too much crunch, lack of sauce, there is no marrying the tortilla and the sauce. Not of my affection at all to be honest with you… these are more like nachos, no bueno.

Divorced chilaquiles:
Half red, half green, for indecisive people or people who want it all. I must just say, just marry one sauce at the time. Having two sauces at the same time will not make you more content…it just confuses the flavors thereby ruining the dish…a bad marriage. Rojos o Verdes will always be the dilemma. If you and yours can’t get together on this one you may need to follow the recipes below and prepare both sauces SEPERATLEY, on different weekends, or just flip a coin.

There must be another 845, 632 more recipes out there, different chilaquiles preparations, sauces combinations, chiles, herbs, cooking methods, you name it!; I’m giving you my 2 ultimate salsas, VERDE and ROJA, you decide which one you want to prepare.

I’m also including 2 different Chilaquiles preparation styles. The Migas- that wanted to be Chilaquiles which are the ones my Grandma used to make. These are dear to my heart and I prepare them when I’m feeling a bit nostalgic.

The other style I’m sharing with you its my absolutely favorite one: The Semi-Crunchy Chilaquiles. I believe they are the ultimate cosmic flavor knock out, textural extravaganza, Chilaquiles. I must warn you, once you have this version, you will have recurrent cravings and dream about them…

So, please remember: “ Don’t just make them good…make them Awesome!”…
Enjoy, Let’s cook!

Chilaquiles Manifesto

Let’s start by Choosing and Preparing your Salsa, then choose the style of chilaquiles you want.

Chilaquiles-Manifesto-Chilaquiles-Verdes-Yes,-more-please!

For the Salsa VERDE:

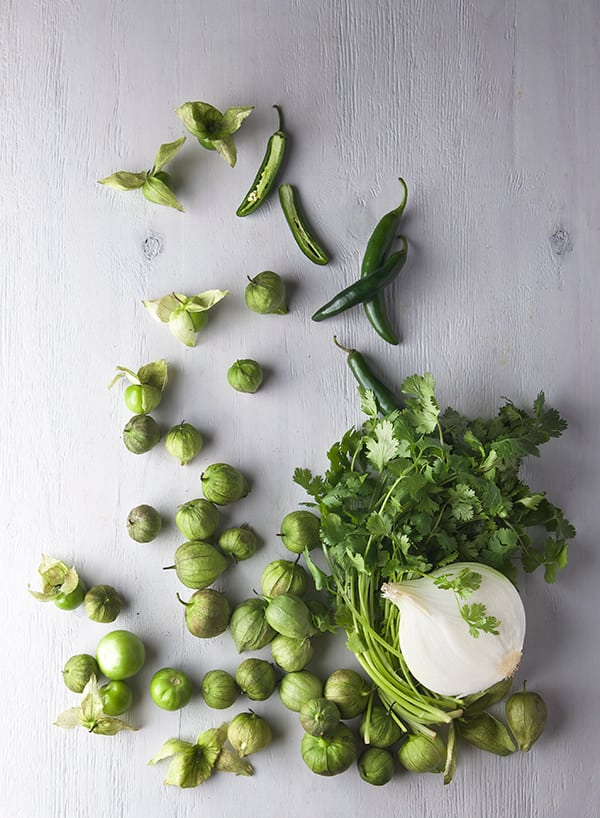
1 lbs. Tomatillos peeled and washed. I used tomatillo milpero, the smaller the tomatillos the best flavor.
½ small or ¼ medium white onion
4 Chiles Serranos or 2 large Jalapenos remove stems.
Small bunch of cilantro about 14-18 sprigs upon size.
1 teaspoon sea salt
2-3 tablespoons of the reminder oil from were the tortillas were fried.

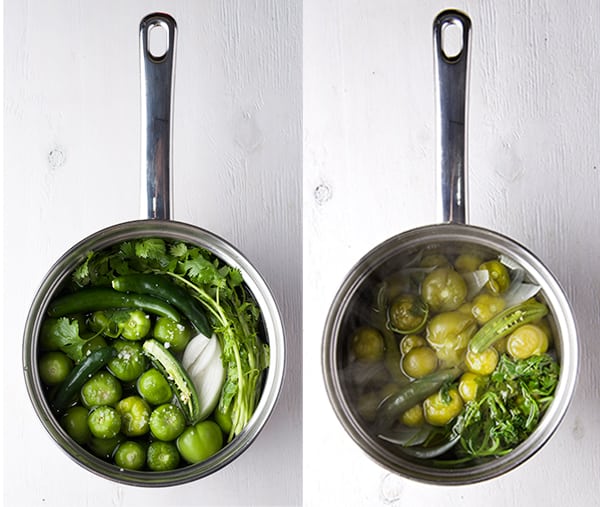
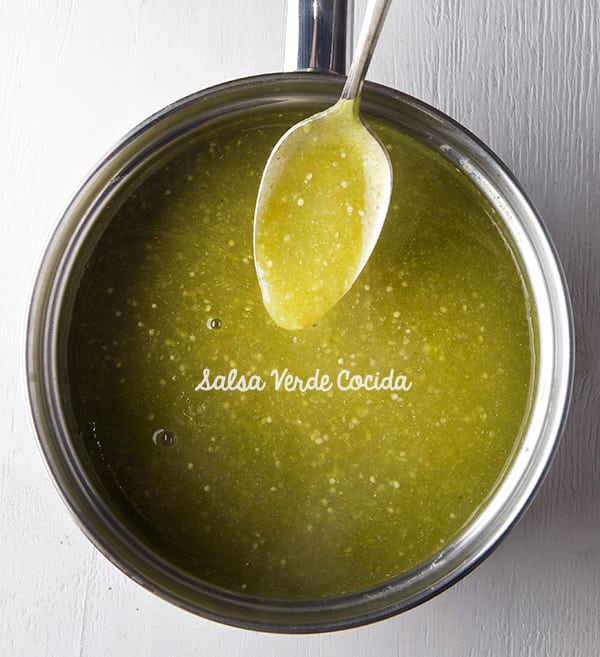
In a small-medium sauce pan place tomatillos, chiles,onion, cilantro, and barely cover with water. Place lid and simmer until they are cooked, about 12-15 minutes. Once they are cooked, remove ¾ of the liquid add salt and blend.

Chilaquiles-Manifesto_Chilaquiles-Verdes_-ingredients_Salsa-verde_Yes,-more-please!

How-to-Make-Salsa-Verde-Cocida_Chilaquiles-Verdes-Yes,-more-please!

_Salsa-Verde-Cocida_Chilaquiles-Verdes-Yes,-more-please!

For the Salsa ROJA:

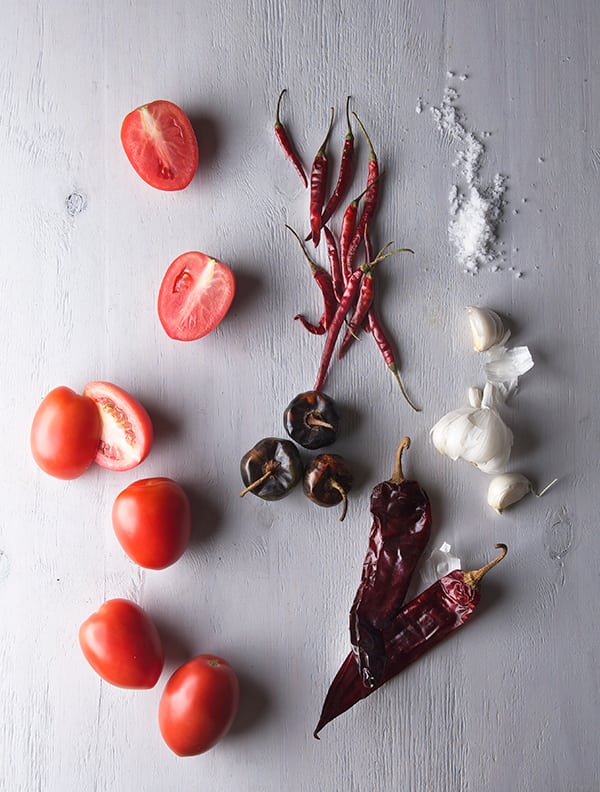
5-6 Roma Tomatoes choose the reddest and ripest for best flavor.
½ small or ¼ medium white onion
1 garlic Clove
3 dry chiles Cascabel toasted, seeds and stems removed.
8 dry chiles de Arbol toasted, stems removed.
2 dry chiles Guajillos remove seeds and stem and boil along with the tomatoes.
1 teaspoon sea salt
1 pinch of sugar
2 tablespoons of the reminder oil from were the tortillas were fried.

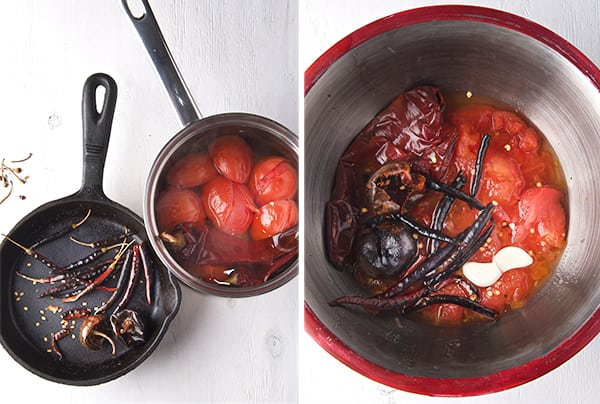
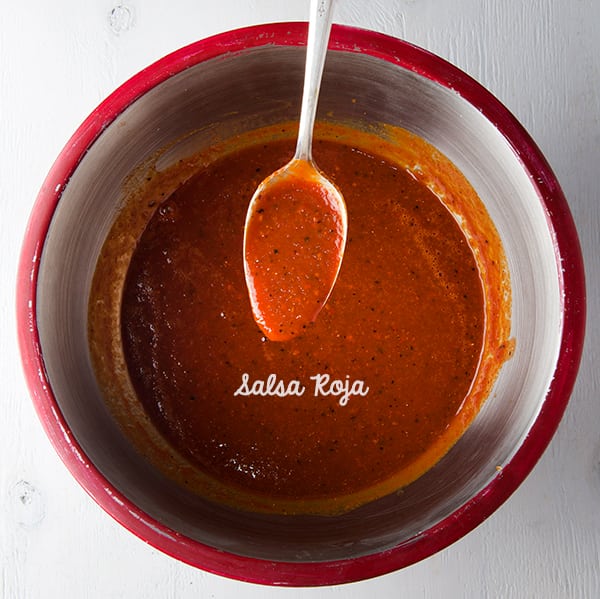
In a medium sauce pan place tomatoes, chiles guajillos,and onion. Cover with water. Cover and simmer until they are cooked, about 8-10 minutes or until a knife easily inserted. Once they are cooked, save 1-1/2 cups of the water in which they cook, toss the rest of the liquid. Remove tomato skins, add the toasted chiles, garlic, salt and blend with one cup of the reserved water until smooth. Taste and adjust water and salt if necessary. See picture for consistency.

Chilaquiles-Manifesto_Chilaquiles-Rojos_Ingredients_Salsa-Roja_Yes,-more-please!

How-to-Make-Salsa-Roja-Asada-Cocida_Chilaquiles-Verdes-Yes,-more-please!

Salsa-Roja-Cocida_Chilaquiles-Rojos-Yes,-more-please!

1. The Semi-Crunchy Chilaquiles Preparation:

Hands down, my favorite ones!

Serves 4, maybe just 2 hangover creatures…

12 White Corn tortillas
Grape seed oil or Corn oil to pan fry the tortillas about 1/2 cup
(maybe less, maybe more, upon your tortillas.)

1 or 2 eggs per person, sunny side up or over easy.

Preparation:

1.Prepare one recipe of your choice of salsa VERDE or ROJA. (listed above). Set aside.

2.Cut the tortillas into triangles, separate them. Heat up a frying pan add ¾ cup of the oil wait until the oil is starting to ripple, add the tortillas in two batches and pan fry them until evenly golden light brown as possible. Remove from pan and drain them into a pan lined with a paper towel.

3.Start cooking the sunny side up or over easy eggs. Set them aside, on a tray to keep them warm. Do this just before the final step so they don’t get cold.

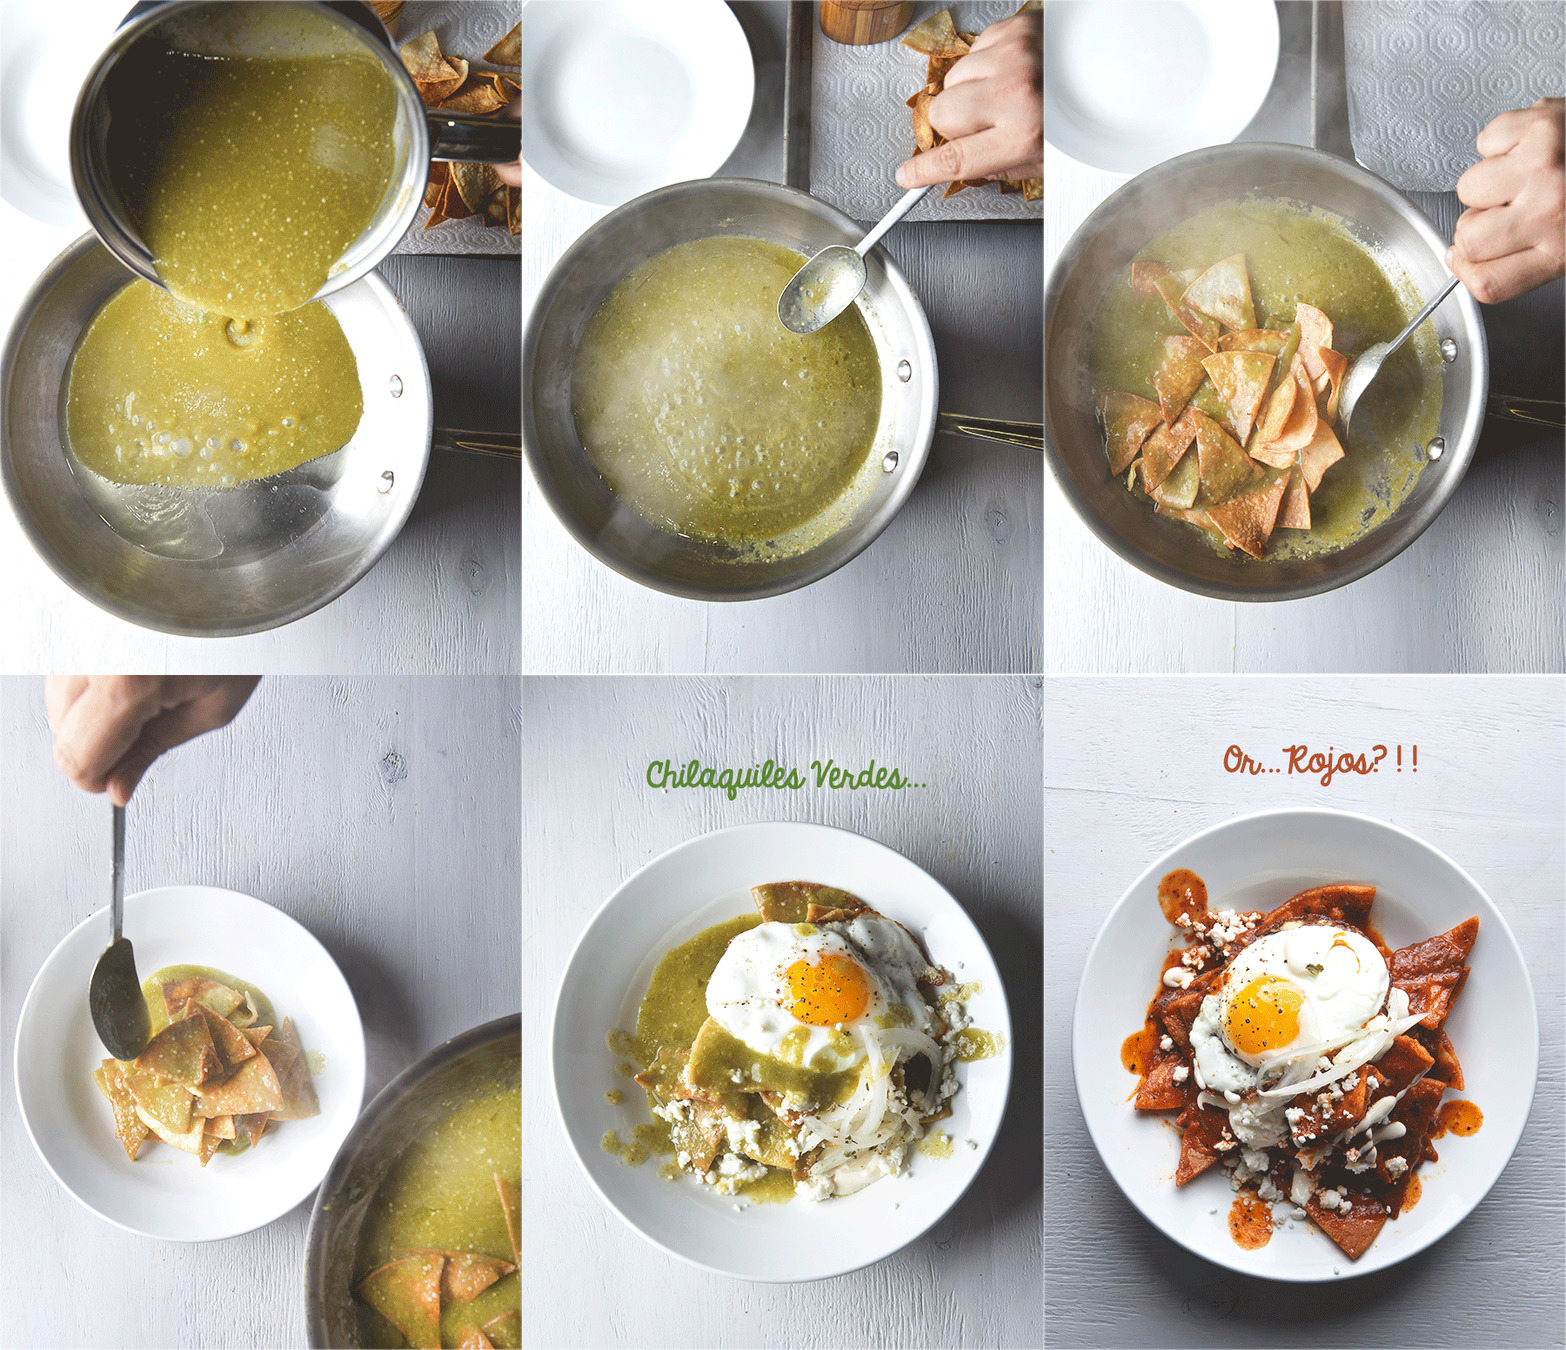
4.Remove the excess oil from the pan, and leave about 2 tablespoons of oil into the pan. Once the oil is hot, add the salsa VERDE or ROJA and cook for 1-2 minutes, stir constantly until bubbly. Add the tortilla triangles you just panfried and toss into the salsa for 1-2 minutes. Plate them immediately. Top with an Sunny side up egg or over easy egg. Garnish with Crema, Queso Fresco and Onions, and a side of refried beans. Enjoy!

Chilaquiles_Manifesto_Chilaquiles_Verdes-or-Rojos_how-to-make-Crunchy-chilaquiles_recipe

2. Miga-Quiles a.k.a my Grandma’s Chilaquiles

Serves 4, maybe just 2 hangover creatures…

12 White Corn tortillas
Grape seed oil or Corn oil to pan fry the tortillas about 1/2 cup
(maybe less, maybe more, upon your tortillas)

You will need 6 large eggs to scramble into the tortillas

Preparation:

1.Prepare one recipe of your choice of salsa VERDE or ROJA. (listed above). Set aside.

2.Cut the tortillas into squares, separated them. Heat up a frying pan add ¾ cup of the oil wait until the oil is starting to ripple, add the tortillas and pan fry them until evenly golden brown as possible. Remove from pan and drain them into a pan lined with a paper towel.

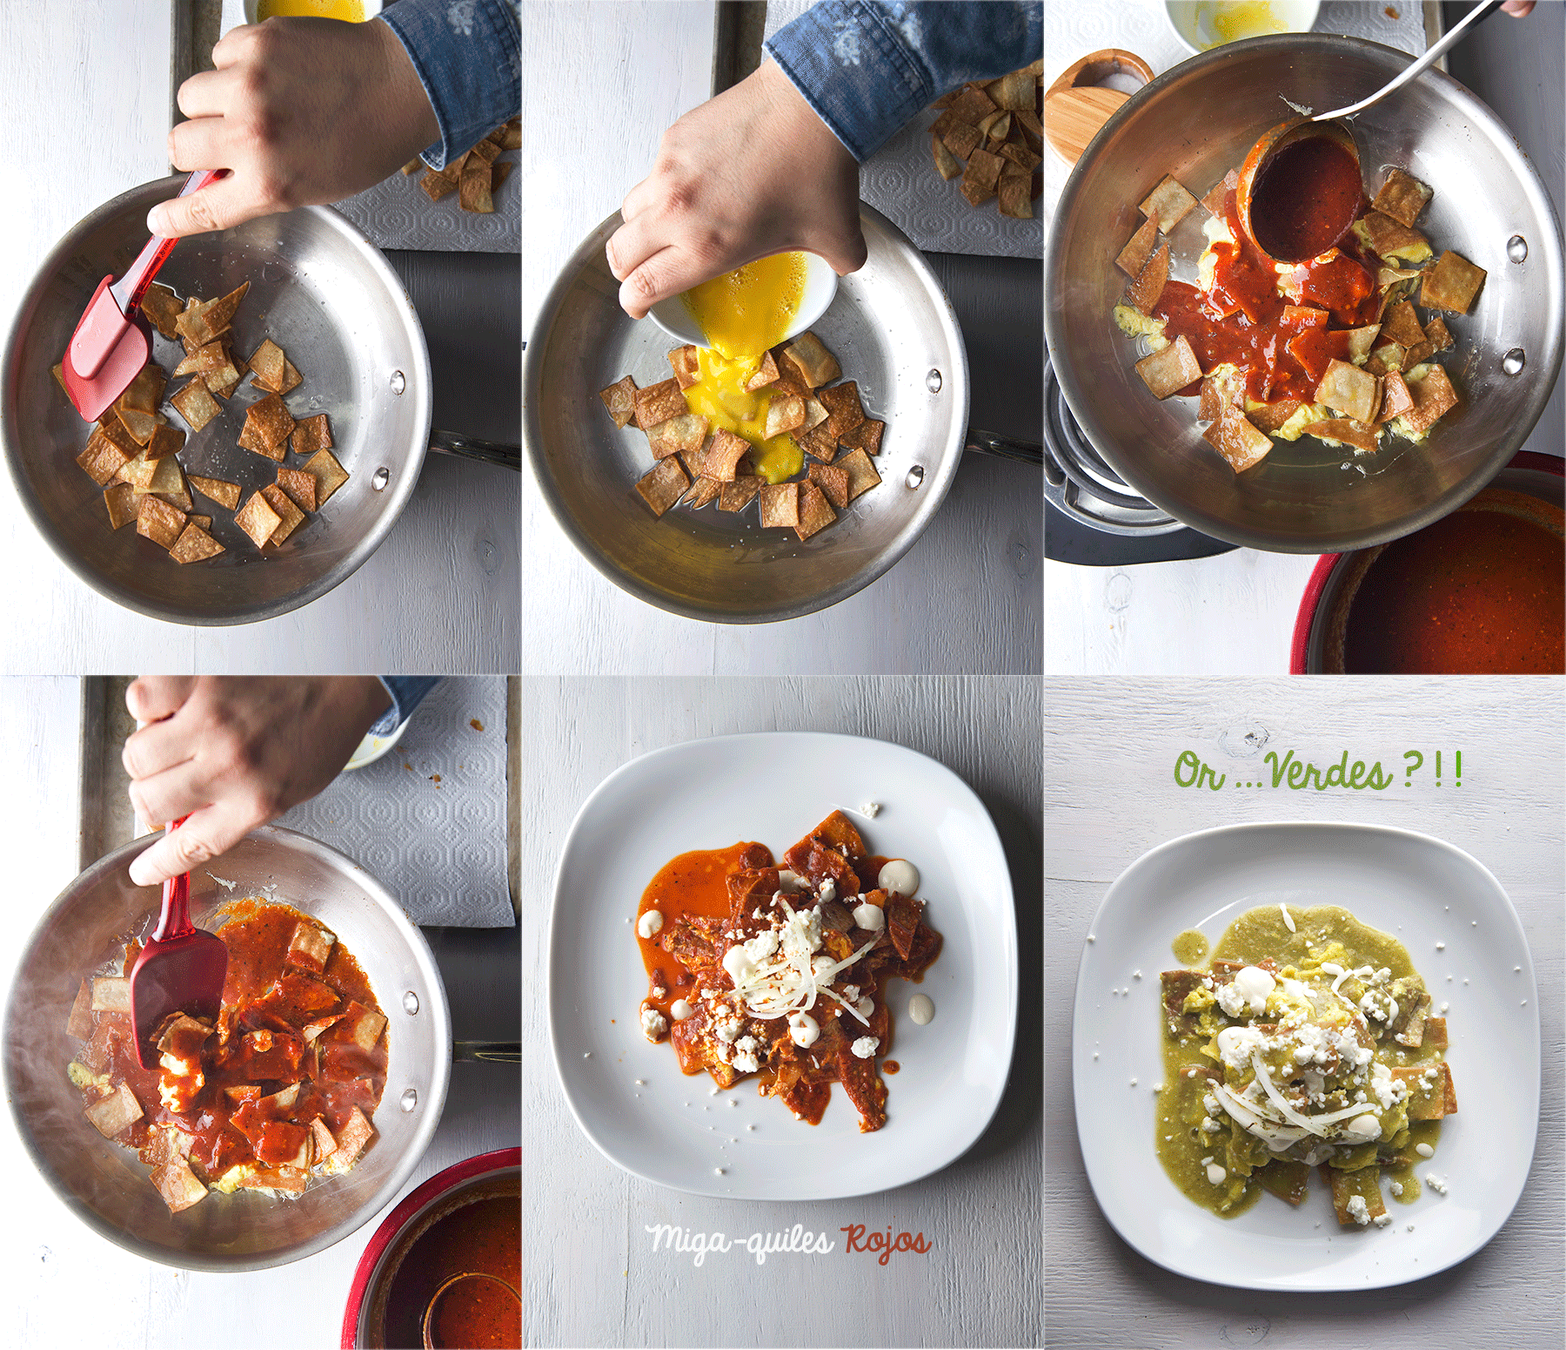
3.Remove the excess oil from the pan, and leave about 2 tablespoons of oil. Whisk about 5-6 eggs depending on size, add the fried tortillas to the pan and then add the whisked egg, toss quickly. Once the egg start to set add the salsa VERDE or ROJA cook for 1-2 minutes tops!, remove from heat and serve immediately. Garnish with Crema, Queso Fresco and Onions, a side of refried beans. Mmmm…

Chilaquiles_Manifesto_Miga-Quiles-Rojos_or-Verdes_how-to-make-chilaquiles_recipe

This Plate of saucy carbs has been known for lifting morning moods, helping the thirsty drunken souls alleviate the hangover. It is easy to make for a lonely ranger or to size it for a Family meal. Any weekend and hazy Sunday morning can be lightened-up with a plate of these great classic Mexican dish.

Chilaquiles_Manifesto_Miga-Quiles-Rojos_or-Verdes_recipe

Chilaquiles_Manifesto_The-best-recipe-for-Chilaquiles-Verdes_Yes,-more-please!

Chilaquiles_Manifesto_The-best-recipe-for-Chilaquiles_Rojos_spicy_Yes,-more-please!

Make them! I would love your feed back,
Which ones are you favorites?…
Are you a GREEN or a RED soul?
Send a comment below, I want to hear from you!!!
Chilaquiles_Manifesto_-chilaquiles-Verdes_Yes,-more-please!


5 from 4 votes
Print

Chilaquiles VERDES

www.yes-moreplease.com

Chilaquiles can be served for Breakfast, or Brunch if topped with sunny side up or over easy eggs. And they can be serve for Lunch or Dinner, change the eggs for shredded rotisserie chicken. A side of refried beans its always a must. 


Course Breakfast, Brunch, Main Course
Cuisine Mexican
Prep Time 15 minutes
Cook Time 30 minutes
Total Time 45 minutes
Servings 4

Ingredients

  • 1 lbs. Tomatillos, I used tomatillo milpero, they have the best flavor, if you can't find this kind, choose the smallest tomatillos from the bunch.
  • 1/2 small white onion
  • 3-4 Serrano chiles, fresh
  • 1 small Bunch of Cilantro
  • 1 teaspoon Sea salt
  • 2-3 tablespoons Corn, or sunflower oil, you can use the reminder oil you use to fry the tortillas.
  • 1-2 eggs per person, sunny side up or over easy

To fry the tortillas

  • 12 White corn tortillas
  • 1/2 cup Grapeseed oil, sunflower or corn oil, to pan fry the tortillas.

Garnish with:

  • 1/2 cup Queso Fresco
  • 1/2 cup Crema Mexicana
  • 1/2 cup White or red onions, diced
  • Refried beans, its a must!

Instructions

  1. Prepare the salsa verde:

    In a small-medium sauce pan place tomatillos, chiles,onion, cilantro, and barely cover with water. Place lid and simmer until they are cooked, about 12-15 minutes. Once they are cooked, remove ¾ of the liquid add salt and blend. 

    Set aside.

    The Semi-Crunchy Chilaquiles Preparation:

    1.Prepare one recipe of your choice of salsa VERDE Set aside.

    2.Cut the tortillas into triangles, separate them. Heat up a frying pan add ¾ cup of the oil wait until the oil is starting to ripple, add the tortillas in two batches and pan fry them until evenly golden light brown as possible. Remove from pan and drain them into a pan lined with a paper towel.

    3.Start cooking the sunny side up or over easy eggs. Set them aside, on a tray to keep them warm. Do this just before the final step so they don’t get cold.

    4.Remove the excess oil from the pan, and leave about 2 tablespoons of oil into the pan. Once the oil is hot, add the salsa VERDE and cook for 1-2 minutes, stir constantly until bubbly. Add the tortilla triangles you just panfried and toss into the salsa for 1-2 minutes. Plate them immediately. Top with an Sunny side up egg or over easy egg. Garnish with Crema, Queso Fresco and Onions, and a side of refried beans. Enjoy!

    Happy cooking!

Recipe Notes

If you need a tutorial on How to make the best beans you ever had!

Check our recipe: Mexican Beans Manifesto


Chilaquiles_Manifesto_THe-best-recipe-for-Chilaquiles-Rojos_Yes,-more-please!


5 from 4 votes
Print

Chilaquiles ROJOS

www.yes-moreplease.com

Chilaquiles can be served for Breakfast, or Brunch if topped with sunny side up or over easy eggs. And they can be serve for Lunch or Dinner, change the eggs for shredded rotisserie chicken. A side of refried beans its always a must. 

Course Breakfast, Brunch, Main Course
Cuisine Mexican
Prep Time 15 minutes
Cook Time 30 minutes
Total Time 45 minutes
Servings 4

Ingredients

For the Salsa ROJA:

  • 5-6 Roma tomatoes, choose the reddest and ripest for best flavor
  • 1/2 medium white onion
  • 1 large garlic clove
  • 3 dry chiles Cascabel toasted, seeds and stems removed.
  • 6-8 dry chiles de Arbol toasted, stems removed.
  • 2 dry chiles Guajillo, remove seeds and stem and boil along with the tomatoes.
  • 1 teaspoon sea salt
  • 1 pinch sugar
  • 1 pinch cinnamon
  • 2 tablespoon of the reminder oil from were the tortillas were fried.

To fry the tortillas:

  • 12 White corn tortillas
  • 1/2 -3/4 cup Grapeseed oil, sunflower oil, or corn oil, to pan fry the tortillas

Garnish with:

  • 1/2 cup Queso Fresco
  • 1/2 cup Crema Mexicana
  • 1/2 cup white red onions, diced
  • Refried beans, on the side its a must!

Instructions

  1. Prepare Salsa Roja:

    In a medium sauce pan place tomatoes, chiles guajillos,and onion. Cover with water. Cover and simmer until they are cooked, about 8-10 minutes or until a knife easily inserted. Once they are cooked, save 1-1/2 cups of the water in which they cook, toss the rest of the liquid. Remove tomato skins, add the toasted chiles, garlic, salt and blend with one cup of the reserved water until smooth. Taste and adjust water and salt if necessary. See picture for consistency. Set aside.

    The Semi-Crunchy Chilaquiles Preparation:

    1.Prepare the salsa roja

    2.Cut the tortillas into triangles, separate them. Heat up a frying pan add ¾ cup of the oil wait until the oil is starting to ripple, add the tortillas in two batches and pan fry them until evenly golden light brown as possible. Remove from pan and drain them into a pan lined with a paper towel.

    3.Start cooking the sunny side up or over easy eggs. Set them aside, on a tray to keep them warm. Do this just before the final step so they don’t get cold.

    4.Remove the excess oil from the pan, and leave about 2 tablespoons of oil into the pan. Once the oil is hot, add the salsa ROJA and cook for 1-2 minutes, stir constantly until bubbly. Add the tortilla triangles you just panfried and toss into the salsa for 1-2 minutes. Plate them immediately. Top with an Sunny side up egg or over easy egg. Garnish with Crema, Queso Fresco and Onions, and a side of refried beans.Enjoy!

    Happy cooking!

Recipe Notes

If you need a tutorial on How to make the best beans you ever had!

Check this link: Mexican Beans Manifesto


Cooking Music Pairing: Danzon No.2 Artuto Marquez 

Conducted by: Gustavo Dudamel

https://youtu.be/PA7vEIj6Lzk
View Post or View Comments 34

Scotch Mex Eggs

Scotch-Mex-eggs_original-recipe_Yes,-more-please!

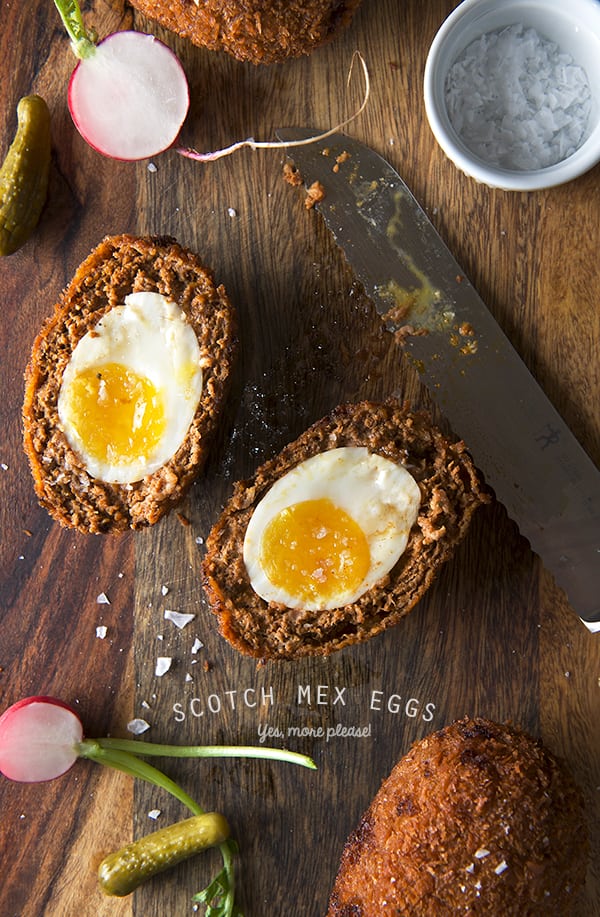
How can I begin to tell you that the infamous “Scotch Egg” is not Scottish. It is believed that it was created by a London department store Fortnum and Mason in the 18th century. However, origins may go back to Algerian cooking or possibly to a fish paste and egg recipe that produced ‘Scotties’. want to know more about the history of these creatures, click here.
This etymological confusion distracts from what could be the best picnic food not yet consumed widely in the US. We love to eat hard boiled and deviled eggs at picnics. We also love delicious salty savory fried treats. This is only the marriage of each to the other. The crunchy breadcrumb exterior of the egg covered in sausage is from the deep frying technique and enhances the experience of  eating this savory delight. When prepared correctly the yolk will be cooked through but still soft and creamy. The Scotch Egg we present in this recipe has been further enhanced by the seasoning of the meat with Mexican spices adding a smokey and spicy note to the sausage mixture.

The result is a New World revision of an Old World treat. And doesn’t it seems appropriate that this recipe was created by a Mexican for his Husband which happens to be an American of Scottish ancestry?

This Eggs could be served many ways and for different occasions. It is certainly terrific on its own or served with some pickled vegetables, but may be the shining star of an Easter appetizer plate or as a side for an outdoor grilling gathering. It holds up well to dipping sauces but to tell you the truth all it needs is a good splash of malt vinegar to balance the richness, and put the British accent on it.

These eggs take a little discipline and patience to prepare but the effort is worth it. They can be the perfect new thing to try this Easter or on your next picnic and you may be shocked by the flavor explosion that this Algerian-British-Mexican Scotch Egg delivers. Enjoy!

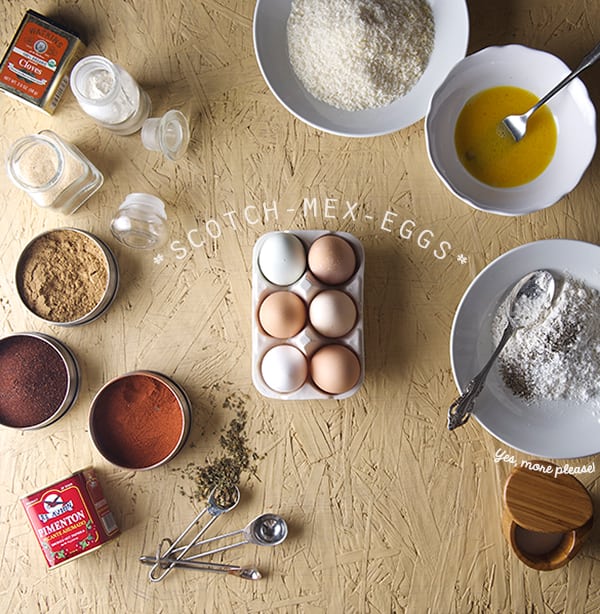
Scotch-Mex-Eggs_ingredients_Yes,-more-please!

Let’s cook! here comes the recipe…

Continue Reading →

View Post or View Comments 2

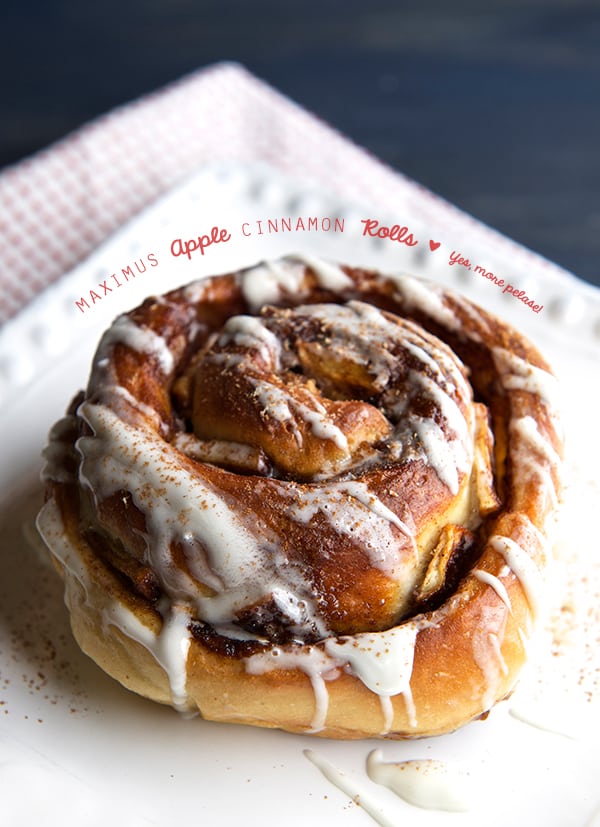
Maximus Apple Cinnamon Rolls with Eggnog Glaze

Maximus-Apple-Cinnamon-Rolls_Yes,-more-please!

Oh! Sweet Christmas, It is that time of the year where you want to enjoy yourself in the kitchen, to give and to allow the time to go by with no remorse while indulging the guiltless pleasure of a Holiday morning…. Waaahw Wahhw Wahhw Wahhw… Rewind that… you wake up and your children are screaming “Can we open the presents?” Dog barking, Phone ringing, hubby half sleep, you are feeling cranky because you stayed up late making these rolls for breakfast… this is more like it right?, But where is the Christmas spirit?… No worries, it’s coming out of the oven in a few minutes. Make coffee, place the tray of Apple Cinnamon Rolls in the oven to warm up while you open a few presents. Twenty minutes later your house will start to smell like the north pole kitchen. Cinnamon is in the air! Drizzle the glaze, and scream “Breakfast is ready!”

I know this recipe is not the 1,2, 3 mix and done cinnamon rolls. But, why settle for less?, let’s make it AWESOME, It’s Christmas! I promise you it’s all worth it.

One bite of these rolls and you will feel how the world is merry, joyful, and your efforts so worth it when making these rolls. Time to sit, relax and enjoy!

Undoubtedly, these Maximus Apple Cinnamon Rolls with Eggnog glaze will ungrinch-ify the grinchiest Grinch.

Merry Christmas, Happy holidays, Joy and Hugs!

Ian & Mariana

Apple-Cinnamon-Buns_ingredients

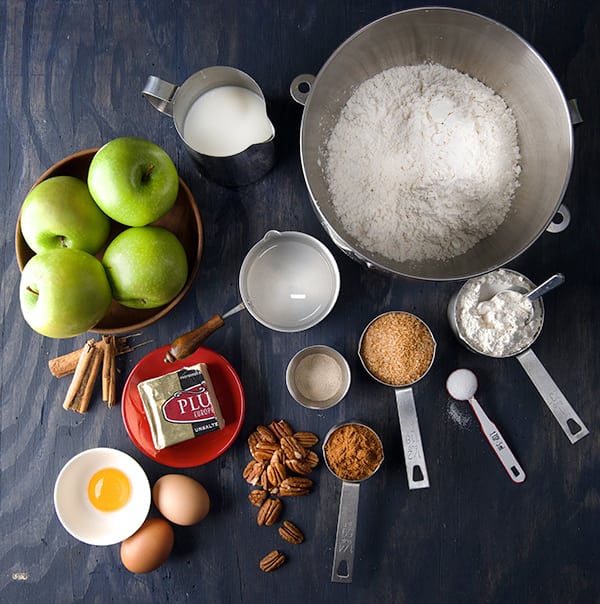
For the recipe you will need…

Continue Reading →

View Post or View Comments 6

Huevos Rancheros

Huevos-Rancheros-on-a-rainy-afternoon_Yes,-more-please!

This is the perfect breakfast on a rainy weekend morning. Or a even cold snowy morning, if you live north of Texas. The origin of this dish is unknown to me yet very familiar. It’s a classic everywhere in Mexico. There are dozens of variations with different toppings and seasonings from various regions, families, grandmas,  mercados, or restaurants. This is the dish in its purest form. All principles items include fried eggs, dried chiles, tomato sauce, tortillas, and that last onion section that you didn’t quite finish on Thursday. This Mexican one pan wonder is the weekend antidote when you wake up extra hungry and craving a breakfast worth making. Imagine the creamy runniness of a sunny side up egg, smothered with savory spicy warm salsa over soft fried corn tortillas, a side of black beans, crema, and queso fresco. I would wake up to that in a flash!

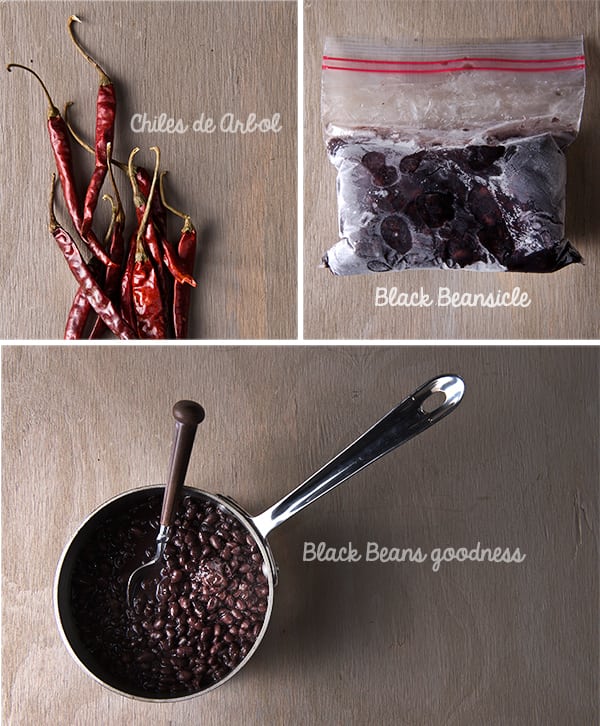
My Huevos Rancheros version gets a side of black beans which I prepare almost every month by cooking a large batch in a slow cooker. I make little portion bags that I freeze for quick use. It makes my life easier and tastier. Ian calls them “Beansicles”. They are very easy to defrost and use either whole or smashed when ever needed they are there for you. Now, what you need from the pantry is that forgotten can of tomatoes. Please check your refrigerator drawers for a couple of fresh ones if in season. I always have my staple dry chiles in the pantry. Dried chiles are miracle workers. I can make salsa in a flash, or spice up soups or even hot cocoa like this. Fresh chiles? Yes, please! Serranos, jalapeños, chipotles en adobo; for me all variations are delicious as long you follow the ranchero principle: simple sauce + fried egg + corn tortilla + beans = Best Huevos Rancheros. Please no melty cheese in my Rancheros, save it for a quesadilla.

Huevos-Rancheros_chiles-&-Black-Beans

One of my favorite version of Huevos Rancheros Its the one you are about to see, easy enough to prepare them before coffee, and the spicy kick to the sauce will add to your morning wake up.
Huevos Rancheros cures hangovers, rainy mornings, helps you forget weekly stress, and fuels the most ambitious of Caudillos. Its uncomplicated preparation will give you a boost of confidence and culinary accomplishment. The way I prepare them could work for bigger crowds if arranged on a large platter or  for a brunch with friends or neighbors. All you have to do is learn how to fry an egg and combine 4 ingredients for a killer salsa. Enjoy!

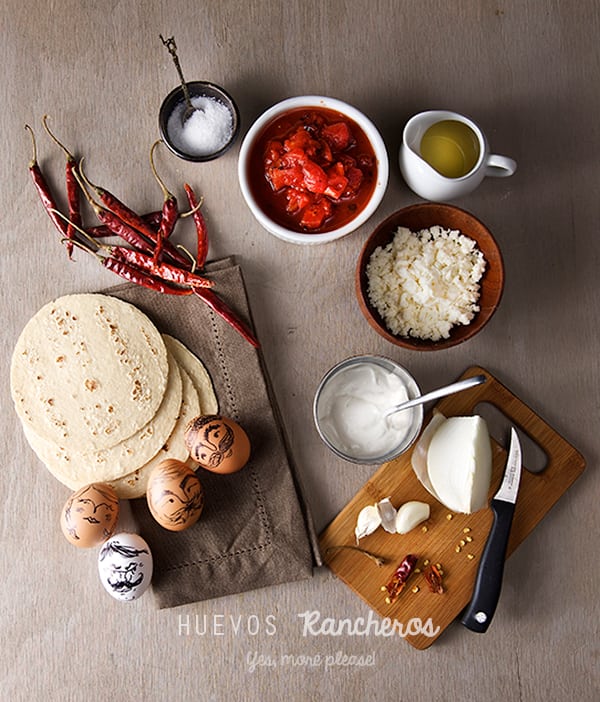
Huevos-Rancheros_all-ingredients_Yes,-more-please!


Huevos Rancheros

Serves 1 Güerito and 1 Mexican

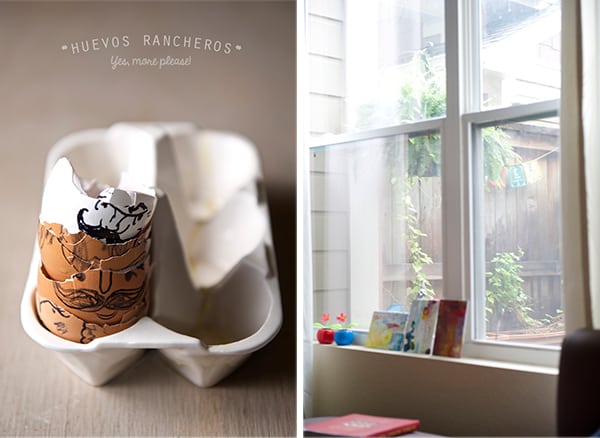
4 Eggs (ranchero faces drawing optional)
4 corn tortillas best kind you kind find.
Corn oil or your frying oil of preference enough to fry the eggs. about 2-3 glugs.
Salt and black pepper to taste
1 cup Black beans whole or fried is up to your preference.

For the Sauce:

1-1/2 cups roasted tomatoes I used roasted canned, if using fresh when in season you will need about 4 Roma tomatoes.
6-8 Chiles de Arbol  (For amateurs please start with 3-4 chiles. When this dry chiles get toasted, the flavor profile is a bit smoky and much milder in spice, so do not fear them!)
1 garlic clove
1/8 onion
Salt and black pepper

Toppings:

1/4 cup crumbled queso fresco
2 tablespoons Mexican crema
1-2 fresh cilantro sprigs

Quick pickled onions:

1/8 onion slivered and rinsed*, 1/2 lime juice, one good pinch of salt, one good pinch Mexican dry oregano, combine everything on a small dish, wait for 10 minutes, serve. * I always like to rinse my onions when they gonna be eaten raw, it smooths away that sharp taste, and you will not have to brush your teeth five times before the flavor on your palate is gone.


Preparation:

1. Start by preparing all your toppings, warm up your beans, make the quick pickled onions, set a side.

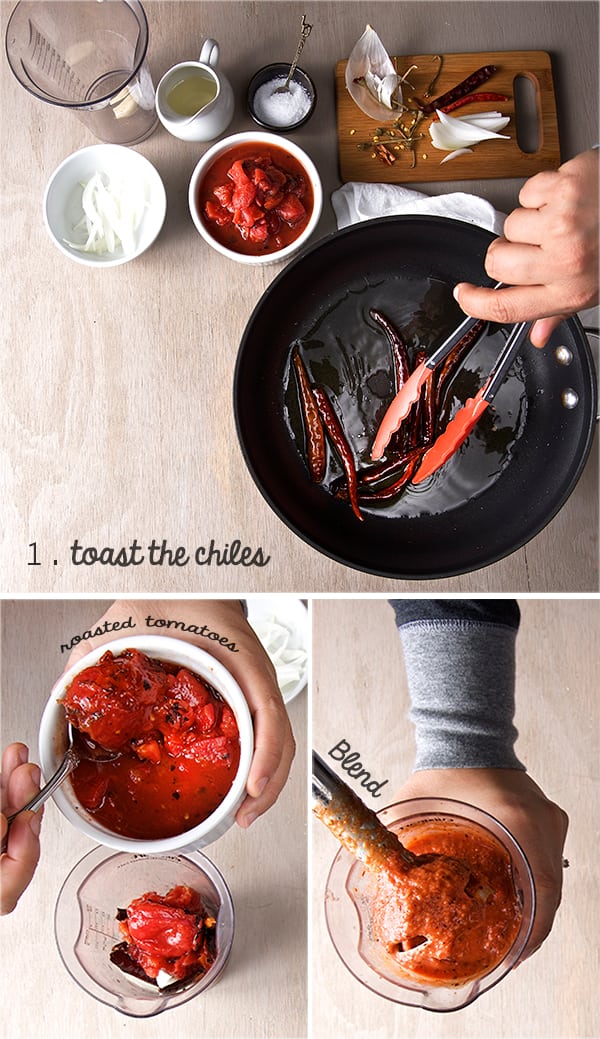
2. Remove the stems of all your dry chiles de arbol. On a medium size frying pan, (good enough o fry some sunny side up eggs) place about two glugs of Corn oil over medium high heat, add the chiles and toast them tossing often, until a deep dark red. Remove the chiles, and add 1/8 of an onion for a quick sauté. Remove the onion, turn of the pan. In a Blender or with the help of an immersion blender Combine the roasted tomatoes, the toasted chiles, one garlic clove, the sautéed onion, 1/2 cup water,salt and a bit of black pepper. Blend until smooth. Set aside.

Huevos-Rancheros_making-the-salsa

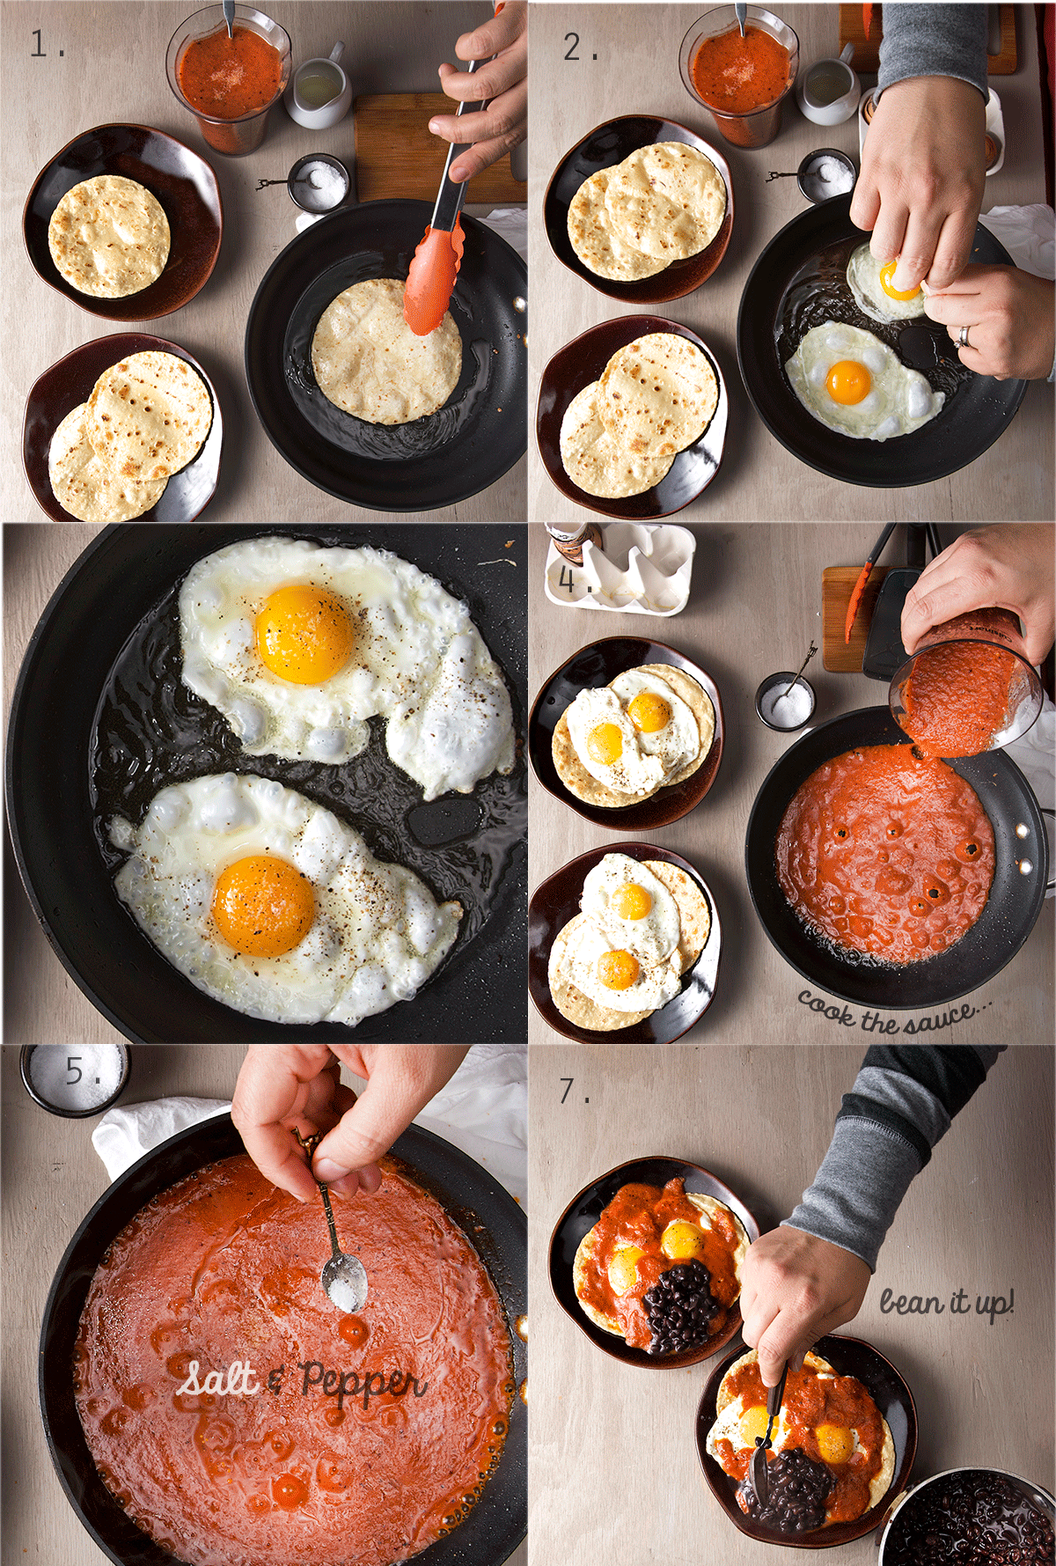
3. Warm up over medium high heat the same pan and oil you use to toast the chiles and onion. There should be plenty of oil to sauté the corn tortillas. If not enough add a bit more oil. Oil must be hot before soft frying the tortillas. Cook the tortillas in the oil one by one both sides. Tortillas should have a toasty color and they should be playable. Place the tortillas as you go into the plates; one tortilla per egg.

4. Using the same pan and oil fry your eggs. I like to fry 2 eggs at the time, so they have lots of room and the temperature of the pan does not drop. I like my eggs with a bit of crunchy edges but soft runny yolks. It’s really up to you, cook them up to your preference. Place the eggs on top of the tortillas one egg per tortilla as you go. Remember that it is important letting the pan and oil to come up to hot temperature in-between egg batches. Like I said, I like sunny side up eggs in this recipe so I do not over cook the yolks. In fact I leave them a little under done, so when I pour the warm sauce over the eggs, it will warm them up and finish the cooking  to a perfect creamy runniness. Take this in consideration when your cooking your eggs.

5. Once your eggs are ready, in the same pan with the remaining oil and while it warm add the sauce. (Be careful sauce might get a bit feisty, you might end up with a polka dot pajama!). Lower the heat. Stir and season with salt and pepper. Simmer for 2-3 minutes. Sauce should be rich and at the same time lose enough to cover the eggs. If the sauce is too tick add a bit of water or chicken stock, if to loose keep reducing it.

Huevos-Rancheros_How-to-cook-them

6. Taste your sauce for seasonings and adjust if needed. Sauce your eggs with plenty of warm sauce. Place leftover sauce in a small bowl and take it to the table for an extra spoon or two.
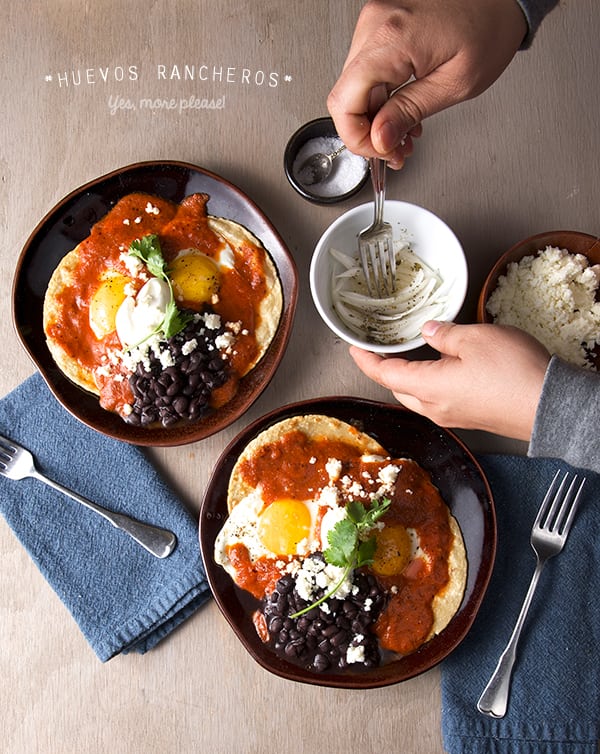
Serve a couple of tablespoons of  black beans on the side, top with queso fresco, crema, cilantro for garnish and the quick pickled onions on the side. Enjoy!

Huevos-Rancheros_Yes,-more-please!

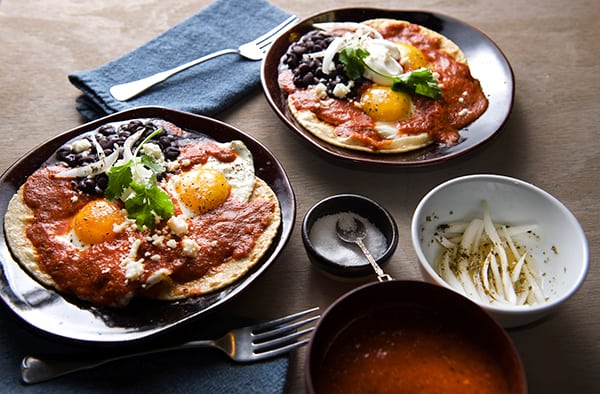
Huevos-Rancheros_ready-to-eat


Huevos-Rancheros_ready-to-serve_Yes,-more-please!

 Huevos Rancheros, A great rainy weekend breakfast!

Music Pairing: Pedro Infante – El Ranchero

View Post or View Comments 5

Spiced Poached Pears

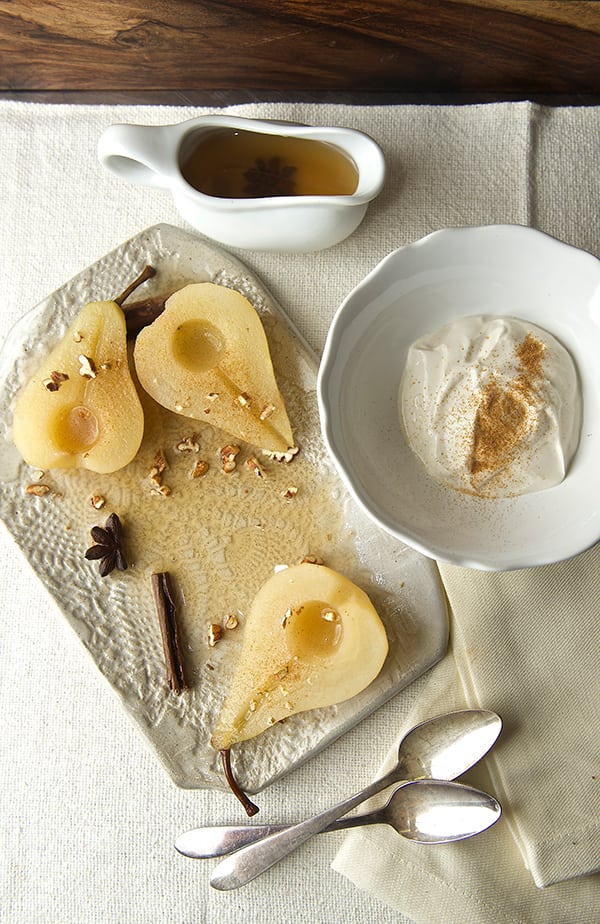
Spiced-poached-pears_and-mascarpone_Yes,-more-please!

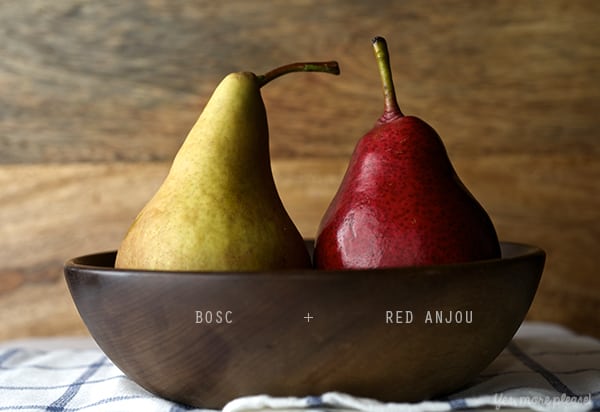
Stone fruits are in season, I found beautiful pears at the market, Bosc and Red Anjou.  I will describe the Red Anjou pears as aromatic, juicy, fresh and sweet: while the Bosc pears are crisp, woodsy and  have a honey-sweet light flavor.
I could not decide which ones to bring home for this recipe…so I used both and the characteristics of each pear gave a great flavor to this simple recipe. Poached pears sounds so boring right? A dessert out of the 70’s…well its not and done right and with aromatics and the right cooking method its a great fruit dessert, the perfect end to a rich dinner like Thanksgiving… Or just for a simple treat on a rainy day…

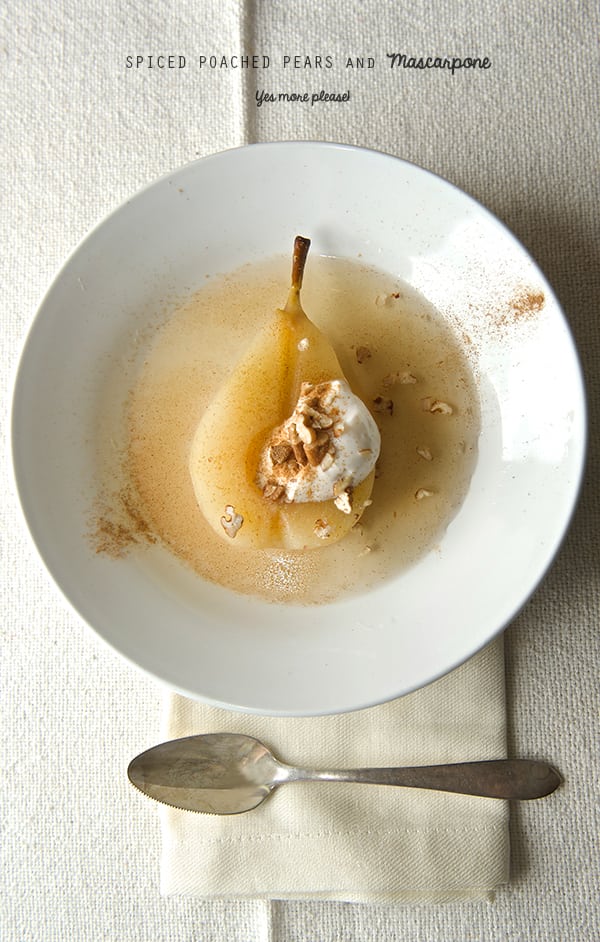
The rum and the spices add warmth and great flavor to the light syrup, which is not overly sweet. The alcohol evaporates leaving all the good woodsy rum flavors in the fruit. A little dollop of whipped mascarpone cheese and honey add the perfect creamy  balance that makes these spiced poached pears irresistible.

This is one of those recipes with plenty of freedom for adjustment, and have the certainty that its gonna come out great. I like the light flavors and the delicate pear flavor is the star of the show. One of the best parts when you are cooking this recipe is the smell that your house is infused with…*sigh*..
Enjoy!

Spiced-poached-pears_BOSC-+RED-ANJOU

Spiced-poached-pears_spices

Spiced Poached Pears

Serves 6

3 Red Anjou Pears peeled, halved, removed the seeds and steam.
3 Bosc Pears peeled, halved, removed the seeds and steam.
4 cups water
½ to 3/4 cup spiced rum…up to you!
4 lime or lemon slices
1/2 cup turbinado sugar
½ cup honey
( you can substitute the total amount of sugar and honey for ¾ agave nectar, or nectrase)

Aromatics:

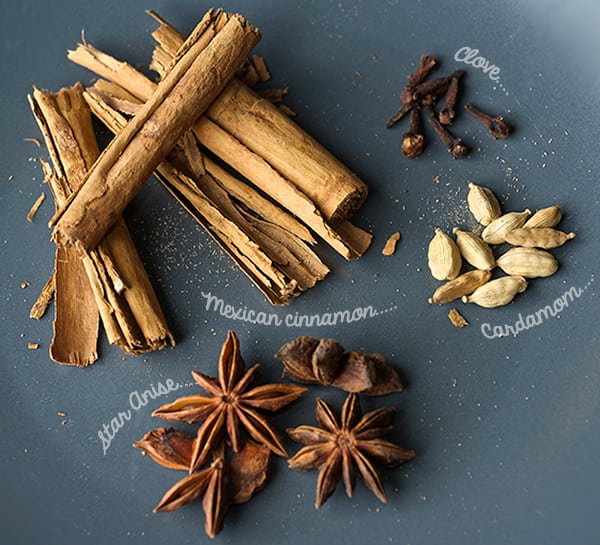
5 sticks Mexican Cinnamon
6 cloves
5 star anise
6 cardamom pods smashed
1/8 teaspoon grated nutmeg

Parchment paper

Garnish with:

Whipped mascarpone and honey
About ½ cup of mascarpone and 2 tablespoons of honey, whip them together until light and fluffy.

Toasted chopped pecans
Ground cinnamon

Directions:

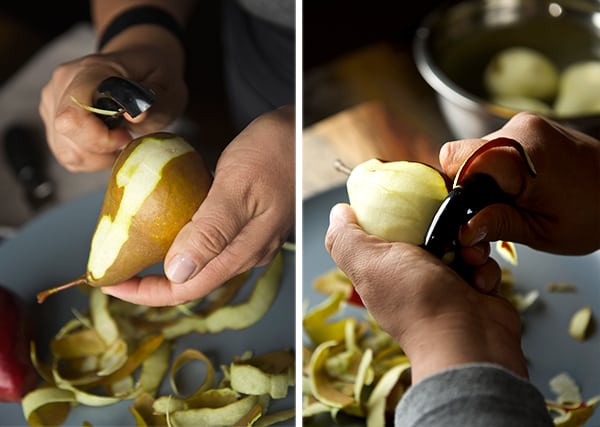
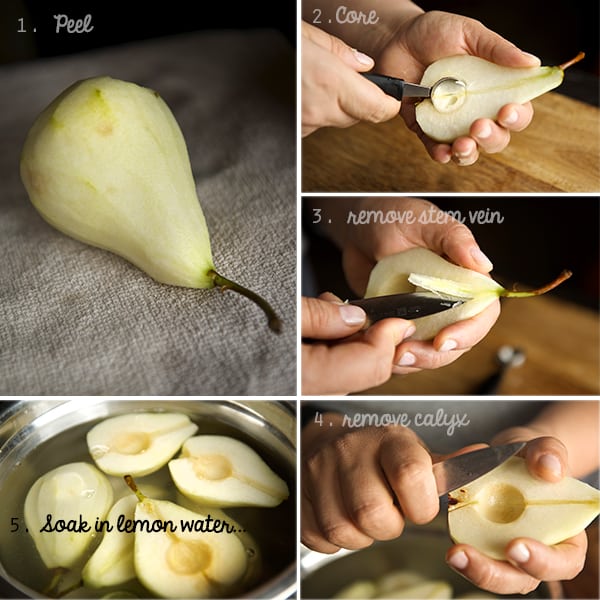
1. Peel, half, remove core and stem in the pears. Keep them in a bowl with water and a few drops of lemon juice to avoid oxidation. (see picture below)

Spiced-poached-pears_peeling-pears_Yes,-more-please!Spiced-poached-pears_preparing-the-pears
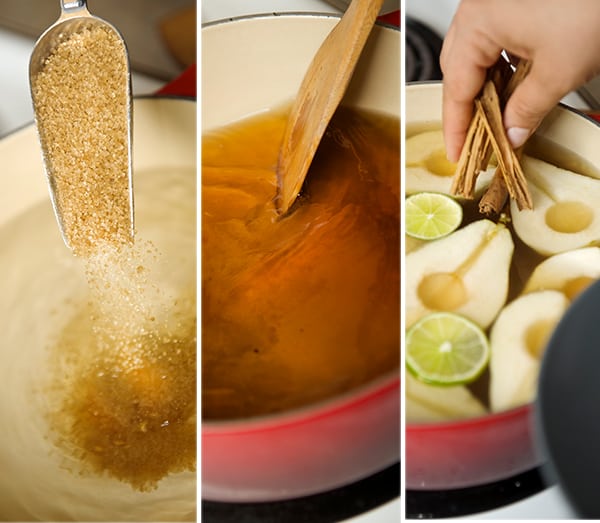
2. In a medium size pot over medium high heat add water, turbinado sugar and honey to dissolve.

Spiced-poached-pears_dissolve-the-sugar
3. Once the water is simmering and sugar is dissolved, add rum, spices and simmer for 7 minutes.
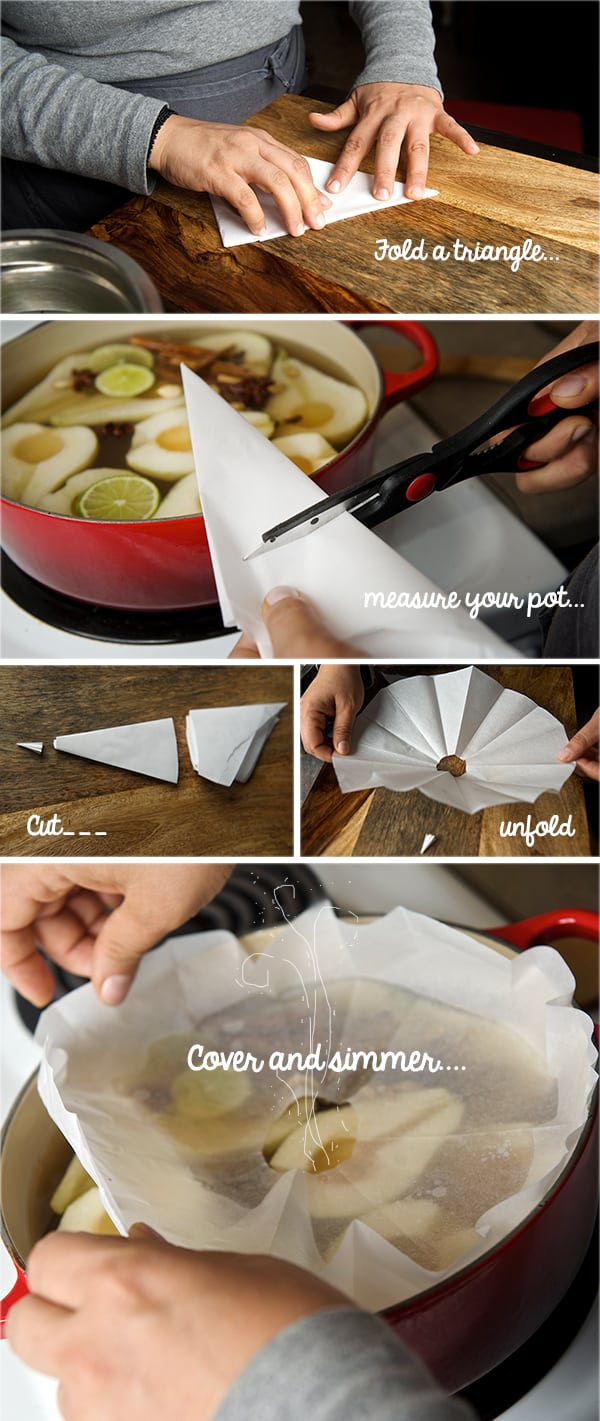
4. Make a parchment paper square, fold it into a triangle, measure your pot radius and cut. Once you unfold the triangle you’ll have a nice circle to cover the pot.
5. Add Pears into the simmering liquid and cover with the parchment paper.Make sure the paper is touching the water to avoid the pears from any discoloration.
6. Simmer in low for about 20-25 minutes, or until the pears are tender when a knife is inserted.
Spiced-poached-pears_how-to
7. Turn off the heat and Let them cool for about 30 minutes. Remove pears from liquid. Heat up the liquid and reduce by half. It should have the viscosity of a light syrup. At this point you can adjust the flavors by adding more honey or more cinnamon if you desire.
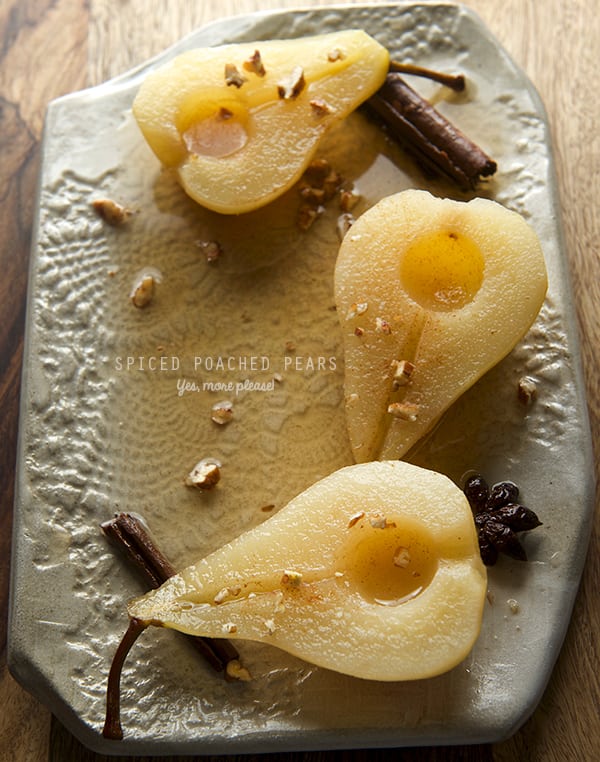
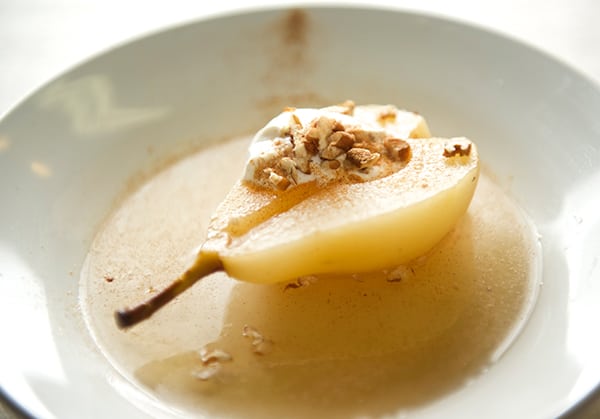
8. Plate the warm pears individually or on a platter. Keep the syrup on a little serving pitcher to add the warm syrup when served. Top with a dollop of whipped mascarpone and honey, toasted pecans, sprinkle some cinnamon. Enjoy!

Note: This dessert can be made ahead. Just keep the pears inside of the syrup, and reduce the syrup until the next day. The pears will taste even better the day after is made. It’s a crowd pleaser dessert fit for Vegans, if the mascarpone is omitted, gluten-free and a light sweet bite to end a nice dinner…. Enjoy!

Spiced-poached-pears_Yes,-more-please!

Spiced-poached-pears_and-mascarpone_ready-to-serve

Spiced-poached-pears_and-mascarpone_plated

ENJOY!

Music Pairing: Nat King Cole – I love you for Sentimental Reasons

View Post or View Comments 6

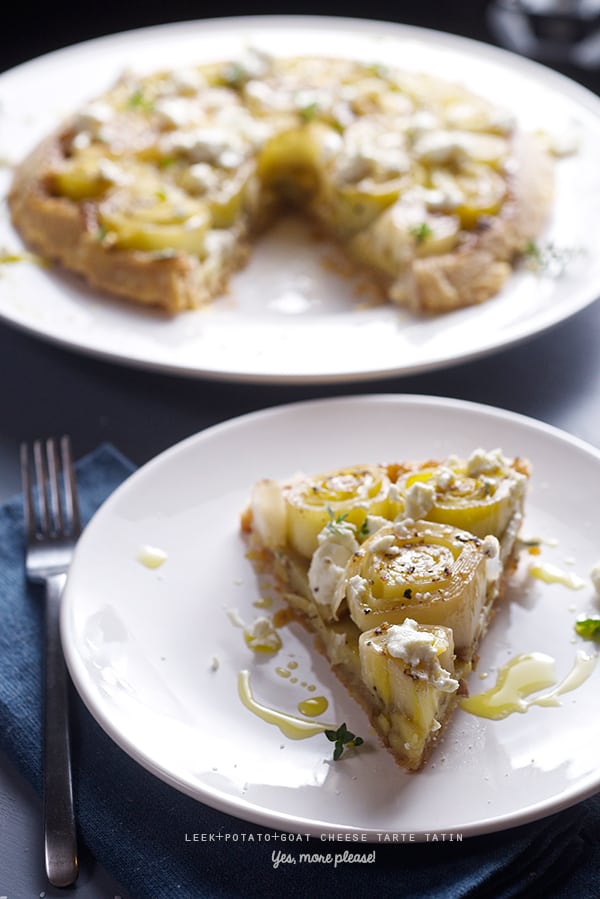
Leek+Potato+ Goat Cheese Tarte Tatin

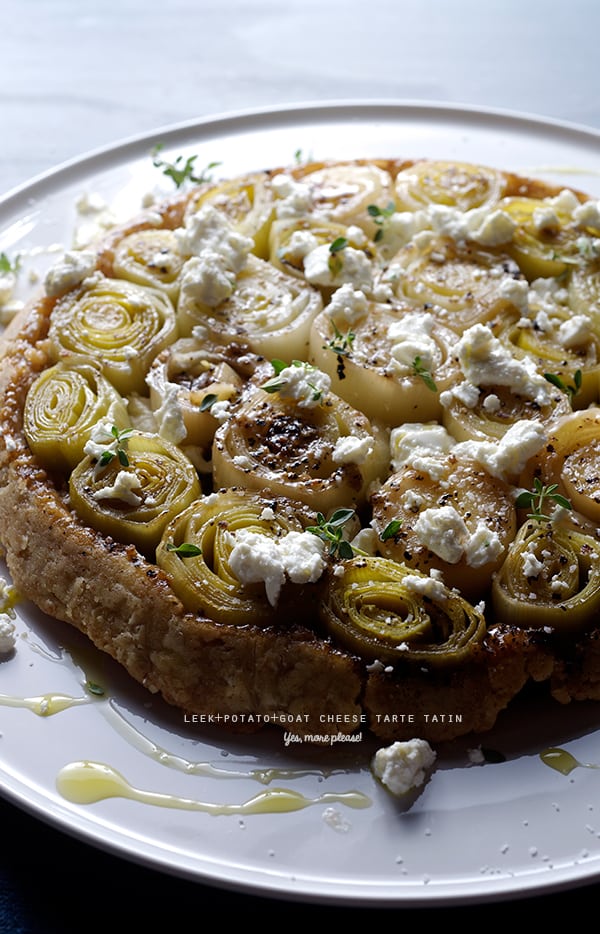
Leek-potato-goat-cheese-Tarte-tatin~Yes,-more-please!
What is a Tarte tatin anyway?.. Basically its an upside down pie. Why would you want to make an upside down pie?..In a word, caramelization. It’s not only the easiest pie-tart you will make, it’s also one of the tastiest. Leeks, green onions, and potatoes are in season. Inspired by the classic of classics Vichyssoise soup, I gave my little spin using the same ingredients I transformed them in to a leek and potato tarte tine that it tastes equally delicious warm or at room temperature.

I used a mix of whole wheat and white flour, to give the crust a nutty flavor and added some thyme, to flavor the crust. Super easy to prepare. The flavors of the leeks, and potatoes shine together,the leeks mellow out the onion flavor and became buttery complementing the potatoes. the little addition of honey adds a little sweet note, fresh cracked pepper , salt and butter is all this tart needs.
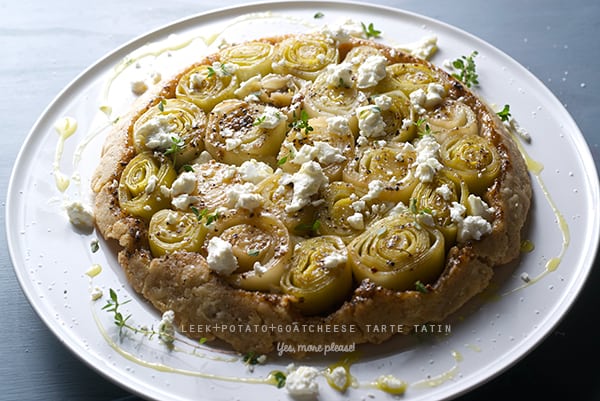
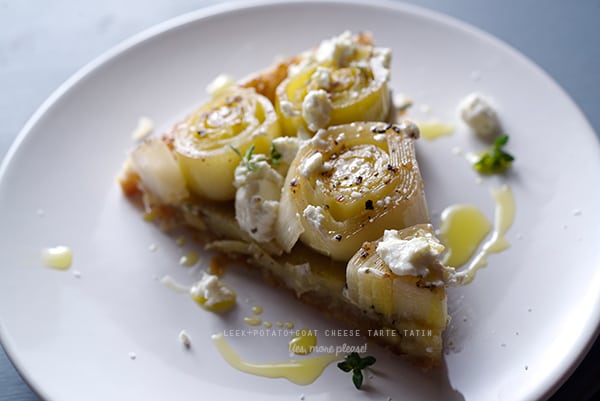
Top it all off with the king of fresh cheeses: goat cheese and a little drizzle of extra virgin olive oil.

I made it for dinner with a great green salad and orange slices on the side… The next day we had leftovers for breakfast with a sunny side up egg on the side… Choose your weapon, this is a killer recipe..enjoy!

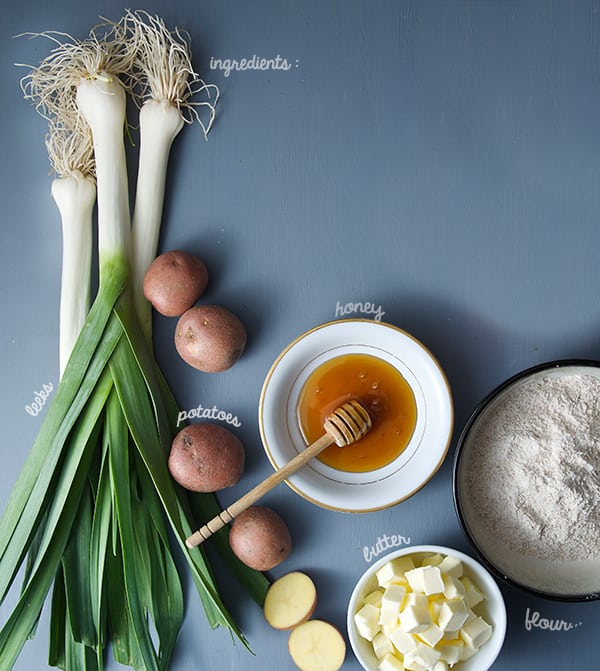
Leek-Tarte-tatin_ingredients

Leek+Potato+ Goat Cheese Tarte Tatin

Makes 1- 10” round tarte tine

3-4 Leeks upon diameter and length.
4- 6 Small red potatoes or yellow wax potatoes thinly sliced.
1 tablespoon honey
1 glug extra virgin olive oil
4 tablespoons butter
Salt + Pepper to taste

1 dough recipe follow  below

Garnish with:

Liberally amounts of Goat Cheese (until you yodel-adle-eedle-idle-odle!)
Drizzle of extra virgin olive oil
Fresh Thyme
Adjust Salt and Pepper

Preparation Method:

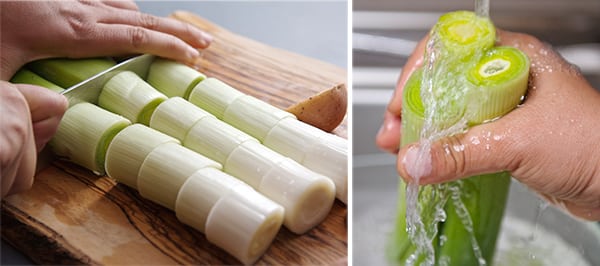
How to wash your Leeks, a leeky matter…

Leek-Tarte-tartin_how-to-wash-them

Leeks are bulbs like onions, the part we are eating is the bulb that is under the soil and believe it on not, this is the cleanest. The part of the plant that sprouts out of the soil that’s were the trouble is. That’s where all the sand sneaks in and there is nothing worse than when you are eating a leek, than to crunch those little particles of sand. Until I understood the anatomy of this vegetable, I couldn’t make sense of how to clean it.
Infinite inner layers, like an onion in a tube form is where the sand goes. Depending on how are you cut them there are different washing methods.
In this case, I removed almost all the green leafy part. As my friend Arin said, “Don’t get greedy!’ The greener parts look pretty but they tend to be more fibrous. Leave those parts to make vegetable stock. Slice in 1”-2” rounds removing the tops.(see picture below)
The parts that are closer to the leafy greens are the ones that needed the most care and to wash the rest are fine. I just submerge the greenest slices and press a little under the running water. I slice them and place them in paper towels that absorb the extra water. Once this procedure is out of your way the fun part begins. Preparing the dough!

For the Dough:

Makes 1- 10″ round  crust

¾ cup unbleached all purpose flour
¾ cup whole wheat flour
2-3 thyme sprigs
½ teaspoon salt
1 stick = 4 oz unsalted butter, cold and cut into small squares.
4 to 6 tablespoons iced water

How to make the crust:

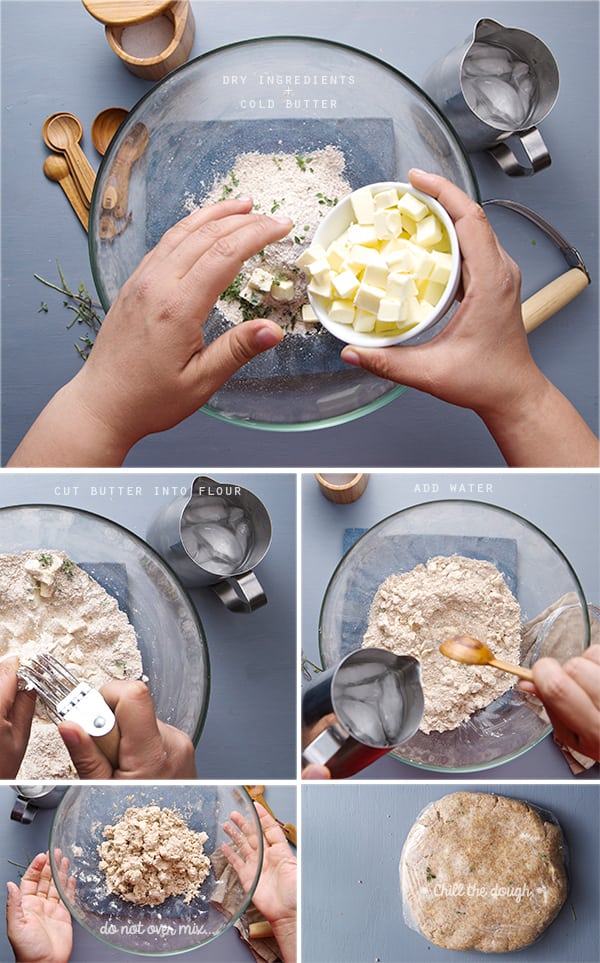
Measure all your ingredients, and place all the dry ingredients in a bowl and mix. Place bowl in the freezer. Meantime cut your cold butter, and iced water ready to measure. Remove the bowl of dry ingredients from freezer and add the butter. Add the thyme. With a pastry Blender incorporate the butter and flour until the mixture resembles to a coarse meal, and the butter pieces are small like the size of a pea. Slowly add the cold water and carefully with your hands form a dough that just holds together. Do not over work the dough. Once that the dough barely holds together cut a piece of plastic wrap and place your dough. Wrap it and shape it into a disk.
Refrigerate for at least 1 hour or 15-20 minutes on the freezer. If you plan ahead you can make the dough the night before.

Leek-Tarte-tartin_making-the-dough

Assembling the tart:

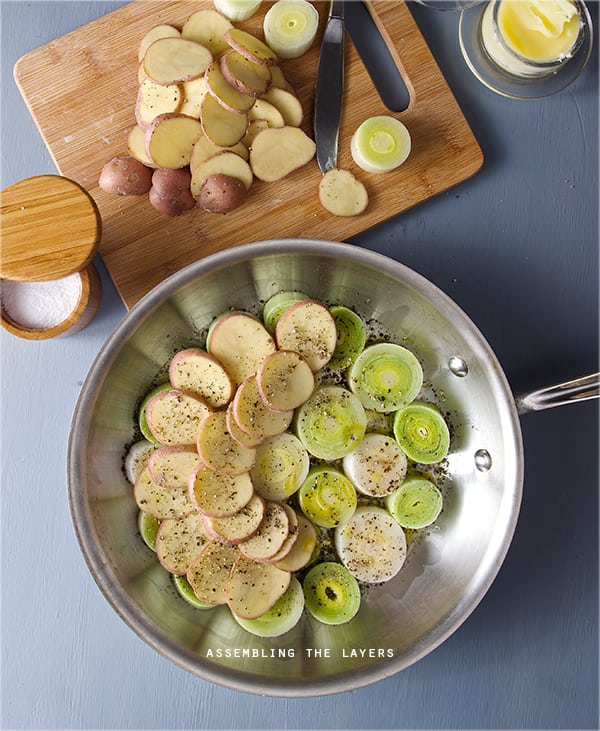
1. In a 9-10” skillet with rounded edges, melt 4 tablespoons of butter, add a glug of extra virgin olive oil, drizzle the honey, sprinkle the sea salt and freshly ground pepper.
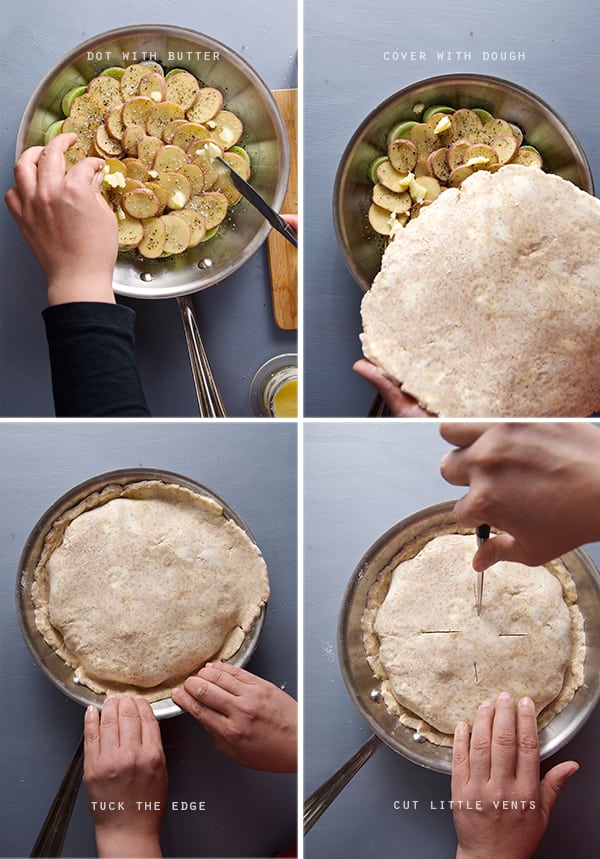
2. Place an even and tight layer of leeks, and top this with a layer of the thinly slices of potato.
Sprinkle some salt and pepper.

Leek,-potatoe-goatcheese-Assambling-tarte-tartin
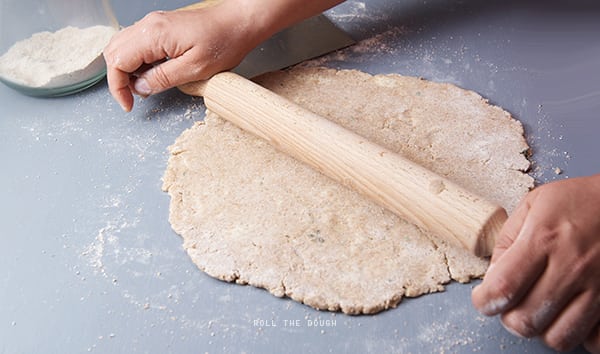
3. Once your dough is chilled, roll it out into a 10” circle 1/4” inch thick.

Leek,-potatoe-goatcheese-roll-the-dough
4. Cover the inside of the skillet with the dough, and tuck the edges.(see picture)
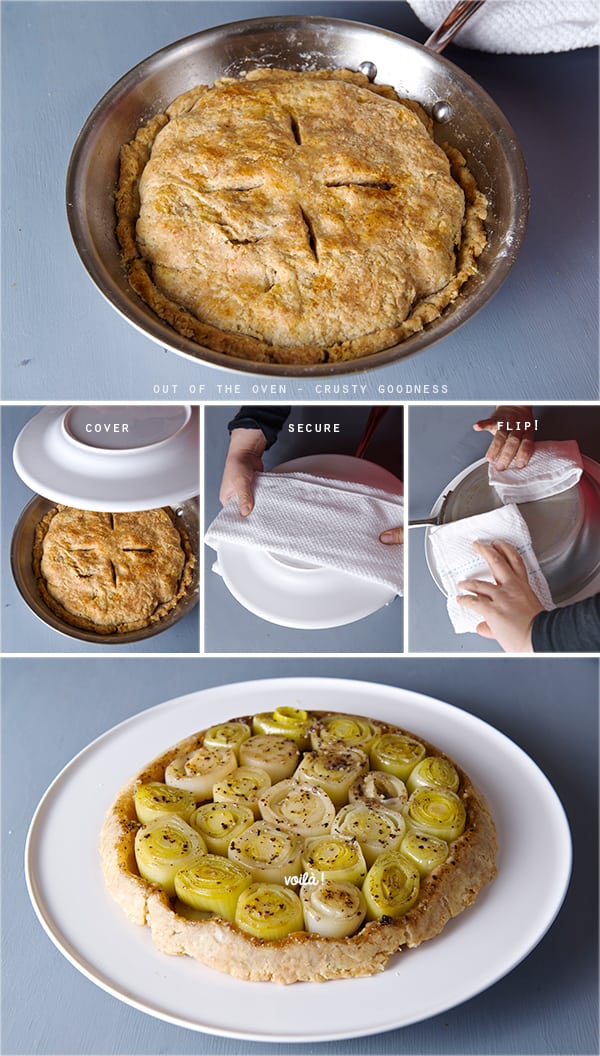
5. With a small pairing knife make 4 incisions. Bake at 425F/ 220C for about 25-30 minutes on the first 1/3 of the oven rack. until the top is golden brown.

Leek-tarte-tartin_how-to-place-the-dough
6. Remove from the oven, and cool the tarte tine for about 10-15 minutes.
7. With the help of a round plater, cover the skillet and wrap it with a kitchen towel. Flip.
Flip it with conviction, As Julia Childs said! (you can try to make the voice, some times this works best…)

Leek-Tarte-tatin_how-to-flip!

Leek-potato-goat-cheese-Tarte-tatin_Yes,-more-please!

Leek-potato-goat-cheese-Tarte-tatin_slice,-ready-to-eat

The leeks should be perfectly cooked, but not mushy, they hold their shape, they have this beautiful yellowish green color, the butter has done it’s magic. It should glisten…
Sprinkle some kosher salt, pepper, drizzle some extra virgin olive oil, and fresh thyme.

Enjoy!

Leek-potato-goat-cheese-Tarte-tatin_slice-Yes,-more-please!


View Post or View Comments 15

Warm Farro Asparagus and Poached Egg

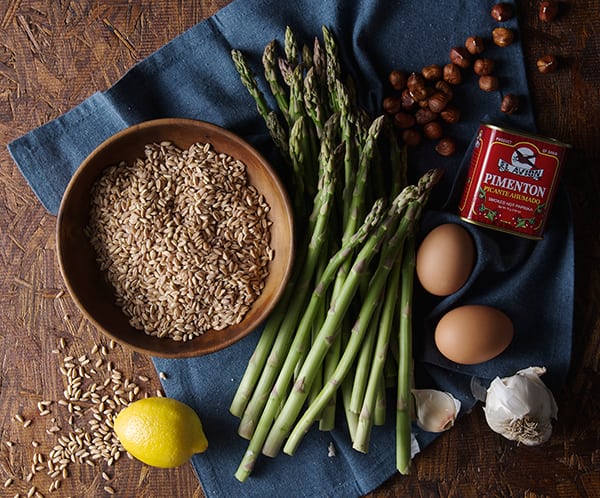
Warm-Farro-Asparagus-and-Poached-egg-ingredients

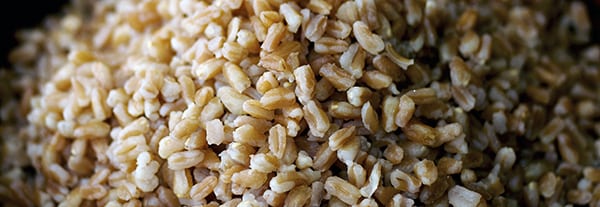
Have you ever tried farro before? Farro is a handsome Italian whole grain with a great tan color, a nutty and slightly sweet flavor. Farro’s texture is firm with a bit of a chew.  An early variety of hard wheat, farro has been around for more than 10,000 years. It was originally grown in Tuscany, Italy and nowadays you can find great organic farms here in U.S that now cultivate this “ancient” new grain.

Farro has a number of nutritional advantages over other grains. It is a complex carb which makes it far more nutritious than white rice. It is higher in protein than regular durum wheat and higher in fiber in comparison to many other grains. It is rich in Vitamin B complex, A, C, E and rich in Magnesium. Due to it’s low gluten content is easier to digest and to make it even better:  it has a low glycemic index. As you can see Farro is not just a handsome whole grain. Farro is smart and a gentleman too.

I strongly believe that farro should be the new super grain. I would say I prefer farro over quinoa.  There are different varieties of farro and the one I recommend to try first is farro perlato. It cooks in the same way as white rice. 2:1 ratio, 2 cups of water, 1 cup of farro perlato and in 20-25 minutes is perfectly cooked a bit al-dente and each grain separated which it makes it fantastic to sprinkle on salads or as a whole dinner like in this recipe. If you have more time and you are craving more fiber, choose a wholesome farro, soak it overnight and it cooks for about 45-1 hour… (but not my favorite choice, look for perlato!)
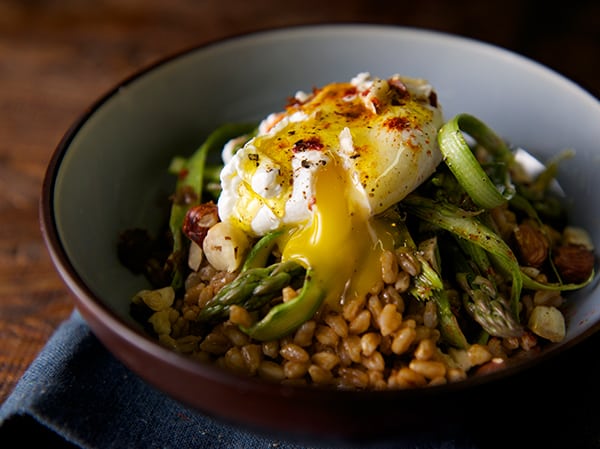
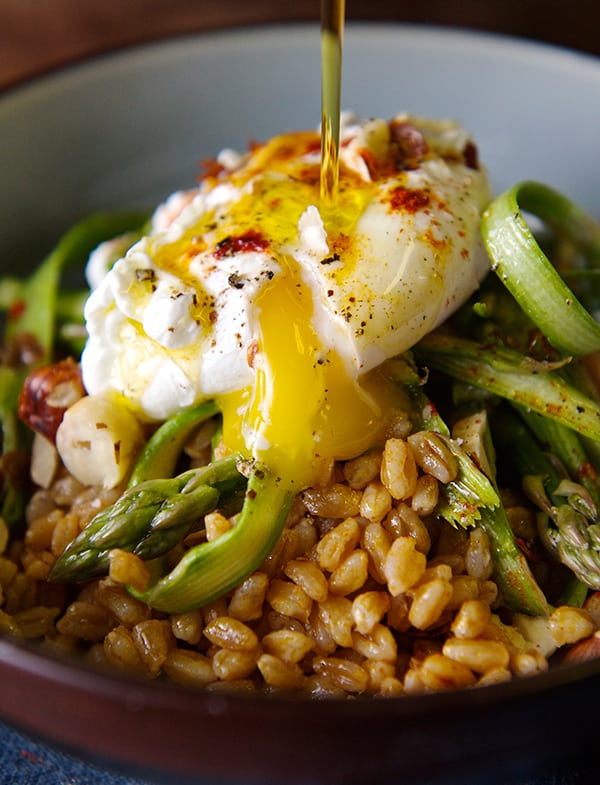
For this recipe I cooked the farro with some garlic and tossed it with extra virgin olive oil, lemon salt and smokey hot paprika. To top it off… a poached egg… And that farro dinner was amazing. I know you will love it and I would love to hear some feedback after you have dinner with this Italian grain…This recipe is definitely comforting and effortless.
Warm Farro, asparagus and poach egg… makes a great brunch, lunch or dinner.

FARRO TextureWarm-Farro-Asparagus-and-Poached-egg-asparagus-ribbons-Warm-Farro-asparragus-and-poached-egg--~Yes,-more-please!

Warm Farro Asparagus and Poached Egg

Serves 2 with some left over farro to sprinkle over your next green salad.

1 Cup Farro Perlato (Bluebird Grain Farms, Bob’s Red Mill Natural foods)
2 cups water
2 garlic cloves
1 teaspoon salt
1 glug of extra virgin olive oil
½-1 teaspoon Smoked Hot Spanish Paprika. (upon you preference, start with ½ , check on flavor)

8-12 asparagus (the thiner the better, pencil asparagus work great , they are tender and less fibrous)
1 glug of extra virgin olive oil
1 Lemon (the zest and the juice)
Salt and Pepper

2 Eggs room temperature

To garnish:

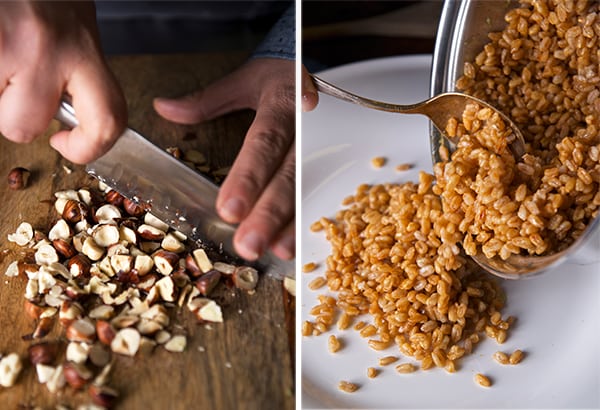
2 tablespoons toasted hazelnuts, coarsely chopped .
2-3 pinches Smoked Hot Spanish Paprika.

Preparation method:

1. In a medium size pot bring 2 cups of water to boil along with two garlic cloves. Add the Farro and a pinch of salt. Reduce heat to medium-low and cook for 20-25 minutes. Or follow directions on package otherwise.
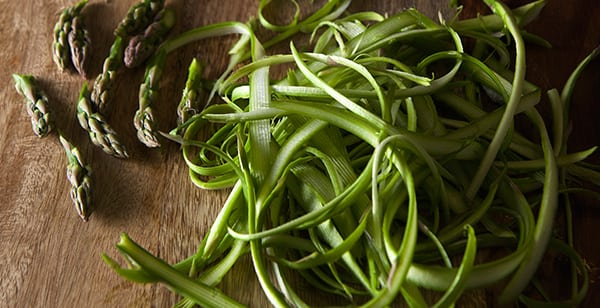
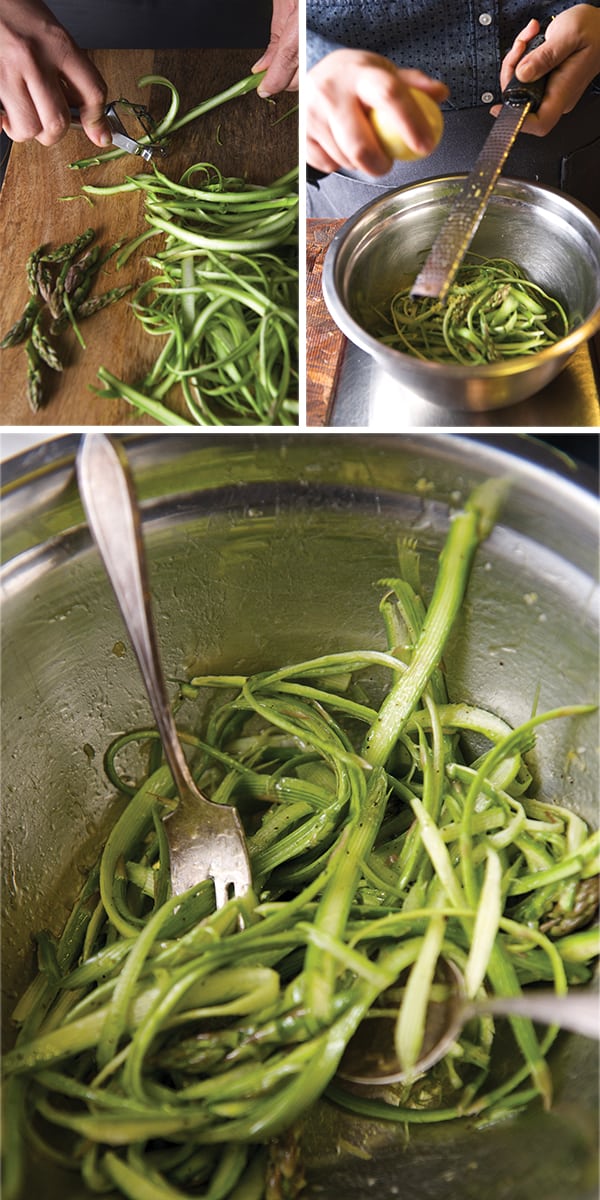
2. Meantime, wash your asparagus, cut the ends, and with a vegetable peeler make thin ribbons. In a medium size bowl toss the asparagus with salt, pepper, extra virgin olive oil lemon zest and lemon juice.set aside.

Warm-Farro-Asparagus-and-Poached-egg-asparagus-ribbons

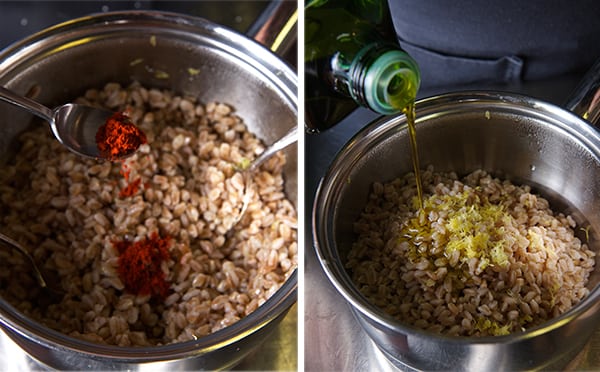
3. When Farro is cooked, turn off the heat remove the garlic cloves and Season the Farro by adding a glug of extra virgin olive oil, salt, pepper, the Smoked Hot Spanish Paprika, lemon zest and a squeeze of lemon juice. Toss and cover with a lid to keep warm.

Warm-Farro-asparragus-and-poached-egg-seasoning-the-farro

How To poach eggs:

It is certain that poached eggs take a bit of patience and timing, but I assure you that eggs meant to be poached. Practice helps, and if you follow this easy method you will be an expert poacher in no time. The reward makes it worth trying.

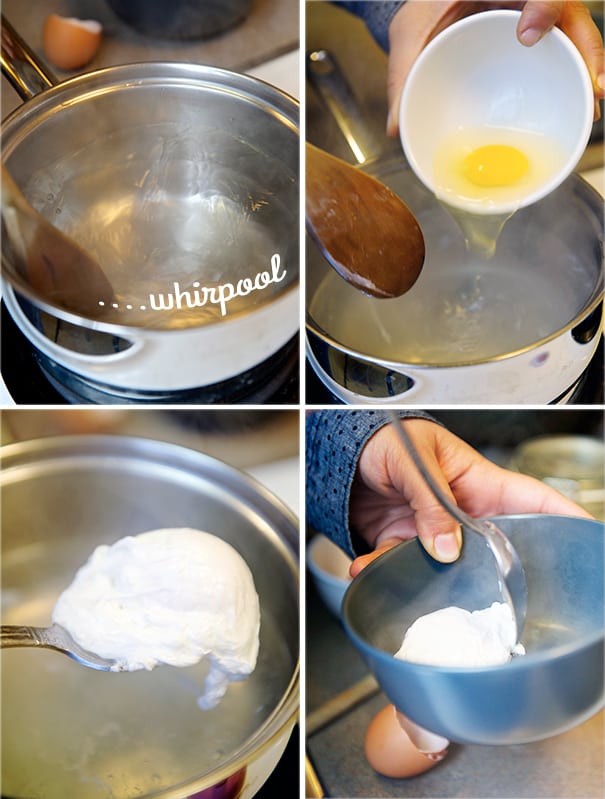
1.In a small pot bring about 6 cups of water into a simmer. Add 1 teaspoon of salt, 1 tablespoon of white vinegar.
2. Crack one egg at a time onto a small ramekin or a small cup (this with help you to drop the egg into the water more easily)
3. With a Wooden spatula, create a water whirlpool and drop the egg into the center of the whirlpool. This will help to contain the shape of the egg-white into a pillowy egg goodness.
4. Turn down the heat to low
5. Let it swim into the water for about 2-3 minutes if the egg was room temperature. If the egg was in the refrigerator, it might take about 4-5 minutes.
4. With a slotted spoon carefully remove the egg from the water, and place it into a warm ramekin with a bit of tepid water, while you proceed to poach the next egg.Warm-farro-asparagus-and-poached-egg-how-to-poach-and-egg

Note: if you are not trilled about the poaching your eggs,  over easy eggs will work to!
There is no rules in here, this is just pure cooking inspiration!

5. Plate a generous amount of warm farro and top it with the asparagus ribbon salad.
6. Carefully Place the warm poached egg on top.
7. Drizzle some extra virgin olive oil, sprinkle some toasted hazelnuts, sea salt, fresh cracked pepper and a pinch of Smoked Hot Spanish Paprika. Enjoy!

Warm-Farro-asparragus-and-poached-egg-toasted-hazelnuts-and-farroWarm-Farro-asparragus-and-poached-egg-toasted-drizzle-olive-oli

If you want to know more about Farro, check this articles:

http://www.takepart.com/article/2013/03/20/jane-says-farro

http://www.bluebirdgrainfarms.com/nutritional-information.html

View Post or View Comments 8

Betsy’s Scottish Potato Scones

Scottish-Potatoe-Scones_ingredients~Yes,-more-please!

Scottish Potato Scones, or Potato Tatties are simply delicious clouds of light and fluffy potatoes baked in a griddle. They are especially popular in Scotland and the Isle of Man as a breakfast staple.

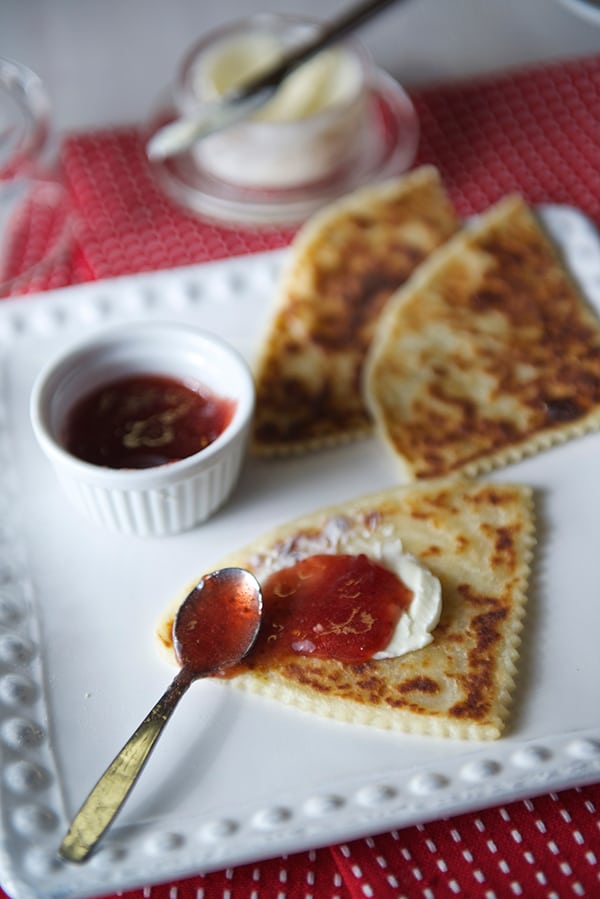
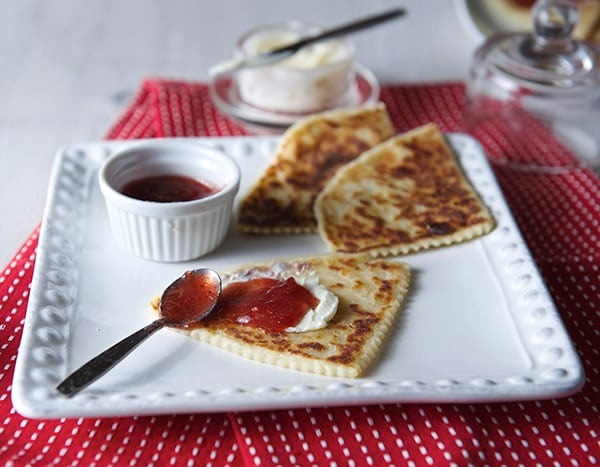
Ian introduced me to this simply delicious Scottish scones. The recipe has been in his family for a long time. His grandma passed the recipe onto his mother and his mother used to make them when he was a little child. Ian remembers dearly how Betsy used to make this Potato Scones for him and his siblings. Eating them with butter and strawberry jam was a delicious treat!

Based on this childhood memory we were determined to find the recipe and make them…Of course with no luck on our side, we could not find any trace of recipe, so we had to start by scratch. I think I made about 11 batches of these puppies before Ian said” that’s it”, these are the ones, these taste like the ones she used to make!…Hurray!!! I was thrilled that based on a memory of flavor, taste and texture we were able to found the recipe. We felt so happy, that  from now on we will embrace this as our Christmas breakfast.

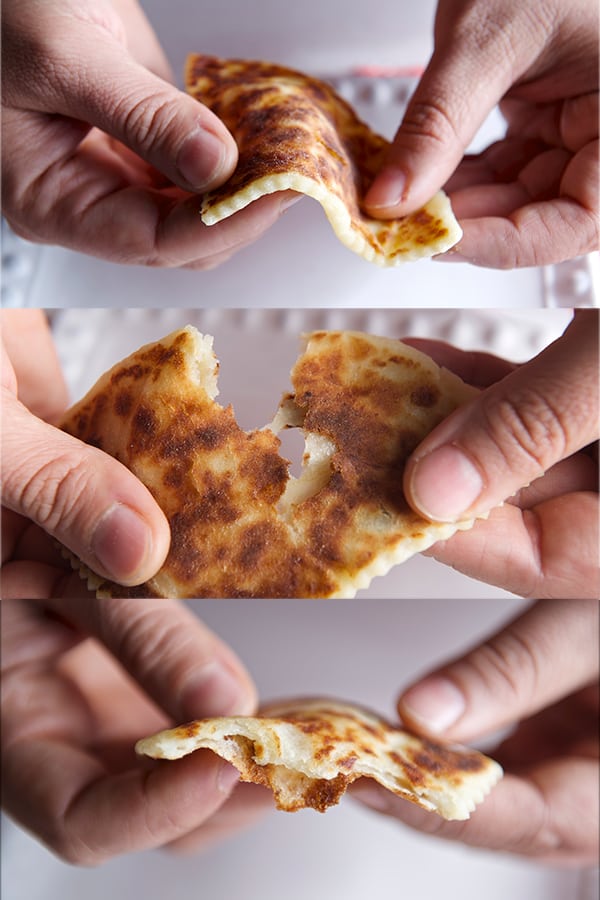
There are many, many ways to make a Scottish Potato Scone, believe me, we tried every single ratio of potato-flour-butter. Until  Ian said: this it it! they taste just like the one’s Betsy made! (Im sure they are not as good as the ones she made, moms have their special touch, but I will keep practicing!) In this recipe case, they are a little thinner than the average ones, they have soft and light consistency, its like a pillowy thicker potato-flour tortilla, not salty, nor sweet, which makes it the ideal breakfast scone.

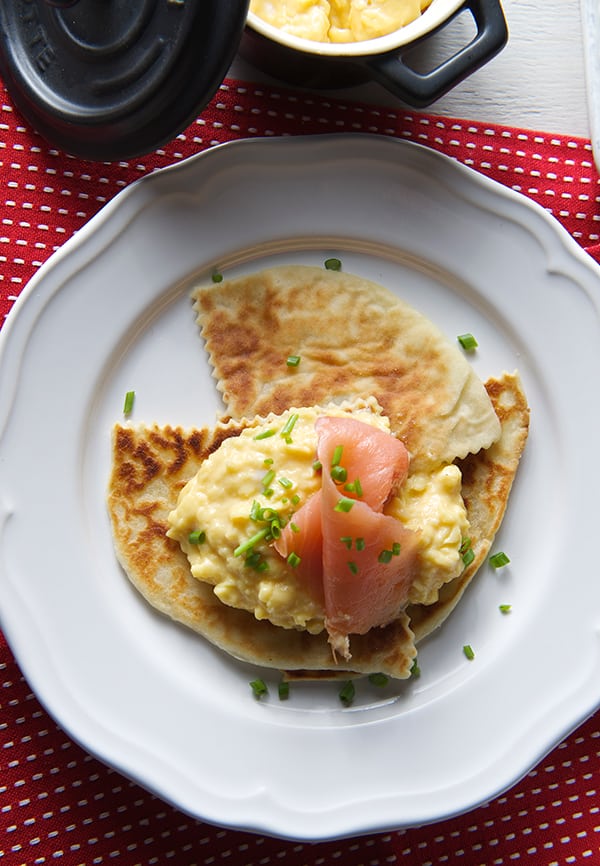
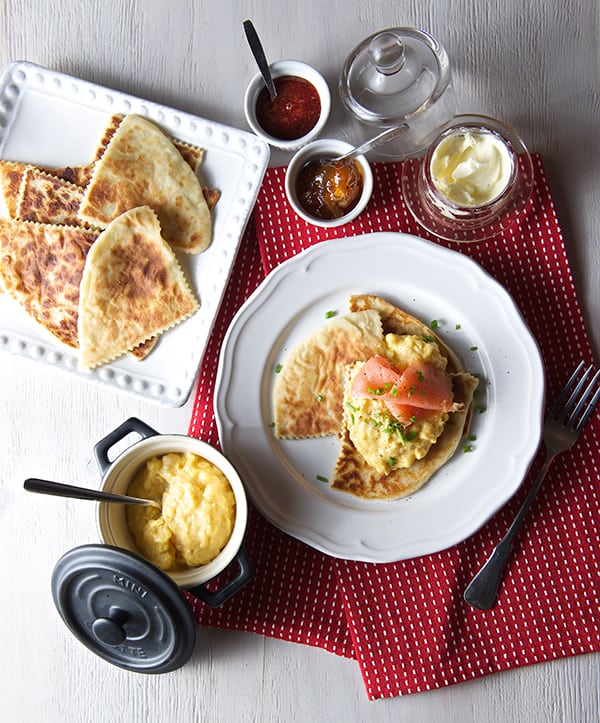
To make them as a whole breakfast, we decided to serve them with Ian’s fantastic creamy eggs and smoked salmon. We put a  little twist on one of our favorite breakfast recipes from Gordon Ramsey, he makes this similar creamy eggs and serve them on a toasted croissant topped with smoked salmon. what’s not to like right?… well, wait until you try this scones, I think it is a great and dainty pairing.

What we wanted to achieve with this recipe is to recreate a hearted memory. We both come from small families and sometimes is hard to get together; people are far away, work can distract.  And when it comes this time of the year, there’s always the need to create our own memories and make things that remind us that no matter what, the people we love will always be with us in memory and heart.

Every Christmas we try to make something special to remember Ian’s mother, Betsy, who left us on a Christmas Eve. She absolutely adored Christmas time, she used to find us thrifty quirky funny  presents that will make us laugh or need the un-needable! she also loved decorating and cooking for the family.  Since then, we have been making a special dish, decoration and playing music to commemorate her. We love and miss you Betsy!

This year this is our tribute to her, and we proudly wanted to share the recipe with you.
Merry Christmas!, Happy Holidays!

May this season be filled with love and great memories.
Ian and Mariana

Betsy's-Scottish-Potatoe-Scones_with-strawberry-Jam-~Yes,-more-please!

Betsy’s Scottish Potato Scones

Makes about 16 triangles, serves 4 or 2 Celtic creatures

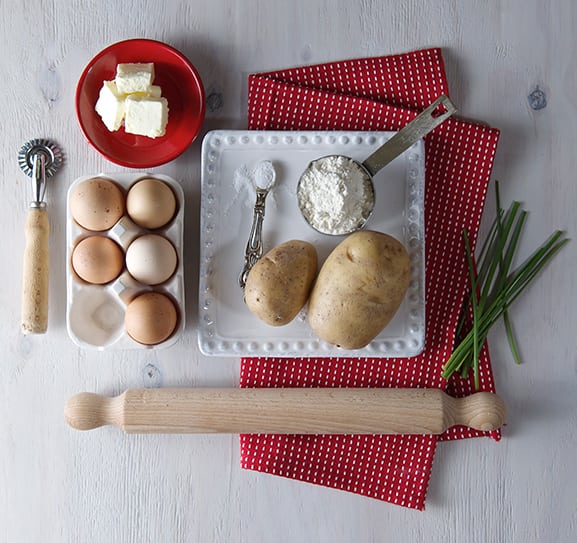
2 medium size potato (Equivalent to 2 cups when mashed) like Maris Piper, King Edward or Yellow potato.
1 cup all purpose flour + more to dust and roll
4 oz good irish butter I used Kerrygold, or Organic Valley
1/2 teaspoon baking powder
2 healthy kosher salt pinches

Method:

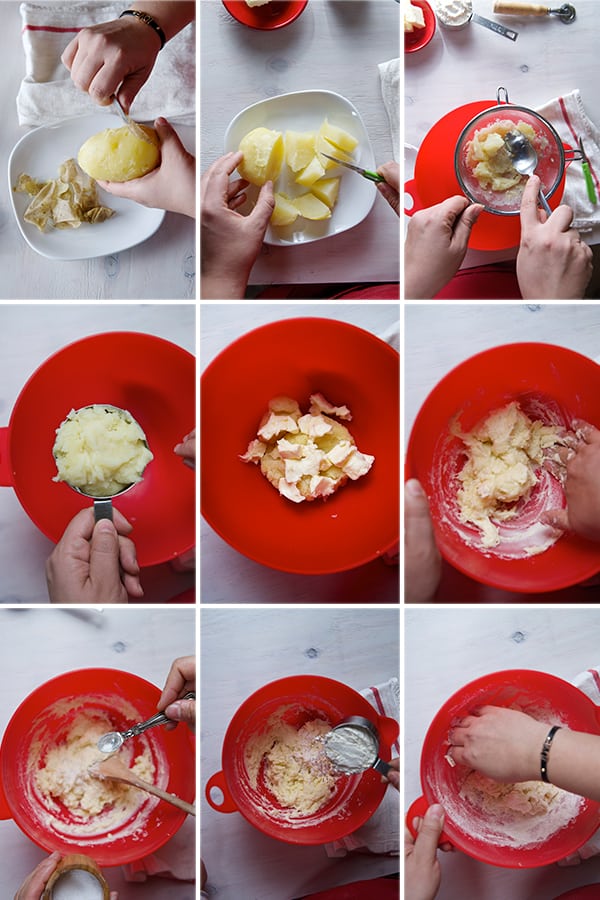
1. Steam the potato, skin it, cut in cubes and with the help of a strainer or a ricer puree the potato into a medium size bowl.
2. Add Butter and mix with your hand until incorporated
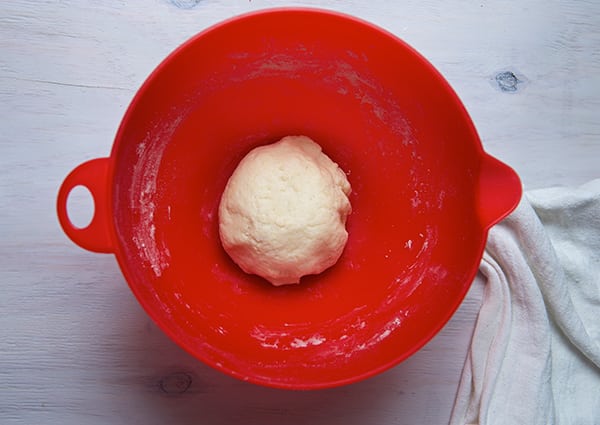
3. Add Salt and Flour and mix with a wooden spatula until you feel you need to use your hands in order to get all the flour incorporated to the dough.

Scottish-Potato-Scones_Step-by-step~-Yes,-more-please!

Scottish-Potatoe-Scones_the-dough~Yes,-more-please!
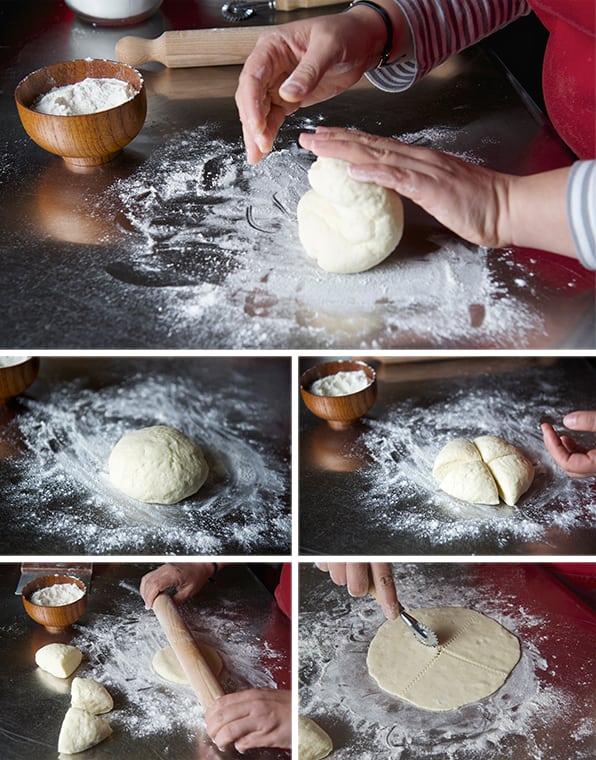
4. In a lightly flour dusted surface, softly Knead the Dough in folded movements for about 2 minutes. Shape it into a ball and divide into 4 equal pieces. Roll each piece about 6” diameter and 1/8-1/4 inch thick disk. With a pizza or ravioli cutter, gently cut the disk into four pieces.

Scottish-Potato-Scones_kneading-the-dough~Yes,-more-please!
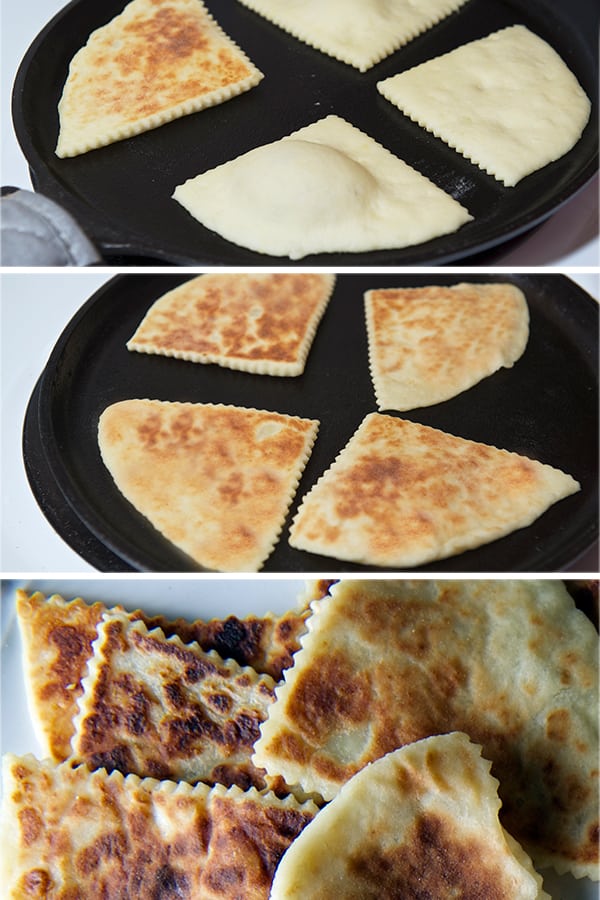
4. Warm a cast Iron Griddle using medium-low heat. Oil a paper towel and lightly grease the griddle. Place the 4 triangle Scones and cook them about 3-4 minutes per side. The way to know when to flip them is when they start forming air pockets, watch your heat, they cook better in medium low, some cast iron pans can hold a lot of heat so you might have to adjust for a lower setting during the cooking. Is kind of like Pancakes, The first batch is not so good, and after that everything cooks beautifully!
5. Serve warm.

Scottish-Potato-Scones_on-the-gridle

“Betsy’s scones where soft , light and pillowed, with a bit of chewy like a  flour tortilla”

That’s how Ian describe them.

Scottish-Potato-Scones_texture~Yes,-more-please!

Ian’s Creamy Eggs:

Serves 2

When it comes to eggs it really does makes the difference to use the best quality you can.
Organic free range , thats what we use, Smith & Smith farms, Boggy Creek Farm if you are in Austin this are ones of the best!

4 large Eggs
1-2 Tablespoons butter
A splash ah-roo of heavy cream.
Salt and fresh cracker pepper to taste.

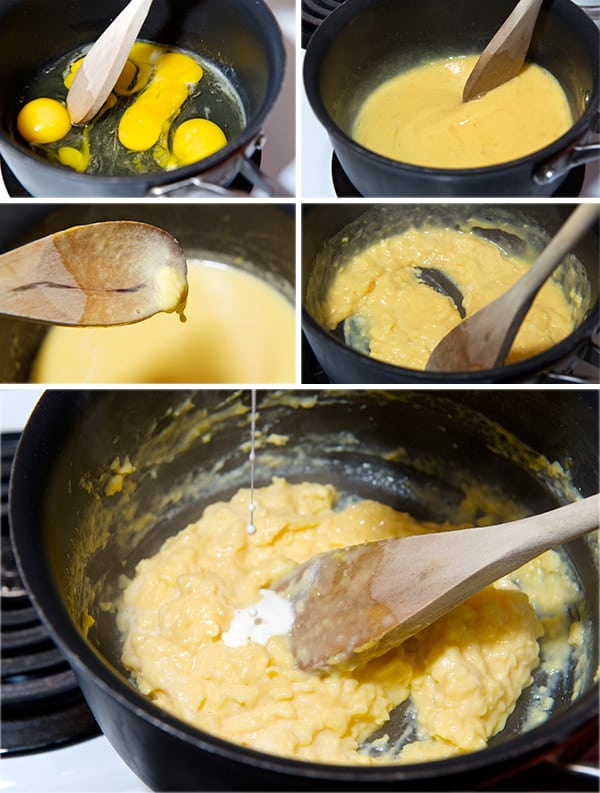
These eggs are really easy to make, but they require all your attention, its all about stirring slowly at all times until they start to curdle. Be sure to start the eggs at last. Once you have your table set up, the scones made, plates warm, smoked salmon in the table, chives ready, coffee on the table. Yes it is this crucial you have everything ready, so you can enjoy the eggs as creamy and warm as possible, since they change their consistency as you eat them. The consistency of these eggs is like a creamy custard with small curdles of egg, soft and tender, they just melt in your mouth. Salt and pepper is added at last to prevent though egg whites.

So, -ready-; set …GO!

Method:

In a small-medium non-stick pot, over a low heat melt 1 tablespoon of butter very gently.
Add the 4 eggs and whisk gently until well incorporated.
With a wood or rubber spatula, start stirring the eggs in circles, at all times.( As if you where gently whisking)
Until they start to curdle, add the second tablespoon of butter keep stirring, remove from heat and add a small splash of the heavy cream ( keep stirring) place them back into the heat, for about 6-8 seconds, and transfer them into a warm ramekin or ceramic dish. Serve immediately Add salt and pepper to taste.

Scottish-Potato-Scones_creamy-eggs~Yes,-more-please!

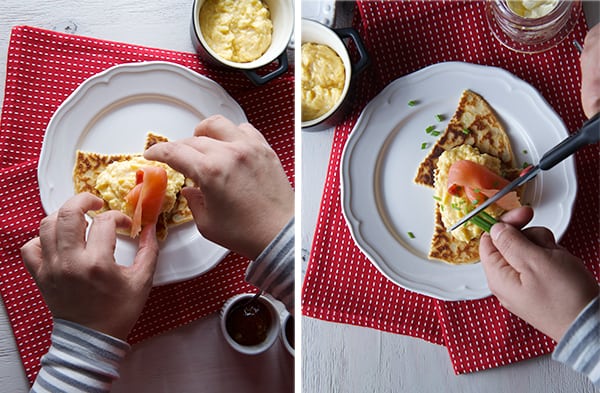
Serve: Over 2 or 3 scones, a couple of tablespoons of egg and top it with the smoked salmon and chives. Enjoy!

Betsy's-Scottish-Potato-Scones_plating-~-Yes-more,-please

Betsy's_Scottish-Potatoe-Scones_withIan's-Creamy-eggs-~Yes,-more-please!

Betsy's_Scottish-Potatoe-Scones_Creamy-Eggs,-smoked-salmon-and-strawberry-Jam~Yes,-more-please!

Betsy's_Scottish-Potatoe-Scones_with-strawberry-Jam~Yes,-more-please!

Merry Christmas!!!

View Post or View Comments 0

Privacy Policy Contact Us Yes, more please!