GLUTEN-FREE RSS feed for this section

Pizza Azteca

Pizza-Azteca_Yes,-more-please!

It’s a pizza!…no!
It’s a casserole!….no! It’s a tamale?!…..no!
It’s a Corn Masa Pizza Pie!….Yes!
As silly as it sounds, it is ridiculously delicious!
Call it what you like: Mexican pizza, Corn Masa pizza; Pizza Azteca-its the ultimate summer one pan wonder. This is a great quick meal solution too! To get pizza on board it takes no more than 35 minutes since the masa does not rely on yeast or waiting time to rise.
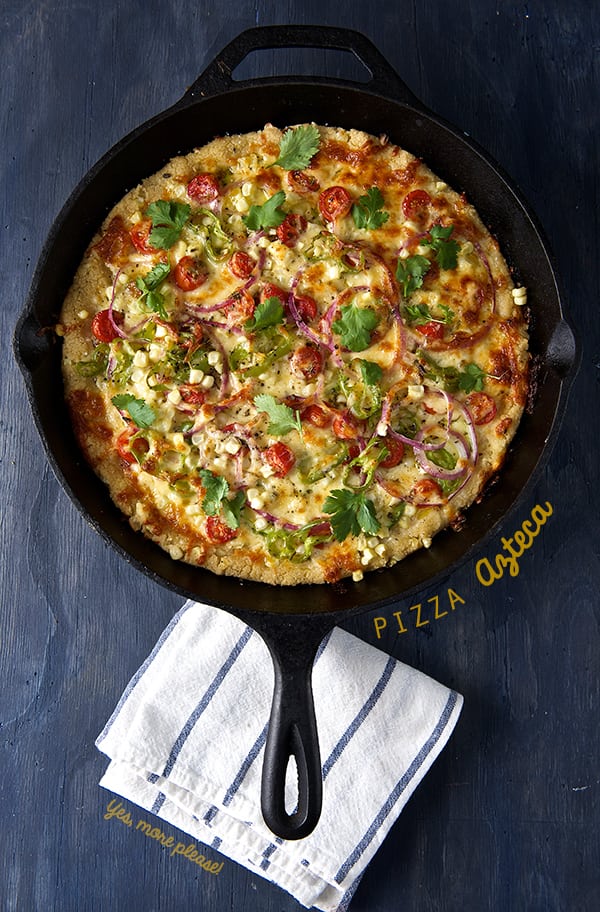
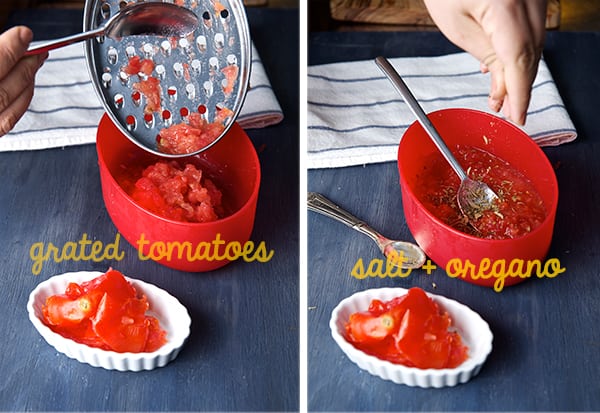
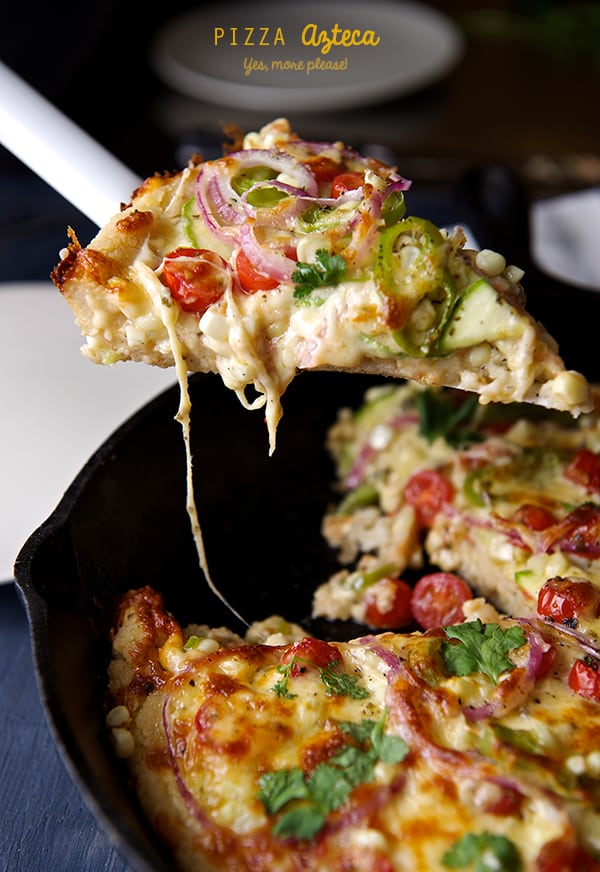
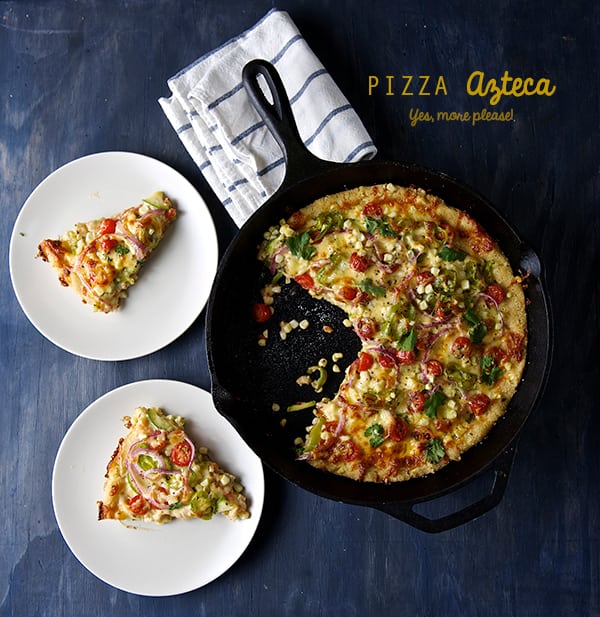
Let me describe this pizza for you… Imagine a hot cast iron pan filled with corn masa crust, when baked the bottom gets crusty with soft delicious nutty corn masa. Fresh corn kernels add texture, enhance the corn flavor and add moisture to the crust. The top layer load with summer vegetables like zucchini, fresh corn, tomatoes, red onions, hatch peppers, and loads of melty cheese layered on top. The summer vegetables pair great with the flavor of the corn masa, the oregano on the fresh quick base sauce adds the perfect herb note. I made the pizza sauce by grating some fresh tomatoes which adds extra freshness to the pizza. I baked everything on the king of pans, “the cast iron pan”.

When this pizza comes out of the oven you will be fill with warmth and happiness as you experience the comforting smell of cooked corn masa and fresh vegetables. Pizza Azteca is best served with a fresh green salad on the side and will be a sure crowd pleaser.

This Pizza Azteca is what I would offer Moctezuma on a summer afternoon… Pizza Azteca is a meal fit for kings!

Enjoy!

Pizza-Azteca_Yes,-more-please!_ingredients

Pizza Azteca

Makes 1 round 12” pizza, yields 8-10 slices.

For the crust:

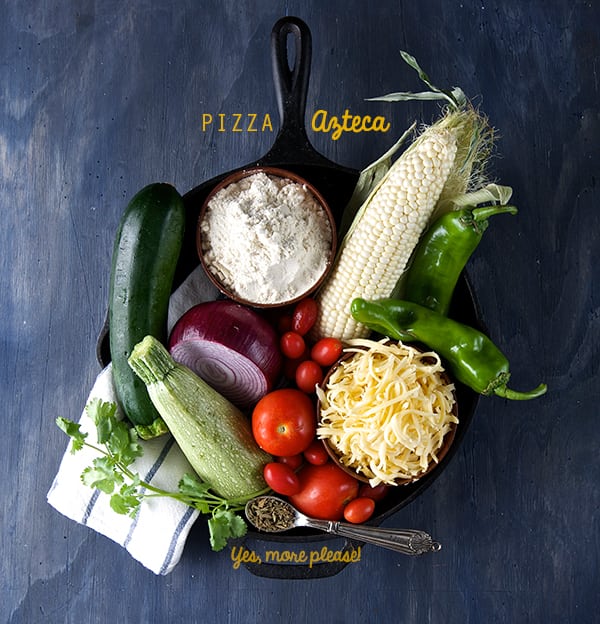
2 cups corn masa- Maseca is the brand I like, if you can get fresh masa, use it! you will be in heaven.
2 to 2-1/2 cups warm water
½ teaspoon kosher salt
½ cup fresh corn kernels (white or yellow corn is ok)

For the sauce:

3 medium roma tomatoes grated
1 tablespoon tomato paste
1 teaspoon dry oregano
1 garlic clove grated
1 tablespoon extra virgin olive oil
1 teaspoon kosher salt
Fresh cracked pepper to taste

For the toppings:

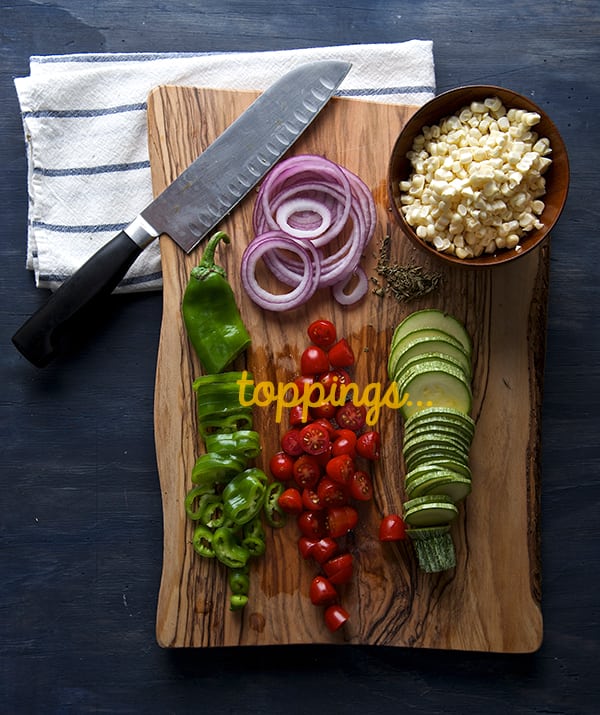
1 large or 2 medium zucchini thinly sliced.
1 ear of corn worth of kernels
1 hatch pepper or substitute for 1 good pinch of red pepper flakes.
Use roasted red peppers if you do not care for spicy.
1 cup cherry, sun golds or grape tomatoes sliced in half.
2 cups of grated cheese like Adobera, Oaxaca, Gouda, Mozzarella or Monterrey jack.
Use the cheese you like the most, as long it melts and has a mild flavor so you can taste the rest of the ingredients.
Salt and pepper to taste a little extra virgin olive oil for drizzle.

Preparation:

Preparing the masa:

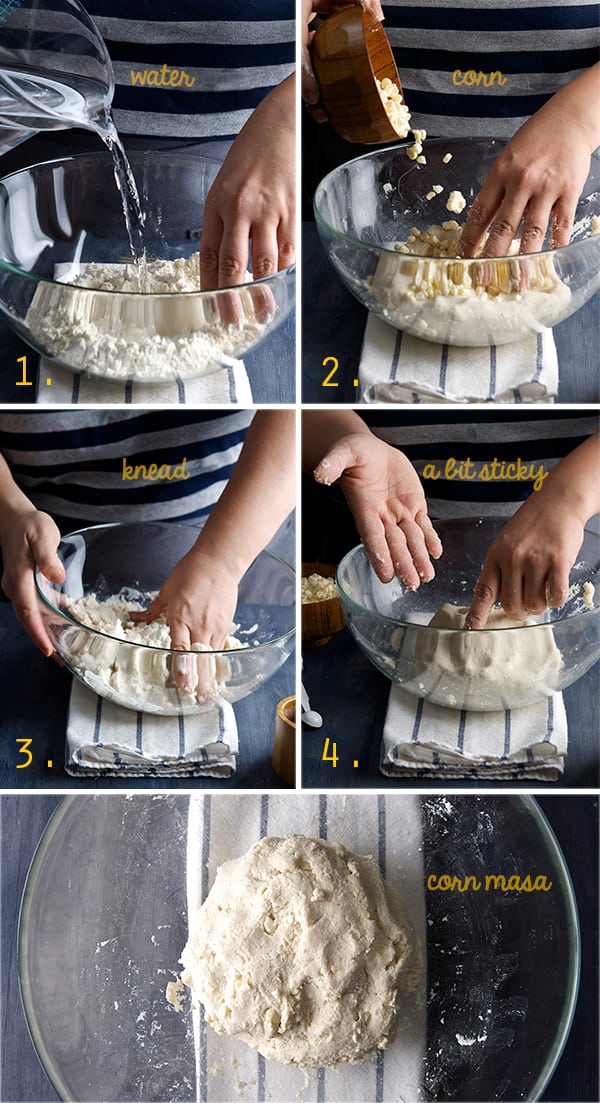
1. Start by preparing the masa dough. Dissolve the salt into the 2 cups of warm water.
2. In a large bowl place your dry corn masa flour, make a well in the center add half of the water, and start incorporating the flour from the sides. Add corn kernels and the rest of the water. Knead for 2-3 minutes until water is well absorbed by the masa.
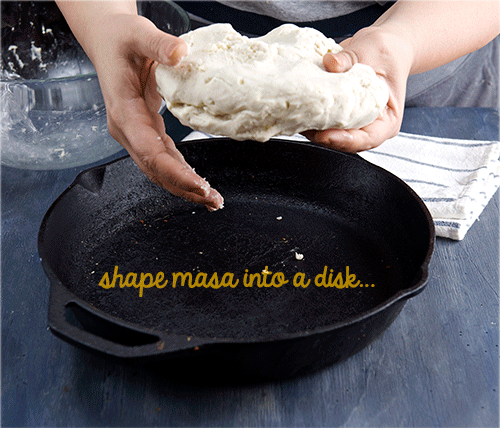
3. The masa should feel moist a bit sticky to the touch. You should be able to shape it into a ball and cover with plastic wrap, set aside let it rest while you prepare the rest of your vegetables.
4. Preheat Oven at 450F/ 230F

Pizza-Azteca_how-to-make-the-crust
5. Prepare and slice all your vegetables, grate your cheese and prepare your tomato sauce by grating the tomatoes and adding the oregano, salt, garlic, black pepper and extra virgin olive oil. Set aside.

Pizza-azteca_ingredients

Pizza-azteca_Sauce
6. At this point your masa should be well hydrated and ready to shape into the cast iron pan. Using a 11-12” Cast Iron Pan place your masa dough in the center and with wet hands start by evenly shaping the masa into the pan. Create a  higher rim on the edge of the pan. see photo.

Note: If your cast iron pan is well seasoned do not worry about the crust it will not stick to the pan, if not just apply some neutral oil on a napkin and grease the pan before shaping your crust.

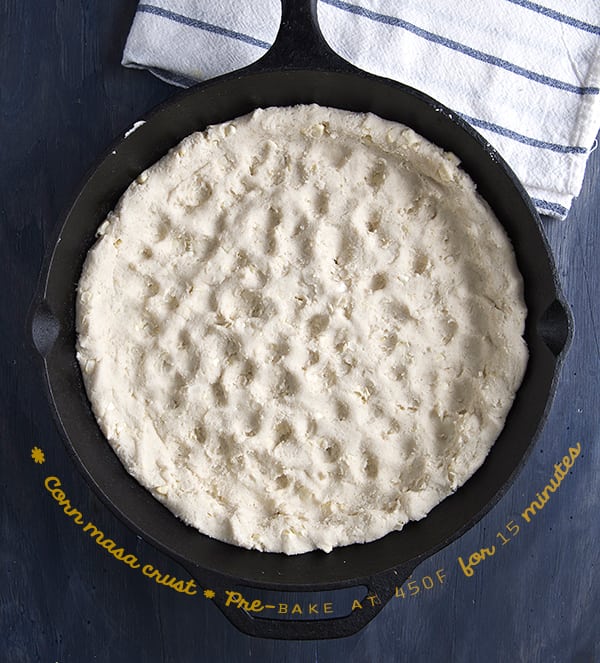
7. Once you have an even layer with a bit of a rim on the outside edges, Place skillet with the crust in the oven, on the bottom rack. Bake for 15 minutes lowering the oven temperature to 425F as soon the crust is in the oven.

Pizza-Azteca_Pizza-crust

Pizza-Azteca,pre-bake-crust
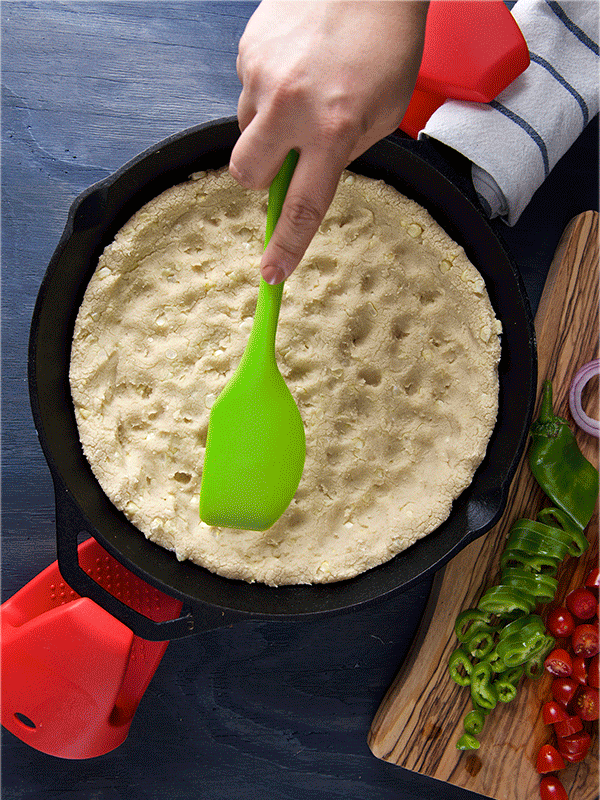
8. Carefully remove the skillet from the oven, place it on top of the stove or a metal trivet and start layering your pizza ingredients. Note: leave the pot holders into the cast iron pan handles at all times!, this will prevent you to try to grab the hot pan by mistake!…believe me I’ve been there…ouch!
9. Layer the ingredients same way you do like on a pizza, starting with tomato sauce on the bottom, half of the cheese, zucchini, corn, onions, tomatoes, peppers, and the rest of the cheese. A pinch of salt and some fresh cracked pepper.
10. Place the cast iron pan into the oven for another 20-25 minutes until cheese is melted and the pizza has some gratin golden brown blisters.

Pizza-Azteca_layers
11. Remove from oven, place the pan on a trivet and wait 5 minutes to cool off a bit before cutting. Sprinkle some fresh cilantro for garnish.
12. Serve and Enjoy!


Pizza-Azteca,-ready-to-serve_slice

Pizza-Azteca,-Yes,-more-please!_slice

Enjoy!

Silly, silly music pairing: Brak’s Pizza Song with the Space ghost…

View Post or View Comments 13

Zucchini Ginger Brown Rice Bowls

Zucchini-Ginger-Brown-Rice-bowls_ready-to-serve-Yes,-more-please!

Light and refreshing is what best describes this recipe. A one bowl meal! It’s no fuss, maximum flavor, raw zucchini with a gingery-soy sauce over a nutty sesame seasoned brown rice. This Zucchini Asian flare recipe, is so light, refreshing and savory, you are going to want to eat it more than once a day.
I know what Brown rice does not have a great reputation among the grains because it tends to be mushy and it can taste like cardboard… Well my friend, I have you covered on this one, you will love the quick easy method that I use. Cook the brown rice as you would cook pasta. Use  a large pot with plenty of water and pinch or two of sea salt. The brown rice boils loosely for about 25-30 minutes; stir often and check for an al-dente consistency. When is up to my desired doneness I strain it and the heat of the steam dries the excess water in the brown rice,  leaving you with perfectly cooked,  fluffy individual grains, with great texture cooked trough and slightly  al-dente.

Using this method, I cook larger batches of brown rice and use them later for a quick sautéed, salads, soups or in this case; this humble and refreshing Zucchini Ginger Brown Rice bowl.

As you can see there is hope for this misunderstood grain. I assure you once you try this method you will love brown rice again.

Enjoy the bountiful zucchini season and stay fresh!

Zucchini-Ginger-Brown-Rice-bowls_ingredientsZucchini-Ginger-Brown-Rice-bowls_short-grain-brown-rice

Zucchini Ginger Brown Rice Bowls

Makes 2 meal bowls

3 medium size zucchini any color is up to your preference.
1/2 cup toasted and finely chopped cashews or walnuts
2 green scallions finely chopped
1 tablespoon toasted sesame seeds (any color)
1 tablespoon of fresh grated ginger.
1 small garlic clove grated

For the dressing:

1 Tablespoon soy sauce
2 Tablespoons sesame seed oil
2 Tablespoon Rice Vinegar

For the rice:

1 cup short grain brown rice
8 cups of water
2 pinches of salt.

Season the rice with:

1 Tablespoon sesame seed oil
1 Tablespoon sesame seeds
2 Tablespoons seasoned rice vinegar.

Preparation Method:

1. Bring to a boil a large pot filled with 8 cups of water and 2 good pinches of sea salt. Once is boiling add the brown rice, bring back to a boil, and then lower the temperature for a slow simmer. Simmer for about 25-30 minutes. Stirring occasionally.
2. While your rice is cooking, shred your zucchini, ~omit the seed core on the zucchinis~ I used one of my favorite uni-taskers, I absolutely adore this julienne peeler! you can get it any cooking supply store or get it on-line. Toast your walnuts, chop the scallions, grate your ginger and garlic.

Zucchini-Ginger-Brown-Rice-bowls_julienne-peeler
3. In a large bowl combine the shredded zucchini and one good pinch of salt, toss well and let it stand for a few minutes. This will draw out some of the excess water out of the zucchini.Toss water from bowl and place zucchini on a clean kitchen towel and gently squeeze with your hands as much water as possible. remove from towel and with your hands fluff up the shredded zoodles. This step is very important, because avoids watering down your vinaigrette.
4. In a large bowl Combine the drain shredded zucchini, finely chopped toasted walnuts, toasted sesame seeds, green scallions, grated ginger, grated garlic.
5. Combine the soy sauce, sesame seed oil, rice vinegar. Set a side you will dress your zucchini right before serving. Please check on your rice.

Zucchini-Ginger-Brown-Rice-bowls_fresh-grated-ginger
6. Check for rice doneness. I usually look for a soft but firm grain, that tastes cooked and has a god bite. Usually is around 25-30 minutes, the doneness I prefer. See the picture below.If you want to go a little further on cooking is up to your preference, give the rice another 5 minutes, re-check and taste; always taste!
7. Once your rice is cooked, with the help of a colander or a sieve, strain the rice. Allow the hot steam to dry the extra water, give it around 5-7 minutes. Once all the excess water is drained and still warm, transfer the rice into a bowl and season with the sesame oil, sesame seeds and rice vinegar toss until well combined.

Zucchini-Ginger-Brown-Rice-bowls_how-to-cook-brown-rice
8. Once your rice is seasoned, Add the Soy sauce sesame seed oil, and rice vinegar dressing to the zucchini mixture. Toss well.

Zucchini-Ginger-Brown-Rice-bowls_add-dressing

Zucchini-Ginger-Brown-Rice-bowls_tosswell
9. Using two deep bowls, divide the rice and top it with the zucchini mixture. Sprinkle some extra sesame seeds and for spice maybe some Thai pepper, red pepper flakes, or some Sriracha-hot sauce! Enjoy!

Zucchini-Ginger-Brown-Rice-bowls_assambling-the-bowls

Zucchini-Ginger-Brown-Rice-bowls_ready-to-servel

Fresh, light, easy lunch or dinner…

Music Pairing: Nanobots – They Might be Giants


View Post or View Comments 3

Mexican Shrimp Cocktail


Mexican-Shrimp-Cocktail_Yes,-more-please!

Hold your horses! Hide the children! What you are about to see is food rated “R” at its best! My Mexican Shrimp Cocktail is to die for. Fresh, delicious, and savory; it’s the perfect simple light meal for a hot summer afternoon. This juicy cold and light savory cocktail is a meal in itself. What makes it Mexican style? Well the whole combination of vegetables, accoutrement, and the cold broth. It’s a savory broth made with shrimp shells and seasoned with fresh orange and lime juice, ketchup, and some dashes of hot sauce. The result is this light fresh savory broth that goes incredibly well with the shrimp. In my opinion there’s no need to buy those bottled clam juices when you can get the most natural flavor out of your shrimp!
This Mexican Shrimp Cocktail is an entrée rather than an appetizer with a dipping sauce as served in the States. In Mexico, this cocktail is typically served on the coastal cities as an iconic refreshing staple and a must have if you are spending your day on the beach. In the city, shrimp cocktail is widely known as the number one ‘hangover elixir.’
There are many variations in which more than one shellfish is added to this concoction. Common ingredients include octopus, clams, oysters, baby scallops. It is called “Vuelve a la vida” which translates to “come back to life” because its invigorating attributes. That, I can not guarantee, however I assure you that it will refresh and invigorate you on a summer afternoon. In my case, I just love the simplicity of flavors and the way the shrimp skins cooked as a base produce a magic broth with depth and character!

Prepare this dreamy cocktail for yourself ! You can make it in advance, since it is served cold on chilled glasses. For parties you can serve it with all the vegetable accoutrement on the side which allows your guests to customize their own. Keep it ice-cold at all times. It is truly a great summer crowd pleaser. Enjoy!

I can assure you this recipe will be part of your repertoire for many years to come.
Happy Summer, Enjoy!

Mexican-Shrimp-Cocktail_ingredients

Mexican Shrimp Cocktail

Serrves 2 sailors 4 mermaids

This cocktail is light and refreshing, it can serve two as a meal or four to six as an appetizer. This recipe can easily be doubled or tripled upon family size, or a friendly party crowd.

1 – ½ lbs. Jumbo or medium large shrimp, peeled save the skins and deveined.

For the shrimp stock:
The reserved skins from the shrimp.
2 celery stalks
¼ wedge of a white onion.
2-3 sprigs of fresh thyme
1/2 teaspoon Sea salt
¼ teaspoon black pepper

Seasonings for the cold cocktail broth:
The juice of one small Valencia orange
3 large limes + 1 or 2 more to garnish.
¼-1/2 cup ketchup sauce
A few dashes of your favorite Mexican Bottled Hot Sauce, I prefer Cholula, Valentina or Huichol.

Prepare cocktail with:
2 roma tomatoes, small diced
1 small white or purple onion, small diced
1 medium cucumber seedless such as jade or English cucumber, small diced. 
¼ cup finely chopped cilantro
1 chile Serrano or Jalapeno with seeds.
1 small Hass avocado

Serve with:
Saltine crackers or Tostadas
Plantain Chips
And a really cold light Mexican beer (I prefer Modelo Especial or Victoria oh yeah!)

Preparation Method:

1. Place two glass serving bowls in the freezer. (Mason jars, or glass mugs will work too.)
2. Peel and de-vein the shrimp, reserve the skins and leave 4-6 unpeeled, tail-on shrimp for garnish.Mexican-Shrimp-Cocktail_peel-and-devein-the-shrimp
3. In a non-reactive pan place the shrimp skins, along with the celery stalks, onion wedge, thyme, a pinch of sea salt and some cracked black pepper. Add 3 cups of water and simmer for about 15- 20 minutes.

Mexican-Shrimp-Cocktail_save-the-skins-to-make-a-broth
4. Meantime, prepare all your vegetable accoutrement. Dice and chop the tomato, cucumber, onion, serrano or jalapeno peppers, limes, avocado and cilantro. Set aside.
5. Check on your broth. With a slotted spoon, remove the skins and all the vegetables from the broth. Add the peeled and deveined shrimp to the hot broth and simmer the shrimp for about 2-3 minutes or until they change color and curl up.~Shrimp cook very fast so be attentive! You do not want rubbery overcooked shrimp!~

Mexican-shrimp-cocktail_how-to-boil-shrimp-
6. With a slotted spoon, pull out the shrimp a little before you think they are ready. They will keep cooking with their residual heat. Place the shrimp on a plate with ice underneath. (see picture below).
7. Fill a bowl halfway with ice and place a metal or glass bowl on top of the ice. Place a fine sieve on top of the bowl and drain the broth. With a wooden spoon, start whisking to cool off the broth until the temperature of the broth feels fresh and cooler.

Mexican-Shrimp-Cocktail_cooling-the-broth
8. You should have around 2 to 2-1/2 cups of broth left, transfer the broth into a liquid measuring cup if you have more than 2 ½ cups discard the extra broth.
9. Start seasoning the broth. Squeeze the juice of 3 limes, the juice of 1 small Valencia Orange, add Ketchup (I used my favorite: Sir Kensington’s spicy ketchup!) add a couple of dashes of hot sauce, the sea salt, and whisk. Taste and adjust flavor for salt or pepper.

Mexican-Shrimp-Cocktail_Season-the-broth
10. Pull out the frozen glass serving bowls and start arranging your cocktail. Start by layering the ingredients and add the seasoned broth at the end. No rules here! You can add as much or as little veggies as you want. Avocado is a must, highly necessary!, A little extra squeeze of lime juice, sprinkle some cilantro and an extra dash of hot sauce…Prepare for the stampede!.. you are gonna love it. Enjoy!
Mexican-Shrimp-Cocktail_ready-to-serve!Mexican-Shrimp-Cocktail_authentic

You know you want it!

Mexican Shrimp Cocktail

www.yes-moreplease.com

Refreshing, light this Mexican cocktail its perfect for a pool party or a weekend of leisure at home. remember to have a very very cold beer, Ceveza bien fria! Enjoy!

Course Brunch, Lunch, Main Course
Cuisine Mexican
Prep Time 30 minutes
Cook Time 12 minutes
Total Time 42 minutes
Servings 4 sailors or 4 mermaids

Ingredients

  • 1-1/2 ibs. Jumbo Shrimp, peeled, save the peels and deveined

For the shrimp stock:

  • 2 celery stalks
  • 2-3 sprigs fresh thyme
  • 1/4 wedge of a white onion.
  • 1/4 teaspoon black pepper
  • 1/2 teaspoon sea salt

Seasonings for the cocktail broth:

  • 1 the juice of one small Valencia orange
  • 3 large limes, plus 1 or 2 more to garnish.
  • 1/4-1/2 cup ketchup sauce
  • A few dashes of your favorite Mexican Bottled Hot Sauce, I prefer Cholula, Valentina or Huichol.

Garnish with:

  • 2 roma tomatoes small diced
  • 1 small white or red onion, small diced
  • 1 medium cucumber, such as jade or English cucumber. small diced
  • 1/4 cup Cilantro, finely chopped
  • 1-2 Chiles Serranos or jalapeño, finely chopped
  • 1 small Hass avocado

Serve with:

  • Saltine crackers or Tostadas
  • Plantain Chips
  • And a really cold light Mexican beer (I prefer Modelo Especial or Victoria oh yeah!)

Instructions

  1. 1. Place two glass serving bowls in the freezer. (Mason jars, or glass mugs will work too.)

    2. Peel and de-vein the shrimp, reserve the skins and leave 4-6 unpeeled, tail-on shrimp for garnish.

    3. In a non-reactive pan place the shrimp skins, along with the celery stalks, onion wedge, thyme, a pinch of sea salt and some cracked black pepper. Add 3 cups of water and simmer for about 15- 20 minutes.

    4. Meantime, prepare all your vegetable accoutrement. Dice and chop the tomato, cucumber, onion, serrano or jalapeno peppers, limes, avocado and cilantro. Set aside.

    5. Check on your broth. With a slotted spoon, remove the skins and all the vegetables from the broth. Add the peeled and deveined shrimp to the hot broth and simmer the shrimp for about 2-3 minutes or until they change color and curl up.~Shrimp cook very fast so be attentive! You do not want rubbery overcooked shrimp!~

    6. With a slotted spoon, pull out the shrimp a little before you think they are ready. They will keep cooking with their residual heat. Place the shrimp on a plate with ice underneath. (see picture below).

    7. Fill a bowl halfway with ice and place a metal or glass bowl on top of the ice. Place a fine sieve on top of the bowl and drain the broth. With a wooden spoon, start whisking to cool off the broth until the temperature of the broth feels fresh and cooler.

    8. You should have around 2 to 2-1/2 cups of broth left, transfer the broth into a liquid measuring cup if you have more than 2 ½ cups discard the extra broth.

    9. Start seasoning the broth. Squeeze the juice of 3 limes, the juice of 1 small Valencia Orange, add Ketchup (I used my favorite: Sir Kensington’s spicy ketchup!) add a couple of dashes of hot sauce, the sea salt, and whisk. Taste and adjust flavor for salt or pepper.

    Pull out the frozen glass serving bowls and start arranging your cocktail. Start by layering the ingredients and add the seasoned broth at the end. No rules here! You can add as much or as little veggies as you want. Avocado is a must, highly necessary!, A little extra squeeze of lime juice, sprinkle some cilantro and an extra dash of hot sauce…Prepare for the stampede!.. you are gonna love it. Enjoy!

    Happy Cooking!

Music Pairing: Vereda Tropical-Esquivel


View Post or View Comments 10

Grilled Cauliflower with Garlic + Cumin Rub

Grilled-Cauliflower-with-Garlic-+-Cumin-Rub-

Chef Dan Barber was the creator of the famous Cauliflower steak. His original recipe uses the whole cauliflower head. He slices two thick cauliflower wedges and sears them in a cast iron pan until the cauliflower is caramelized but al dente. He cooks the rest of the cauliflower florets in milk to make a smooth and light mash. He serves the cauliflower steak over the light cauliflower mash. The contrast in textures and different cooking methods is what makes this dish outstanding.
Cauliflower to the square; a brilliant idea.

Chef Dan’s cauliflower approach inspired me to create this recipe. Instead of contrast in textures, I wanted a contrast in flavors but chose a spice that enhanced the grilled cauliflower. With Dan’s premise of simplicity in mind, I made a four ingredient paste as a rub with garlic, cumin seeds, extra virgin olive oil and sea salt. I wish you could off been here with me when I was pressing the garlic and cumin seeds in the mortar, the smell was insanely good.  I must confess that prior this recipe I was not fond of cumin seed flavor and using cumin was totally out of my comfort zone.This recipe gave me a different outlook about it.

  I rubbed two cauliflower steaks and the rest of the loose florets with this pasty rub and grilled them. When the cauliflower was grilling the aromas were insanely good: smokey, lemony cumin and garlic.   It’s a savory aroma that squeezes your tongue from behind. I just can say that  I am converted now. These  two flavors work together so well that I see lots of cauliflower in my near feature…
Enjoy!

Grilled-Cauliflower-with-Garlic-+-Cumin-Rub-Yes,-more-please!

Grilled Cauliflower with Garlic + Cumin Rub

Serves 2 as main dish, 4 if served as a side dish.

1 Medium fresh Cauliflower head.

For the rub:

2  teaspoons cumin seeds slightly toasted.
3 medium garlic cloves
2 teaspoons sea salt. (I used grey sea salt)
1/3 – ½ cup extra virgin Olive oil.

Serve with:

Tangy Bulgarian yogurt
Grilled pita bread
Sprigs of cilantro
Fresh cracked black pepper.

Grill and natural Charcoal.

Preparation method:

1. In a small skillet over low heat, toast the cumin seeds for 2-3 minutes.
2. Using a small mortar, place the toasted cumin seeds, garlic cloves and sea salt. Start smashing these ingredients with the pestle, until it looks like a paste.
3. At this point start adding the extra virgin olive oil little a the time, and keep mixing and smashing until each oil addition is incorporated.
4. With a silicone brush rub both sides of the cauliflower slices and the florets.
5. Fire up your grill.
6. Grill the Cauliflower steaks for about 4-5 minutes per side. They should look charred and with a fork check the center core for doneness.
7. Remove from grill and serve warm with some grilled pita bread, Bulgarian yogurt, fresh cilantro, a bit of fresh black pepper and a squeeze of lemon if desired. Enjoy!

Grilled-Cauliflower-with-Garlic-+-Cumin-Rub_applying-the-rub

Grilled-Cauliflower_Yes,-more-please!

Grilled-Cauliflower-with-Garlic-+-Cumin-Rub-serve-with-yogurt,-pita-bread

 Enjoy!

View Post or View Comments 2

Grilled Nopalitos and Red Bell Pepper Salad

Grilled-Nopalitos+RED-Pepper-Salad

Have you ever had Nopalitos? Nopalitos are traditionally used in Mexican cuisine, they are part of the cactus family, there are more species than you want to know about. The word “Nopal” comes from the Nahuatl word meaning “pads” refers to the plant shape. They are a great source of Vitamin C, minerals like magnesium, manganese, calcium,and  also a great source of fiber. Besids their delicious and nutritious qualities, recent research studies have shown a positive effect on glycemic index which could be useful and a great value to add to your diet when managing diabetes or to include on your weight loss diet.

Anyhow, what you really need to know about Nopalitos and what I want to share with you is how delicious they are when prepared in a right simple manner.

Nopalitos have a bad reputation among vegetables because of their slimy and viscous flesh. However there are different ways to prepare them and a couple of tricks to avoid the slimy culinary disaster.

Like any other vegetable, Nopalitos can be boiled, steamed, sautéd, grilled or eaten raw, and there is a trick for each one of these cooking methods. Just to mention one of these tricks briefly, boiling nopalitos is the most common of all methods. When boiling Nopalitos, the trick to it is to add 4-6 tomatillo husks along with a piece of onion, a small bunch of cilantro and some sea salt in a pot of simmering water. The tomatillo husks will avoid the slimy matter. Simmer them in a pot over medium heat  for about 15-20 minutes, until they change of color. Turn the heat down, and  let them cool.  Strain and rinse thoroughly. Combine the nopalitos with a good amount of Pico de Gallo salsa, toss and they are ready to serve. As you can see, with a little effort you can make the fastest salad of them all!

This kind of Nopalito salsa/salad is ideal to have as a side dish. You can make tacos, sprinkle some queso fresco, and  even cook some of this left over salad with scrambled eggs, to prepare nopalitos egg breakfast tacos. OMG I just gave you another recipe! hehehe…

My favorite way to eat nopalitos it’s grilled. The char gives them a great flavor, firm texture and reduces the slimy texture almost to zero when you grill them. Therefore it’s one of my favorite ways of cooking them. Nopalitos when grilled, make the best tasting salad. This is definitely one of my personal favorite Mexican dishes, so simple and full of great flavors.

This Grilled Nopalitos and Red Bell Pepper Salad, combines simple ingredients and a crisp and tangy simple vinaigrette. As easy as it sounds it’s a great summer dish. This salad can be served as a side dish to accompany any grilled meat or fish. It can be made into vegetable medley tacos or as a vegetable complement over rice, quinoa, or whole black beans.

I hope you enjoy the recipe and give yourself the opportunity to try something new. Nopalitos salad has been in Mexican cuisine for a long time and it is too delicious to be ignored.

Give nopalitos a chance!

I would love to hear back from your culinary adventures. Remember to check our music pairings, if you are in need to shimmy while you grill…Enjoy!

Nopalito-Salad_Ingredients_Yes,-more-please!

Grilled Nopalitos and Red Bell Pepper Salad.

Serves 4… or 2 hungry Vegetarian Mexicans!

5-6 Nopalito pads, cleaned and thorn removed.*
1 large red bell pepper
3 small shallots or 1 small white onion thinly sliced.
1 small bunch cilantro (leaves only)
1 serrano pepper no-seeds finely chopped (optional)

For the vinaigrette:

1/3 cup Orange juice
2 tablespoons apple cider vinegar
4 tablespoons grape seed oil
2 tablespoons agave nectar
1 tablespoon toasted sesame seeds.
2 sprigs of fresh oregano or 1 teaspoon dry mexican oregano.
1 teaspoon sea salt.
Fresh cracked black pepper to taste.

Garnish with:

Toasted sesame seeds.
¼ cup Cotija cheese crumbled.

*Nowadays it’s very easy to find fresh Nopalitos that have been cleaned and de-thorned. If you are lucky enough to have your very own nopalito cactus plant, gear up! Use thick leather gardener gloves, a pair of tongs, and a  sharp fillet knife to shave the thorns off. Rinse and wash thoroughly. Now it’s ready to use!
If you live here in Texas this type of Cactus Plant is very common to find in the prairie. Have a culinary adventure!
Tip: when choosing wild nopalitos: you will want to pick the medium-small size, deep green, about 1/4 inch thin or less. They look tender and have plump edges with no dry spots.These are the best tasting nopalitos and tender when cooked.

Preparation Method:

1.Wash and with a pairing knife gently score your clean nopalitos.
2.Prepare your vinaigrette by combining all the ingredients on a bowl and whisk.

Nopalito+Red-Pepper-Salad_vinaigrette+redpeppers

3. Fire up your grill. Grill Nopalitos and red bell pepper. Grill both sides until cooked and charred.
Nopalitos turn color from bright green to a olive green when cooked. Be sure to blister them. This will add so much flavor to the salad.

Nopalito-+-Red-pepper-Salad_grilled

4. Slice your grilled Nopalitos into ¾” ribbon strips, slice your grilled bell peppers into a thinner strips.

Nopalitos+RED-Pepper-Salad_nopalito-ribbon-slices 
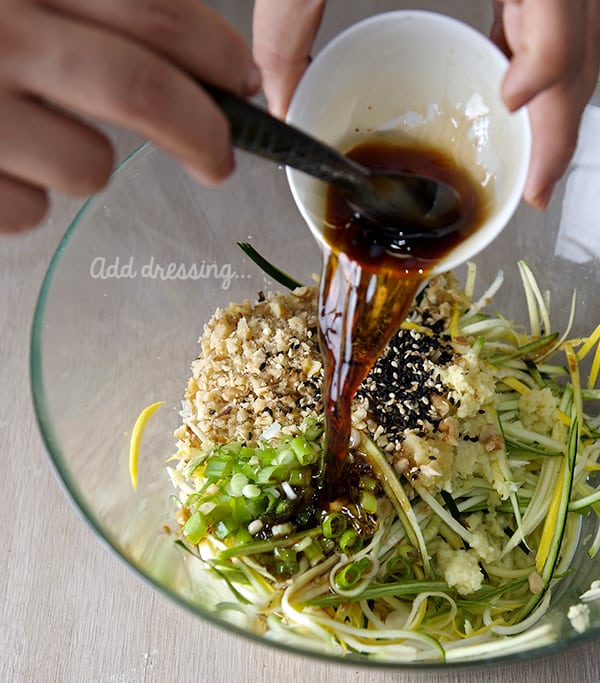
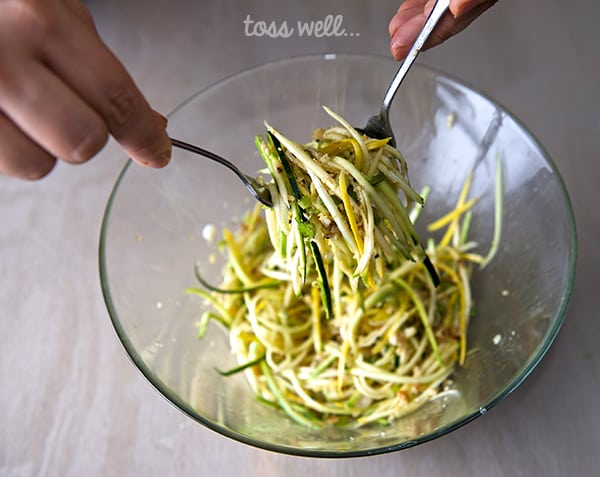
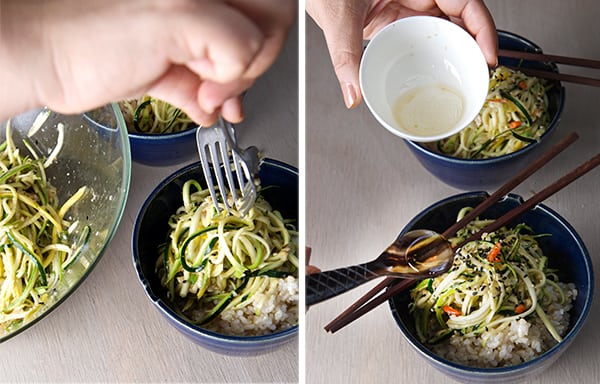
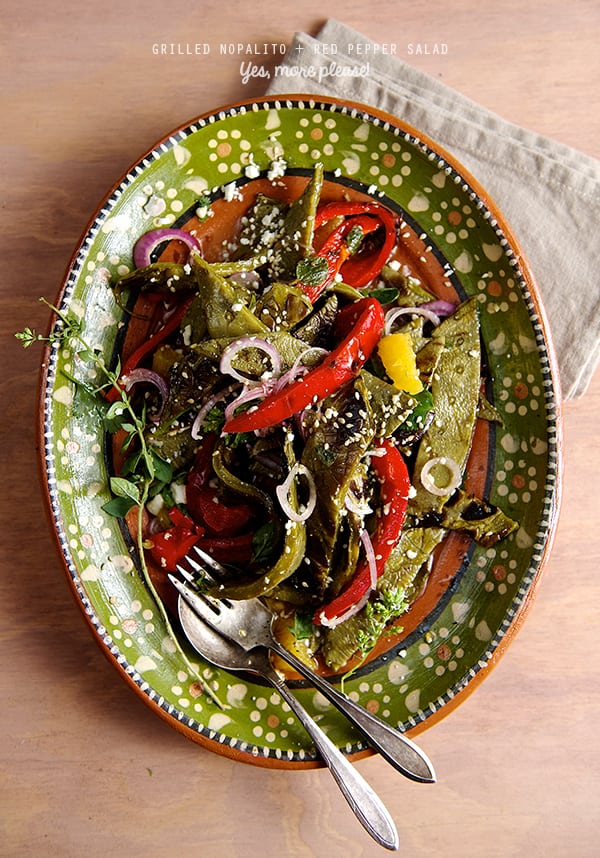
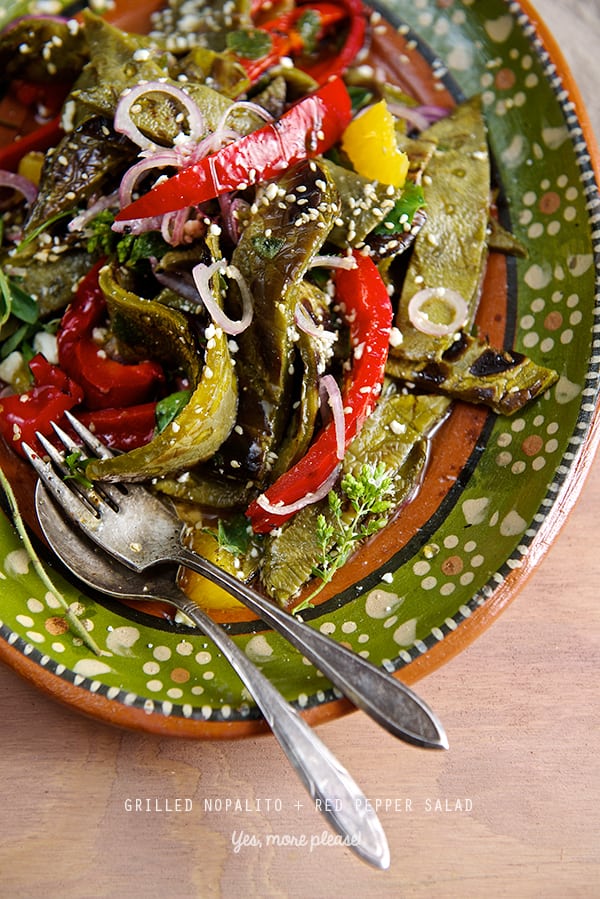
5. On a platter toss all ingredients and drizzle the vinaigrette. Sprinkle some toasted sesame seeds and/or some Cotija cheese crumbled. Serve room temperature.
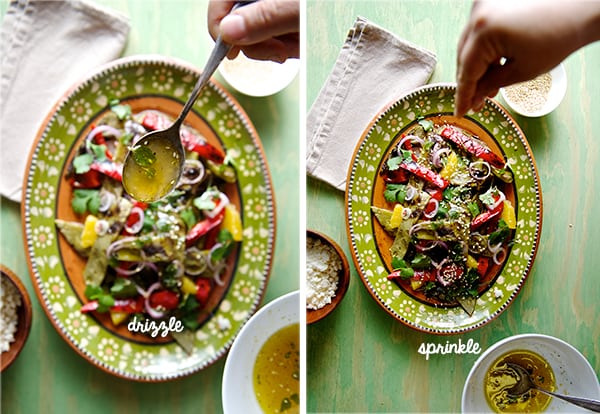
Nopalitos+RED-Pepper-Salad_assambling_Yes-more-please!

Nopalitos+RED-Pepper-Salad_Yes-more-please!

Special Thanks to my Aunt Paloma,  who sent us this beautiful hand painted clay platter

from Guadalajara Jalisco, Mexico. XoXo 

Best, Ian & Mariana.

Music Pairing: John Lennon – Give Peace a Chance

View Post or View Comments 0

Vegan-mato a Vegetable Cocktail

Vegan-mato-veg-cocktail-Yes,-more-please!-drink-your-veggies-in-a-fun-way!

Need some veggies in your life? Let’s veg-out!, I mean Veg-in, Vegan-mato is a vegetable cocktail that delivers a fun way to drink and eat your vegetables. Let’s  throw a party in a glass!
Sometimes you just need something that boost your inner health and some vegetable motivation in liquid form is the way to go. Not sure what to do with left overs veggies of the week? juice it up!
This Vegan-mato is waiting for you, perfect summer power drink, made with fresh vegetables, all natural, extremely flavorful and fun to make.

It can’t be easier than to throw all the veggies on a food processor, season, squeeze some lime juice, sea salt, a little hot sauce kick, some ice, a straw and some extra veggies to munch and crunch.

This Vegetable-non alcoholic cocktail is one of the best ways to drink you veggies.

Have a great weekend…Enjoy!

Do you need an umbrella to go with this cocktail? Perhaps, perhaps, perhaps…
Check our music gallery for our music-recipe pairings…

VEGANMATO_VEGCOCKTAIL_ingredients_Yes_moreplease

Vegan-mato a Vegetable Cocktail

Serves 2 large mugs or 4 short glasses.

4 Roma tomatoes
3 large carrots
1 medium orange peeled
2-3 small cucumbers
1 spinach handful
2 large celery stalks including the leafy tops (celery leafy tops are a great source of magnesium do not waste them! Drink them, include them on your salads.)
1 sprig of parsley
1 green onion
2 inches of fresh ginger

Season with:

the juice of 2 limes
2 teaspoons soy sauce
1 teaspoon sea salt
1 pinch of celery salt
2 pinches of freshly ground black pepper
1 teaspoon of spicy brown mustard
2, 3, 4 dashes of your favorite hot sauce.

Garnish with:

2 bamboo skewers
Celery stalks
Martini Olives, jumbo pepper stuffed olives or Jalapeno stuffed olives.
Pickles
Fresh cucumber wedges
Cherry tomatoes
Radishes and chopped capers

Some extra sea salt and a half of lime to cover the rim of the mug.

Note: It is very important to me to make emphasis on how important it is to buy organic produce when juicing. Flavor, nutritional value is superb when organic vegetables are used; believe me you don’t want to be drinking pesticides. Please take this in consideration…

Vegan-mato_extract-the-juices_Yes,-moreplease!

Directions:

1. Chill your Mugs, by placing them on the freezer.
2. Wash and cut the hard ends of vegetables.
3. With the help of an electric juicer, juice all your vegetables first and add the orange last. The juicy orange will help to clean up all bits of vegetable flavor on your juicer.
4. To this juice, add the soy sauce, sea salt, pepper, spicy brown mustard, a few dashes of hot sauce, and the juice of two limes. WHISK!!! until well combined. Taste to adjust the flavor.

Vegan-mato_a-Veg-cocktail_squeeze-the-limes!

Veganmato_vegcocktail-party-Yes,-more-please!

Veganmato_vegcocktail-party-Yes,-more-please!
5. Make your vegetable skewers, using what ever you prefer for garnish, cherry tomatoes, radishes,caper-berries, olives, pickles the limit is your imagination.
6. Take the mugs out of the freezer, rub some lemon on the rim and dip it in salt. Add lots of ice.
7. Add your celery stalk, a garnish skewer, a straw, umbrella, sandals, a sunny porch and some great music check our music pairings here!

Sip-crunch-munch-repeat_Vegan-mato_Yes,-more-please!

Cooking music Pairing: Guardians of the Galaxy- Awesome Mix Vol. 1


View Post or View Comments 2

Jalapeño and Bacon Meatloaf

Jalapeno-Bacon_Meatloaf_Yes,-more-please!_i

If you are a meat lover, carnivore, bacon-ator, you just clicked on this post at the right moment and the right time. This is for you baby!…
As you know, every now and then, we do appreciate and love meat. Not too often, but when we do, we tend to go all-out; a big steak, a visit to Franklin’s BBQ, pork tacos. I’m telling you, Texas all the way. On this occasion, the meat craving translated into the form of meatloaf!

I asked Ian what would you like for dinner he answered: “not carrots”, so I said ‘be more specific’, he said “Meatloaf”.. Meatloaf it is!… I’ll do anything for love. (and please do not even relate to “that” Marvin Lee Aday song… I won’t do that.) I think this is the second time in my life that I’ve made meatloaf …and it was not too shabby, shall I say.

Meatloaf is pure comfort food, classic Americana recipe. There might be a million meatloaf recipes out there, the same as in Mexico for beans! Every family has their own recipe and spin, technique, breadcrumbs, no bread crumbs, beef, bison, ground turkey, ~ a mix ~ spices, ketchup, brown sugar, baked cover uncovered uff! lots of ways…

I did my research, and rescued the common thread of ingredients. I came up with a pretty good contender. This meatloaf put a big smile on Ian’s face.

Since we are just two I decided to make a small one, using my little cast iron pan. I fell in love with the way the meatloaf turned out. Crusty bottom and edges, caramelized top, really moist and great soft crumb.
I’ve learned that meatloaf left overs translate into meatloaf sandwiches and hey that sounds glorious… but we are trying to balance the act here. Maybe next time I will just make this mini meat loaf for the sake of sandwiches…are you still with me?…great!

For this baby Jalapeño and Bacon Meatloaf I used red onions, bottom mushrooms, panko breadcrumbs, and yes a dash of that “W”sauce. I used half ground lean turkey and half ground lean pork. My little spin: I added a bit of jalapeño pepper vinegar to the meat mixture and I topped it with bacon, slices of jalapeño, fresh cracked black pepper, and the classic ketchup-mustard-honey~instead of brown sugar~ and a little jalapeño vinegar to loosen up the glaze. I baked and served it all in the same little pan. The way this little pan is awesome! It works like a charm, bakes evenly gives the meatloaf a bit of crust on the edges and bottom and best of all it’s ready in 25-30 minutes… to die for… Meat it up!, Enjoy.

Jalapeno-meatloaf_ingredients

Jalapeño and Bacon Meatloaf

Serves 4 or two hungry caveman.

For the meatloaf:

8 oz of ground 85% lean pork
8 oz of ground 90% lean turkey
1 egg
1/3 cup panko breadcrumbs or almond flour will work great for those GF souls.
¼ cup chopped red onions
1 cup chopped or sliced mushrooms up to preference.
1 tablespoon ketchup
1 teaspoon Dijon mustard
1 garlic clove grated
1 tablespoon jalapeño vinegar
1 tablespoon Worcestershire sauce
1 teaspoon kosher salt
6-8 good cranks of freshly cracked black pepper

For the glaze:

1/3 cup ketchup
1 teaspoon Dijon mustard
2 dashes of Worcestershire sauce.
1-2 teaspoon of honey

Toppings for the meatloaf:

Caramelized onions
2 slices thick bacon.
2 pickled jalapeños sliced in thick wheels
Fresh cracked pepper.


Preparation method:

1. Start by caramelizing the onions. Slice them about 1/8 inch or thicker, place them in a pan with 1 tablespoon of olive oil, a splash of apple cider vinegar and a pinch of salt over medium heat, toss and then lower the temperature until they look soft, but hold their shape, and they have a mahogany color just like this:

Jalapano_Bacon-Meatloaf_toppings,-caramelized-onions,-jalapenos-and-bacon

2. In a large bowl combine the 2 kinds of ground meat, egg, bread crumbs, chopped red onions, sliced mushrooms, ketchup, Dijon mustard, jalapeño vinegar, grated garlic, salt and black pepper. Mix until well combined and forms a ball. (look picture below)

Jalapeno-Bacon_Meatloaf_Mixing-the-meat
3. Place the meat mixture into a 7″ cast iron pan , creating a slightly domed center.
4. Apply some of the glaze top with caramelized onions.
5. Cut the slices of bacon in half so you end with 4 short slices. Place one slice across the meatloaf and alternate with one row of the jalapeño slices, until your meatloaf is cover with all the bacon and jalapeño peppers. (see picture below)

Jalapeno-_Bacon-Meatloaf_placing-the-topings
6. Bake at 375 on the lower 1/3 of the oven, uncovered.
7. Check in 25 minutes and apply the rest of the glaze on top, bake for another 5 minutes.
8. At this point your meat loaf is cooked, you can broil the top for a couple of minutes to crisp up the bacon.
9. Using a trivet, take the meatloaf to the table and serve! Enjoy.

Jalapeno_Bacon_Meatloaf_Yes,-moreplease!


I served the meatloaf with this lemony mashed potatoes and peas  and a green salad on the side.

This was a great comforting meal, Enjoy!

Lemony-Mashed-Potatoes-+-Peas_Yes,-more-please!

Lemony mashed Potatoes and Peas

Serves 2

2 small potatoes, skin on, cut in cubes. I used yellow wax potatoes, I love how creamy they are when smashed.
1/2 cup peas
¼ cup milk or reserve water from the potatoes.
2 tablespoons olive oil + a little more to drizzle.
the zest of 1 lemon
Salt and fresh black pepper to taste.

Preparation:

1. In a pot with enough water, boil the potatoes until tender. Drain and smash.
2. Add olive oil, peas, lemon zest, milk salt and cracked pepper.
3. Mix until peas are bright green but snappy and warm through. sprinkle some lemon zest, extra virgin olive oil salt and pepper.
4. Serve immediately.

Jalapeno-Bacon-Meatloaf_sides-of-lemon-potatoe-peas-smashed_Yes,-more-please!Jalapeno-Bacon-Meatloaf_with-a-side-of-lemon-potatoe-peas-smashed-dinner-is-served_Yes,-more-please!

 Enjoy!

Music Pairing: Pixis – La la Love You

View Post or View Comments 5

Sweet Potato Salad

Sweet-Potatoe-Salad_ingredients

It takes a lot to be a sweet potato…to be more precise 95 days. Along with plenty of ground space and long warm days; they grow best in an imperfect soil. Sweet potatoes grow fast. Deer, japanese beetles, and many other insects love to nibble on their sweet leaves causing light damage to the plant. However, sweet potatoes are so vigorous that they usually outgrow foliage pest problems. When they are ready to harvest, they need to be cured 10 days after they have been cut to develop their sweetness. In late summer, Sweet potatoes often produce flowers that resemble those of morning glory, the ones that are blue and look like a phonograph.

When I learned about the life of a sweet potato, it reminded me of my life.
I, like the sweet potatoes, have grown on an imperfect soil, raised from a divorced parents I grew up in a not so perfect family. It takes a lot to be complete and to develop your persona considering this circumstances. I grew up fast. And just like sweet potatoes I’ve been vigorously fighting life problems and circumstances that in most cases have allowed me to grow new foliage. Both of my parents have helped me in being who I am today and for that I’m infinitely grateful for every bit of it.

Now, for quite a while, I’ve been trying to find my so called “purpose” utilizing my passions and skills. Eight months ago, after a long stretch of unfulfilling jobs, I decided to start this cooking blog with Ian, my husband. Finally I felt I could cultivate the life I was meant to be pursue. And we have. We post, we photo shoot, we write, we share, we eat, we laugh and listen to music, we’ve seen the blog grow and will keep it coming!.

To Ian who often I call “My sweet potatoe” some days is hard to harvest,
but always sweet when I’m with you.

I made this salad thinking of him enjoying the process and watching this blog bloom.

Thank you to all our family, friends and readers for your time, comments and support. You, reading the blog, making the recipes sharing and commenting that’s what keep us going. Enjoy!

Sweet-Potatoe-Salad_ready-to-eat!

Sweet Potato Salad

Serves 4-6

3-4 medium size sweet potatoes.
1 medium size red bell pepper dice into cubes
1 english cucumber with skin small diced
½ cup celery into small dice, including the leafy parts
½ cup red onion
1 tablespoon of roughly chopped capers
3 tablespoons of fresh mexican mint -yerbabuena chiffonade* see picture below.
(if using spermint, or mint use a little less since the flavor is a bit stronger.)

Sweet-Potatoe-Salad_mint-chifonade

For the vinaigrette:

6 tablespoons of good quality extra virgin Olive Oil I used
3 tablespoos rice vinegar
2 tablespoons lemon juice
¼ cup of fresh mandarin juice or orange juice
1 teaspoon dry or fresh dill
1 garlic clove grated
1 teaspoon salt
1 teaspoon fresh cracked pepper

Preparation:

1. Wash, peel, cut into cubes and boil the sweet potatoes. Cook until firm or al-dente.
When cooked drain and rinse with cold water to stop the cooking process. Live them air dry.
2. Dice, cut, shifonade all the rest of the vegetables and combine them all in a bowl.
3. Wisk all the vinagrette ingredients.
4. Combine the vinaigrette, cooked sweet potatoes and the rest of the vegetables.
Toss until well combined. Serve.
5. This salad taste great if you make it ahead of time. Serve at room temperature.

Sweet-Potatoe-salad_vinaigrette

Sweet-potatoe-Salad_assamblingSweet-Potatoe-Salad-Yes,-more-please!


View Post or View Comments 6

Privacy Policy Contact Us Yes, more please!