GLUTEN-FREE RSS feed for this section

Huevos Rancheros

Huevos-Rancheros-on-a-rainy-afternoon_Yes,-more-please!

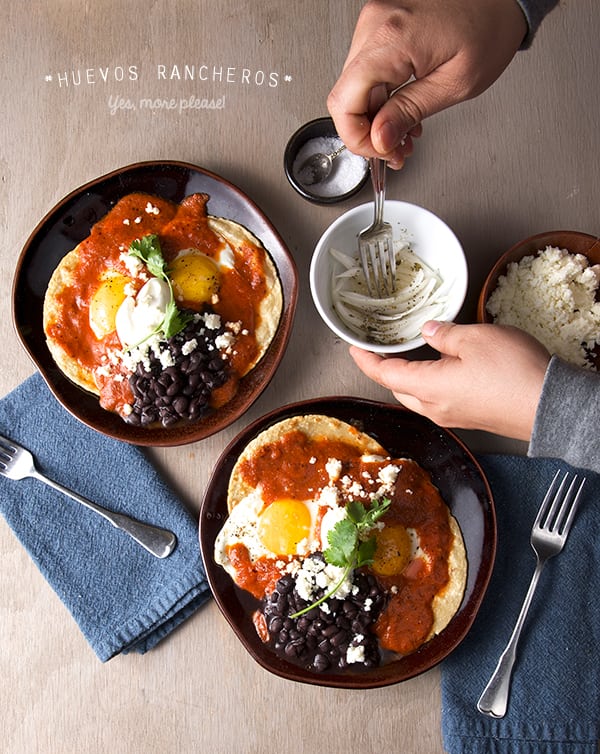
This is the perfect breakfast on a rainy weekend morning. Or a even cold snowy morning, if you live north of Texas. The origin of this dish is unknown to me yet very familiar. It’s a classic everywhere in Mexico. There are dozens of variations with different toppings and seasonings from various regions, families, grandmas,  mercados, or restaurants. This is the dish in its purest form. All principles items include fried eggs, dried chiles, tomato sauce, tortillas, and that last onion section that you didn’t quite finish on Thursday. This Mexican one pan wonder is the weekend antidote when you wake up extra hungry and craving a breakfast worth making. Imagine the creamy runniness of a sunny side up egg, smothered with savory spicy warm salsa over soft fried corn tortillas, a side of black beans, crema, and queso fresco. I would wake up to that in a flash!

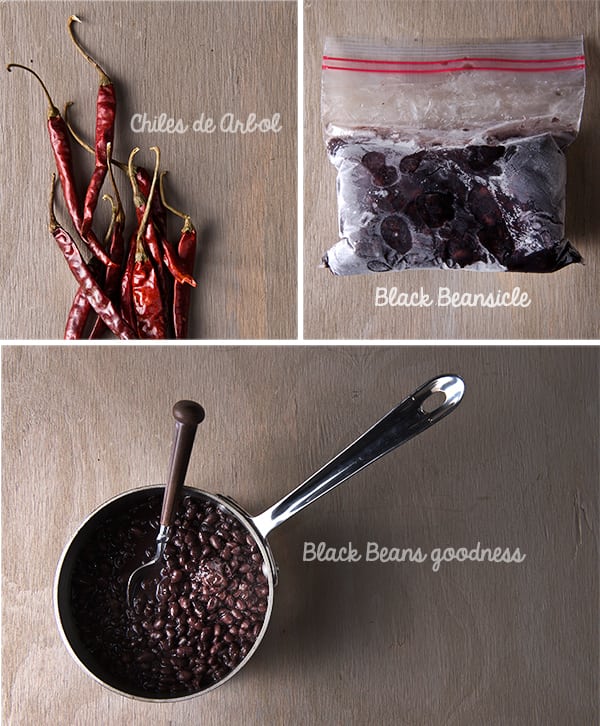
My Huevos Rancheros version gets a side of black beans which I prepare almost every month by cooking a large batch in a slow cooker. I make little portion bags that I freeze for quick use. It makes my life easier and tastier. Ian calls them “Beansicles”. They are very easy to defrost and use either whole or smashed when ever needed they are there for you. Now, what you need from the pantry is that forgotten can of tomatoes. Please check your refrigerator drawers for a couple of fresh ones if in season. I always have my staple dry chiles in the pantry. Dried chiles are miracle workers. I can make salsa in a flash, or spice up soups or even hot cocoa like this. Fresh chiles? Yes, please! Serranos, jalapeños, chipotles en adobo; for me all variations are delicious as long you follow the ranchero principle: simple sauce + fried egg + corn tortilla + beans = Best Huevos Rancheros. Please no melty cheese in my Rancheros, save it for a quesadilla.

Huevos-Rancheros_chiles-&-Black-Beans

One of my favorite version of Huevos Rancheros Its the one you are about to see, easy enough to prepare them before coffee, and the spicy kick to the sauce will add to your morning wake up.
Huevos Rancheros cures hangovers, rainy mornings, helps you forget weekly stress, and fuels the most ambitious of Caudillos. Its uncomplicated preparation will give you a boost of confidence and culinary accomplishment. The way I prepare them could work for bigger crowds if arranged on a large platter or  for a brunch with friends or neighbors. All you have to do is learn how to fry an egg and combine 4 ingredients for a killer salsa. Enjoy!

Huevos-Rancheros_all-ingredients_Yes,-more-please!


Huevos Rancheros

Serves 1 Güerito and 1 Mexican

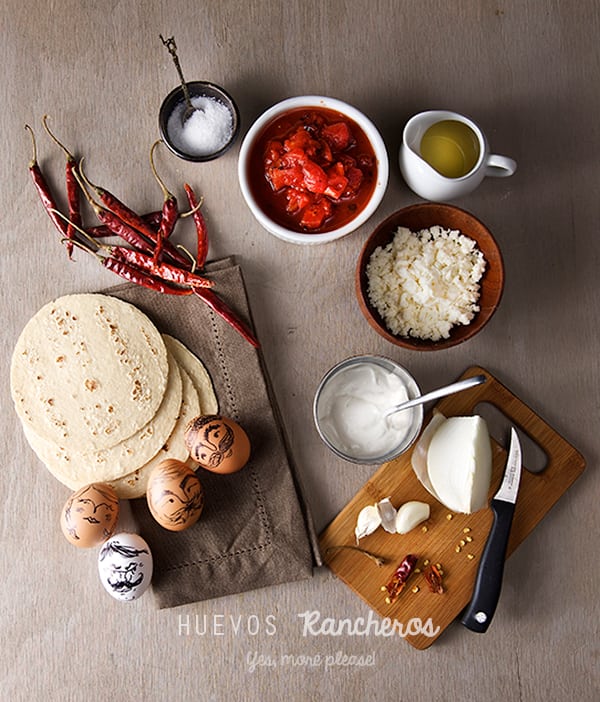
4 Eggs (ranchero faces drawing optional)
4 corn tortillas best kind you kind find.
Corn oil or your frying oil of preference enough to fry the eggs. about 2-3 glugs.
Salt and black pepper to taste
1 cup Black beans whole or fried is up to your preference.

For the Sauce:

1-1/2 cups roasted tomatoes I used roasted canned, if using fresh when in season you will need about 4 Roma tomatoes.
6-8 Chiles de Arbol  (For amateurs please start with 3-4 chiles. When this dry chiles get toasted, the flavor profile is a bit smoky and much milder in spice, so do not fear them!)
1 garlic clove
1/8 onion
Salt and black pepper

Toppings:

1/4 cup crumbled queso fresco
2 tablespoons Mexican crema
1-2 fresh cilantro sprigs

Quick pickled onions:

1/8 onion slivered and rinsed*, 1/2 lime juice, one good pinch of salt, one good pinch Mexican dry oregano, combine everything on a small dish, wait for 10 minutes, serve. * I always like to rinse my onions when they gonna be eaten raw, it smooths away that sharp taste, and you will not have to brush your teeth five times before the flavor on your palate is gone.


Preparation:

1. Start by preparing all your toppings, warm up your beans, make the quick pickled onions, set a side.

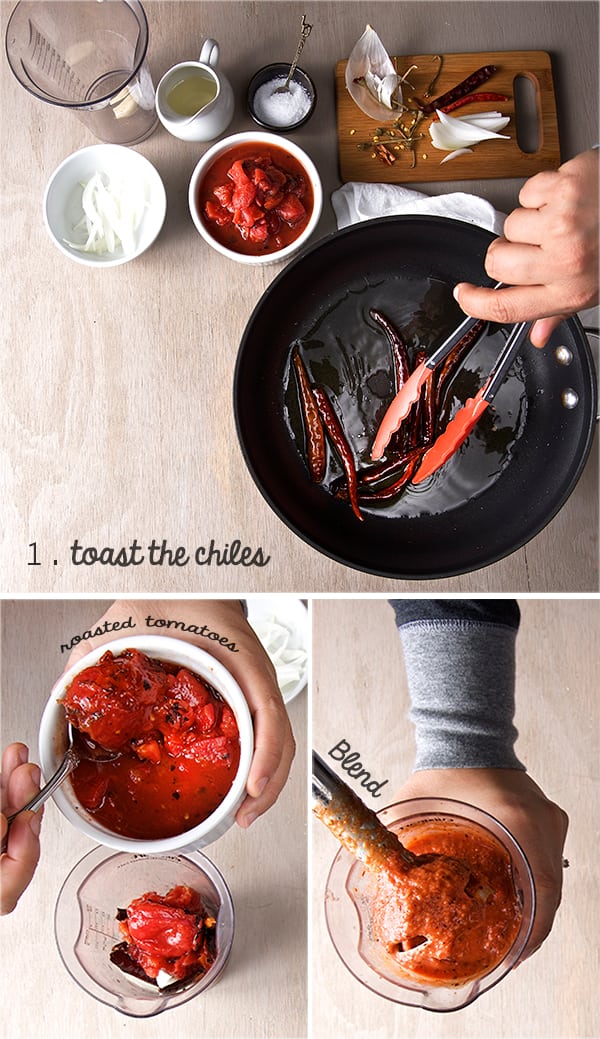
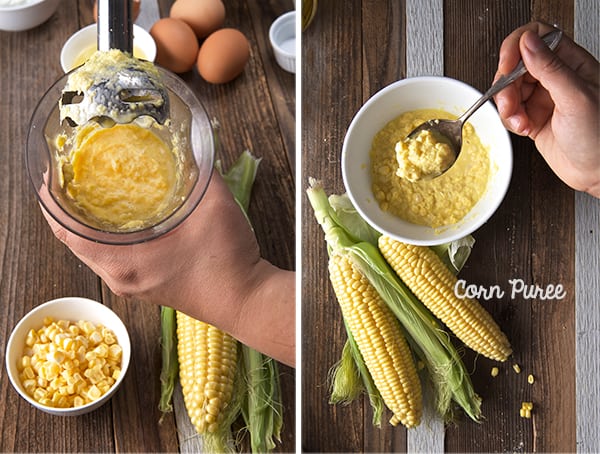
2. Remove the stems of all your dry chiles de arbol. On a medium size frying pan, (good enough o fry some sunny side up eggs) place about two glugs of Corn oil over medium high heat, add the chiles and toast them tossing often, until a deep dark red. Remove the chiles, and add 1/8 of an onion for a quick sauté. Remove the onion, turn of the pan. In a Blender or with the help of an immersion blender Combine the roasted tomatoes, the toasted chiles, one garlic clove, the sautéed onion, 1/2 cup water,salt and a bit of black pepper. Blend until smooth. Set aside.

Huevos-Rancheros_making-the-salsa

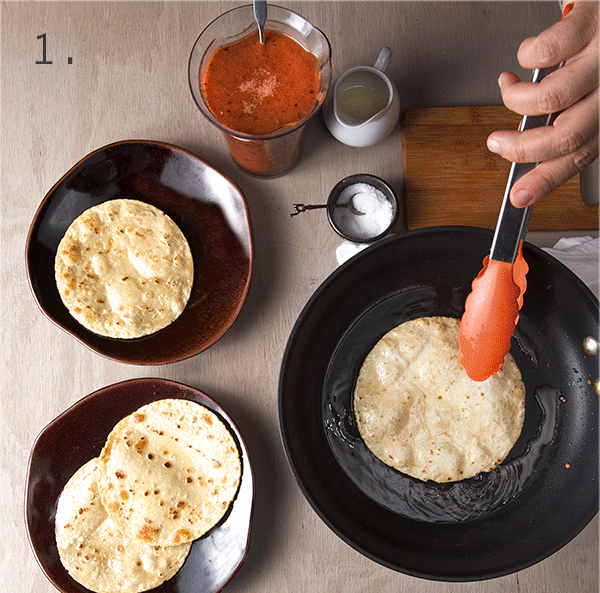
3. Warm up over medium high heat the same pan and oil you use to toast the chiles and onion. There should be plenty of oil to sauté the corn tortillas. If not enough add a bit more oil. Oil must be hot before soft frying the tortillas. Cook the tortillas in the oil one by one both sides. Tortillas should have a toasty color and they should be playable. Place the tortillas as you go into the plates; one tortilla per egg.

4. Using the same pan and oil fry your eggs. I like to fry 2 eggs at the time, so they have lots of room and the temperature of the pan does not drop. I like my eggs with a bit of crunchy edges but soft runny yolks. It’s really up to you, cook them up to your preference. Place the eggs on top of the tortillas one egg per tortilla as you go. Remember that it is important letting the pan and oil to come up to hot temperature in-between egg batches. Like I said, I like sunny side up eggs in this recipe so I do not over cook the yolks. In fact I leave them a little under done, so when I pour the warm sauce over the eggs, it will warm them up and finish the cooking  to a perfect creamy runniness. Take this in consideration when your cooking your eggs.

5. Once your eggs are ready, in the same pan with the remaining oil and while it warm add the sauce. (Be careful sauce might get a bit feisty, you might end up with a polka dot pajama!). Lower the heat. Stir and season with salt and pepper. Simmer for 2-3 minutes. Sauce should be rich and at the same time lose enough to cover the eggs. If the sauce is too tick add a bit of water or chicken stock, if to loose keep reducing it.

Huevos-Rancheros_How-to-cook-them

6. Taste your sauce for seasonings and adjust if needed. Sauce your eggs with plenty of warm sauce. Place leftover sauce in a small bowl and take it to the table for an extra spoon or two.
Serve a couple of tablespoons of  black beans on the side, top with queso fresco, crema, cilantro for garnish and the quick pickled onions on the side. Enjoy!

Huevos-Rancheros_Yes,-more-please!

Huevos-Rancheros_ready-to-eat


Huevos-Rancheros_ready-to-serve_Yes,-more-please!

 Huevos Rancheros, A great rainy weekend breakfast!

Music Pairing: Pedro Infante – El Ranchero

View Post or View Comments 5

Mexican Hot Chocolate

Mexican-Hot-chocolate_Yes,-more-please!

“If there’s no chocolate in Heaven, I’m not going.”
― Jane Seabrook


Chocolate must be, with out a doubt, one of the best gifts from Mexico to the world: Xocolat, Kakawa, Chocolate. Mayan and Aztec gods “seed of love and generosity”, manifested in a cacao bean, which they transformed into a beverage known as xocolatl meaning “bitter water”. Modern drinking chocolate is the result of the 17th century European addition of milk and sugar.

One of my favorite guilty pleasures is a cup of Mexican hot chocolate. It lifts my spirit, brings happiness, joy, comfort, warmth, peace, and a great sensation of fulfillment. Love in a cup Mexican hot cocoa also features amazing warm cinnamon notes, vanilla, and frothed milk.

I have fond memories of my Grandma preparing a cup of frothy hot cocoa as dinner. It was almost like an adrenalin shot when we could hear her in the kitchen frothing the milk with her molinillo, the arousing aroma of chocolate, cinnamon and vanilla coming out of the kitchen was heavenly. What is the molinillo?…it  is a wood handled tool that is used to froth and dissolve the chocolate into warm milk. By spinning the long handle between two hands, air is churned into the liquid turning it into a light cloud of goodness. My Grandma definitely knew how to use her molinillo. Her hot chocolate was like sipping a light cloud.

The following recipe is a delicious Mexican Hot Chocolate which provides an exciting experience much different from the little packets to which you add water. In my opinion, this preparation is well worth the extra time and a few ingredients added to your shopping list.
In this recipe I made the addition of chile ancho powder and a hint of pasilla negro, which tickle and warm the throat and enhance the chocolate flavor. I know you will love the recipe. Serve it at your next get-together on a chilly day and watch faces light up with surprise and satisfaction.

Keep warm and enjoy the weather!

Mexican-Hot-chocolate_warm-up_Yes,-more-please!

Mexican-Hot-chocolate_ingredients

Mexican Hot Chocolate

Makes 2 generous large mugs, serves two yetis.

2 cups of whole milk
1 cup almond milk
2 chocolate tablets Taza Chocolate brand Chocolate Mexicano 70% Cacao Puro*
½ teaspoon vanilla bean paste or Mexican vanilla extract
1-2 teaspoon ancho powder. Start with one, taste and decide if you need the second one.
2 generous pinches of pasilla negro powder, cayenne or one dry chile de arbol
1 stick of mexican cinnamon
Agave nectar, turbinado sugar or piloncillo to your taste. This is totally up to you, I like mine barely sweet, some people like it sweet, or extra sweet. I would say start with 2 tablespoons and move from there up to your desire sweetness. 

1 wood molinillo or blender.
1 tall pot will work best.

Why Mexican Vanilla and Cinnamon?
Everything that grows together, for me it translates in flavors that belong together. Vanilla comes from an orchid endemic from Veracruz, Mexico and the Mexican cinnamon flavor is delicate and extremely fragrant , if you can get this two your hot cocoa will taste divine!.

Vegan or Lactose intolerance substitutions: Soy milk and Almond Milk/ Rice milk and Almond Milk 
Nut allergies?: Soy milk and coconut / Rice milk and Coconut

Preparation:

1. Place all the ingredients into a tall pot, over medium low heat. With a wood spoon stir until the chocolate tablet becomes a soft paste and the heat starts dissolving the chocolate.
2. Increase the heat to medium and watch the pot at all times. (Believe me the worst spillages on the stove are from milk it can haven in a franc of a second, so watch out!)
3. As soon as you start seen bubbles on the edge of the milk, and the color of the milk has change, star frothing the chocolate with the molinillo.
Place both hands and star swirling around, making sure the molinillo is half into the milk and half out to incorporate as much air as possible into the milk. Once you see a thick layer of chocolate foam , it’s time to serve the chocolate. I usually poor it from high to achieve even more foam. At this point everything goes, sprinkle  some cinnamon and extra cayenne powder or spike it up with some mezcal, rum, hazelnut liquor, coffee liquor…Keep warm!
Mexican-Hot-chocolate_Swirl-up!

Mexican-Hot-chocolate_bate-que-bate-el-chocolate
Mexican-Hot-chocolate_poor-the-chocolate

Lets talk about chocolate:


Other Mexican chocolate brands that I find extremely good, and they all can be purchased online:
Moctezuma, this chocolate comes from Michoacan, Mexico, it has an intense chocolate flavor, notes of cinnamon and vanilla.
Mayordomo, this legendary chocolate paste is from Oaxaca, and part of a production is still made by hand, absolutely divine.
Rancho Gordo, this chocolate comes from Guerrero, Mexico, its stone ground 70% cacao and its sweetened with piloncillo! amazing, be aware it goes fast on line, but if you are on their website, check for their beans, and multiple other goodies, you can scape!
La taza, hecho en Mexico, I like its strong but balanced flavor, and their varieties. Try other flavors like clove, rose petals, anis (my favorite!), canela, almendras.. etc..
This is a list of my favorite choices, for Mexican chocolate.

Great Chocolate Sources:

Taza CacaoXocolatlMayordomo ClasicoStone Ground Chocolate from Guerrero Mexico,

Chocolate Abuelita:
This is the most common used chocolate tablets for hot cocoa in Mexico. Unfortunately and to my surprise last time I prepared some, the flavor was not the same as it used to. I had to use almost double the amount to give the punch of chocolate and cinnamon flavor that was so characteristic of Abuelita brand…

Mexican-Hot-chocolate_hot-cocoa-mexican-style

Mexican-Hot-chocolate_cling!Yes,-more-please!

Music Pairing: Naufragar – Ana Ferper/Constantini

View Post or View Comments 4

Gluten free Cornbread Muffins with Poblano Peppers and Smoked Gouda

Corn-Bread-Muffins-with-Poblano-peppers-and-Smoked-Gouda-ready-to-serve-Yes,-more-please!

This is the time of the year when quick breads like this fill up the house with warmth and delicious comforting aromas. MAKE THEM, It’s a must.
I have had this recipe for about 25 years …from one of my grandma’s best friends. It is one of the first encounters I had with baking. My modern grandma Ana Fernanda used to make this cornbread; she used some canned goods and different chiles from the north part of Mexico including chile California a bright green chile mild in spice. Also she used Chihuahua style cheese and baked it in a big rectangular dish. By the time this corn bread hit the table it was pretty much gone, absolutely delicious.

I decided to adjust the recipe and replace the canned goods by using fresh ingredients. For me it makes such a big difference in flavor and in texture. I used corn meal instead of corn mix, and interchanged the flour for gluten-free flour mix, which gives them a lighter and fluffier texture. The recipe works great with both types of flour, whether if you are using all-purpose flour, or a gluten-free all-purpose mix.

Now, instead of a big rectangular bread, I think to portion them out it’s the ticket! It cuts down the cooking time and each muffin gets an irresistible crusty top. I used Poblano peppers instead of California, Hatch chiles would be also great if you happen to have some frozen ones from this last season. Now, do not worry about the Poblanos, they are mild with just a hint of heat that play really well with the sweet corn. Instead of Chihuahua cheese, since I could not find one of a good quality and flavor, I used Smoked Gouda. Use what you like, perhaps something local, mild with good melting qualities.

These Cornbread Muffins with Poblano peppers and Smoked Gouda will make everybody happy at the table, including your gluten-free guests, they are moist , fluffy and  flavorful, I assure you this babies can be the hit at your Thanksgiving table or any given baking night!…Or Breakfast…Ian and I split them in half, warmed them on the pan with a dash of butter and topped them with a sunny side up egg…you’ve got to love the leftovers, if there are any…

Enjoy and Happy Thanksgiving!

Corn-Bread-Muffins_ingredients

Gluten free Cornbread Muffins with Poblano Peppers and Smoked Gouda

Makes 12 muffins or one 9×13 rectangular baking dish.

1-1/2 cups organic corn meal flour *
1 cup gluten-free all-purpose flour ** Not gluten-free fan? you can use regular all-purpose flour.
2 teaspoons baking powder***
1 teaspoon plus one pinch kosher salt
4 eggs
½ cup greek yogurt
1-1/2 tablespoons honey
¾ cup corn oil. Grape seed oil, sunflower will work too.
4 tablespoons melted butter
4 small medium fresh ears of sweet corn
1 cup shredded smoked gouda cheese
2 Poblano peppers roasted, skinned, de seeded and sliced into strips. Remember to save some strips to top the muffins!
1 pinch smoked paprika

Topping with:

½ cup shredded cheese
12 thin Poblano strips
smoked paprika to sprinkle on top
12 baking liners

*If you are in Austin, Boggy Creek Farm has the best one, Lamb’s stone ground meal, or Bob’s Red Mill for a national brand.
**The brands I prefer for gluten-free all-purpose flour: Cup4Cup, King Arthur all-purpose gluten-free mix.Not a gluten-free fan, you can use regular unbleached all-purpose flour.

*** I always use aluminum free Baking Powder.

Preparation Method:

1. De-kernel 3 ears of corn and blend on the food processor or immersion hand blender, until a coarse purée. De-kernel the 4th ear of corn and add the kernels to the purée.

Corn-Bread-Muffins_Corn-puree
2. Preheat your oven at 375F. Line two muffin baking pans with the large muffin liners 6 on each pan alternating spots. (Please: Read bottom note about baking liners and baking times.)
3. In a medium size bowl mix all DRY ingredients, whisk well to incorporate. Add cheese and toss.
4. In another medium size bowl, mix all your WET ingredients, including the corn kernel purée and the poblano strips. Remember to save some poblano strips to top the muffins.

Corn-Bread-Muffins-with-Poblano-Peppers-and-Smoked-Gouda_Mixing-the-batter
5. Combine wet ingredients into Dry with a wood spatula, until well incorporated, do not over mix.

Corn-Bread-Muffins_Mixing-wet-and-Dry-ingredients
6. Apply a little oil to a standard size Ice cream scooper, and fill each cup with a well-rounded heaping scoop of the batter. If you are using smaller cups use a leveled scoop.

Corn-Bread-Muffins-with-Poblano-Peppers-and-Smoked-Gouda_Scooping-the-muffins
7. Sprinkle a little cheese, a poblano strip and a dash of paprika on each muffin.

Corn-Bread-Muffins-with-Poblano-peppers-and-Smoked-Gouda-cheese_toppings
8. Place them into the oven on the lower third rack and LOWER the temperature to 350F.
9. Bake at 350F for 17-20 minutes until golden brown tops and a toothpick comes out almost clean with a few crumbs. Remove from oven and wait for 1-2 minutes, remove from pan into a baking rack or a basket and take them to the table. Enjoy.

Note:
Baking liners: I used a large paper cups that overlap if you bake them to close. That’s why I alternate them, and I used two trays. I love the medium size muffins and the raised muffin tops. They take about 17-20 minutes to bake.
If you are using regular cupcake liners I would say you might have more than a dozen, since they are smaller, and they will bake faster, perhaps 12-15 minutes. So, watch out and keep an eye on them.
If you are using dark muffin pans you might have to lower down your oven temperature at 325F since the darker pans retain more heat.

Corn-Bread-Muffins-with-Poblano-peppers-and-Smoked-Gouda-Yes,-more-please!Corn-Braead-Muffins-with-Poblano-Peppers-and-Smoked-Gouda_spread-some-butter!_Yes,-more-please!

Corn-Bread-Muffins-with-Poblano-Peppers-and-Smoked-gouda-Cheese_tear-apart

Enjoy!

Music Pairing: Billie Holiday – The very thought of you

View Post or View Comments 20

Mariana’s Mexican Mushroom Soup – a.k.a. M-mmm Soup!

Mexican-Mushroom-Soup_Yes,-more-please!

Cold weather, soups and blankets. The time has come and I’m setting you up with the most delicious Mexican mushroom soup. I was planning to make cream of mushrooms since one of my friends asked me for a recipe I made many years ago when I was a student in Guadalajara. (Rosi, if you are reading this please make this soup I think you’re gonna love it more than the cream of mushroom…although the cream of mushroom recipe is in your e-mail by now.)

As usual my brain went in multiple directions when I was at the market. I saw the epazote, smelled it and immediately thought of the Pasilla peppers I had at home. Suddenly it evoked the smells and flavors the recipe which were in my head and I could almost taste this delicious mushroom soup.

As you can see it has nothing to do with the cream of mushrooms I had plan to made, but I have to say that when I trust my instincts and let go, a wonderful recipe arises. I think when the soup was ready, it knock me down it tasted so good and it is so easy to make.

Warm and earthy yet light at the same time, this mushroom soup has the distinct flavor of the Pasilla peppers which tint the broth with a mahogany color and a faint spice. The Cremini mushrooms’ heartiness shine through along with the epazote licorice-minty flavor. The corn masa rue gives the broth a nutty corn flavor and great consistency.
To top it off, I recommend a bit of fresh crema or a dollop of plain greek yogurt which can be added along with some queso panela or queso fresco. For a Vegan version, you can add tofu squares, and a bit of unsweetened coconut cream. If you are looking for a soup that will warm you up with a friendly calorie count this Mariana’s Mexican Mushroom Soup might be just what you where waiting for… Mmm!!!

Mexican-Mushroom-Soup_ingredients

Mariana’s Mexican Mushroom Soup – a.k.a. M-mmm Soup!

Serves 4 or 2 hungry Mexican Yetis.

1 lb cremini mushrooms, clean and medium thin sliced.
1 large or 2 small dried pasilla chile seedless and cut with scissors
1 tablespoon corn masa-harina “Maseca”
½ medium white onion small diced
1 medium garlic clove finely diced
4 roma tomatoes
4 cups chicken, beef or vegetable stock
1 glug corn oil or extra virgin olive oil (what ever flavor you prefer)
2 sprigs of epazote (if you are using Mexican epazote, use just one)
Sea salt to taste.
2-3 cranks of Fresh Black Pepper

Garnish with:

Fresh Mexican crema, crème fraîche or plain greek yogurt
Queso Panela or queso fresco
Fresh epazote

Vegan substitutions:

Vegetable stock
Garnish with: unsweetened coconut milk, and firm tofu squares.

Preparation method:

1. Cut a little cross on the bottom of each tomato. In a small pot boil your tomatoes until soft. Remove the skins. Reserve one cup of the boiling water and blend them until smooth. Set aside.
2. Remove the stem of the chile pasilla and shake to remove all the seeds and core.With the help of kitchen scissors slice the chile pasilla into an 1/8” inch thin strips.

Mexican-Mushroom-Soup_how-to-cut-Pasilla
3. Have everything ready beside your stove to start the soup.
4. In a medium large soup pot, over medium high heat add the oil, wait until warms up and then add the pasilla strips. Toss with a wood spoon for 1-2 minutes until they start looking crispy and they release their flavor. After 2 minutes the color of the oil is orange. Remove the crispy rings from oil and reserve them for garnish.
5. Lower the heat to medium and add 1 tablespoon of the corn-masa harina and stir until slightly golden brown. Add the diced onions and garlic, toss for 1-2 minutes, add the tomato pure, toss and season salt and pepper, bring to a boil.
6. Add the chicken stock, and the epazote sprig. Bring to a boil and then simmer for 5 minutes. Add the cremini Mushrooms and crush some of the fried pasilla reserved. Bring to a slow simmer, cover and cook for 15-20 minutes until the mushrooms are tender and the broth has a richer consistency.

Mexican-Mushroom-Soup_Yes,-more-please!_for-two
7. Taste for salt and pepper. Turn down the heat and let the soup rest for 10 minutes.
8. Meantime prepare your garnishes. Warm up some corn tortillas, serve the soup and garnish with crema, queso panela o fresco, some of the crispy pasilla rings, fresh epazote, and Warm up!

Note: If you are the spicy soul like me, toast some chile de arbol with a little bit of oil and crush some of this spicy chile on top… mmm spicy!

Mexican-Mushroom-Soup_Serve-and-Garnish

Mexican-Mushroom-Soup_Yes,-more-please!_for-twoMexican-Mushroom-Soup_Plate_Yes,-more-please!

Warm up!

Note: Now that I think about it.. it will be delicious if you add some kale or swiss chard, even baby spinach…at the end  of the preparation…yum!

Music Pairing: Lila Downs – Llorona Frida Kahlo

View Post or View Comments 6

Apple Buckwheat Crepe Cake with Cider Caramel Sauce

Apple-buckwheat-crepe-front_Yes,-more-please!

“With an apple I will astonish Paris.”
~ Paul Cezanne ~

This cake is for the person who loves to cook and who enjoys the process of creating, and building something from scratch; layering flavors, textures, and aromas. This cake taught me patience. From the conception, to the making I learned all the way. I learned that fast and easy are not always worth it. I was reminded of the “virtuous” character of patience. We can use it when we desire the outcome we imagine. To enjoy making this cake, reserve time, and relax. There is something about craftsmanship in this recipe that I love, especially the gratification of assembling the components. The results of such efforts are worth every step.

Time, and patience are the main ingredients. Apples, buckwheat flour ,butter and apple cider are the witnesses to the madness. The smells are insane once you start to cook; peeling the green apples, that crisp sweetness from breaking the skins, to the nutty and buttery aromas that fill the kitchen with a warm cloud when making the buckwheat crepes.

Imagine 26 soft silky layers of light, thin, buttery and nutty buckwheat crepes carefully layered with thinly sliced tart green apples sautéed with cinnamon and honey, mascarpone cinnamon cheese spread between layers. Add toasted pecans and a tipsy cider caramel sauce that sinuously hangs from the crispy feathery crêpe edges…This is the ultimate tribute to the apple and buckwheat love affair.

When you cut the first slice of this cake, your work shows, it makes you feel like a better person and all that patience and love invested in the creation it is absolutely worth it for a slice of this cake.

Fifty percent apples plus cheese and a bit of flour make it almost guiltless and mildly sweet, do not get the appearance trick you.

If you want to enjoy an apple cake this season, something memorable, and not so overly sweet, Apple Buckwheat Crepe Cake with Cider Caramel Sauce is the dessert you been waiting for.
Make time for this love affair and prepare to astonish.

Apple-buckwheat-crepe-Yes,-more-please!

Apple-Buckwheat-Crepe-Cake_ingredients

Apple Buckwheat Crepe Cake with Cider Caramel Sauce

Serves 8-10

For the Crepes:

11/2 cups buckwheat flour
½ cup unbleached all-purpose flour
1 ½ tablespoons turbinado sugar or agave nectar.
¾ teaspoon fine salt
1 pinch of cinnamon

3 cups of milk
4 Large eggs
3 tablespoons of melted butter
2 tablespoons mild extra virgin olive oil

Plus about 3 more tablespoons of butter to cook the crepes.
1 – 8” non-stick pan
1 Ice cream scooper
1 baking sheet or cookie sheet tray

For the Apples:

7 medium size green tart Granny smith apples*
3 medium size Braeburn apples*
½ cup honey
1/2 cup turbinado sugar
½ teaspoon salt
1 tablespoon cinnamon
¼ teaspoon nutmeg
1 teaspoon lemon juice
¼ teaspoon lemon zest
2 tablespoons butter
2 teaspoons cornstarch
¼ cup apple cider

Note:  I’m combining two different types of apples, green tart wich are super crisp and hold their texture when sautéed, and the Braeburn wich are sweet and fragrant and wich also hold their texture when they are cooked. Once balance the others, I did not wanted to use a lot of sugar, since the cake will be drizzled with a cider caramel sauce. My advice is please, taste your apples: If they are to sweet or two tart you might need to add more sugar or honey is up to your preference and your sweet tooth.

For the Mascarpone filling:

2 cups mascarpone cheese
¼ cup honey
½ teaspoon cinnamon

For the Apple Cider Caramel Sauce:

2 cups apple cider
½ cup turbinado sugar
¼ cup honey
4 tablespoons butter
1 cup heavy cream
1/4 cup calvados.

1/2 cup roughly chopped toasted pecans.

Directions:

1. Start by preparing your Crepe batter. Combine all dry ingredients, Combine all wet ingredients and add them little by little to the dy ingredients whisking throughly until well combined and no lumps. Cover your batter with plastic wrap, making sure the plastic is touching the mixture, to avoid a skin to form. Refrigerate for at least 1 hour. You can make it the night before or in the morning and make the crepes at night. The batter will keep for about 48 hours.

Apple-Buckwheat-crepe-cake_making-crepe-batter
2. Mean time your crêpe batter is resting, prepare your apples. Peel them, core them as you peel and core them place the apples on a bowl with water and lemon juice to prevent the apples turning brown. Slice the apples about an 1/8 inch thin using a mandolin or the food processor. When using a mandolin, I always use a metal mesh glove, it is safe and comfortable when slicing, than the plastic apparatus that come with the mandolin set.

Apple-Buckwheat-Crepe-Cake_preparing-apples
3. Place them on a bowl and toss them with the honey, sugar, salt cinnamon, nutmeg, lemon juice lemon zest. On a large pot over medium high heat melt the butter and add the tossed apples. Mix the cold apple cider with the cornstarch to avoid lumps, and add to the apples. Saute the apples tossing gently for about 6-7 minutes until they are tender, but not mushy, they have a glistening light brown color the juices are reduced. Taste for sweetness, add more sugar if needed. Set aside, to allow to cool. Reserve some of the best looking round slices to decorate the top layer.

Apple-Buckwheat-Crepe-Cake_sautee-apples
3. Once your batter has rested, pull it out f the refrigerator and allow to come to room temperature, whisk a little and start preparing to make the crepes. Pre-heat your 8” nonstick pan over medium heat. Add a little dab of butter until melted and remove excess with a folded paper towel. Poor about 1.5 to 2 ounces of batter into the center of the pan immediately swirl the pan all around to spread the batter on an evenly coat that covers all the bottom of the pan. Cook for about 30 seconds until the edges start releasing when you pull them with the help of a spatula. At this point flip. And cook for another 10 to 15 seconds, transfer to the baking sheet, lay them out flat and allow them to cool. Continue with the same procedure, using the buttered paper towel in between crepes works great, you do not have to add butter every time to the pan, a small coat from the napkin will do it. Continue until your batter is gone.

Tips and Notes to the crêpe maker:
– I use an Ice cream scooper to portion the batter, this allow me to have equal thickness every time. a small ladle will work too.
-The first crêpe is not always the prettiest, usually is the test drive; it allows you to adjust the temperature in your pan and rectify the heat.
– If this is your first time making crepes please do not get discouraged, it gets better as you go. Once you get the groove on it is fun and the smell on your kitchen is heavenly!

Apple-Buckwheat-Crepe_How-to-make-crepes_Yes,-more-please!

4. Once you finish making all the crepes, allow them to cool, and make your mascarpone filling. Combine all the ingredients in a small bowl and whip them for 2-3 minutes with a hand blender until smooth and well combined.
5. Now that you have all the components start assembling, on a flat platter or a cake stand, place a dollop of the cheese and place your first crêpe, arrange a single even layer of the sautéed apples unfolding the slices if tangled, then add a crêpe, then a thin layer of mascarpone cheese, apples. Between, crêpe and crêpe, gently press to ensure you have even layers. Continue until you are done with the crepes and filling, ending with a crêpe. Cover the cake with some plastic wrap and place it in the refrigerator for 30 minutes so the layers can set.  Mean time make the caramel sauce.

Apple-Buckwheat-Crepe-Cake-assambling-sequence
6. On a small heavy bottom pot, add the apple cider, sugar, honey and butter. Bring to a rapid simmer, you want o evaporate as much water on the sauce. This will take around 15-20 minutes until reduced by half. You will see the formation of big bubbles, and the consistency of the sauce is thicker it resembles more like a syrup.
At this point add the heavy cream whisking at all times, until all is incorporated. Add the Calvados and let it simmer for another 10-15 minutes until the consistency of a caramel sauce. Remove sauce from heat. And transfer into a small poring jar. Allow to cool before drizzling on the cake.

Apple-Buckwheat-Crepe-Cake_apple-cider-caramel-sauce
7. Pull the cake out of the refrigerator, place the reserved pretty slices of sautéed apples and decorate the top, once the caramel has cool down a little, pour some of the caramel sauce all over the cake drizzle all edges and sprinkle with the toasted pecans.
8. Make sure you reserve at least half of the sauce to drizzle some extra when the cake is served. Enjoy.

Apple-buckwheat-crepe-with-Cider-caramel-Sauce_Yes,-more-please!

Apple-buckwheat-crepe-slice_Yes,-more-please!Apple-buckwheat-crepe-back_Yes,-more-please!Apple-buckwheat-crepe-sliced-cake_Yes,-more-please!

Apple Buckwheat Crepe Cake

with Cider Caramel Sauce

Music Pairing: Erik Satie – The Essential Collection

View Post or View Comments 3

Spiced Poached Pears

Spiced-poached-pears_and-mascarpone_Yes,-more-please!

Stone fruits are in season, I found beautiful pears at the market, Bosc and Red Anjou.  I will describe the Red Anjou pears as aromatic, juicy, fresh and sweet: while the Bosc pears are crisp, woodsy and  have a honey-sweet light flavor.
I could not decide which ones to bring home for this recipe…so I used both and the characteristics of each pear gave a great flavor to this simple recipe. Poached pears sounds so boring right? A dessert out of the 70’s…well its not and done right and with aromatics and the right cooking method its a great fruit dessert, the perfect end to a rich dinner like Thanksgiving… Or just for a simple treat on a rainy day…

The rum and the spices add warmth and great flavor to the light syrup, which is not overly sweet. The alcohol evaporates leaving all the good woodsy rum flavors in the fruit. A little dollop of whipped mascarpone cheese and honey add the perfect creamy  balance that makes these spiced poached pears irresistible.

This is one of those recipes with plenty of freedom for adjustment, and have the certainty that its gonna come out great. I like the light flavors and the delicate pear flavor is the star of the show. One of the best parts when you are cooking this recipe is the smell that your house is infused with…*sigh*..
Enjoy!

Spiced-poached-pears_BOSC-+RED-ANJOU

Spiced-poached-pears_spices

Spiced Poached Pears

Serves 6

3 Red Anjou Pears peeled, halved, removed the seeds and steam.
3 Bosc Pears peeled, halved, removed the seeds and steam.
4 cups water
½ to 3/4 cup spiced rum…up to you!
4 lime or lemon slices
1/2 cup turbinado sugar
½ cup honey
( you can substitute the total amount of sugar and honey for ¾ agave nectar, or nectrase)

Aromatics:

5 sticks Mexican Cinnamon
6 cloves
5 star anise
6 cardamom pods smashed
1/8 teaspoon grated nutmeg

Parchment paper

Garnish with:

Whipped mascarpone and honey
About ½ cup of mascarpone and 2 tablespoons of honey, whip them together until light and fluffy.

Toasted chopped pecans
Ground cinnamon

Directions:

1. Peel, half, remove core and stem in the pears. Keep them in a bowl with water and a few drops of lemon juice to avoid oxidation. (see picture below)

Spiced-poached-pears_peeling-pears_Yes,-more-please!Spiced-poached-pears_preparing-the-pears
2. In a medium size pot over medium high heat add water, turbinado sugar and honey to dissolve.

Spiced-poached-pears_dissolve-the-sugar
3. Once the water is simmering and sugar is dissolved, add rum, spices and simmer for 7 minutes.
4. Make a parchment paper square, fold it into a triangle, measure your pot radius and cut. Once you unfold the triangle you’ll have a nice circle to cover the pot.
5. Add Pears into the simmering liquid and cover with the parchment paper.Make sure the paper is touching the water to avoid the pears from any discoloration.
6. Simmer in low for about 20-25 minutes, or until the pears are tender when a knife is inserted.
Spiced-poached-pears_how-to
7. Turn off the heat and Let them cool for about 30 minutes. Remove pears from liquid. Heat up the liquid and reduce by half. It should have the viscosity of a light syrup. At this point you can adjust the flavors by adding more honey or more cinnamon if you desire.
8. Plate the warm pears individually or on a platter. Keep the syrup on a little serving pitcher to add the warm syrup when served. Top with a dollop of whipped mascarpone and honey, toasted pecans, sprinkle some cinnamon. Enjoy!

Note: This dessert can be made ahead. Just keep the pears inside of the syrup, and reduce the syrup until the next day. The pears will taste even better the day after is made. It’s a crowd pleaser dessert fit for Vegans, if the mascarpone is omitted, gluten-free and a light sweet bite to end a nice dinner…. Enjoy!

Spiced-poached-pears_Yes,-more-please!

Spiced-poached-pears_and-mascarpone_ready-to-serve

Spiced-poached-pears_and-mascarpone_plated

ENJOY!

Music Pairing: Nat King Cole – I love you for Sentimental Reasons

View Post or View Comments 6

Swirly butternut squash and kale soup

Swirly-butternut-squash-and-kale-soup_Yes,-more-please!

Butternut squash is my favorite squash. Autumn has arrived and I could not wait for the cold to make this soup. This nutty winter squash has the creamiest texture and tastes like a delicate pumpkin with mild citrus aroma. In my opinion Butternut squash makes the velvetiest soup in the world!…..

Now, you know how I feel about vegetable creams or pureed soups.
I do not want my squash soup to taste of chicken therefore vegetable stock is my preference. This vegan soup enhances all the pure flavors of the kale and the butternut squash by roasting them and letting those flavors stand out. I roasted the squash and steamed the kale with coconut milk to empower their own flavors.

I love the fusion of flavors in soups, but for me there is nothing better that the awareness of the fusion. What do I mean by that? Well these two ingredients are in harmony but they do not mix until you take a spoonful in your mouth then you taste the delicious swirl and contrast in colors, textures, flavors, and even in temperature. The kale and coconut milk add an herbal note without being overwhelming. The velvety roasted butternut squash adds sweetness and evokes the Autumn season.

This swirly butternut squash and kale soup is fun to make its easy and it looks appetizingly gorgeous. Whether its lunch with you alone, your friends, or a family get-together this soup is easy to portion and delicious…and it happens to be vegan! Enjoy!

Swirly-butternut-squash-and-kale-soup_ingredients

Swirly butternut squash and kale soup

Serves 4 bears or 2 mom and pop bears..

For the Butternut squash soup:

1 medium Butternut squash cut into cubes
½ medium size yellow or white onion
1-2 glugs of mild extra virgin olive oil
4-5 cups Vegetable stock
1 teaspoon kosher salt
½-1 teaspoon freshly grated nutmeg (start with 1/2 teaspoon taste and add more if you like… I love it with 1 whole teaspoon!)
1 pinch of cayenne pepper (optional)
Freshly black pepper to taste.

For the Kale swirl:

8 Curly-leaf kale leaves deveined.
¼ medium yellow or white onion
¾-1 cup coconut milk
½ teaspoon kosher salt

Toppings:

Roasted Walnuts roughly chopped
1-2 pinches Smoked paprika

Preparation Method:

Preheat oven at 450F
1. Peel and cut into small cubes the Butternut squash. Slice the onion.

Swirly-butternut-squash-and-kale-soup_peel-de-seed-cube
2. On a baking pan lined with aluminum foil or parchment paper, toss the Butternut squash, onions, salt pepper nutmeg and one glug of olive oil all in one layer. Roast in the oven at 425F for about 30-35 minutes, shake the pan every now and then, until the little cubes are fork tender, and toasty.
3. Remove pan from the oven, and in a medium size deep pot, add the roasted butternut squash, add the 4 cups of vegetable stock, salt, nutmeg, pepper, and puree with the help of an immersion blender, or use a regular blender.
4. Check for thickness and if needed add another cup of vegetable stock. This is up to your preference, however I like my soup with a lot of body, and therefore I usually use 4-5 cups. Feel free to add a little more if its too thick or to add some almond milk for an extra nutty flavor.
5. Let your soup warm up on a low low heat, and stir constantly.

Swirly-butternut-squash-and-kale-soup_roasted-butternut-squash

Swirly-butternut-squash-and-kale-soup_velvety-butternutsquash-soup
6. For the kale swirl: in a small pot place the leafy parts of the kale, discarding the main vein.
Add the coconut milk, roughly chopped piece of onion, garlic, salt and pepper.
7. Cover the pot over a slow simmer for about 7-10 minutes until the kale feels soft, and turns bright green. You can taste a little piece to check for doneness, you want it soft and cooked but not over cooked.
8. Remove from the stove and using an immersion blender to puree the kale mixture. Adjust seasoning with salt and pepper. The consistency should be creamy and light. It should look like a deep bright emerald green.

Swirly-butternut-squash-and-kale-soup_kale-swirl-soup
9. Roast the walnuts, sprinkle a little smoked paprika and salt.
10. Serve 2-3 ladles of the butternut squash on each bowl and then add the kale swirl. Sprinkle some roasted walnuts, and a pinch of smoked spanish paprika for best flavor. Enjoy!

Note: Remaining soup keeps well for 3-4 days and although it diminishes in flavor, extra portions can be frozen and stored for 30 days or so; this minimizes waste if you happen to make too much or have a desire for homemade soup next time you’re too busy to cook.

Swirly-butternut-squash-and-kale-soup_swirl!Swirly-butternut-squash-and-kale-soup_ready-to-serve_Yes,-more-please!

Enjoy!

Music Pairing: For this recipe our dear friend Ana Ferper plays

a beautifully classic guitar melodie by  J.S Bach Allemande Suite No.1

View Post or View Comments 6

Green Green Coleslaw

Green_Green-Cole-Slaw_ready-to-eat!_Yes,-more-please!

Texas summer heat is like Kryptonite. Do you remember how Superman used to get exposed to this green glowing Kryptonite and you could hear a sound like this: ~ waaayioh, waaayioh, waaayiho )) ) ) ) ) you could almost see the waves that debilitated the strongest blue and red caped man in the comic world… Well, I’m not muscled or caped like Superman, but the Summer sun is my Kryptonite.

I often can see and hear the heat waves whispering:

~ waaayioh, waaayioh, waaayiho )) ) ) )

~ Am I delirious?…

No, the truth is that I’m in much need of a little break from the high temperatures. I needed a boost of fresh glowing green in my life and I could not resist some leafy crunchy vegetable medley action. We all know what this leafy greens are brimming with fiber along with vitamins, minerals, and plant-based substances. Imagine what they can do for you.

August is a hard month to get great produce; too much heat here in Texas. I know the green leafy season is not here yet, but thanks to California’s amazing weather and hard-working farmers, I armed myself with some of my favorite green vegetables: kale, mustard greens, green cabbage, green apples, celery, onions and a little fresh corn. After a little chopp-ah-rooh, and combining all this shredded goodness with some light vinaigrette, this Green Green Coleslaw was born.

Green-Green-Cole-slaw

The combination of the different greens add great flavor and texture. A tangy oil honey and apple vinegar dressing, with a good punch of dry oregano, and seasons, make this green-green coleslaw light and crunchy. It is lightly dressed. No soggy cole slaw for me, thank you. If you are the creamy cole slaw type, this will convert you into the vinaigrette version.

This Green Green Coleslaw, makes a great side dish for, salmon, any white grilled fish, chicken, pork, beef , shrimp, tofu, tempeh, rice, lentils, white beans…you name it. You can add some roasted almonds, walnuts, or sunflower seeds and it will be a great left over for next day lunch.

Nice and easy, this recipe is all about fresh and nutritious green power all in one bowl. A salad
with great personality and flavors, this green-green cole slaw will restore your energy and refresh you on this fiery Summer. Like a good Kryptonite, you know? hehehe Enjoy.

Green--Green-Cole-slaw_Vegetables

Green Green Coleslaw

Serves 4-6 or 1 super man.

The vegetable action:

½ half of a small green cabbage head
4-5 San Jacinto Kale leaves
1 large mustard green leaf.
2 celery stalks
1 ear of sweet yellow corn
1 medium-large green apple
½ medium onion

For the dressing:

¼ cup grape seed oil
4 tablespoons apple cider vinegar
2 tablespoons honey
1 heaping teaspoon dry oregano. (Not crazy about oregano?, tarragon, dry basil will go great too…)
½ teaspoon celery salt
½ teaspoon kosher salt
½ teaspoon fresh ground pepper
The zest and the juice of one lemon.

Feel free to add some nuts, for crunch and protein, toasted almonds or walnuts will taste fantastic.
Or some golden raisins will add an extra sweet note. If you are a Mayonnaise lover, substitute the oil for 1/2 cup of mayonnaise and 2 tablespoons of plain greek yogurt.

Preparation:

1. Finely chop the cabbage, the kale (remember to remove the hard steam on the kale and the mustard greens), Finely chop the onions, celery and de-kernel the sweet corn. Chop the apple like  matchsticks.

Green-Green-Cole-slaw_chop,-chop,-chop
2. In a large bowl, whisk all your dressing ingredients, add all the chopped vegetables and toss well.

Green-green-Cole-slaw_dressing-and-de-kerning-the-corn
3. Set a side and let it rest for 10 to 15minutes before serving.
4. Taste, adjust for salt and pepper if necessary. Serve and Enjoy!

Green-Green-Cole-slaw_toss-well_Yers,-more-please!

Green-Green-Cole-slaw_close-up

Green-Green-Cole-slaw_Vegetables_tangy-and-fresh


View Post or View Comments 1

Privacy Policy Contact Us Yes, more please!