Recipes, Cooking & Art Direction: Mariana Nuño Ruiz McEnroe | Photography: Ian McEnroe |
Published: October 15, 2016
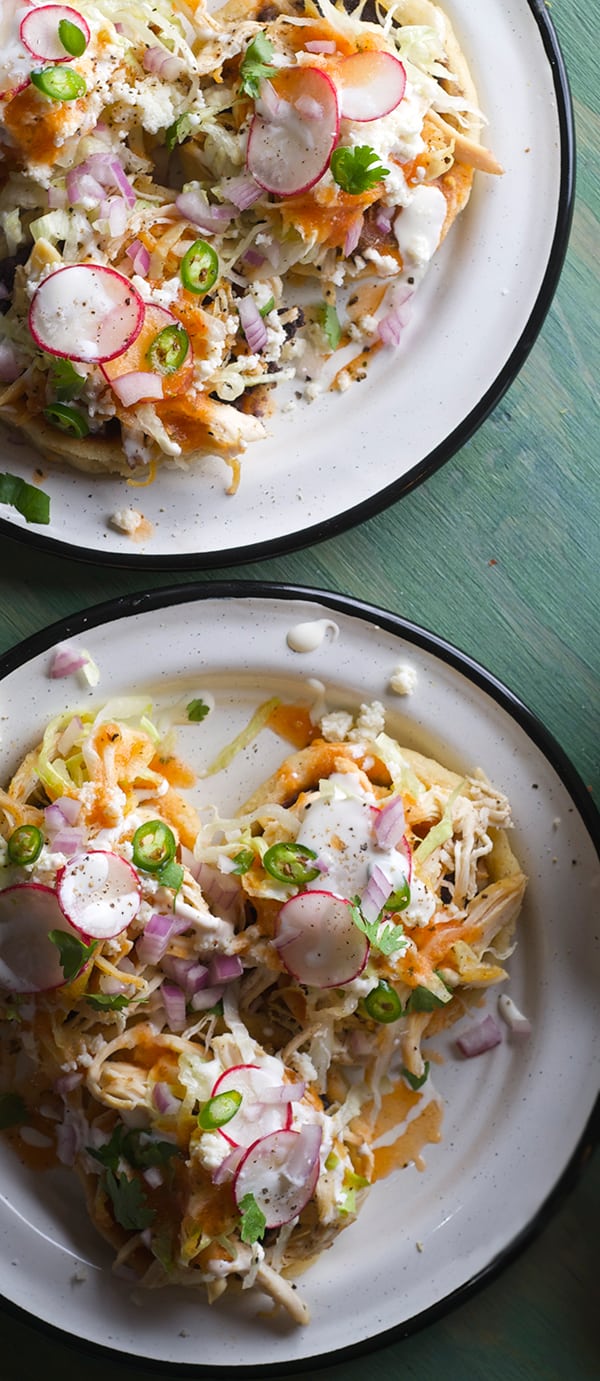
Antojitos Mexicanos…These are the “small bites” in Mexican street food. Go to the fair or the Tianguis (street market) and they are the perfect food for an impromptu craving. Sopes de Pollo – Chicken Sopes is one of them. Take corn masa dough and create a small fried or grilled pattie and you have the foundation to add any kind of toppings you like; shredded chicken, beef, pork, picadillo, chorizo, requeson~Mexican Ricotta, refried beans, mashed potatoes, calabazitas, poblano rajas, mushrooms, infinite filling possibilities. Top them off with a simple tomato salsa, shredded lettuce or cabbage, onions, radishes, crema and queso fresco or cotija cheese, and these little sopes, will be a highly crave-able meal.
In Guadalajara, Jalisco, where I’m from, these fresh corn masa patties are called Sopes de Masa, or pellizcadas which translates into “pinched”. Why? Once these masa patties are cooked, on the comal or fried, the edges of these round patties are pinched all around to create a border-leap that will hold the fillings and topping goodness.
This masa pinching is done by an experienced cook, a grandma or an aunt, cooks that have developed Moctezuma fingers, with digital prints deleted by the generational hard work in the kitchen. Since these patties are piping hot, you need this kind of strong digital numbness to achieve the results. Lucky you, this is not the only way to make sopes, I will provide you with an easy solution using two spoons. You get to keep your fingerprints.
Recipes, Cooking & Art Direction: Mariana Nuño Ruiz McEnroe | Photography: Ian McEnroe |
Published: February 27, 2016
“Feelings…. nothing more than Fillings”… Hello friends, we’re back.We have been on a roller coaster; from a vacation in Mexico, to Slow Wine Festival, meeting new people, giving cooking classes, Ian giving lots of photography classes…we have been busy, but you have always been on our minds.
Visiting my Mexico after more than eight years was reinvigorating. Being back in my birth country was very fulfilling and I felt my roots strongly. We were welcomed at the airport with a big familiar smile and , thankfully, we did not have to get in the long customs line. During the visit we could eat and breathe the delicious in-season ingredients that Baja produces; from papayas, to avocados, chiles, lettuce, pineapples, limes, guanabanas, tomatoes, chard, radishes, you name it!. I just felt like a fish back in the water, especially walking along the pristine coastline. Now I’m melancholic… its hard to forget the people, the laughs, the air and the sea… and the food. From freshness, flavor, aroma, ingredients, preparations, sazones… can you imagine? Good thing we just visited one little town…Phew!
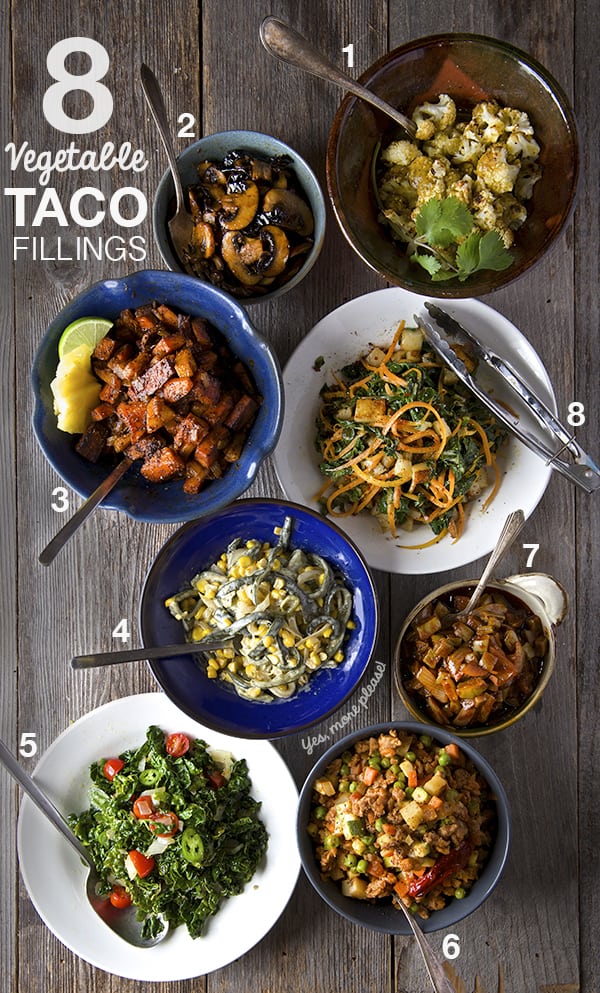
I have harnessed the melancholy and channeled it into a love letter to every Vegan and Vegetarian who has felt neglected by the Taco Love. Yes baby, not one, not two, but EIGHT vegetable fillings that will add vitamin “V” (vegetable) on any Taco night!
Recipes, Cooking & Art Direction: Mariana Nuño Ruiz McEnroe | Photography: Ian McEnroe |
Published: July 28, 2015
Entomatadas;//Adjective, En=in / tomat= from the word tomato /adas = adjective termination that denotes action,”adas”
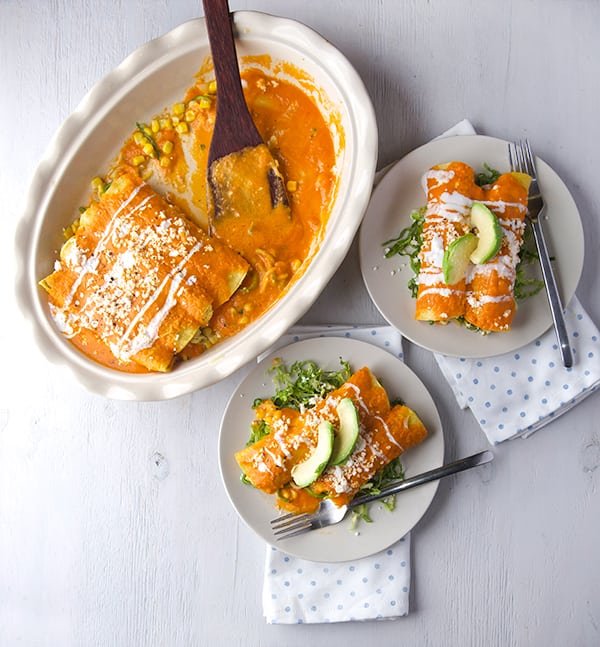
I would say that the closest translation of the word “entomatadas” or “entomatado” would be “smothered in tomato”.
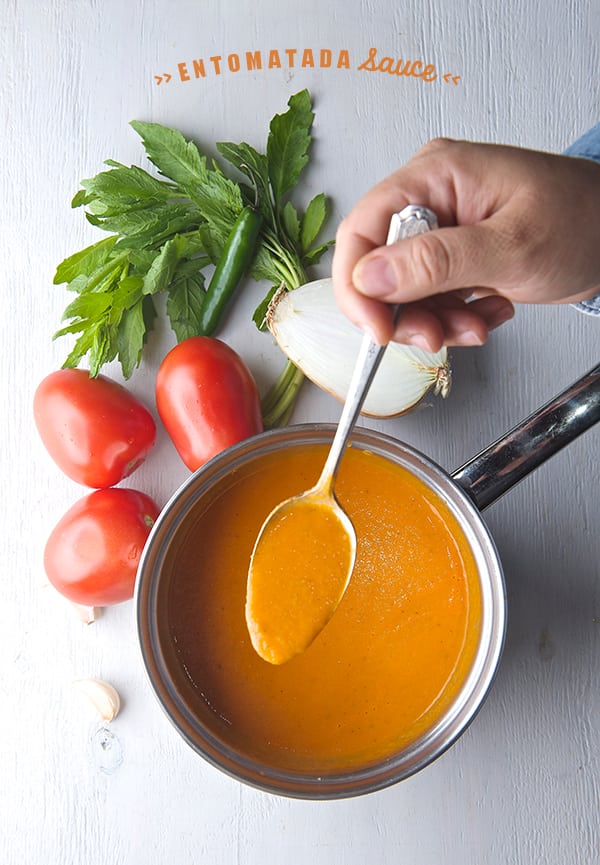
These Entomatadas are the mellow cousins of the Enchiladas. They have the same concept and construction, rolled tortillas filled with infinite possibilities and covered with a sauce made with dry chiles. The sauce used in entomatadas is made with red tomatoes, as its name suggests. Roma, or Tomboys tomatoes, or jitomate “bola” in Spanish is usually the tomatoes of choice when making this sauce, but certainly any red round meaty and juicy tomatoes, along with mild herbs and spices will work.
The basic Entomatada sauce is very mellow and showcases the best in tomatoes. In this version of mine, I rock it out a little bit by adding a single serrano, that mimics the black pepper and adds deep of flavor to the sauce. The sauce consist of boiled tomatoes, that are skinned, blended, and then sautéed with onion, garlic and fresh epazote or mint. Then its pureed for a second time to produce the most velvety and creamy tomatoey sauce. The creamy sauce contains no dairy however, which makes the sauce light and fresh. Also on the virtue of looking for a healthier, lighter version of the classic way to make entomatadas which calls for frying the tortillas, I warmed up the corn tortillas and I drizzled them with a bit of a delicious green… a grassy extra virgin olive oil! This step not only adds another layer of flavor, but also prevents soggy tortillas when the salsa is added.
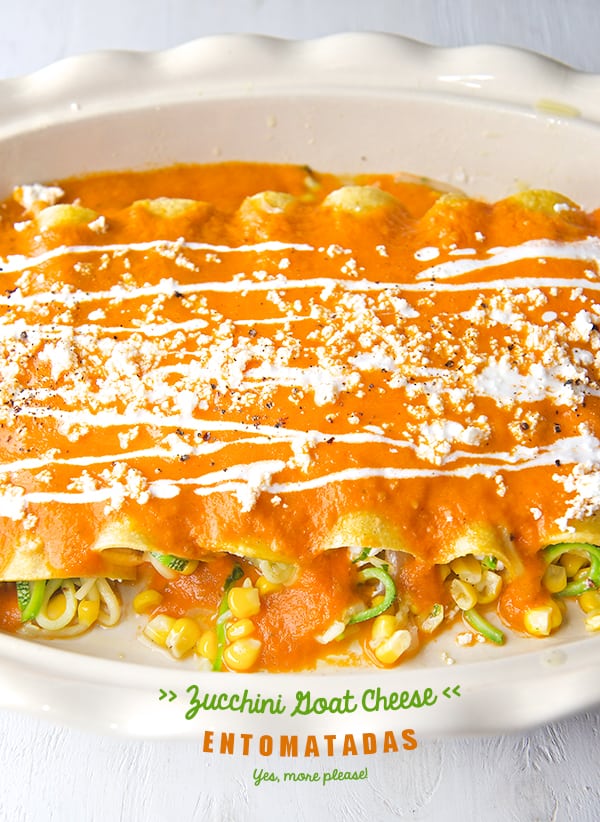
These Entomatadas of mine are filled with sautéed zucchinis, onions, sweet corn, and goat cheese. Once I roll them up, they are smothered with the piping hot tomato sauce which warms them through. These Entomatadas are best eaten warm almost tepid temperature.
Pouring the sauce separately when making any kind of enchilada is my favorite way to make them; It avoids enchilada uni-blocks. Best of all, by using this technique on these Entomatadas, is that it makes them BAKE-FREE!!! keeping you and your house odor free when you have closed the windows to run the A/C. If you don’t understand how that works, then come further South.
Entomatadas are great for entertaining. I usually have them rolled up and when its time to serve them. I pour the piping hot tomato sauce all over, drizzle of Mexican crema or in this case I use a diluted Greek yogurt and sprinkle of queso fresco to keep them on the lighter side. Take them to the table and serve on a bed of shredded fresh lettuce and avocado wedges. I’m telling you, these Zucchini Goat Cheese Entomatadas scream Summer out loud! Whether its a midweek dinner or a potluck this recipe, its a must try! I know you will like them as much as we do!…
Recipes, Cooking & Art Direction: Mariana Nuño Ruiz McEnroe | Photography: Ian McEnroe |
Published: June 24, 2015
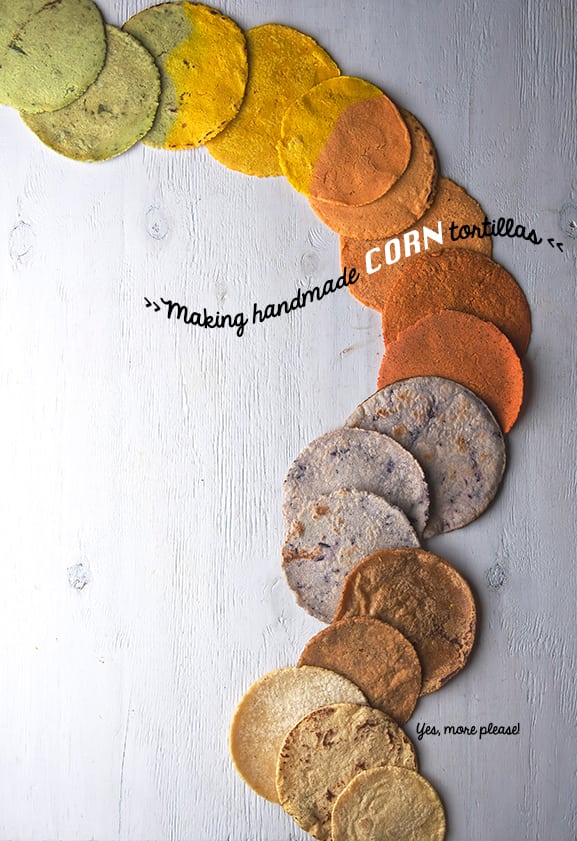
Do you want to learn how to make your own corn tortillas? Get ready! Once you go handmade, its hard to go back to the store bought. The process is fairly easy once you get the hang of it; patience, my little grasshopper, is the key. The first two are horrible, and then the magic happens and you learn from your mistake and “Bippidi-Boppidi-Boo” …your tortillas start to take shape. In the kitchen, making tortillas is one of the things I enjoy the most. Its so rewarding and in my opinion they taste so much better than machine made. Imagine the smell of warm corn filling up the kitchen and the taste of soft fresh tortillas…it has no comparison.
Making tortillas requires lots of patience and “patience”. Yes, if you have patience and a little extra time, go for it! Make them because its 100% worth it. Although I recommend you do not attempt to learn how to make them the night before if you have a big crowd to feed or a party… to do so would be a bit of a nightmare. You do need practice and like I said LOTS of patience. Tortillas don’t like people in a hurry. You have to be in a Zen tortilla mode, focus and get into the groove. It can be frustrating at the beginning. Just like pancakes usually the first one is not so good but once you get the right amount of heat and rhythm you are in tortilla mode. Soon after a heavenly bite of a soft corn homemade tortilla, this will become the best taco you ever had. Now, please follow these instructions carefully. I experimented with several proportions and these were the most successful. It is hard to make a tortilla from fresh masa, the procces is labor intensive, it takes about 2 days to make good fresh masa. From the process of nixtamalization, the grinding and the kneading. In Mexico this process is the regular norm, since tortillas are the main staple on the Mexican diet. you can find places where tortillas are made fresh everyday or the tortillerias which they are also made fresh by a machine, and people line up everyday in the middle of the day to buy fresh tortillas. It is hard to settle when you know the real flavor and texture of a tortilla, being on the states it is more common to find the pre packaged tortillas at supermarkets, which they are far in flavor and texture from the real tortillas. This recipe attempts to recreate that warm, soft, toasty corn flavor that tortillas have when just made out of the comal. Despite the fact they are made from corn Masaharina, the results are much closer to the flavor ant texture of a real mexican tortilla. On the recipe you will find variations and different brands of masaharina. I suggest to follow the instructions and try to find the brand I recommend, for best results in flavor and texture. You can easily find this brand online, if you live abroad, might be easier for you to order online.
This handmade tortillas last about 3-4 days if they are kept on a plastic bag on the refrigerator. How to Reheating next day? No problem!.. My dear 50%Scottish- 50%American husband taught his 100% Mexican wife to reheat the tortillas on the bachelor way: In a toaster. Would you believe?!!! Ha! Well I have to say that it is a very effective method. What I learned is that by sprinkle them with a little water on each side, then place one tortilla into each toaster slide, set up the toaster number 3-4 depending on the toaster and you will have the most efficient and fast reheating method for tortillas. The tortillas turn out warm and not dry. Be careful using your fingers to remove them, they get very hot. Thank you Ian, but of course for a Mexican the first choice would be a comal, or over the flame on a gas stove to heat them. This char the edges, giving them extra flavor.
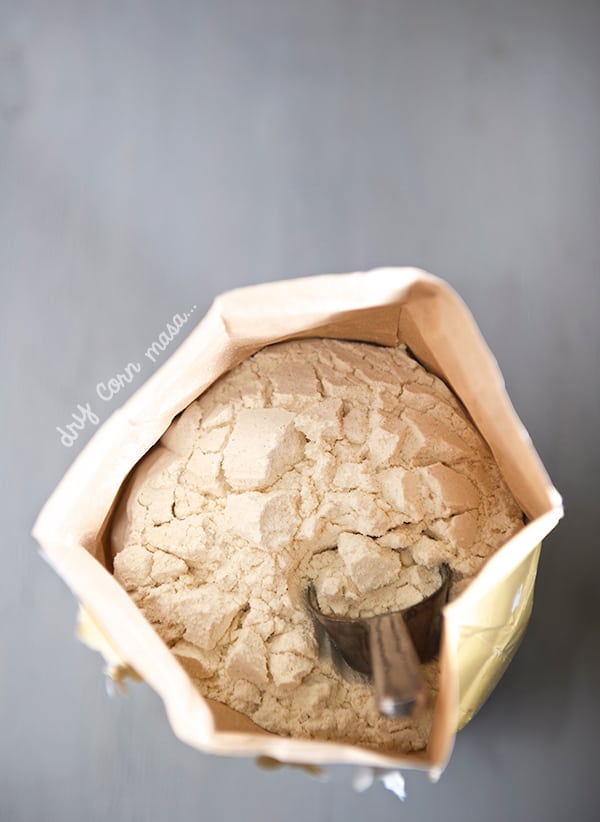
1 lbs of fresh masa* 1/2 up to 1 cup of warm water (maybe less, maybe more…) Kosher or sea salt Tortilla press 1 plastic bag (see photos below for instructions). *If you are in Austin, Tx you can buy fresh masa at the Milagro Factory on 6th st. Ask for fresh corn masa, not the one that is prepared for tamales, make sure to specify you are making tortillas. If you want to make your own masa… well that is a whole other process… I will work on that… soon : ) !
However If you don’t find fresh masa, dry masa harina is a good choice. Minsa brand, and Arrowheads Mills also offer this type of masa harina. What is special about this masa-harina? Well it is the process of Nixtamalization, which dates from the Aztecs back in 1200-1500 B.C. In this procces, dry corn kernels are soaked and cooked in an alkaline solution, made with limestone and water, which helps remove the outer hull of the grains and pre-cook the corn kernels. These corn kernels once are soaked and rinse several times, are grinded, added water, a bit of salt and transform into fresh masa. The brands I previously mentioned are dehydrated masa transformed into Masa-harina. Masa -harina its a very common alternative when there is no access or time to make fresh masa. My best advice is to check with your supermarket, in the international food aisle, today a lot of supermarkets have a “Hispanic food aisle” and if you are abroad, your best bet is to order online. I included my favorite brands at the end of this post.
From Dry Masa:
1 cup dry Masa harina*
Organic options are suggested at the end of the post, If you are using Organic dry masa harina I will recommend to use 1/2 cup minsa + 1/2 cup Organic white masa harina, for better texture and flavor.
3/4 up to 1 cups warm water
1/4 teaspoon kosher or sea salt
Use measuring cups for better results.
*I recently find out that Minsa the other leading brand for Masa harina in Mexico, Has announced their commitment and certification as a NON GMO, USDA Organic, Kosher, GF and whole grain. This means that this is the best Mexican Masa Harina you can buy. if you want to know more about it please visit their website. Minsa
Preparation:
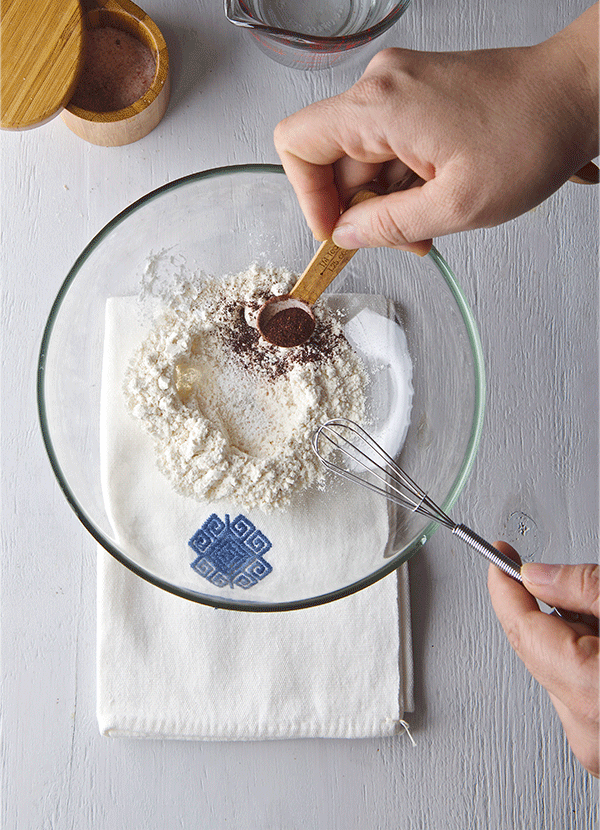
1. Start by dissolving the kosher salt into the warm water, On a large bowl place 1 cup of masa-harina, mix and make a well add the water in the center and star mixing with your hands little by little until you have a soft ball and all the flour is incorporated. Kneed for 2-3 minutes. Make a ball and cover the masa with a damp towel or plastic wrap let it rest at least 20-30 minutes, let the masa-harina re-hydrate as longer as possible. Usually after this period you need to make some adjustments. Too dry: it will start to crumble, you need to add more water. Too wet : it will be sticky on your hands you need to add a bit more masa harina
The right texture resembles a moister play-dough. It is ok for the masa to be a little humid to the touch. Making tortillas is a matter of feeling the masa, the more you make them the better you will get at it. Your masa has to be always room temperature (except if you live in Yakutsk, hehhehe), slightly warm to the touch works best.
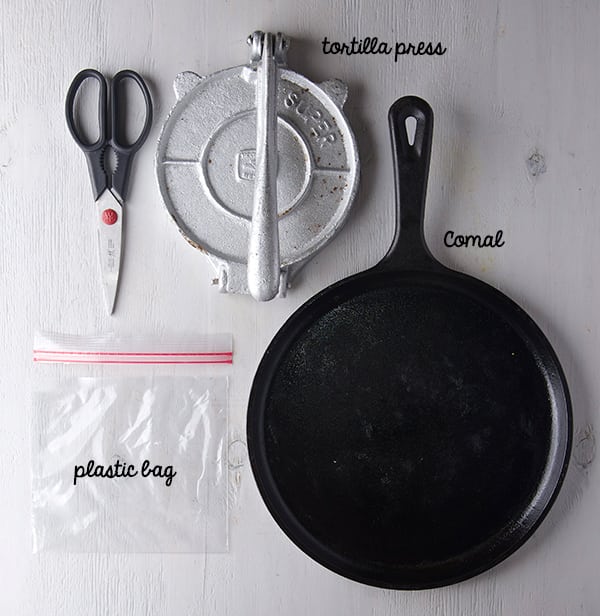
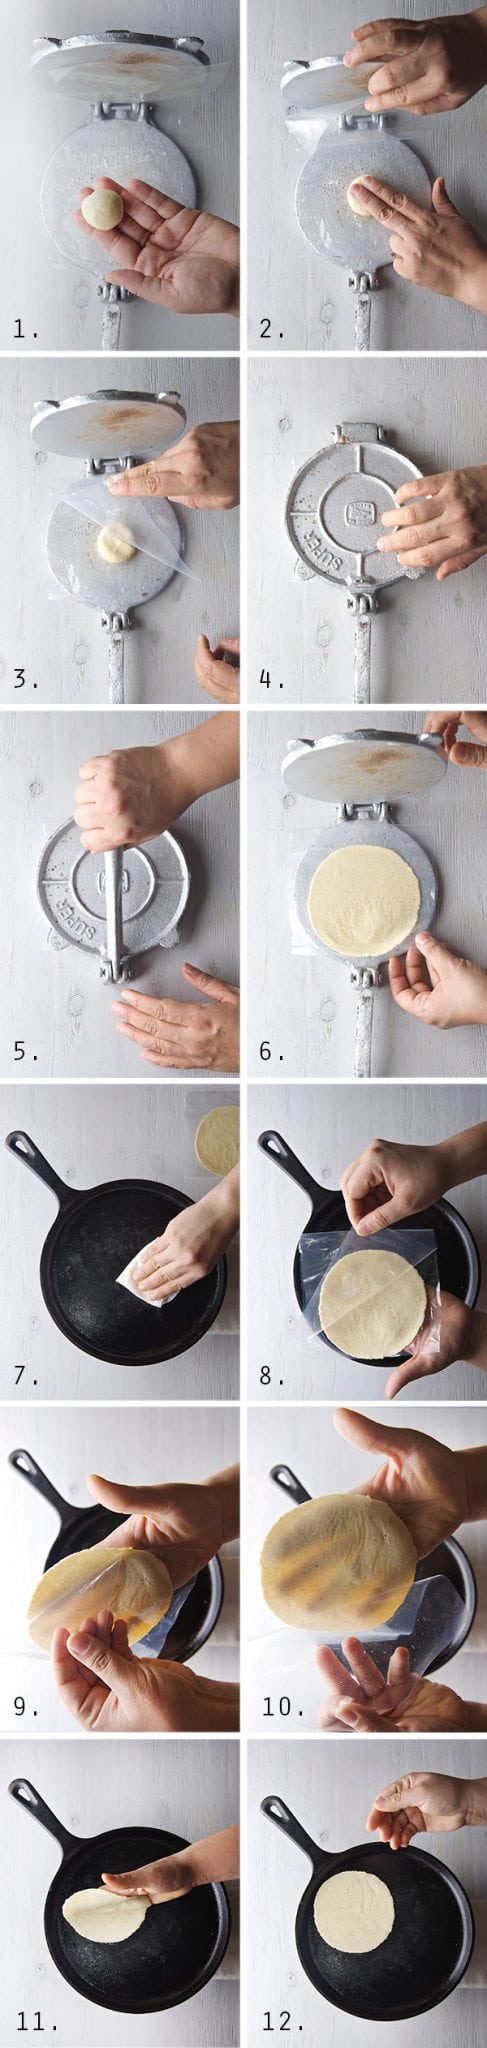
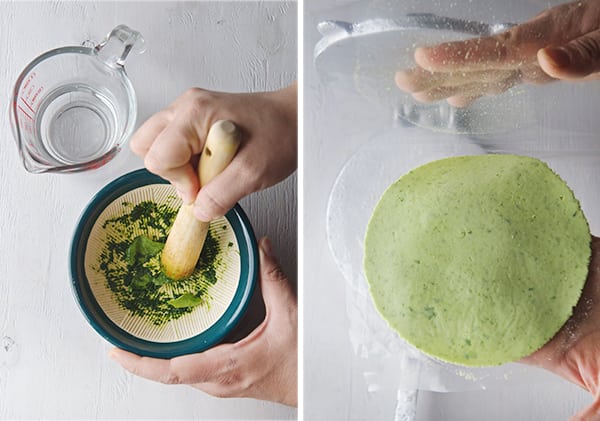
2. After 30 minutes, prepare the resealable bag, by cutting the top sealed lines of the bag and cut open the 2 sides of the bag. Now you have like a plastic folder. Open the tortilla press and put a drop of oil, then lay down the plastic. This will prevent the plastic from moving while pressing the masa. Now, Start by making 1 ½” round ball (you can use a small Ice cream scooper to help make them even size). Remember to Keep your masa covered with a piece of plastic wrap or damp towel at all times to prevent from drying out. Work with one ball of masa at a time. Now, place the masa ball in the center of the opened plastic and flatten slightly with your fingers. Fold the plastic over the masa, and fold down the metal tortilla press. Hold the handle and press down gently until the dough has spread about 4” inch diameter. Rotate the plastic and slightly press if necessary.
3. On medium-high heat, heat up a large cast iron pan, a griddle, a comal, or a teflon pan will work too. With your hand, hold the tortilla in the plastic, and carefully peel the plastic just like if you where peeling a sticker. Once one side is peeled, flip it into your writing hand and peel the rest of the plastic. As you peel allow the tortilla to rest halfway on your hand, and half hanging down. Gently lay down the tortilla on the warm skillet. Once you place it Do not try to reposition!, you just have one shot!….
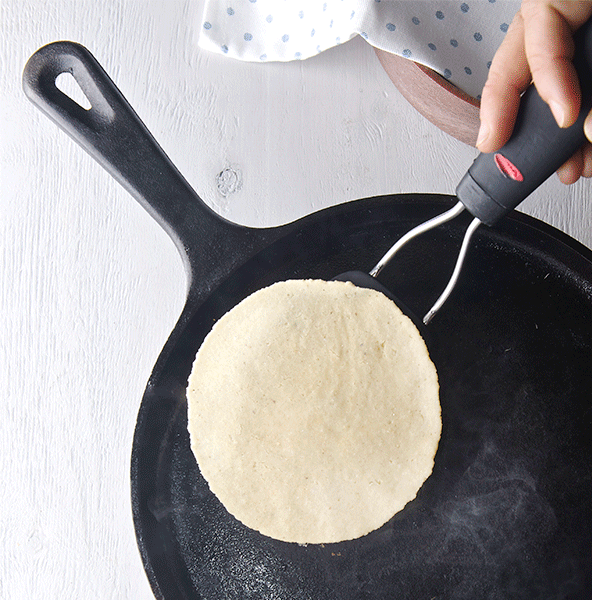
4. Using a flat spatula, flip the tortilla until the edges start to release from the skillet. Once it releases easily, then its time to flip. You should not battle the flip if it does not release with ease, just give it a bit more time. Usually it takes 30-40 seconds per side, especially with these little tortillas. Once you flip you can press down a little on the edges. After you laid the tortilla on the pan, 2 flips its all it needs. The tortilla should be lightly colored and air pockets will form on the second flip. As soon as the air pockets are forming the tortillas are done. Transfer the tortilla into a tortilla warmer lined up with a clean cotton kitchen towel with a dry paper towel on the bottom to keep them moist. Keep them warm in a tortilla warmer until you finish with all the masa, working one ball at the time. Depending on size you can fit 2 or 3 on a 12″ skillet, and once you start getting a good tortilla rhythm its fun and the process goes fast and smooth.
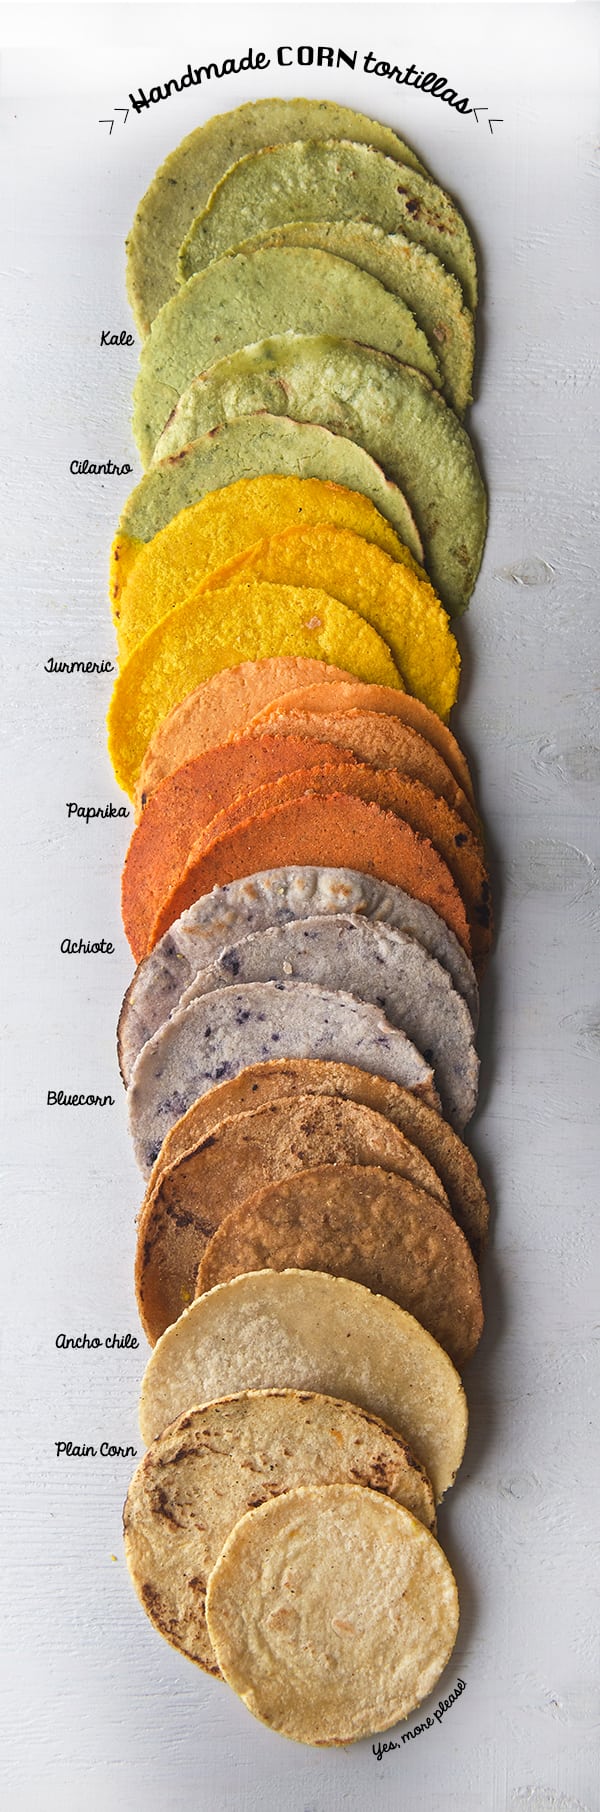
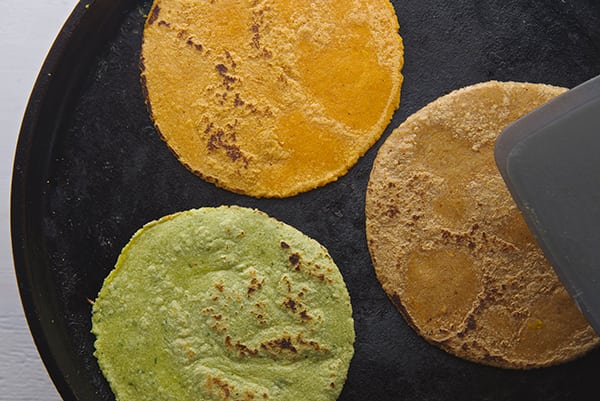
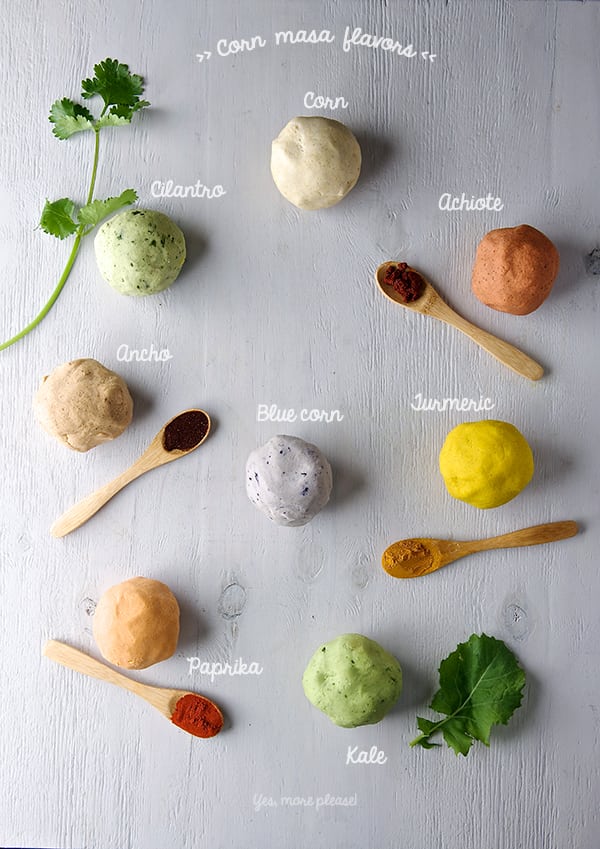
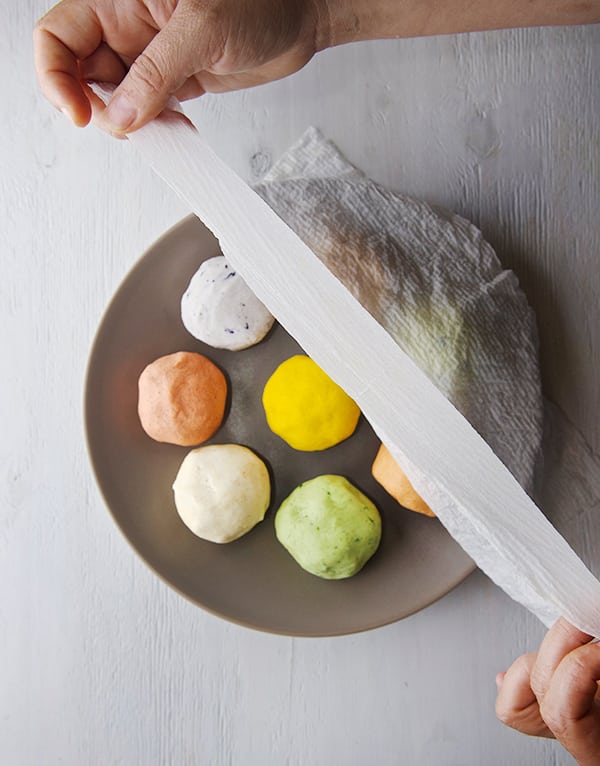
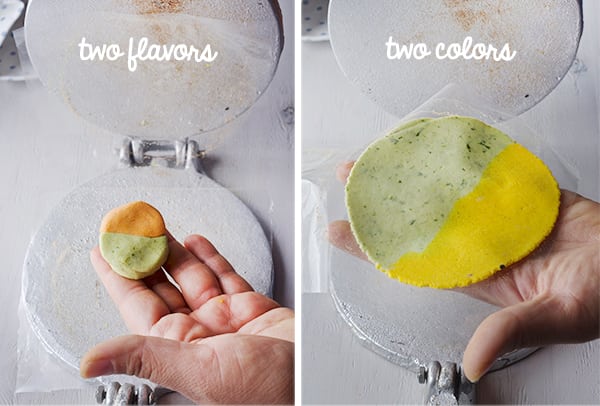
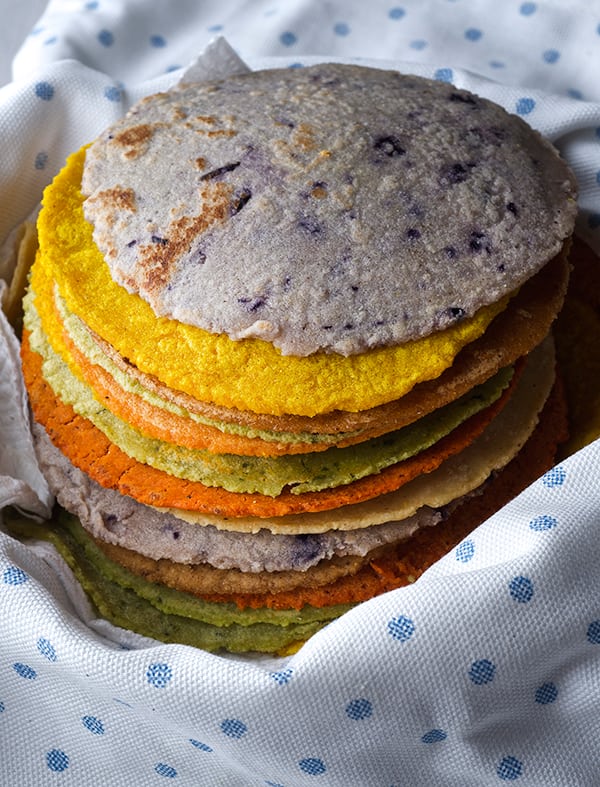
My spin for Natural Flavored and Colorful Tortillas:
Feeling a little whimsical? Why not adding an extra punch of flavor? these variations using chili powders, spices and vegetable purees help a lot, especially when you are using dry masa-harina. They are a great variation and make amazing quesadillas or any taco of your affection.
Add one of the following to the dry masa, and then proceed with the recipe, adding the water little by little, specially for the purees, you might need to add less water to the masa.
3 teaspoons Ancho powder
2 teaspoons Sweet Paprika
2 teaspoons Turmeric
2 tablespoons of Achiote paste dissolved into the meassured warm water.
5-6 sprigs of Cilantro, remove the stems and smash the cilantro in to a paste, stir into the measured warm water.
1/4 cup packed baby Kale or lacinato kale, remove hard stems and smash the leaves into a paste, (you can use a immersion blender to make the puree) stir puree into the measured water.
1 chile poblano roasted and pureed
2 carrots steamed and pureed
1 small beetsteamed and pureed
2 guajillopeppers boiled, pureed and strained to remove the seeds.
Other flavors: Tomato paste, Any other chile, like guajillo, chipotle, jalapeño, poblanos, spinach, sweet corn, sesame seeds, pumpkin seeds, Texan’s and New Mexicans : Hatch chile into the mix will be the the bomb!.
Just Follow this principles by adding a powder or a paste.
Try and play by making crazy ones with different flavors and colors, these are great for quesadillas…
Tips:
* First tortilla is always a disaster, do not get discouraged, learn from it.
* Feel the masa; t0o wet will stick to the plastic and won’t release, to0 dry, it will crack, and won’t hold together.
* Gear up! a nice heavy cast iron griddle, a Mexican tortilla press and a good old plastic bag…
* When cooking: Too hot griddle will char the tortillas with out cooking them through, too low temperature, will dry out the tortillas before they are cooked, and they won’t be pliable and soft… This temperature issue is the same when you are making pancakes, the first pancake its always a bad one until you bring the pan to the right temperature, …then you are on the right track!
* When making tortillas: Masa and tortillas don’t like to be rushed or people in a hurry. Get into your tortilla Zen mode first, once you get the tortilla rhythm you will start having fun!…and eating them too heehehe!
* Practice my little grasshopper, practice, because once you get the hang of it there is no comparison from homemade/handmade fresh tortillas than the store bought…that is a fact Jack!
The CORN Organic / Non-GMO situation:
In order to make a better quality of tortilla, I research for an organic Non-GMO Masa Harina. I found three respectable brands with a great commitment to organic and Non-GMO products:
1.Minsa Masa Harina, one of the leading brands in Mexico, has recently made a great commitment by completing all the certifications USDA organic, NON GMO, Kosher, GF, WHole Grain, and GFSI. This makes this brand my first choice when making tortillas from dry masa harina. Its now available on the USA.
2. The closest option I found is a brand named Gold Mine Natural Food.co, they sell Non-GMO, organic, BLUE masa harina. They just started to carry 1lb. bags. for a fairly good price. If you have a big corn tortilla commitment go for the 50lb. bag and share it with your friends hehheeh. Down side is you have to order on-line or ask on your nearest Whole-foods Market if they can carry in stores. Here is the link to their website.
3.Bob’s Red Mill- Masa Harina Golden Corn Flour. I tried this masa harina it has great quality and flavor, but it is made from yellow corn. The variety I’m used to is white corn, since I’m from the South of Mexico. Flavor its different, a little sweeter than the white. You can use as substitute in this recipe, adjusting the water, maybe up to 1-1/4 cups. This Flour its available on line and often found at regular supermarkets.
It is with great sadness, and concern what is happening in Mexico. The government just passed a law that will allow to GMO Corn to be grown in Mexico. This could affect more than 59 types of heirloom corn. If you would like to know more about it and take action signing a petition to revoke that law, click here for more information ad supporting this cause, Save the CORN! for more information about the cause Green Peace Mexico and ANAAthe National Assembly of Environmental Affectings.
Thank you for Caring!
Have fun!
Music Pairing: Arturo Marquez Danzon No.2 Alondra de la Parra
Recipes, Cooking & Art Direction: Mariana Nuño Ruiz McEnroe | Photography: Ian McEnroe |
Published: June 5, 2015
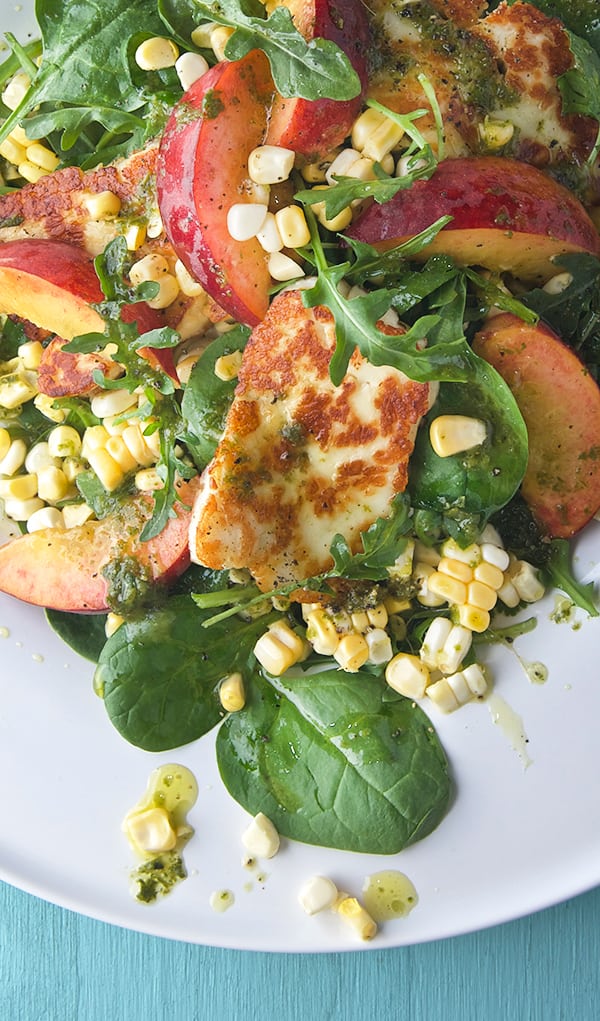
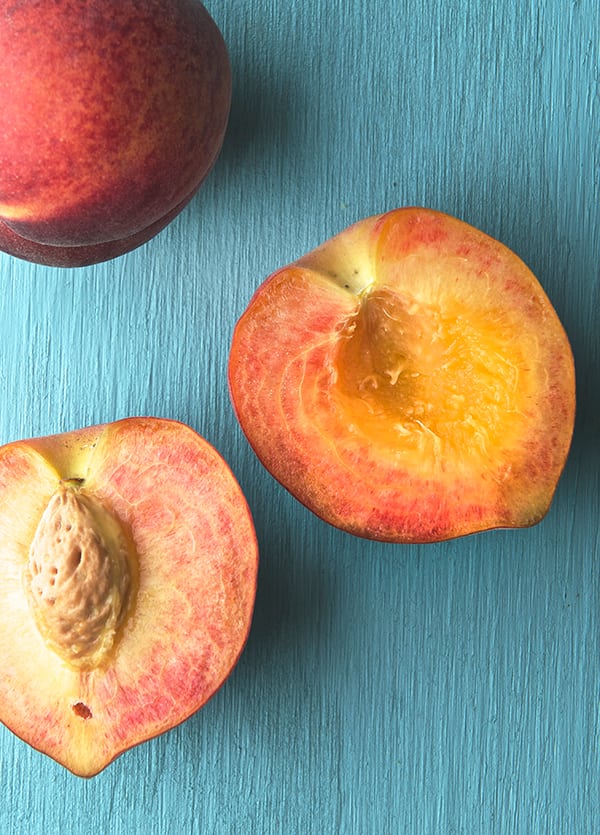
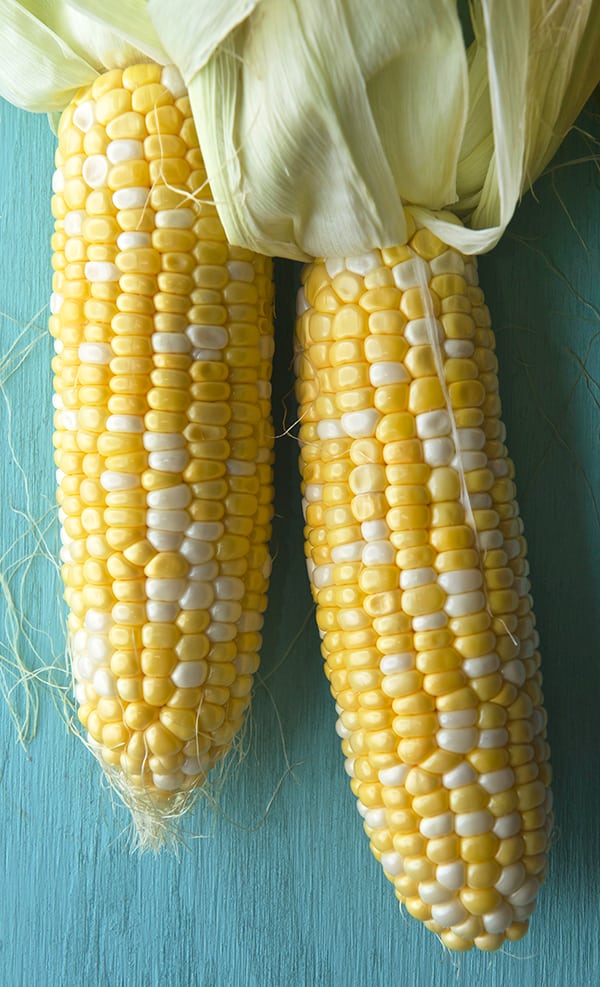
This salad sums up summer in one plate. It is the kind of salad you eat and feel so happy and satisfied, sunshine on a plate. Fresh sweet corn and juicy peach season is here in Austin and I can have this salad almost every day until the last peach. If you are like me and bought two little baskets of peaches at the market, because one did not seem enough for your peachy desires, well we are in the same boat. The good thing is that extra peaches are not a problem once you get the hang of this salad.And if you still have some peaches left over, bake a pie, make this fantastic minipeaches and cream empanadasyou have a good alibi for as long those peach baskets last you….
Let me describe you this salad. Imagine the flavor of fresh sweet corn crispy yellow kernels, in combination with juicy bright sweet tangy floral peach slices, a few pieces of pan seared golden Halloumi cheese salty, crusty outside, and creamy gooey inside, over fresh arugula and greens. All come together with a delicious sweet and tangy Lemon-Basil Vinaigrette. It is ridiculously good. It is. Because yes. All the sweet, juicy tangy, salty briny, herb flavors together, one bite of these salad you are hooked!
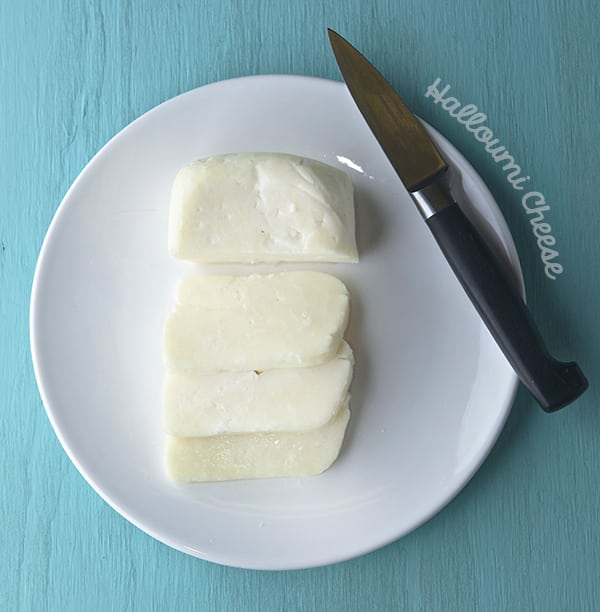
If you never had Halloumi, it is a firm brined cheese that when pan-fried or grilled holds it’s shape and gets crusty golden. It is a bit salty, and texture-wise along its warm its gooey on the inside, then becomes a bit chewie, a pleasent chewie. I bought it in this fantastic shop called Phoenicia Bakery and Deli here in Austin, Tx. It is a fabulous store. They carry foods from around the world but their emphasis is Mediterranean and Middle Eastern specialties. Cheeses, olives, pantry items, spices, preserves, teas, coffee, dry fruit, to mention a few. They also make the best freshly baked pitas in town. Not to mention they have a small menu for lunch, with great falafel, Gyros, Kafta and Shawarma. Dessert?… no problem from Pistachio Baklava to delicate pastries filled with pine nuts and rose water. And for me their fresh Feta cheese is the best in town, they have 3 different kinds, Bulgarian, French and sheep’s milk simply delicious. You have to go, it is a must…
If you are not in Austin you must try to find a specialty food shop were you can buy this delicious cheese… Explore and try something new! Get your inner peach and make this glorious Peach Sweet Corn and Halloumi Salad with Lemon Basil Vinaigrette fresh salad. Lunch, dinner or both, it travels great for a picnic on the park or to daydream about summery days at the office. All you have to do is to close your eyes and almost feel your feet on the green grass, the sun warming up your eye lids and a warm breeze asking you is it summer time yet?….Run and get peachy now! Enjoy.
Recipes, Cooking & Art Direction: Mariana Nuño Ruiz McEnroe | Photography: Ian McEnroe |
Published: August 29, 2014
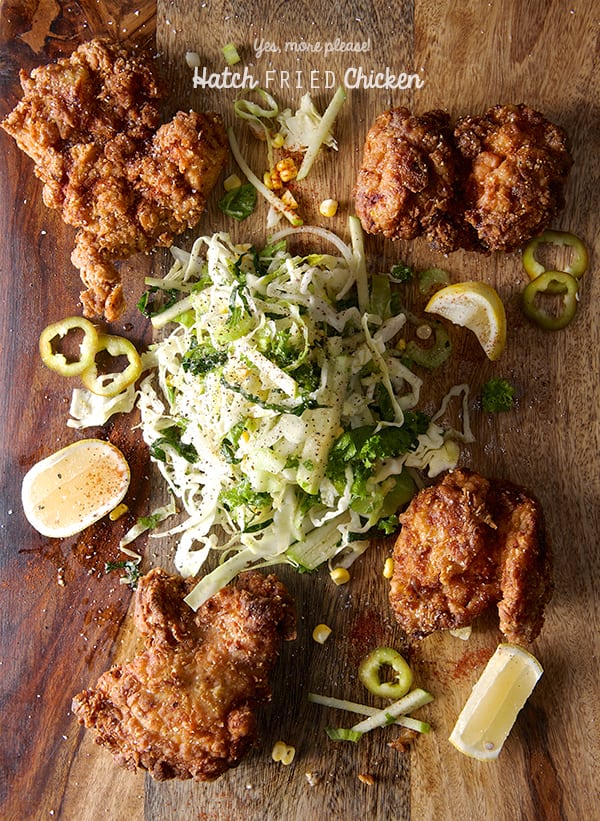
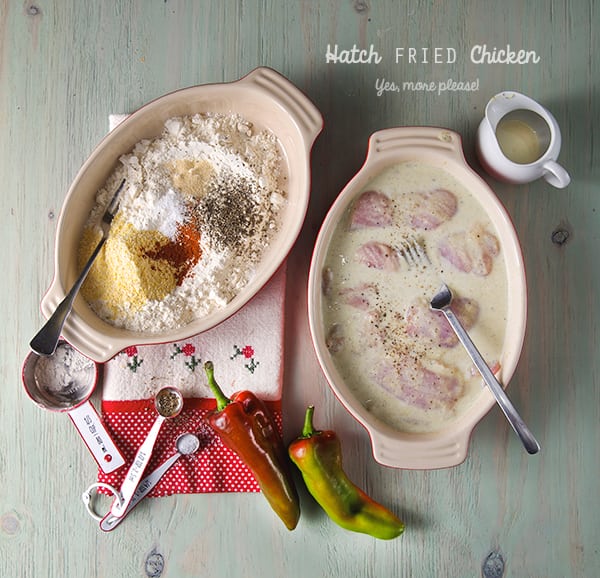
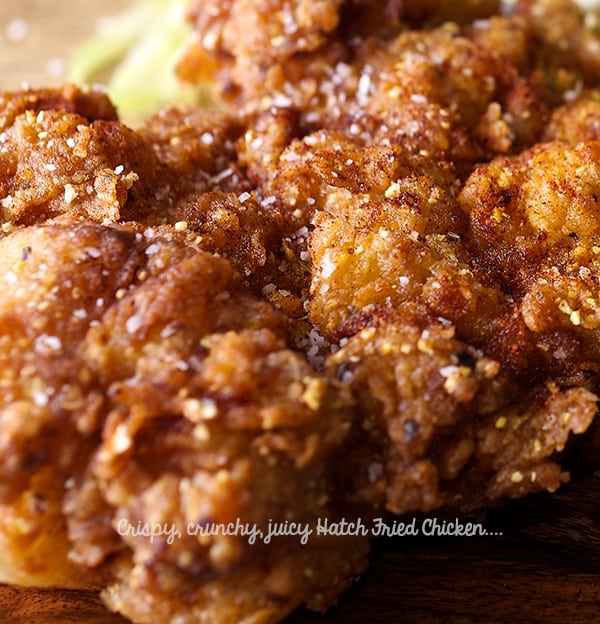
With a guiltless dance and a smile on my face I implore you to give this hatch fried chicken a “must try” label. This is my new favorite Hatch recipe.
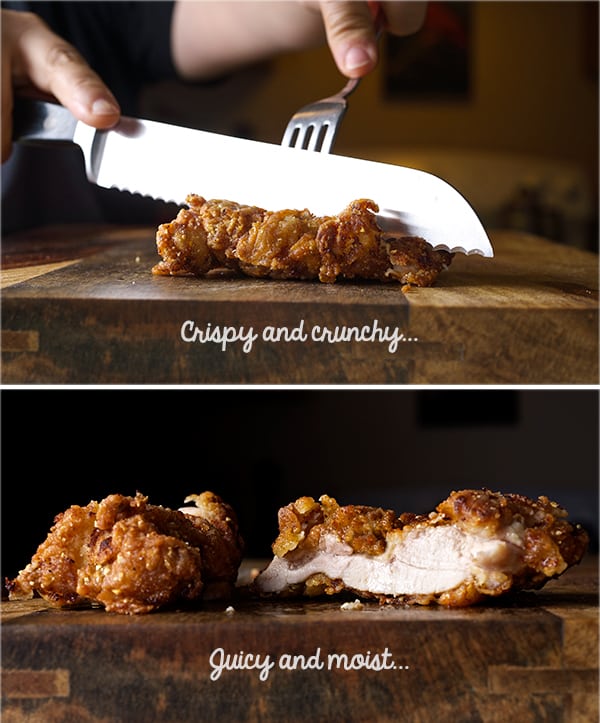
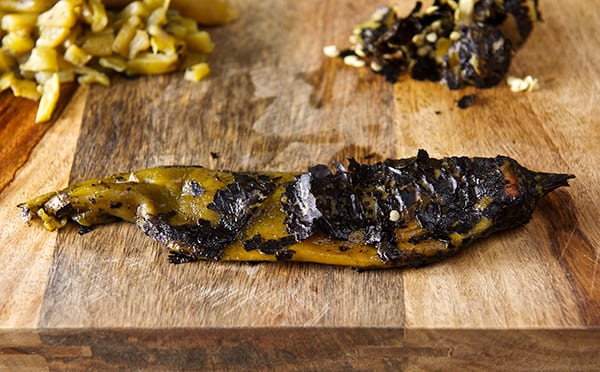
I used skinless chicken thighs and marinated them in a concoction of yogurt, milk and pureed roasted Hatch peppers until the chicken got tender and flavorful. After a quick drench of well seasoned flour I deep-fried them in peanut oil, making the chicken crunchy crusty, crispy, and tender and juicy on the inside.
Why make fried chicken at home? Because I believe it often tastes better, but also It makes you appreciate what you are about to eat.Nothing tastes more rewarding than making the effort to cook an effortless recipe with awesome results!
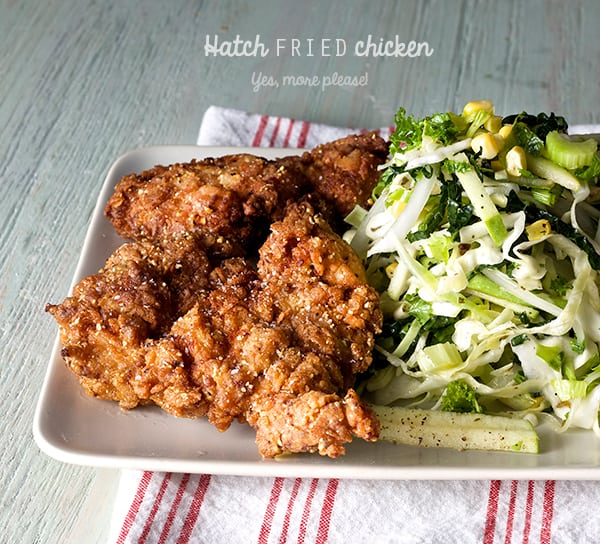
Happiness and bliss have been achieved when these Hatch Fried Chicken thighs come out of the pan and onto your plate beside the greenest green green coleslaw. It’s a balancing the act of rich and a tangy. You will be dancing from the beginning of the recipe to end of your meal. Its richness is a combination of the dry seasonings and the Hatch peppers’ distinctive mild chili note.
I used chicken thighs, they have great flavor and they are so moist that you can use them skinless, But imagine the possibilities!, chicken breast, legs, wings!… quail. Ok… I just got myself in trouble now… I want quail!…
Any way, If you make this recipe, I would love to know how it went and if you enjoyed as much as we did! Juicy, crispy, spicy fried chicken is gonna make you a fried chicken believer.
Have fun!
Hatch Fried Chicken
Makes 6 chicken thighs and one little happy dance.
1.5 lbs. of organic skinless chicken thighs
For the marinade:
3/4 cup plain Bulgarian or Greek yogurt style.
2-3 roasted hatch peppers (remove skins and seeds)* check notes for substitutions at the end of the post.
good 4-5 cranks of freshly ground pepper
1 tsp. kosher salt
For the flour drench:
1 cup unbleached all-purpose flour
1/4 cup corn meal
2 tablespoons cornstarch
1/4 teaspoon paprika
1 teaspoon black pepper
1 teaspoon garlic powder
1 teaspoon salt
For frying:
3 -4 cups – Peanut oil (grape seed oil or corn oil will work too.)
A 10″-12″ heavy bottom enamel pan or a cast iron pan for best results.
1 pair of metal tongs
Preparation method:
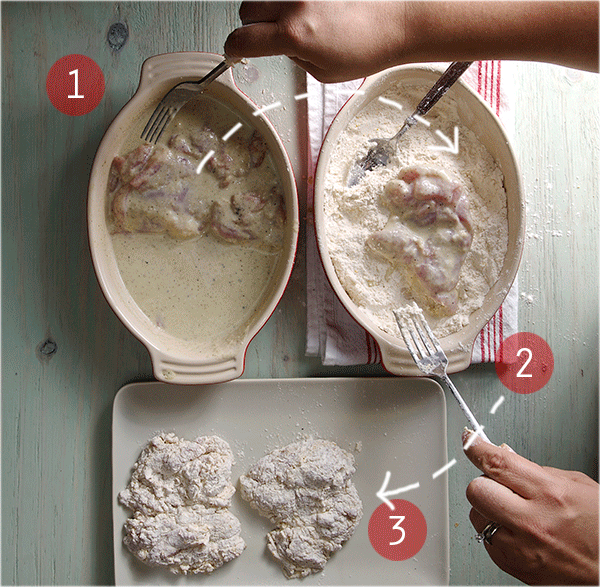
1. Puree all the marinade ingredients.
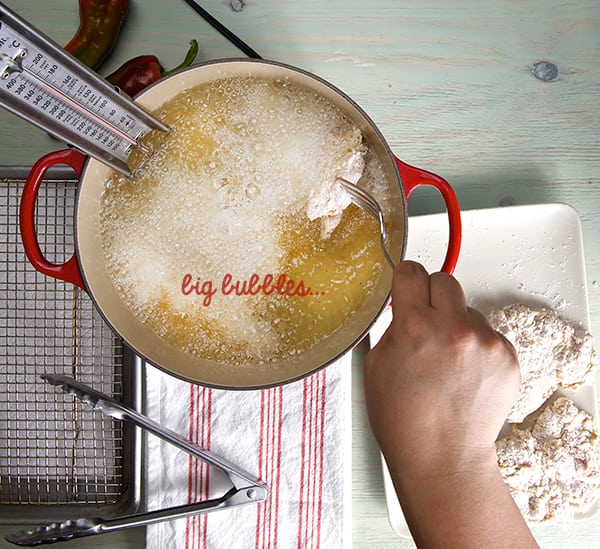
2. Pat dry and trim some of the excess fat on the chicken thighs, if any. 3. In a ceramic or glass dish place the chicken thighs and poor the marinade over them, massage them a little bit, place them in the refrigerator for at least 2-3 hours, over night is best. 4. Next day, Pull the chicken out of the refrigerator 20 minutes before cooking. 5. In a ceramic or glass dish combine all the ingredients for the dredging flour. 6. Start heating the oil. I like to start heating the oil at a low temperature, and slowly turn up the heat. This will ensure your oil will not taste burn and is evenly heated.
***Take care to monitor your oil and your kitchen carefully while deep-frying, never take your attention away from hot cooking oil. No distractions!!*** 7. While the oil is slowly heating up, with the help of a fork take one piece of the chicken and tap it a little to remove any excess marinade, dredge into the flour, and with a spoon start covering each piece of chicken really well. Set the dredged flour pieces on a clean dry plate. Proceed with the rest of them one at the time.
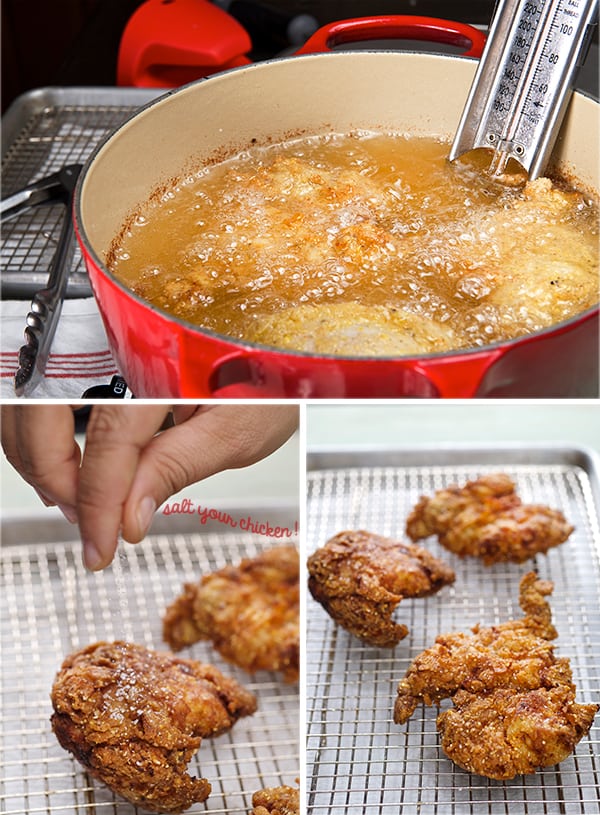
8. Check on your oil. Place a frying thermometer on the edge of the pan, and check for 350F-360F sprinkle a little flour on the oil, you want big bubbles. 9.When the oil reaches 360, start frying your chicken 2 pieces at a time, to avoid lowering down the temperature of the oil. Check the temperature on your thermometer at all times, you want big bubbles around each piece of chicken, and thermometer reads at least 350/360F to make sure your chicken is not absorbing extra oil, making it soggy and greasy. iaks!
10. Depending on the size of the thighs it will take about 5-6 minutes per side. You want to turn the chicken until you have a rich golden mahogany color on the bottom and the size on the bubbles around the chicken are smaller. This is the right time to gently flip. Always flip away from you to avoid splatter. 11. Once you flip, lower the temperature a bit to 320F, it might take less time, about 3-4 minutes. Chicken should look golden brown and the bubbles around the chicken are really small. Take the pieces out to drain and check for doneness, the internal temperature of the chicken should read minimum 165F. 12. Drain the chicken on a cooling rack lined on top of a baking sheet and immediately, sprinkle some salt. Placing the chicken on a cooling rack will make sure you the chicken will stay crispy. 13. Adjust the temperature for the next batch and go ahead and fry the rest of the chicken.
14. Ready to eat! Serve the chicken with a great side of coleslaw like this green green coleslaw, check it out is from a previous post, it is tangy crunchy, fresh and so mighty green that I believe it’s the best complement for this spicy hatch fried chicken. Also some lemon wedges, if your brave , maybe some extra dashes of tabasco sauce, or any other vinegary hot sauce. Enjoy!
Enjoy!
*Note:
I used fresh Hatch peppers and roasted them. Here in Texas you can find them very easily when in season. If you are wondering if you can use canned Hatch peppers, yes you can. Our dear friend and follower Ed who is from El Paso, Texas and he and his family have cooked with hatch peppers for many generations, suggested me two good brands: Victoria and Santa Fé ‘Ole brand (bottled)-Double Fire-Roasted . He assures this brands are first-rate to get when hatch is not in season. Thank you so much Ed, for this great information!…
Remember that freezing the chiles is also a good option. Once you roast, peel and de-seeded them, you can purée, dice them or keep them whole, pack them on freezer bags and freeze them for future recipes. You can even make hatch chile purée ice cubes and add them to soups or stews on the winter season…delish!
Recipes, Cooking & Art Direction: Mariana Nuño Ruiz McEnroe | Photography: Ian McEnroe |
Published: August 12, 2014
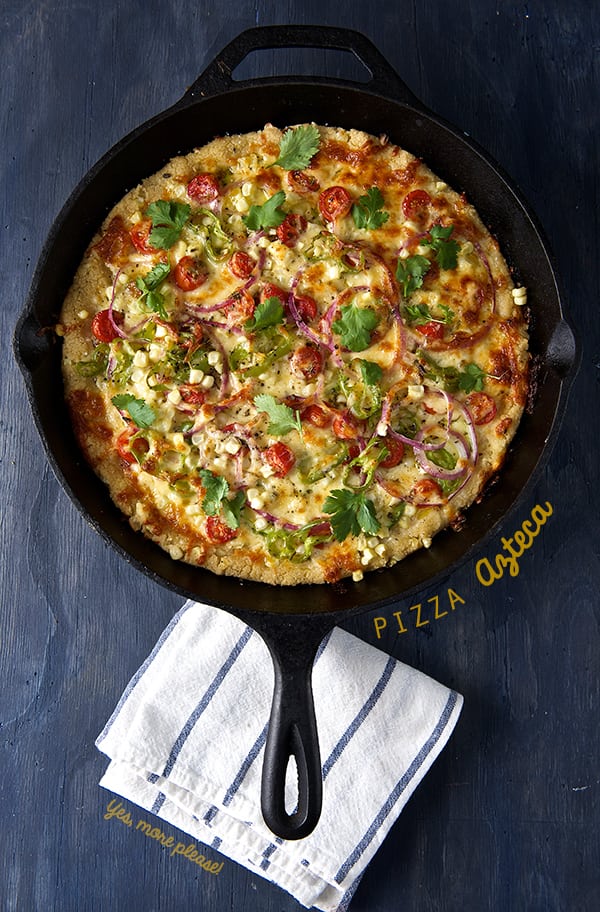
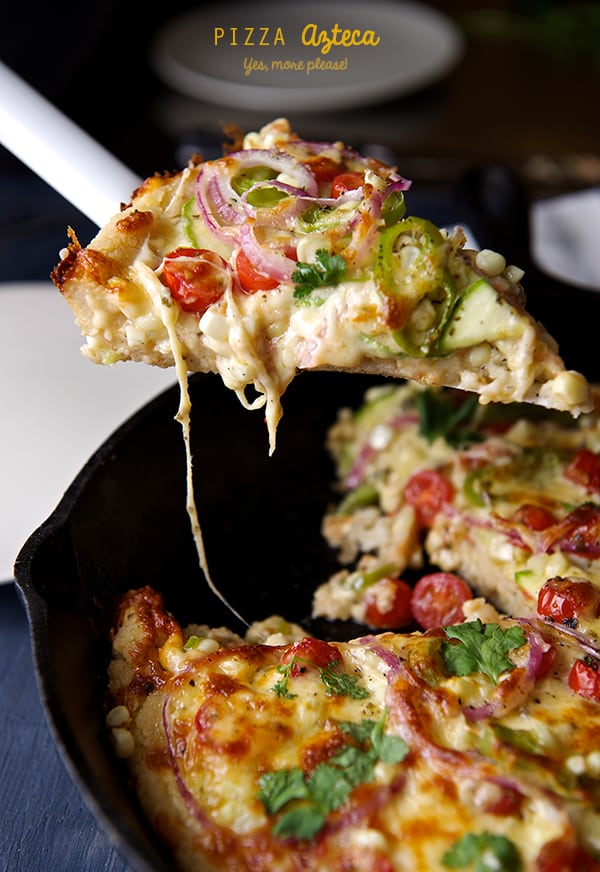
It’s a pizza!…no!
It’s a casserole!….no! It’s a tamale?!…..no!
It’s a Corn Masa Pizza Pie!….Yes!
As silly as it sounds, it is ridiculously delicious!
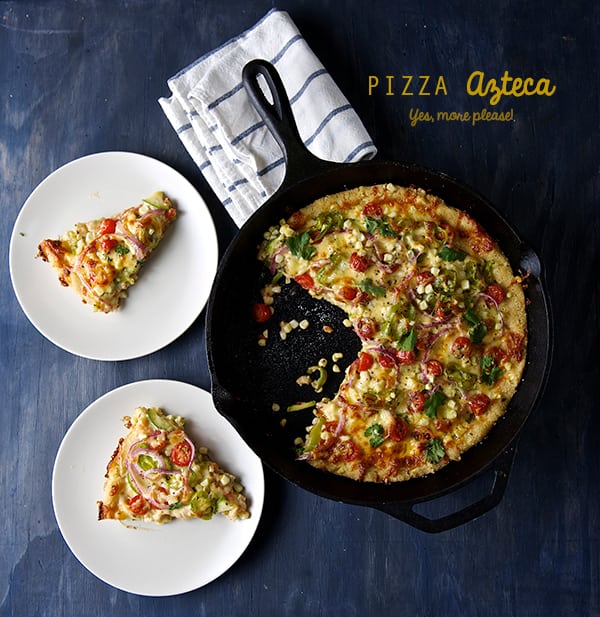
Call it what you like: Mexican pizza, Corn Masa pizza; Pizza Azteca-its the ultimate summer one pan wonder. This is a great quick meal solution too! To get pizza on board it takes no more than 35 minutes since the masa does not rely on yeast or waiting time to rise.
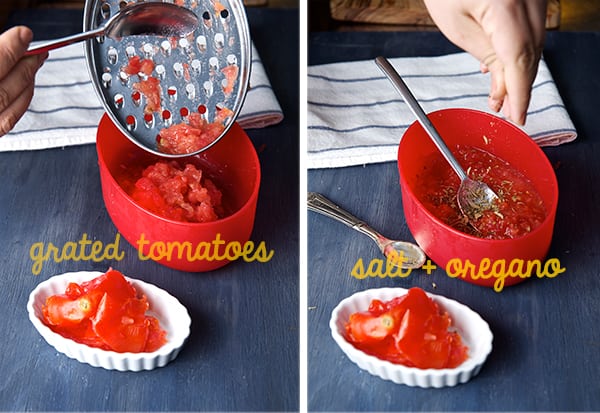
Let me describe this pizza for you… Imagine a hot cast iron pan filled with corn masa crust, when baked the bottom gets crusty with soft delicious nutty corn masa. Fresh corn kernels add texture, enhance the corn flavor and add moisture to the crust. The top layer load with summer vegetables like zucchini, fresh corn, tomatoes, red onions, hatch peppers, and loads of melty cheese layered on top. The summer vegetables pair great with the flavor of the corn masa, the oregano on the fresh quick base sauce adds the perfect herb note. I made the pizza sauce by grating some fresh tomatoes which adds extra freshness to the pizza. I baked everything on the king of pans, “the cast iron pan”.
When this pizza comes out of the oven you will be fill with warmth and happiness as you experience the comforting smell of cooked corn masa and fresh vegetables. Pizza Azteca is best served with a fresh green salad on the side and will be a sure crowd pleaser.
This Pizza Azteca is what I would offer Moctezuma on a summer afternoon… Pizza Azteca is a meal fit for kings!
Enjoy!
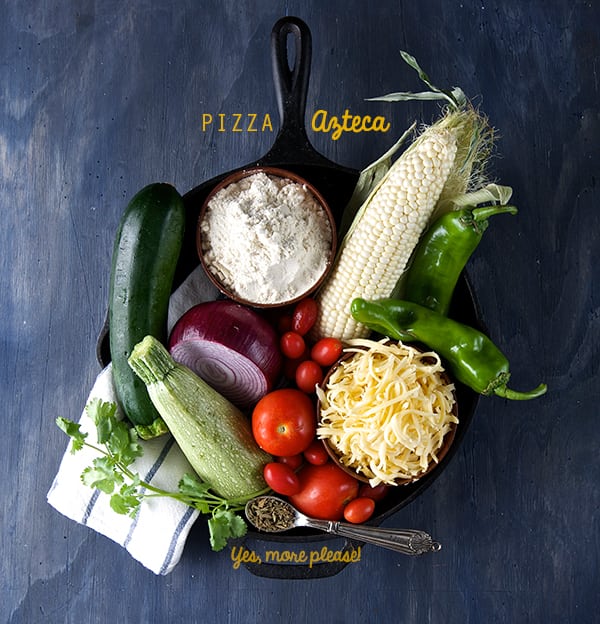
Pizza Azteca
Makes 1 round 12” pizza, yields 8-10 slices.
For the crust:
2 cups corn masa- Maseca is the brand I like, if you can get fresh masa, use it! you will be in heaven.
2 to 2-1/2 cups warm water
½ teaspoon kosher salt
½ cup fresh corn kernels (white or yellow corn is ok)
For the sauce:
3 medium roma tomatoes grated
1 tablespoon tomato paste
1 teaspoon dry oregano
1 garlic clove grated
1 tablespoon extra virgin olive oil
1 teaspoon kosher salt
Fresh cracked pepper to taste
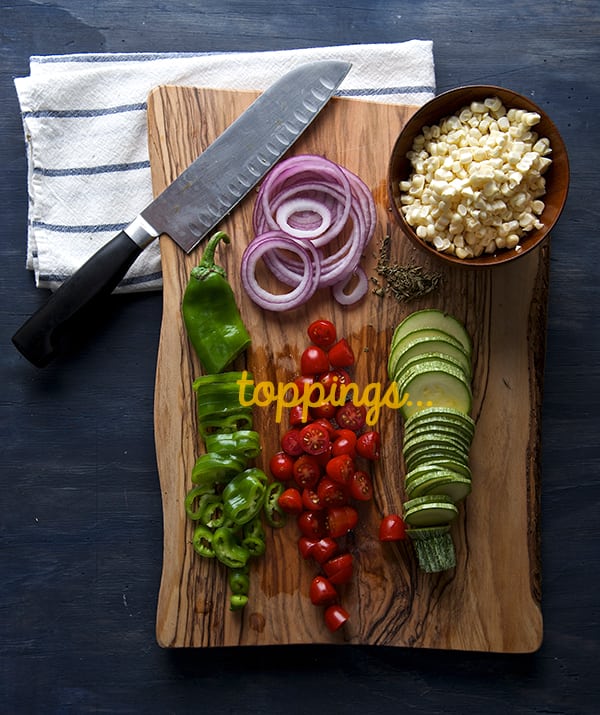
For the toppings:
1 large or 2 medium zucchini thinly sliced.
1 ear of corn worth of kernels
1 hatch pepper or substitute for 1 good pinch of red pepper flakes.
Use roasted red peppers if you do not care for spicy.
1 cup cherry, sun golds or grape tomatoes sliced in half.
2 cups of grated cheese like Adobera, Oaxaca, Gouda, Mozzarella or Monterrey jack.
Use the cheese you like the most, as long it melts and has a mild flavor so you can taste the rest of the ingredients.
Salt and pepper to taste a little extra virgin olive oil for drizzle.
Preparation:
Preparing the masa:
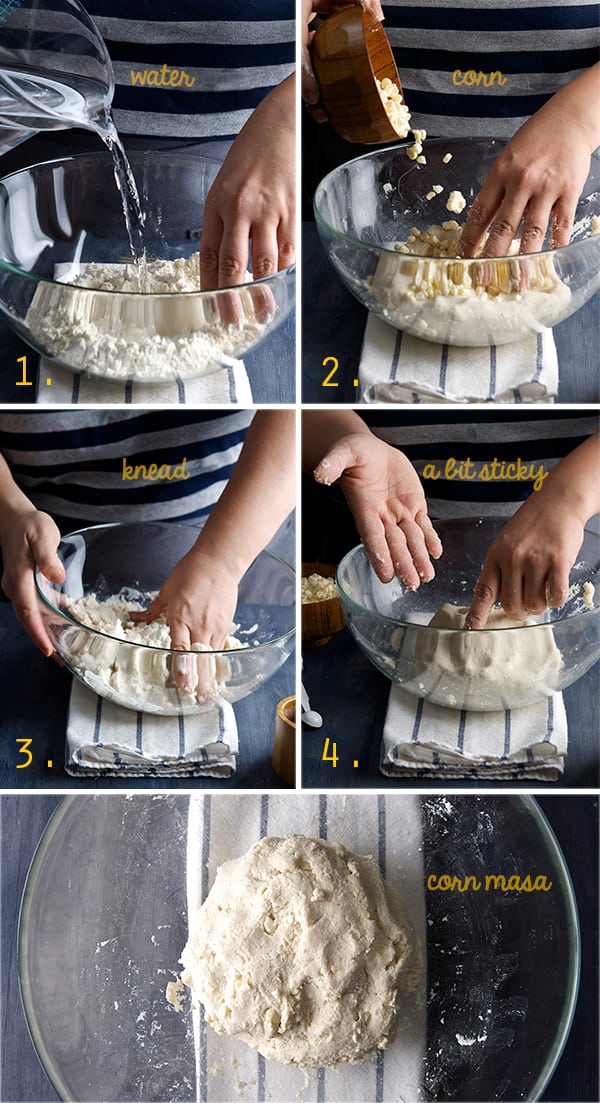
1. Start by preparing the masa dough. Dissolve the salt into the 2 cups of warm water. 2. In a large bowl place your dry corn masa flour, make a well in the center add half of the water, and start incorporating the flour from the sides. Add corn kernels and the rest of the water. Knead for 2-3 minutes until water is well absorbed by the masa. 3. The masa should feel moist a bit sticky to the touch. You should be able to shape it into a ball and cover with plastic wrap, set aside let it rest while you prepare the rest of your vegetables. 4. Preheat Oven at 450F/ 230F
5. Prepare and slice all your vegetables, grate your cheese and prepare your tomato sauce by grating the tomatoes and adding the oregano, salt, garlic, black pepper and extra virgin olive oil. Set aside.
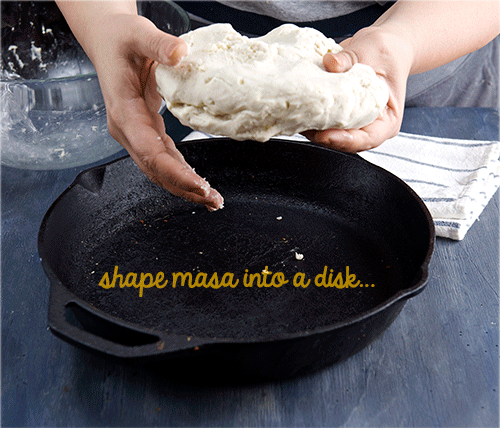
6. At this point your masa should be well hydrated and ready to shape into the cast iron pan. Using a 11-12” Cast Iron Pan place your masa dough in the center and with wet hands start by evenly shaping the masa into the pan. Create a higher rim on the edge of the pan. see photo.
Note: If your cast iron pan is well seasoned do not worry about the crust it will not stick to the pan, if not just apply some neutral oil on a napkin and grease the pan before shaping your crust.
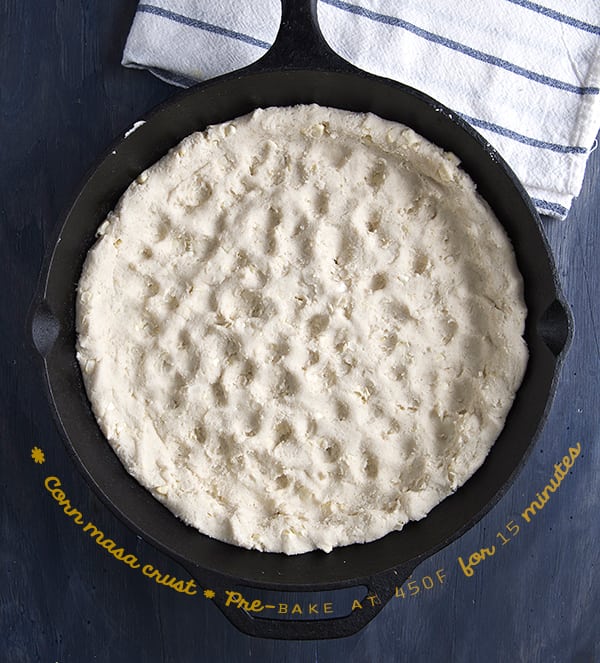
7. Once you have an even layer with a bit of a rim on the outside edges, Place skillet with the crust in the oven, on the bottom rack. Bake for 15 minutes lowering the oven temperature to 425F as soon the crust is in the oven.
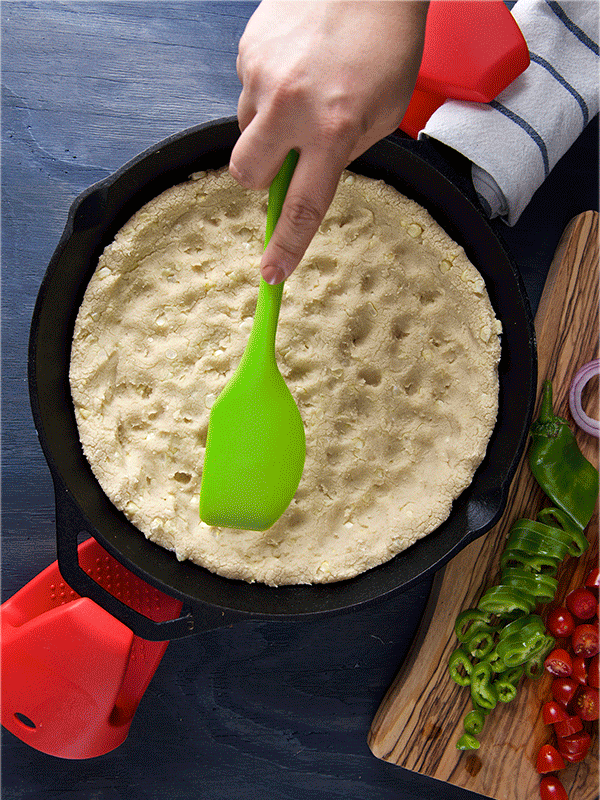
8. Carefully remove the skillet from the oven, place it on top of the stove or a metal trivet and start layering your pizza ingredients. Note: leave the pot holders into the cast iron pan handles at all times!, this will prevent you to try to grab the hot pan by mistake!…believe me I’ve been there…ouch! 9. Layer the ingredients same way you do like on a pizza, starting with tomato sauce on the bottom, half of the cheese, zucchini, corn, onions, tomatoes, peppers, and the rest of the cheese. A pinch of salt and some fresh cracked pepper. 10. Place the cast iron pan into the oven for another 20-25 minutes until cheese is melted and the pizza has some gratin golden brown blisters.
11. Remove from oven, place the pan on a trivet and wait 5 minutes to cool off a bit before cutting. Sprinkle some fresh cilantro for garnish. 12. Serve and Enjoy!
Enjoy!
Silly, silly music pairing: Brak’s Pizza Song with the Space ghost…
Recipes, Cooking & Art Direction: Mariana Nuño Ruiz McEnroe | Photography: Ian McEnroe |
Published: April 13, 2014
So many carrots too little time… Its carrot bonanza season, rabbits everywhere, and have you started to turn orange yet?… Well I hope not, because this recipe is gonna drive you insane. As you know, despite all the wholesomeness I believe in, I have a weakness for a certain processed food… hot dogs…I know, its terrible isn’t it? I know every fact of how the industry introduced us into this strange tubular meat, but yet I’m still hooked.
So in the search for a less processed option, a friend told me about this place in L.A where they serve sous-vided carrots and make vegetarian hot dogs, how crazy good does that sound?
That’s when I had a revelation: How about creating a corn dog, with carrots? Kaz-zam! Done deal. I made them. No, I do not own a sous-vide machine and nor the rest of the mortal cooking souls on earth but if you do , call me we can hang out!; So I oven roasted the carrots, to give some extra flavor and also to pre-cook the carrot. I made the most basic recipe for the batter. But they needed a little extra luv. I wanted a contrast in textures, that thing you crave in a fried object, the crusty salty outside and soft inside.
To that end I added 1 part of rice flour, peas, green onions and corn kernels into the batter.
The result is crazy good!… when you deep fry these babies, they get crusty outside, soft inside, and the peas and corn kernels pop in your mouth with a burst of extra flavor. The carrot center is stellar.
Don’t be nervous about deep-frying, using the proper technique will ensure you great success. I do not deep fry food very often, so I do not own a deep fryer and I do just fine.
You can easily get great results with the following tips:
Get a thermometer for crying out loud!
They cost around $9-14 no need to break the bank and it is one of the best kitchen investments.
Buy Peanut Oil:
It is the best oil to deep fry, no saturated fats, no smells, no greasy food.
Now a days you can buy small amounts of peanut oil at the super market.
Use a heavy bottom, 6″-8″ diameter deep enamel or aluminum pot. Straight sides for easy thermometer attachment.
And remember safety always come first when dealing with hot oil.*
This carrot corn dogs are great for kiddos and vegetarian adults in need of a little indulgence, Enjoy!
Carrot Corn dogs
Makes 12-16 / 3” mini carrot corn dogs.
6-8 Long, medium thick carrots.
You will need about 12-16 of 3’” long pieces.
2 tablespoons honey
1 large egg
1/2 cup milk or unsweetened coconut milk
1 teaspoon apple cider vinegar
1 scallion finely chopped
½ cup fresh corn kernels
¼ cup fresh peas or frozen if you must.
16 oz Peanut Oil for deep-frying.
16 wooden or bamboo sticks.
Utensils:
Long tongs, deep fryer, or candy thermometer, 6”-8”diameter pot with straight walls for deep-frying, cooling rack.
Preparation Method:
1. Cut carrots into 3”- 4” long. Place them on a roasting pan, season them salt and pepper do not drizzle oil. Roast them at 400F for about 12-15 minutes.
Carrots should not be soft, al dente centers is best, since they gonna keep cooking when frying.
2. When ready, set the carrots aside let them cool completely, then proceed to insert the bamboo sticks.
3. Meantime in a medium size bowl, mix all the dry ingredients, then add all the wet ingredients, mix until well incorporated , small lumps are ok. Fold into the batter corn kernels and peas. Refrigerate for about 10-15 minutes
4. Place your chilled batter into a tall glass or jar, this will allow you to easily submerge the carrots into the batter.
5. Prepare your utensils and have everything ready, tongs, cooling rack, batter in a glass, see picture below.
6. Start heating the oil. Check the oil temperature 360-375 degrees / 185-190 Celsius.
7. Dip the carrots into the batter, one at a time, holding the carrots from the stick with tongs, carefully and slowly drop it into the hot oil.
8. Monitor the temperature, it should not drop more than 15 degrees, when placing the corn dogs.
9. Do not crowd the pan. Fry 3-4 corn dogs at the time. This will ensure you evenly golden brown and well cooked batter.
10. How to know when they are cooked and ready to come out of the oil? Corn dogs are floating, look evenly golden brown color, the bubbles around them are smaller.
11. Use tongs to take them out. Place them onto a cooling rack. Keep them warm in the oven.
12. Serve warm, with the dipping sauces, or simple ketchup and mustard. Enjoy!.
*Be aware, hot oil at this temperature can inflict a lot of pain and injury so use a back burner on your stove if possible and keep the cooking pot (and its handle) away from children. In fact, I think its best to keep younger children away from the whole process and never let the frying pot leave your attention so you can monitor the oil’s temperature and keep the food from over cooking. Deep frying this batter, or anything else, some oil is bound to spatter so use long tongs or a spider to handle the food. This will prevent you from getting burns too. Focus and be on a Zen frying mode. The reward is scrumptiously good.


