Recipes, Cooking & Art Direction: Mariana Nuño Ruiz McEnroe | Photography: Ian McEnroe |
Published: November 8, 2013
It is cakes like this that make me happy…really simple cakes with a light crumb and buttery flavor. It’s so basic and cozy that hits you straight in your heart.
The flavors in this buttery Ricotta cake stand alone and the honey and lemon make a good balance of sweetness; the thyme adds a little herbal note and enhance the lemon zest in the batter. This cake is pure comfort and simplicity.
Honey Lemon and Thyme it ‘s one of my favorite glazes for this type of cakes, there are many other good glaze flavor combinations that I will recommend like Honey and rosemary, lavender, orange, camomile you name it, or just dust it with a little confectioners sugar. It’s a cloud of buttery and light cheesy crumble goodness.
You can make this cake in the morning for a nice breakfast or brunch. Or it can be part of your bake-goods repertoire for Thanksgiving….why not? Give it a try.
This Ricotta Cake & Honey-Lemon-Thyme glaze is great with a cup of tea in a rainy afternoon, or a glass of milk for the little ones.
You can add some fresh fruit or whipped cream on the side to complement this cake… enjoy!
Ricotta Cake & Honey-Lemon-Thyme Glaze
Serves 12-14
2 cups All purpose flour
2 tablespoons Baking Powder
1 pinch of salt
½ pound ricotta cheese (strain some of the liquid with a cheese cloth or fine sieve)
2 cups sugar
4 Large eggs
1 cup whole milk – room temperature.
8 oz / butter melted
1 teaspoon lemon zest
For the Glaze:
¼ cup Honey
the juice of half a lemon
3-4 thyme sprigs and a little more for garnish.
In a small pot, gently warm the honey lemon juice and thyme once that the honey resembles a light syrup. Remove from heat and let it cool down. ( do not let the honey boil or to form small bubbles around the pot)
Directions:
Preheat Oven at 350 F /
1. Grease a 10” x 3” round aluminum cake pan (use a light color pan for best results).
2. In a medium size bowl, sift the flour, salt and baking powder.
3. In a large bowl mix sugar, ricotta, eggs, and melted butter mix well.
4. Start alternating flour and milk in 3 additions. Until well incorporated, do not over mix.
5. Pour the batter into your prepared pan and bake for about 25-30 minutes or until a skewer comes out clean or with a few little crumbs.
6. Cool on a rack for 15-20 minutes and unmold.
7. Place the cake on a plater and poke the top of the cake with a fork or skewer.
8. Once the cake is cool, with a pastry brush, apply the honey- lemon-thyme glaze .
9. Garnish with a few more sprigs of thyme on the side and sprinkle some leaves on top.
Recipes, Cooking & Art Direction: Mariana Nuño Ruiz McEnroe | Photography: Ian McEnroe |
Published: November 6, 2013
Hands down.. (heheh and fingers also) this kind of potatoes are in my top recipes list. Fingerling potatoes are a family of heritage potatoes that naturally grown much smaller than conventional potatoes. You will find them in season for Fall and they can also be grown at home, in temperate climates.
They have an elongated and a slightly knobbly shape, that resembles fingers. These little potatoes are extremely flavorful, they are waxy , starchy and colorful, from creamy white, orange to rich purple. They can be used just like regular potatoes in an assortment of roasted, broiled, baked, grilled, or boiled dishes.
What makes them so special is their texture; they are creamy and starchy but waxy and have a rich earthiness, especially the purple ones. I love the skin when you roast them, it becomes crispy and the inside creamy and tender. This recipe, combines the roasted potato, the herbed garlic butter with the toasted almonds that give an extra crunch. For me is all about the texture and flavor contrast, creamy-roasted potato skin, salty, buttery and lemony, herb-garlic and the nutty crunch, that makes this potatoes the bomb!
They cook pretty fast and they can be a show stopper for your Thanksgiving dinner… or any other special meal. Because of their shape I frequently serve them as an appetizer. They taste good warm or at room temperature… you will be licking your fingers after tasting this recipe!
Roasted Fingerling potatoes with garlic, herbs & almonds
Serves 6 … or many more if served as an appetizer.
2 pound bag fingerling potatoes (organic preferable)
1 small bunch of parsley finely chopped
3 rosemary sprigs remove leaves from sprig and roughly chop.
4 thyme sprigs remove leaves from sprig and roughly chop.
1 teaspoon dry dill
3 garlic cloves finely chopped
1 or 2 drizzle of Extra Virgin Olive Oil
4-6 tablespoons of butter
the zest of one lemon and the juice of half.
¼ cup toasted almonds.
Sea salt and ground pepper to taste.
Directions:
In a medium size pot, parboil the potatoes for about 5 minutes.
Drain them, and cut the bigger potatoes on a bias.
Preheat the oven at 400F /200C
In a separate small pot, melt the butter add the garlic and heat for about 1 minute. Add chopped herbs and let stand at room temperature.
Place the potatoes on a baking sheet lined with aluminum foil, drizzle with olive oil, salt, and pepper. Roast them for about 20-25 minute. Check for doneness.
Once they are fork tender and show some color from roasting, remove from oven and drizzle the butter and herb mixture. Toss well and pop them back in the oven for about 3-4 more minutes.
Pull them out of the oven and sprinkle the chopped almonds, zest and drizzle with lemon.
Serve warm. Enjoy!
Recipes, Cooking & Art Direction: Mariana Nuño Ruiz McEnroe | Photography: Ian McEnroe |
Published: November 1, 2013
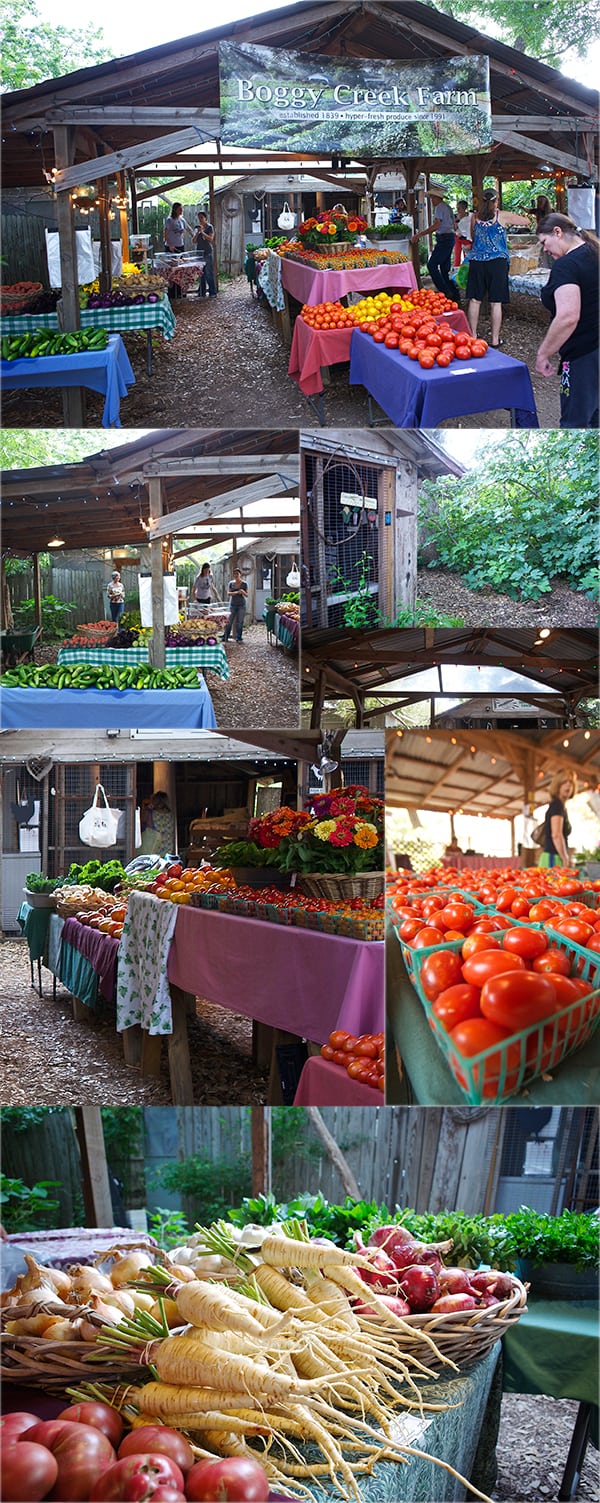
In the past few months Austin urban farms have been in an endangered situation by the new code of regulation and ordinance that it is claiming the East side zone as “single family” under zoning protection. My question to this new ordinance is: Isn’t single families quality of life made greater by organic urban farms? I think the root of the problem is not the presence of urban farms but the attitude about them. Why does the city sees opportunity on the weakest links, when it is a great opportunity to take care and promote these urban farms that add so much value to the neighborhoods and families.
I visit and shop for my produce regularly at the Boggy Creek Farm, which is one of the pioneer urban farms in Austin. I can not express the joy that shopping there brings me by only thinking that soon its going to be Wednesday or Saturday so I can have my piece of heaven, just 7 minutes from my home.
Arriving to the farm, everything smells alive and the rows of seasonal flowers receive you. They have their own inside parking area, you can ride a bicycle or walk if you live near by. People arrive with their kids to feed the happy chickens, and you can take a walk around the beautiful fields of pampered vegetables. There is an open barn area where the workers bring the freshly cut and perfectly washed seasonal vegetables and it is all arranged in baskets and tables with a beautiful array of colours and life! . Sometimes I just stare at the produce and think that I’m there to buy LIVE vegetables which where cut an hour ago, 20 minutes ago? It reminds me vegetables we eat should always be this fresh and it makes me feel grateful to have the opportunity to shop at a place like this.
I can not put into words how happy this makes me feel and how inspired I get from just seeing and knowing that somebody cares so much about what I’m going to buy and eat, and how much healthier I’ve become and feel better when I eat these fresh veggies…
I can not understand the motive of the city of trying to keep the zone of single family ordinance… isn’t these farms part of what makes a family happy?, improve their eating habits, teach children how to live and eat healthier?..We need to focus on the other side of the coin for once and appreciate the great value that urban farms bring to our community and to become a city that leads the example of a new scheme of urban life.
I just can say:
Carol Ann and Larry,
Thank you so much for making this world better one vegetable at the time!
Sincerely
Ian and Mariana McEnroe
We would like to share some of the pictures that we’ve taken when we visit the farm or just after arriving home with all the beautiful produce that makes our week just full of life!
Boggy Creek Farms inspire me every day! visit the farm every Wednesday and Saturday from 8-1:00 pm
How you can help? :
Austin’s urban farms provide a tremendous benefit to our community. Click here to read more about the importance of the farms to all Austinites.
Here’s a few ways you can help the farms:
1. Write a letter to the editor of the Austin American-Statesman in support of urban farms.Click on the link below and get active!
2. Help Austin Urban Farm Day with social media using hashtag #urbanfarmday.
3. Help spread the word! Ask your friends and neighbors to support Austin Urban Farms.
The City Council next meeting is currently scheduled for November 21, 2013.
Recipes, Cooking & Art Direction: Mariana Nuño Ruiz McEnroe | Photography: Ian McEnroe |
Published: October 30, 2013
Do you remember those little boxes with caramel popcorn and peanuts with the sailor and the little present inside?…Well, if you liked that kind of popcorn you are in my boat. Butterscotch popcorn is so easy to make, I can not believe that 4 ingredients taste so incredibly good… I need to warn you this is highly addictive… once you eat one you can’t stop… imagine what the caramel sugar and the butter do to the little fluffy and crunchy popcorn! It creates a light crunchy coat of sweet and nutty flavor. When you pop the little morsels in your mouth the crunchy sound hits your brain the glands on the side of your throat start cramping and your eyeballs are about to fall … Sweet, crunchy, nutty, buttery, salty, .. all your ultimate snack wishes come true in a single little morsel…
For this reason and every bodies sake I adjust the recipe for a moderate amount, it makes approximately 16 cups of popcorn. Do you think is to much? Wait until you try the first bite…
You should share it as soon it comes out from the bowl. It is ideal for a rainy sunday afternoon, movie night, and definitely will make good treats for halloween, or any other kid friendly celebration.
Butterscotch Popcorn with Roasted salted Peanuts
Yields 16 cups
½ cup of corn kernels
2 tablespoons of canola
1 teaspoon of kosher salt
½ cup roasted lightly salted peanuts
(you can change peanuts for pecans, cashews, almonds any nut you like!)
For the Butterscotch:
½ cup sugar
¼ cup water
½ cup butter
Directions:
1. Pour oil into a large pot and add popcorn. Heat over medium-high heat. place a fitting lid tight onto the pot but leave a little space on one side for steam to escape.
2. Pop the corn. And when the popping slows down turn off the heat. (you can use a kettle pot or microwave natural popcorn no salt no extra flavoring)
3. Pour popcorn into a large bowl and season with salt.
4. Add a layer of nuts over the popcorn, so when you poor your caramel they do not sink on the bottom of the bowl.
5. In a shallow pan over medium high heat place the sugar in the center and water all around
6. Once the sugar is dissolved and start simmering start paying carefully attention to the color of the sugar. It needs to reach an amber golden color.
7. At this point add your pieces of butter and whisk.
Once that the foam goes away start whisking faster until you see that the sugar and butter fat is emulsified.
8. Promptly add this mixture to the popcorn bowl and with the help of two rubber spatulas start mixing the popcorn until evenly coated.
9.Cool the popcorn for about 5-8 minutes until dry and crunchy. Shake the bowl to separate the popcorn.
10. Leftovers keep well for 4-5 days in a sealable bag or air tight container…
Recipes, Cooking & Art Direction: Mariana Nuño Ruiz McEnroe | Photography: Ian McEnroe |
Published: October 25, 2013
Dia de los muertos translates into “Day of the Dead”.
The tradition of celebrating Day of the Dead dates from Pre-Columbian times, when the natives of Mexico focused a great deal on the manner in which someone died and rituals were created to commune with the dead and deities from those ancient times. As often happens when two cultures meet, the Spaniards combined the native rituals with their own beliefs which produced a festival that assimilated the ideology, religion, art, agriculture and all the ingredients of the existing culture and resulted in our modern “Dia de los Muertos”.
In 2003 The Day of the Dead, was named by UNESCO as a patrimony intangible of humanity. It is a symbol of Mexico’s cult to the dead and the fascination for the unknown. It is a remembrance of life and the necessity to keep our bounds that seem so impossible to achieve and maintain when our loved ones depart. It is of great importance to remember and maintain these traditions of a rich and colorful culture. Mexico has a lot of good traditions to share with the world…
In Mexico, Day of the Dead is celebrated over three days starting October 31st. November 1 day of all saints, and November 2nd day of all souls. We celebrate the people who departed in hope that they might come back and visit to celebrate with us. And if they are coming all the way from a different dimension we better have some feast worth the trip!
Family altars are decorated with the remembered ones’ favorite foods, photographs, possessions,sugar skulls, drinks and flowers. Candles are placed to illuminate the way for a safe journey back home. This phenomenon it is assimilated with respect and irony, defying the dead as they laugh about her. With a sarcastic bitter-sweet humor Mexicans celebrate the ones that are no longer with us but with the biggest respect they built altars to commemorate them singing, drinking and praying. Now a days people also makes altars for their Favourite historical characters, artist, singers, anybody who means or have influenced in some way your life, or that you just simple admire.
Our Altar in the picture above is made for the 2 most representative artist in Mexico, Frida Kahlo and Diego Rivera which I admire the most.
Pan de Muerto is one of the elements that can not be missed on an altar, a bread that resembles a skull with bones. Enjoy it with a cup of hot cocoa, warmed up and sweeten up the memories of the ones that are no longer with us. It is a good excuse to make this delightful bread and maybe… acquire a tasty tradition…
And ofcourse you need some music to go with it… who is better than Chavela Vargas to accompany this recipe and also to sing to their friends…I hope you enjoy… This song talks about the simple things in life, about love and time…http://youtu.be/-mnZcErj-SA
PAN DE MUERTO
Makes 3 -6” round loaves or 4- 4” liltte round loaves.
Printing recipe at the end of the post
1 lb / 500 gr. unbleached all purpose flour* plus 1/2-3/4 of a cup more flour for dusting when shaping and kneading.
¾ cup / 200gr. Sugar.
¾ cup / 200 gr. Butter room temperature and cut into small chunks.
½ cup / 125ml. Whole milk
2 teaspoons dry active yeast or one little dry active yeast package of 7gr.
3 whole eggs
2 yolks, save the whites for egg wash later…
1 teaspoon salt
1 teaspoon orange blossom water /extracto de flor de azhar
1 teaspoon ground anise seeds
1 teaspoon ground mexican cinnamon
the zest of one small orange
For the Egg wash:
2 left over egg whites you saved when making the dough…
A dash of milk
Coming out of the oven :
1 tablespoon melted butter
1/4 cup granulated sugar
1 pinch of cinnamon
Directions:
Day one:
1. Measure and gather all your ingredients.
2. Start by warming the milk just about luke warm, add a teaspoon of sugar and sprinkle the yeast until bloom. About 10-15 minutes. The yeast should look foamy and creamy. 3. Meantime, on a clean flat surface make a “wheel” with the flour using your bowl to make a perfect circle. 4. Sprinkle the sugar around the flour wheel. In the center add the eggs, egg yolks, spices, extracts, anise, cinnamon, salt. Check on your yeast and if its ready add it to the center of the wheel. Mix all this ingredients using the tips of your fingers or a fork.
5. With your hand in a spider position, start incorporating little by little the flour from the edges. Be careful and gentle not to break the flour ring. Start in circular motions all around the inner flour circle until you have fully incorporated all the flour and almost all the sugar.
6. Now using both hands start incorporating the butter. At this point you can decide, kneading the dough by hand for about 20-25 minutes, it is hard work, but I love the way the dough develops as the warm of your hands soften the dough and help the yeast making the dough smooth and shiny. This efforts shown when the bread is baked, it comes out with a tender finer crumb. The other option, using your mixer with a dough hook for about 10-15 minutes. Both routes work is just about preference and time. ~for me, the key to making a good dough is to feel the dough, that’s why I prefer to mix it by hand~
As dough is kneaded, you can add up to 1/2 cup more flour if needed, if after kneading, the dough feels to sticky, sprinkle 1/4 cup and knead, until your dough feels soft, moist, smooth,and has a shine to it. This dough is very easy to make and as soon the kneading develops the right texture you will know. It will feel soft and it looks a bit shiny, as you can see on the last picture below. So be patient, give the love and knead gently and confident that everything will come out at the right time.
7. Once the dough is ready dust a large bowl with flour, place the dough in the bowl, cover with plastic wrap and a towel and place it in the refrigerator over night. I’ve tried different methods and the bread did not come out as tender and buttery as traditional good bread. 8 to 10 hours over night gives the right time for the dough to develop flavor.
Day two:
1. Pull dough out of refrigerator, punch your dough and reshape kneading gently and briefely. 2.Flour a clean surface and cut into 4 equal parts. Shape each part using your hands creating a concave shape, gently surround the dough with your hand like a little cave, and gently, create circular motion with the dough rubbing against the table until you have formed a smooth round ball. Place each ball into a baking sheet lined with parchment paper, cover gently with a piece of plastic wrap dusted with flour and a clean kitchen towel.
3. Shape 3 parts of the dough and save one to make the bones and skulls for the tops. Divide this ball into 6 stripes and 3 small 1” balls equal sizes. 4.With your fingers make a little cylinder strip and gently pressing in between your fingers make the bones. (see picture below)
5. Place the bone strips, forming a cross and then place the a small ball in the middle, flattening a little making sure it sticks with the rest of the dough. 6. Cover the tray with a piece of plastic wrap dusted with flour to prevent to stick. Let the bread rise for a second time for about 45-60 minutes or until doubled in size. Once they are doubled apply the egg wash evenly.
7. Preheat the oven at 375F / 190C Place tray in the oven, and lower the temperature to 350F/ 175C .Bake for 25-30 minutes.Until golden brown and hollow sound.
8. Remove from oven, brush them with melted butter and drench in sugar. Cool bread on a rack. Prepare the hot cocoa, a cafe de olla and be ready to celebrate!
Enjoy your Pan de Muerto and Celebrate life!
* * *
Altar dedicated to Frida Kahlo and Diego Rivera
Traditional Sugar skulls are made with sugar and in the shape of skulls. One of my favorites Mexican cartoonist illustrator artists is José Guadalupe Posada who is the autor of the Famous Calavera Catrina. If you want to know more about him: http://publicdomainreview.org/2012/11/02/the-calaveras-of-jose-guadalupe-posada/
How to make Sugar Skulls its easy and fun, you can decorate with sugar icing , sprinkles, candy, colored sugar crystals anything that rocks your imagination, have fun!
Course
Snack
Cuisine
Mexican
Prep Time10minutes
Cook Time1hour
Total Time1hour10minutes
Servings82"x 3" small flat skulls
Ingredients
Royal Icing, for decorating:
1cuppowder sugar
1teaspoonmeringue powder
1-3teaspoonswarm water
2-4 drops of natural food coloring of your choice,start with one drop at the time until you achieve the desired color saturation.
For the sugar skulls:
3cupgranulated sugar
1egg white,from a large egg
Instructions
1. Mix troughly until you have a mixture that resembles like sand.
2. Using a plastic mold pack the sugar into the mold really well and level it. Un mold carefully placing a piece of tick cardboard behind the mold, flip and remove the plastic mold carefully. Place cardboard on top of a baking tray and Bake for at least 1 hour on 200F/90C. Remove from oven carefully. Leave tray on a safe place and let them air dry for an extra day.
3. Proceed and decorate with royal Icing and a little black coloring or melted dark chocolate.
This sugar skulls are not meant to be eaten, it is just for decoration since they will just taste like plain sugar…But you are welcome to eat them if you have a strong sugar tooth, have fun!
You can buy this awesome Guadalupe Posadas Skull Molds and many more on the following link: Mexican Sugar Skulls
This recipe is for traditional style Pan de Muerto. The bread, is buttery and the egg yolks give a beautiful rich color and flavor to the bread. Anise and orange zest give this bread a unique aroma and flavor. The texture is soft and with a strong crumb to hold up to one of we mexicans favorite thing to do: "Dunking the bread in to a cup of chocolate caliente-hot-cocoa" ~Enjoy!
1lb /500gr.Unbleached all purpose flour,plus 1/2 cup more for dusting and kneading
3/4cup/200gr.granulated sugar
3/4cup/200gr.Butter,room temp and cut in small chunks
1/2cup/125gr.whole milk
2teaspoonsdry active yeast,equivalent to 1 7gr.package.
3whole eggs
2yolks
1teaspoonsalt
1teaspoonorange blossom water/ extract de flor de azhar
1teaspoonground anise seeds
1teaspoonground mexican cinnamon
1the zest of one small orange
Instructions
DAY ONE:
1.Measure and gather all your ingredients.
2. Start by warming the milk just about luke warm, add a teaspoon of sugar and sprinkle the yeast until blossom. About 10-15 minutes. The yeast should look foamy and creamy.
3.Meantime, on a clean flat surface make a “wheel” with the flour using your bowl to make a perfect circle.
4.Sprinkle the sugar around the flour wheel.
5. In the center add the eggs, egg yolks, spices, extracts, orange zest, anise, cinnamon, salt.
6.Check on your yeast and if its ready,looks "foamy and creamy" add it to the center of the wheel.
7.Mix all these ingredients with a fork.
8.With your hand in a spider position, start incorporating little by little the flour from the edges. Be careful and gentle not to break the flour ring.
9.Start in circular motions all around the inner flour circle until you have fully incorporated all the flour and all the sugar.
10.Now using both hands start kneading into the butter. At this point you can decide, mixing your dough by hand, or using a mixer. I prefer kneading the dough by hand because the warm of your hands softens the dough as you knead, making it really smooth and shiny. Knead for about 20-25 minutes, until dough forms a smooth ball. If using your mixer, place a dough hook and mix for about 10-15 minutes. Both routes work is just about preference and time. The key to making a good dough is to feel the dough. That’s why I prefer to mix it by hand, I can tell when its ready and avoid over mixing. You can add up to 1/2 cup more flour if needed, if after a bit of kneading it feels to sticky, sprinkle 1/4 cup and knead, until your dough feels soft, smooth, and tender. This dough is very easy to make and as soon is the right texture you will know. It will feel not sticky and it looks a bit shiny, as you can see on the last picture below. So be patient, give the love and knead gently and confident that everything will come out at the right time.
11.Once the dough is ready grease the inside of a bowl with butter and place the dough ball, and cover with plastic wrap and a towel and place it in the refrigerator over night. I’ve tried different methods and the bread did not come out as tender and buttery as traditional good bread. 10-12 hours over night is great, the dough develops flavor and texture.
DAY TWO:
For the Egg wash:
1 egg slightly beaten, or those egg whites you saved when making the dough!
a dash of heavy cream
For the Glaze:
1 teaspoon flour
1/4 cup milk
1 egg
For sprinkle the bread
1/2 -3/4 cup of sugar
1/2 teaspoon of ground cinnamon
Directions:
Take the doug out of the refrigerator and let it come to room temperature, about 1-2 hours, before shaping.
1. Punch your dough and reshape dough kneading gently and briefely.
2. Dust with flour a clean surface and cut dough into 4 equal parts.
3. Shape each part in circular motions. Until you have formed a round ball. Place it into a baking sheet lined with parchment paper.
4. Shape 3 parts and save one to make the bones and skulls for the tops. Divide the 4th ball into 9 stripes and 3 small 1” balls equal sizes.
5.With your fingers make a little cilinder and gently pressing in between your fingers make the bones. (see picture above)
6.Proceed to place the bone stripes on top of the bread as picture above.
8.Cover the tray with a piece of plastic wrap dusted with flour to prevent to stick. Let the bread rise for a second time for about 30 minutes, or until double in size. When proofed, brush the the bread lightly with egg wash.
9. Preheat the oven at 375F / 190C once the bread is in the oven lower it to 350F/ 175C and bake for 25-30 minutes.
10.Remove from oven and quickly brush them with the flour glaze and sprinkle with sugar/cinammon mixture, place the bread bake in the oven and bake for 5-7 more minutes. Pull them out of the oven check the center for doneness. Cool them on a rack.
Note: If you don't, want to use the glaze, omit the egg wash and the glaze step. Bake the bread with out egg wash for 25-35 minutes. When bread comes out of the oven and cool slightly, brush the bread with melted butter and sprinkle the bread with the sugar and cinnamon mixture, until fully covered.
You can plan ahead and make the dough the night before, over the weekend. Wake up Sunday or Saturday and shape and bake your bread in the morning and have it for breakfast with a cup of warm chocolate ~ hot-cocoa, a coffee, or cafe de olla.
Enjoy your well deserved Pan de Muerto and Celebrate life!
Recipes, Cooking & Art Direction: Mariana Nuño Ruiz McEnroe | Photography: Ian McEnroe |
Published: October 23, 2013
These cranberry walnut Bran muffins are a delicious source of fiber and because of its high fiber content and wheat germ they are a great source of folic acid. They deliver approximately 14-15 carbs per muffin and loads of antioxidants from the dry fruit and nuts.
I like these muffins instead of toast for breakfast with some yogurt or fruit. As a snack they reduce cravings for refined breads or cookies especially in the middle of the afternoon… They give me plenty of energy and keep me very full from afer lunch until dinner.
The texture is a bit more dense than your regular muffin, but despite all the fiber content the flaxseed acts like a binder and moisten the inside giving it a soft crumb easy to eat and digest. The cinnamon adds the perfect aroma when you bake them the house smells like apple pie (with out the calories).
These muffins are so versatile; you can create any flavor combination so you won’t get bored, there are infinite combinations; like raisins & walnuts, dates& pecans, golden raisins & orange zest, cinnamon & apples, candied ginger and cashews, anchovies & peanut butter….okay, well almost anything… They are so easy and quick to make and to bake that once you have the recipe you can whip a batch of these babies in no time.
I usually bake this muffins once a month, The recipe it’s so fast to prepare and freeze friendly if 16-18 are to many for you, you can freeze half a batch, and reheat them in the toaster oven.
So fall in love with them and start baking a batch!!!
Cranberry- Walnut Bran Muffins
Makes 16-18 muffins -Vegan friendly!!!
4 tablespoons ground flaxseeds
3/4 cup water
2 cups wheat bran
1 ½ cups whole wheat flour
½ cup wheat germ
1 pinch of cinnamon
¾ cup brown sugar, firmly packed
2 ½ teaspoons baking soda
1 teaspoon salt
1 cup non-dairy milk (soy, almond, coconut, rice)
1/3 cup canola oil
1 teaspoon vanilla extract
½ cup cranberries
½ cup walnuts
Sprinkle with:
1/2 cup raw sugar cane
Directions:
1.-
Preheat the oven at 400F/200C
Line with cupcake liners or lightly grease muffin tins.
Measure all your ingredients. (it helps a lot when you are baking so you don’t forget any of them! it is worth the step at least the first couple of times you are making them)
2.-
Whisk the flaxseed and ½ cup of water until foamy.
3.-
Combine dry ingredients.(except for the cranberries and walnuts)
Combine wet ingredients until smooth and creamy.
Add together wet and dry until well combined (do not over mix).
Add Cranberries and walnuts fold gently.
4.-
Scoop into muffin pan, each 2/3 full and sprinkle with some raw sugar cane.
Bake for 12-15 minutes.
5.-
Wash the dishes while they are baking….
6.-
Cool on a rack…
Eat them a little warm with some vegan spread…delicious!
Recipes, Cooking & Art Direction: Mariana Nuño Ruiz McEnroe | Photography: Ian McEnroe |
Published: October 18, 2013
What a crazy title! I think it took me more time to name this dish than to make it. What the title really should say is: Roasted Vegetables stacked with a Bison spicy Bolognese. The “napoleon “part is just a fancy name to say stacked, and this dish by any means is “fancy”…
Well, this was dinner yesterday. They say not to live in the past, always in the now, but memories are important and this meal was one of the memorable ones.
When our carnivorous crave knocks at our door: Lamb, Pork or Beef?… Bison!
Here in Texas that’s what every carnivore should be eating because its extremely remarkable in beef flavor due to its high Iron content. Bison has 80% less fat and 49% less calories than beef. Lets say Bison is the Better Red meat. Just make sure to look for the USDA approval triangle on the front label and look for 100 percent natural-grass feed-hormone free. Keep in mind that you’ll get what you pay for. Tender, flavorful bison costs more to raise, thus it costs a bit more, but one bite and you’ll never go back!… it is indeed a great option.
This is why: Bison spicy bolognese works great because it makes the bolognese sauce lighter yet richer in flavor. And because Bison cooks faster than beef, this 30 minutes spicy bolognese can change your life. You can make a double batch and freeze it for a fast pasta dinner during the week.
Half inch sliced vegetables, roasted at 475 F temperature for 25 minutes can be magical, all the flavor of the vegetables just seems to concentrate and develop their natural sweetness and caramelization.
All in all this is a great recipe, You can serve it with a green salad on the side, a piece of crusty bread, and a glass of wine… Enjoy!
Vegetarian & Vegan suggestions:
Now, I do think on my vegetarian friends and it is such an easy way to transform the recipe, using a combination of bottom and cremini mushrooms instead of meat.
Or if you are fan you can use texturized soy protein.
For the cheese, a walnut sauce is always a great substitution. Here is the link to a previous post where you can find the recipe.
Roasted Vegetable Napoleon with Spicy Bison Bolognese
Serves 2 with room sauce for 4 or you can freeze the rest of the sauce for another night.
1 egg plant
1 green zucchini
1 yellow squash
1 medium large portobello mushroom
3 sweet red peppers
Extra Virgin Olive Oil
Salt and pepper
1/2 cup Assiago
1/2 cup Fontina cheese shredded
For the Mirepoix:
1 cup chopped sweet onions
½ cup carrot small diced
½ cup celery small diced
3 garlic cloves
1 Bay Leaf
1/2 teaspoon of red pepper flakes
1 teaspoon of salt
½ teaspoon freshly ground black pepper
3 tablespoons extra virgin olive oil
For the Spicy Bison Bolognese
1 pound of grass feed-hormone free-Ground Bison (or beef or turkey or texturized soy or cremini mushrooms)
2 cups Red wine (Cabernet-or a rich tempranillo)
1-12 oz. canned San Marzano tomatoes (this is my only exception to the rule on canned products)
1 tablespoon Balsamic vinegar
3 dashes of Worcestershire sauce
1 tablespoon Sriracha* the odd ingredient but it is so good!
Salt and pepper to taste
2 tablespoons of butter optional*
Directions:
1.-
Start by making the sauce;
In a Medium- Large sauce pot, saute the mirepoix ingredients in 3 tablespoons of extra virgin olive oil until onions and celery are translucent. Add the ground Bison saute for 3-4 minutes with the help of a wood spatula making sure you incorporate everything avoiding big lumps of meat. Add the wine and let the alcohol evaporate for about 3-5 minutes. Add the can of diced San Marzano tomatoes, the balsamic, Worcestershire sauce, Sriracha sauce, and adjust salt and pepper. Simmer the sauce for about 15-20 minutes or until the excess juices have evaporated. You want a slightly thick consistency. Cover with a lid and keep the sauce on low. At this point you can decide to add 1 or 2 tablespoon of butter this will round off the flavors on the sauce.
2.-
Once the sauce is ready, preheat the oven at 450-475F / 230-245 C
In a large Baking pan lined with parchment paper, arrange the vegetable slices in one single layer. Drizzle some Olive Oil seasoned with salt and pepper. Roast for about 10-15 minutes or until the vegetables have a golden -to dark brown on the edges.
In two oven Ramekins of Pyrex, start layering the vegetables alternating with the sauce and grated cheese. You can add some fresh herbs like basil, parsley or rosemary. Make sure the last layer is cheese and broil in the oven for about 5-6 minutes or until cheese is bubbling and melted. Serve placing the ramekins in a flat plate for safety.
Roasted Vegetable & Spicy Bolognese Napoleon..ready to serve!
Recipes, Cooking & Art Direction: Mariana Nuño Ruiz McEnroe | Photography: Ian McEnroe |
Published: October 13, 2013
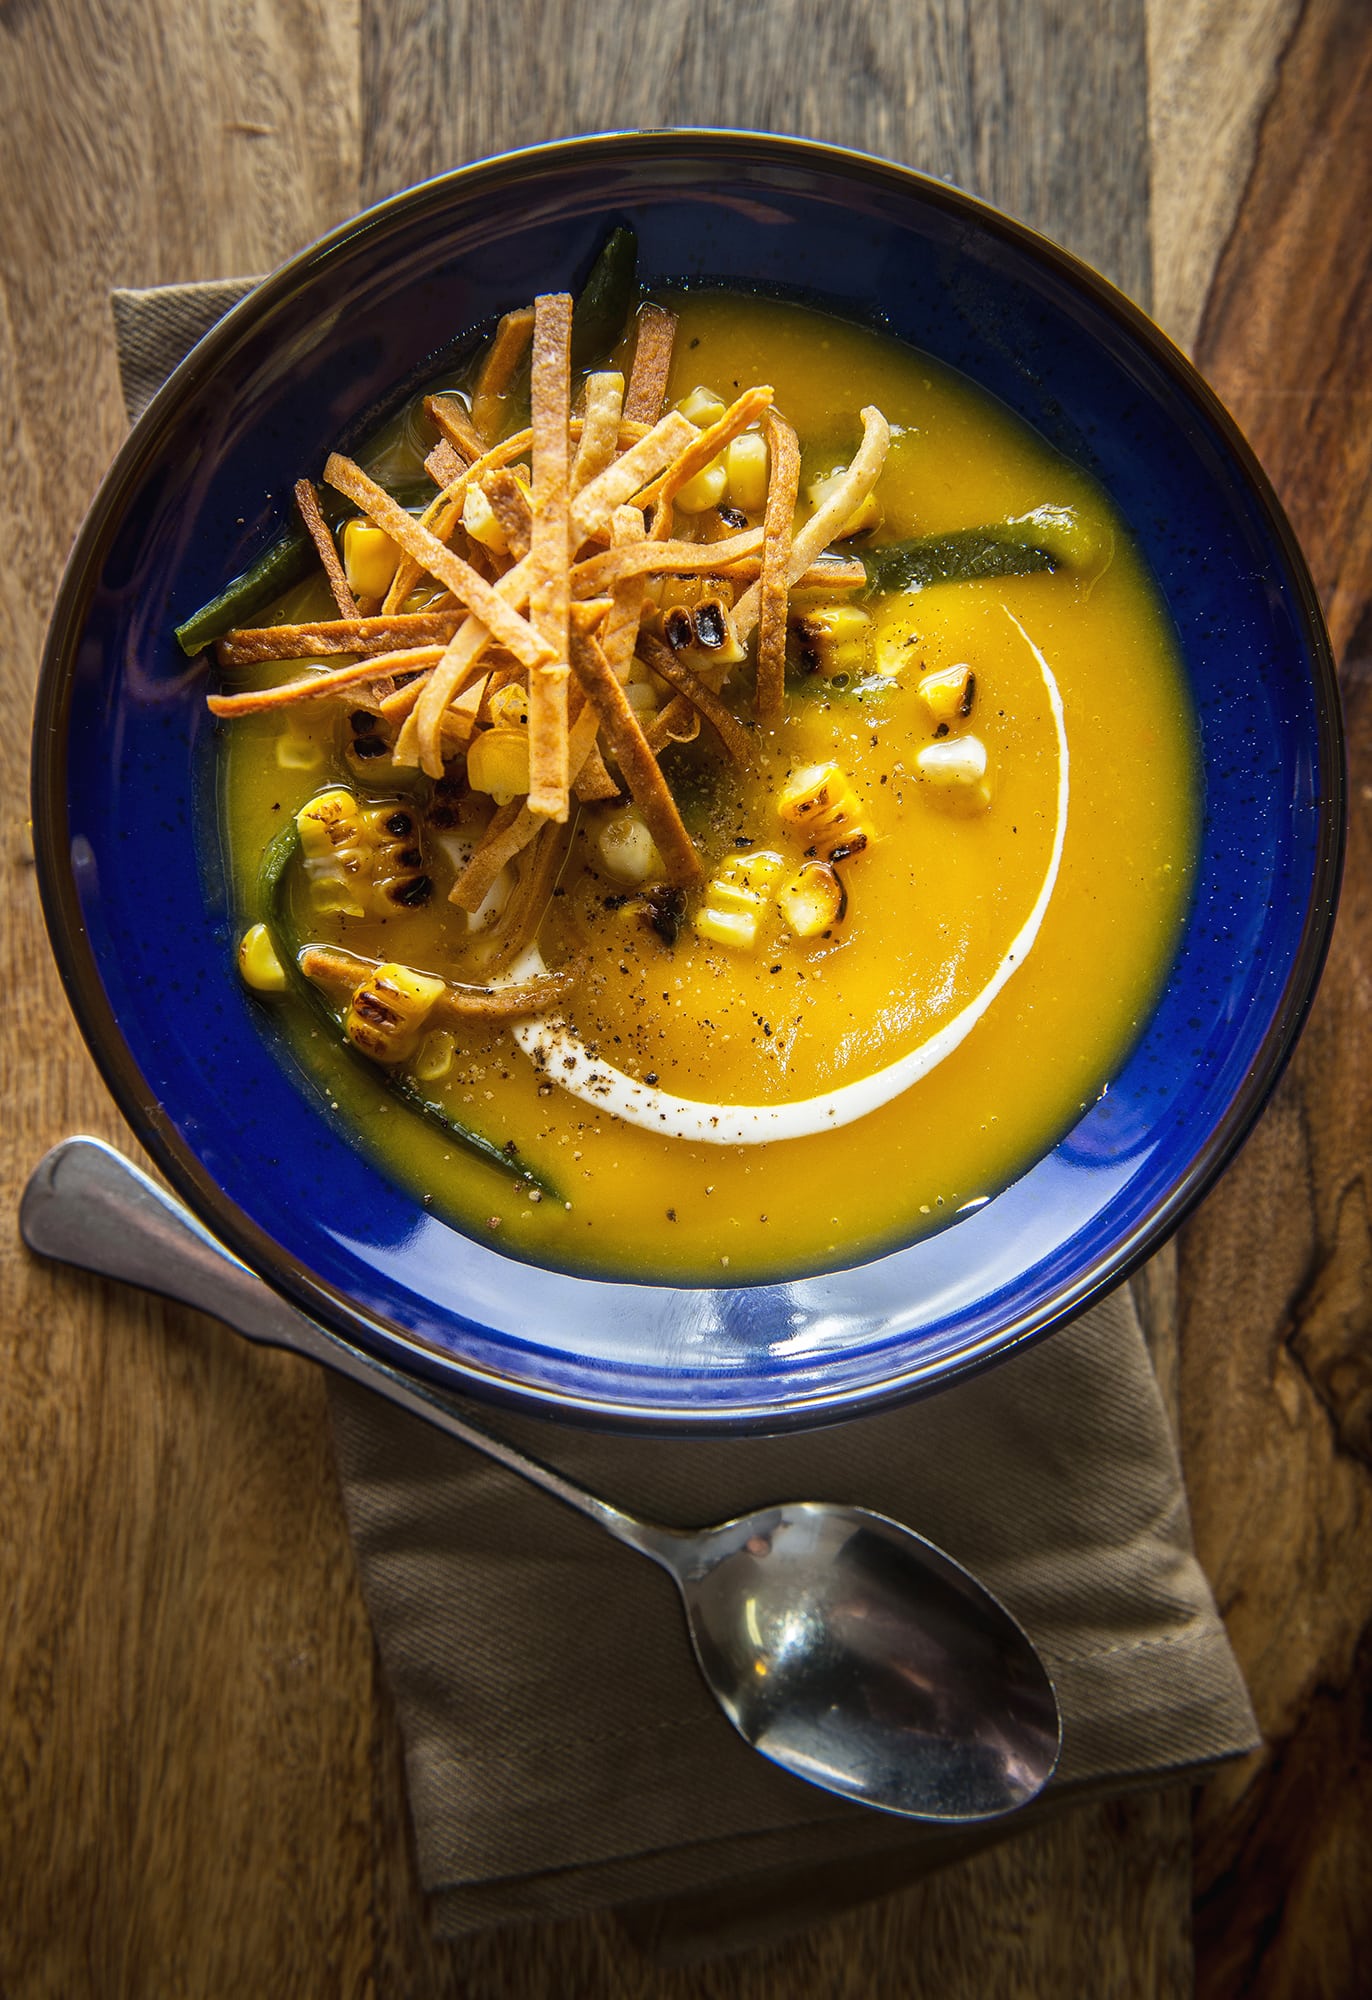
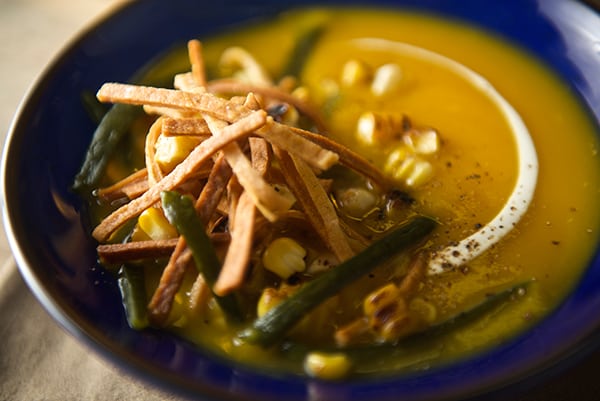
Warm and velvety and with a hint of roasted sweetness….It is inevitable to succumb to the cliche of pumpkin soup. I assure you there are 1,000 recipes out there with all different combinations spices, creamy, vegan, vegetarian…This version is my humble version of the Roasted pumpkin-poblano soup.
For the past few years, I’ve been making my vegetable soups under one principle: “do not add chicken stock”. Yes, it is that simple. I don’t want, under any circumstance, my broccoli soup to taste like chicken (or my potatoes, carrots, or any vegetable to taste like the bird). I want to savor the flavor of the vegetable. It is certainly a challenge to follow this principle because our inner chicken stock flavored souls desperately want to add more “depth of flavor”. For me, this is totally wrong. The way I make my vegetable soups are by enhancing the vegetables using different cooking methods like roasting, grilling, braising; all these cooking methods bring out the vegetable qualities, enhance the sweetness and flavor concentration to the soup. And yes, at times just a little help from other vegetable friends can harmonize the flavor.
Pumpkin has a delicate flavor so it is easy to mask, yet easier to harmonize. I love roasting or braizing. In this case, I chose to roast the pumpkin and add some caramelized sweet onions to bring out the sweet and earthy flavor of the pumpkin. Roasted poblanos, charred sweet corn, and some tortilla crisps play perfectly in this soup and add contrast in texture. With no doubt, it is one of my favorite soups to make, so easy and comforting. It freezes well if you want to store it for a quick-thaw meal and I just can tell you that after the photo shooting this soup was our good comforting dinner…
Roasting pumpkin is easy and so rewarding, I love the way the house smells, it’s a welcoming to fall. When getting ready for the pumpkin season, I usually pick 2 small pumpkins the size of a volley-ball or smaller. They are easier to cut in half and they cook faster than the bigger ones. Once I cut them in half, I scrape all the inner seeds, save them for feature roasting if I feel like-, and I place the pumpkin halves flat side down on a full sheet tray covered with foil rubbed with some oil to avoid from sticking. I bake them on the lower rack in the oven at high-temperature 450F for 25-35 minutes or until a paring knife inserts easily through the skin. Remove them from oven and let them cool off. Using a spoon I scrape all the pumpkin ~this is my favorite part so I don’t have to peel the pumpkin, which is hard and lots of work~. Once I scrape all pumpkin into a bowl, I use my handy-dandy immersion blender to puree the pumpkin. About each pumpkin half yields 1 to 1.5 cups or puree depending on the size of the pumpkin, then I make little reusable bags with 1 or 2 cups of the puree depending on the recipes I want to make, and freeze. 2 pumpkins is usually all the pumpkin I need and I’m ready for the season! Click on this link to check a How to roast a pumpkin tutorial with step by step photos and how to make a delicious pumpkin seed snack!
Roasted Pumpkin-Poblano soup
Serves 2 hungry persons as the main dish for dinner or 4 starter soups.
2 cups roasted pumpkin purée(I do prefer natural and roasting my own, you will need about 1 small pumpkin the size of a softball. You can use canned, about 2- 8oz cans, but it is definitely not my favorite option)
4 cups water
1 small sweet yellow onion caramelized
1 tablespoon butter
1 tablespoon olive oil
1 teaspoon salt
1/2 teaspoon white pepper
1/4 -1/2 teaspoon grated nutmeg
Garnish with:
2 poblanos roasted, skin, devein and cut into strips
1 cup of charred corn kernels, about 1-2 ears of corn depending on size
¼ cup of Mexican cream or Greek yogurt, If using Greek yogurt dilute with a bit of water and add a pinch of salt.
2 corn tortillas, thinly cut into strips, baked or fried
Directions:
Over medium-high heat using a heavy bottom soup pot, place the oil the onions and a pinch of salt. Cook until they are soft and translucent. Lower the heat and keep on cooking until deep golden brown and caramelized.
Add pumpkin puree, water salt, pepper nutmeg. With the help of an immersion blender blend the soup until smooth.Let it simmer until bubbly hot. Adjust the liquids and salt if needed, for desired consistency and taste. At last, right before serving, add the tablespoon of butter and stir until melted and incorporated.
Serve warm in a soup bowl and garnish with the warm poblanos, charred corn, and thinly fried tortilla strips.
You can add a dollop of Greek yogurt or a swirl of cream.
For vegan:
Use: vegan butter and replace cream swirl with any soy or coconut or almond based cream.
Music Pairing: The smashing Pumpkins, Tonight, Tonight
Warm up with this cozy Mexican spin on a fall pumpkin soup!
Course
Soup
Cuisine
Mexican
Prep Time35minutes
Cook Time20minutes
Total Time55minutes
Servings4people
AuthorMariana McEnroe
Ingredients
2cupsroasted pumpkin puréeI do prefer natural and roasting my own, you will need about 1 small pumpkin the size of a softball. You can use canned, about 2- 8oz cans, but it is definitely not my favorite option
4cupswater or vegetable stock
1smallsweet onion,caramelized
1tablesspoonbutter
1tablespoonextra virgin olive oil
1teaspoonsea salt
1/2teaspoonwhite pepper
1/4 -1/2teaspoongrated nutmeg
Garnish with:
2largeroasted poblanos,skin, deveined and cut into strips
1cupcharred corn kernels,about 2 small ears of corn depending on size
1/4cupGreek yogurt,diluted with some milk or water and pinch of salt
2piecescorn tortillas,thinly cut into strips, baked or fried.
Instructions
Over medium-high heat in a soup pot, place the oil the onions and a pinch of salt. Cook until they are soft and translucent. Lower the heat and let them become brown and caramelized. About 7-8 minutes.
Add pumpkin puree, water/or/vegetable stock, salt, white pepper, nutmeg. Let it simmer until bubbly hot. Adjust the liquids for desired consistency.
At last, add the tablespoon of butter and stir until melted and incorporated.
Serve warm in a soup bowl and garnish with the poblanos, charred corn, and thinly fried tortilla strips.
You can add a dollop of Greek yogurt or a swirl of Mexican crema. Enjoy!


 8. Promptly add this mixture to the popcorn bowl and with the help of two rubber spatulas start mixing the popcorn until evenly coated.


