Recipes, Cooking & Art Direction: Mariana Nuño Ruiz McEnroe | Photography: Ian McEnroe |
Published: October 15, 2016
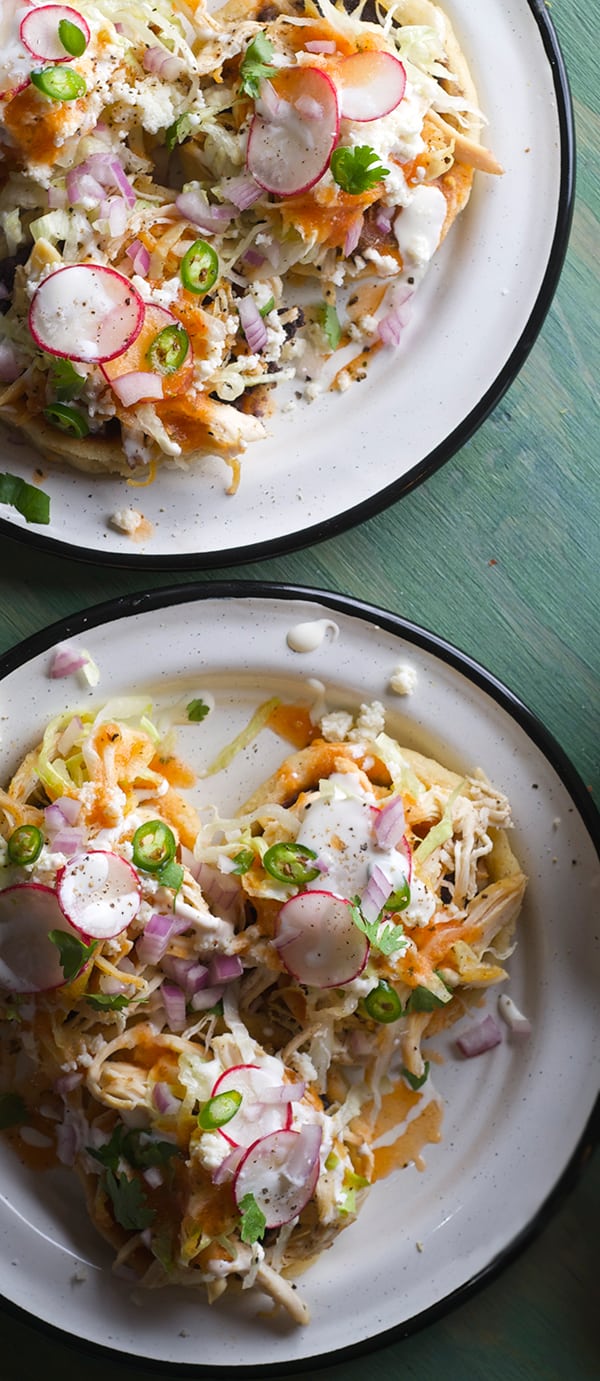
Antojitos Mexicanos…These are the “small bites” in Mexican street food. Go to the fair or the Tianguis (street market) and they are the perfect food for an impromptu craving. Sopes de Pollo – Chicken Sopes is one of them. Take corn masa dough and create a small fried or grilled pattie and you have the foundation to add any kind of toppings you like; shredded chicken, beef, pork, picadillo, chorizo, requeson~Mexican Ricotta, refried beans, mashed potatoes, calabazitas, poblano rajas, mushrooms, infinite filling possibilities. Top them off with a simple tomato salsa, shredded lettuce or cabbage, onions, radishes, crema and queso fresco or cotija cheese, and these little sopes, will be a highly crave-able meal.
In Guadalajara, Jalisco, where I’m from, these fresh corn masa patties are called Sopes de Masa, or pellizcadas which translates into “pinched”. Why? Once these masa patties are cooked, on the comal or fried, the edges of these round patties are pinched all around to create a border-leap that will hold the fillings and topping goodness.
This masa pinching is done by an experienced cook, a grandma or an aunt, cooks that have developed Moctezuma fingers, with digital prints deleted by the generational hard work in the kitchen. Since these patties are piping hot, you need this kind of strong digital numbness to achieve the results. Lucky you, this is not the only way to make sopes, I will provide you with an easy solution using two spoons. You get to keep your fingerprints.
Recipes, Cooking & Art Direction: Mariana Nuño Ruiz McEnroe | Photography: Ian McEnroe |
Published: August 29, 2014
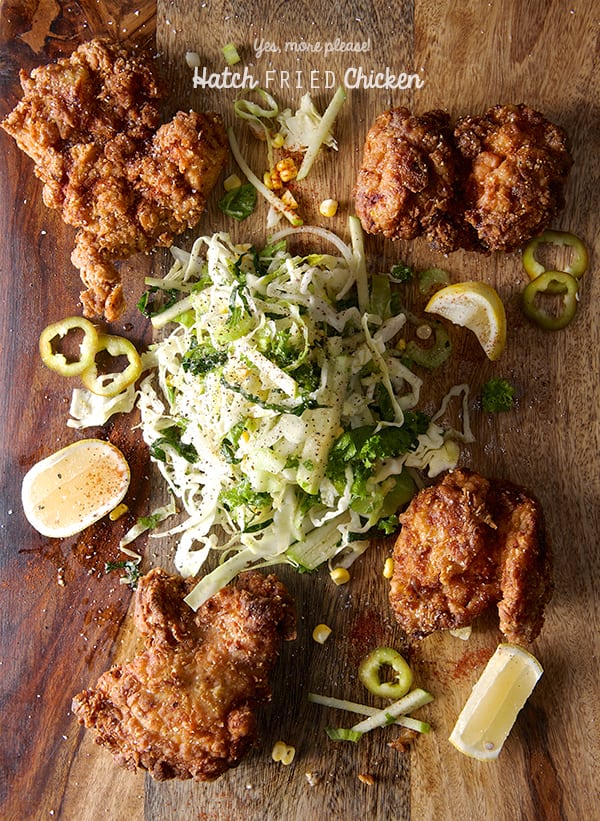
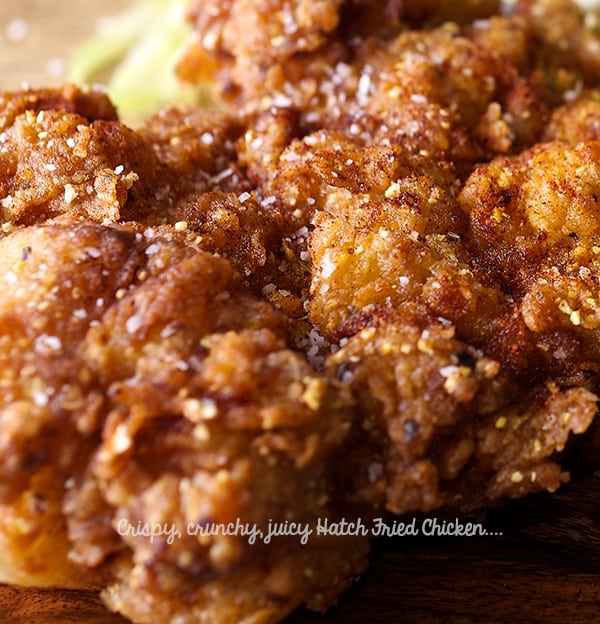
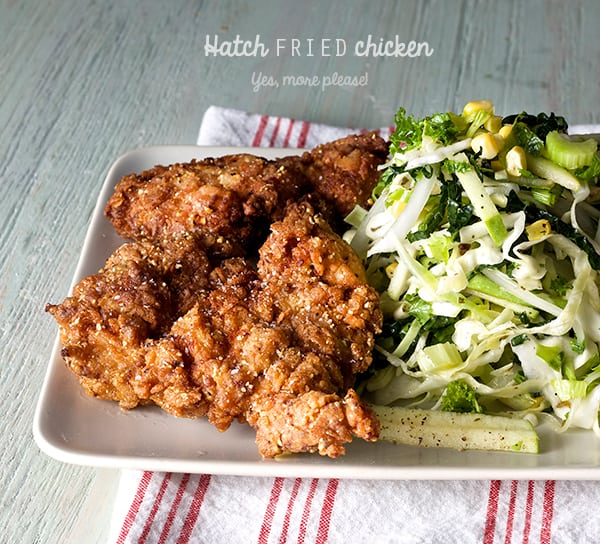
With a guiltless dance and a smile on my face I implore you to give this hatch fried chicken a “must try” label. This is my new favorite Hatch recipe.
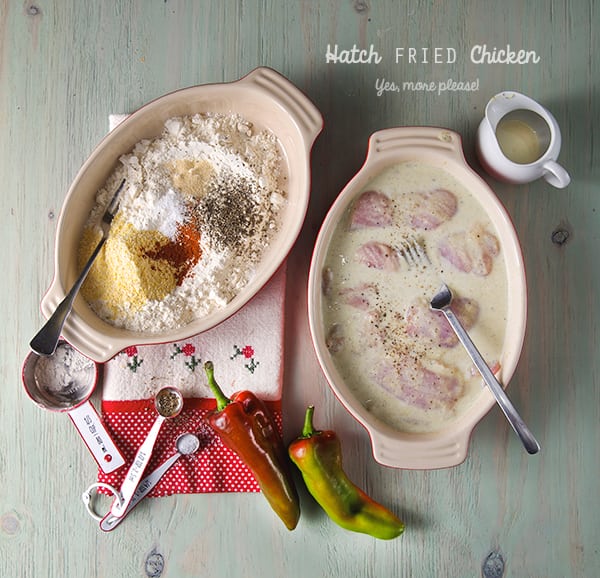
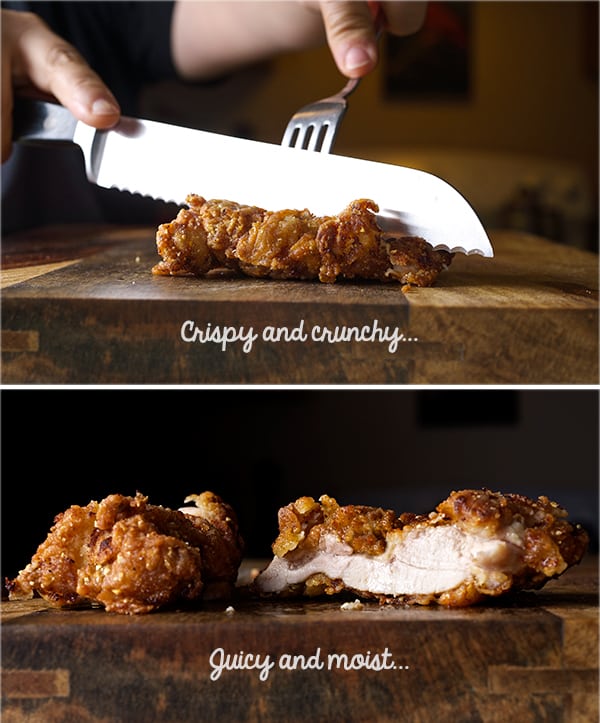
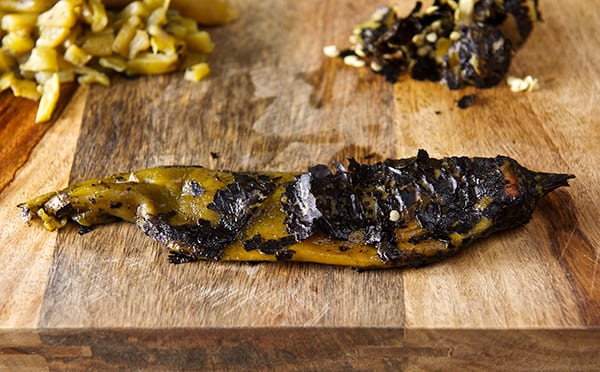
I used skinless chicken thighs and marinated them in a concoction of yogurt, milk and pureed roasted Hatch peppers until the chicken got tender and flavorful. After a quick drench of well seasoned flour I deep-fried them in peanut oil, making the chicken crunchy crusty, crispy, and tender and juicy on the inside.
Why make fried chicken at home? Because I believe it often tastes better, but also It makes you appreciate what you are about to eat.Nothing tastes more rewarding than making the effort to cook an effortless recipe with awesome results!
Happiness and bliss have been achieved when these Hatch Fried Chicken thighs come out of the pan and onto your plate beside the greenest green green coleslaw. It’s a balancing the act of rich and a tangy. You will be dancing from the beginning of the recipe to end of your meal. Its richness is a combination of the dry seasonings and the Hatch peppers’ distinctive mild chili note.
I used chicken thighs, they have great flavor and they are so moist that you can use them skinless, But imagine the possibilities!, chicken breast, legs, wings!… quail. Ok… I just got myself in trouble now… I want quail!…
Any way, If you make this recipe, I would love to know how it went and if you enjoyed as much as we did! Juicy, crispy, spicy fried chicken is gonna make you a fried chicken believer.
Have fun!
Hatch Fried Chicken
Makes 6 chicken thighs and one little happy dance.
1.5 lbs. of organic skinless chicken thighs
For the marinade:
3/4 cup plain Bulgarian or Greek yogurt style.
2-3 roasted hatch peppers (remove skins and seeds)* check notes for substitutions at the end of the post.
good 4-5 cranks of freshly ground pepper
1 tsp. kosher salt
For the flour drench:
1 cup unbleached all-purpose flour
1/4 cup corn meal
2 tablespoons cornstarch
1/4 teaspoon paprika
1 teaspoon black pepper
1 teaspoon garlic powder
1 teaspoon salt
For frying:
3 -4 cups – Peanut oil (grape seed oil or corn oil will work too.)
A 10″-12″ heavy bottom enamel pan or a cast iron pan for best results.
1 pair of metal tongs
Preparation method:
1. Puree all the marinade ingredients.
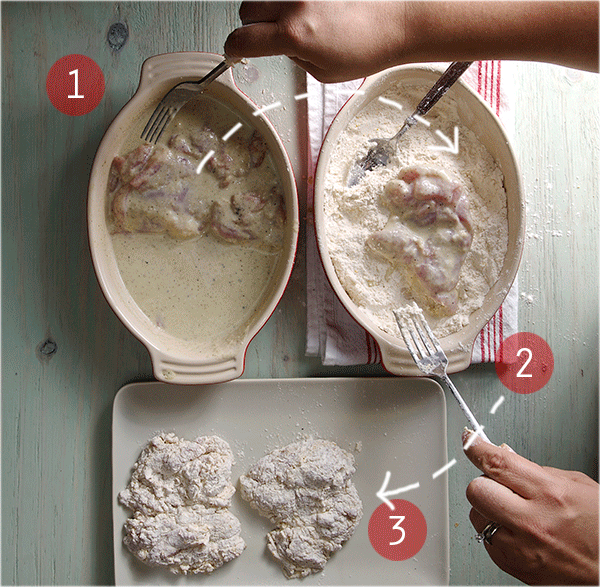
2. Pat dry and trim some of the excess fat on the chicken thighs, if any. 3. In a ceramic or glass dish place the chicken thighs and poor the marinade over them, massage them a little bit, place them in the refrigerator for at least 2-3 hours, over night is best. 4. Next day, Pull the chicken out of the refrigerator 20 minutes before cooking. 5. In a ceramic or glass dish combine all the ingredients for the dredging flour. 6. Start heating the oil. I like to start heating the oil at a low temperature, and slowly turn up the heat. This will ensure your oil will not taste burn and is evenly heated.
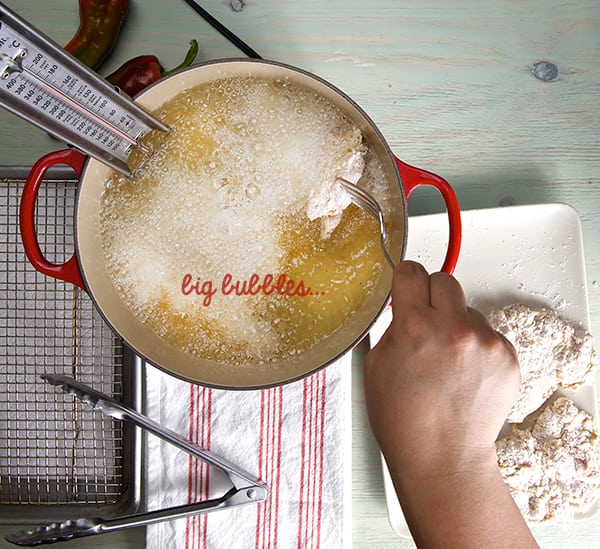
***Take care to monitor your oil and your kitchen carefully while deep-frying, never take your attention away from hot cooking oil. No distractions!!*** 7. While the oil is slowly heating up, with the help of a fork take one piece of the chicken and tap it a little to remove any excess marinade, dredge into the flour, and with a spoon start covering each piece of chicken really well. Set the dredged flour pieces on a clean dry plate. Proceed with the rest of them one at the time.
8. Check on your oil. Place a frying thermometer on the edge of the pan, and check for 350F-360F sprinkle a little flour on the oil, you want big bubbles. 9.When the oil reaches 360, start frying your chicken 2 pieces at a time, to avoid lowering down the temperature of the oil. Check the temperature on your thermometer at all times, you want big bubbles around each piece of chicken, and thermometer reads at least 350/360F to make sure your chicken is not absorbing extra oil, making it soggy and greasy. iaks!
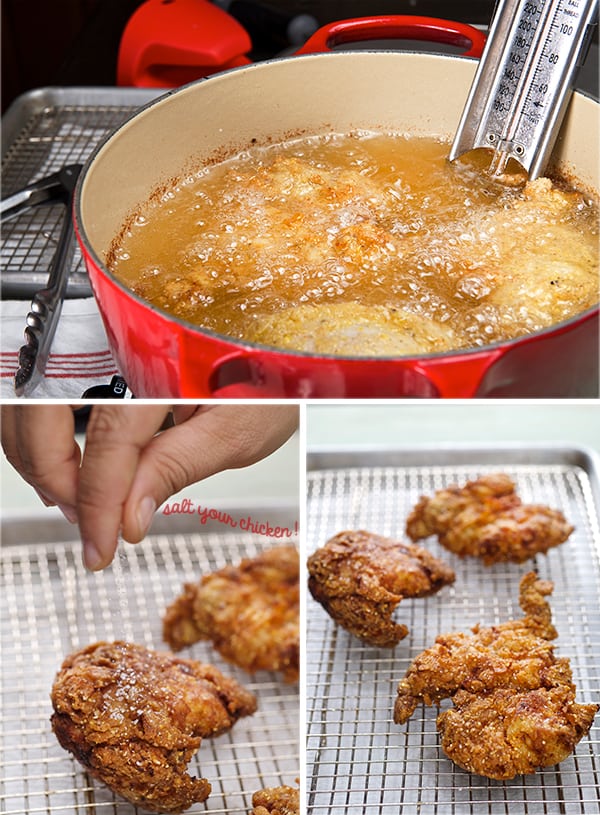
10. Depending on the size of the thighs it will take about 5-6 minutes per side. You want to turn the chicken until you have a rich golden mahogany color on the bottom and the size on the bubbles around the chicken are smaller. This is the right time to gently flip. Always flip away from you to avoid splatter. 11. Once you flip, lower the temperature a bit to 320F, it might take less time, about 3-4 minutes. Chicken should look golden brown and the bubbles around the chicken are really small. Take the pieces out to drain and check for doneness, the internal temperature of the chicken should read minimum 165F. 12. Drain the chicken on a cooling rack lined on top of a baking sheet and immediately, sprinkle some salt. Placing the chicken on a cooling rack will make sure you the chicken will stay crispy. 13. Adjust the temperature for the next batch and go ahead and fry the rest of the chicken.
14. Ready to eat! Serve the chicken with a great side of coleslaw like this green green coleslaw, check it out is from a previous post, it is tangy crunchy, fresh and so mighty green that I believe it’s the best complement for this spicy hatch fried chicken. Also some lemon wedges, if your brave , maybe some extra dashes of tabasco sauce, or any other vinegary hot sauce. Enjoy!
Enjoy!
*Note:
I used fresh Hatch peppers and roasted them. Here in Texas you can find them very easily when in season. If you are wondering if you can use canned Hatch peppers, yes you can. Our dear friend and follower Ed who is from El Paso, Texas and he and his family have cooked with hatch peppers for many generations, suggested me two good brands: Victoria and Santa Fé ‘Ole brand (bottled)-Double Fire-Roasted . He assures this brands are first-rate to get when hatch is not in season. Thank you so much Ed, for this great information!…
Remember that freezing the chiles is also a good option. Once you roast, peel and de-seeded them, you can purée, dice them or keep them whole, pack them on freezer bags and freeze them for future recipes. You can even make hatch chile purée ice cubes and add them to soups or stews on the winter season…delish!
Recipes, Cooking & Art Direction: Mariana Nuño Ruiz McEnroe | Photography: Ian McEnroe |
Published: January 22, 2014
Pozole is a soup usually made with hominy, pork meat, spices and fresh garnishes that create a wonderful one bowl meal warm soup. Let’s say Pozole Is kind of the Mexican Pho. There are a couple of variations upon regions and availability of ingredients, red chiles , green tomatillos and poblanos, or just garlic and onion. There’s even not so traditional versions using chicken or turkey to make the soup a little lighter and healthier; even vegetarian versions using button mushrooms instead of meat, in my opinion all equally delicious in its own way.
Another variation on this dish would be the fresher version also known as ‘Pozolillo’, that uses fresh white corn in the cob kernels like in Michoacan and Guerrero. Which is the version I prepared.
The hominy used in Pozole is freshly made from dry kernels that are transformed into ‘nixtamal’ this process involves soaking the dry corn kernels in water and limestone to burn and cook the skin. It is an intense preparation more commonly used in the South of Mexico, Sinaloa, Jalisco, Michoacan, Guerrero, State of Mexico and Distrito Federal. While in the norther mexican states like Sonora, Monterrey, Chihuahua, the proximity with the border has a not so preferred commodity, hominy on a can which to my taste is hard to equal the good flavor from the freshly made.
Despite the regionalism, Pozole is a classic soup among mexican families, every family has its own recipe and a style; whether is white, red or green, a grandma, sister, mom or aunt who makes it; It is always a great comforting meal that brings family and friends together.
In my family, My Grandma, from my father’s side is my Pozole Guru. She will start to cook the Pozole two days in advance by soaking the dry corn-nixtamal with a bit of lime stone to lose the skins on the kernels, rinse it infinite times and slow cook it for a couple of hours. Grandma Mago used pork shoulder and very meaty pork cuts. Her Pozole was white, meaning she would not add any chiles to tint and flavor the broth, the flavor came from the cosmic union of the extremely well prepared artisanal hominy, tender pork, garlic and onion. Amazing, simply amazing.
On the other side of my family, the Pozole Guru is my Aunt Paloma, she makes the BEST Red Pozole. Absolutely delicious, she uses also pork and red chiles like ancho and guajillo which are very mild chiles that flavor the broth transforming it in this aromatic and savory broth you almost want to use a straw to drink it. Scrumptious.
As you can see I have a mayor task here, So far I’ve cooked both Pozole styles, white and red, I love them equally. And yes, it is the cook hand, what we call “sazon” that makes a dish your dish and the only way to exceed at it is practice, practice and more practice my little grasshopper.
This time I’m attempted to recreate a Pozole Verde or Pozolillo. First time I had this green gem soup was at a friend’s house she was from Michoacan. I inmediatelly fell in love.
This Pozole Verde is made with white corn kernels instead of hominy and uses tomatillo, serrano and poblano peppers to flavor the broth. What is so special about it? the broth in this Pozole Verde It’s light, fragrant, almost has a herbaceous flavor, and the green tomatillo adds a bit of a thickness to the broth without making it heavy to the palette. The corn kernels make this Pozole a great fresh taste, really unique and very achievable if you lack of a mexican Grandma, Aunt or good quality hominy.
In this recipe, I used sweet corn. Why? Well, Ian is more familiar with the corn flavor than with the hominy. Not a lot of people likes hominy and I strongly believe is because what they have tried is from a can. So what you do? What did I do?..I used what I had freshest available. This week I ran into a good corn sale at the market, it was fresh and tasted sweet, juicy and crunchy good enough to make it into a soup.
Now, I know some people will crucify-me about using sweet yellow corn but, I have to say that the variation came out tasting really good.
Do your best with what you have, use what is freshest available to you, if you find white corn this will be my first option, and if you prefer Hominy, I will encourage you to find “Rancho Gordo hominy”.
This Rancho Gordo California farm grows heirloom beans and grains, the quality and flavor resembles a lot of the hominy you can find in Mexico. Sometimes I can find them at Whole foods or Traders Joe’s. If you plan ahead of time, order them on-line. absolutely divine. http://www.ranchogordo.com/index.htm
Last option will be Juanita’s Mexican style hominy. Yes this particular brand has the best texture, and 3 ingredients, water, hominy, lime stone. Making it the best option. If can is the only option you have, this will taste good.
I used chicken one of my favorite chickens from Smith & Smith Farms, I know chicken again!!! well I do not mind when the quality of it is so good In fact, every other weekend I’ve been buying a whole chicken from this farms, there are so good I crave chicken!.. ridiculous I know…
Any how, easy recipe, one pot wonder, it keeps really well, I have not attempted to make this Pozole Verde on a crock pot, I see no reason why not you could use it. Please, if you do, let me know how it goes.
Keep warm and EAT your SOUP, do not lick the bowl, use a straw!.
Pozole Verde a.k.a. Pozolillo
Serves 4 Mexicans 6-8 Green coats.
8 cups /2Lt. chicken stock
3.5-4 lbs. Whole chicken or the meat of a roasted chicken shredded.
6-8 ears of white corn preferable or yellow corn de-kernel
2lbs green tomatillos.
3 poblano peppers remove seeds and deveined.
2-3 serrano peppers
1 large bunch cilantro
½ teaspoon mexican dry oregano
1 medium white onion
1 small head of garlic
2 teaspoons Sea Salt.
1/4 cup Corn, Sunflower or Vegetable oil
14-20 Dry chiles de Arbol- (remove stems, include seeds)
1-2 medium garlic cloves
1 pinch of sea salt.
Toast in Oil about 14-20 dry red chile de arbol, until they have this mahogany dark color, remove from heat, add 2 garlic cloves cut in half and a good pinch of sea salt. Blend all this until a coarse puree. Add a dash of dis paste when ready to eat.The heat in this sauce-paste is mild, due to the toasting of the chiles, it makes it smoky and mild heat.
Preparation:
If you are using the whole chicken:
1. In a large pot add 8 cups of water ½ medium onion, ½ teaspoon oregano, ½ head of garlic ½ bunch of cilantro, 2 bay leaf, 1/2 teaspoon dry thyme, 2 carrots, 1 sprig of celery, 2 teaspoons sea salt. Add the whole chicken, skin on, cut in pieces, for faster cooking. Bring to a slow simmer; with a ladle remove the white foam that forms as it cooks. Cook for about 35-45 minutes. Until chicken is tender.
2. Once the chicken is cooked, Remove the chicken, herbs, onion, garlic, sieve the broth.
3. Let the chicken to cool down until riches a comfortable temperature to remove the skin and shred the chicken meat. Set aside.
If you are using a Roasted Chicken:
1. Remove skin from roasted chicken and shred. Save the chicken carcasses and set aside.
2. In a large pot add 8 cups of chicken stock, ½ onion, ½ teaspoon oregano, ½ head of garlic ½ bunch of cilantro, 1-2 teaspoon salt and the chicken carcasses from the roasted chicken. Bring to a slow simmer; with a ladle remove the white foam that forms as it cooks. Cook for about 20-25 minutes. Until chicken is tender.
3. Once the chicken broth is seasoned and cooked, Remove the chicken carcasses, herbs, onion, garlic. sieve.
4. Remove the tomatillo husk, wash them and cut in halves. Cut poblano peppers in half remove the green veins, and seeds. In a blender add the tomatillos, poblano peppers, the other ½ onion, 3-4 garlic cloves, the other ½ bunch cilantro, salt, 2-3 serrano peppers. Add one serrano at a time and taste in between blending so you can measure how spicy it is. The serranos in this recipe are used to add flavor not spice, they act like black pepper. Add a little of the chicken broth from the pot to help blend all this. Blend until is pureed.
5. On a large deep pot add 1 tablespoon sunflower oil until oil is hot. Add the tomatillo blended sauce to the oil and cook for 5 minutes (careful it will splatter). Now that the sauce is sautéed, add the 8 cups of chicken stock, along with corn kernels. Bring to a slow simmer. Cook for about 25-35 minutes.The broth will change color from emerald green to a bright sage green. At this point taste to adjust for salt. Add your shredded chicken to warm through.
7. Serve piping hot and garnish with shredded lettuce, chopped onions, slices of radishes, squeeze of lime and a dollop of crema. Enjoy!
Recipes, Cooking & Art Direction: Mariana Nuño Ruiz McEnroe | Photography: Ian McEnroe |
Published: January 6, 2014
One of the dishes that can be found in almost every culture is chicken soup. Chicken dumplings, Chicken noodle soup, Mexican Caldo de Pollo, Avgolemeno (Greek) , Penicillin (Jewish), Kerala (Indian), French using aromatics and herbs, German creamy chicken and potato soup. You name it, Chicken soup is the queen of soups.
Vietnamese cuisine features one favorite chicken soup, Pho Ga Vietnamese Chicken Noodle Soup . This cosmic broth can bring the use of all your tastebuds at once. There are two styles of this soup; Pho from Hanoi- phở bắc or “Northern Pho” and Saigon Pho-phở Sài Gòn from the south, both have two ingredient variations. Pho Ga (Chicken), Pho Bo (Beef).
Hanoi Pho uses a wider noodle, lots of green onions, vinegar and spicy chilies to garnish the dish. Saigon Pho uses a thinner noodle. The broth has lots of aromatics and slightly sweeter taste. For garnish they use a wide variety of fresh herbs, soy bean sprouts, lime, and chilli “rooster sauce” (Sriracha).
Saigon style is the one I’m more familiar with. I’ve made a little variations on this recipe. Usually Chicken Pho “Pho Ga”is served with a clear broth flavored with charred onion, ginger, and coriander seeds. While the Beef version “Pho Bo” the broth has notes of cinnamon, cardamom, star anise, and of course the flavor of roasted bones intensify the broth.
I added a few more notes to my chicken broth to accent the chicken flavor and give a little more depth of flavor. I hope you enjoy it. I think it is a fantastic dish, light and great for January with its cold weather. This would be a good recipe for a weekend since it requires a couple of hours worth of preparation and cooking. Now with all the big holiday dinner parties and big calorie dishes gone, I’m craving lighter dishes with a punch of flavor and fresh herbs or vegetables, Pho Ga Vietnamese Chicken Noodle Soup is my cosmic route.
Pho Ga Vietnamese Chicken Noodle Soup
~Saigon Style~
Serves 4-vietnamese portions
For the Broth:
1 ½ medium large yellow onion
1-2 fresh ginger arms about 3 inches long (choose the plumper ones.)
1 whole chicken 3.5-4 lbs. (2-2.5 Kg)
2-3 lbs. extra chicken parts like wings, backbones, neck or any other bony chicken parts.
(if you do not have the time or prefer the short route you can buy no-salt or low sodium organic chicken stock, you will need about 32 oz which equals 1 quart jug of stock)
I cook organic chickens which I purchase locally from the good folks of Smith & Smith farms:
smithandsmithfarms.webs.com
4 quarts of water
5-7 star anise (around 30-35 picks)
10-12 cardamom pods
4-6 cloves
1 tablespoon Coriander seeds
2 sticks Saigon cinnamon
½ teaspoon whole black pepper
2 tablespoons turbinado sugar
1/4-1/2 cup fish sauce (I like this kind)
1-1/2 tablespoons sea salt
1 piece of cheese cloth and cotton string or a large tea ball.
For the Bowls:
1 1/2–2 pounds small flat rice noodles (bánh phở), dry or fresh
Cooked chicken, sliced or shredded at room temperature
1/2 yellow onion, sliced paper-thin, rinsed in cold water, soaked for 30 minutes and drained
or 1 shallot thinly sliced.
4 to 6 scallions, thinly chopped include greens
1/3 cup chopped fresh cilantro, leafy tops only
To Garnish:
4 cups soy bean sprouts
10 to 12 sprigs mint
10 to 12 sprigs Thai basil (if is not in season you can use regular)
12 to 15 fresh culantro leaves
2 or 3 Thai, serrano or jalapeño chiles, thinly sliced
2 or 3 limes, cut into wedges
“Rooster sauce”- Sriracha.
Method:
1. Rinse the ginger pieces with the skin on and cut the onions in half leaving the skins on. Place them in a cast iron pan and roast them in the oven at 450F/230C for about 15-20 minutes. Broil them for 2-3 minutes to charred the outside. If you have a gas stove, use direct flame until well charred. Set aside to cool them and peel and remove the ginger and onion skins.
2. Toast your spices, star anise, coriander, cinnamon sticks, cloves, cardamom pods, pepper until they start to release their aromas. Using a piece of cheese cloth, a linen bag or a large tea ball, make a pouch and attach this to the pot making sure the bag is immerse in the water.
3. Rinse chicken inside and out roughly with warm water. Pat it dry. In a large pot add 4 quarts water.
Add your chicken and let it simmer for 15 minutes. Clean and remove the foam that forms on the top constantly until it no longer forms .This will ensure you to have a nice clear broth. At this point add the pouch of spices, the charred onion and ginger, add sugar and fish sauce,
4. If you are using the extra chicken parts, par boil them in a separate pot for about 15 minutes. At this point toss the water, rinse the chicken parts and add them to the main pot along with the whole chicken. Bring to a slow simmer and simmer uncovered for about 25 minutes. Using a ladle remove any extra foam that might form from the chicken broth. Once that the broth is cleared, cover and simmer for at least 15more minutes.
5. Short Alternative: There are a lot of good quality organic chicken broths available at the super markets. If you prefer to use something already made my only suggestion would be to buy organic and no-salt added or low sodium so you can control the amount of salt in your broth If you are using this route , just add the 32oz. jug of chicken broth to the main chicken and water pot. Bring to a slow simmer with the whole chicken, the pouch of spices, the charred onions and ginger. Simmer uncovered for about 25 minutes. Using a ladle remove any extra foam that might form from the chicken broth. Once that the broth is cleared, cover and simmer for at least 15 more minutes.
6. At this point, the chicken is cooked it should feel firm and juicy. Use a pair of tongs to grab the chicken and transfer it to a large bowl. Rinse the chicken with cold water and drain well. Cover and set aside for 15 to 20 minutes until it is cool enough to handle. Meanwhile, keep the broth at a steady simmer.
7. When the chicken is cool enough to handle remove all the breast meat, leg and thighs keep the flesh in big pieces so it does not dry out, cover with plastic wrap, refrigerate. And remember to bring it to room temperature before assembling your noodle bowl.
8. Return carcass and all other attached parts to the stock pot and keeping in it under slow simmer. Cook the broth for at least one more hour. Adjust salt.
9. Strain the broth through a fine mesh sieve, discard the solids. Use a ladle to skim the broth if it has to much extra fat. Usually if you are using an organic chicken the fat content is way lower than chickens that had been in a faster grow diet. That’s why I will 100% recommend you to use an organic chicken which have less fat and stellar flavor! Return the broth to the stock pot and keep it at a slow simmer. At this point you should have about 4qts to 16 cups of broth left.
The broth should look translucent amber color, glistening and a bit saltier to compensate and balance the saltiness when you add the noodles.
10. Slice, chop, rise and dry your herbs and garnishes, place them in little side dishes on the table so everybody can customize their soup.
Assembling the Pho Bowls:
1. For dried noodles: cover them with hot tap water and let soak for 15 to 20 minutes, or until they are pliable and opaque. Drain in a colander.
For fresh rice noodles: untangle them, place in a colander, and rinse briefly under cold running water.
2. Slice or shred the chicken removing the meat from the leg bones, remove the skin. Set aside.
3. Warm your bowls in the oven at a low temperature make sure your bowls are oven safe. This is an extra step, but very important if its cold and you want your soup to stay warm longer when its served. I love my white authentic ceramic pho bowls they keep my soup warm!
4. In a large pot bring enough water to a boil and blanch your noodles. Strain them in a colander. And serve immediately into the bowls. (For best results follow the directions on the package. The key point is to leave them al-dente they will keep cooking in the broth when served.)
5. In a warm bowl place the blanched, strained, noodles, top with slices of chicken, sprinkle some green onions, finely sliced yellow onions or shallots, crack some fresh pepper. Add 2-3 ladles of the simmering hot broth or until the broth covers the noodles. Serve immediately and top with the extra garnishes at the table. Enjoy!!!
Recipes, Cooking & Art Direction: Mariana Nuño Ruiz McEnroe | Photography: Ian McEnroe |
Published: December 3, 2013
In this global world we are living, what is authentic anyway?…
I think as I get to know more people from different backgrounds, cities, expatriates, cultures, beliefs, culinary eccentrics, purist, creators; the more I conclude that authenticity is not a place, a language, a heritage, a culture, or a belief.
I think authenticity comes from within. Who you are at this right moment, in this place and at this time; and the one that you want to become…. that’s authenticity for me.
It reminds me of a monolog phrase in the movie “All about my mother” from Almodovar’s
and one of the characters in the movie quotes the following:
“… because you are more authentic the more you resemble what you’ve dreamed of being” – “La Agrado’s” monologue (All About My Mother) Almodovar.
And you are wondering what does this has to do with tortilla soup?,
In the culinary world, I’ve always questioned myself about what is considered an authentic dish? Perhaps it is the dish that resembles more to the people who created it?
For example, If you are from Mexico; is the soup that your grandma prepares more authentic, than my grandma’s soup?.. No, I really don’t think so.
I believe you embrace the flavors that make you happy and satisfy, that make you re- create a memory a flavor, an aroma and you create the soup you want to eat and share with your loved ones… It will be hard to imagine Mexican grandmas cooking for the authenticity sake! I believe you can cook along the way with tradition and make it your own with a few touches.
In this Chicken Tortilla Soup, I wanted to evoke the aromas, textures, flavors, freshness, from the cooking style in Guadalajara, Jalisco the city I’m originally from. This soup re-creates a little memory of my home city, easy on the condiments and full of flavor…
I hope you like the soup as much as I do. So let’s cook!. Enjoy.
Chicken Tortilla Soup “Mariana Style”
Serves 4-6
For the chicken stock:
1 whole chicken 3.5-4 lbs. I’m in love with the chickens from Smith & Smith Farms
1 medium size with onion
2 carrots
2 celery stalks
1 roma tomato
1 head of garlic
3-4 sprigs of thyme
2-3 sprigs of fresh oregano
1 teaspoon dry epazote or mint
1 tablespoon of salt
1/4 teaspoon black pepper
2 ears of corn- cut the corn of the cob
(my preference is white corn if I can find it, but yellow is ok too)
For the sauce:
2-3 dry Pasilla chiles slightly toasted
4-6 dry Guajillo chiles slightly toasted
1-2 dry Arbol Chiles slightly toasted
4 Roma tomatoes
¼ piece of onion
1 garlic clove
4 tablespoons of corn or sunflower Oil
Salt and pepper.
4-5 cups Chicken stock previously made… or the best option you have available.
Garnish with
8-10 Corn Tortillas cut into 1/2-1/4” wide strips.
½ to ¾ cup Canola Oil
1 ripe avocado, cut in slices or cubes
1 cup queso fresco crumbled
½ cup Mexican style crema or Creme fraiche
½ cup diced onion
2-3 Limes
2-4 dry Arbol Chiles toasted with a little bit of oil, until they look dark. (see photo below)
Preparation:
1. Start by preparing your chicken stock on a 7-8 qt pot. Place the whole chicken and add all the stock ingredients, add water enough to cover the chicken. Bring to boil and then lower down the heat to a slow simmer cover with a lid and cook for about 45 minutes.
2. Mean time slightly toast your chillies on a pan, small comal or cast iron pan.
3. In a small pot boil the toasted chillies and the tomatoes.
4. Once they are soft, place the chillies, tomatoes, onion & garlic into a blender or food processor and puree.
5. Using a strainer, strain the chilli puree to eliminate the seeds and pieces of skin. (see picture below)
6. Cut and Fry the tortilla strips. Once fried place them on a plate with a paper towel to remove the oil excess. Sprinkle with salt while they’re warm.
7. Check on your chicken stock, the broth should look translucent, no foam on the top, vegetables soft and onion translucent, chicken fork tender. If it is done remove at least 4 cups of chicken stock and strain. Take out the chicken, place it on a bowl and cover with some aluminum foil wait a bit until ready to handle, remove the skin and shred the chicken.
I usually use about ½ a chicken to serve 4. you can save the rest for tomorrow’s enchiladas…hehehe
8. In a medium size pot add 4 tablespoon of canola, or sunflower oil, once is rippling hot add your chilli-tomato puree, and cook the sauce in medium low for about 4-5 minutes.
9. Add chicken stock, and corn kernels season with salt and simmer for about 10-15 minutes.
10. Taste the soup for salt and paper.
11. Chop and prepare your garnishes
12. Serve on a deep bowl place the shredded chicken 2 to 3 ladles of the chilli broth place a good handful of the fried tortilla strips, and garnish with the cream, crumble cheese, avocados, and some of the chile de arbol fresh or toasted with a little oil for more heat.
ENJOY!!!
I’m in love with the chickens from Smith & Smith Farms, it is a small family operated farm, they specialize in pasture raised meats that are hormone and antibiotic free. They raise Dorper Lambs, all different breeds of laying hens, Cornish Rock meat chickens, Red wattle hogs, and Broad Breasted White Turkeys. All of the animals on their farm are free range and roam around every where! They are all as happy as can be, and you can taste the happines when you cook them. Delicious!
Recipes, Cooking & Art Direction: Mariana Nuño Ruiz McEnroe | Photography: Ian McEnroe |
Published: November 15, 2013
Have you ever tried hibiscus?… hibiscus is a flower from a tall plant that when dried makes the most fabulous aromatic and vitamin C loaded tea or cold beverage. It is one of my favorite ingredients.
I’m from Mexico and Hibiscus is called “Jamaica” and it is pronounced Ha-my-cah, not to get it confused with the Island. Hibiscus is used in many different preparations, the most common is to prepare “agua fresca”flavored water. Jamaica it is very floral and refreshing, its our natural instant beverage.
It is also used in candy making in Mexico on the Chapala Lake Riviera, in Jalisco. There they make delicious sweet and tart hard candy pieces. If I was to describe the hibiscus flavor, it resembles a little to cranberry. The difference: Hibiscus has this floral notes that makes it so remarkable.
I was thinking of a little spin on Thanksgiving for people who find cranberry too tart so I thought of Jamaica. Then, what to do besides agua fresca and candy? Chutney?.. no… Glaze!
Oh yes I experimented last week glazing some Cornish Hens and it tastes delicious. My original thought was to glaze some quail, but I look for a good source of quail here in Austin and I was with out luck… so I cooked Cornish Hens…and what a treat!
The results?… Well you have to try it. It’s floral, tart, sweet and I added a hint of orange zest, and ancho powder to give a little spicy kick….Ian loved it!.. and yes I liked it too.. I definitely want to share the recipe with you, let me know what you think!
Try it with Quail if you or some soul around reading this can find some. I think it will be wonderful and if not it’s great on Cornish Hen! And if you are already a Hibiscus Lover, try our recipe Martini dos Flores… you will fall in love with it! https://yes-moreplease.com/2013/08/martini-dos-flores/
Hibiscus-Orange Glazed Cornish Hens
Serves 2-4
2 cornish Hens, about 18 to 22 oz each
4 sage leaves
4 bay leaf Sea salt and black pepper
Directions:
To roast the perfect cornish hens, I always follow the following steps:
1. Bring the Cornish Hens to room temperature. Take them out of the refrigerator at least 30 minutes before start cooking. 2. Preheat the Oven at 450 F/ 232 C – cook at 425 F/ 218 C 3. Using paper towels pat dry the hens. Salt, pepper and add 2 bay leaves and 2 sage leaves to each bird cavity. 4. Truss the birds, ensuring legs are tight and the tips of wings are behind the body just like if the bird is taking a nap in the sun. Trussing the Cornish Hens make a more even mass, so they cook more evenly. 5. Place them on a baking sheet or a heavy bottom roasting pan and roast for 30-25 minutes until a meat thermometer, inserted in between the breast and thigh reads 165 F/ 70 C anf juices run clear. 0While the hens are in the oven, make the glaze.
Hibiscus-Orange Glaze
The first time I made this dish I tried to make the glaze using the Cornish Hens drippings from the pan and de-glaze de pan like when you are making a gravy. I did not like this, the delicate floral flavors from the hibiscus were masked by the chicken fat so I made the glaze separate to keep the floral notes alive.
1 cup dry Hibiscus flowers
the zest of ½ medium size valencia orange
½ cone piloncillo, grated
1 aromatic clove
1 chile de arbol
1 teaspoon ancho powder
4-6 sprigs of thyme
1 tablespoon of butter
pinch of sea salt
Directions:
Steep 1 cup dry hibiscus flowers in about 1 ½ cups of simmering water for about 8-10 minutes.
In a small sauce pan add the concentrated hibiscus tea, piloncillo, clove, chile de arbol, ancho chili powder, orange zest, and thyme. Bring to a slow simmer, simmer for 4-6 minutes.
Remove the sprigs of thyme clove and chilies. Bring the glaze to a rapid simmer stir constantly, until the glaze is reduced by half. Check the consistency by dipping a spoon into the glaze and running your finger tip across. If the line stays put, your glaze is ready (see picture below). At this point add 1 tablespoon of butter until melted and well incorporated, set aside.
Check cornish Hens at 35 minutes. If the thermometer reads 160F/70C start glazing.
Use a pastry brush or a rubber brush to varnish them. Apply 1 coat and keep baking for about 2 minutes, apply 2 or 3 glaze coats in total. If necessary turn on the broil on the oven and broil for 1 minute for a shiny glaze finish.7. Check temperature until reads 165F/74C and juices run clear.
Remove from the oven and let them rest for 10-12 minutes before serving.
Serve over a bed of herbed farro or buttery rice, recipe follows…
Quick herb-orange farro
Serves 2
½ cup farro perlato
2 cups water or chicken stock
¼ cup finely chopped parsley
1 teaspoon orange zest
1 tablespoon butter (or you can use some of the chicken fat from the roasting pan)
salt & pepper to taste.
In a small sauce pan, bring water to boil and add farro. Reduce heat to a low simmer.
Cook for about 20-25 minutes. Check for doneness. It usually takes 30-35 to be al dente,
at this point add butter, chopped parsley, orange zest, salt and pepper. Toss well, remove from heat and cover with a lid for 5 minutes. Serve warm. Note: I love farro done this way, I like it a little al dente, not too mushy, and I like to add the herbs, at the end to keep the flavors fresh and colors vibrant.


 One of the dishes that can be found in almost every culture is chicken soup. Chicken dumplings, Chicken noodle soup, Mexican Caldo de Pollo, Avgolemeno (Greek) , Penicillin (Jewish), Kerala (Indian), French using aromatics and herbs, German creamy chicken and potato soup. You name it, Chicken soup is the queen of soups.


 I’m in love with the chickens from Smith & Smith Farms, it is a small family operated farm, they specialize in pasture raised meats that are hormone and antibiotic free. They raise Dorper Lambs, all different breeds of laying hens, Cornish Rock meat chickens, Red wattle hogs, and Broad Breasted White Turkeys. All of the animals on their farm are free range and roam around every where! They are all as happy as can be, and you can taste the happines when you cook them. Delicious!


