Recipes, Cooking & Art Direction: Mariana Nuño Ruiz McEnroe | Photography: Ian McEnroe |
Published: April 29, 2015
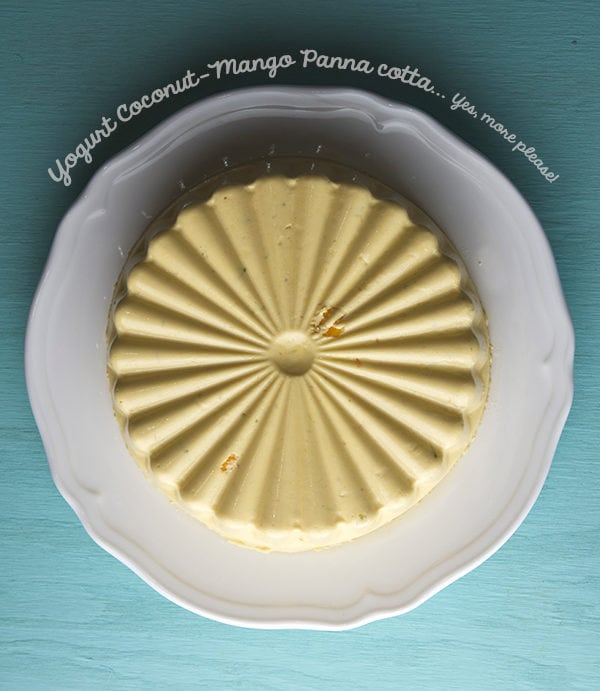
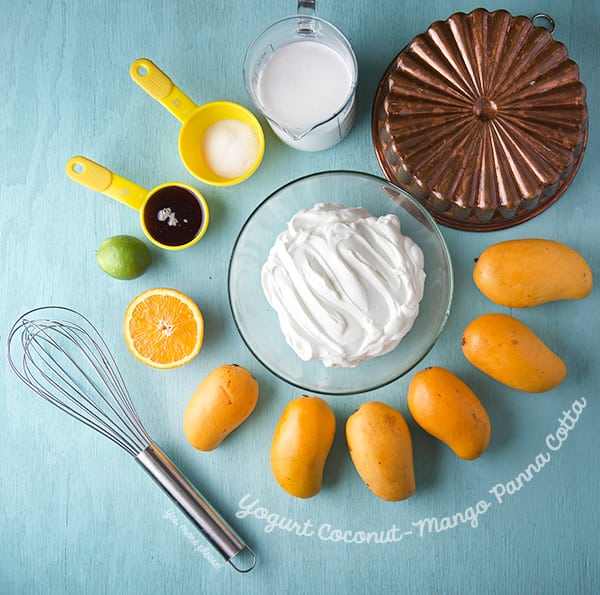
This dessert is just perfect if you want to incorporate delicious fresh fruit with a creamy luscious texture. The yogurt mixture includes a bit of gelatin without getting the kitschy translucent rainbow colors molded dessert from the 50’s. Instead, you get a custard-like creamy consistency that is delicately sweet and tastes mainly of …fruit!
The yogurt adds a pleasant acid note, in contrast with the creamy coconut milk and sweet pulp from the mangos.Mmmm, definitely a guiltless pleasure…
This recipe is also a cinch to prepare if you are pressed for time and you have a small party or family dinner, make it the night before in less than 30 minutes, refrigerate and next day is ready to serve. This Pana Cotta will be ready in approx 3 hours if kept in a good chill area in the fridge. Find an interesting mold (mine came from Goodwill, next to the sad wicker baskets from Thanksgivings past) a little whimsical shape it’s always appealing to the eye.
Toppings like honey or Agave nectar let you control the sweet sugary qualities so you can tune it to your tastes. In season soft fruit of any kind will be great substitutions like berries, stone fruit, like peaches and nectarines. Other good tropical options like pineapple will be fantastic.
This Creamy Yogurt Coconut-Mango Panna Cotta will win over any dessert hold-outs! Call it Panna Cotta, call it Jello whatever rocks your boat…Enjoy this delicious recipe for a fruity and creamy dessert…
Recipes, Cooking & Art Direction: Mariana Nuño Ruiz McEnroe | Photography: Ian McEnroe |
Published: October 28, 2014
“With an apple I will astonish Paris.”
~ Paul Cezanne ~
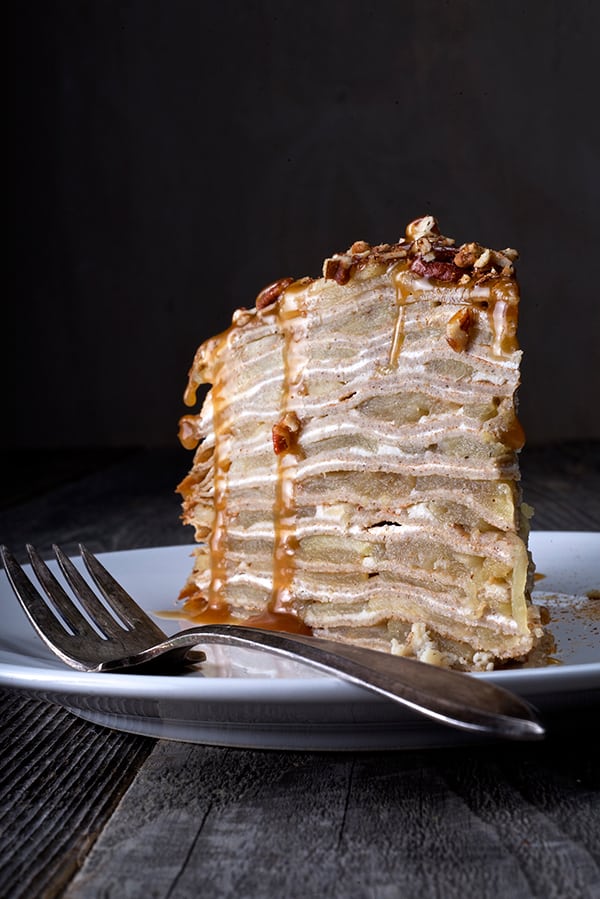
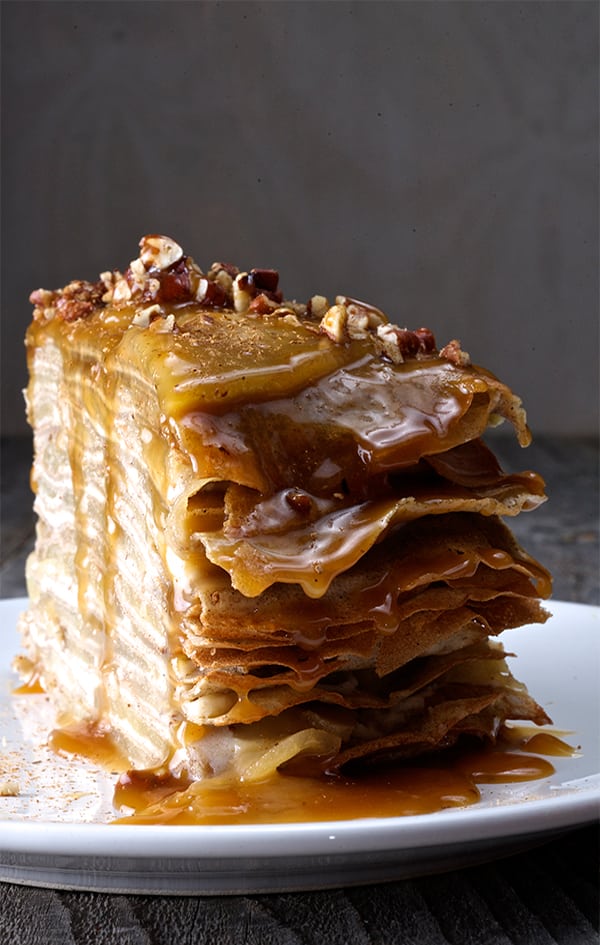
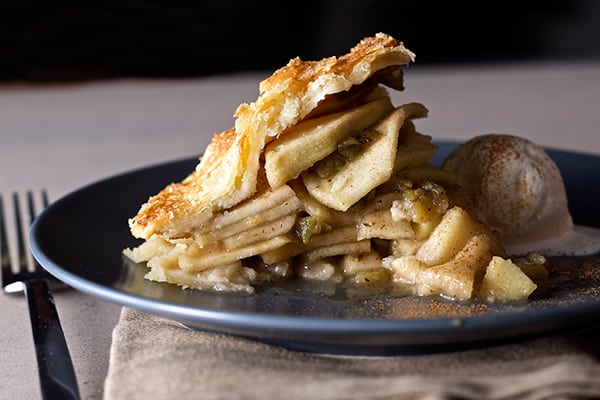
This cake is for the person who loves to cook and who enjoys the process of creating, and building something from scratch; layering flavors, textures, and aromas. This cake taught me patience. From the conception, to the making I learned all the way. I learned that fast and easy are not always worth it. I was reminded of the “virtuous” character of patience. We can use it when we desire the outcome we imagine. To enjoy making this cake, reserve time, and relax. There is something about craftsmanship in this recipe that I love, especially the gratification of assembling the components. The results of such efforts are worth every step.
Time, and patience are the main ingredients. Apples, buckwheat flour ,butter and apple cider are the witnesses to the madness. The smells are insane once you start to cook; peeling the green apples, that crisp sweetness from breaking the skins, to the nutty and buttery aromas that fill the kitchen with a warm cloud when making the buckwheat crepes.
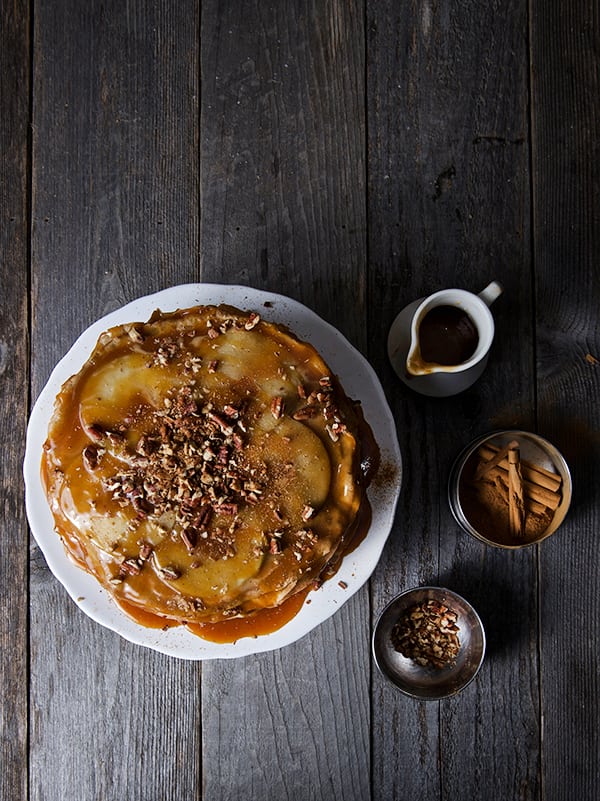
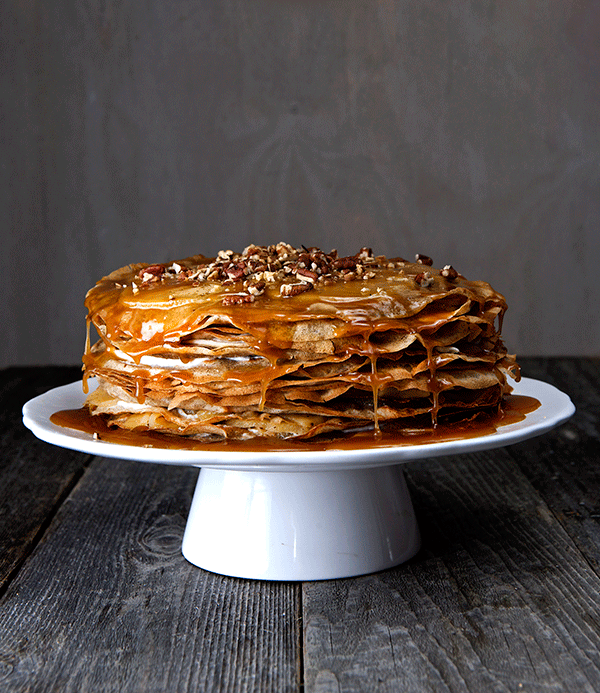
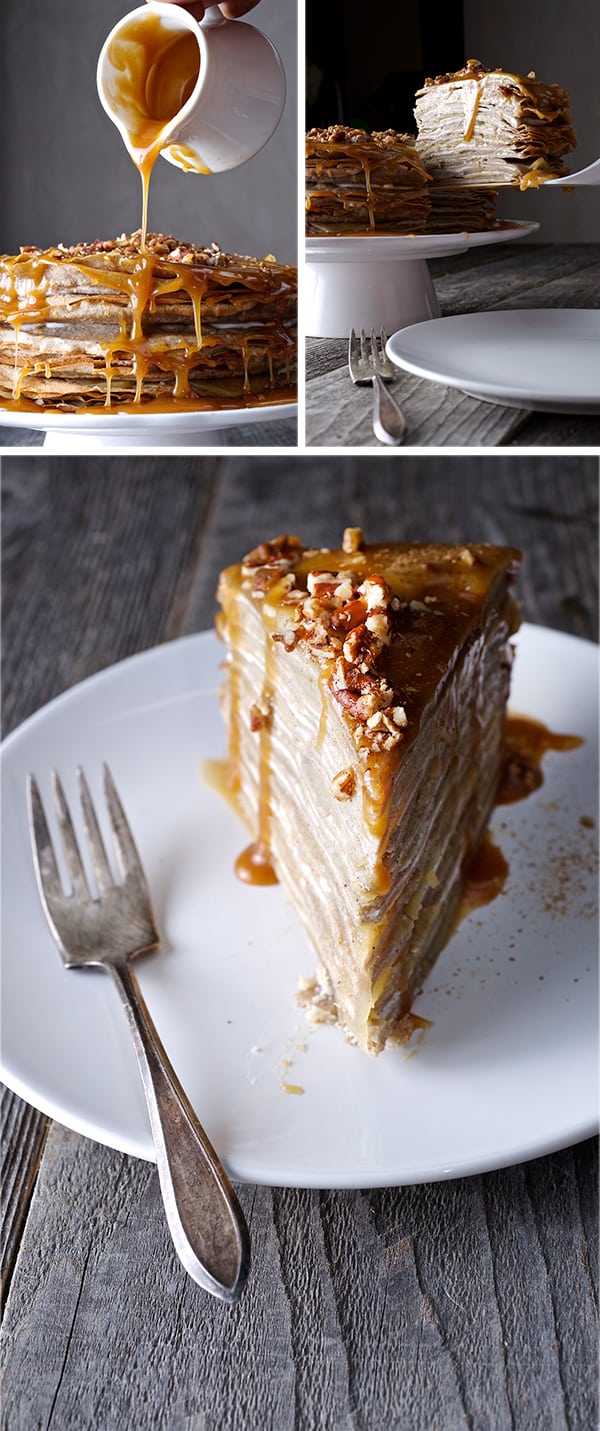
Imagine 26 soft silky layers of light, thin, buttery and nutty buckwheat crepes carefully layered with thinly sliced tart green apples sautéed with cinnamon and honey, mascarpone cinnamon cheese spread between layers. Add toasted pecans and a tipsy cider caramel sauce that sinuously hangs from the crispy feathery crêpe edges…This is the ultimate tribute to the apple and buckwheat love affair.
When you cut the first slice of this cake, your work shows, it makes you feel like a better person and all that patience and love invested in the creation it is absolutely worth it for a slice of this cake.
Fifty percent apples plus cheese and a bit of flour make it almost guiltless and mildly sweet, do not get the appearance trick you.
If you want to enjoy an apple cake this season, something memorable, and not so overly sweet, Apple Buckwheat Crepe Cake with Cider Caramel Sauce is the dessert you been waiting for.
Make time for this love affair and prepare to astonish.
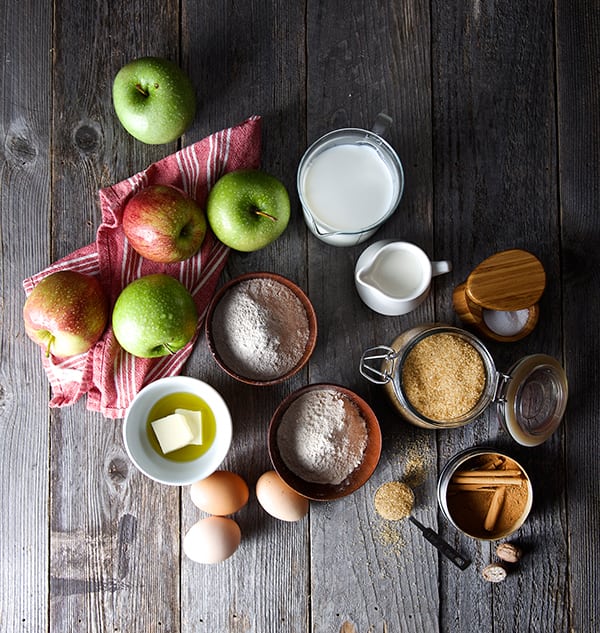
Apple Buckwheat Crepe Cake with Cider Caramel Sauce
Serves 8-10
For the Crepes:
11/2 cups buckwheat flour
½ cup unbleached all-purpose flour
1 ½ tablespoons turbinado sugar or agave nectar.
¾ teaspoon fine salt
1 pinch of cinnamon
3 cups of milk
4 Large eggs
3 tablespoons of melted butter
2 tablespoons mild extra virgin olive oil
Plus about 3 more tablespoons of butter to cook the crepes.
1 – 8” non-stick pan
1 Ice cream scooper
1 baking sheet or cookie sheet tray
For the Apples:
7 medium size green tart Granny smith apples*
3 medium size Braeburn apples*
½ cup honey
1/2 cup turbinado sugar
½ teaspoon salt
1 tablespoon cinnamon
¼ teaspoon nutmeg
1 teaspoon lemon juice
¼ teaspoon lemon zest
2 tablespoons butter
2 teaspoons cornstarch
¼ cup apple cider
Note: I’m combining two different types of apples, green tart wich are super crisp and hold their texture when sautéed, and the Braeburn wich are sweet and fragrant and wich also hold their texture when they are cooked. Once balance the others, I did not wanted to use a lot of sugar, since the cake will be drizzled with a cider caramel sauce. My advice is please, taste your apples: If they are to sweet or two tart you might need to add more sugar or honey is up to your preference and your sweet tooth.
For the Mascarpone filling:
2 cups mascarpone cheese
¼ cup honey
½ teaspoon cinnamon
For the Apple Cider Caramel Sauce:
2 cups apple cider
½ cup turbinado sugar
¼ cup honey
4 tablespoons butter
1 cup heavy cream
1/4 cup calvados.
1/2 cup roughly chopped toasted pecans.
Directions:
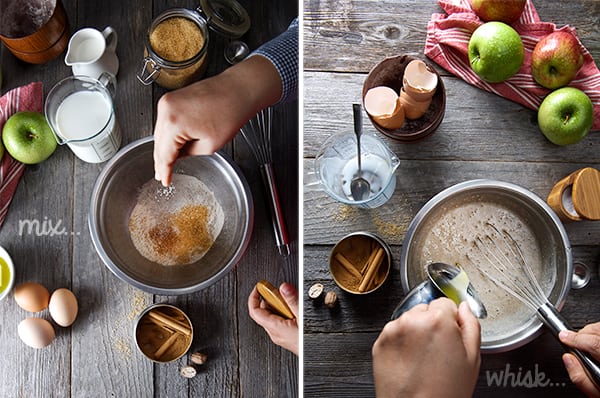
1. Start by preparing your Crepe batter. Combine all dry ingredients, Combine all wet ingredients and add them little by little to the dy ingredients whisking throughly until well combined and no lumps. Cover your batter with plastic wrap, making sure the plastic is touching the mixture, to avoid a skin to form. Refrigerate for at least 1 hour. You can make it the night before or in the morning and make the crepes at night. The batter will keep for about 48 hours.
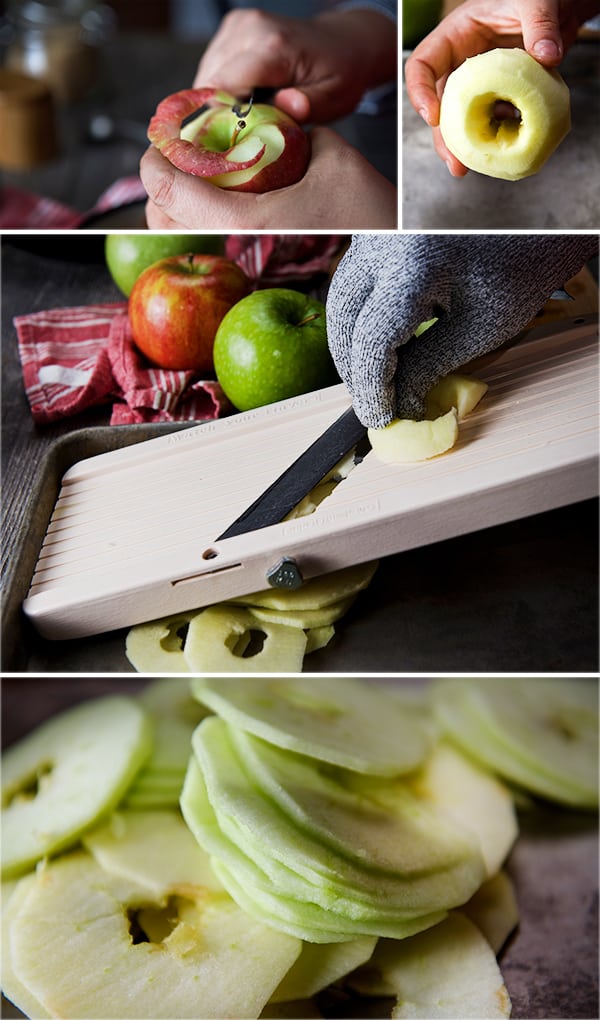
2. Mean time your crêpe batter is resting, prepare your apples. Peel them, core them as you peel and core them place the apples on a bowl with water and lemon juice to prevent the apples turning brown. Slice the apples about an 1/8 inch thin using a mandolin or the food processor. When using a mandolin, I always use a metal mesh glove, it is safe and comfortable when slicing, than the plastic apparatus that come with the mandolin set.
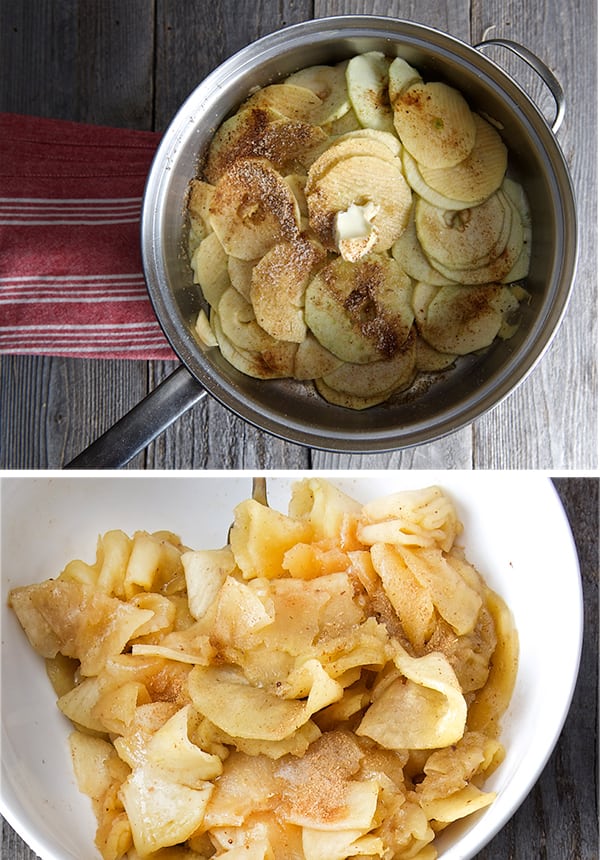
3. Place them on a bowl and toss them with the honey, sugar, salt cinnamon, nutmeg, lemon juice lemon zest. On a large pot over medium high heat melt the butter and add the tossed apples. Mix the cold apple cider with the cornstarch to avoid lumps, and add to the apples. Saute the apples tossing gently for about 6-7 minutes until they are tender, but not mushy, they have a glistening light brown color the juices are reduced. Taste for sweetness, add more sugar if needed. Set aside, to allow to cool. Reserve some of the best looking round slices to decorate the top layer.
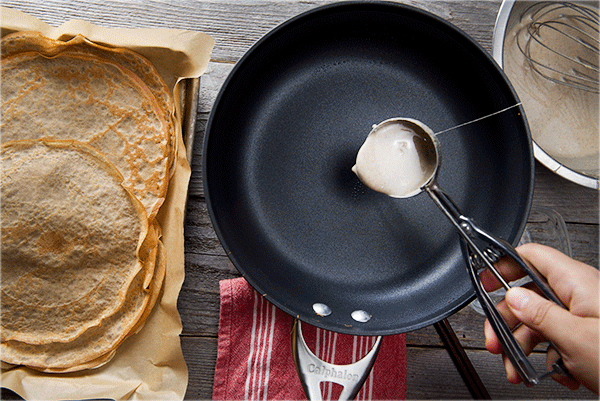
3. Once your batter has rested, pull it out f the refrigerator and allow to come to room temperature, whisk a little and start preparing to make the crepes. Pre-heat your 8” nonstick pan over medium heat. Add a little dab of butter until melted and remove excess with a folded paper towel. Poor about 1.5 to 2 ounces of batter into the center of the pan immediately swirl the pan all around to spread the batter on an evenly coat that covers all the bottom of the pan. Cook for about 30 seconds until the edges start releasing when you pull them with the help of a spatula. At this point flip. And cook for another 10 to 15 seconds, transfer to the baking sheet, lay them out flat and allow them to cool. Continue with the same procedure, using the buttered paper towel in between crepes works great, you do not have to add butter every time to the pan, a small coat from the napkin will do it. Continue until your batter is gone.
Tips and Notes to the crêpe maker: – I use an Ice cream scooper to portion the batter, this allow me to have equal thickness every time. a small ladle will work too. -The first crêpe is not always the prettiest, usually is the test drive; it allows you to adjust the temperature in your pan and rectify the heat. – If this is your first time making crepes please do not get discouraged, it gets better as you go. Once you get the groove on it is fun and the smell on your kitchen is heavenly!
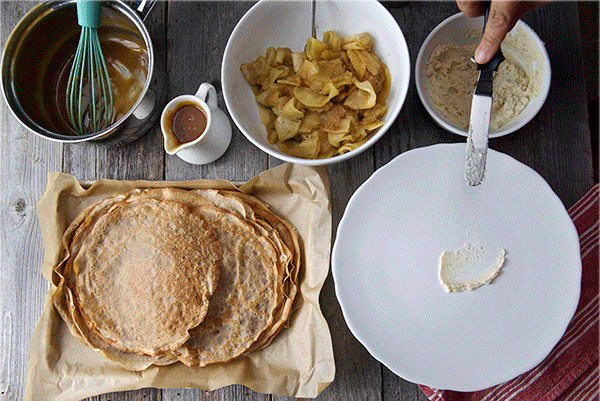
4. Once you finish making all the crepes, allow them to cool, and make your mascarpone filling. Combine all the ingredients in a small bowl and whip them for 2-3 minutes with a hand blender until smooth and well combined. 5. Now that you have all the components start assembling, on a flat platter or a cake stand, place a dollop of the cheese and place your first crêpe, arrange a single even layer of the sautéed apples unfolding the slices if tangled, then add a crêpe, then a thin layer of mascarpone cheese, apples. Between, crêpe and crêpe, gently press to ensure you have even layers. Continue until you are done with the crepes and filling, ending with a crêpe. Cover the cake with some plastic wrap and place it in the refrigerator for 30 minutes so the layers can set. Mean time make the caramel sauce.
6. On a small heavy bottom pot, add the apple cider, sugar, honey and butter. Bring to a rapid simmer, you want o evaporate as much water on the sauce. This will take around 15-20 minutes until reduced by half. You will see the formation of big bubbles, and the consistency of the sauce is thicker it resembles more like a syrup.
At this point add the heavy cream whisking at all times, until all is incorporated. Add the Calvados and let it simmer for another 10-15 minutes until the consistency of a caramel sauce. Remove sauce from heat. And transfer into a small poring jar. Allow to cool before drizzling on the cake.
7. Pull the cake out of the refrigerator, place the reserved pretty slices of sautéed apples and decorate the top, once the caramel has cool down a little, pour some of the caramel sauce all over the cake drizzle all edges and sprinkle with the toasted pecans. 8. Make sure you reserve at least half of the sauce to drizzle some extra when the cake is served. Enjoy.
Apple Buckwheat Crepe Cake
with Cider Caramel Sauce
Music Pairing: Erik Satie – The Essential Collection
Recipes, Cooking & Art Direction: Mariana Nuño Ruiz McEnroe | Photography: Ian McEnroe |
Published: September 27, 2014
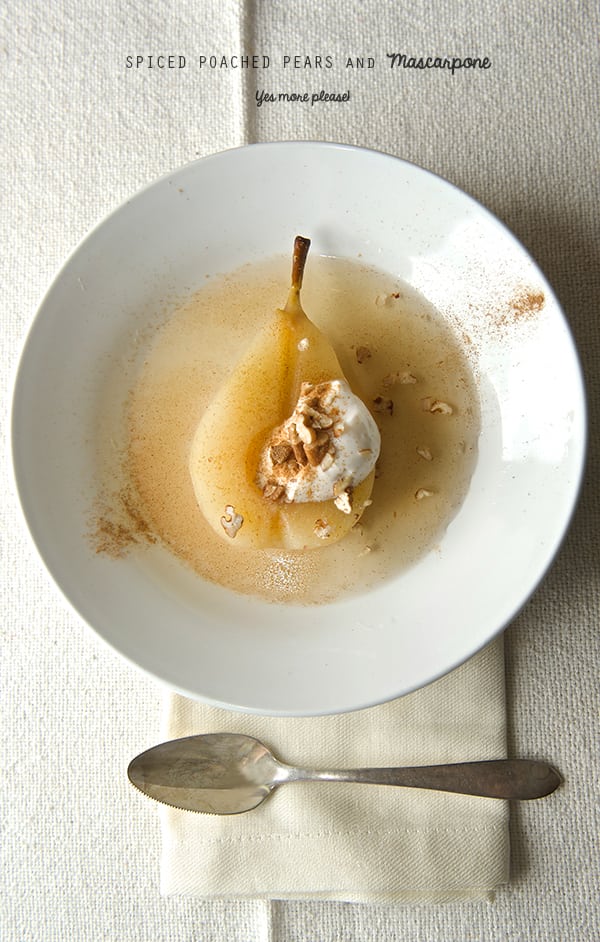
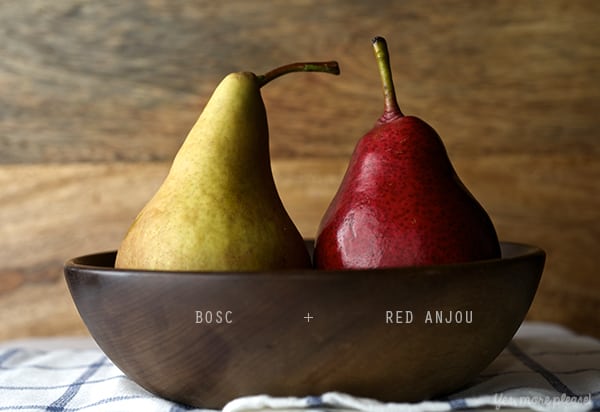
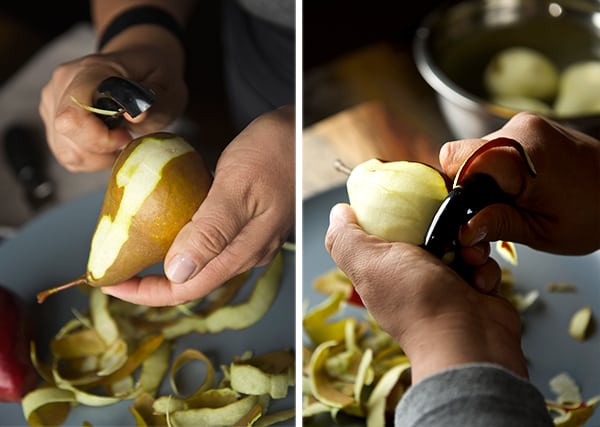
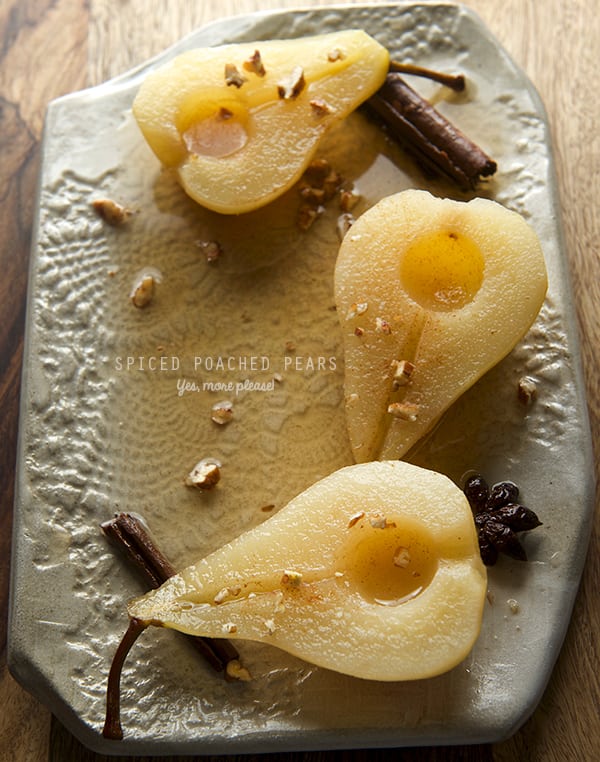
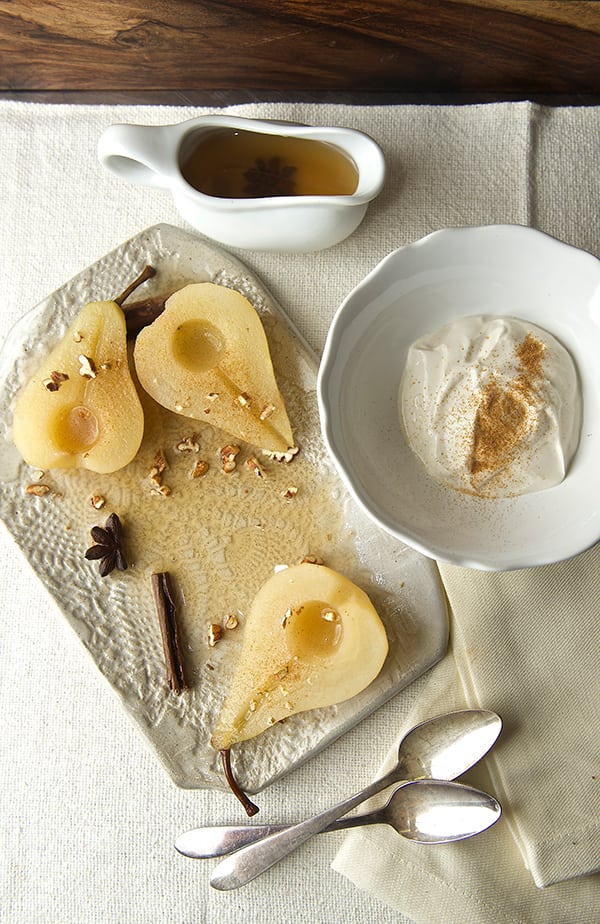
Stone fruits are in season, I found beautiful pears at the market, Bosc and Red Anjou. I will describe the Red Anjou pears as aromatic, juicy, fresh and sweet: while the Bosc pears are crisp, woodsy and have a honey-sweet light flavor.
I could not decide which ones to bring home for this recipe…so I used both and the characteristics of each pear gave a great flavor to this simple recipe. Poached pears sounds so boring right? A dessert out of the 70’s…well its not and done right and with aromatics and the right cooking method its a great fruit dessert, the perfect end to a rich dinner like Thanksgiving… Or just for a simple treat on a rainy day…
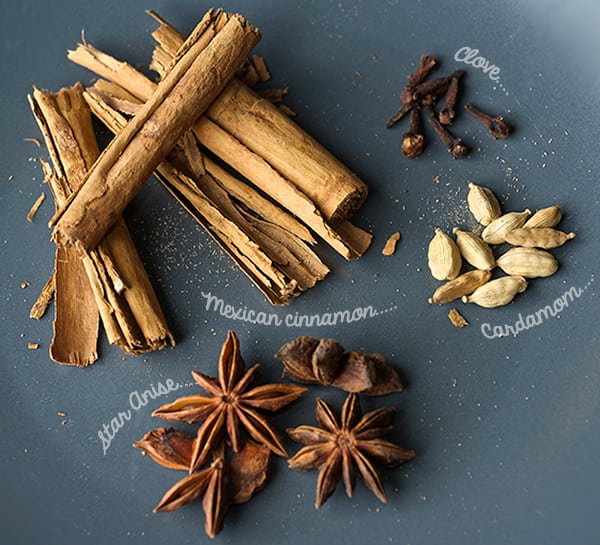
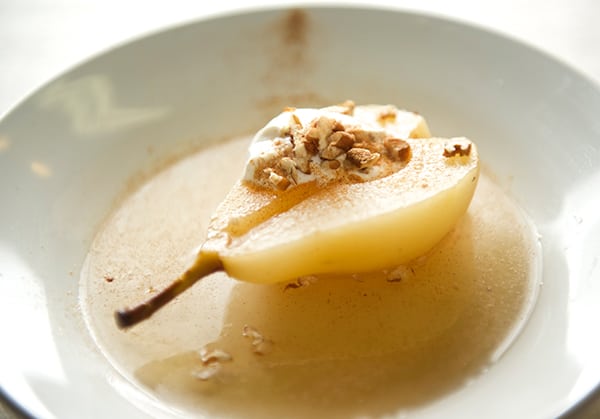
The rum and the spices add warmth and great flavor to the light syrup, which is not overly sweet. The alcohol evaporates leaving all the good woodsy rum flavors in the fruit. A little dollop of whipped mascarpone cheese and honey add the perfect creamy balance that makes these spiced poached pears irresistible.
This is one of those recipes with plenty of freedom for adjustment, and have the certainty that its gonna come out great. I like the light flavors and the delicate pear flavor is the star of the show. One of the best parts when you are cooking this recipe is the smell that your house is infused with…*sigh*..
Enjoy!
Spiced Poached Pears
Serves 6
3 Red Anjou Pears peeled, halved, removed the seeds and steam. 3 Bosc Pears peeled, halved, removed the seeds and steam. 4 cups water ½ to 3/4 cup spiced rum…up to you! 4 lime or lemon slices 1/2 cup turbinado sugar ½ cup honey ( you can substitute the total amount of sugar and honey for ¾ agave nectar, or nectrase)
Whipped mascarpone and honey About ½ cup of mascarpone and 2 tablespoons of honey, whip them together until light and fluffy.
Toasted chopped pecans Ground cinnamon
Directions:
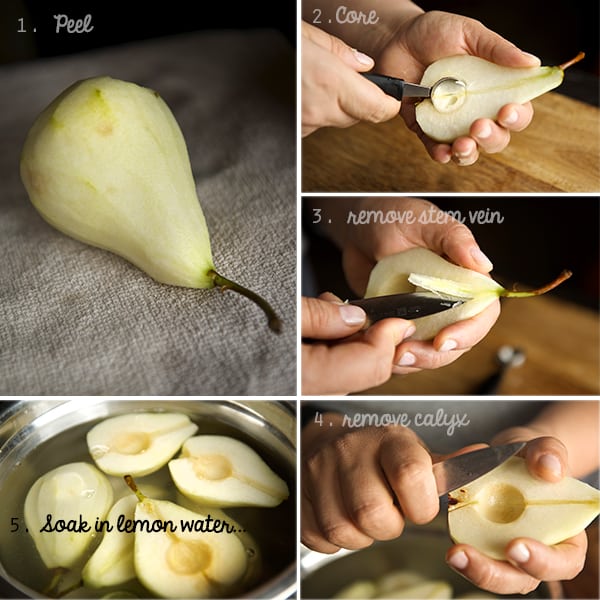
1. Peel, half, remove core and stem in the pears. Keep them in a bowl with water and a few drops of lemon juice to avoid oxidation. (see picture below)
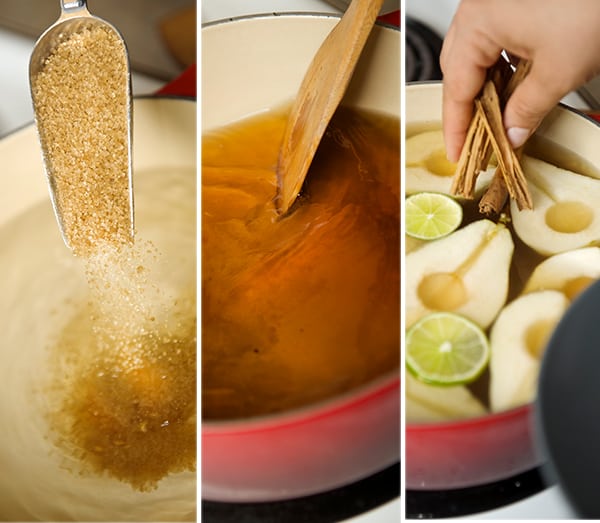
2. In a medium size pot over medium high heat add water, turbinado sugar and honey to dissolve.
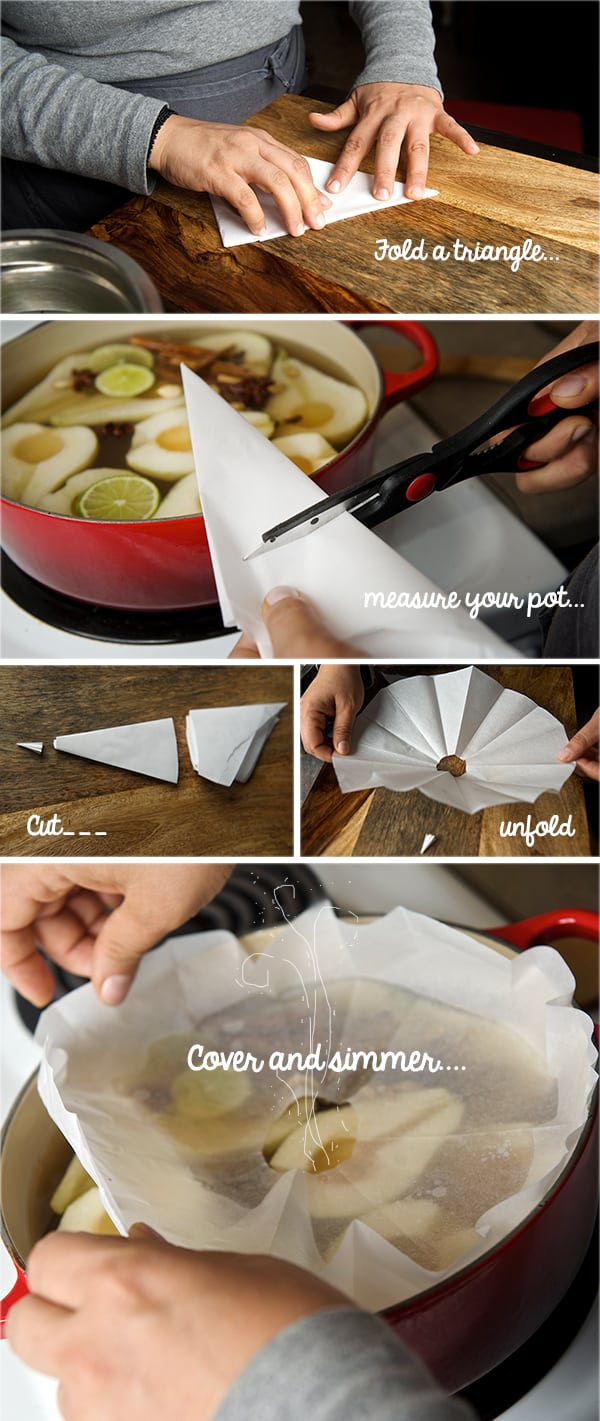
3. Once the water is simmering and sugar is dissolved, add rum, spices and simmer for 7 minutes. 4. Make a parchment paper square, fold it into a triangle, measure your pot radius and cut. Once you unfold the triangle you’ll have a nice circle to cover the pot. 5. Add Pears into the simmering liquid and cover with the parchment paper.Make sure the paper is touching the water to avoid the pears from any discoloration. 6. Simmer in low for about 20-25 minutes, or until the pears are tender when a knife is inserted. 7. Turn off the heat and Let them cool for about 30 minutes. Remove pears from liquid. Heat up the liquid and reduce by half. It should have the viscosity of a light syrup. At this point you can adjust the flavors by adding more honey or more cinnamon if you desire. 8. Plate the warm pears individually or on a platter. Keep the syrup on a little serving pitcher to add the warm syrup when served. Top with a dollop of whipped mascarpone and honey, toasted pecans, sprinkle some cinnamon. Enjoy!
Note: This dessert can be made ahead. Just keep the pears inside of the syrup, and reduce the syrup until the next day. The pears will taste even better the day after is made. It’s a crowd pleaser dessert fit for Vegans, if the mascarpone is omitted, gluten-free and a light sweet bite to end a nice dinner…. Enjoy!
ENJOY!
Music Pairing: Nat King Cole – I love you for Sentimental Reasons
Recipes, Cooking & Art Direction: Mariana Nuño Ruiz McEnroe | Photography: Ian McEnroe |
Published: August 20, 2014
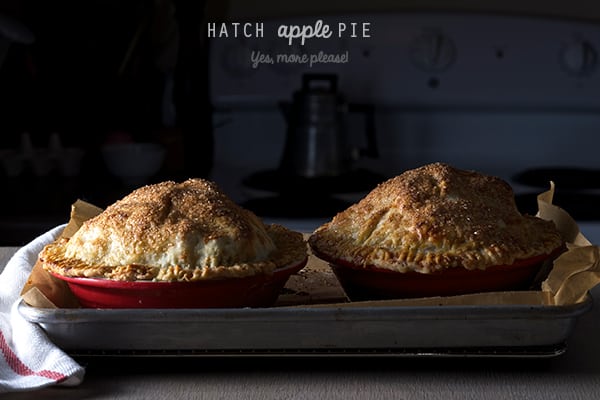
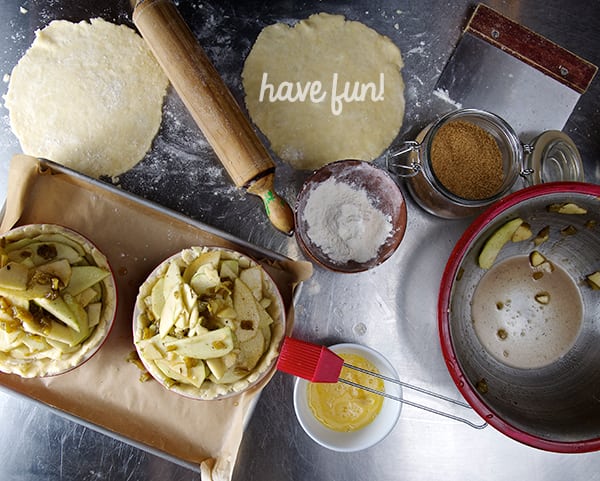
Last week I went prickly pear hunting with my good friends Andrea and Arin. This involved intense heat, lots of driving, and careful handling of ingredients, and lots of tiny needles. After picking these thorny fruits, we juiced them and they produced a bright pink fragrant juice which tastes like a sweet tart lemonade. Afterwards, we were having a food conversation over our drinks and Hatch chilli’s which are in season became the topic,no matter what we always end up talking about food is inevitable…I love it!. As ingredients go Hatch peppers its one of the gems of the chili world, having a mild heat and great flavor. Andrea’s Hatch mode was contagious. After tossing around some favorite Hatch combinations, I began considering Apple Pie with Hatch peppers. Apple pie is normally reserved for the fall but I am married to a man who can eat it regardless of season. I thought this would be the right time to bake a test batch (which ran on Instagram, which you knew because all of you MUST follow YMP on Instagram) and they turned out splendidly, or at least the eaters of the samples left not a crumb,apple, or chili behind.
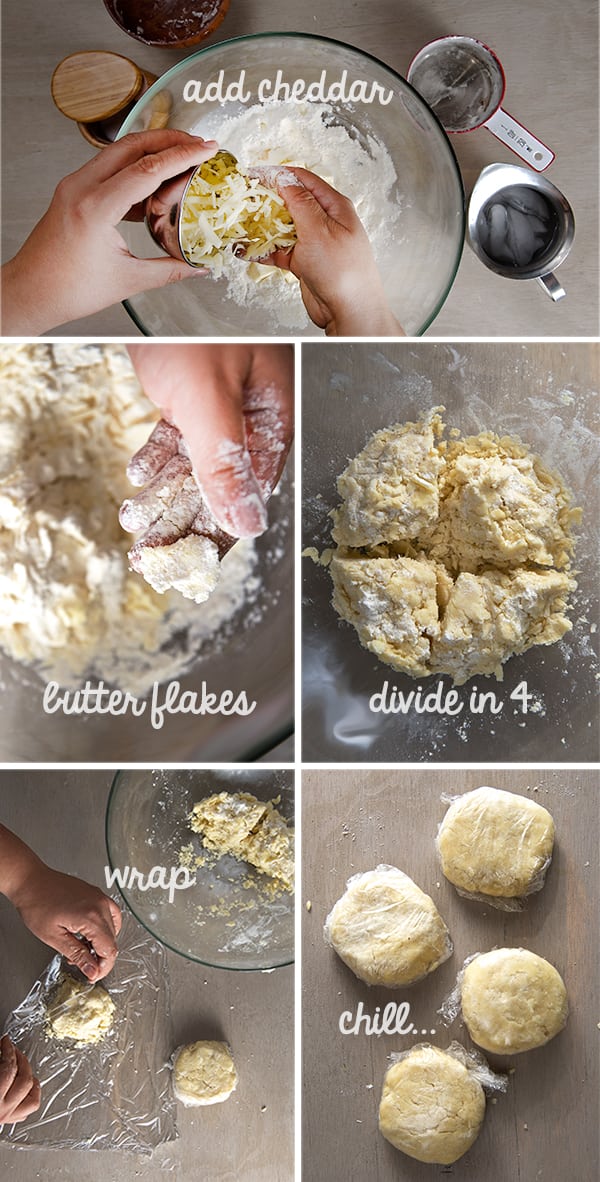
I twisted my classic crostata crust recipe which you can find the step by step in this post (Ian this phrase is just for me!..need to plug the link!) and I added cheddar cheese! Yes you heard well, sharp cheddar cheese. It came to me like a dream. The cheddar adds the savory a bit salty note to the crust, and it makes it airy and flaky. I also tried a new technique when kneading the pie crust, I learned by watching one of the episodes “ The Mind of a Chef ” with Sean Brock and southern baker Lisa Donovan who were making her amazing buttermilk pies. What I learned about her Pate brise type of dough, (which is my favorite kind for pie), is the following: she “flaked the butter” when she was making her dough, instead of leaving those famous “pea size butter chunks”. She squeezes them between her thumb and index finger to create what she called “butter flakes” Genius!!!! So I tried her technique and I added grated cheddar to create more flaking. The result is this utterly buttery and flaky crust, you can see the pictures which do not lie! Omg what a great technique and awesome combination between the fat of the butter and the cheese if I do say so myself.
But where is the hatch? After I chard them, they were hanging out with the apples in a combination of raw sugar, Gause Jaupon honey, Mexican cinnamon, and nutmeg. That’s what the crust had to stand up to! You can only imagine the amazing outcome after all these ingredients colliding in the same universe. Amazing pie. Go for it. Don’t be shy. If you want to comment on your experience with it please e-mail me. If you love the recipe shout it on the streets! …Enjoy!
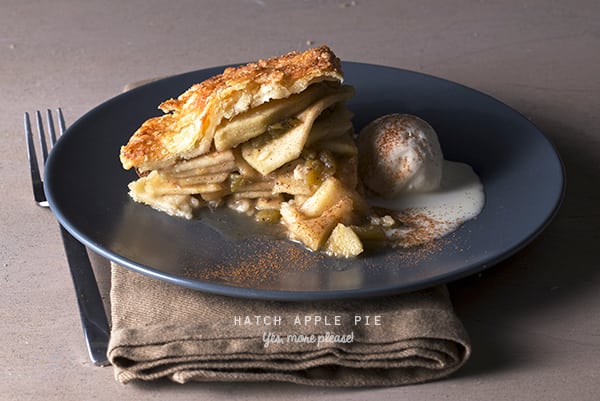
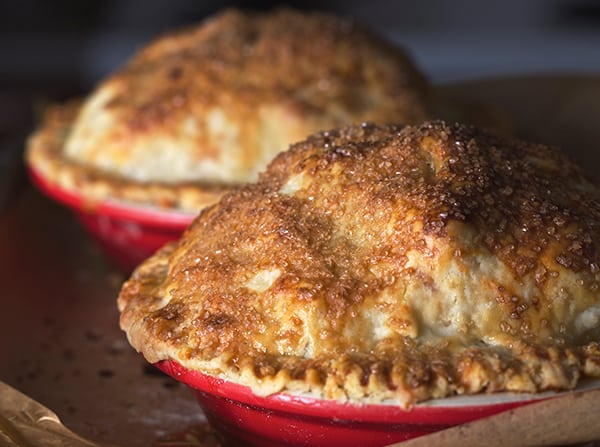
Hatch Apple Pie
A tongue twister by name and by taste!
Makes 2- 5” baby pies
For the pie filling:
2 green apples
2 red Apples
2-3 hatch chiles charred, skinned , de-seeded and chopped. (I used hot!)
¼ cup honey
½ cup turbinado sugar
1 teaspoon mexican cinnamon grated
¼ teaspoon nutmeg
2 tablespoons of butter
1 teaspoon corn starch
½ teaspoon apple cider vinegar
1 good pinch of salt
For the cheddar cheese crust:
1+1/4 cup unbleached all-purpose flour
1 stick = 4 oz. of european style butter cut into small cubes.
4 oz. sharp cheddar cheese grated
1 pinch of kosher salt
3-4 tablespoons of iced water.
Extra flour for dusting and rolling the dough. 1 egg for egg-wash the pie tops a little extra turbinado sugar to sprinkle on crust.
Preparation method:
1. Start by making the crust. In a large bowl combine flour and salt. Then add the chilled butter cubes, and the grated cheddar cheese. With you hands start rubbing the flour and butter between your fingers and creating “the flakes” see picture bellow) you want to be gentle and as fast as possible. 2. Once your dough looks flaky and coarse, add the iced water and quickly combine by incorporating the flour with the least kneading possible. (see picture below) 3. The dough will look almost like is not together. Gently press into a flat ball and divide into fours. (you will need two tops, and two bottoms) 4. Wrap each portion in plastic wrap and quickly shape into 4 small disks. Chill them for at least 15-20 minutes in the freezer.
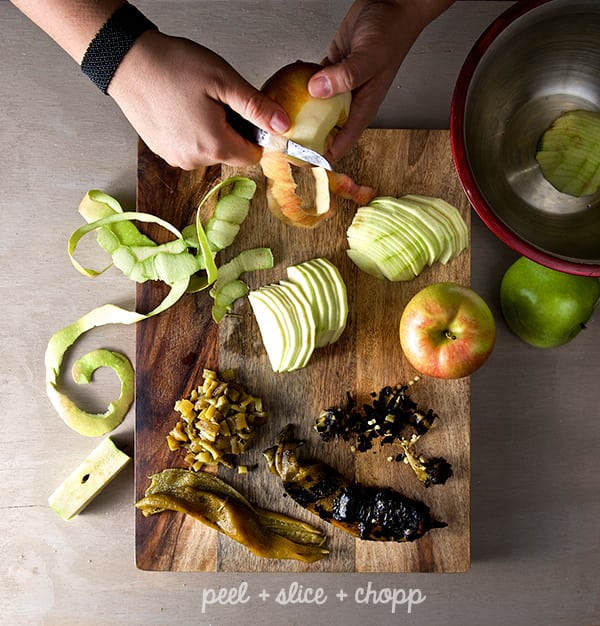
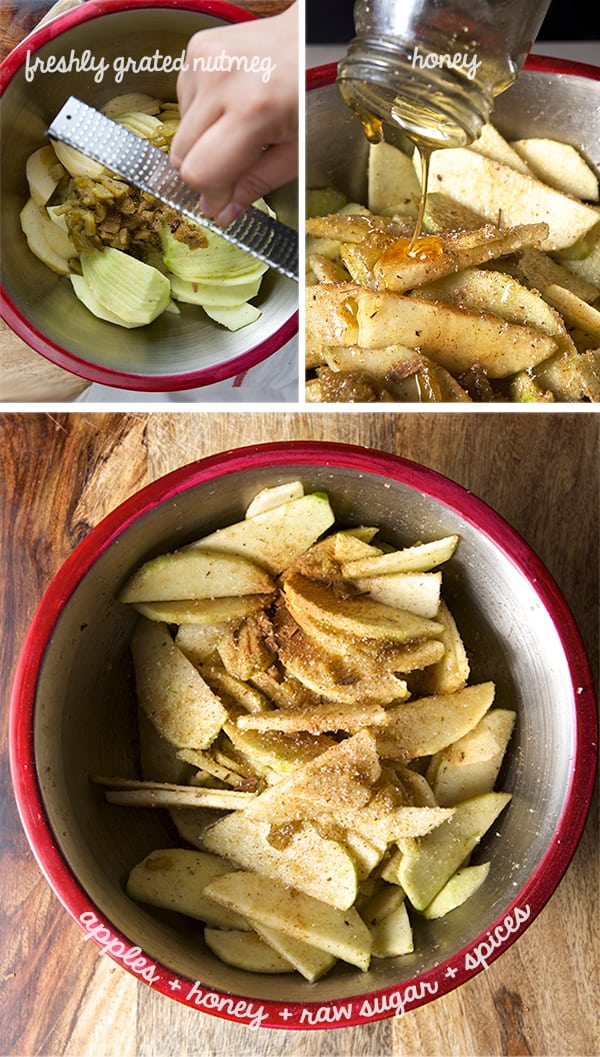
5. Meantime, prepare the apple filling. Peel and thinly slice the apples. In a medium bowl toss the sliced apples, diced roasted hatch peppers, honey, sugar, cinnamon, nutmeg, cornstarch, salt apple cider vinegar. Mix well. Use your hands to well combine every ingredient. Set aside.
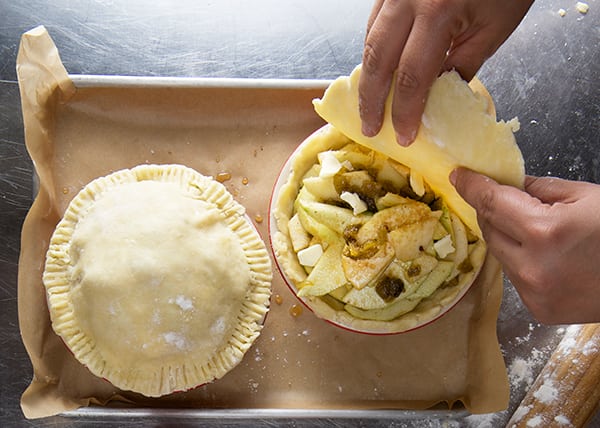
6. Time to roll up your dough!.. this is fun! Using 2 small 5” baking pie dishes. Roll each dough piece into a 7- 8” rounds. Rub some butter into the dishes, and then place the bottom disc shaping the dough into the dish with your hands. 7. Fill each pie with half of the apple filling. Arrange the apple pieces in flat layers. You don’t want to be to fussy about it, just pay attention at not leaving apple gaps specially on the bottom layer ; )
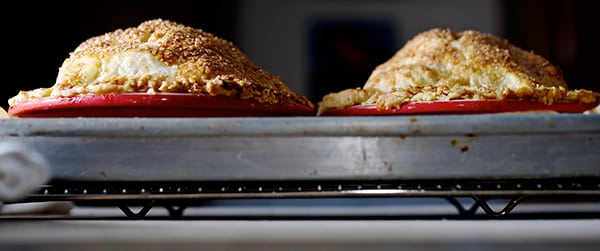
8. Now your pies look like mountains of apples, that’s great! Roll the other two pastry disks into 7”-8” and cover your pies. 9. Crimp the edges of the pie with the help of a fork, make four 1” slits on top of the pie. Beat one egg and 1 teaspoon of water and with a pastry brush, brush the tops of the pies with this egg wash mixture. Sprinkle turbinado sugar on top, and edges of the pie. 10. Line up a baking sheet with a lip with aluminum foil. Place the two pies in the tray. Place the tray in the freezer for about 20 minutes. 11. Place the rack oven into the bottom third of the oven. Preheat your oven at 400F. 12. After 20 minutes, remove the pies from freezer and place them directly into the oven. 13. Bake at 400F for the first 20 minutes. Rotate the pies and lower the temperature to 350F. Bake for another 20-25 minutes. 14. By now your house smell like heaven! Place the pies into a cooling rack let them cool for about 30 minutes. Serve with a scoop of your favorite vanilla ice cream and a dash of ground cinnamon. Enjoy!
Life is too short. Make pie. Eat pie. Repeat!
Music Pairing: Nouvelle Vague – Dancing with Myself
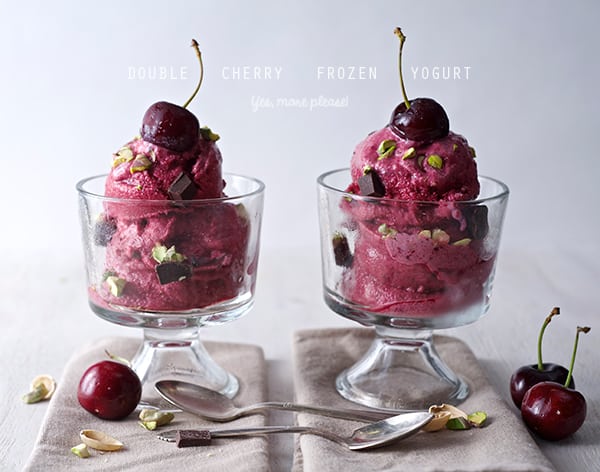
Recipes, Cooking & Art Direction: Mariana Nuño Ruiz McEnroe | Photography: Ian McEnroe |
Published: July 29, 2014
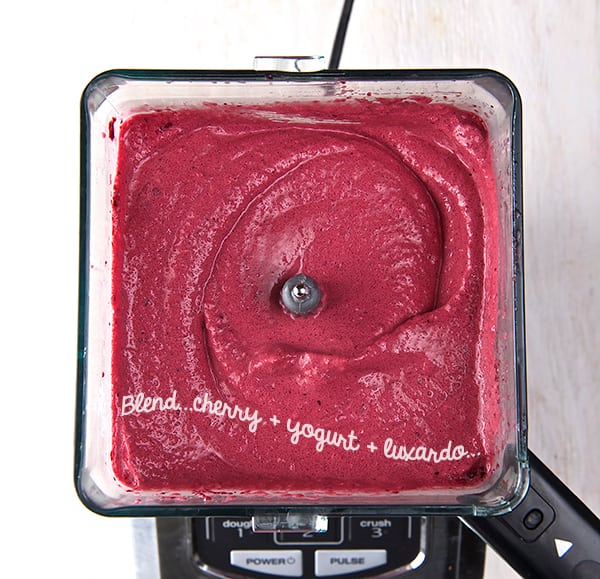
“So we grew together like to a double cherry, seeming parted, but yet an union in partition, two lovely berries molded on one stem.”
― William Shakespeare, A Midsummer Night’s Dream
Before the season ends take this stone fruit so plentiful in the summertime and make it delicious and refreshing. I love frozen yogurt in all its rich flavors and smooth texture as my favorite hot weather indulgence to beat to cool off my palate. I often like to go to one of the many frozen yogurt shops and take advantage of the endless number of flavors and toppings. This is the best time of the year to prepare your own and you might be surprised that you just need a freezer and a blender or food processor to make frozen yogurt at home.
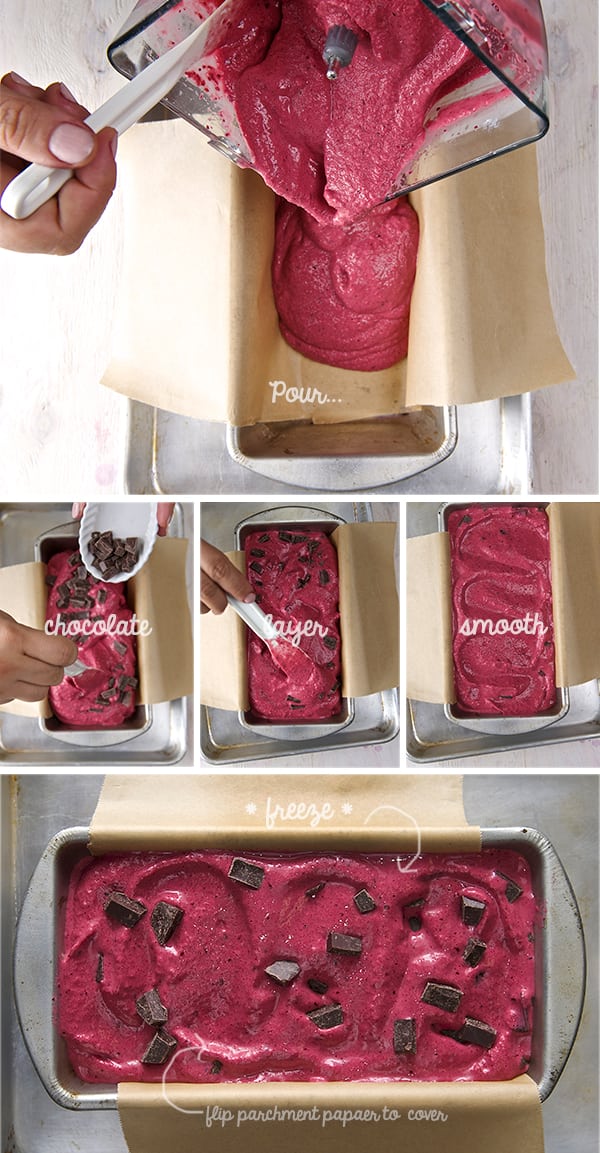
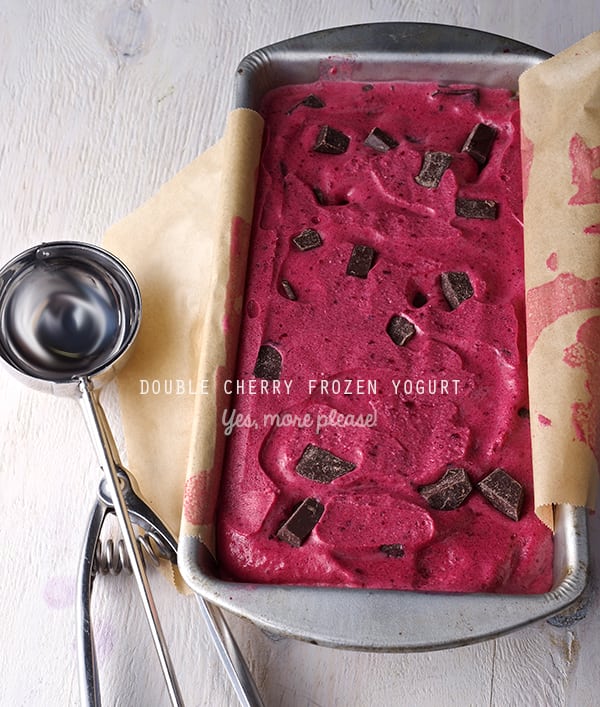
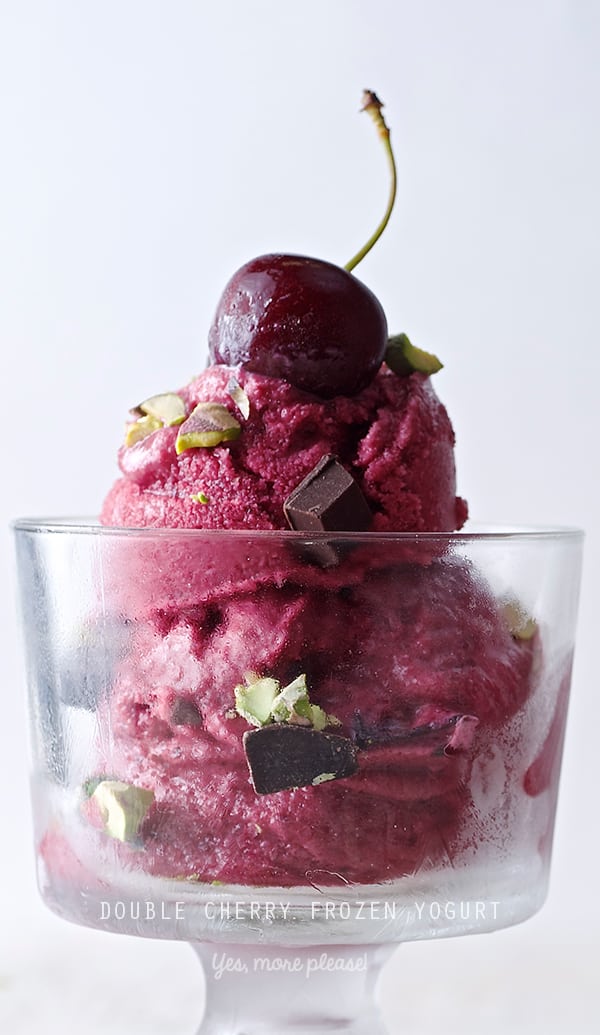
Red cherries have a sweet and tart flavor which is intense and works well for a yogurt flavor. By de-stoning several plump fresh cherries you can freeze the fruit and combine it with yogurt frozen in cube form in a blender or food processor to create a soft and creamy rich dessert. To further enhance the flavor, I added a cherry liquor of good pedigree. This becomes even more decadent with …wait for it…. dark chocolate morsels. Sorry for those of you clinging dearly to ‘simple’ because here comes the topping…nothing less than roasted and chopped pistachios. Once these have landed on top of a couple scoops of this romance you will certainly experience nothing short of Cherry Ecstasy followed by perfect summertime bliss.
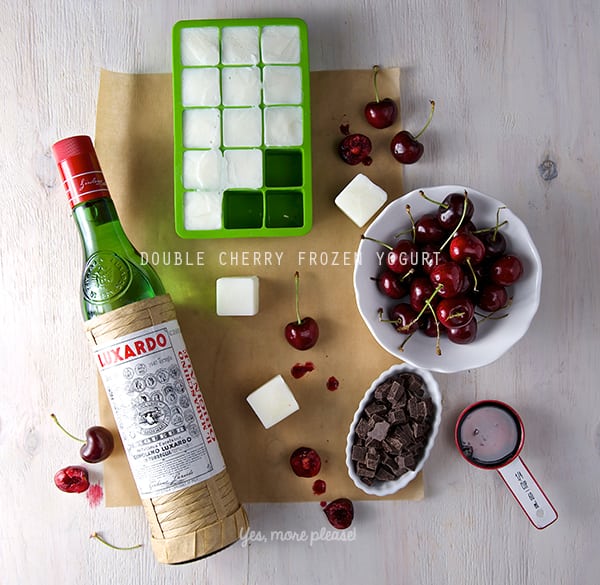
Double Cherry Frozen Yogurt
Serves 4-6 on a midsummer afternoon…
2 cups greek yogurt frozen into ice cubes tray.
1 1/2 cups fresh cherries, pitted and frozen.
1/4 cup agave nectar
1-2 ounces LUXARDO Il Maraschino Originale
Toppings:
1/2 cup dark chocolate chunks, I used Scharffen Berger Chocolate, Fine Artisan Dark, Baking Chunks, Semisweet
1/4 cup Roasted pistachios
Preparation Method:
1. Using an ice cube tray pour the yogurt and freeze. You can do this step one day in advance. During summer time I always have yogurt ice cubes handy to make a quick frozen treat, they are life savers when you are in a snack attack mode! I like to use this rubber ice cube trays they are super easy to pull out.
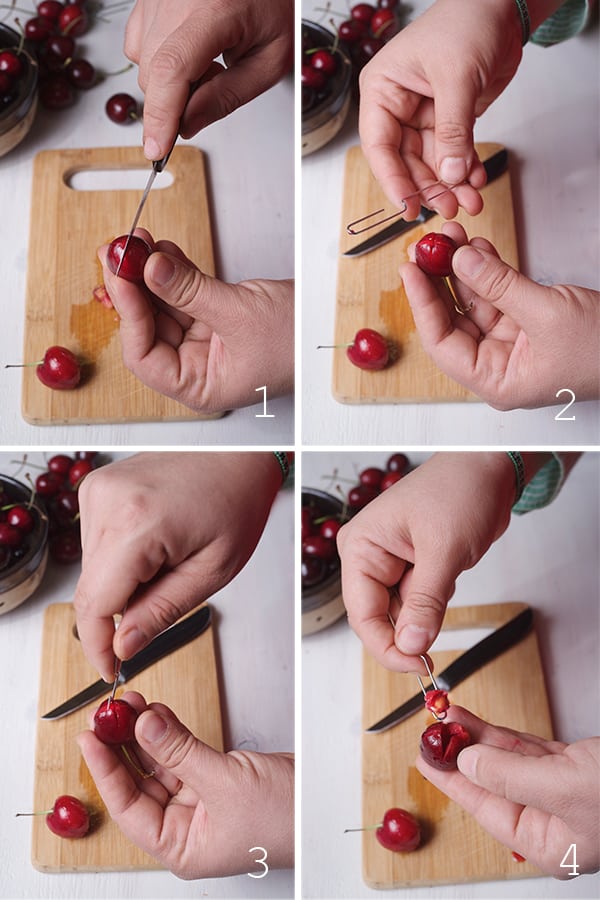
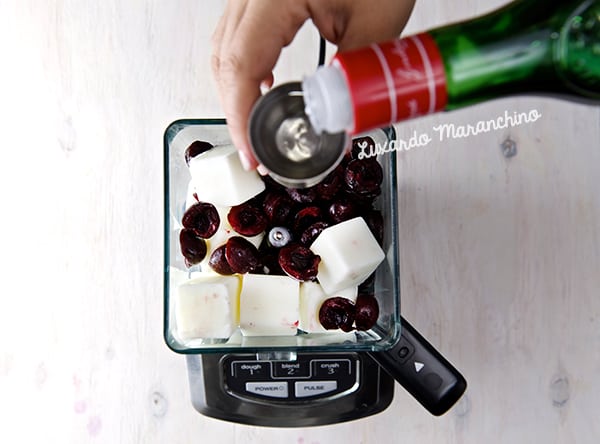
2. Cut in halves and Pitt the Cherries. If you do not own a cherry pitter I’ve heard good comments on this one, or since you are just pitting a small amount you can use my super easy “clip” method check this out:
3. Once you have every frozen item you need, place the yogurt ice cubes, frozen cherries, agave, and one ounce of the LUXARDO liquor and blend well until smooth. Taste, and if you want to go ahead and add the other ounce of liquor is up to your taste. The Maranchino cherry liquor enhance the cherry flavor with some almond and honey notes, it is the perfect complement to this frozen treat. If you do not care about this liquor, just add 1/2 teaspoon of almond extract.
4. Line up a loaf metal pan with parchment paper and poor half of the cherry frozen yogurt, sprinkle some chocolate chunks, cover with the rest of the frozen yogurt. and cover with parchment paper making sure it makes contact with the mixture, to avoid freezer burn.
5. Place in Freezer for about 2 hours. Serve and sprinkle with some chopped roasted pistachios. Enjoy!
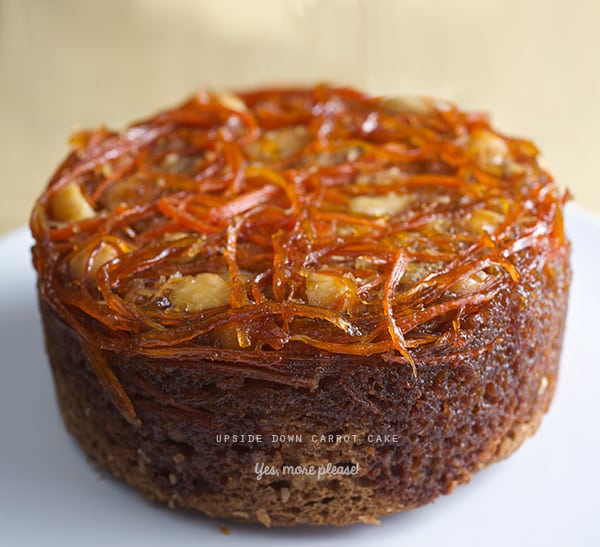
Recipes, Cooking & Art Direction: Mariana Nuño Ruiz McEnroe | Photography: Ian McEnroe |
Published: April 26, 2014
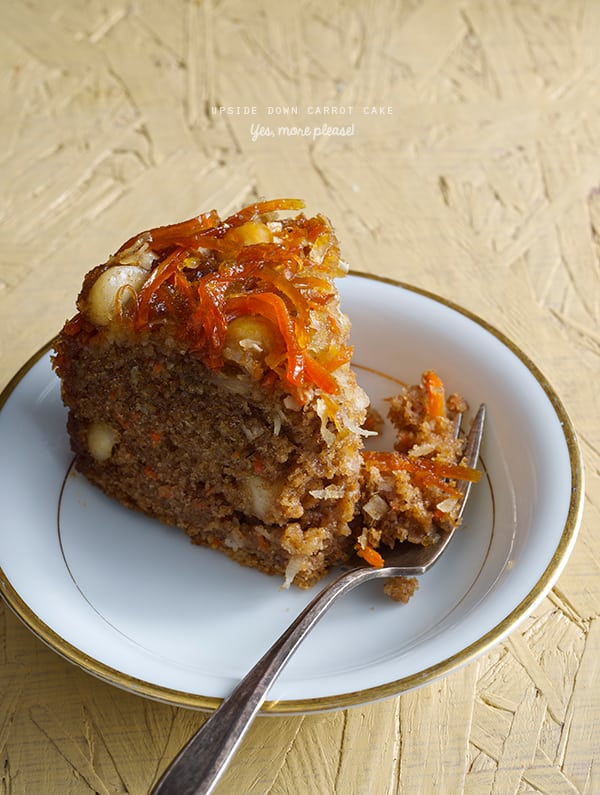
Lately everything in my world seems upside-down, but the little wacky moments in everyday life can be fun. Being playful in the kitchen is my kind of fun. And boy, if this cake screams upside-down, I’m seeing life straight up now!~
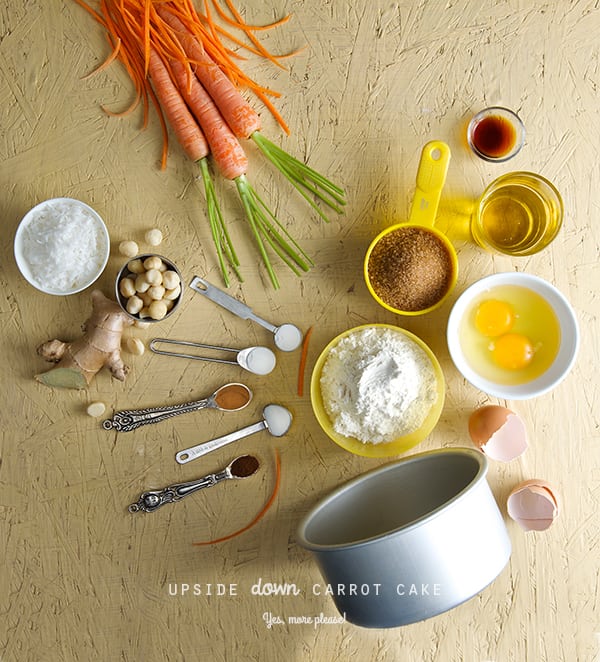
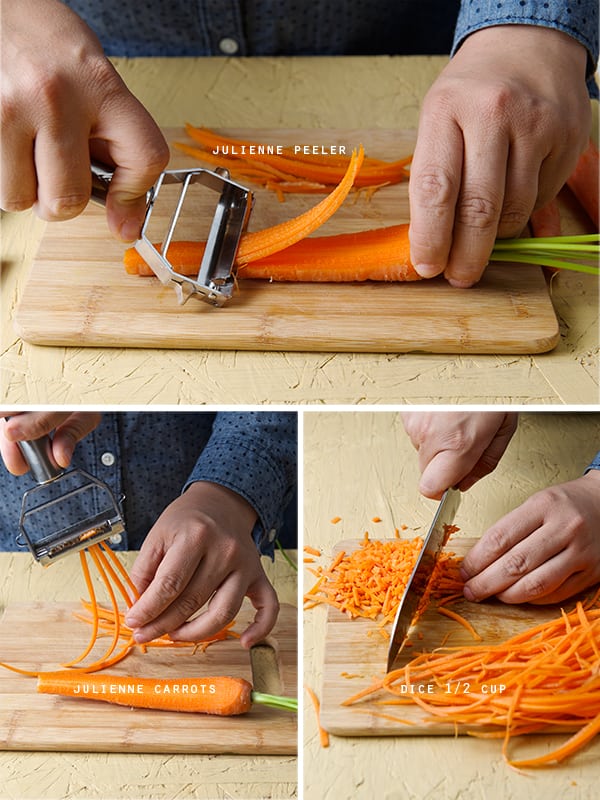
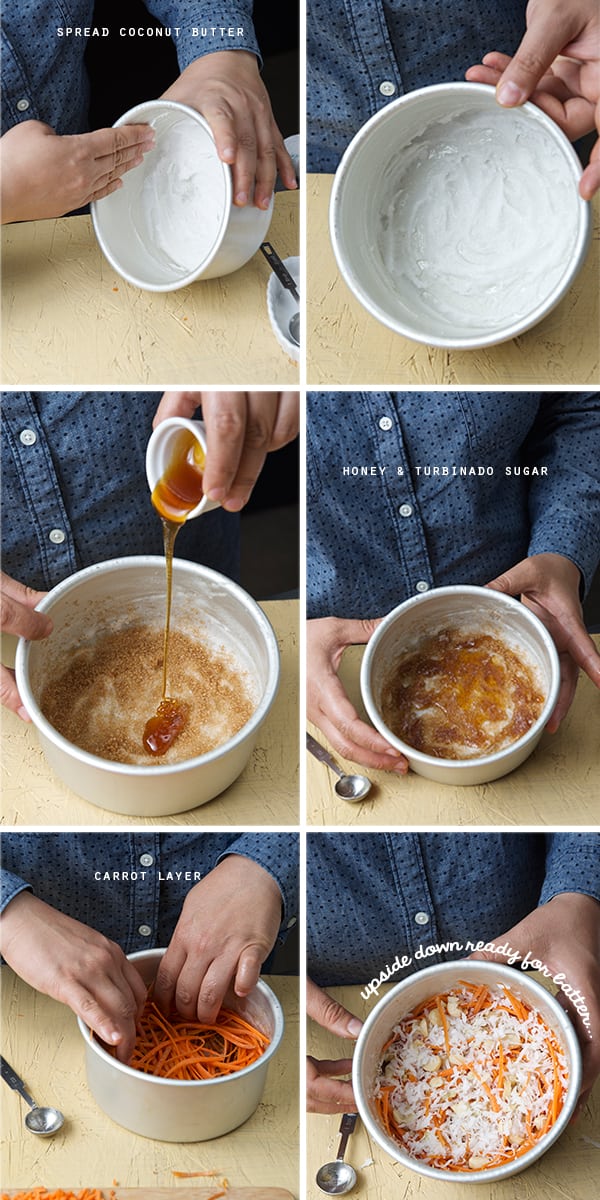
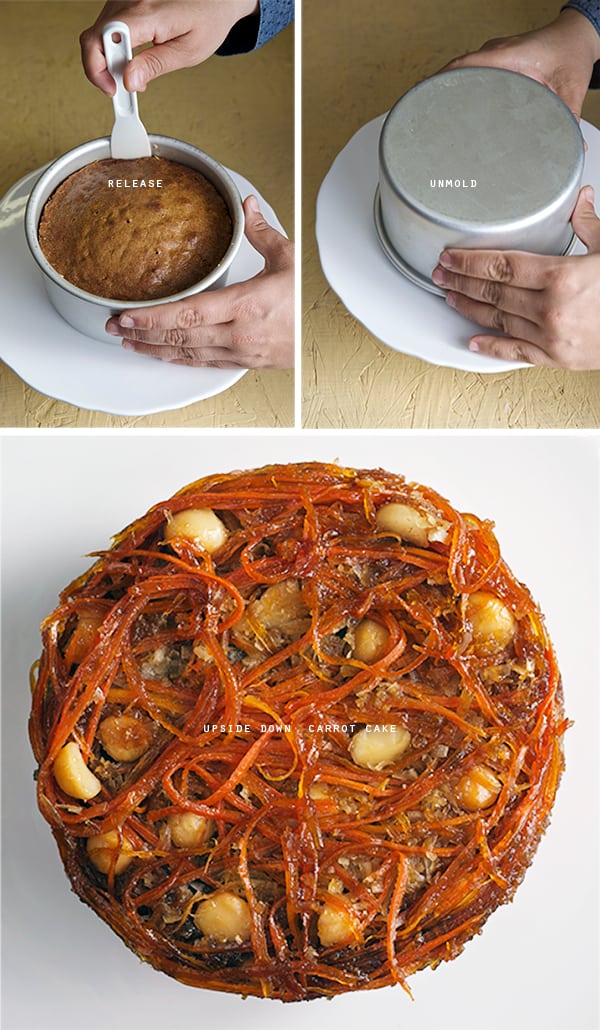
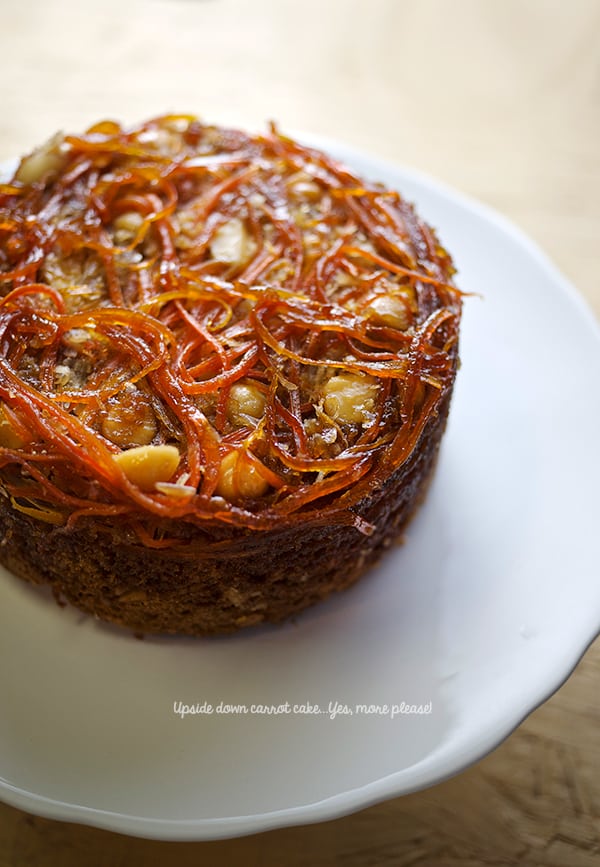
After making the Leek and Potato Tarte tatin, a light bulb turned on in my head and crisscrossed with the idea of a carrot cake. What if I apply almost the same concept of a pineapple cake to the carrot cake? Without hesitation I made ½ of a recipe, and it turned into a delicious unexpected result. I placed the carrots on the bottom of the pan and used coconut butter instead of regular butter to create a coating. I added some honey and turbinado sugar which caramelized beautifully on the bottom. Adding some freshly ground ginger was the final touch; fragrant with a spicy lemony note.
I think Ian looked at me funny when I told him I was baking an upside-down carrot cake. He probably though I was crazy…and then when he saw the cake, he just smiled and understood, and when he tried it he asked: “When are we shooting this?”… So I guess he liked it!
The cake is mildly sweet. The caramelized carrots add the sweetness and texture to this scrumptious cake, without being overly sweet. It is more of a coffee cake than the classic carrot cake with cream cheese icing, (which I adore) but, in this case, the no frosting makes the idea of baking and eating cake for breakfast more…manageable…*hehehe*
This recipe I wrote is for a small 6” cake, since is just Ian and I it is more than plenty. You can easily double it and bake a 9”-10”. for bigger crowds. This upside down carrot+coconut+ginger cake will make a fantastic bake good for brunch or a simple delicious birthday. I’m really hopping you enjoy this recipe, shoot us a comment, we’d love to hear from you!
Upside down Carrot Cake
Makes 1- 6” cake, serves 4-6
Dry:
1 cup all-purpose flour
½ teaspoon baking soda
½ teaspoon baking powder
1 teaspoon cinnamon
½ teaspoon nutmeg
¼ teaspoon ground clove
½ cup shredded carrots
¼ cup shredded coconut
¼ cup roasted Macadamia nuts, roughly chopped
Wet:
1 tablespoon freshly ground ginger
¾ cup turbinado sugar
½ cup safflower oil
2 eggs
For the bottom of the cake pan:
4 tablespoons solid extra virgin coconut oil I used this kind or butter if you prefer
3 tablespoons turbinado sugar
4 tablespoons honey
1-1 1/2 cups of long shredded carrots
¼ cup shredded coconut
½ tablespoon freshly ground ginger
¼ cup roasted macadamia nuts halves or whole.
1. In a 6”x 4”tall pan, spread an even thick coat of the solid coconut oil.
Thinly grease the sides of the pan as well.
2. Scatter evenly the sugar and honey
3. Layer the shredded carrots evenly
4. Sprinkle the roasted macadamia nuts halves
5. Sprinkle the shredded coconut in an even layer.
6. Set aside in a cool place
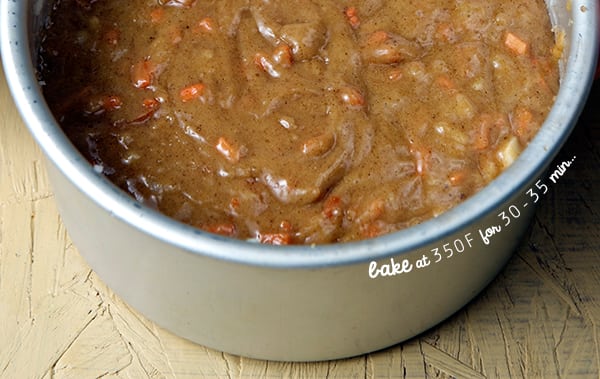
7. In a medium size bowl whisk together all the dry ingredients.
8. Add the ½ cup shredded carrots, shredded coconut, and roasted macadamia nuts.
9. In a small size bowl whisk first oil, sugar and ginger, then add the eggs one at a time and whisk until well combined.
10. With a spatula, mix wet ingredients into dry ingredients until well combined.
11. Poor the batter on top of the carrot layer, and bake for about 30-35 minutes. Until a toothpick in the center comes up clean.
12. Cool on a rack for 20 minutes and un-mold the cake before its completely cool.
Knife… Ready, set go!… first slice is mine!…Enjoy!
Recipes, Cooking & Art Direction: Mariana Nuño Ruiz McEnroe | Photography: Ian McEnroe |
Published: February 10, 2014
This sounds so wrong, but it taste so right that you will be stumbling back for more.
Homemade marshmallows are totally different creatures than store-bought, and incredible easy to make. Despite the intimidating words ”candy thermometer” and “powdered gelatin” Hey! Its easy, easy potatoes!,
You will need to flatten some dark beer, hydrate some gelatin, boil some sugary mixture, whip the hell out of it , add a powdery cloud of confectioners sugar and let it set…it is a fun process. To finish them up, drizzle chocolate and crunchy pretzels…What’s not to like?
Making candy and these confections is fun and if there is some leftover beer you should have a little glass, to cook along with … Music? Yes, more please! I was listening to one of my favorite bands “The Squirrel Nut Zippers” . For me, this is marshmallow music and I’m sharing the link: https://www.youtube.com/watch?v=VdAt4qWvz_8
My twist in this recipe has to do with the choice of stout I used. My friend Andrea introduced me to this amazing stout from Adelbert’s “Barrel of Love”. Adelbert’s is a local brewery that produces hand-crafted Belgian style ales here in Austin,Texas. Crazy good stuff! This beer was recently released, a dark beer with chocolate and whiskey notes…kiss me now!… Wait until you try these beer marshmallows creatures…Holy Shubangwaaa!
Ok too much Blah, blah blah, let’s get started. Hands up!
I will not describe the flavor for you… be brave, be adventurous and try this… you will go bananas… it is the best way to get happy-drunk on marshmallows! Have fun.
Makes 9 large glutton size, or 120 skinny jeans size.
Technically if you use a 8×8 pan 36 pieces of 1.5×1.5 inches…
3 envelopes unflavored gelatin /approx. 21 grams (I used powder, you’re welcome to use gelatin sheets )
1 cup cold, flat beer, divided in two (I used Adelbert’s brewery “Barrel of Love”) You can use any dark stout like Guinness will be fantastic too! For Kids version: 1 cup of Miller light… not! …Use 1 cup of Cherry soda, Dr. Pepper soda, Cream of soda and use the same method of removing the gas as much as you can see step 1. Other options can be fruit juices, like apple, beet, carrot, they will taste delicious and will give a hint of color to the fluff.
2 cups granulated white sugar
1/2 cup corn syrup
2 pinches of sea salt
2 large egg whites beaten until stiff peaks.
1 teaspoon vanilla extract
To dust:
½ cup confectioners sugar
½ cup cornstarch
Toppings:
1 cup dark chocolate for melting.
3-4 tablespoons roasted salted peanuts crushed.
Salty, pretzels. (I used Snaps from Snyder’s)
1 teaspoon of sea salt.
Method:
1. Whisk the beer to flatten the beer. Remove some of the foam if necessary.
2. Lightly oil your 8×8 pan and generously dust with the confectioners sugar and cornstarch mixture. Reserve the rest for when cutting the marshmallows.
3. Using the mixing bowl of your stand mixer, place ½ cup of beer and sprinkle the 3 envelopes of gelatin powder.
4.Whisk your egg whites until stiff peaks set aside.
5. In a medium saucepan over medium high heat mix the sugar, corn syrup, and the other ½ cup of flat beer until the sugar is dissolved. At this point attach the candy thermometer to your saucepan and bring this sugary mixture to a slow boil until it reaches 240F/ 116C . Remove from heat.
6. Fitted with the whisk, start your stand mixer on the slowest speed. Being very careful, start adding the hot syrup in a low stream to incorporate with the bloomed gelatine.
7.Once you poor all the syrup,mix for 2 minutes and proceed to add the fluffy egg whites along with the vanilla extract.
8.Mix on high for about 10-12 minutes, until the mixture has double or tripled in size, it turns an off-white color, it has a nice shine to it and it holds stiff peaks.
9. At this point with the help of a spatula (lightly spray the spatula with some nonstick spray), Poor all this fluffy and highly sticky gooey goodness into your greased and powdery pan.
10. Flatten the top and allow the marshmallow to dry for at least 4-6 hours. Overnight is best. The marshmallow should fill springy and soft to the touch.
11. Once dry, over a piece of parchment paper generously dusted with powder sugar and cornstarch mixture, un-mold the marshmallow sheet with a little spatula pulling from one corner and place the big square on top of the paper. With the help of a dusted knife, pastry cutter, pizza cutter or scissors, cut your marshmallows into squares. Start by dividing them in half and then, thirds. When cutting any kind of pastry, it helps a lot start visualizing “half of the half” rather than five or six equal pieces. In this way you can end up with pretty much equal size marshmallows. Do not worry about the round edges, people is gonna eat them any way!…Although if you are going for perfect little squares just trim all the round edges to have a perfect square and then proceed to cut. (see photo below)
12. Once they are cut, place the remainder of the confectioners sugar and cornstarch mixture in a bowl and toss the squares, so every side is covered with powder to avoid sticking. Shake the excess powder, and place the marshmallows on a clean cookie rack.
13. Melt the dark chocolate, and drizzle the marshmallows, sprinkle with pretzels and crushed peanuts.
14.Eat while the chocolate is warm…its crazy good!!!
Recipes, Cooking & Art Direction: Mariana Nuño Ruiz McEnroe | Photography: Ian McEnroe |
Published: February 5, 2014
One of Ian’s greatest discoveries at my little Sunday Farmers Market, at Muller here in Austin, it’s Kiskadee Chocolates. Ian was wandering around the market and ran into this amazing hot cocoa drink. He got a sample for me and when I drank it! Immediately I was deeply in love with the chocolate elixir drink. So the next weekend I walked to the market and I had the opportunity to meet the owner, Laura Atlas, who happens to be my neighbor as well! That’s what I call luck!. We went for a walk and she told me her story.
She started her business after tasting handcrafted chocolate truffles given to her by her husband on their anniversary; that’s how her chocolate making journey began. She handcrafts chocolate bars, cacao nibs, and her recent addition to her fantastic quality chocolate collection: “The Baking Chocolate Bar” of 85% cacao and uses very little sugar. Her chocolate is organic, from single-sourced cacao from the Dominican Republic. The variety is called “La Red”. The farmers who grow the beans are part of a co-op called Guaconejo. If you would like to know more about the co-op: http://www.raakachocolate.com/pages/cacao-origin-profile-la-red-guaconejo-dominican-republic.
Laura shows a great passion for her chocolate and you can taste the fantastic chocolate products at the Cedar Park and Mueller Market, In.gredients, Frofoyo…I totally recommend you to meet her at the farmers market, she can tell you all about her journey and you can taste and learn how to make a delicious chocolate drink.
As you can tell I really loved the chocolate. I been working on this recipe for about two weeks now.
I wanted to create a great a brownie bite showcasing the flavor profile of this unique chocolate baking bar. The results…Kiskadee chocolate is on my top favorites on my chocolate list. The chocolate profile flavor its remarkable, it’s a dark chocolate that has intensity and great aroma. It finishes clean and feathery light, with a fruity natural sweetness. What to do with this lingot of chocolate gold?… Brownies.
I love brownies in small doses (yeah, right). I made these decadent little Cherry and Cacao nibs brownie bites pairing the chocolate with fresh cherries, to bringing out the fruity natural notes on the kiskadee baking chocolate. I added some cocoa nibs for extra crunch and texture contrast. These brownies are right in the middle, not overly fudg-y not too cake-y. I baked them in a mini-cupcake pan, they bake so beautifully, if you are a brownie edge lover, you are gonna love this mini brownies, they get a nice crust all around, and a soft fudge center. I find they have a great balance and 2 or 3 bites will beyond satisfy your chocolate craving. You are gonna love them.
Remember when baking use the best ingredients, good organic eggs, great butter and if you can not have access to this chocolate, search what is your best possible option beyond the supermarket limitations. (A few of my favorite suggestions for amazing baking chocolate will be: El Rey, Cacao Barry, Valor, Valrhona, Scharffen Berger. in that order.)
I hope you enjoy them as much as Ian and I did…they are gone now, sharing with friends was great. Enjoy!
Cherry and Cacao Nibs Brownies
Makes 24 brownie bites.
24 Fresh red Cherries pitted and steams on
1 large metal paper clip (see the super easy instruction photos below)
¼ cup Dark Rum *optional
½ cup unsalted butter= 1 stick of butter
6 oz. bitter sweet baking chocolate (El Rey, or Valrhona would be in my top favorites.)
1 tablespoon of ground cacao nibs
½ cup turbinado sugar
½ cup white sugar
3 eggs
1 teaspoon vanilla bean paste or vanilla extract
5-6 drops almond extract
½ cup unbleached-all purpose flour, sifted after measuring.
2 pinches of sea salt.
1-2 tablespoons cacao nibs
Preparation method:
How to Pitt a cherry?
It is extremely easy, you just need a paper clip, yes you read well a large paper clip, unfolded, cut a little cross on the back of the cherry, insert the clip hook, gently twist, and the pit is out!no need of a fancy equipment…unless you own a cherry tree then buy one.
Soak the pitted cherries in a little dark rum or kirsch, while you prepare the brownie batter.
Preheat oven at:
325F/165C if is a dark metal non stick pan, if you have a light metal pan bake at 350F/175C
In a metal bowl over a double boiler melt butter and chopped baking chocolate. Be carefully, that the metal bowl do not touch the water, to prevent scorching the chocolate.
Once the chocolate and butter are almost melted remove from heat and stir until smooth.
Add both kinds of sugars into the chocolate mixture, vanilla and almond extract. With the help of a spatula mix well.
Add eggs one a at a time until well incorporated.
At last add the sifted flour and salt in folding movements until well incorporated, do not over mix.
Grease pan with soft butter and dust with cocoa powder, to prevent brownies from sticking.
Using a small ice cream scoop, scoop 1 load of the brownie batter into each mold.
Top with cherry pressing half way through the batter. (See photo below) Sprinkle some cacao nibs.
Bake for 12-15 minutes or until a toothpick comes out with a few sticky cooked crumbs.
Remove from the oven and let them cool for a few minutes in the pan. Once they have cool down slightly, remove carefully from pan with the help of a small spatula, press and twist to release them intact.
Cool them in a wire rack. Serve room temperature or slightly warm. Dust with confectioners sugar.
Enjoy!
Notes: If you are more into brownie squares, this recipe will make an 8×8 square, use a ceramic or glass dish for best results, lining the bottom with parchment paper and living enough parchment paper hanging on the sides for easy pulling. Bake time: 22-25 minutes check the center, if is not done give it another 2-3 minutes.


 One of Ian’s greatest discoveries at my little Sunday Farmers Market, at Muller here in Austin, it’s Kiskadee Chocolates. Ian was wandering around the market and ran into this amazing hot cocoa drink. He got a sample for me and when I drank it! Immediately I was deeply in love with the chocolate elixir drink. So the next weekend I walked to the market and I had the opportunity to meet the owner, Laura Atlas, who happens to be my neighbor as well! That’s what I call luck!. We went for a walk and she told me her story.


