Recipes, Cooking & Art Direction: Mariana Nuño Ruiz McEnroe | Photography: Ian McEnroe |
Published: March 31, 2015
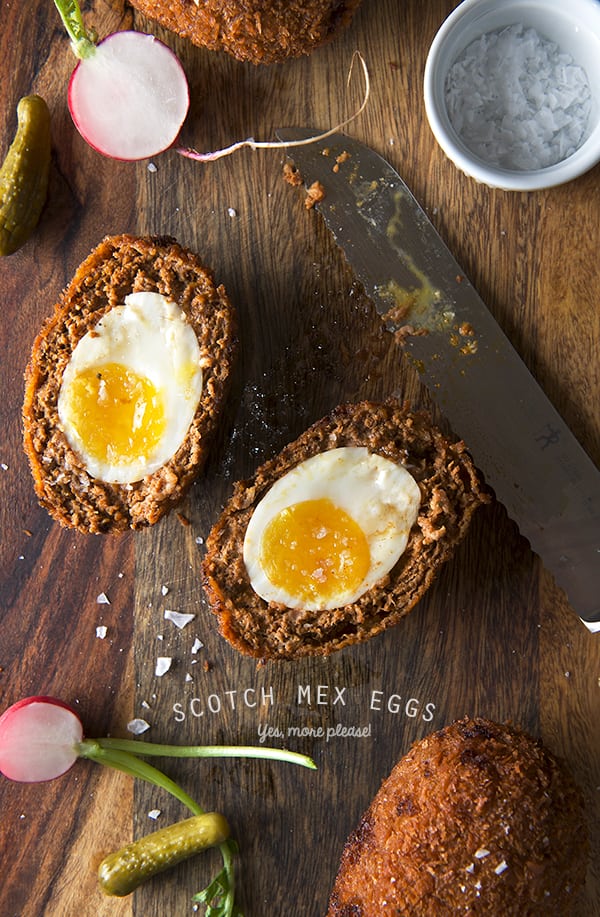
How can I begin to tell you that the infamous “Scotch Egg” is not Scottish. It is believed that it was created by a London department store Fortnum and Mason in the 18th century. However, origins may go back to Algerian cooking or possibly to a fish paste and egg recipe that produced ‘Scotties’. want to know more about the history of these creatures, click here.
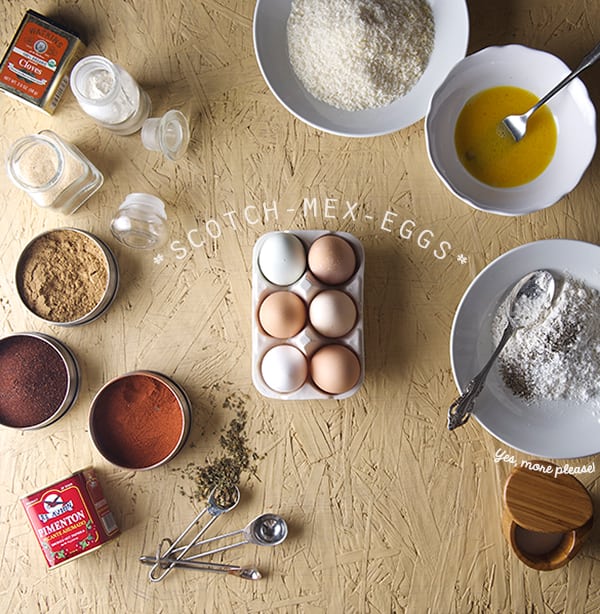
This etymological confusion distracts from what could be the best picnic food not yet consumed widely in the US. We love to eat hard boiled and deviled eggs at picnics. We also love delicious salty savory fried treats. This is only the marriage of each to the other. The crunchy breadcrumb exterior of the egg covered in sausage is from the deep frying technique and enhances the experience of eating this savory delight. When prepared correctly the yolk will be cooked through but still soft and creamy. The Scotch Egg we present in this recipe has been further enhanced by the seasoning of the meat with Mexican spices adding a smokey and spicy note to the sausage mixture.
The result is a New World revision of an Old World treat. And doesn’t it seems appropriate that this recipe was created by a Mexican for his Husband which happens to be an American of Scottish ancestry?
This Eggs could be served many ways and for different occasions. It is certainly terrific on its own or served with some pickled vegetables, but may be the shining star of an Easter appetizer plate or as a side for an outdoor grilling gathering. It holds up well to dipping sauces but to tell you the truth all it needs is a good splash of malt vinegar to balance the richness, and put the British accent on it.
These eggs take a little discipline and patience to prepare but the effort is worth it. They can be the perfect new thing to try this Easter or on your next picnic and you may be shocked by the flavor explosion that this Algerian-British-Mexican Scotch Egg delivers. Enjoy!
Recipes, Cooking & Art Direction: Mariana Nuño Ruiz McEnroe | Photography: Ian McEnroe |
Published: December 26, 2014
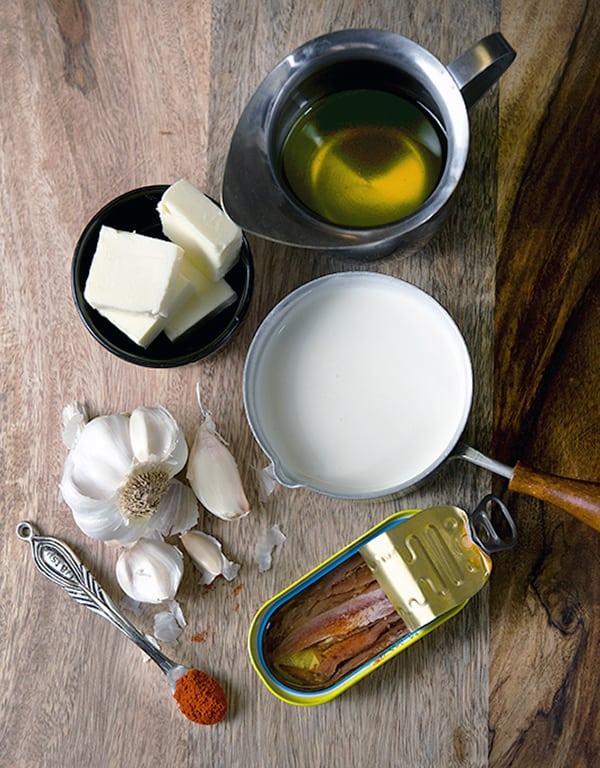
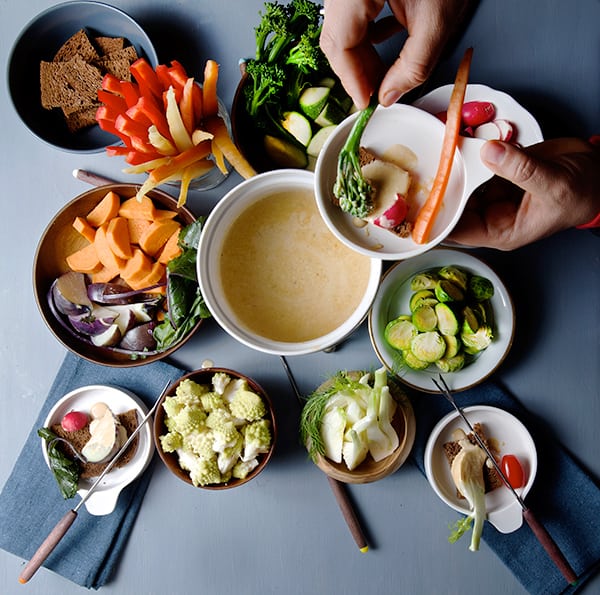
Bagna Cauda, is a traditional dish from the North region of Italy, Piedmont. Bagna Cauda, literally means “Hot bath”. It is served in a similar way as fondue. It is a warm dip made with Olive Oil or Walnut Oil that it’s heated with generous amounts of garlic and… please do not panic when you read this, I promise you, that when you try this recipe you will fall in love with the abominable ingredient “anchovies”. Me, I’m not afraid at all, I’m an anchovy lover, but I know that there is a lot of people who is even scared by the word. Not even to mention the profound and terrified feeling if they know they are an ingredient in their food preparation, and some people might off gone into strike if they have to touch them.
Well,what can I say?… give anchovies a chance. Anchovy flavor when is paired with different food and use as condiment to enhance deep of flavors in sauces or stews, acts as a salty umami background flavor. It gives a salty and nutty note that can bring any sauce, salad dressing, marinade or stew to a whole different level. No fishiness or crazy smells. And particularly in this warm sauce, it brings the punch of flavor to the tub party!….
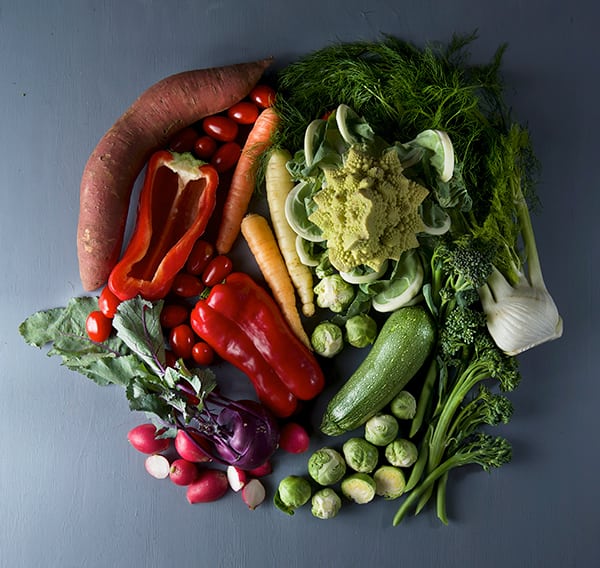
Now, who is taking the bath?…Vegetables, any vegetable raw, steamed, roasted, “ a n y “ vegetable you like. The best way to serve it is keeping the dip warm, I usually use a ceramic Fondue set with a tea light underneath, and serve the warm vegetables in separated plates or arranged in a big platter. Cutting the vegetables in bite size is a must so they can easily be reheated when drenched into the dip. Slices of crusty artisanal bread are ideal to complement the creamy sauce.
There are two ways to prepare Bagna Cauda, the oil route or the creamy route, I like the creamy version for fall-winter cold weather, because is richer and it goes great with the wintery seasonal greens and root vegetables.
The Extra Virgin Olive Oil or Walnut Oil version works great for the summer months when you want to eat something lighter, and in my opinion, the summer seasonal vegetables pair magically with the olive oil.
This recipe is great for parties, or for an easy light dinner, Ian and I we usually try to have a vegetable night during the week and this Bagna Cauda it’s fun, easy to prepare and really fulfilling.
How would I describe the flavor of the Bagna Cauda? Creamy-umami, salty-nutty , velvety sauce that makes any vegetable taste like a million bucks with a poor mans budget!…
Give it a try, I will advice you that If you are experimenting for the first time with anchovies, start shy, it is a bit of an acquired taste. But if you already love them kick it up! you gonna love them even more!. About the vegetables, honestly you are the one who is in charge, go to your farmers market see whats in season, try something different one vegetable at a time, chose some veggies you are comfortable with, so you don’t end up giving up. Trying many new flavors at once can be overwhelming.
When choosing your vegetable assortment apply the colors of the rainbow, sounds silly but this will ensure you to have a great variety of flavor, texture, vegetables that taste better raw versus cooked and it will bring a great visual interest to your table… because in the end if it looks good you are more likely to eat it. So have fun!
Ah!… I almost forgot, this is the last recipe of the 2013, thank you so much for all your support!
Happy New year!
Recipes, Cooking & Art Direction: Mariana Nuño Ruiz McEnroe | Photography: Ian McEnroe |
Published: September 10, 2014
This makes for a versatile dish: appetizer, summer dinner, or lunch; place it in any part of a summer’s day. If you just want something lighter, easy, and extremely tasty, with a little Mexican flair, this is your recipe to go!.
Forget for a bit about the tired guacamole and chips or ceviche. I know they are delicious, but this is going to turn on your appetizer-snack light bulb. There are so many other ingredients in Mexican cuisine, and so many fusions that can take place, that this dish stroked me last night and it was a delicious dinner…Yes, yes we had this for dinner, along with a couple of pomegranate Margaritas…if you want the recipe for them leave me a comment and I will post it next week…
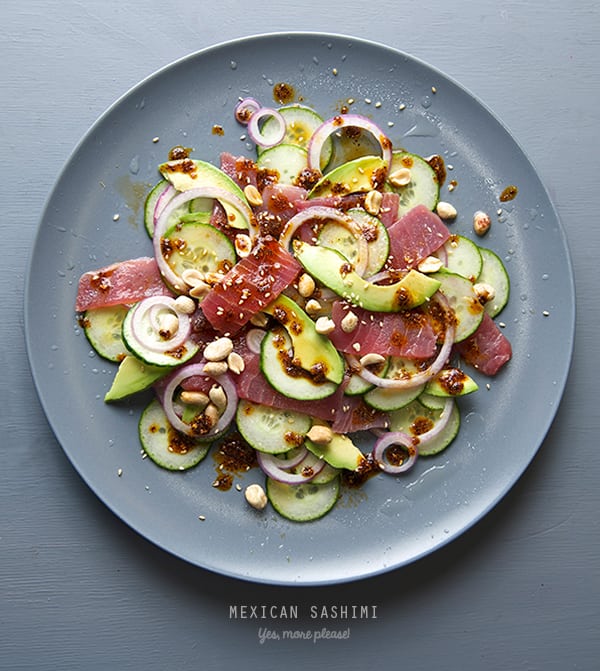
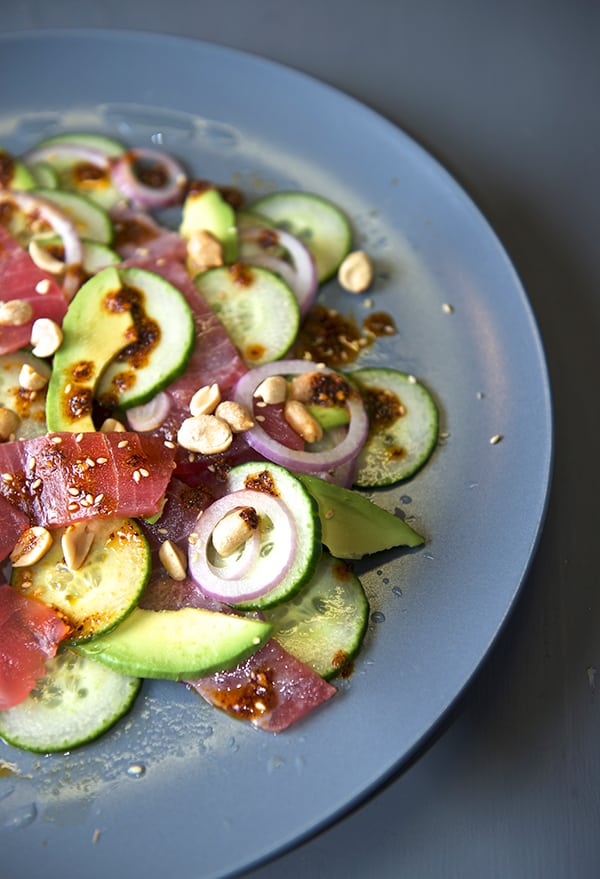
Let me introduce you to my version of Mexican Tuna Sashimi. In Mexico there is a kind of sashimi preparation named Agua chile. Agua Chile is a quick appetizer in which shrimp, octopus, are partially cooked in lime juice and a fresh serrano pepper and a couple of dashes of a well known dark sauce seasoning starting with “M” are added. It is ridiculously simple and delicious.
With this Agua chile dish in mind and Masaharu Morimoto whispering in my ear: “Tuna Sashimi”~
I fused a couple of ideas and created this scrumptious appetizer, summer lunch, Desperate Housewives re-runs, or foodie football game night.
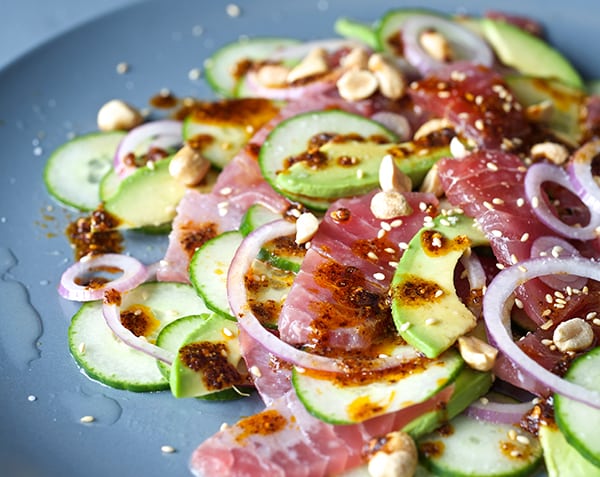
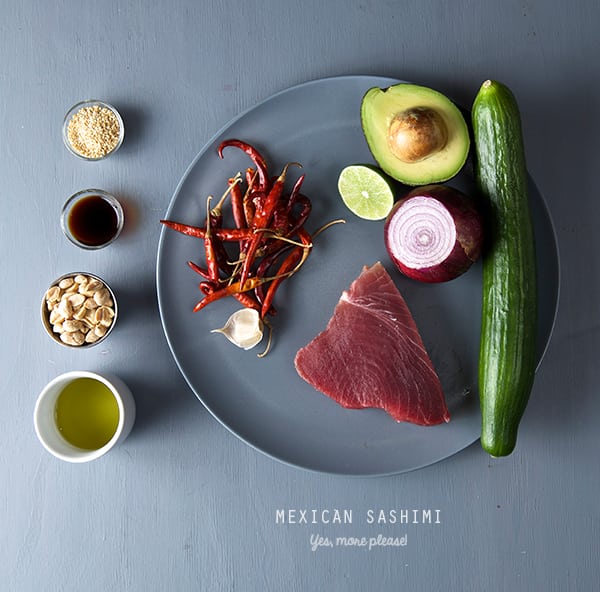
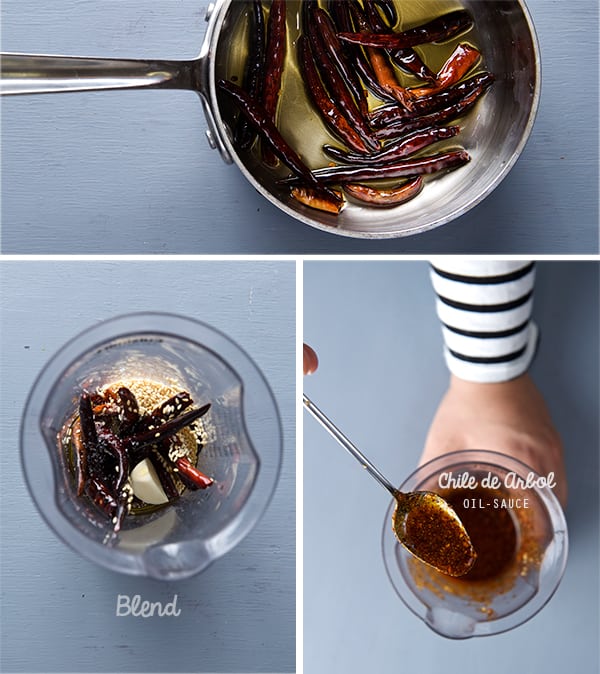
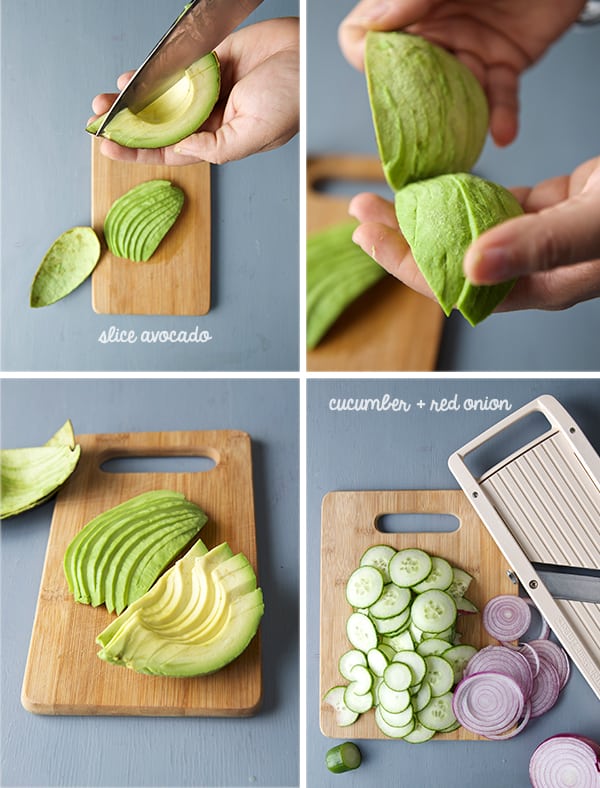
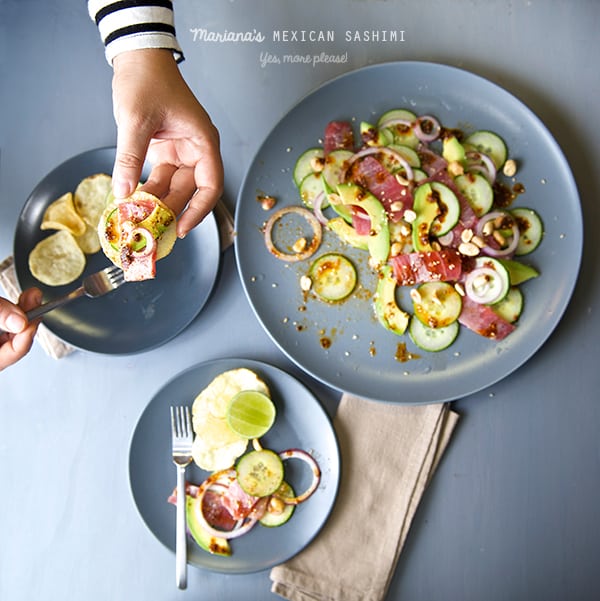
For the recipe sushi grade tuna, a crisp English cucumber, creamy avocado, red onion, lemon juice, soy sauce are plated and combined with my weapon of choice: a red toasted chile de arbol oil sauce. To add some fun and crunch factor, Kettle potato chips or some salty crispy rice chips are delicious on the side to complement the ingredients in this crazy adventure.
The result is a cosmic bite that takes you to Japan and back to play at a mariachi band! Please, you must try this. Share and repeat.
You will find your self craving this appetizer often. Just like we now do…
Mariana’s Mexican Tuna Sashimi
Serves 2 or 4.
½ lb tuna steak, sashimi quality, from sustainable sources, ask your fishmonger for best available.
½ English cucumber thinly sliced
½ small red onion thinly sliced
½ Mexican Hass avocado
1 lemon
1-2 teaspoons mirin
2 teaspoons tamari sauce or soy sauce
For the Chile de Arbol oil-sauce :
12 dry Chiles de Arbol remove stems if any.
1 garlic clove
2 good pinches of sea salt
¼ cup grape seed oil
1 teaspoon toasted sesame seeds.
Garnish with:
2 tablespoons unsalted roasted peanuts
toasted golden sesame seeds.
Preparation:
1. First make the sauce. In a small pot heat up the oil and chiles on medium-low, until the chiles are deep dark red, almost black. Set aside and let it cool. Once its cooled down blend the chiles, the oil, sesame seeds, garlic, and salt until you have thick chili oil. Feel free to add a bit more oil if it is too thick. Set aside.
2. Now, place your tuna steak in the freezer for about 10 minutes before slicing, this way it will slice easily. I usually set up a timer so I don’t forget its there and you end up with a tuna lollipop! 3. Meantime, with a Mandolin or a sharp knife, thinly slice: cucumber, red onion, avocado.
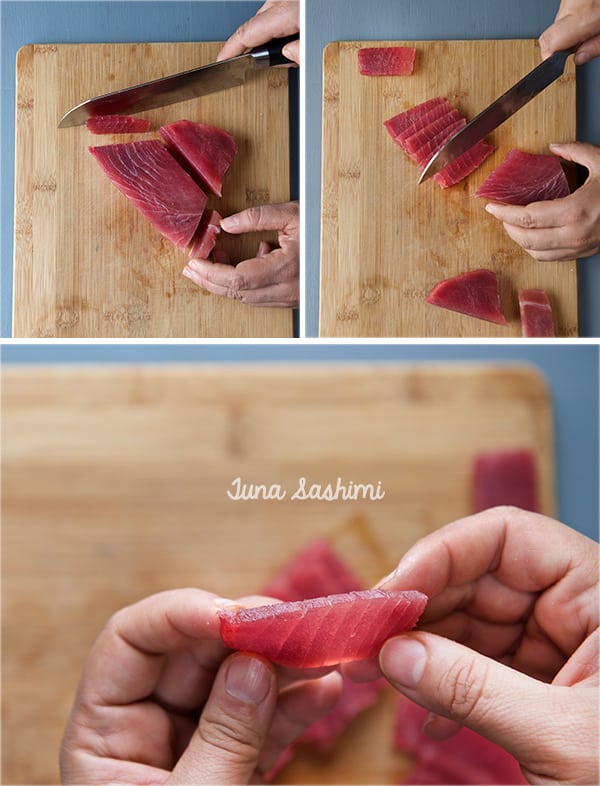
4. Remove the tuna from freezer and slice with the sharpest knives you have. It can be a filet knife, a fish knife, if you own a sashimi knife you are my idol!… Me, I used what I was confident would make a great thin slices, My Santoku knife…I know a lot of people will be reading this and they would want to hang my neck for this… The only person that I could feel I need to apologize to is Masaharo Morimoto… “sorry Chef… I had to”
So yes, using my sharp confidence knife I proceed to slice my tuna steak. It is very important you follow the picture below, on how you cut your tuna steak to avoid a tuna massacre.
There is just a few points to follow:
– Cut the tip of the triangle that is separated by a silver tissue.
– remove the opposite tip of the triangle, the one that looks darker in color and it almost have no visible grain. This is the most tender and delicious part of the tuna steak, its the little corner that it is closer to the vertebra, therefore its tender. Save it to make two special bites if you want.
– Once you remove the two tips, your tuna steak will look more like a rectangular shape.
– Start slicing your tuna from the shortest side of the rectangular shape. Making sure you use just one slide motion on your knife like if you are cutting air. Sway the knife to get the cleanest cut possible.
5. Now the fun part begins, layering the flavors. In a large plate or platter, start layering the cucumber slices, onion, avocado and tuna. Squeeze some lime juice, soy sauce, mirin, sesame seeds, and little drops of the chili oil. Start another layer, until you finish with your vegetables and tuna.
Note: You will have lots of chile de arbol oil left. You can use it on stir fried dishes, shrimp, fish, or save it in a air-tight container in the refrigerator and it will be good for at least 4 weeks.
6. To finish up sprinkle the roughly chopped roasted peanuts on top of the plated items, grab you kettle potato chips, a nice pomegranate margarita, or any drink of your choice, sake, Japanese or Mexican beer will work too!
And enjoy!
Recipes, Cooking & Art Direction: Mariana Nuño Ruiz McEnroe | Photography: Ian McEnroe |
Published: July 18, 2014
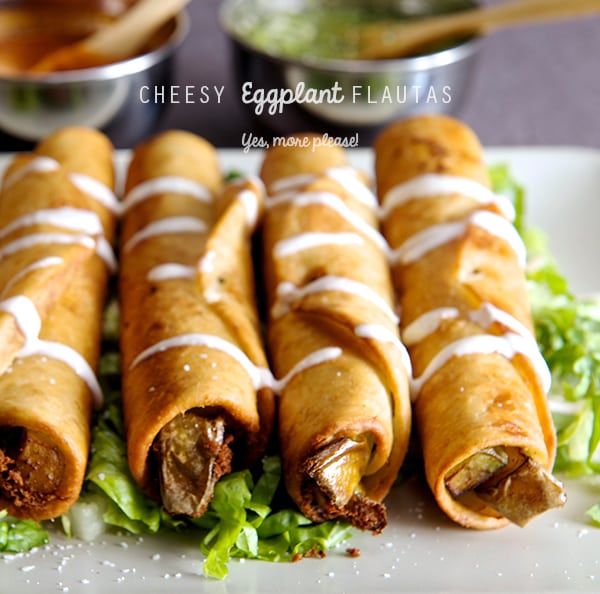
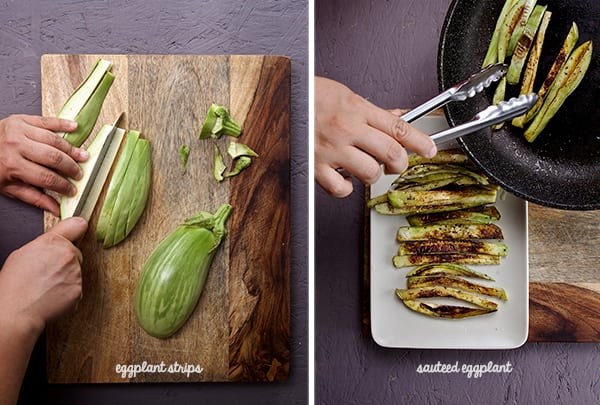
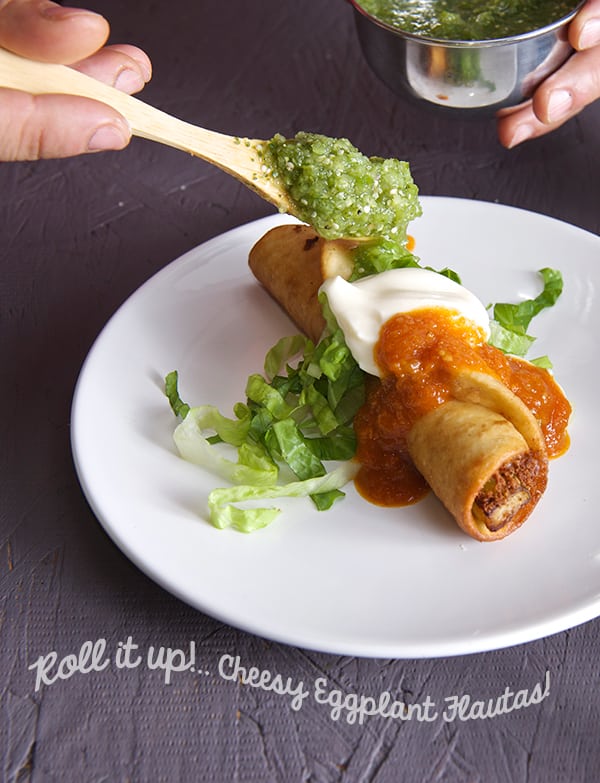
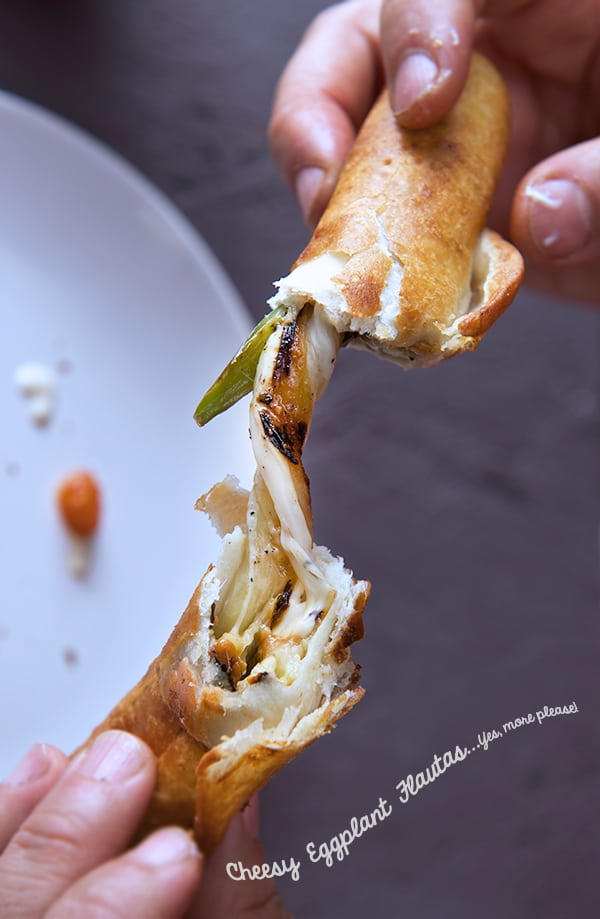
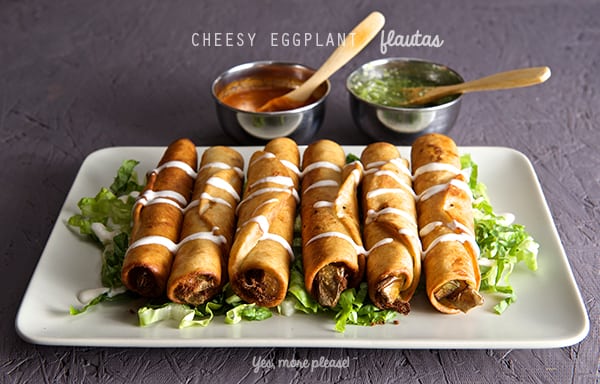
Roll e’m up, folks! These Flautas ~a.k.a~ rolled tacos are scrumptious! They are filled with quickly sauteed eggplant and a strip of Oaxaca stringy cheese in a thin flour tortilla. THis recipe is quite different from your regular eggplant recipes. The eggplant marries to the cheese inside of the crunchy warm rolled-up flour tortilla, making the filling into utterly creamy vegetable goodness.
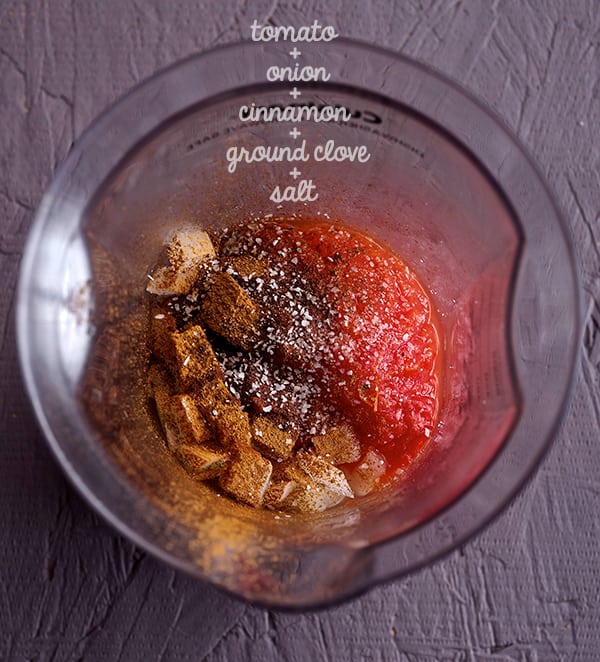
They are best served on a bed of crisp fresh lettuce, drizzled with some liquid sour cream or Mexican cream. You can make my fabulous Tomato-Cinnamon sauce for dipping it is slightly spicy and sweet, the cinnamon warms up the tomato flavor is a match made in heaven with the eggplant. A Salsa Verde also works divine… you choose, or make them both, why not?!
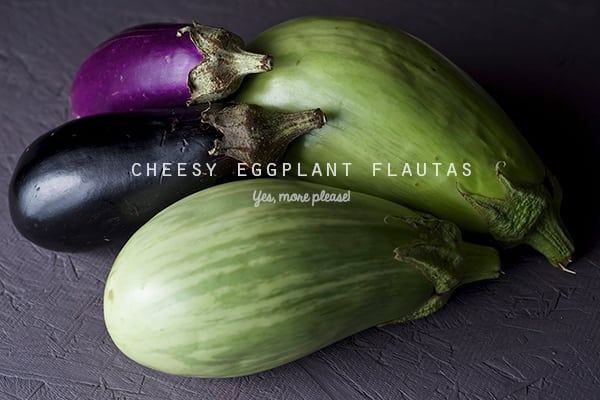
I struggle to find a great variety of quick dishes for eggplant. Cheesy Eggplant Flautas are a great way to utilize those extra eggplants and a fun vegetable option that makes for a great, simple and delicious entree.
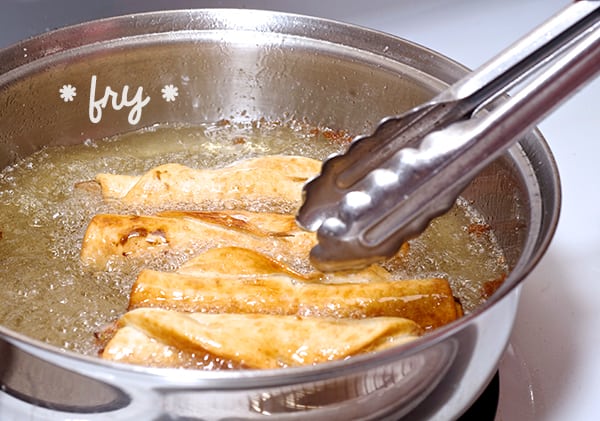
Don’t feel like frying?…then brush the rolled flautas with some vegetable oil and bake them!…
Now, get those eggplants rolling. Have fun!
Cheesy Eggplant Flautas
Makes 8 Flautas
1 large eggplant cut into thick strips.
½ pound of Oaxaca cheese.
8 thin flour tortillas
4 cups of corn oil for frying.
1-2 cups of finely shredded Romain lettuce.
For the Tomato – Cinnamon salsa:
1 large red tomato such as red prudence or 2 Roma tomatoes will do too.
¼ cup fine diced sweet onion.
1 pinch of ground clove
1 pinch red pepper flakes or one dry chile de arbol
½ teaspoon ground cinnamon.
½ teaspoon salt
½ teaspoon sugar
1 tablespoon of apple cider vinegar
1 small glug of grape seed oil or mild olive oil.
2. Boil the tomato and puree it. 3. In a small pot add oil and saute the onions until soft and translucent. 4. Add the spices and salt stir until well combined and fragrant. 5. Add the tomato puree and the sugar and cook for 3-5 minutes. 6. Turn off the heat and add the apple cider vinegar, adjust seasonings.
Make the Flautas: 1. Saute the thick eggplant stripes using a little olive oil, season salt and pepper. Set aside.
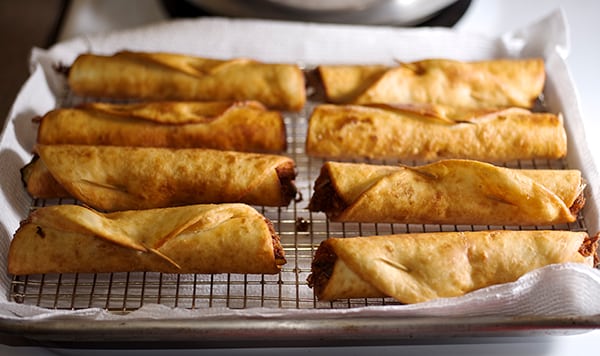
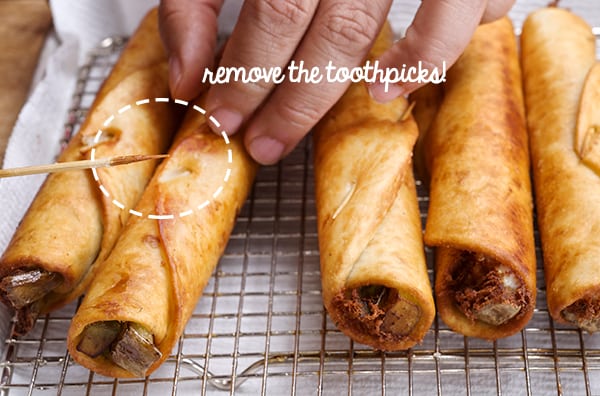
2. String the cheese into a thinner stripes. 3. Slightly warm up the flour tortillas, place one or 2 eggplant stripes and some cheese strings roll it tightly and secure the end with a wooden toothpick. Proceed with the rest.
4. In a medium size heavy bottom pan add the 4 cups of oil and warm up until your thermometer reaches between 350-375 degrees. NOTE: Take care while frying to avoid any skin contact with hot oil. Watch the pan and carefully monitor the temperature. Avoid all distractions since these flautas cook very quickly. 5. Fry the flautas until evenly golden brown around 2-3 minutes or less. Watch them at all times.
6. Pull them out on a cooling wire rack
7. Serve immediately on a bed of lettuce, drizzle the crema, dip into the salsa roja or verde…. bite, dip-bite-repeat. Enjoy!
Recipes, Cooking & Art Direction: Mariana Nuño Ruiz McEnroe | Photography: Ian McEnroe |
Published: July 6, 2014
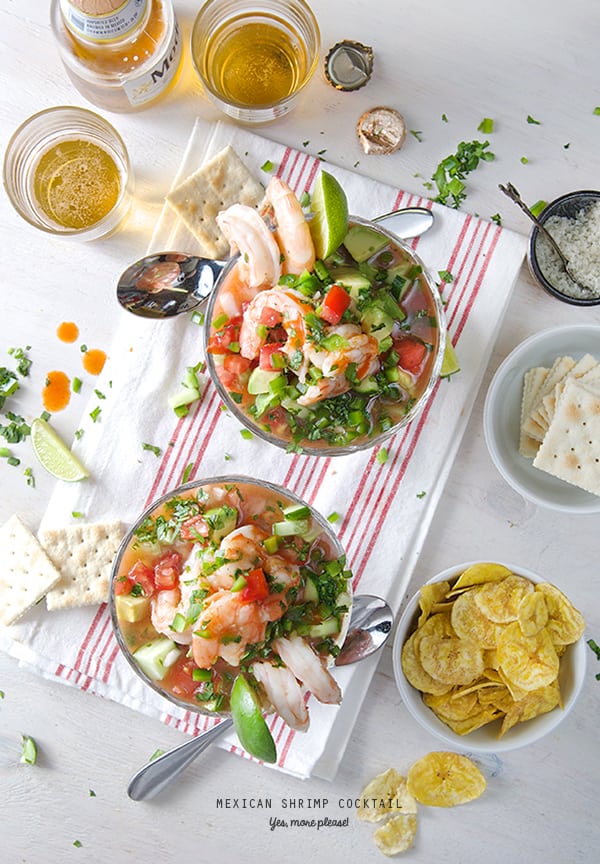
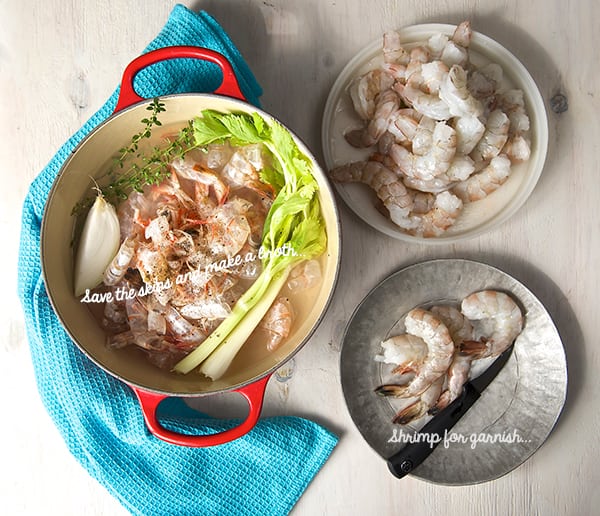
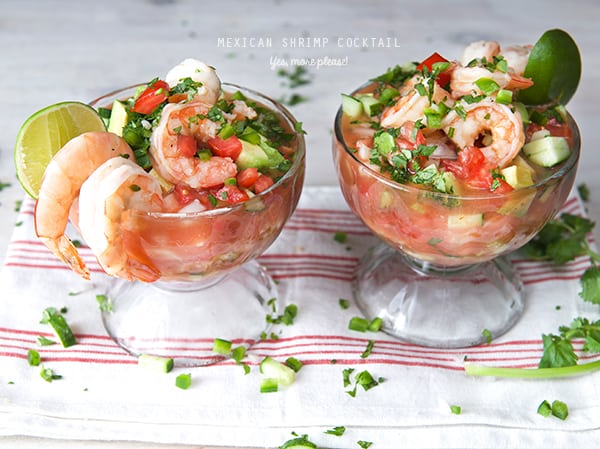
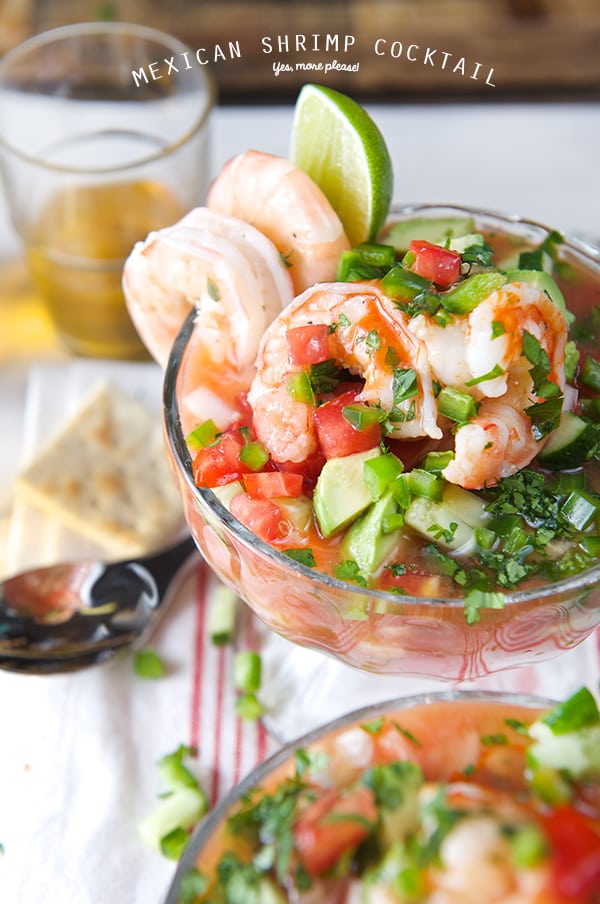
Hold your horses! Hide the children! What you are about to see is food rated “R” at its best! My Mexican Shrimp Cocktail is to die for. Fresh, delicious, and savory; it’s the perfect simple light meal for a hot summer afternoon. This juicy cold and light savory cocktail is a meal in itself. What makes it Mexican style? Well the whole combination of vegetables, accoutrement, and the cold broth. It’s a savory broth made with shrimp shells and seasoned with fresh orange and lime juice, ketchup, and some dashes of hot sauce. The result is this light fresh savory broth that goes incredibly well with the shrimp. In my opinion there’s no need to buy those bottled clam juices when you can get the most natural flavor out of your shrimp!
This Mexican Shrimp Cocktail is an entrée rather than an appetizer with a dipping sauce as served in the States. In Mexico, this cocktail is typically served on the coastal cities as an iconic refreshing staple and a must have if you are spending your day on the beach. In the city, shrimp cocktail is widely known as the number one ‘hangover elixir.’
There are many variations in which more than one shellfish is added to this concoction. Common ingredients include octopus, clams, oysters, baby scallops. It is called “Vuelve a la vida” which translates to “come back to life” because its invigorating attributes. That, I can not guarantee, however I assure you that it will refresh and invigorate you on a summer afternoon. In my case, I just love the simplicity of flavors and the way the shrimp skins cooked as a base produce a magic broth with depth and character!
Prepare this dreamy cocktail for yourself ! You can make it in advance, since it is served cold on chilled glasses. For parties you can serve it with all the vegetable accoutrement on the side which allows your guests to customize their own. Keep it ice-cold at all times. It is truly a great summer crowd pleaser. Enjoy!
I can assure you this recipe will be part of your repertoire for many years to come.
Happy Summer, Enjoy!
Mexican Shrimp Cocktail
Serrves 2 sailors 4 mermaids
This cocktail is light and refreshing, it can serve two as a meal or four to six as an appetizer. This recipe can easily be doubled or tripled upon family size, or a friendly party crowd.
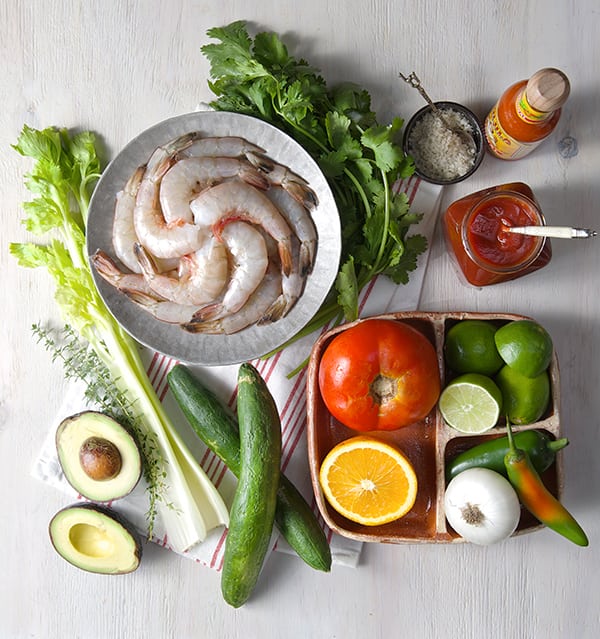
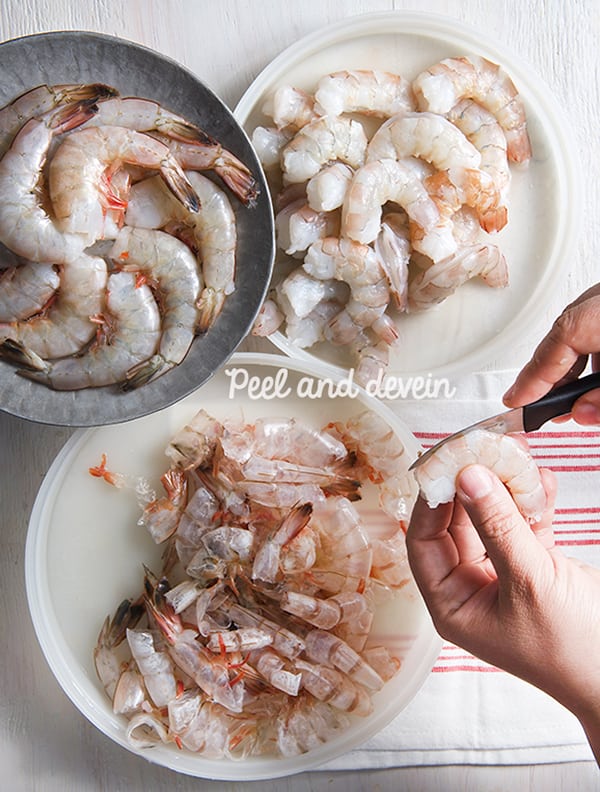
1 – ½ lbs. Jumbo or medium large shrimp, peeled save the skinsand deveined.
For the shrimp stock:
The reserved skins from the shrimp.
2 celery stalks
¼ wedge of a white onion.
2-3 sprigs of fresh thyme
1/2 teaspoon Sea salt
¼ teaspoon black pepper
Seasonings for the cold cocktail broth:
The juice of one small Valencia orange
3 large limes + 1 or 2 more to garnish.
¼-1/2 cup ketchup sauce
A few dashes of your favorite Mexican Bottled Hot Sauce, I prefer Cholula, Valentina or Huichol.
Prepare cocktail with:
2 roma tomatoes, small diced
1 small white or purple onion, small diced
1 medium cucumber seedless such as jade or English cucumber, small diced.
¼ cup finely chopped cilantro
1 chile Serrano or Jalapeno with seeds.
1 small Hass avocado
Serve with:
Saltine crackers or Tostadas
Plantain Chips
And a really cold light Mexican beer (I prefer Modelo Especial or Victoria oh yeah!)
Preparation Method:
1. Place two glass serving bowls in the freezer. (Mason jars, or glass mugs will work too.) 2. Peel and de-vein the shrimp, reserve the skins and leave 4-6 unpeeled, tail-on shrimp for garnish. 3. In a non-reactive pan place the shrimp skins, along with the celery stalks, onion wedge, thyme, a pinch of sea salt and some cracked black pepper. Add 3 cups of water and simmer for about 15- 20 minutes.
4. Meantime, prepare all your vegetable accoutrement. Dice and chop the tomato, cucumber, onion, serrano or jalapeno peppers, limes, avocado and cilantro. Set aside. 5. Check on your broth. With a slotted spoon, remove the skins and all the vegetables from the broth. Add the peeled and deveined shrimp to the hot broth and simmer the shrimp for about 2-3 minutes or until they change color and curl up.~Shrimp cook very fast so be attentive! You do not want rubbery overcooked shrimp!~
6. With a slotted spoon, pull out the shrimp a little before you think they are ready. They will keep cooking with their residual heat. Place the shrimp on a plate with ice underneath. (see picture below). 7. Fill a bowl halfway with ice and place a metal or glass bowl on top of the ice. Place a fine sieve on top of the bowl and drain the broth. With a wooden spoon, start whisking to cool off the broth until the temperature of the broth feels fresh and cooler.
8. You should have around 2 to 2-1/2 cups of broth left, transfer the broth into a liquid measuring cup if you have more than 2 ½ cups discard the extra broth. 9. Start seasoning the broth. Squeeze the juice of 3 limes, the juice of 1 small Valencia Orange, add Ketchup (I used my favorite: Sir Kensington’s spicy ketchup!) add a couple of dashes of hot sauce, the sea salt, and whisk. Taste and adjust flavor for salt or pepper.
10. Pull out the frozen glass serving bowls and start arranging your cocktail. Start by layering the ingredients and add the seasoned broth at the end. No rules here! You can add as much or as little veggies as you want. Avocado is a must, highly necessary!, A little extra squeeze of lime juice, sprinkle some cilantro and an extra dash of hot sauce…Prepare for the stampede!.. you are gonna love it. Enjoy!
Refreshing, light this Mexican cocktail its perfect for a pool party or a weekend of leisure at home. remember to have a very very cold beer, Ceveza bien fria! Enjoy!
Course
Brunch, Lunch, Main Course
Cuisine
Mexican
Prep Time30minutes
Cook Time12minutes
Total Time42minutes
Servings4sailors or 4 mermaids
Ingredients
1-1/2ibs.Jumbo Shrimp, peeled, save the peels and deveined
For the shrimp stock:
2celery stalks
2-3sprigsfresh thyme
1/4wedge of a white onion.
1/4teaspoonblack pepper
1/2teaspoonsea salt
Seasonings for the cocktail broth:
1the juice of one small Valencia orange
3largelimes,plus 1 or 2 more to garnish.
1/4-1/2cupketchup sauce
A few dashes of your favorite Mexican Bottled Hot Sauce, I prefer Cholula, Valentina or Huichol.
Garnish with:
2roma tomatoessmall diced
1smallwhite or red onion,small diced
1mediumcucumber, such as jade or English cucumber.small diced
1/4cupCilantro,finely chopped
1-2Chiles Serranos or jalapeño,finely chopped
1smallHass avocado
Serve with:
Saltine crackers or Tostadas
Plantain Chips
And a really cold light Mexican beer (I prefer Modelo Especial or Victoria oh yeah!)
Instructions
1. Place two glass serving bowls in the freezer. (Mason jars, or glass mugs will work too.)
2. Peel and de-vein the shrimp, reserve the skins and leave 4-6 unpeeled, tail-on shrimp for garnish.
3. In a non-reactive pan place the shrimp skins, along with the celery stalks, onion wedge, thyme, a pinch of sea salt and some cracked black pepper. Add 3 cups of water and simmer for about 15- 20 minutes.
4. Meantime, prepare all your vegetable accoutrement. Dice and chop the tomato, cucumber, onion, serrano or jalapeno peppers, limes, avocado and cilantro. Set aside.
5. Check on your broth. With a slotted spoon, remove the skins and all the vegetables from the broth. Add the peeled and deveined shrimp to the hot broth and simmer the shrimp for about 2-3 minutes or until they change color and curl up.~Shrimp cook very fast so be attentive! You do not want rubbery overcooked shrimp!~
6. With a slotted spoon, pull out the shrimp a little before you think they are ready. They will keep cooking with their residual heat. Place the shrimp on a plate with ice underneath. (see picture below).
7. Fill a bowl halfway with ice and place a metal or glass bowl on top of the ice. Place a fine sieve on top of the bowl and drain the broth. With a wooden spoon, start whisking to cool off the broth until the temperature of the broth feels fresh and cooler.
8. You should have around 2 to 2-1/2 cups of broth left, transfer the broth into a liquid measuring cup if you have more than 2 ½ cups discard the extra broth.
9. Start seasoning the broth. Squeeze the juice of 3 limes, the juice of 1 small Valencia Orange, add Ketchup (I used my favorite: Sir Kensington’s spicy ketchup!) add a couple of dashes of hot sauce, the sea salt, and whisk. Taste and adjust flavor for salt or pepper.
Pull out the frozen glass serving bowls and start arranging your cocktail. Start by layering the ingredients and add the seasoned broth at the end. No rules here! You can add as much or as little veggies as you want. Avocado is a must, highly necessary!, A little extra squeeze of lime juice, sprinkle some cilantro and an extra dash of hot sauce…Prepare for the stampede!.. you are gonna love it. Enjoy!
Recipes, Cooking & Art Direction: Mariana Nuño Ruiz McEnroe | Photography: Ian McEnroe |
Published: June 21, 2014
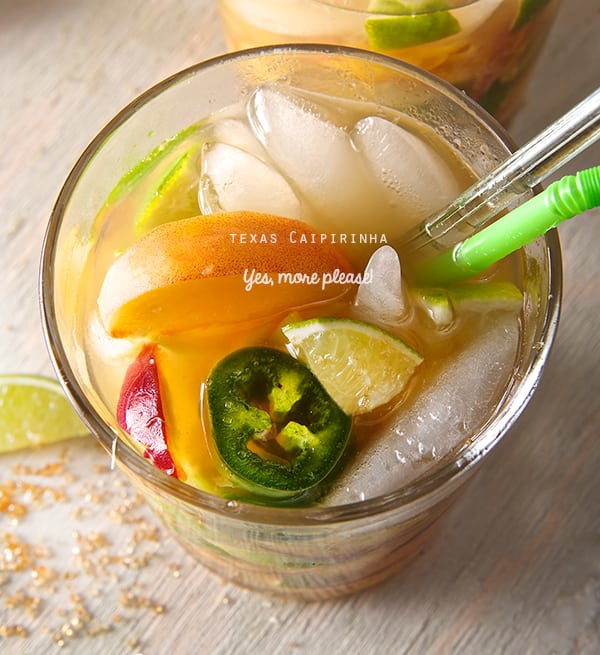
Summer is here, and with it the longest day of the year. Why not enjoy the extra day time by making these delicious Texas Caipirinhas with the best company there is: a great bowl of fresh chopped salsa and chips…Oh yes, my friends this is one of the best ways to start your Summer!
Brazil’s national cocktail “Caipirinha”is an easy and refreshing cocktail. This recipe has great twist that makes it Texan all the way. It will knock your socks off! ~which is about time is summer bring out the sandals!~ You are gonna love this Peachy Caipirinhas. Now instead of talking about them, just start making them, you’ll see what I mean pictures speak more than a thousand words on this recipe. Company? I got you covered “chips and salsa”. I made a Cucumber-Avocado Pico de Gallo, it’s refreshing and a cross between your regular Pico and Guacamole. I’m sharing my salsa tips with you. Making salsa is so easy when you know the little tricks. I’m sure these tips will make your salsa dance and taste even better.
Cheers to a happy Summer, have a great weekend!
Peach Jalapeño Texas Caipirinhas
Makes 2…because a drink always taste better when you are in company!
2 large lime cut in pieces
1 small ripe Texas Peach
2 jalapeño slices no seeds!!!
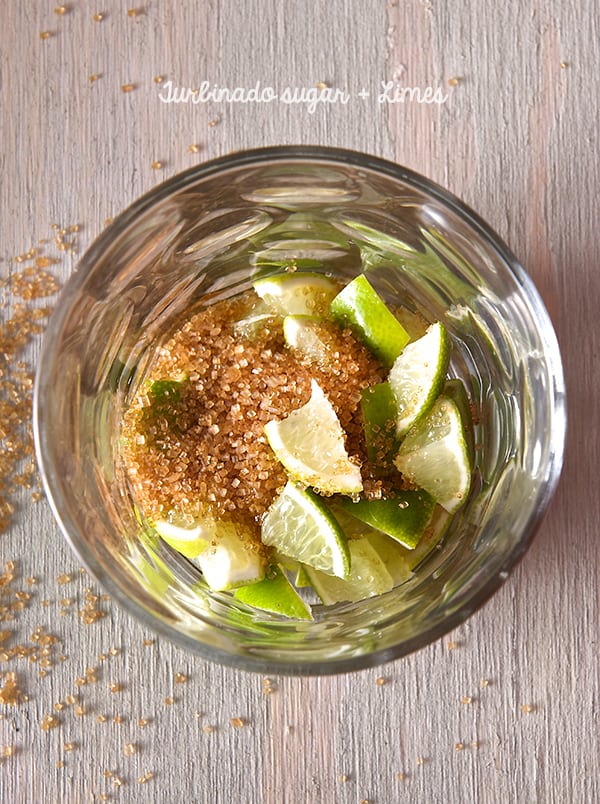
3 teaspoons turbinado sugar (1-1/2 for each glass.)
4 ounces of Cachaça Pitu or Yurioca My favorites.
Plenty Ice cubes
Preparation:
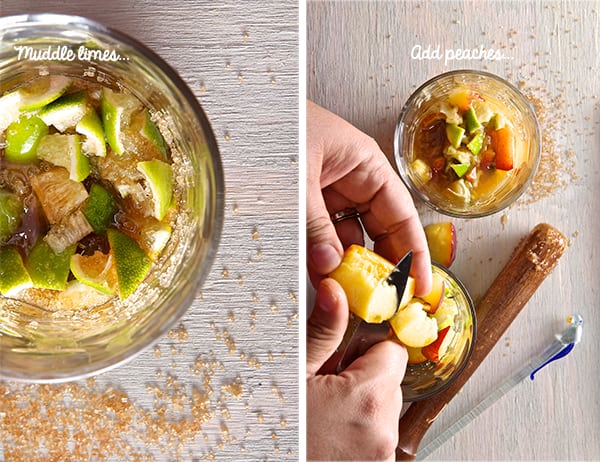
1. In a short wide glass place pieces of 1 lime, the sugar and muddle with a wood pestle.
2. Add ½ a peach on each glass and muddle.
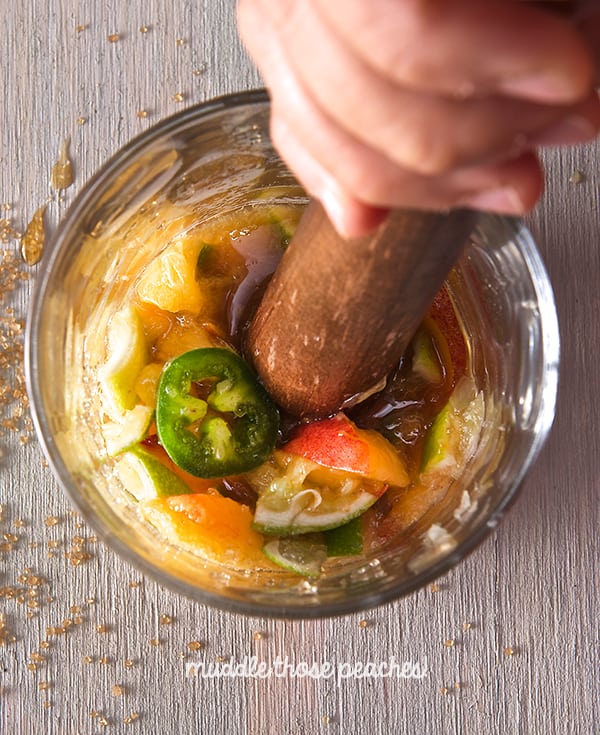
3. Add 1 jalapeño slice into each glass and muddle just enough to release the spicy juices.
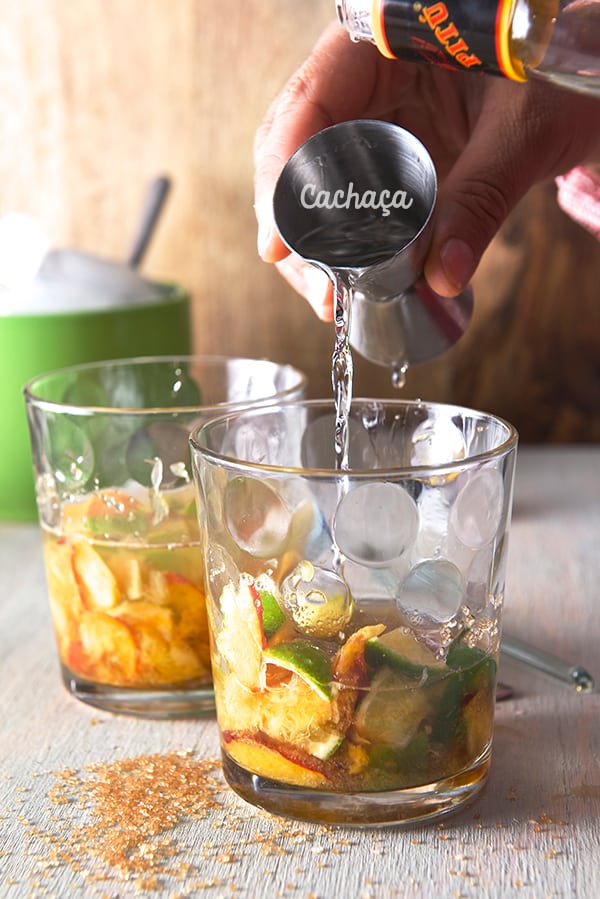
4. Pour the 2 ounces of Cachaça into each glass. Stir.
5. Fill glasses with ice
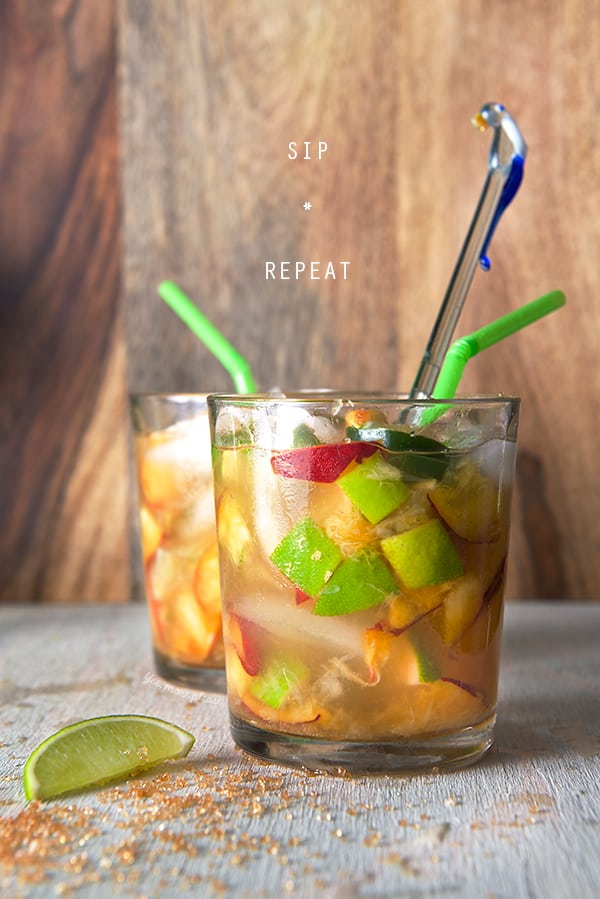
Stir well. Sip. Repeat.
Recipes, Cooking & Art Direction: Mariana Nuño Ruiz McEnroe | Photography: Ian McEnroe |
Published: June 12, 2014
Not too long ago, roaming around whole foods supermarket aisles, I discovered on the shelves the magical Sir Kensington’s ketchup. Looking at me rom the wide mouth glass jar I noticed Sir Kensington’s top hat personality and I fell in love with his aristocratic moustache. That was my very first impression. But the man behind the monocle had way more to offer than just an attractive moustache. As I grabbed the jar and started to read the label my jaw just dropped, Non- GMO, 50% less sugar, 33%less sodium, and a short list of ingredients in which whole tomatoes take the first place ingredient. I was totally in love.
You all know my love affair with tomatoes, so you must know what this discovery meant to me. In my opinion this is the best ketchup I’ve had. Shortly after I discovered the whole condiment collection, mayo, chipotle mayo, spicy ketchup and their recent addition “The” Sir Kensington’s Spicy Brown Mustard. I’ve tried them all. You should, too. Period.
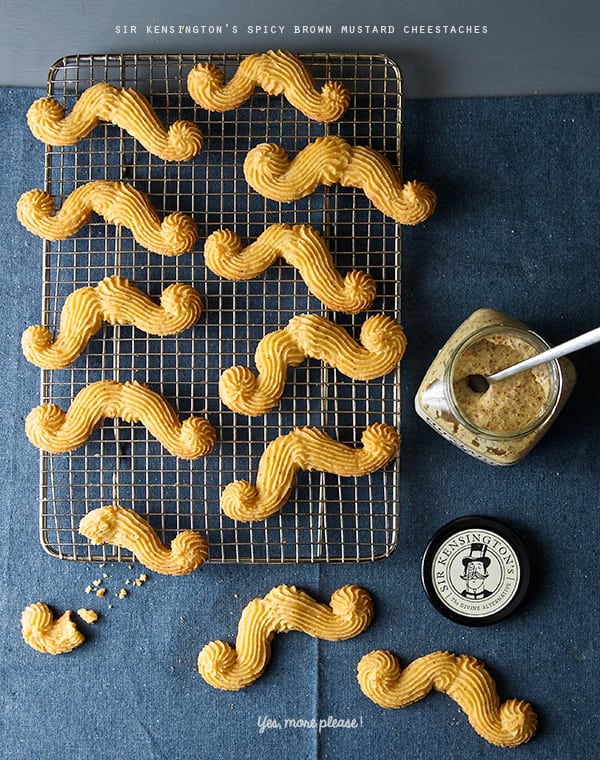
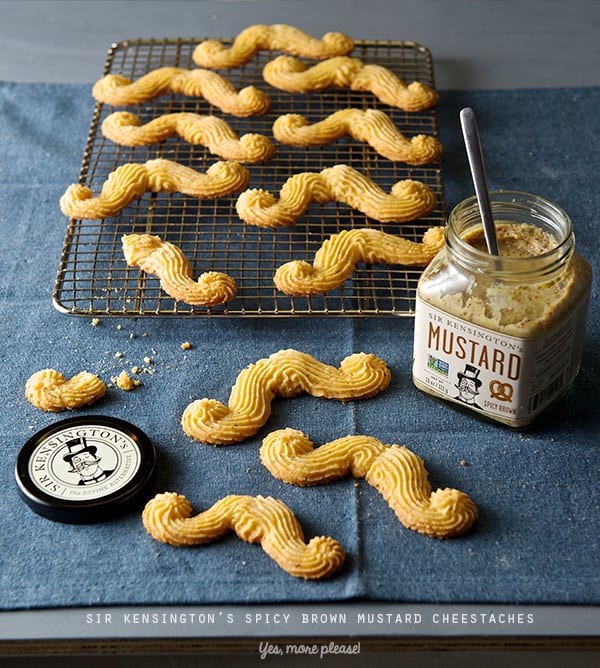
A condiment revolution is here! With all natural ingredients, this spicy brown mustard already has a place in the Mustard Museum with a silver medal on the 2014 world-wide competition. The distinctive spicy mustard flavor has a hint of maple syrup. I have smothered it on everything. I decided to come up with a recipe that enhanced the mustard flavor, and a tribute to Sir Kensington’s Moustache.
This is how this recipe was born. These cheese straws are the ‘piped’ kind you can squeeze from a piping bag or a cookie gun. Not to be confused with the twisted puff-pastry kind. These buttery, cheesy, crumbly, savory cheestaches have a spicy brown mustard kick!
Mild cheddar pairs fantastically with this spicy brown mustard. This easy and fun to make recipe has five ingredients and the result are this cheesy and spicy, utterly delicious moustaches. Most anyone with a love for creamy cheddar cheese and spicy brown mustard will appreciate a treat like this. This fun snack is a great treat to pamper your Dad on Father’s Day. Even if your Dad does not have a mustache!
Apple juice, a cold glass of beer or a cold iced tea will be the perfect match for this Cheestaches on a summer afternoon. Top notch!
Enjoy!
Sir Kensington’s Spicy Brown Mustard Cheestaches
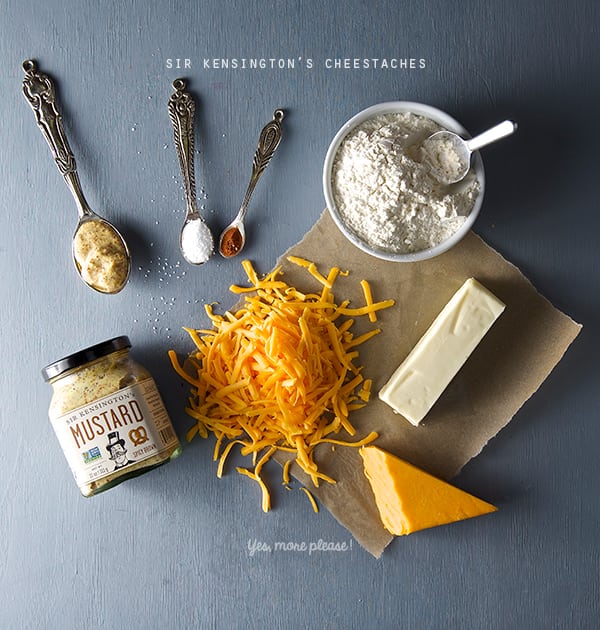
Makes 24 cheestaches
4 oz mild cheddar shredded and at room temperature
4 oz (1stick) unsalted butter room temperature
1 heaping Tablespoon of Sir Kensington’s Brown Spicy Mustard
1/8 teaspoon Cayenne pepper
1/2 teaspoon kosher salt
1+1/2 cups unbleached all purpose flour.
1 medium 12” piping bag
Metal decorating tip # 32 available at any craft store.
1 cookie sheet, parchment paper.
Preparation Method
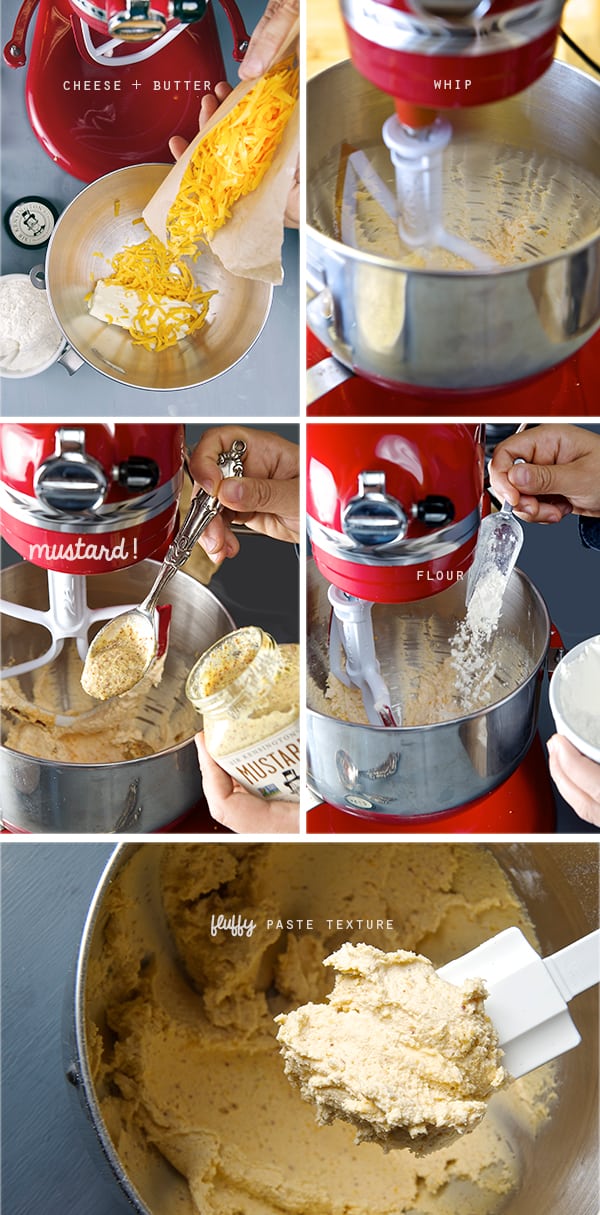
1. In the bowl of a mixer fitted with a paddle attachment, whip the butter for about 4-5 minutes until the butter looks lighter color.
2. Add the shredded cheddar cheese mix for another 3-4 minutes. until you just see small speckles of cheese and the butter is fluffy and looks whipped.
3. Stop mixer, add the spicy brown mustard, cayenne and salt. Mix until combined. 1-2 minutes.
4. Stop the mixer and add the flour in two stages, mixing on medium low until well incorporated.
5. Mix on medium high for 2 minutes. the batter should look like a paste. (if the dough is to stiff, add a bit more mustard and bout a tablespoon more of butter. whip.)
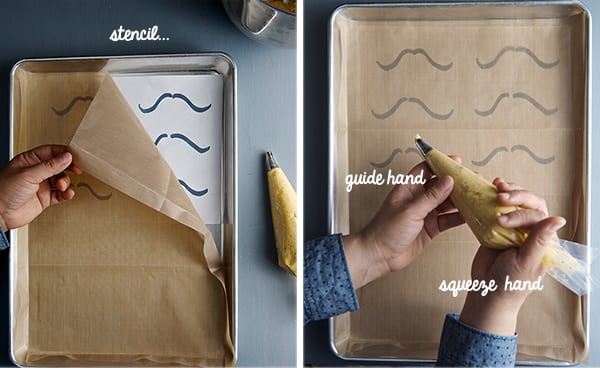
6. Prepare the piping bag, follow instructions below.
7.Line a Baking sheet with parchment paper, a silpad or reusable-parchment, mi favorite!; place the mustache stencil under the parchment.
I made a mustache stencil you can print for easy piping, you can look it up, down load it our Yes, more please! Facebook page click here to get it! Not in the mood of mustaches?.. pipe 3”- 4” stripes and bake for about 12 minutes.
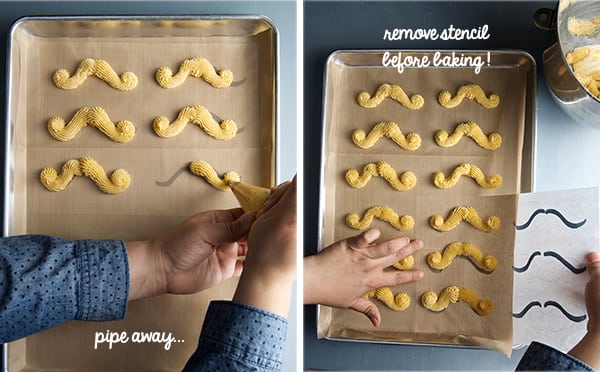
8. Now the fun begins!…Pipe the cheese- mustaches follow the instructions on the picture below, but first take a quick look on my easy way to handle a piping bag.
9. Once you pipe the mustaches place the baking sheet in the refrigerator for at least 15- 25 minutes.
10. Preheat your oven at 350 F.
11. Bake cheese straws for 12-14 minutes, until the tips and base of the mustaches start looking golden brown on the edges.
12. Remove from oven, let them cool on the cooking tray for 4-5 minutes on the tray. Then with the help of a flat spatula transfer them to a cooling rack.
13. This cheese mustaches can be dipped on a bit extra of spicy brown mustard if desired for more kick. But to tell you the truth they are great as they are!..and they taste fantastic the day after.
Serve with a nice cold glass of beer or Iced Tea. Enjoy!
This recipe post was sponsored by Sir Kensington’s brand condiments and the mustard used was furnished by the good folks at Sir Kensington’s.
Recipes, Cooking & Art Direction: Mariana Nuño Ruiz McEnroe | Photography: Ian McEnroe |
Published: March 4, 2014
I must confess that I have a weakness for Korean BBQ… I don’t always cook at home. When we decide to go out, Korean BBQ is on the top of our list. I am amused by all the fresh ingredients that are cooked before your eyes. The orchestrated arrangement of little dishes with fermented vegetables, salty sweet, sour, spicy crunchy, juicy, is a circus of textures, temperatures, flavors and aromas. All my senses are awake.
One of my favorite side dishes would be the the Pajeon or Korean pancake. A savory light pancake, made with eggs, rice flour, flour, scallions-green onions. All sorts of variations can be made, including beef, pork, sea food, shell fish, kimchi…Oh! the kimchi.. My favorite.
With this Korean pancake in mind and a little help of the current abundant green leafy season, I thought about making a lighter all veggie version using one of my favorite seasonal greens…“RainbowChard” this colorful happy leafy green, is a close relative of the beet family, delivers 3 major vitamins A, K and C. Loaded with phytochemicals rainbow chard is one of the healthiest, most beautiful, and tasty vegetables I know. Flavorwise, I would describe it as a cross between baby spinach with a bit of sweet beet background. Texturewise, the leaves are way softer than kale which makes it a bit more pleasant to eat raw or quick sautéed. Rainbow chard has it all, flavor, texture, and color.
Inspired by all these great leafy green qualities, I was almost in a rush to attempt to make an all veggie Rainbow Chard Korean Pancake. The result was fantastic, the rainbow chard’s sweetness and texture are a good match for this light savory pancake. The charred scallions, green garlic and the spicy jalapeño kick in combination with the rice vinegar dipping sauce for the perfect savory pancake match.
Once again I proved to myself that cooking with fresh ingredients is not only a great nutrition and a healthy value. It inspires me and it’s a feast for the eyes!. That for me makes it even more appetizing…Enjoy!
Rainbow Chard Korean Pancake
Makes 2- 9” round savory pancakes
½ cup unbleached-all purpose flour or gluten free flour like all-purpose King Arthur like this
½ cup stone ground rice flour (I used Bob’s Red Mill)
1 egg or 1 tablespoon of ground flax seed + 3 tablespoons of water= 1 egg
2 teaspoons grapeseed oil, canola oil, or any neutral oil. And a little extra oil to pan fry the pancakes.
1 teaspoon roasted sesame oil
pinch of salt
pinch of white pepper
¾ -1 cup water
6-8 rainbow chard leaves
4 scallions
1 garlic clove or 3 green garlic shoots
1-2 red or green jalapeno or red thai chili
2 tablespoons sesame seeds
extra oil for pan fry the pancakes
Rice vinegar dipping sauce:
1 tablespoon rice vinegar
1 tablespoon water
1 teaspoon soy sauce
1 teaspoon agave nectar
a pinch of red dry chili flakes or a teaspoon of sambal sauce
Preparation method:
1. In a medium size bowl, mix the flours, egg, vegetable oil, sesame oil salt, pepper and water, whisk well until a smooth batter that resembles a loose pancake batter. Set a side to rest.
2. Chop all your vegetables, scallions and jalapenos on a bias. Make a roulade of rainbow chard leaves and chop them into a chiffonade, chop rainbow chard stalks into matchstick size.
3. On a cast iron or nonstick skillet over medium-high heat drizzle some oil, and arrange a layer or vegetables, starting with the jalapenos, rainbow chard matchsticks, scallions, green garlic and rainbow chard chiffonade. Sprinkle some sesame seeds and promptly ladle half of the batter , spreading it out evenly into a circle.
4. Reduce the heat to medium and cook until the bottom is golden brown, a few areas will have a bit of char which is perfectly fine. Cook for about 5 minutes per side.
5. The “flipping matter”… you can use Julia’s Child encouraging words “flip it with conviction!!!”, or you can use a plate to flip the pancake upside down and then return it to the pan, to finish cooking…both methods work great!
6. Once both sides are cooked, transfer to a warm plate and repeat the process with the remaining ingredients.
7. In a large platter, cut into triangles and serve warm with the rice vinegar dipping sauce.
Variations: You can add shrimp, small tofu squares, carrots, squash, kimchi!!!
Hey! the pancake is you canvas, have fun and enjoy!


 I must confess that I have a weakness for Korean BBQ… I don’t always cook at home. When we decide to go out, Korean BBQ is on the top of our list. I am amused by all the fresh ingredients that are cooked before your eyes. The orchestrated arrangement of little dishes with fermented vegetables, salty sweet, sour, spicy crunchy, juicy, is a circus of textures, temperatures, flavors and aromas. All my senses are awake.


