Recipes, Cooking & Art Direction: Mariana Nuño Ruiz McEnroe | Photography: Ian McEnroe |
Published: September 10, 2014
This makes for a versatile dish: appetizer, summer dinner, or lunch; place it in any part of a summer’s day. If you just want something lighter, easy, and extremely tasty, with a little Mexican flair, this is your recipe to go!.
Forget for a bit about the tired guacamole and chips or ceviche. I know they are delicious, but this is going to turn on your appetizer-snack light bulb. There are so many other ingredients in Mexican cuisine, and so many fusions that can take place, that this dish stroked me last night and it was a delicious dinner…Yes, yes we had this for dinner, along with a couple of pomegranate Margaritas…if you want the recipe for them leave me a comment and I will post it next week…
Let me introduce you to my version of Mexican Tuna Sashimi. In Mexico there is a kind of sashimi preparation named Agua chile. Agua Chile is a quick appetizer in which shrimp, octopus, are partially cooked in lime juice and a fresh serrano pepper and a couple of dashes of a well known dark sauce seasoning starting with “M” are added. It is ridiculously simple and delicious.
With this Agua chile dish in mind and Masaharu Morimoto whispering in my ear: “Tuna Sashimi”~
I fused a couple of ideas and created this scrumptious appetizer, summer lunch, Desperate Housewives re-runs, or foodie football game night.
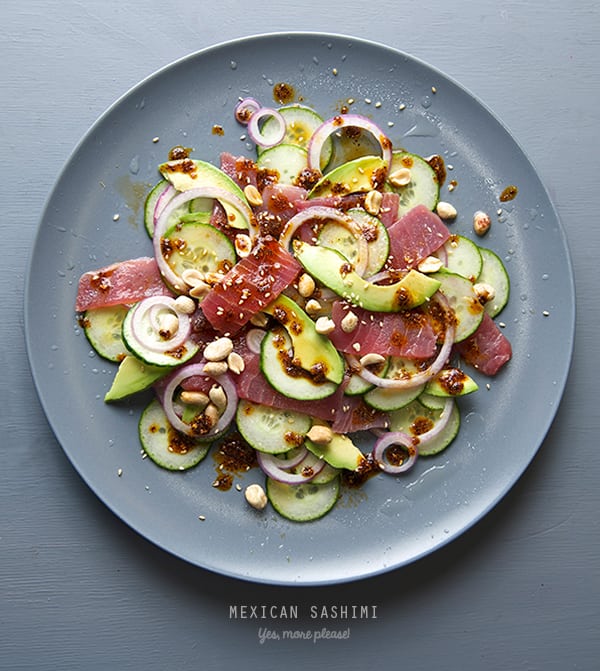
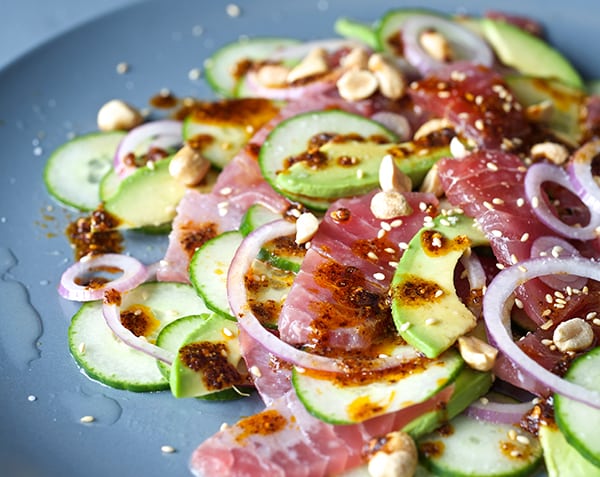
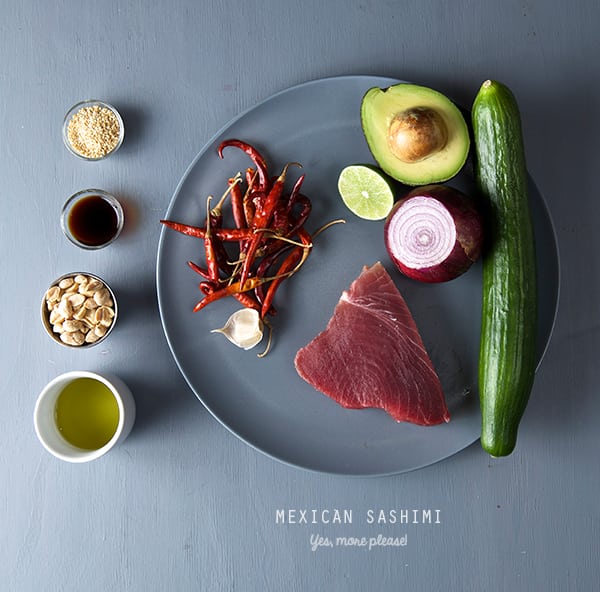
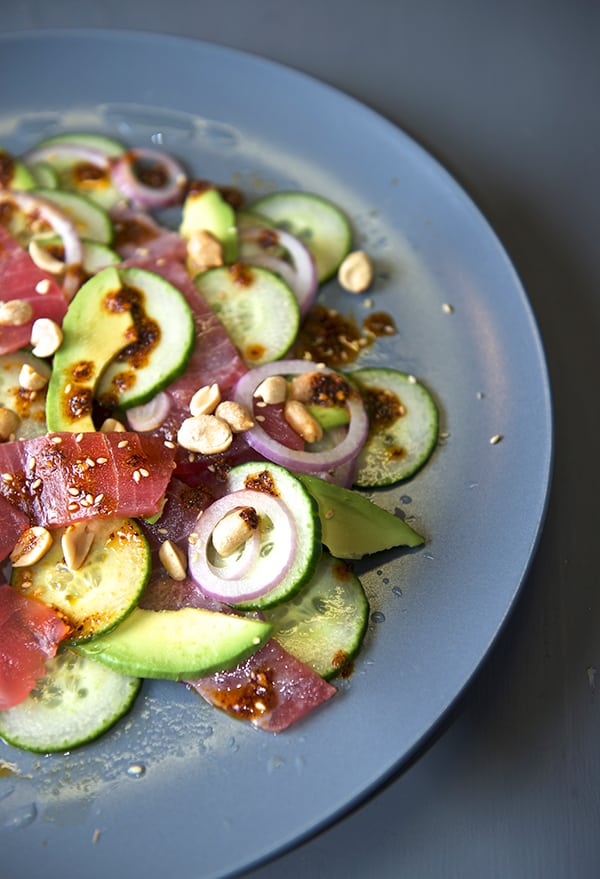
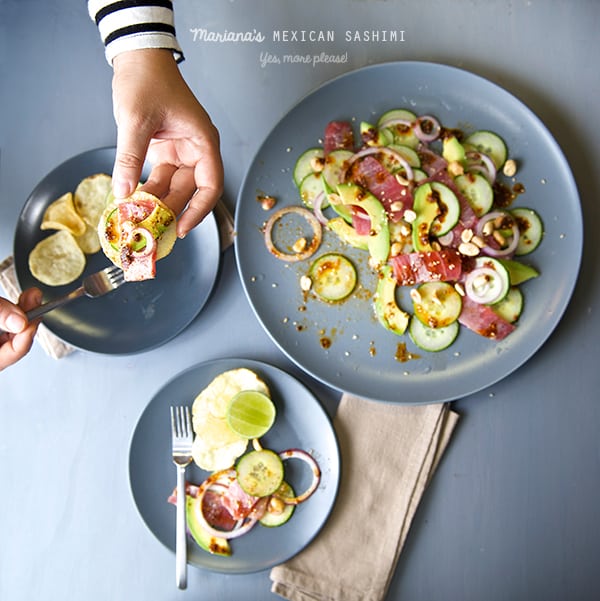
For the recipe sushi grade tuna, a crisp English cucumber, creamy avocado, red onion, lemon juice, soy sauce are plated and combined with my weapon of choice: a red toasted chile de arbol oil sauce. To add some fun and crunch factor, Kettle potato chips or some salty crispy rice chips are delicious on the side to complement the ingredients in this crazy adventure.
The result is a cosmic bite that takes you to Japan and back to play at a mariachi band! Please, you must try this. Share and repeat.
You will find your self craving this appetizer often. Just like we now do…
Mariana’s Mexican Tuna Sashimi
Serves 2 or 4.
½ lb tuna steak, sashimi quality, from sustainable sources, ask your fishmonger for best available.
½ English cucumber thinly sliced
½ small red onion thinly sliced
½ Mexican Hass avocado
1 lemon
1-2 teaspoons mirin
2 teaspoons tamari sauce or soy sauce
For the Chile de Arbol oil-sauce :
12 dry Chiles de Arbol remove stems if any.
1 garlic clove
2 good pinches of sea salt
¼ cup grape seed oil
1 teaspoon toasted sesame seeds.
Garnish with:
2 tablespoons unsalted roasted peanuts
toasted golden sesame seeds.
Preparation:
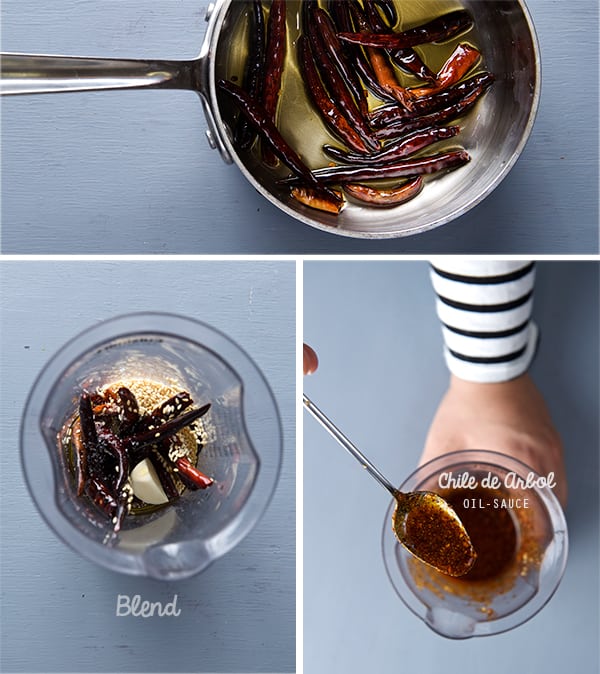
1. First make the sauce. In a small pot heat up the oil and chiles on medium-low, until the chiles are deep dark red, almost black. Set aside and let it cool. Once its cooled down blend the chiles, the oil, sesame seeds, garlic, and salt until you have thick chili oil. Feel free to add a bit more oil if it is too thick. Set aside.
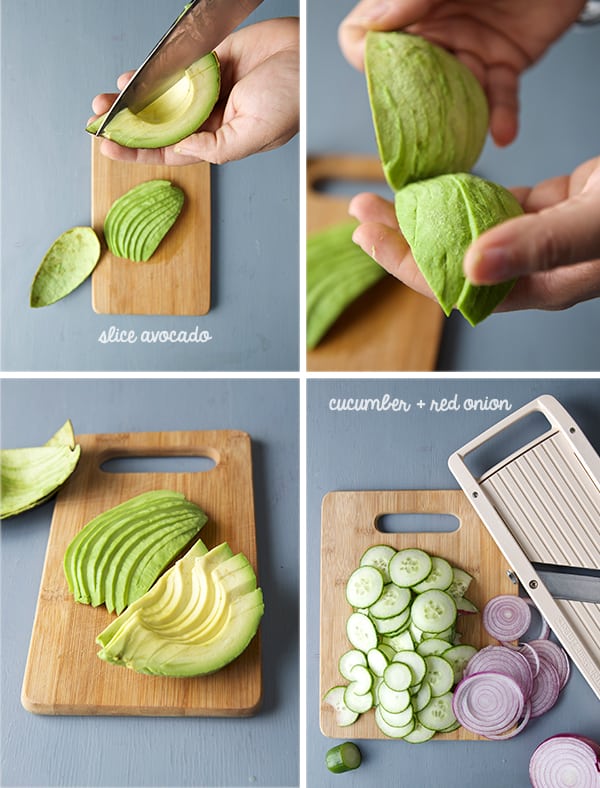
2. Now, place your tuna steak in the freezer for about 10 minutes before slicing, this way it will slice easily. I usually set up a timer so I don’t forget its there and you end up with a tuna lollipop! 3. Meantime, with a Mandolin or a sharp knife, thinly slice: cucumber, red onion, avocado.
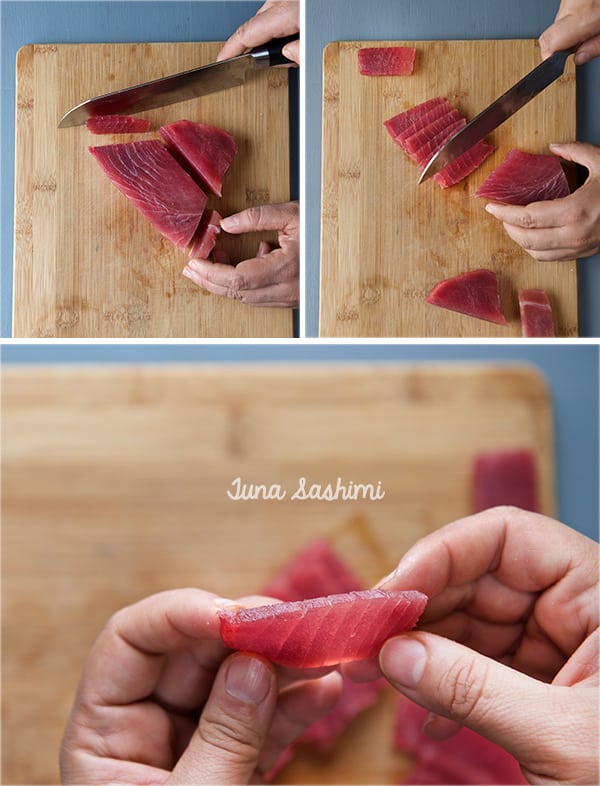
4. Remove the tuna from freezer and slice with the sharpest knives you have. It can be a filet knife, a fish knife, if you own a sashimi knife you are my idol!… Me, I used what I was confident would make a great thin slices, My Santoku knife…I know a lot of people will be reading this and they would want to hang my neck for this… The only person that I could feel I need to apologize to is Masaharo Morimoto… “sorry Chef… I had to”
So yes, using my sharp confidence knife I proceed to slice my tuna steak. It is very important you follow the picture below, on how you cut your tuna steak to avoid a tuna massacre.
There is just a few points to follow:
– Cut the tip of the triangle that is separated by a silver tissue.
– remove the opposite tip of the triangle, the one that looks darker in color and it almost have no visible grain. This is the most tender and delicious part of the tuna steak, its the little corner that it is closer to the vertebra, therefore its tender. Save it to make two special bites if you want.
– Once you remove the two tips, your tuna steak will look more like a rectangular shape.
– Start slicing your tuna from the shortest side of the rectangular shape. Making sure you use just one slide motion on your knife like if you are cutting air. Sway the knife to get the cleanest cut possible.
5. Now the fun part begins, layering the flavors. In a large plate or platter, start layering the cucumber slices, onion, avocado and tuna. Squeeze some lime juice, soy sauce, mirin, sesame seeds, and little drops of the chili oil. Start another layer, until you finish with your vegetables and tuna.
Note: You will have lots of chile de arbol oil left. You can use it on stir fried dishes, shrimp, fish, or save it in a air-tight container in the refrigerator and it will be good for at least 4 weeks.
6. To finish up sprinkle the roughly chopped roasted peanuts on top of the plated items, grab you kettle potato chips, a nice pomegranate margarita, or any drink of your choice, sake, Japanese or Mexican beer will work too!
And enjoy!
Recipes, Cooking & Art Direction: Mariana Nuño Ruiz McEnroe | Photography: Ian McEnroe |
Published: September 3, 2014
The state of Yucatán is located in Southeast Mexico right at the tip of a peninsula and is mostly tropical forest. It is the location of important ancient Mayan cities like Chichen Itza, Izamal, Motul, Mayapan, Ek’Balam and Ichcaanzihoo, which now make up the modern city of Mérida. A tropical forest is filled with an abundance of living species including: Toucans, Guacamayas, Papagayos, Garzas, hummingbirds, serpents, crocodiles, wild boar, porcupines, changos iguanas, squirrels, armadillos, reindeer, and jaguars. All kinds of insects inhabit the forest from ants and wild bees to lightning bugs and mosquitos, all living together in a beautiful fertile land.
Nine thousand years ago this was the land that the Mayan choose to develop their civilization. A paradise of abundance of colors, nature, spices, and rainforest; all your senses are awaken in this land.
It is in the Yucatán where an important culinary fusion took place after the Spanish conquest: Spanish and Mayan cuisine. It is a belief that the people of Yucatán were the first Native Americans that tried the pork meat.
This fusion of cuisines gave origin to a New World cuisine, the Mestizo. These dishes which derive part of their origin from prehispanic ingredients, condiments and techniques were fused with the new ingredients from the old continent. Items like pork, spices, citrus, and different cooking techniques came together to create this New World cuisine.
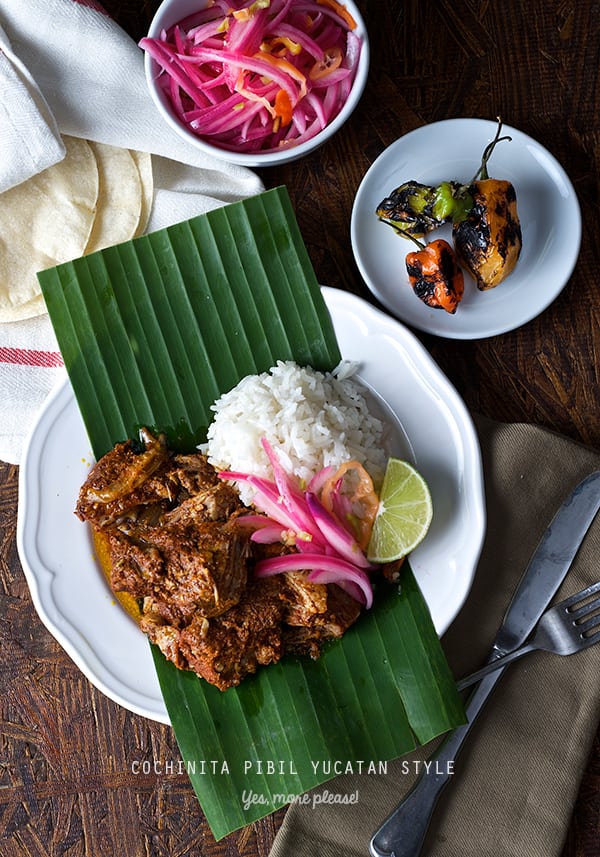
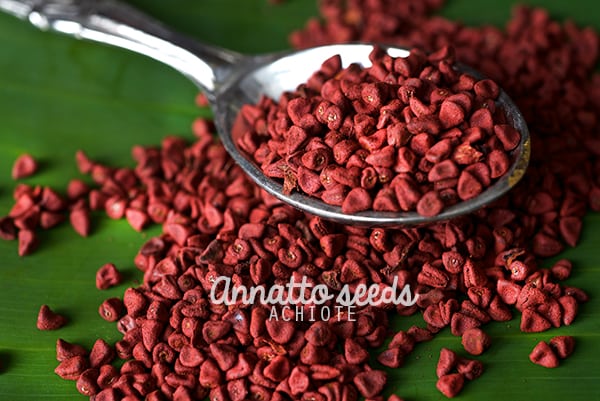
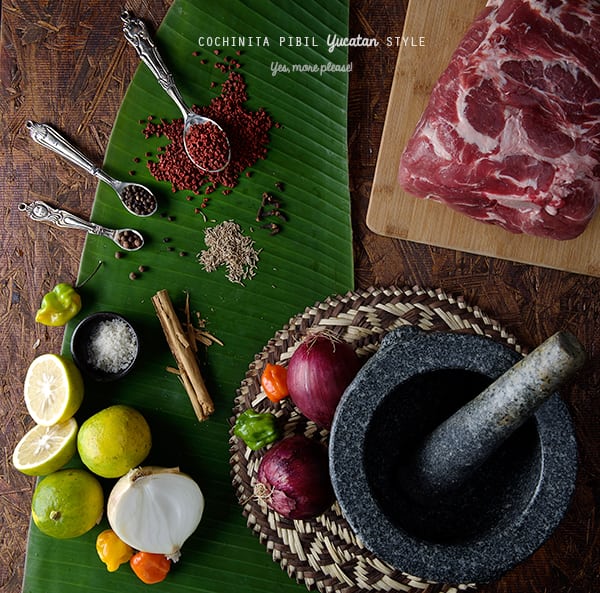
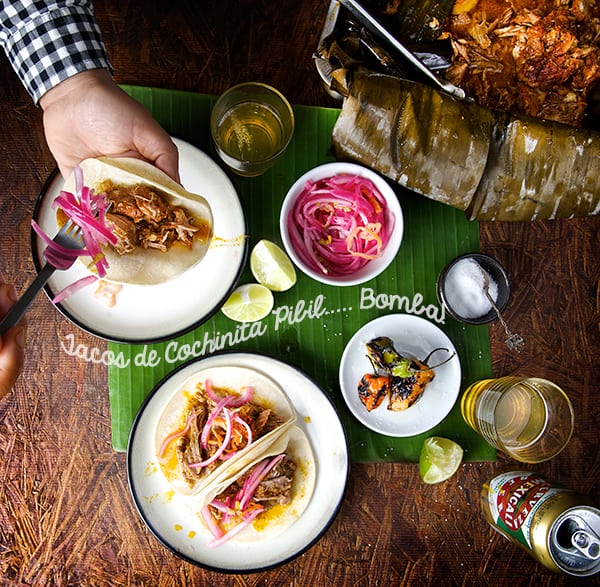
Cochinita Pibil is one of the most renowned dishes in Yucatán. Its name comes from Cochinita = suckling pig or small pig, and Pibil in Mayan means “under the ground” referring to the cooking method that the Mayan developed. It is one of the dishes that I like the most from that region. It is really amusing and fun to prepare. There are two ingredients in this recipe that give character and its particular flavor: Annatto seeds and Bitter oranges. You might have to go on an adventure to find them, although now its easier than ever with all the specialized condiment stores and supermarkets with special sections for ethnic foods. Annatto seeds grow on the tropical forest of a little tree that gives a heart shaped fruit with spiky hairs.When the fruit is fully mature, it splits open revealing the beautiful red seeds. Besides having a culinary purpose, annatto seeds are also used for pigments and food coloring.
Cochinita Pibil is such a rewarding dish. A little love and effort go a long way. First, you work on a rub-marinade for the pork, marinate it overnight or for as long as twenty-four hours. Then make a pork bundle of banana leaves and bake it in the oven or in an outdoor charcoal pit for 3.5 to 4 hours. If you wish you can go all the way and bury it in the ground which is the traditional method. My recipe is more adapted for house or grill cooking. If you want to go with the traditional method send me an e-mail along with and invitation and I will help you cook it! : )
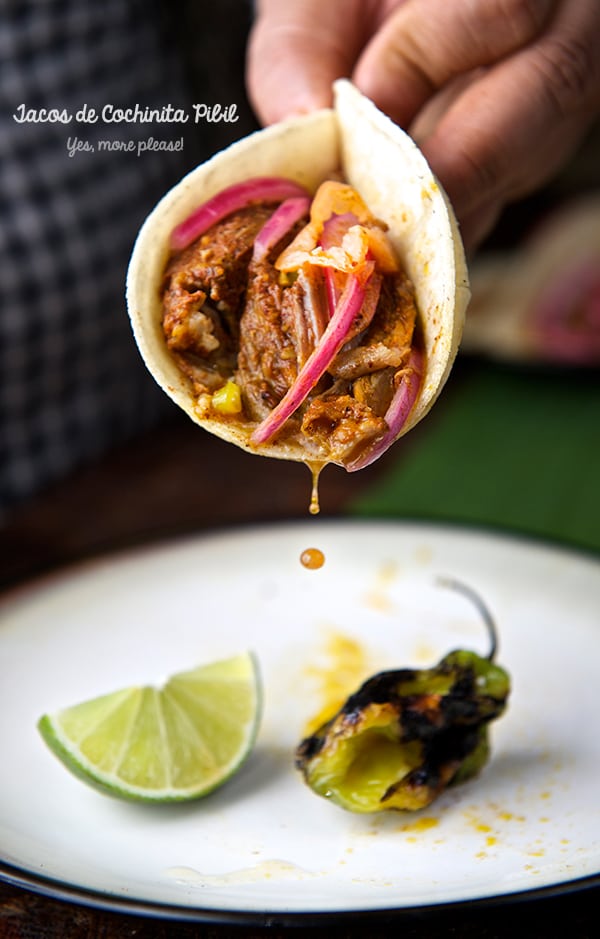
The best way to describe this Cochinita Pibil is addictive. The tangy oranges, the floral annatto seeds and the two types of pepper corns marry the rich pork flavor transforming the pork into the best succulent pork with an extraordinary flavor and tender texture. The pork remains moist from the Banana leaves pocket that keep the pork bundle warm and juicy. The banana leaves perfume the dish giving it an intangible unique quality.
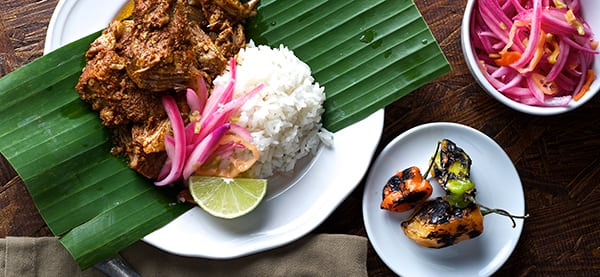
Cochinita Pibil is traditionally served with garlic rice and black beans, in tacos, or tortas.
Other delicious dish preparations could be as a stuffing for enchiladas, poblano chiles or empanadas. For me I think is best on its own, with corn tortillas on the side, hand made if possible.
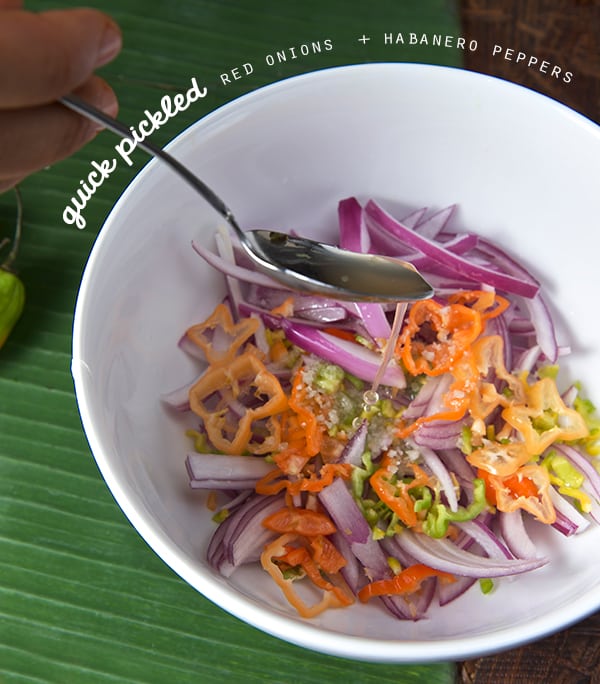
Quick pickled red onions with fresh habanero peppers and a grilled habanero pepper sauce on the side, a cold Mexican pilsner beer are Cochinita Pibil’s best companions… the way its served in Yucatán, the best juicy pork on the planet!
I know you’re gonna love this recipe as much as I do…. ask Ian!…Enjoy!
Cochinita Pibil Yucatan Style
Serves 6 Yucatecos, and 6-8 pork taco lovers.
8lbs.Pork butt or pork shoulder cut into large 3”x 4”cubes approx. Pork butt tends to shrink a lot because of its fat content, always calculate at least 2 or 3 more pounds of what you think you will need. In this recipe 8 pounds, yields about 5-6 net pounds of pork meat.
2 white onions sliced on thin wedges.
For the marinade:
6 tablespoons annatto seeds*
1 tablespoon whole black pepper
8-10 whole All spice peppercorns (upon size small=10 medium-large=8)
6 whole cloves
2 teaspoons cumin seeds
2″ stick Mexican cinnamon
1/2 teaspoon Mexican oregano
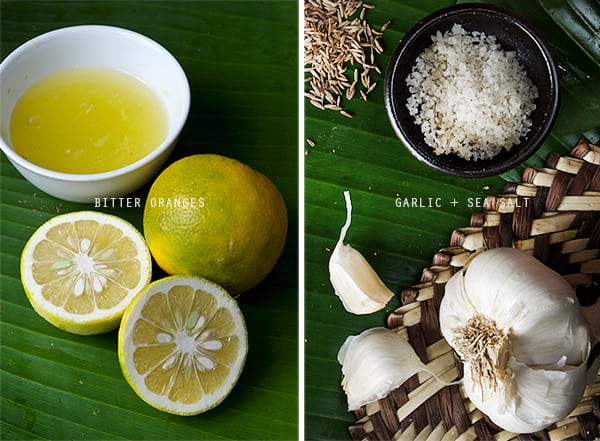
12 garlic cloves
1 Habanero chile de-seeded
1 tablespoon sea salt.
1- 1/2 cup of bitter oranges juice. Bitter oranges have a sour bitter flavor, highly acidic which complement and tenderize the meat.How to recognize them?
They have green and yellow rough skins, picture above.
(If you can’t find this kind of oranges, substitute for 1 cup orange juice and 1/2 cup white vinegar)
For the quick pickled red Onions:
2 medium red onions, sliced in thin wedges
4-5 Habanero peppers, thinly sliced or diced.
Juice of 1 lime
1/2 cup white or pineapple vinegar
1 teaspoon kosher salt
You will need the following to cook your Cochinita Pibil:
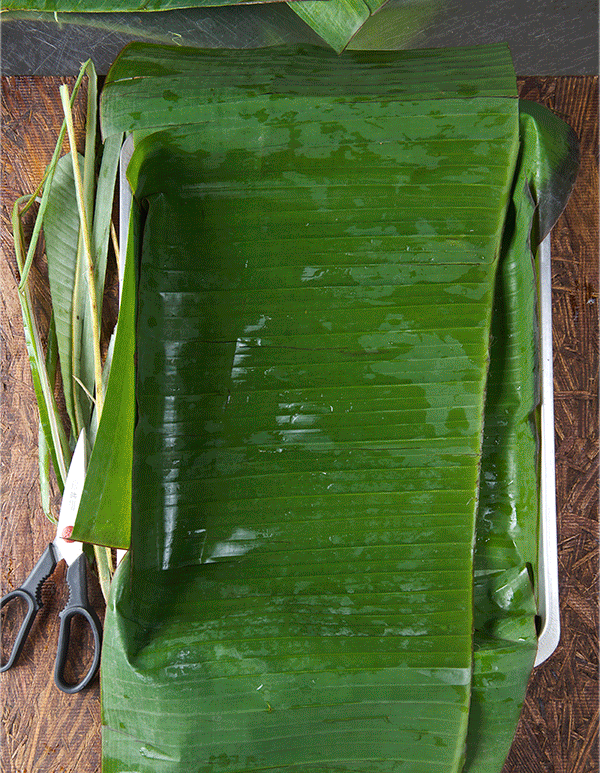
5-6 Banana Leaves
Heavy duty Foil paper
16″x13″ Ennamel, clay or stainless steel roasting pan
Note:
If you cannot get annatto seeds, you can substitute for achiote paste. It is not the same flavor, I really prefer to go with the seeds the flavor and the aroma is so much better. If you use the paste, use 3/4 of the paste bar, and use only 1/2 the amount of salt on the recipe. The same with the rest of the spices, If you can get them whole the spices taste so much better. Why? Well once the spices are grounded the oils inside the seeds that give the aroma and flavor, start to oxidize,losing their intensity of flavor and aroma.
Preparation Method:
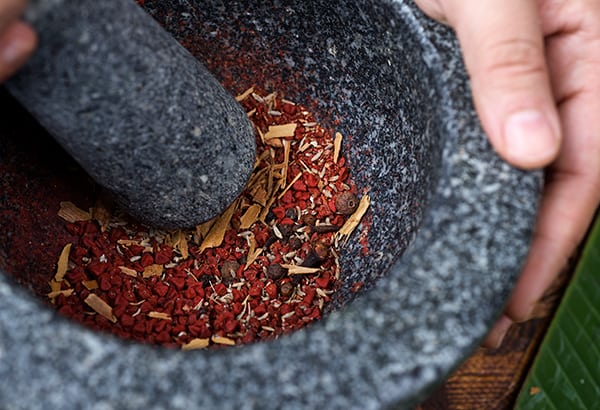
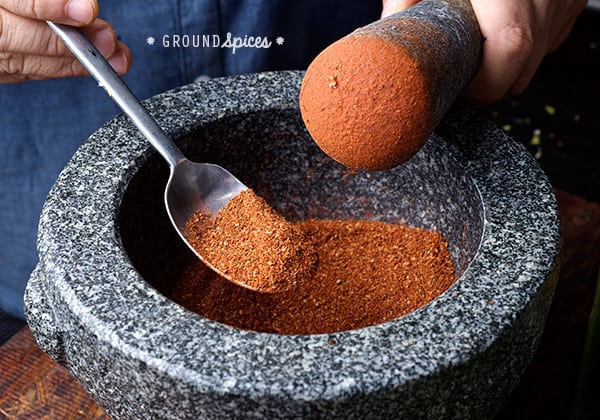
1. Cut the pork into 3”x 4” cubes, set aside. 2. Grind the annatto seeds, black pepper, allspice, cinnamon, cloves, cumin seeds, oregano until powdered. You can use a stone mortar to pulverize the seeds or a coffee grinder. I do recommend fresh spices whole rather than powdered because the whole seeds retain much of their oils and are more fragrant. Since we are making all by scratch, it is worth the extra effort!
I do prefer to use a mortar, is more fun and the aroma of the spices while you grind them is amazing… if you are not so romantic like me..hehehe a coffee grinder will work, just remember that once you use it for spices, just use it for that purpose.
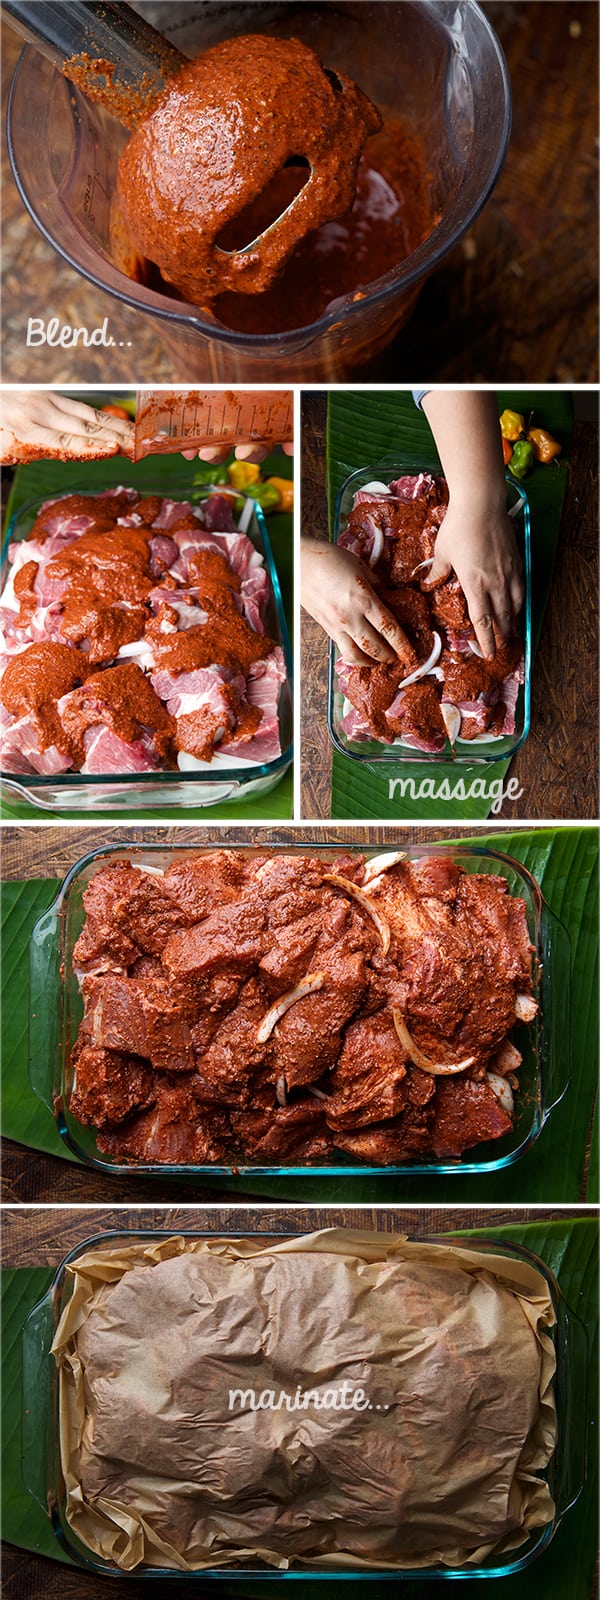
3. In a blender combine the garlic cloves, Habanero chiles, sea salt and orange juice. Blend. 4. In a glass container place the pork and all the blended marinade, massage the pork pieces until well covered. Cover with parchment paper and plastic wrap. Refrigerate, let it rest over night.
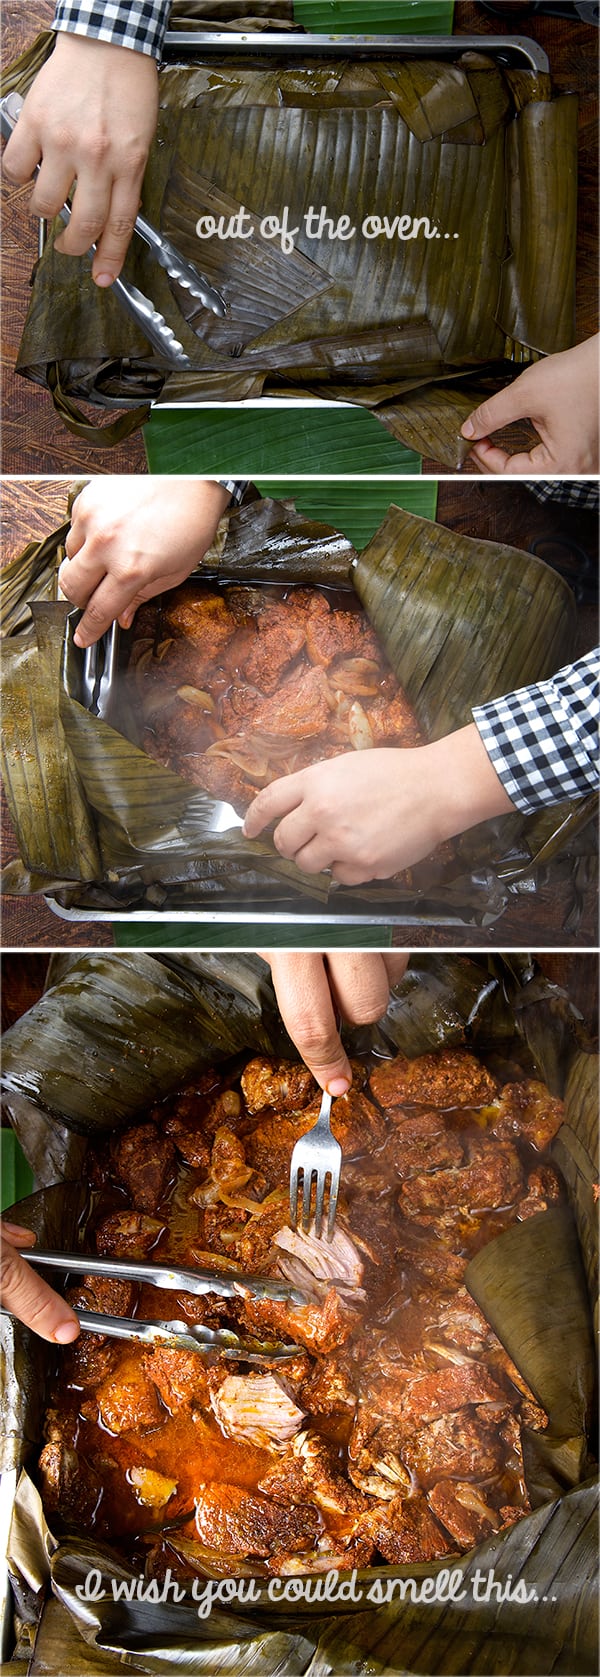
5. Next day remove your pork out of the fridge while you prepare the pan. You want the marinated pork not to be refrigerator cold when you place it in the oven. This allows the meat to cook more evenly and it will be more tender. 6. Move your oven rack to the lowest position in your oven. Preheat the oven at 325 F/160C Place the banana leaves inside the oven for 5-7 minutes.Afterwards they should be a little warm which will make them more pliable. With scissors cut off the banana leaves hard middle rib edge. 7. In a large roasting pan line the banana leaves in both directions, overlapping half way the leaves and placing them cross ways until you can not longer see the bottom of the pan. Place some banana leaves pieces on each corner to ensure there is no leaks.Leave the over hanging leaves, these will help us to make the bundle. 8. On top of the banana leaves place a layer of thin onion wedges and the marinated pork meat in the roasting pan. Add the marinate juices and cover with the over hanging banana leaf. You want to make a pork bundle. Make sure is all fully wrapped up. Take a look at the following images for visual directions. 9. Cover the entire pan bundle with aluminum foil. Tighten the edges fully to seal and contain the heat and moisture. Place the pot into the oven (or the just warm charcoal embers outside in a pit or carefully monitored grill) for 2.30 to 3.30 hours.
10. Pull the cochinita out of the oven and before uncovering it, let it rest for at least 30 minutes. 11. While your pork is resting, prepare your pickled onions by thinly slicing red onions and habbanero peppers. Slightly warm up the vinegar, and add the salt and lime juice to the onions. cover and leave them at room temperature, until the Cochinita is ready. The onions will became hot pink, and the vinegar will have the flavor of the spicy habaneros. Set up the table, get yourself a nice cold Mexican beer to drink.
12.Unveil the Cochinita Pibil and with the help of two forks shreed the pork into smaller pieces, let the pork absorb those juices from the pan. The pork should be fork tender, juicy, moist…fragrant! the smell will fill your kitchen. You will almost hear the toucan screaming and the Mayan Jaguars slinking around behind you (watch out)… Time to eat!… Enjoy!
This Cochinita Pibil is best served with a side of white fluffy garlic rice, and black beans. Tacos are always a great option. corn or flour, what ever rocks your boat. Enjoy!
Serve with Rice…or
Make the most amazing Cochinita Pibil Tacos!
Viva Mexico!…Enjoy!
Bomba! Con esta cara de lec y esta figura de pec te juro preciosa eshpet que te puedo hacer jesmec!…
8lbs.Pork butt or pork shoulder,cut into large 3”x 4”cubes. Pork butt tends to shrink a lot because of its fat content, always calculate at least 2 or 3 more pounds of what you think you will need. In this recipe 8 pounds, yields about 5-6 net pounds of pork meat.
2mediumwhite onions,sliced on thin wedges
For the marinade:
6tablespoonsannatto seeds
1tablespoonwhole black pepper
8-10wholeall spice peppercons, aka pimienta gorda,upon s small=10 medium-large=8
8wholecloves
1tablespooncumin seeds
2"stickMexican Cinnamon
12largegarlic cloves
1habanero chiles,de-seeded
1-1/2tablespoonsea salt
1-1/2cupsbitter oranges juice,Bitter oranges have a sour bitter flavor, highly acidic which complement and tenderize the meat. If you can’t find this kind of oranges, substitute for 1 cup orange juice and 1/2 cup white vinegar.
For the Quick Pickled Onions:
2mediumred onions,sliced in thin wedges
3-4Habanero peppers,thinly sliced or diced.
1Lime,the juice
1/2cupwhite vinegar or pineapple vinegar
1teaspoonkosher salt
You will need the following to cook your Cochinita Pibil in:
5-6largeBanana Leaves
Heavy duty foil paper
16"x 13"Ennamel, clay or stainless steel roasting pan
Instructions
1. Cut the pork into 3”x 3” cubes, set aside.
2. Grind the annatto seeds, black pepper, allspice, cinnamon, cloves, cumin seeds, oregano until powdered. You can use a stone mortar to pulverize the seeds or a coffee grinder. I do recommend fresh spices whole rather than powdered because the whole seeds retain much of their oils and are more fragrant. Since we are making all by scratch, it is worth the extra effort!
I do prefer to use a mortar, is more fun and the aroma of the spices while you grind them is amazing… if you are not so romantic like me..hehehe a coffee grinder will work, just remember that once you use it for spices, just use it for that purpose.
3. In a blender combine the garlic cloves, Habanero chiles, sea salt and orange juice. Blend.
4. In a glass container place the pork and all the blended marinade, massage the pork pieces until well covered. Cover with parchment paper and plastic wrap. Refrigerate, let it rest over night.
5. Next day remove your pork out of the fridge while you prepare the pan. You want the marinated pork not to be refrigerator cold when you place it in the oven. This allows the meat to cook more evenly and it will be more tender.
6. Move your oven rack to the lowest position in your oven. Preheat the oven at 325 F/160C Place the banana leaves inside the oven for 5-7 minutes.Afterwards they should be a little warm which will make them more pliable. With scissors cut off the banana leaves hard middle rib edge.
7. In a large roasting pan line the banana leaves in both directions, overlapping half way the leaves and placing them cross ways until you can not longer see the bottom of the pan. Place some banana leaves pieces on each corner to ensure there is no leaks.Leave the over hanging leaves, these will help us to make the bundle.
8. On top of the banana leaves place a layer of thin onion wedges and the marinated pork meat in the roasting pan. Add the marinate juices and cover with the over hanging banana leaf. You want to make a pork bundle. Make sure is all fully wrapped up. Take a look at the following images for visual directions.
9. Cover the entire pan bundle with aluminum foil. Tighten the edges fully to seal and contain the heat and moisture. Place the pot into the oven (or the just warm charcoal embers outside in a pit or carefully monitored grill) for 3.5 to 4 hours.
10. Pull the cochinita out of the oven and before uncovering it, let it rest for at least 30 minutes.
11. While your pork is resting, prepare your pickled onions by thinly slicing red onions and habbanero peppers. Slightly warm up the vinegar, and add the salt and lime juice to the onions. cover and leave them at room temperature, until the Cochinita is ready. The onions will became hot pink, and the vinegar will have the flavor of the spicy habaneros. Set up the table, get yourself a nice cold Mexican beer to drink.
12. Unveil the Cochinita Pibil and with the help of two forks shreed the pork into smaller pieces, let the pork absorb those juices from the pan. The pork should be fork tender, juicy, moist…fragrant! the smell will fill your kitchen. You will almost hear the toucan screaming and the Mayan Jaguars slinking around behind you (watch out)… Time to eat!… Enjoy!
This Cochinita Pibil is best served with a side of white fluffy garlic rice, and black beans. Tacos are always a great option. corn or flour, what ever rocks your boat. Enjoy!
Recipes, Cooking & Art Direction: Mariana Nuño Ruiz McEnroe | Photography: Ian McEnroe |
Published: August 29, 2014
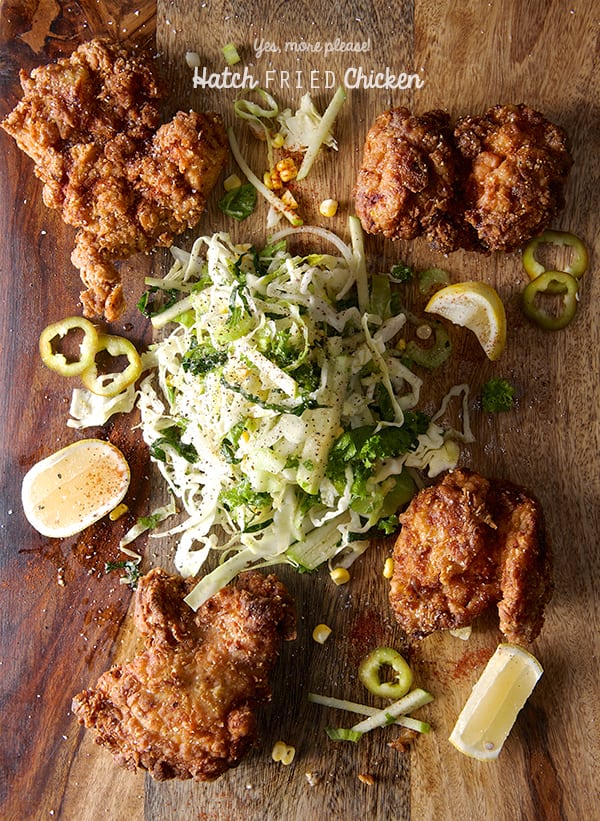
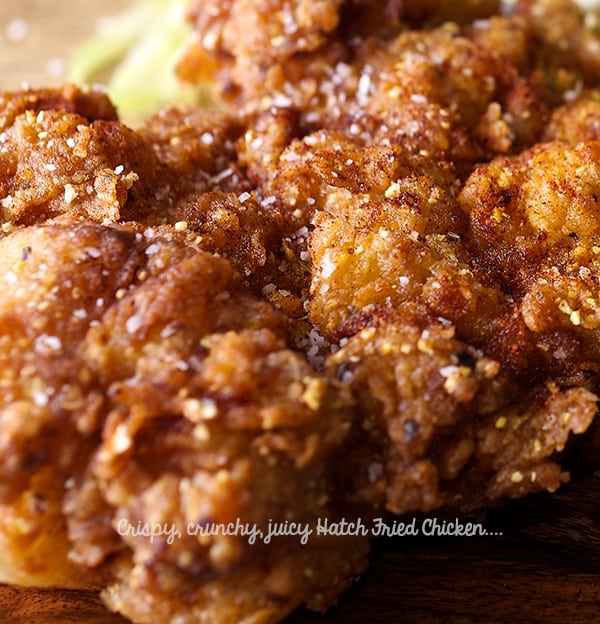
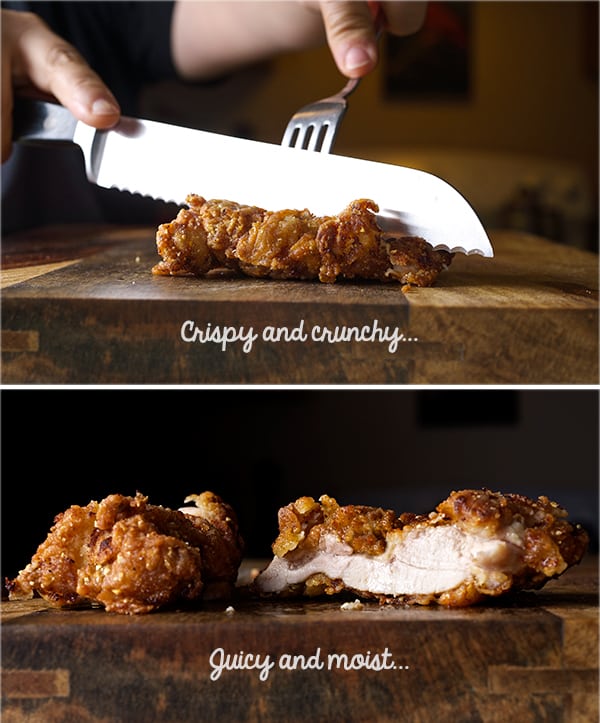
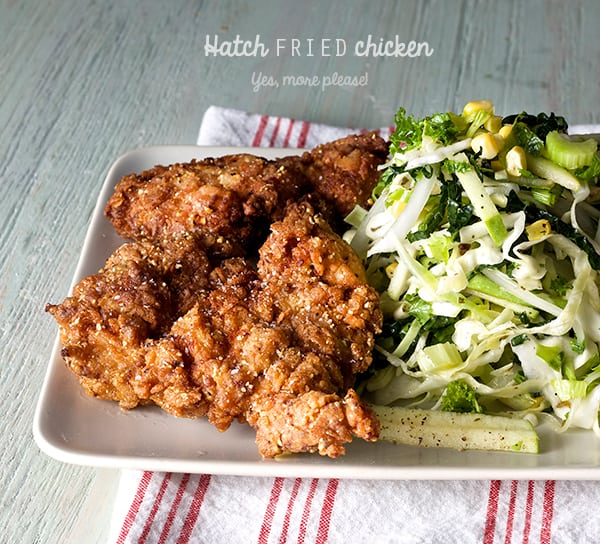
With a guiltless dance and a smile on my face I implore you to give this hatch fried chicken a “must try” label. This is my new favorite Hatch recipe.
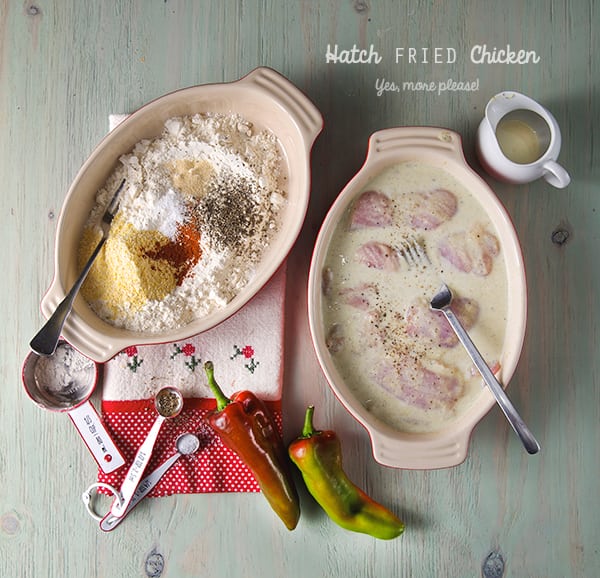
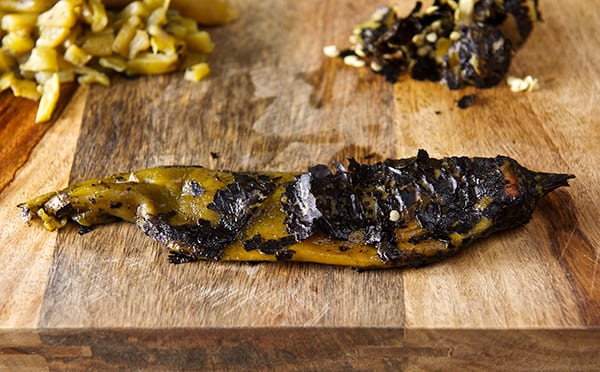
I used skinless chicken thighs and marinated them in a concoction of yogurt, milk and pureed roasted Hatch peppers until the chicken got tender and flavorful. After a quick drench of well seasoned flour I deep-fried them in peanut oil, making the chicken crunchy crusty, crispy, and tender and juicy on the inside.
Why make fried chicken at home? Because I believe it often tastes better, but also It makes you appreciate what you are about to eat.Nothing tastes more rewarding than making the effort to cook an effortless recipe with awesome results!
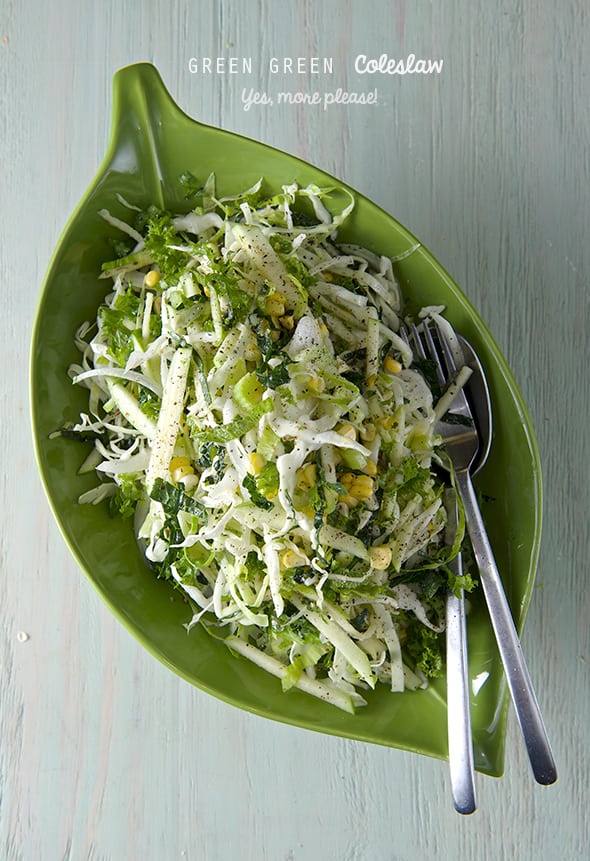
Happiness and bliss have been achieved when these Hatch Fried Chicken thighs come out of the pan and onto your plate beside the greenest green green coleslaw. It’s a balancing the act of rich and a tangy. You will be dancing from the beginning of the recipe to end of your meal. Its richness is a combination of the dry seasonings and the Hatch peppers’ distinctive mild chili note.
I used chicken thighs, they have great flavor and they are so moist that you can use them skinless, But imagine the possibilities!, chicken breast, legs, wings!… quail. Ok… I just got myself in trouble now… I want quail!…
Any way, If you make this recipe, I would love to know how it went and if you enjoyed as much as we did! Juicy, crispy, spicy fried chicken is gonna make you a fried chicken believer.
Have fun!
Hatch Fried Chicken
Makes 6 chicken thighs and one little happy dance.
1.5 lbs. of organic skinless chicken thighs
For the marinade:
3/4 cup plain Bulgarian or Greek yogurt style.
2-3 roasted hatch peppers (remove skins and seeds)* check notes for substitutions at the end of the post.
good 4-5 cranks of freshly ground pepper
1 tsp. kosher salt
For the flour drench:
1 cup unbleached all-purpose flour
1/4 cup corn meal
2 tablespoons cornstarch
1/4 teaspoon paprika
1 teaspoon black pepper
1 teaspoon garlic powder
1 teaspoon salt
For frying:
3 -4 cups – Peanut oil (grape seed oil or corn oil will work too.)
A 10″-12″ heavy bottom enamel pan or a cast iron pan for best results.
1 pair of metal tongs
Preparation method:
1. Puree all the marinade ingredients.
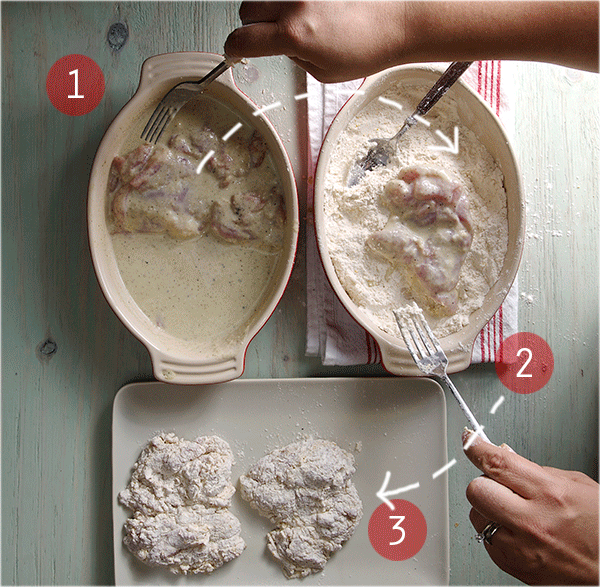
2. Pat dry and trim some of the excess fat on the chicken thighs, if any. 3. In a ceramic or glass dish place the chicken thighs and poor the marinade over them, massage them a little bit, place them in the refrigerator for at least 2-3 hours, over night is best. 4. Next day, Pull the chicken out of the refrigerator 20 minutes before cooking. 5. In a ceramic or glass dish combine all the ingredients for the dredging flour. 6. Start heating the oil. I like to start heating the oil at a low temperature, and slowly turn up the heat. This will ensure your oil will not taste burn and is evenly heated.
***Take care to monitor your oil and your kitchen carefully while deep-frying, never take your attention away from hot cooking oil. No distractions!!*** 7. While the oil is slowly heating up, with the help of a fork take one piece of the chicken and tap it a little to remove any excess marinade, dredge into the flour, and with a spoon start covering each piece of chicken really well. Set the dredged flour pieces on a clean dry plate. Proceed with the rest of them one at the time.
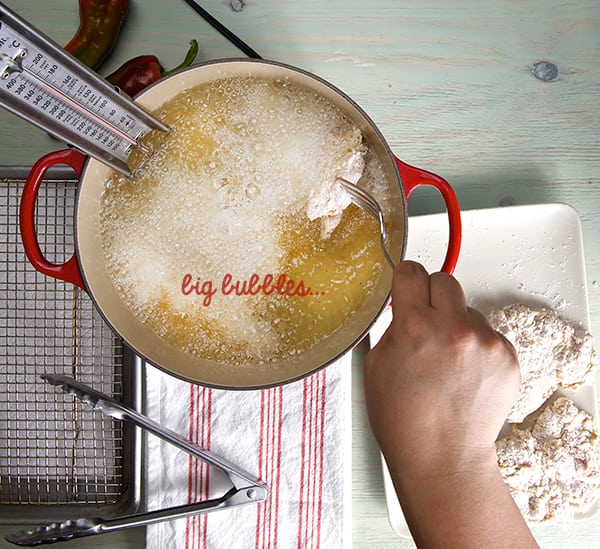
8. Check on your oil. Place a frying thermometer on the edge of the pan, and check for 350F-360F sprinkle a little flour on the oil, you want big bubbles. 9.When the oil reaches 360, start frying your chicken 2 pieces at a time, to avoid lowering down the temperature of the oil. Check the temperature on your thermometer at all times, you want big bubbles around each piece of chicken, and thermometer reads at least 350/360F to make sure your chicken is not absorbing extra oil, making it soggy and greasy. iaks!
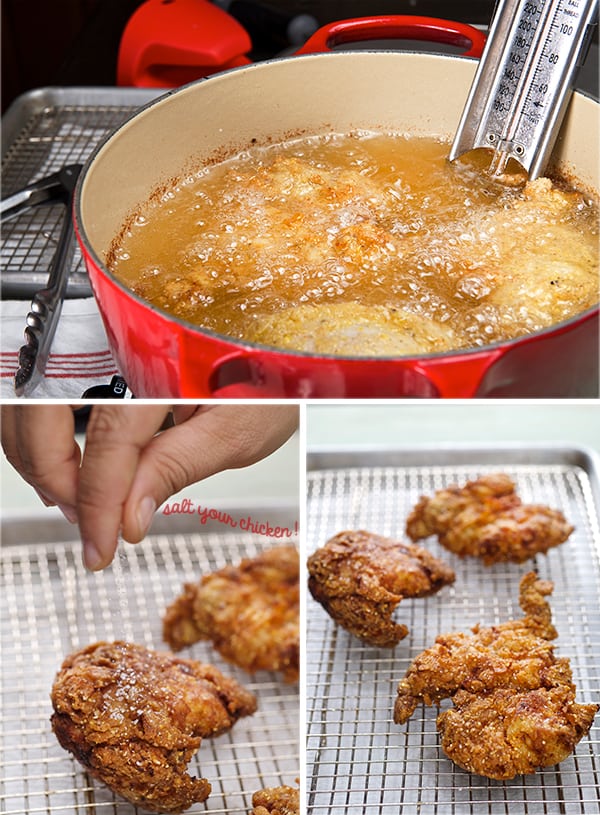
10. Depending on the size of the thighs it will take about 5-6 minutes per side. You want to turn the chicken until you have a rich golden mahogany color on the bottom and the size on the bubbles around the chicken are smaller. This is the right time to gently flip. Always flip away from you to avoid splatter. 11. Once you flip, lower the temperature a bit to 320F, it might take less time, about 3-4 minutes. Chicken should look golden brown and the bubbles around the chicken are really small. Take the pieces out to drain and check for doneness, the internal temperature of the chicken should read minimum 165F. 12. Drain the chicken on a cooling rack lined on top of a baking sheet and immediately, sprinkle some salt. Placing the chicken on a cooling rack will make sure you the chicken will stay crispy. 13. Adjust the temperature for the next batch and go ahead and fry the rest of the chicken.
14. Ready to eat! Serve the chicken with a great side of coleslaw like this green green coleslaw, check it out is from a previous post, it is tangy crunchy, fresh and so mighty green that I believe it’s the best complement for this spicy hatch fried chicken. Also some lemon wedges, if your brave , maybe some extra dashes of tabasco sauce, or any other vinegary hot sauce. Enjoy!
Enjoy!
*Note:
I used fresh Hatch peppers and roasted them. Here in Texas you can find them very easily when in season. If you are wondering if you can use canned Hatch peppers, yes you can. Our dear friend and follower Ed who is from El Paso, Texas and he and his family have cooked with hatch peppers for many generations, suggested me two good brands: Victoria and Santa Fé ‘Ole brand (bottled)-Double Fire-Roasted . He assures this brands are first-rate to get when hatch is not in season. Thank you so much Ed, for this great information!…
Remember that freezing the chiles is also a good option. Once you roast, peel and de-seeded them, you can purée, dice them or keep them whole, pack them on freezer bags and freeze them for future recipes. You can even make hatch chile purée ice cubes and add them to soups or stews on the winter season…delish!
Recipes, Cooking & Art Direction: Mariana Nuño Ruiz McEnroe | Photography: Ian McEnroe |
Published: August 27, 2014
Texas summer heat is like Kryptonite. Do you remember how Superman used to get exposed to this green glowing Kryptonite and you could hear a sound like this: ~ waaayioh, waaayioh, waaayiho )) ) ) ) ) you could almost see the waves that debilitated the strongest blue and red caped man in the comic world… Well, I’m not muscled or caped like Superman, but the Summer sun is my Kryptonite.
I often can see and hear the heat waves whispering:
~ waaayioh, waaayioh, waaayiho )) ) ) )
~ Am I delirious?…
No, the truth is that I’m in much need of a little break from the high temperatures. I needed a boost of fresh glowing green in my life and I could not resist some leafy crunchy vegetable medley action. We all know what this leafy greens are brimming with fiber along with vitamins, minerals, and plant-based substances. Imagine what they can do for you.
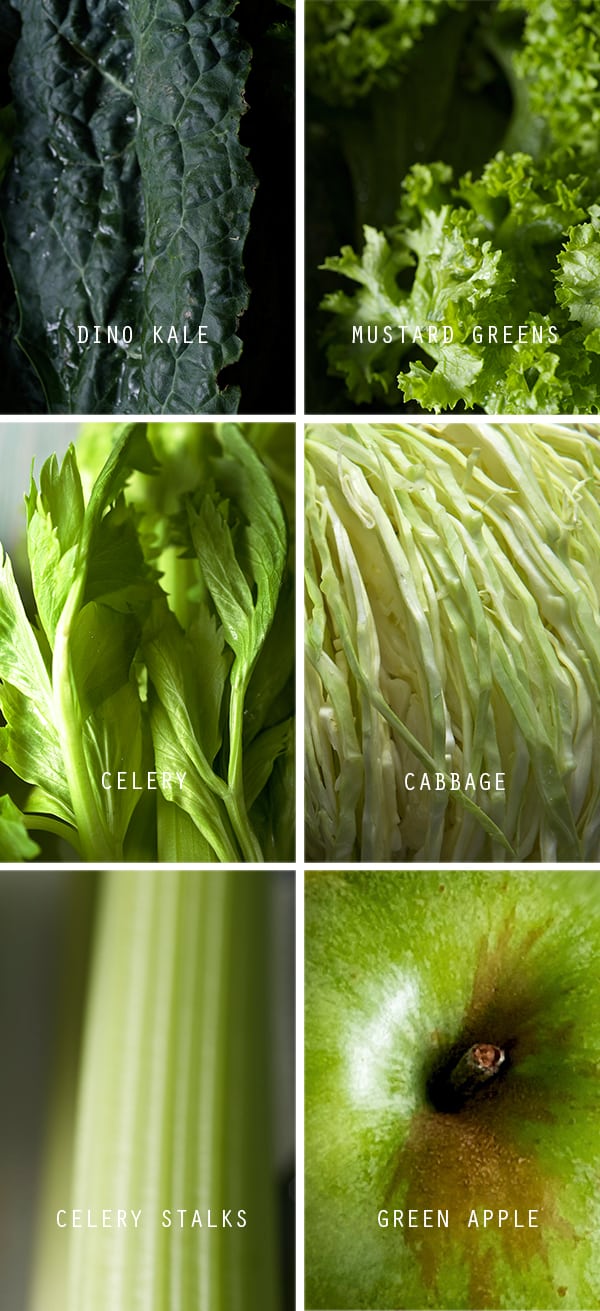
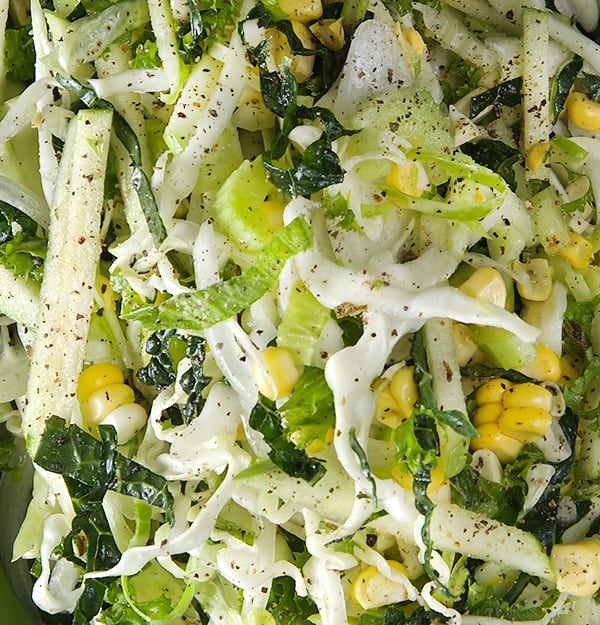
August is a hard month to get great produce; too much heat here in Texas. I know the green leafy season is not here yet, but thanks to California’s amazing weather and hard-working farmers, I armed myself with some of my favorite green vegetables: kale, mustard greens, green cabbage, green apples, celery, onions and a little fresh corn. After a little chopp-ah-rooh, and combining all this shredded goodness with some light vinaigrette, this Green Green Coleslaw was born.
The combination of the different greens add great flavor and texture. A tangy oil honey and apple vinegar dressing, with a good punch of dry oregano, and seasons, make this green-green coleslaw light and crunchy. It is lightly dressed. No soggy cole slaw for me, thank you. If you are the creamy cole slaw type, this will convert you into the vinaigrette version.
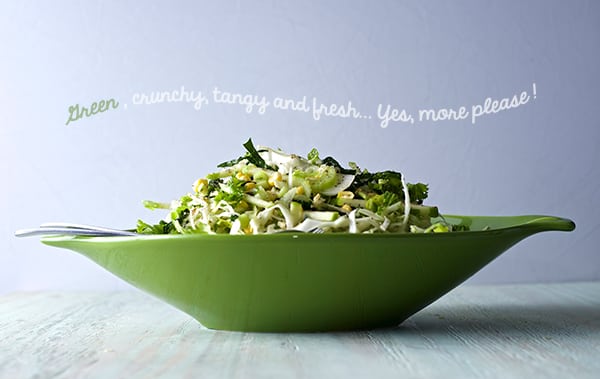
This Green Green Coleslaw, makes a great side dish for, salmon, any white grilled fish, chicken, pork, beef , shrimp, tofu, tempeh, rice, lentils, white beans…you name it. You can add some roasted almonds, walnuts, or sunflower seeds and it will be a great left over for next day lunch.
Nice and easy, this recipe is all about fresh and nutritious green power all in one bowl. A salad
with great personality and flavors, this green-green cole slaw will restore your energy and refresh you on this fiery Summer. Like a good Kryptonite, you know? hehehe Enjoy.
Green Green Coleslaw
Serves 4-6 or 1 super man.
The vegetable action:
½ half of a small green cabbage head
4-5 San Jacinto Kale leaves
1 large mustard green leaf.
2 celery stalks
1 ear of sweet yellow corn
1 medium-large green apple
½ medium onion
For the dressing:
¼ cup grape seed oil
4 tablespoons apple cider vinegar
2 tablespoons honey
1 heaping teaspoon dry oregano. (Not crazy about oregano?, tarragon, dry basil will go great too…)
½ teaspoon celery salt
½ teaspoon kosher salt
½ teaspoon fresh ground pepper
The zest and the juice of one lemon.
Feel free to add some nuts, for crunch and protein, toasted almonds or walnuts will taste fantastic. Or some golden raisins will add an extra sweet note. If you are a Mayonnaise lover, substitute the oil for 1/2 cup of mayonnaise and 2 tablespoons of plain greek yogurt.
Preparation:
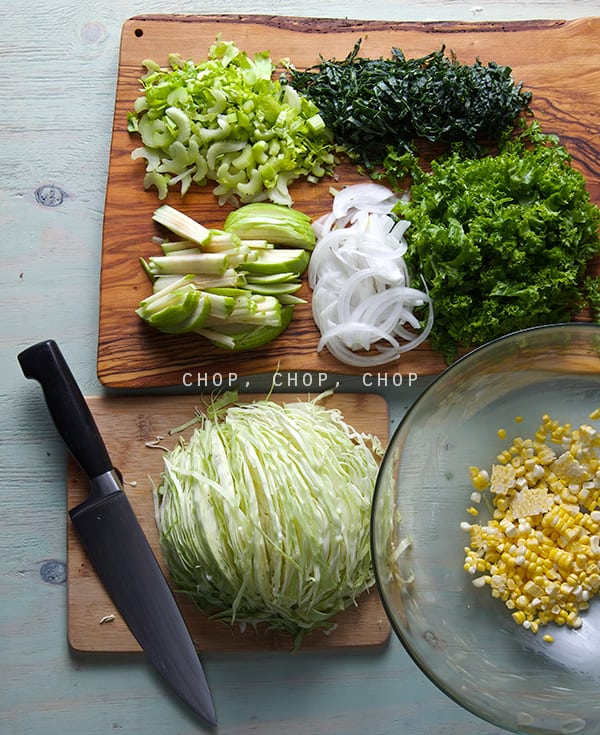
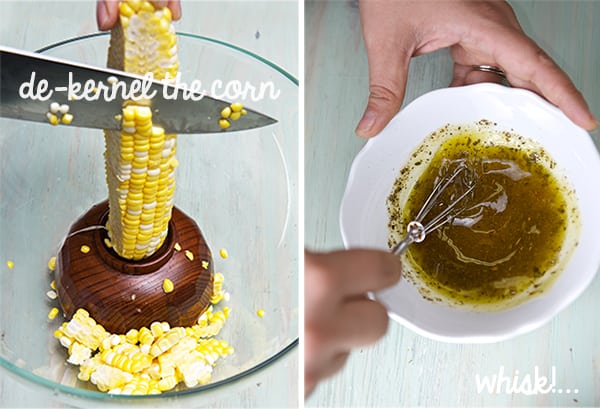
1. Finely chop the cabbage, the kale (remember to remove the hard steam on the kale and the mustard greens), Finely chop the onions, celery and de-kernel the sweet corn. Chop the apple like matchsticks.
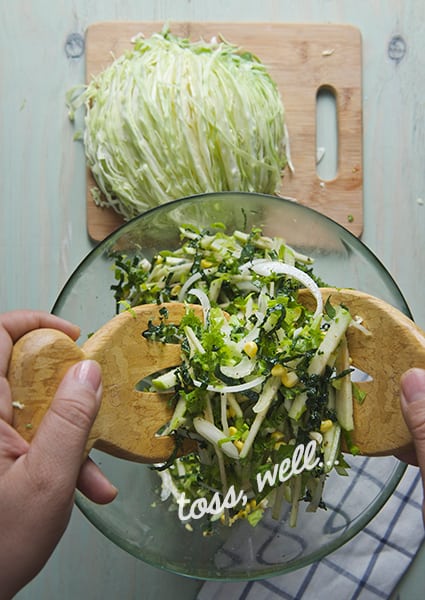
2. In a large bowl, whisk all your dressing ingredients, add all the chopped vegetables and toss well.
3. Set a side and let it rest for 10 to 15minutes before serving. 4. Taste, adjust for salt and pepper if necessary. Serve and Enjoy!
Recipes, Cooking & Art Direction: Mariana Nuño Ruiz McEnroe | Photography: Ian McEnroe |
Published: August 20, 2014
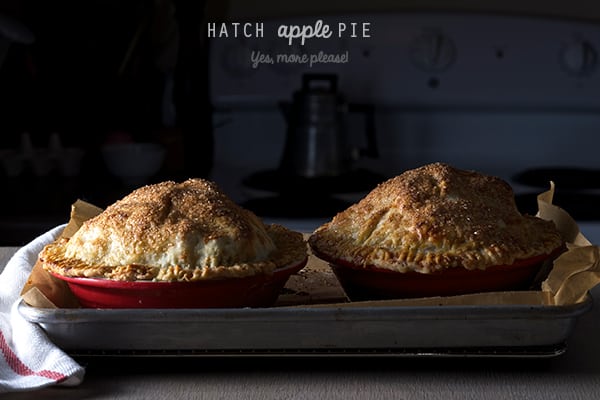
Last week I went prickly pear hunting with my good friends Andrea and Arin. This involved intense heat, lots of driving, and careful handling of ingredients, and lots of tiny needles. After picking these thorny fruits, we juiced them and they produced a bright pink fragrant juice which tastes like a sweet tart lemonade. Afterwards, we were having a food conversation over our drinks and Hatch chilli’s which are in season became the topic,no matter what we always end up talking about food is inevitable…I love it!. As ingredients go Hatch peppers its one of the gems of the chili world, having a mild heat and great flavor. Andrea’s Hatch mode was contagious. After tossing around some favorite Hatch combinations, I began considering Apple Pie with Hatch peppers. Apple pie is normally reserved for the fall but I am married to a man who can eat it regardless of season. I thought this would be the right time to bake a test batch (which ran on Instagram, which you knew because all of you MUST follow YMP on Instagram) and they turned out splendidly, or at least the eaters of the samples left not a crumb,apple, or chili behind.
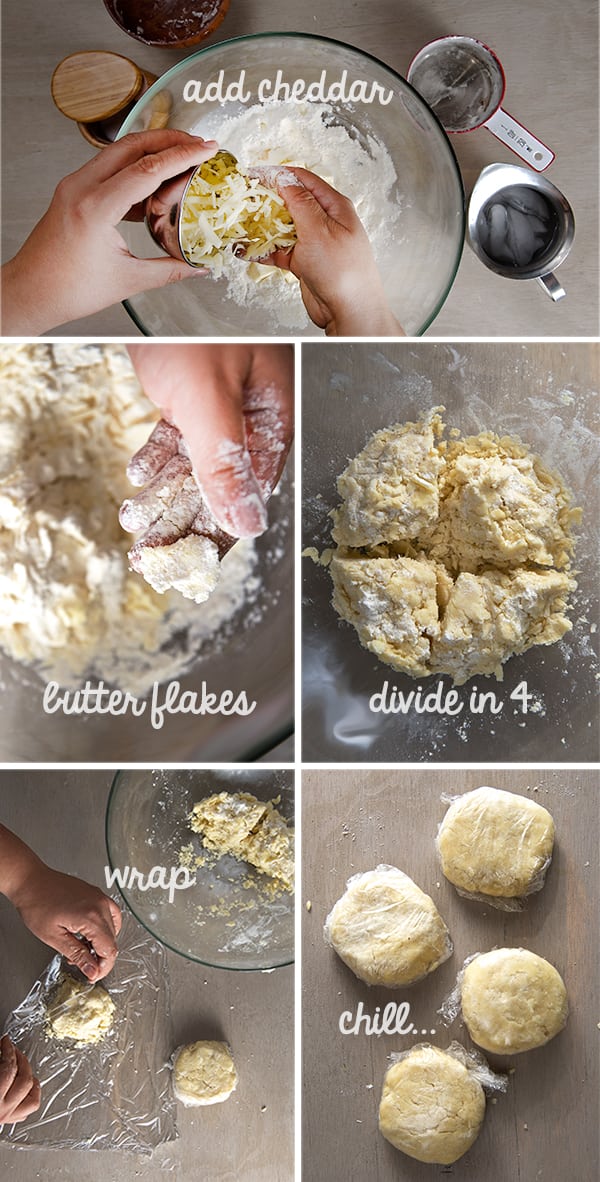
I twisted my classic crostata crust recipe which you can find the step by step in this post (Ian this phrase is just for me!..need to plug the link!) and I added cheddar cheese! Yes you heard well, sharp cheddar cheese. It came to me like a dream. The cheddar adds the savory a bit salty note to the crust, and it makes it airy and flaky. I also tried a new technique when kneading the pie crust, I learned by watching one of the episodes “ The Mind of a Chef ” with Sean Brock and southern baker Lisa Donovan who were making her amazing buttermilk pies. What I learned about her Pate brise type of dough, (which is my favorite kind for pie), is the following: she “flaked the butter” when she was making her dough, instead of leaving those famous “pea size butter chunks”. She squeezes them between her thumb and index finger to create what she called “butter flakes” Genius!!!! So I tried her technique and I added grated cheddar to create more flaking. The result is this utterly buttery and flaky crust, you can see the pictures which do not lie! Omg what a great technique and awesome combination between the fat of the butter and the cheese if I do say so myself.
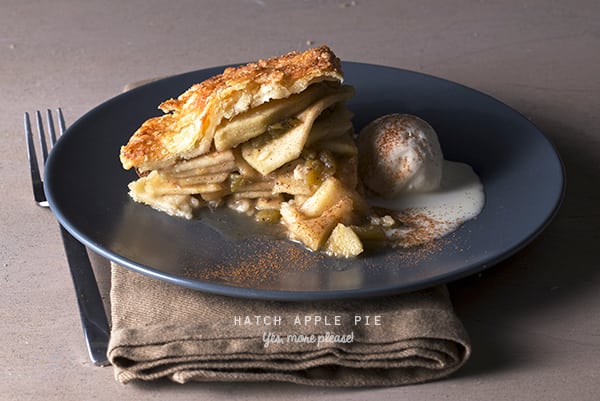
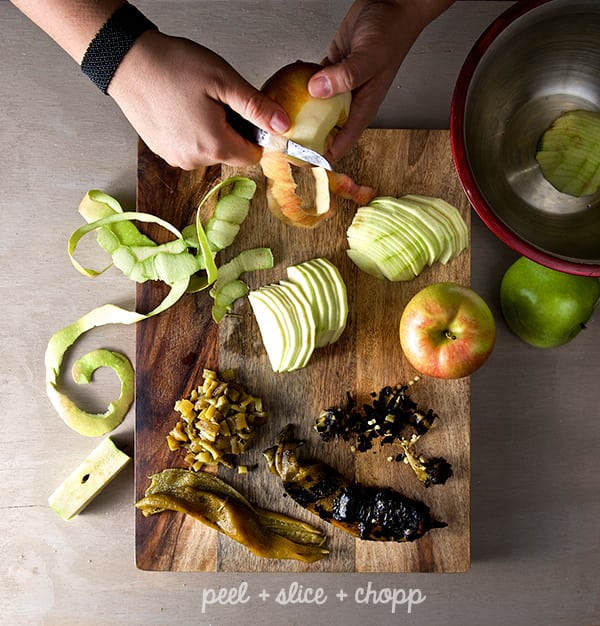
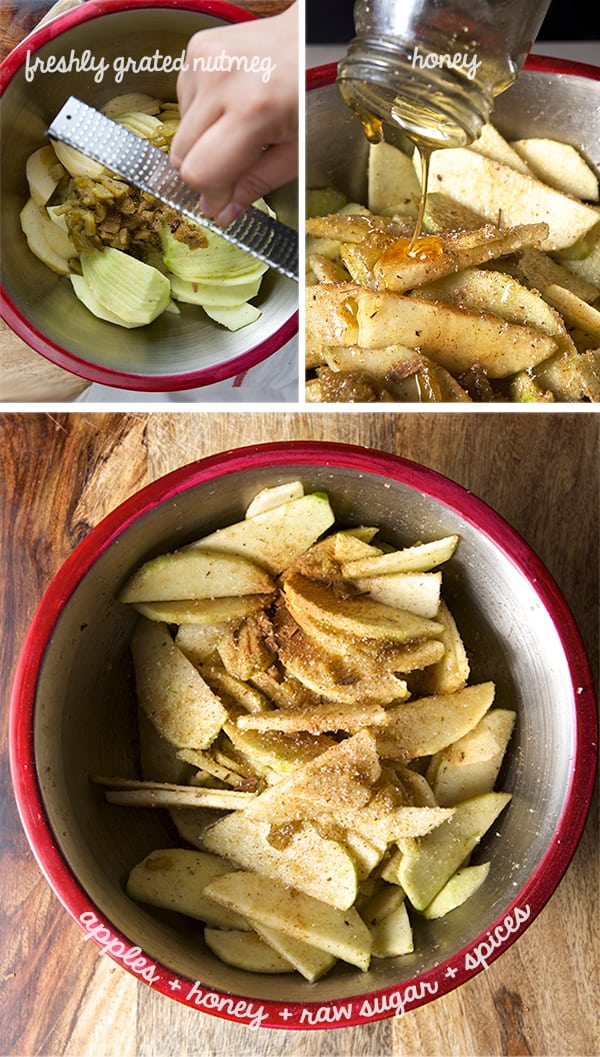
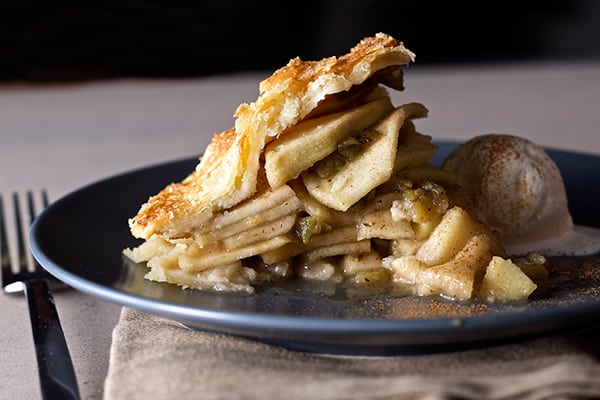
But where is the hatch? After I chard them, they were hanging out with the apples in a combination of raw sugar, Gause Jaupon honey, Mexican cinnamon, and nutmeg. That’s what the crust had to stand up to! You can only imagine the amazing outcome after all these ingredients colliding in the same universe. Amazing pie. Go for it. Don’t be shy. If you want to comment on your experience with it please e-mail me. If you love the recipe shout it on the streets! …Enjoy!
Hatch Apple Pie
A tongue twister by name and by taste!
Makes 2- 5” baby pies
For the pie filling:
2 green apples
2 red Apples
2-3 hatch chiles charred, skinned , de-seeded and chopped. (I used hot!)
¼ cup honey
½ cup turbinado sugar
1 teaspoon mexican cinnamon grated
¼ teaspoon nutmeg
2 tablespoons of butter
1 teaspoon corn starch
½ teaspoon apple cider vinegar
1 good pinch of salt
For the cheddar cheese crust:
1+1/4 cup unbleached all-purpose flour
1 stick = 4 oz. of european style butter cut into small cubes.
4 oz. sharp cheddar cheese grated
1 pinch of kosher salt
3-4 tablespoons of iced water.
Extra flour for dusting and rolling the dough. 1 egg for egg-wash the pie tops a little extra turbinado sugar to sprinkle on crust.
Preparation method:
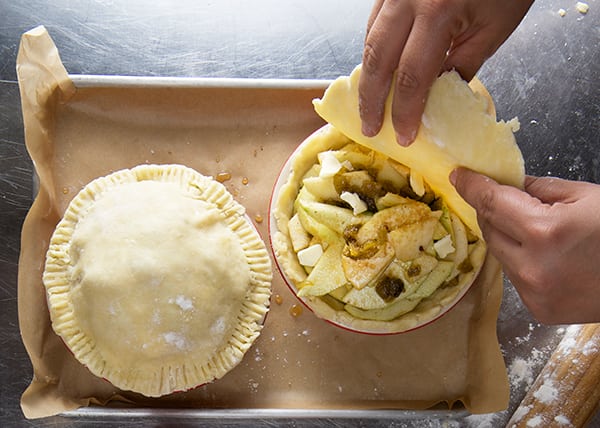
1. Start by making the crust. In a large bowl combine flour and salt. Then add the chilled butter cubes, and the grated cheddar cheese. With you hands start rubbing the flour and butter between your fingers and creating “the flakes” see picture bellow) you want to be gentle and as fast as possible. 2. Once your dough looks flaky and coarse, add the iced water and quickly combine by incorporating the flour with the least kneading possible. (see picture below) 3. The dough will look almost like is not together. Gently press into a flat ball and divide into fours. (you will need two tops, and two bottoms) 4. Wrap each portion in plastic wrap and quickly shape into 4 small disks. Chill them for at least 15-20 minutes in the freezer.
5. Meantime, prepare the apple filling. Peel and thinly slice the apples. In a medium bowl toss the sliced apples, diced roasted hatch peppers, honey, sugar, cinnamon, nutmeg, cornstarch, salt apple cider vinegar. Mix well. Use your hands to well combine every ingredient. Set aside.
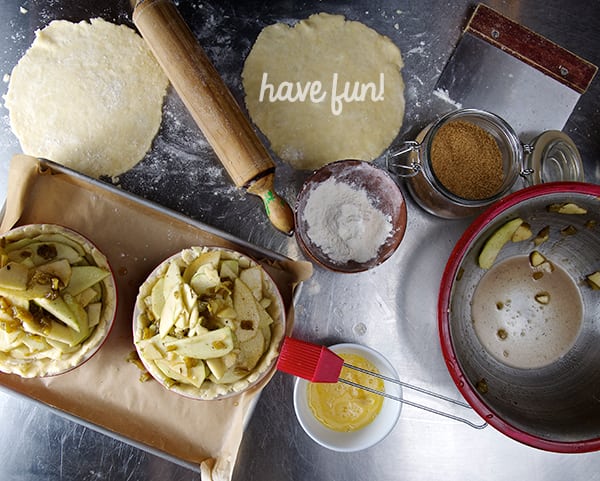
6. Time to roll up your dough!.. this is fun! Using 2 small 5” baking pie dishes. Roll each dough piece into a 7- 8” rounds. Rub some butter into the dishes, and then place the bottom disc shaping the dough into the dish with your hands. 7. Fill each pie with half of the apple filling. Arrange the apple pieces in flat layers. You don’t want to be to fussy about it, just pay attention at not leaving apple gaps specially on the bottom layer ; )
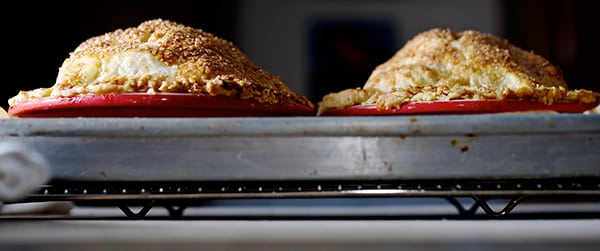
8. Now your pies look like mountains of apples, that’s great! Roll the other two pastry disks into 7”-8” and cover your pies. 9. Crimp the edges of the pie with the help of a fork, make four 1” slits on top of the pie. Beat one egg and 1 teaspoon of water and with a pastry brush, brush the tops of the pies with this egg wash mixture. Sprinkle turbinado sugar on top, and edges of the pie. 10. Line up a baking sheet with a lip with aluminum foil. Place the two pies in the tray. Place the tray in the freezer for about 20 minutes. 11. Place the rack oven into the bottom third of the oven. Preheat your oven at 400F. 12. After 20 minutes, remove the pies from freezer and place them directly into the oven. 13. Bake at 400F for the first 20 minutes. Rotate the pies and lower the temperature to 350F. Bake for another 20-25 minutes. 14. By now your house smell like heaven! Place the pies into a cooling rack let them cool for about 30 minutes. Serve with a scoop of your favorite vanilla ice cream and a dash of ground cinnamon. Enjoy!
Life is too short. Make pie. Eat pie. Repeat!
Music Pairing: Nouvelle Vague – Dancing with Myself
Recipes, Cooking & Art Direction: Mariana Nuño Ruiz McEnroe | Photography: Ian McEnroe |
Published: August 12, 2014
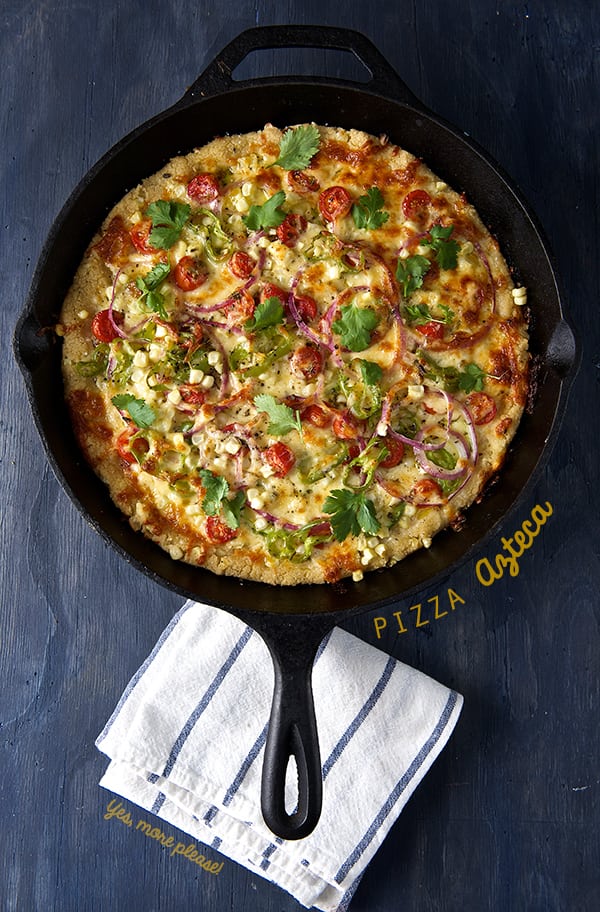
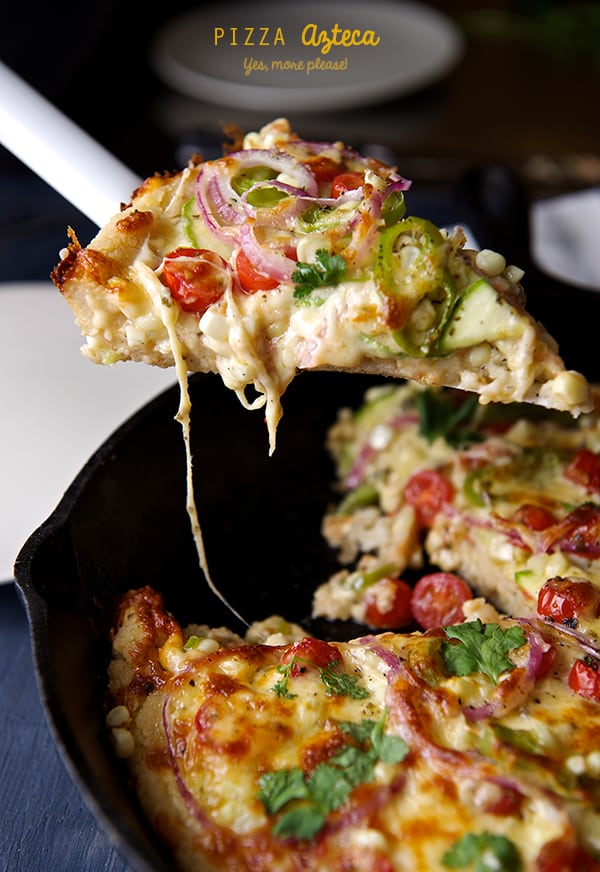
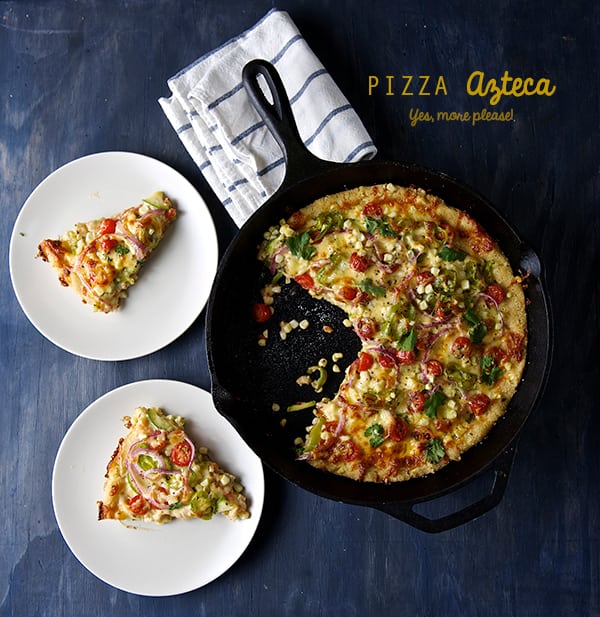
It’s a pizza!…no!
It’s a casserole!….no! It’s a tamale?!…..no!
It’s a Corn Masa Pizza Pie!….Yes!
As silly as it sounds, it is ridiculously delicious!
Call it what you like: Mexican pizza, Corn Masa pizza; Pizza Azteca-its the ultimate summer one pan wonder. This is a great quick meal solution too! To get pizza on board it takes no more than 35 minutes since the masa does not rely on yeast or waiting time to rise.
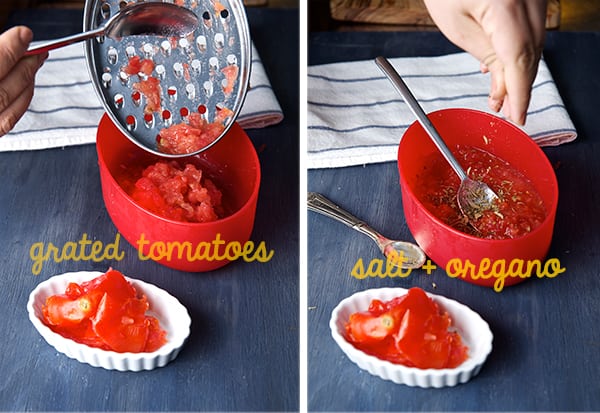
Let me describe this pizza for you… Imagine a hot cast iron pan filled with corn masa crust, when baked the bottom gets crusty with soft delicious nutty corn masa. Fresh corn kernels add texture, enhance the corn flavor and add moisture to the crust. The top layer load with summer vegetables like zucchini, fresh corn, tomatoes, red onions, hatch peppers, and loads of melty cheese layered on top. The summer vegetables pair great with the flavor of the corn masa, the oregano on the fresh quick base sauce adds the perfect herb note. I made the pizza sauce by grating some fresh tomatoes which adds extra freshness to the pizza. I baked everything on the king of pans, “the cast iron pan”.
When this pizza comes out of the oven you will be fill with warmth and happiness as you experience the comforting smell of cooked corn masa and fresh vegetables. Pizza Azteca is best served with a fresh green salad on the side and will be a sure crowd pleaser.
This Pizza Azteca is what I would offer Moctezuma on a summer afternoon… Pizza Azteca is a meal fit for kings!
Enjoy!
Pizza Azteca
Makes 1 round 12” pizza, yields 8-10 slices.
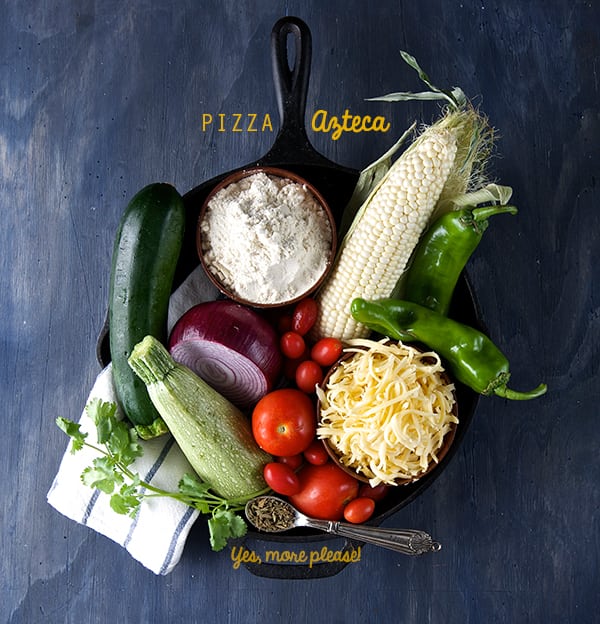
For the crust:
2 cups corn masa- Maseca is the brand I like, if you can get fresh masa, use it! you will be in heaven.
2 to 2-1/2 cups warm water
½ teaspoon kosher salt
½ cup fresh corn kernels (white or yellow corn is ok)
For the sauce:
3 medium roma tomatoes grated
1 tablespoon tomato paste
1 teaspoon dry oregano
1 garlic clove grated
1 tablespoon extra virgin olive oil
1 teaspoon kosher salt
Fresh cracked pepper to taste
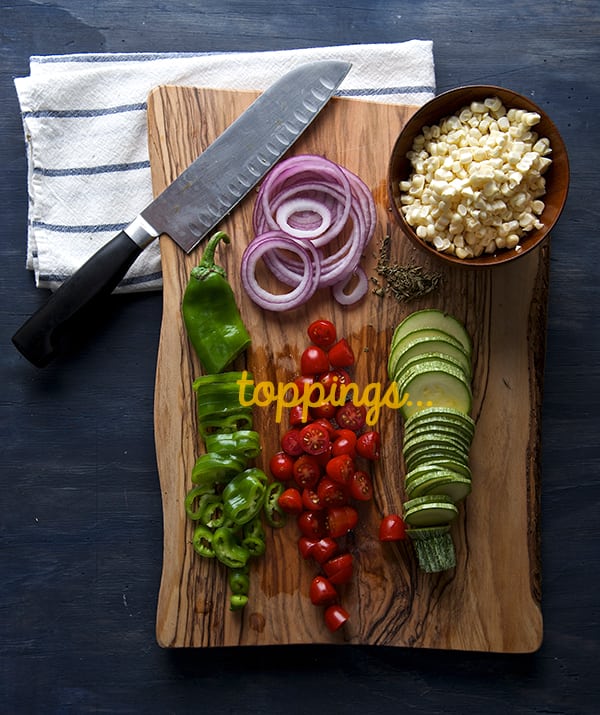
For the toppings:
1 large or 2 medium zucchini thinly sliced.
1 ear of corn worth of kernels
1 hatch pepper or substitute for 1 good pinch of red pepper flakes.
Use roasted red peppers if you do not care for spicy.
1 cup cherry, sun golds or grape tomatoes sliced in half.
2 cups of grated cheese like Adobera, Oaxaca, Gouda, Mozzarella or Monterrey jack.
Use the cheese you like the most, as long it melts and has a mild flavor so you can taste the rest of the ingredients.
Salt and pepper to taste a little extra virgin olive oil for drizzle.
Preparation:
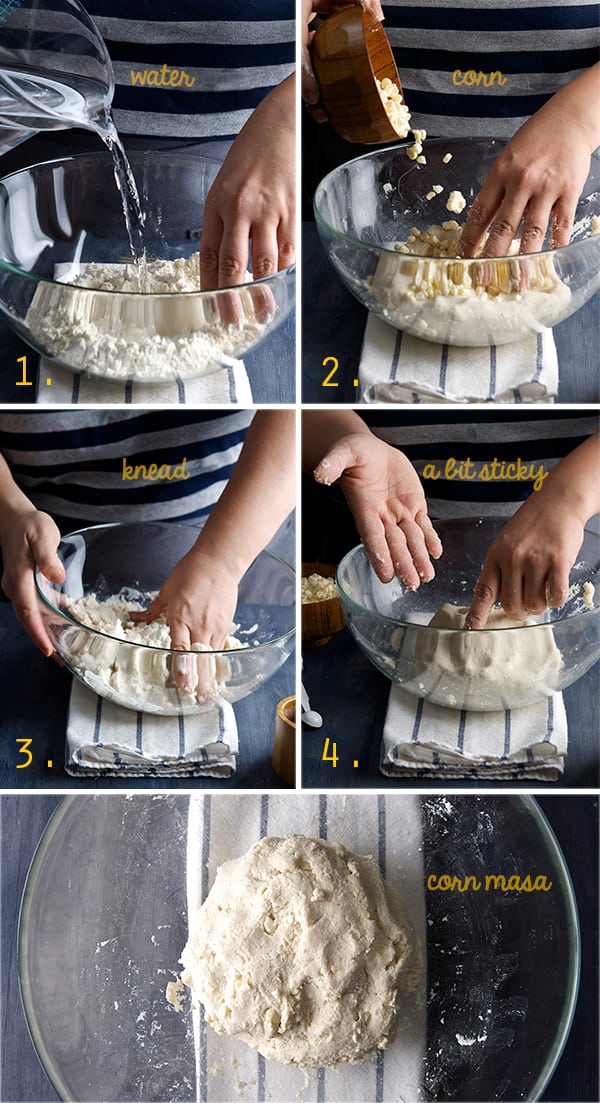
Preparing the masa:
1. Start by preparing the masa dough. Dissolve the salt into the 2 cups of warm water. 2. In a large bowl place your dry corn masa flour, make a well in the center add half of the water, and start incorporating the flour from the sides. Add corn kernels and the rest of the water. Knead for 2-3 minutes until water is well absorbed by the masa. 3. The masa should feel moist a bit sticky to the touch. You should be able to shape it into a ball and cover with plastic wrap, set aside let it rest while you prepare the rest of your vegetables. 4. Preheat Oven at 450F/ 230F
5. Prepare and slice all your vegetables, grate your cheese and prepare your tomato sauce by grating the tomatoes and adding the oregano, salt, garlic, black pepper and extra virgin olive oil. Set aside.
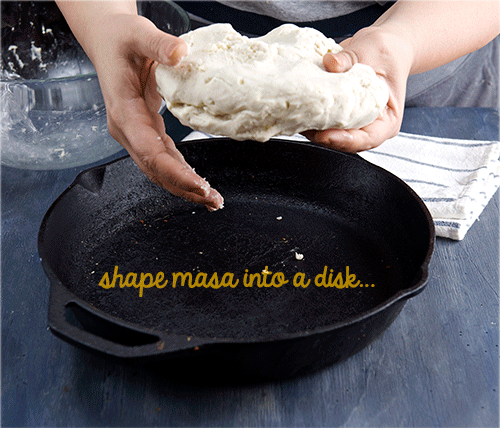
6. At this point your masa should be well hydrated and ready to shape into the cast iron pan. Using a 11-12” Cast Iron Pan place your masa dough in the center and with wet hands start by evenly shaping the masa into the pan. Create a higher rim on the edge of the pan. see photo.
Note: If your cast iron pan is well seasoned do not worry about the crust it will not stick to the pan, if not just apply some neutral oil on a napkin and grease the pan before shaping your crust.
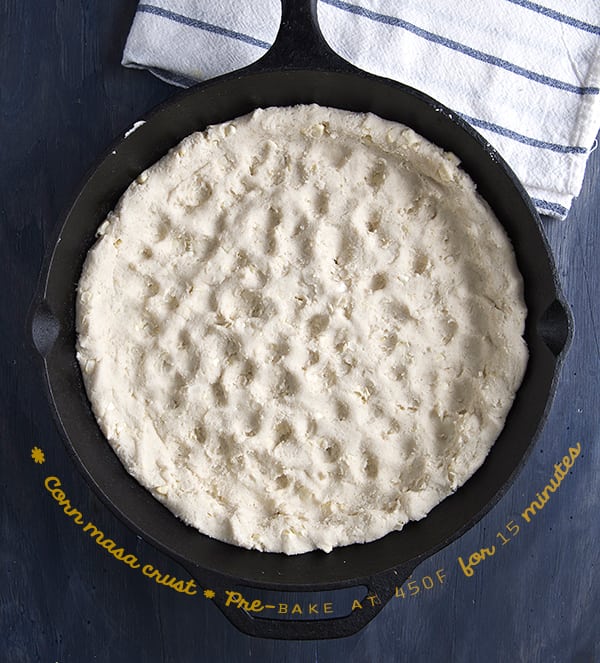
7. Once you have an even layer with a bit of a rim on the outside edges, Place skillet with the crust in the oven, on the bottom rack. Bake for 15 minutes lowering the oven temperature to 425F as soon the crust is in the oven.
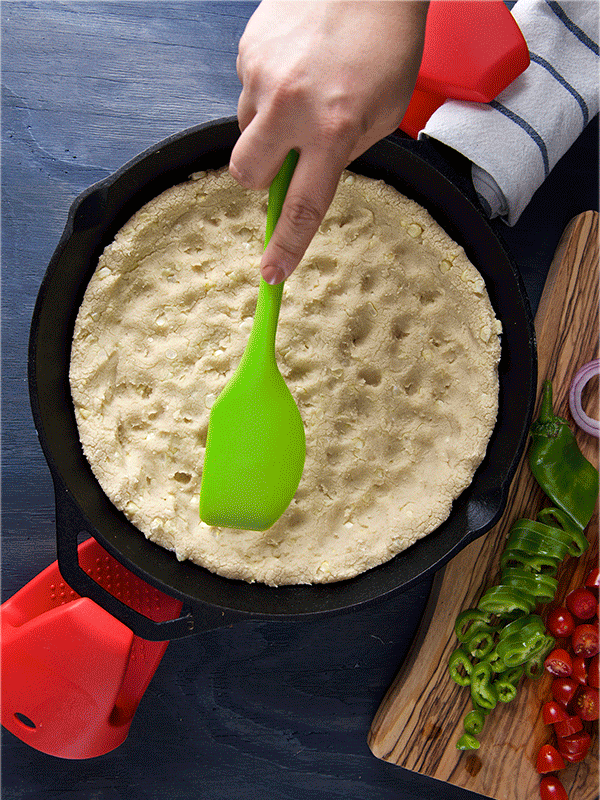
8. Carefully remove the skillet from the oven, place it on top of the stove or a metal trivet and start layering your pizza ingredients. Note: leave the pot holders into the cast iron pan handles at all times!, this will prevent you to try to grab the hot pan by mistake!…believe me I’ve been there…ouch! 9. Layer the ingredients same way you do like on a pizza, starting with tomato sauce on the bottom, half of the cheese, zucchini, corn, onions, tomatoes, peppers, and the rest of the cheese. A pinch of salt and some fresh cracked pepper. 10. Place the cast iron pan into the oven for another 20-25 minutes until cheese is melted and the pizza has some gratin golden brown blisters.
11. Remove from oven, place the pan on a trivet and wait 5 minutes to cool off a bit before cutting. Sprinkle some fresh cilantro for garnish. 12. Serve and Enjoy!
Enjoy!
Silly, silly music pairing: Brak’s Pizza Song with the Space ghost…
Recipes, Cooking & Art Direction: Mariana Nuño Ruiz McEnroe | Photography: Ian McEnroe |
Published: August 9, 2014
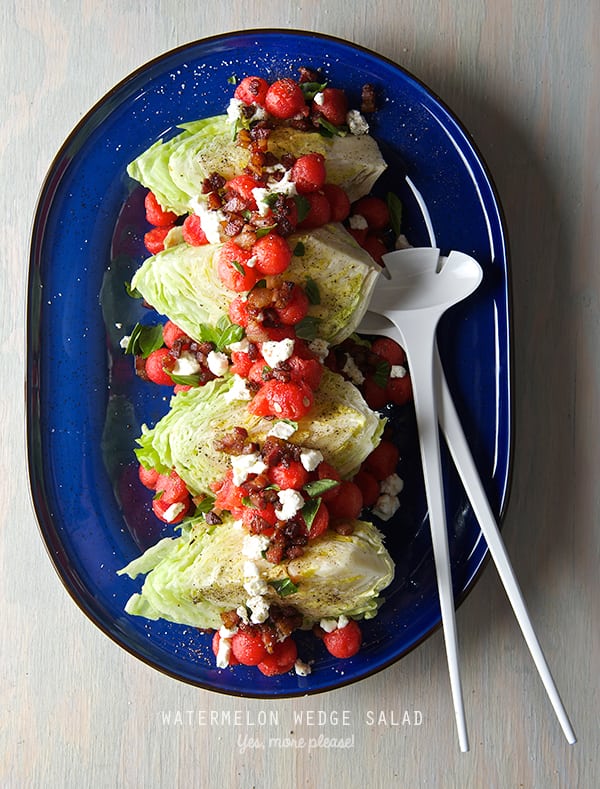
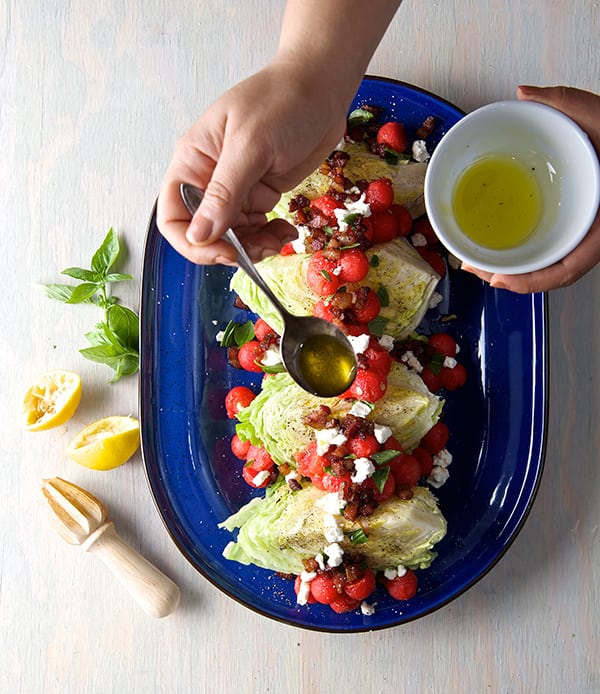
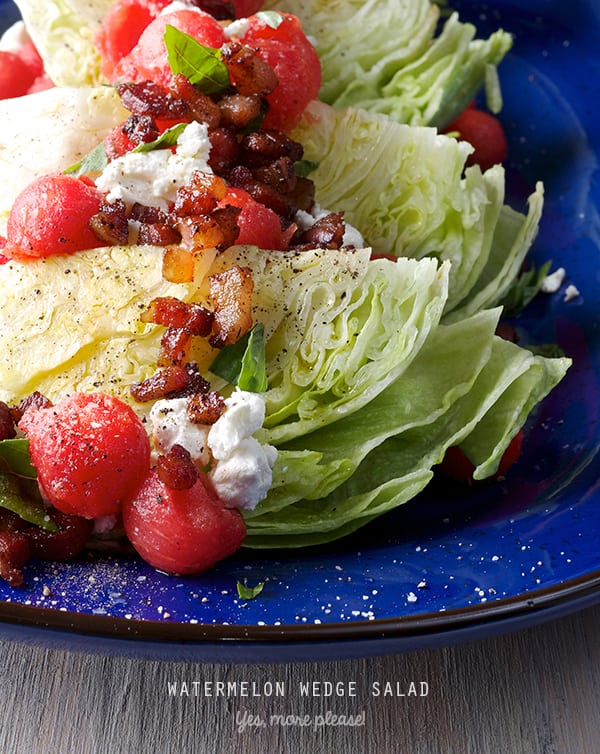
Its hot in here! Austin is reaching 100F temperatures. All I can think of is something refreshing. I’m craving lots of juicy ingredients. So what to make?… Watermelon and iceberg lettuce together its the ultimate ode to crisp and fresh.
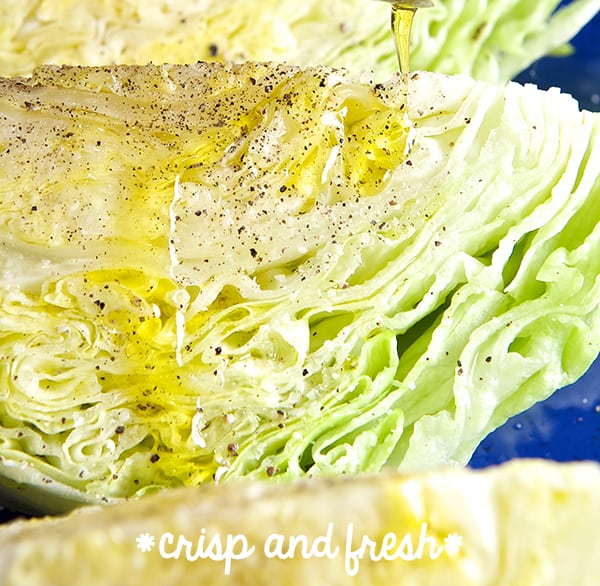
Inspired by the classic wedge salad, I played with summer flavors and made a Watermelon Wedge Salad. It consists of one head of iceberg lettuce cut into quarters plus a good sweet crisp watermelon dressed with a light and clean, olive oil + salt + black pepper dressing. One bite has it all; crisp crunch of the iceberg lettuce, tangy lemony light dressing, sweet juicy watermelon, creamy and salty pancetta, fragrant basil adds a great herb note.
What is not to like ?
This recipe is a pairing of summery ingredients that work divine together. Much like a summer gathering of good old friends having a good time.
Easy, fast and fun to make, in a blink of an eye this salad is ready to cool you down.
Music pairing: Our favorite music band : SPOON just released its new album: “They want my soul “ that is what is playing on the background.
Keep it fresh. Enjoy!
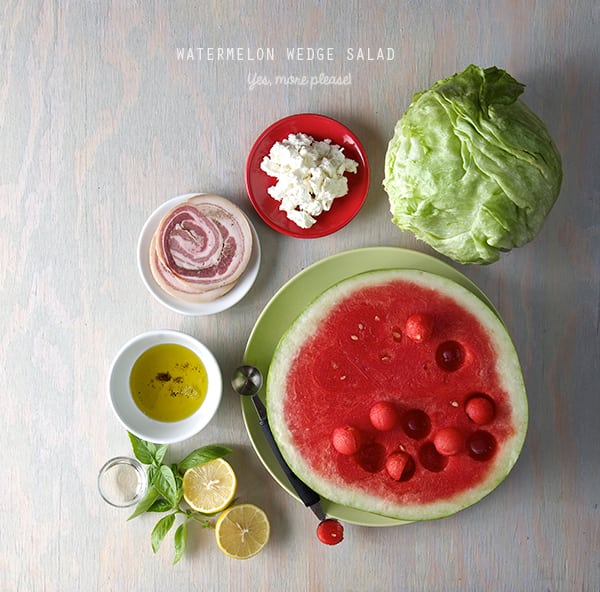
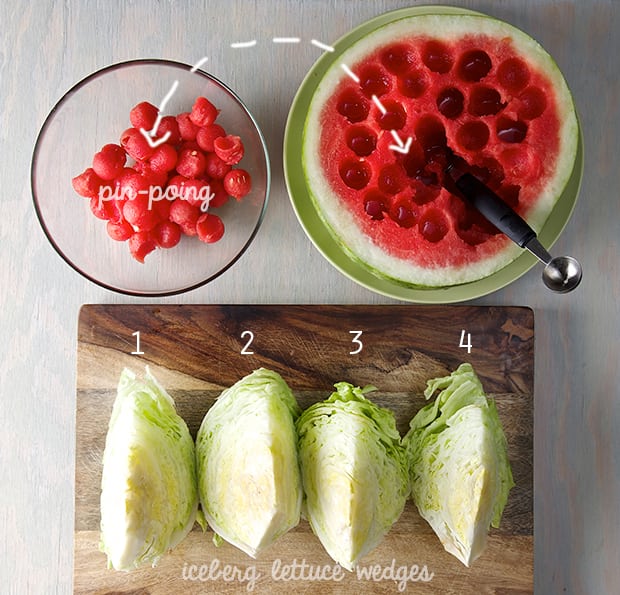
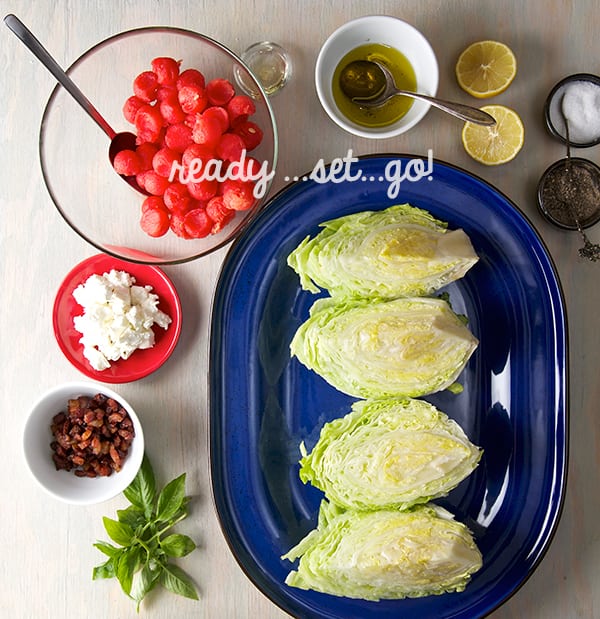
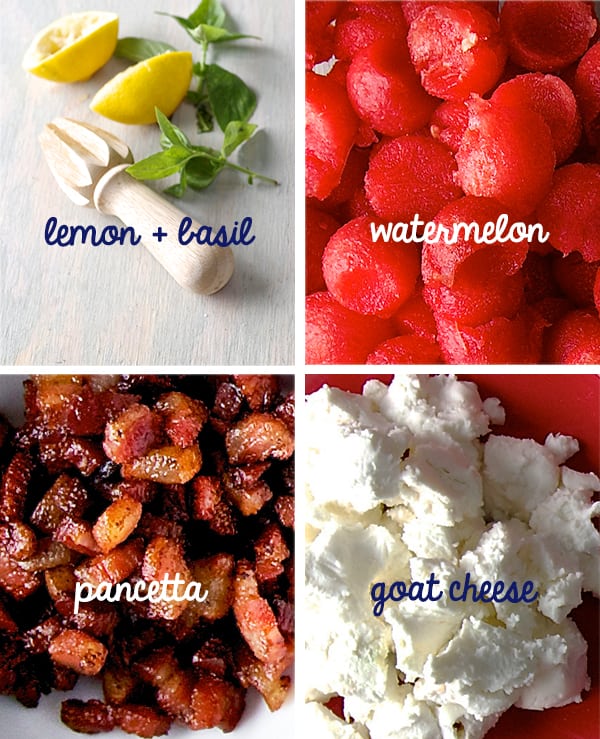
Watermelon Wedge Salad
Serves 4 warm souls
1 head of iceberg lettuce
4 cups seedless watermelon chilled.
½ cup goat cheese crumbs.
2 half inch thick slices of pancetta.
Small bunch 6-8 large leaves fresh basil.
2-3 tablespoons fresh finishing extra virgin olive oil
2 juicy lemons
1 teaspoon Kosher salt
Fresh ground black pepper to taste.
Preparation:
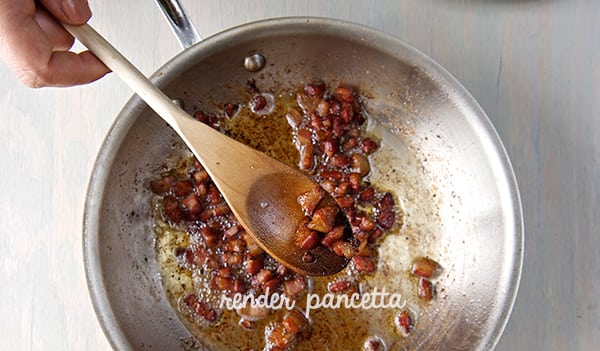
1. Cut the pancetta in small cubes, sauté until crisp and render the fat. Place them over a paper towel to absorb the excess fat.
2. Remove the hard steam of the lettuce. Cut the head lettuce in four wedges. 3. With a melon baller scoop 4-5 cups of watermelon balls.
4. Place the lettuce wedges on a plater, and drizzle olive oil, the juice of 1 lemon, generous amounts of kosher salt and black pepper.
5. Add the watermelon balls, crumbled goat cheese, crispy pancetta.
6. Tier the basil leaves and sprinkle on top, add the rest of the lemon juice a little extra drizzle of olive oil, serve.
Note: Make sure your watermelon is cold, place it into the refrigerator hours before to ensure maximum chill! This salad taste better when the crisp clean iceberg lettuce and the juicy watermelon are cold.
Mirror, mirror on the wall who’s the freshest of them all?
Recipes, Cooking & Art Direction: Mariana Nuño Ruiz McEnroe | Photography: Ian McEnroe |
Published: August 5, 2014
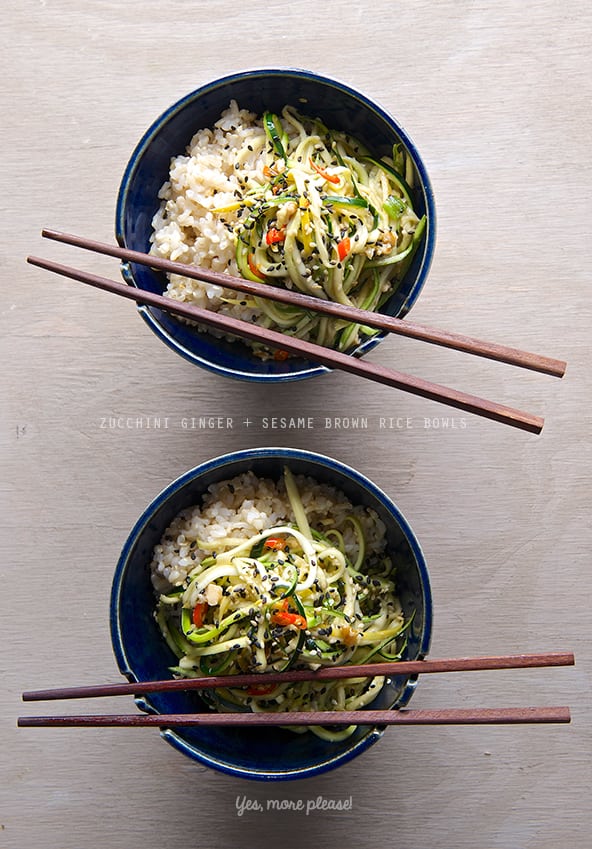
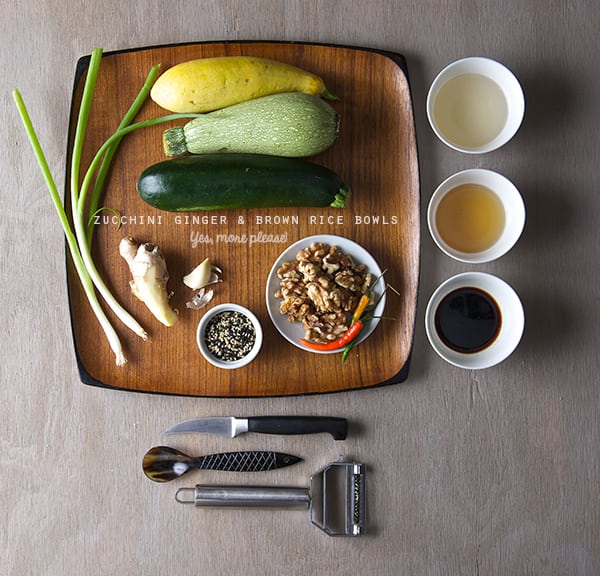
Light and refreshing is what best describes this recipe. A one bowl meal! It’s no fuss, maximum flavor, raw zucchini with a gingery-soy sauce over a nutty sesame seasoned brown rice. This Zucchini Asian flare recipe, is so light, refreshing and savory, you are going to want to eat it more than once a day.
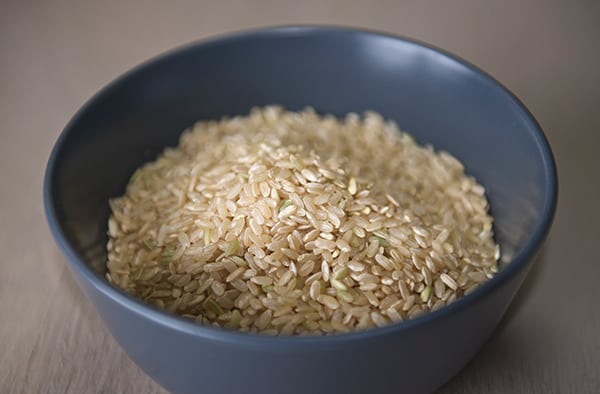
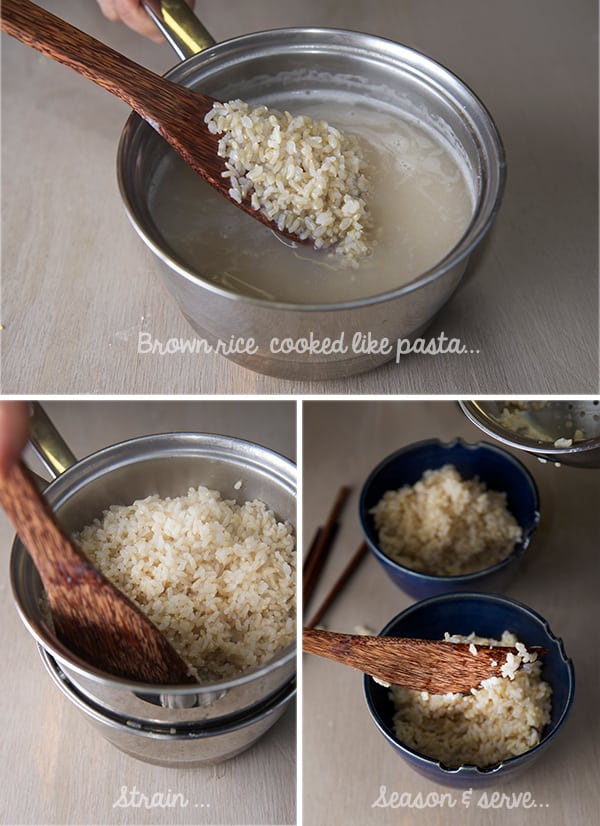
I know what Brown rice does not have a great reputation among the grains because it tends to be mushy and it can taste like cardboard… Well my friend, I have you covered on this one, you will love the quick easy method that I use. Cook the brown rice as you would cook pasta. Use a large pot with plenty of water and pinch or two of sea salt. The brown rice boils loosely for about 25-30 minutes; stir often and check for an al-dente consistency. When is up to my desired doneness I strain it and the heat of the steam dries the excess water in the brown rice, leaving you with perfectly cooked, fluffy individual grains, with great texture cooked trough and slightly al-dente.
Using this method, I cook larger batches of brown rice and use them later for a quick sautéed, salads, soups or in this case; this humble and refreshing Zucchini Ginger Brown Rice bowl.
As you can see there is hope for this misunderstood grain. I assure you once you try this method you will love brown rice again.
Enjoy the bountiful zucchini season and stay fresh!
Zucchini Ginger Brown Rice Bowls
Makes 2 meal bowls
3 medium size zucchini any color is up to your preference.
1/2 cup toasted and finely chopped cashews or walnuts
2 green scallions finely chopped
1 tablespoon toasted sesame seeds (any color)
1 tablespoon of fresh grated ginger.
1 small garlic clove grated
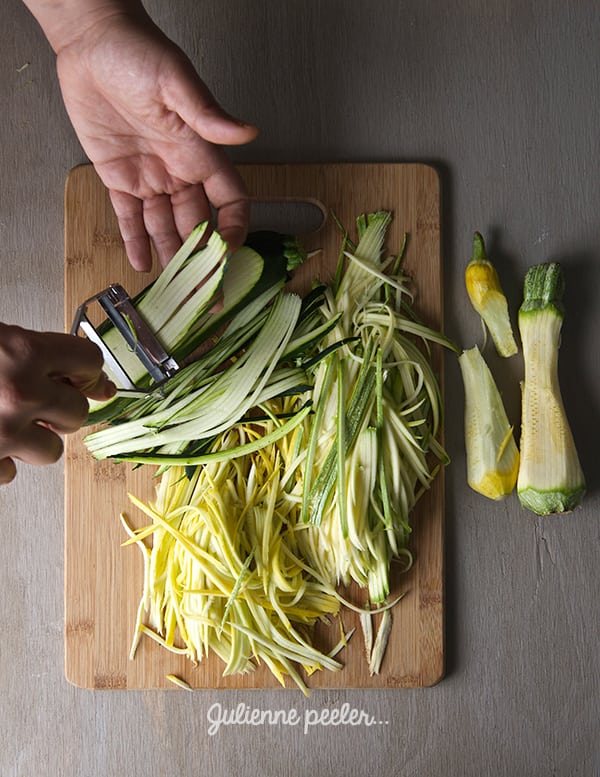
1. Bring to a boil a large pot filled with 8 cups of water and 2 good pinches of sea salt. Once is boiling add the brown rice, bring back to a boil, and then lower the temperature for a slow simmer. Simmer for about 25-30 minutes. Stirring occasionally. 2. While your rice is cooking, shred your zucchini, ~omit the seed core on the zucchinis~ I used one of my favorite uni-taskers, I absolutely adore this julienne peeler! you can get it any cooking supply store or get it on-line. Toast your walnuts, chop the scallions, grate your ginger and garlic.
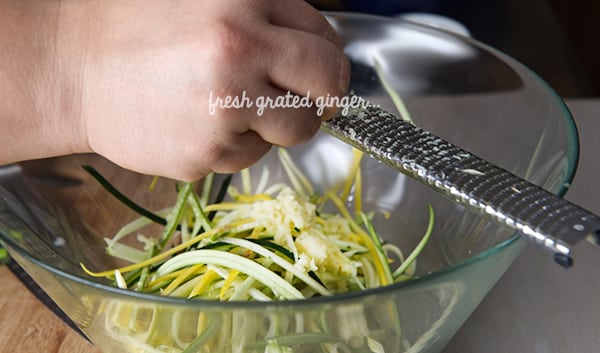
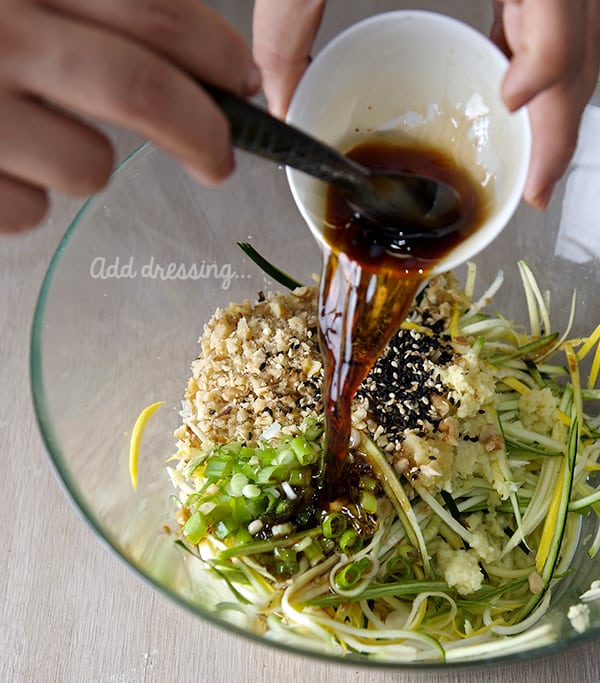
3. In a large bowl combine the shredded zucchini and one good pinch of salt, toss well and let it stand for a few minutes. This will draw out some of the excess water out of the zucchini.Toss water from bowl and place zucchini on a clean kitchen towel and gently squeeze with your hands as much water as possible. remove from towel and with your hands fluff up the shredded zoodles. This step is very important, because avoids watering down your vinaigrette. 4. In a large bowl Combine the drain shredded zucchini, finely chopped toasted walnuts, toasted sesame seeds, green scallions, grated ginger, grated garlic. 5. Combine the soy sauce, sesame seed oil, rice vinegar. Set a side you will dress your zucchini right before serving. Please check on your rice.
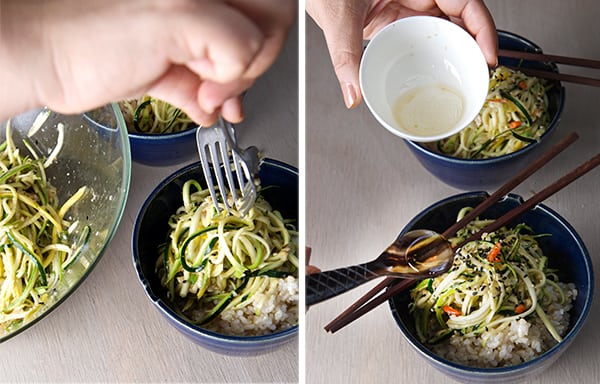
6. Check for rice doneness. I usually look for a soft but firm grain, that tastes cooked and has a god bite. Usually is around 25-30 minutes, the doneness I prefer. See the picture below.If you want to go a little further on cooking is up to your preference, give the rice another 5 minutes, re-check and taste; always taste! 7. Once your rice is cooked, with the help of a colander or a sieve, strain the rice. Allow the hot steam to dry the extra water, give it around 5-7 minutes. Once all the excess water is drained and still warm, transfer the rice into a bowl and season with the sesame oil, sesame seeds and rice vinegar toss until well combined.
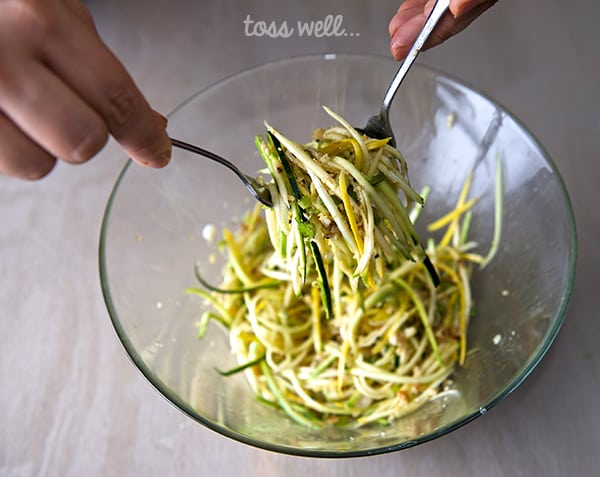
8. Once your rice is seasoned, Add the Soy sauce sesame seed oil, and rice vinegar dressing to the zucchini mixture. Toss well.
9. Using two deep bowls, divide the rice and top it with the zucchini mixture. Sprinkle some extra sesame seeds and for spice maybe some Thai pepper, red pepper flakes, or some Sriracha-hot sauce! Enjoy!


