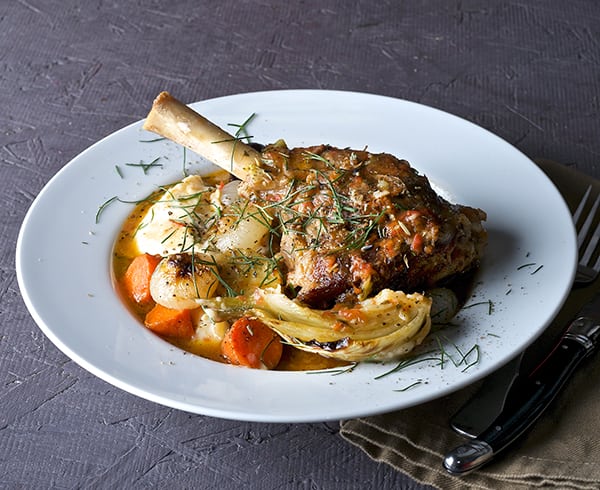
Braised Lamb Shanks with Fennel, Cipollini Onions and Cauliflower Parsnip Mash

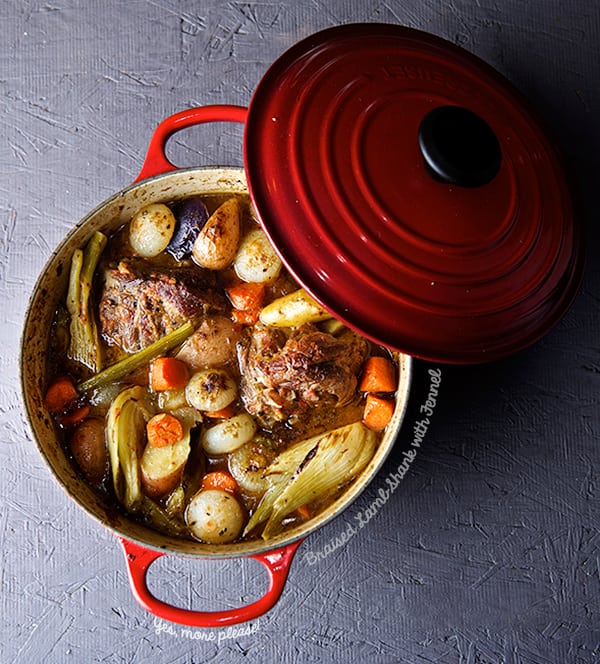
Braised-Lamb-Shanks-with-Fennel_-and-cauliflower-parsnip-mash-ready-to-serve!_Yes,-more-please!

To braise or not to braise, there’s is no question…. To Braise!

Braising is one of my favorite cooking techniques. I’m always amazed by the results of applying minimal efforts, a little pampering and low and slow heat with a “no rush” time frame. The results are beyond expectations: big warm fully developed flavors, aromas all ingredients in deep harmony. A true feast for kings.

If you follow the 3 golden rules for Braising, you are on the boat of a dinner feast.

1. First, seal, brown, caramelize your well seasoned piece of meat with salt & pepper. Brown all sides over medium heat.
2. Build your saucy broth base, adding the trilogy of all times: celery, carrots and onions, Herbs, good quality chicken or beef stock. Red or white wine that you will drink, a bit of balsamic or sherry vinegar and/or tomatoes. These are acidic ingredients that this braising method needs to break up the collagen in the meat. The combination of all this orchestrated herbs, wine, vegetables, stock with the low moist and dry heat along with time, creates the most tender meat and an amazing rich and flavorful effortless sauce, and tender meat.
3. Cover your meat at 2/3 of the way with stock and wine, cook in the oven at a low temperature for at least 2 and 1/2 hrs…. Low and slow.
The Magic of braising is that it combines a dry and a wet cooking method, creating this juicy and saucy tender meat which also has a crust and slightly roasted top. What could be better?…Now can you imagine the possibilities? different acid components, variety of herbs, vegetables, root vegetables and a cut of meat that is suited for the job.Usually tougher cuts of meat, lamb, pork, rabbit the choice is yours.

Winter is just around the corner. Perhaps there is no better way to warm up your house than with this one pot of Braised Lamb Shanks with Fennel, Cipollini Onions and Cauliflower Parsnip Mash. Oh! did I mentioned the Cauliflower Mashed? I think this is a recipe on its own… extremely easy and surprisingly good, steamed cauliflower and parsnip whipped with a bit of butter and Extra Virgin Olive Oil, salt and pepper, its a mashed with an attitude.

This recipe is for two and easily adapted for 4 to 6. I usually make this over the weekend if we are gonna spend the afternoon around the house or on a Lazy Sunday afternoon. Leftovers like this just get better the next day. Effortless love in a pot. Warm up!

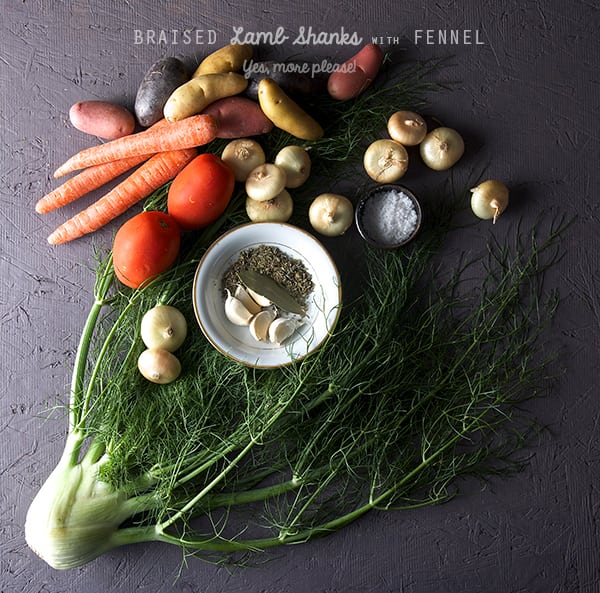
Braised-Lamb-Shanks-with-Fennel_ingredients

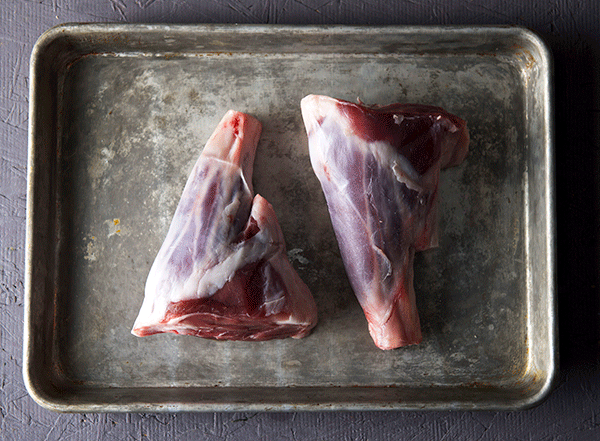
Braised-Lamb-Shanks-with-Fennel_Lamb-Shanks

Braised Lamb Shanks with Fennel, Cipollini Onions and Cauliflower Parsnip Mash

Serves 2

2 Lamb shanks cut for ossobucco (preferable the front Lamb shanks, since they are the meatiest)
1 glug grapeseed oil for browning the shanks.
1 medium fennel bulb cut in fourths
12 cipolinni onions peeled
2-3 carrots cut in medium pieces
6-8 fingerling potatoes or red new potatoes
2 grated Roma tomatoes
2 cups chicken stock or more if needed.
1 cup Dry white wine
1 – 1/2 teaspoons Herbs de Provence
1 bay leaf
4 garlic cloves unpeeled
1-1/2 teaspoon sea salt
1/4 teaspoon fresh crushed black pepper
2 tablespoons of butter

1 Dutch oven or any enamelware medium size pot with a tight lid.

For the Cauliflower-Parsnip Mash:

1 small cauliflower head
1-2 medium-small Parsnips
2 tablespoons butter
1 little glug extra virgin olive oil
1-2 gluts milk, unsweetened almond milk or soy milk upon your preference.
salt and pepper to taste

Preparation method:

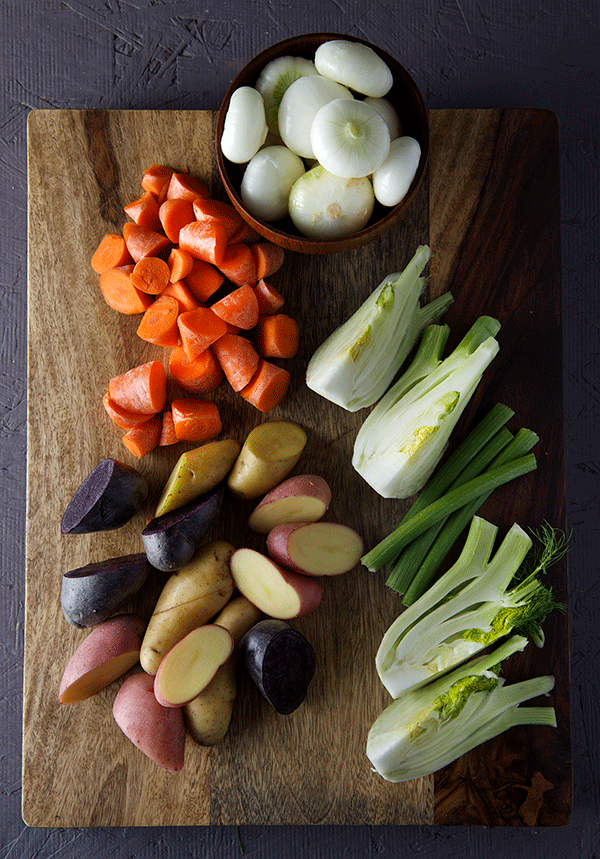
1. Preheat your oven to 425F and prepare all your vegetables, and grate your tomatoes.

Braised-Lamb-Shanks-with-Fennel_vegetables
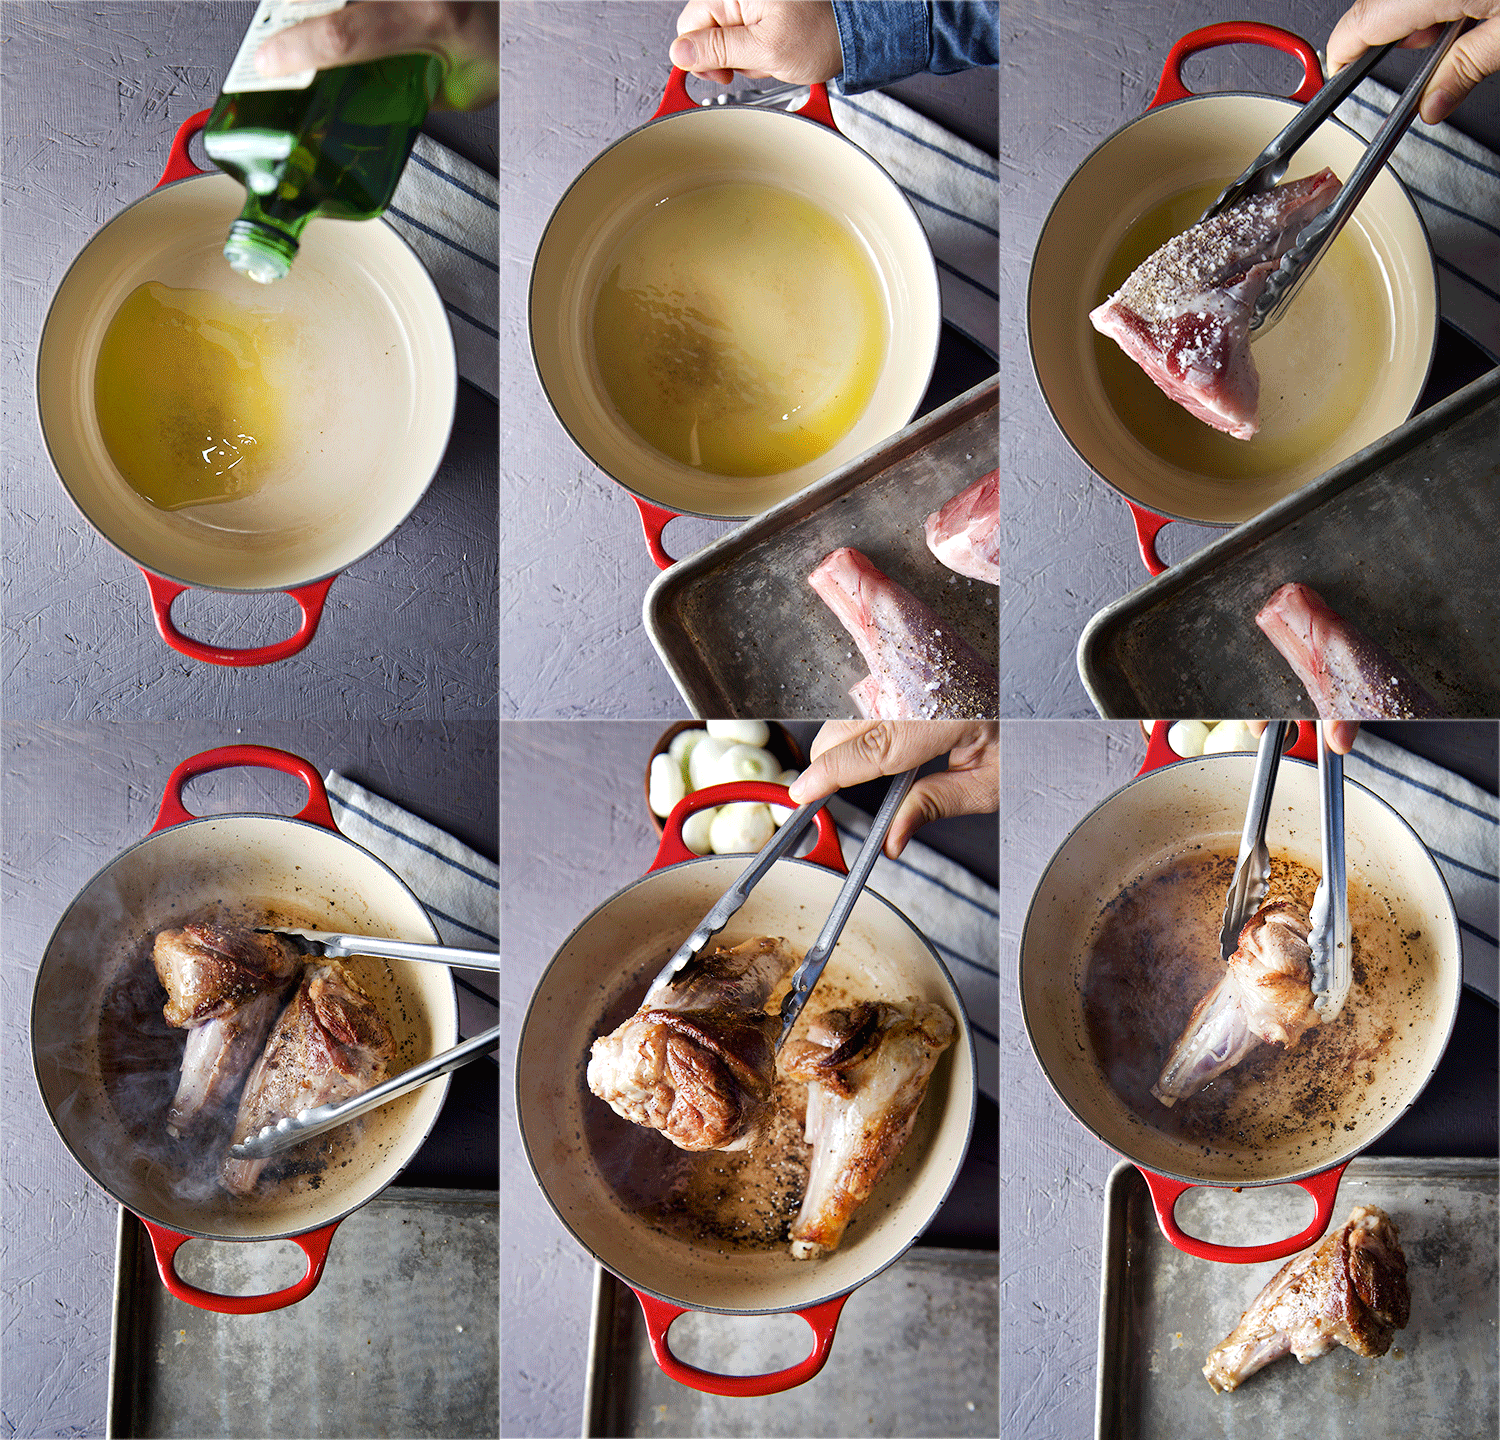
2. Pat dry the lamb shanks and season all sides with sea salt and fresh ground pepper. Heat up the Dutch oven over medium heat, add the grapeseed oil and wait until rippling hot, add the shanks and brown evenly all sides. Remove from pan set aside.

Braised-Lamb-with-Fennel_-how-to-prepare-the-braising-pot
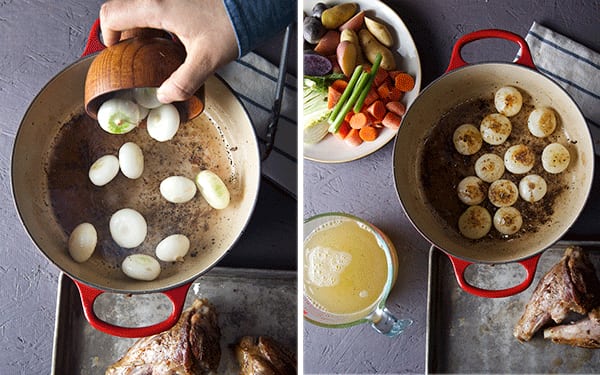
3. To the same pan add the cipolinni onions and re-season with salt and pepper until they have a bit golden brown color both sides. Remove from pot and set aside.

Braised-Lamb-Shanks-with-Fennel_how-to-caramelize-the-cipollini-onions

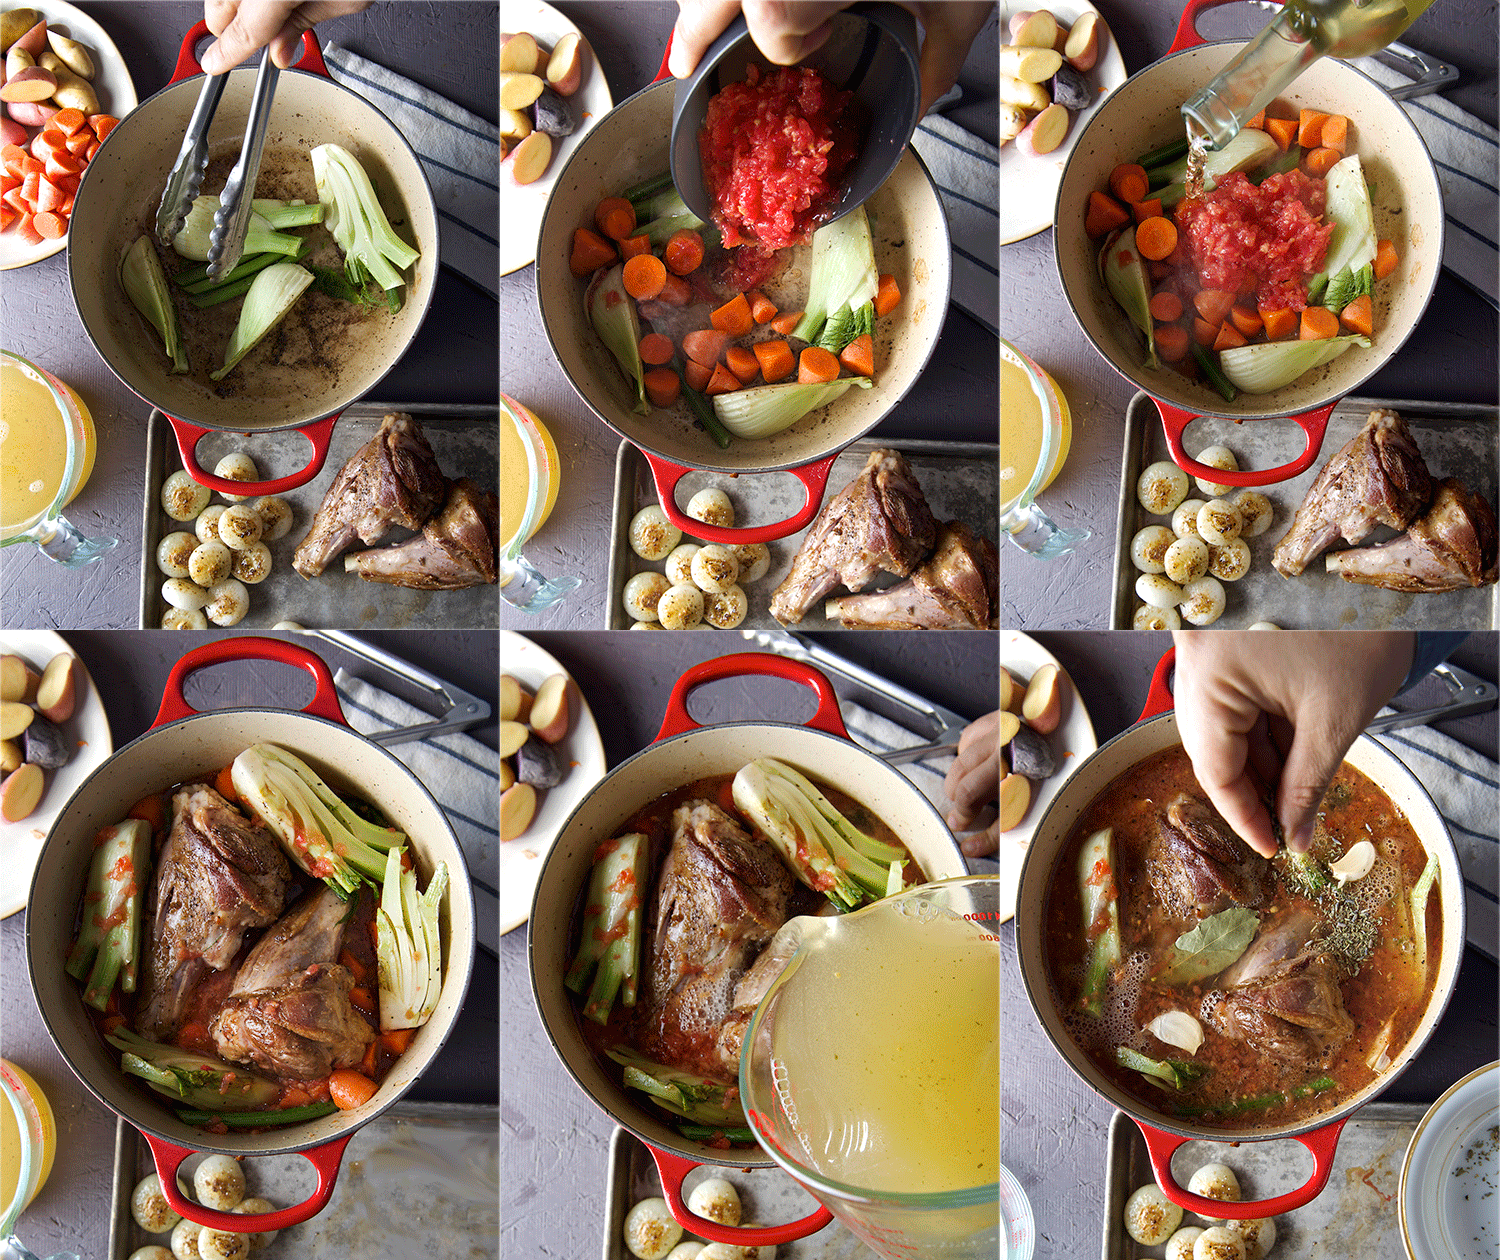
4. In the same pot add the fennel quarters and the carrots until the fennel shows some color, at this point make a well in the center of the pan and add the grated tomato, sauté for 3-4 minutes, then add the wine and cook for another 3 more minutes.
5. Once that the tomato and wine are bubbling, make room in the pot and add back the lamb shanks, add the chicken stock making sure the shanks are at least 2/3 covered in liquid. Add the Herbes de Provence, bay leaf, garlic cloves and cover with a lid on the stove. Bring to a rapid simmer. Remove the fennel from the pot, cover the pot with a lid and place the pot into the oven at 325F Set your timer for 1 and a half hours.

Braised-Lamb-Shanks-with-Fennel_braising-liquids
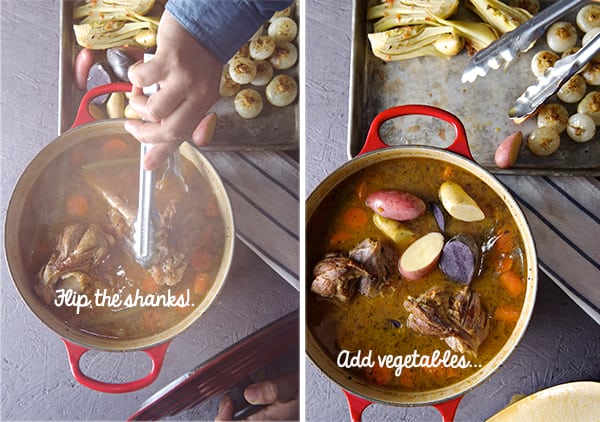
6.After one and a half hours, carefully turn your lamb over, and add the potatoes, fennel and sautéed cipollini onions,make sure the potatoes are summered into the liquid cover with lid and keep braising for another 45 minutes.

Braised-Lamb-Shanks-with-Fennel_braising-the-vegetables
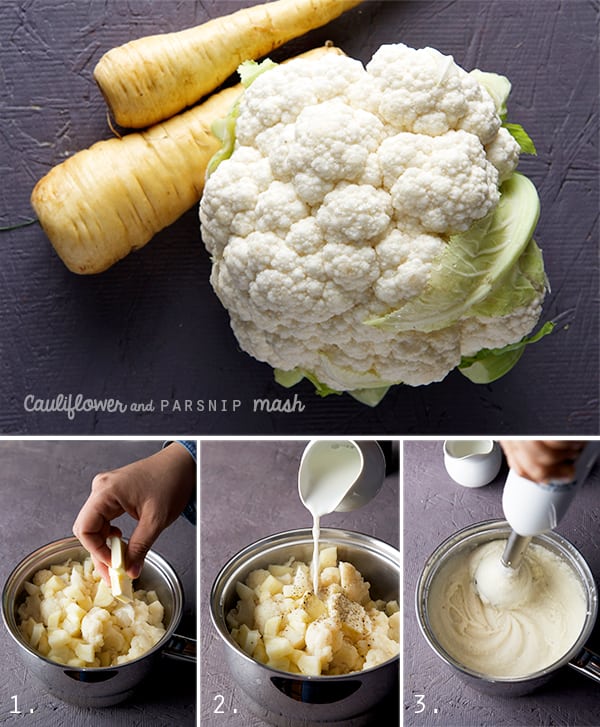
7. Meantime, cut your cauliflower into mini florets, peel and cube the parsnip, steam them on the same pot until soft and tender. Remove from steamer, place in a pot, add butter, salt pepper, extra virgin olive oil and a dash of milk, almond milk or soy milk what ever you prefer. With an inmersion blender whip until creamy and fluffy. A food processor will work well to. Set aside and keep on a warm place.Cauliflower-and-Parsnip-Mashed


8. Remove your Lamb from the oven, remove the lid, add the butter to the sauce and let it rest for 15 minutes before serving. this will allow all the juices to re-distributed and it will bring it to the perfect temperature to serve. I love the consistency of the juices when it comes out of the oven, the consistency of the saucy broth tends to be a little more lose, which for me it is perfect to soak some crusty french country bread.*sigh*… But sometimes, If there is to much liquid, I remove the lid and place the pot back into the oven under the oven broiler for 5-7 minutes,  just to get some extra roasted edges on the meat and veggies and it also helps to evaporate some of the extra juices a bit.
But, If you want your sauce to be  thicker or  to make it in to a glossy gravy, Once you get the pot out of the oven, remove the lamb shanks and vegetables into a platter poor some of the liquid over to avoid drying them out and cover them with some foil paper to keep them warm and moist.  Remove herbs and skim fat if necessary. Place the pot over the stove, and bring the liquids to a boil. Reduce to desired consistency, adjust salt and pepper to taste.

Braised-Lamb-Shanks-with-Fennel_Yes,-more-please!

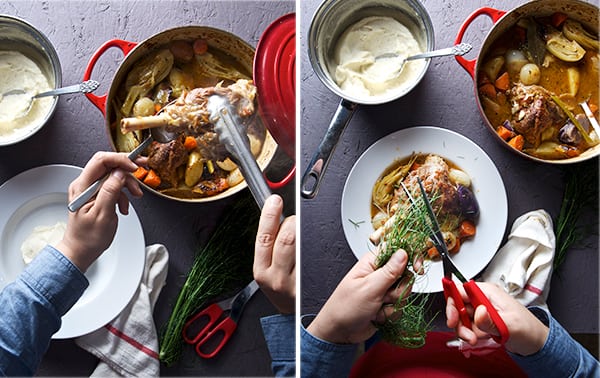
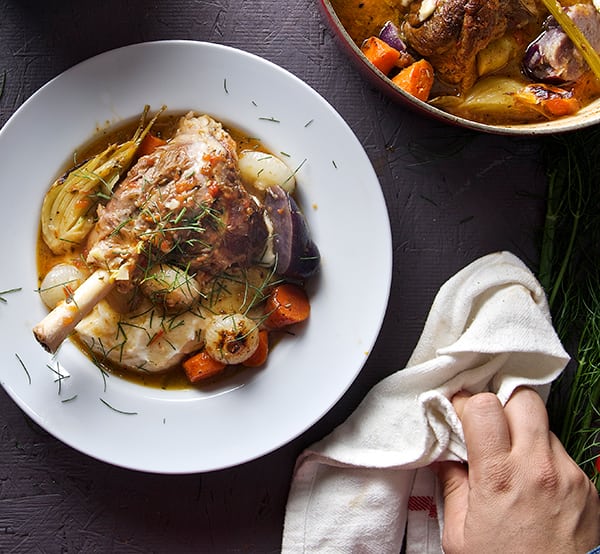
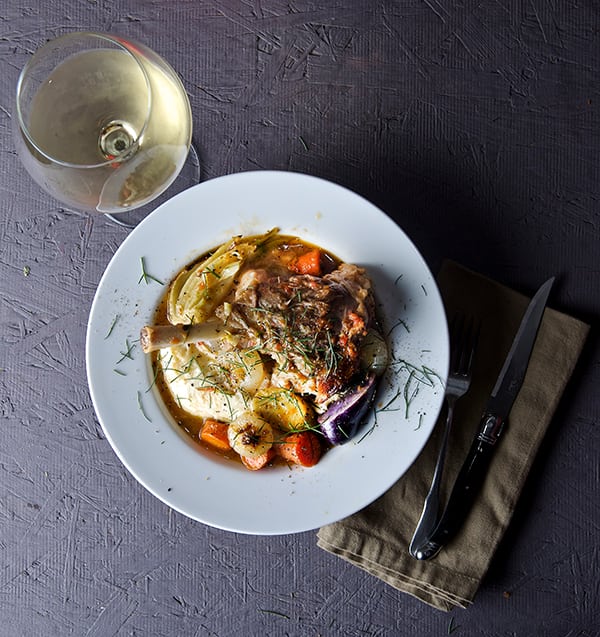
9. To serve, In any of the cases, place your lamb shank over the cauliflower-parsnip mashed, add vegetables on the side and a ladle of the  delicious juicy broth or gravy… do not forget the crusty bread!…Enjoy.

Braised-Lamb-Shanks-with-Fennel_sprinkle-some-fennel-topsBraised-Lamb-Shanks-with-Fennel_and-Cauliflower-parsnip-mash_Yes,-more-please!Braised-Lamb-Shanks-with-Fennel_delicious-dinner!...Yes,-more-please!

Braised Lamb Shanks with Fennel, Cipollini Onions and Cauliflower Parsnip Mash…

where is the crusty bread?

Music Pairing: Nouvelle Vague – Dance with Me

http://youtu.be/1boeQ9zoF-s
View Post or View Comments 0

Apple Buckwheat Crepe Cake with Cider Caramel Sauce

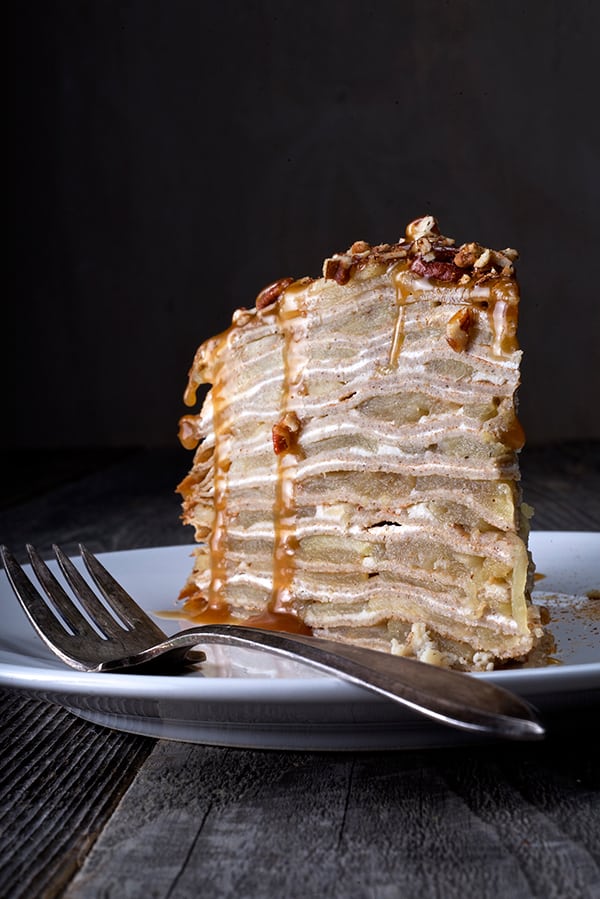
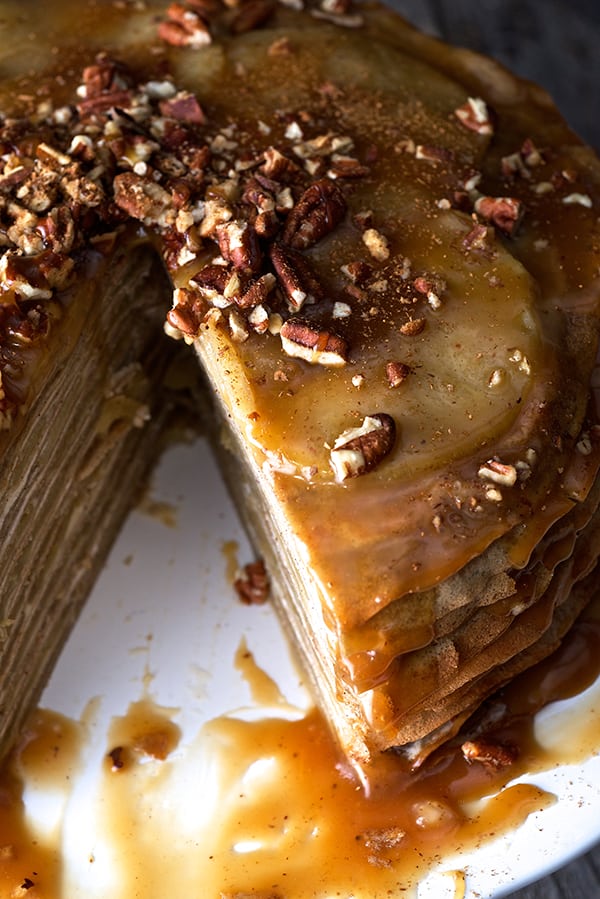
Apple-buckwheat-crepe-front_Yes,-more-please!

“With an apple I will astonish Paris.”
~ Paul Cezanne ~

This cake is for the person who loves to cook and who enjoys the process of creating, and building something from scratch; layering flavors, textures, and aromas. This cake taught me patience. From the conception, to the making I learned all the way. I learned that fast and easy are not always worth it. I was reminded of the “virtuous” character of patience. We can use it when we desire the outcome we imagine. To enjoy making this cake, reserve time, and relax. There is something about craftsmanship in this recipe that I love, especially the gratification of assembling the components. The results of such efforts are worth every step.

Time, and patience are the main ingredients. Apples, buckwheat flour ,butter and apple cider are the witnesses to the madness. The smells are insane once you start to cook; peeling the green apples, that crisp sweetness from breaking the skins, to the nutty and buttery aromas that fill the kitchen with a warm cloud when making the buckwheat crepes.

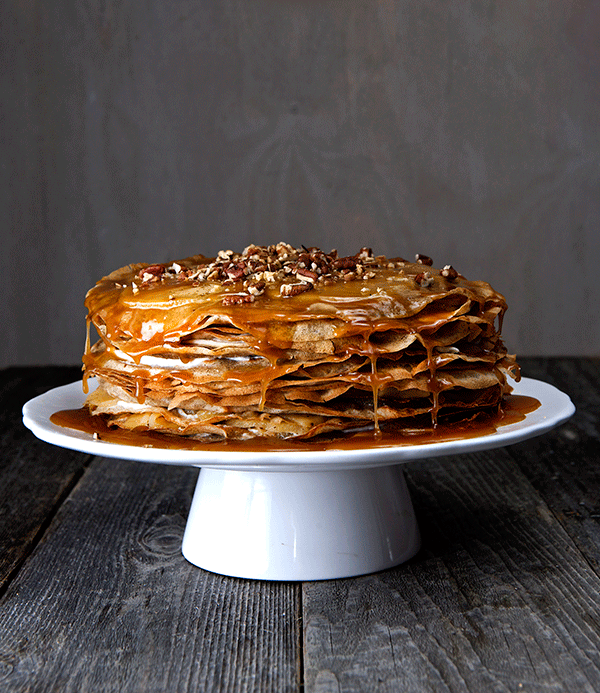
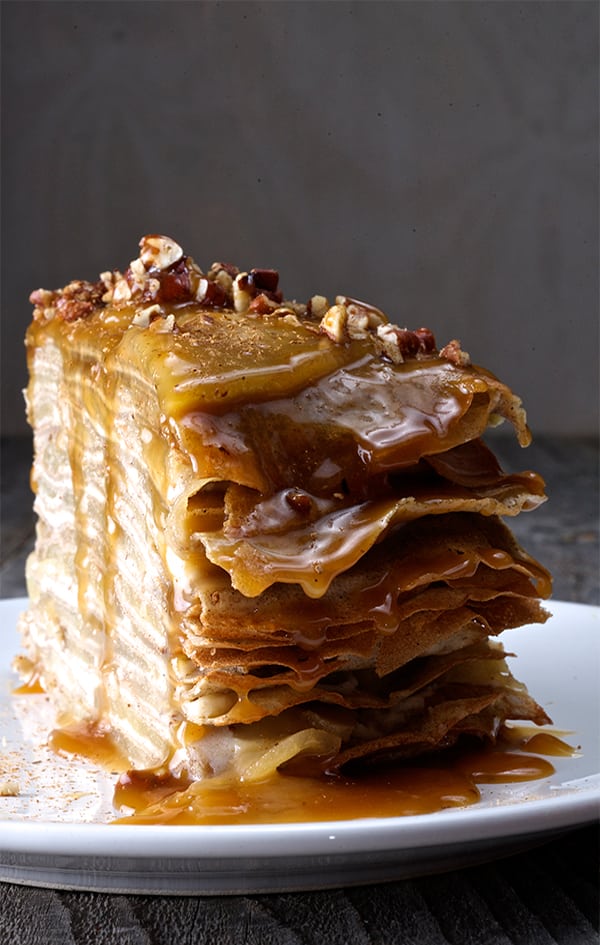
Imagine 26 soft silky layers of light, thin, buttery and nutty buckwheat crepes carefully layered with thinly sliced tart green apples sautéed with cinnamon and honey, mascarpone cinnamon cheese spread between layers. Add toasted pecans and a tipsy cider caramel sauce that sinuously hangs from the crispy feathery crêpe edges…This is the ultimate tribute to the apple and buckwheat love affair.

When you cut the first slice of this cake, your work shows, it makes you feel like a better person and all that patience and love invested in the creation it is absolutely worth it for a slice of this cake.

Fifty percent apples plus cheese and a bit of flour make it almost guiltless and mildly sweet, do not get the appearance trick you.

If you want to enjoy an apple cake this season, something memorable, and not so overly sweet, Apple Buckwheat Crepe Cake with Cider Caramel Sauce is the dessert you been waiting for.
Make time for this love affair and prepare to astonish.

Apple-buckwheat-crepe-Yes,-more-please!

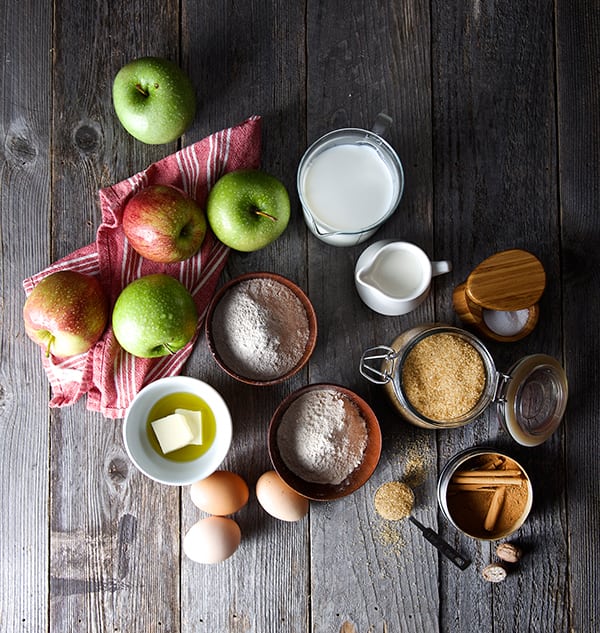
Apple-Buckwheat-Crepe-Cake_ingredients

Apple Buckwheat Crepe Cake with Cider Caramel Sauce

Serves 8-10

For the Crepes:

11/2 cups buckwheat flour
½ cup unbleached all-purpose flour
1 ½ tablespoons turbinado sugar or agave nectar.
¾ teaspoon fine salt
1 pinch of cinnamon

3 cups of milk
4 Large eggs
3 tablespoons of melted butter
2 tablespoons mild extra virgin olive oil

Plus about 3 more tablespoons of butter to cook the crepes.
1 – 8” non-stick pan
1 Ice cream scooper
1 baking sheet or cookie sheet tray

For the Apples:

7 medium size green tart Granny smith apples*
3 medium size Braeburn apples*
½ cup honey
1/2 cup turbinado sugar
½ teaspoon salt
1 tablespoon cinnamon
¼ teaspoon nutmeg
1 teaspoon lemon juice
¼ teaspoon lemon zest
2 tablespoons butter
2 teaspoons cornstarch
¼ cup apple cider

Note:  I’m combining two different types of apples, green tart wich are super crisp and hold their texture when sautéed, and the Braeburn wich are sweet and fragrant and wich also hold their texture when they are cooked. Once balance the others, I did not wanted to use a lot of sugar, since the cake will be drizzled with a cider caramel sauce. My advice is please, taste your apples: If they are to sweet or two tart you might need to add more sugar or honey is up to your preference and your sweet tooth.

For the Mascarpone filling:

2 cups mascarpone cheese
¼ cup honey
½ teaspoon cinnamon

For the Apple Cider Caramel Sauce:

2 cups apple cider
½ cup turbinado sugar
¼ cup honey
4 tablespoons butter
1 cup heavy cream
1/4 cup calvados.

1/2 cup roughly chopped toasted pecans.

Directions:

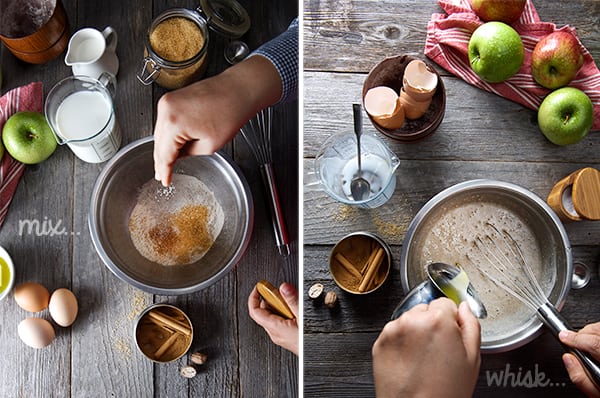
1. Start by preparing your Crepe batter. Combine all dry ingredients, Combine all wet ingredients and add them little by little to the dy ingredients whisking throughly until well combined and no lumps. Cover your batter with plastic wrap, making sure the plastic is touching the mixture, to avoid a skin to form. Refrigerate for at least 1 hour. You can make it the night before or in the morning and make the crepes at night. The batter will keep for about 48 hours.

Apple-Buckwheat-crepe-cake_making-crepe-batter
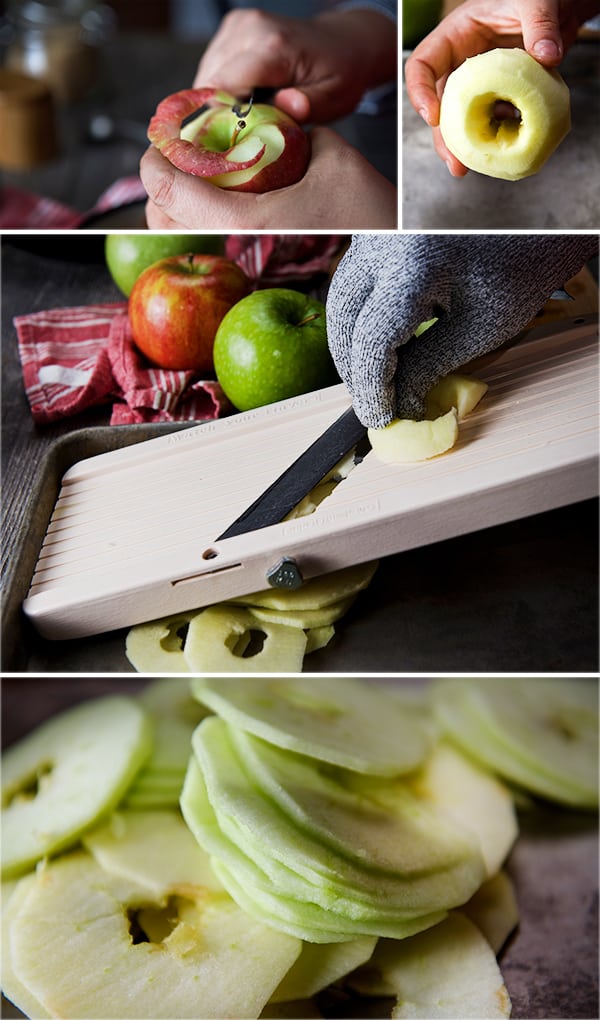
2. Mean time your crêpe batter is resting, prepare your apples. Peel them, core them as you peel and core them place the apples on a bowl with water and lemon juice to prevent the apples turning brown. Slice the apples about an 1/8 inch thin using a mandolin or the food processor. When using a mandolin, I always use a metal mesh glove, it is safe and comfortable when slicing, than the plastic apparatus that come with the mandolin set.

Apple-Buckwheat-Crepe-Cake_preparing-apples
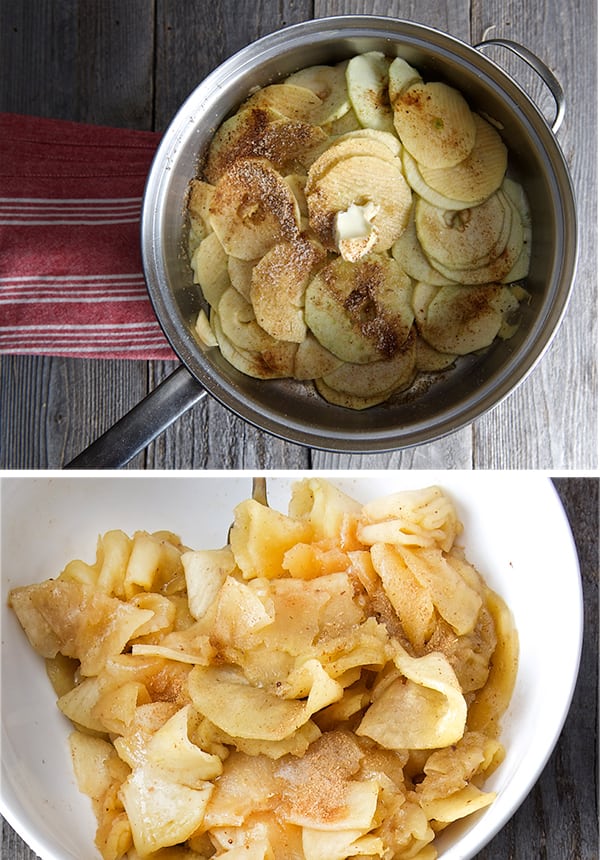
3. Place them on a bowl and toss them with the honey, sugar, salt cinnamon, nutmeg, lemon juice lemon zest. On a large pot over medium high heat melt the butter and add the tossed apples. Mix the cold apple cider with the cornstarch to avoid lumps, and add to the apples. Saute the apples tossing gently for about 6-7 minutes until they are tender, but not mushy, they have a glistening light brown color the juices are reduced. Taste for sweetness, add more sugar if needed. Set aside, to allow to cool. Reserve some of the best looking round slices to decorate the top layer.

Apple-Buckwheat-Crepe-Cake_sautee-apples
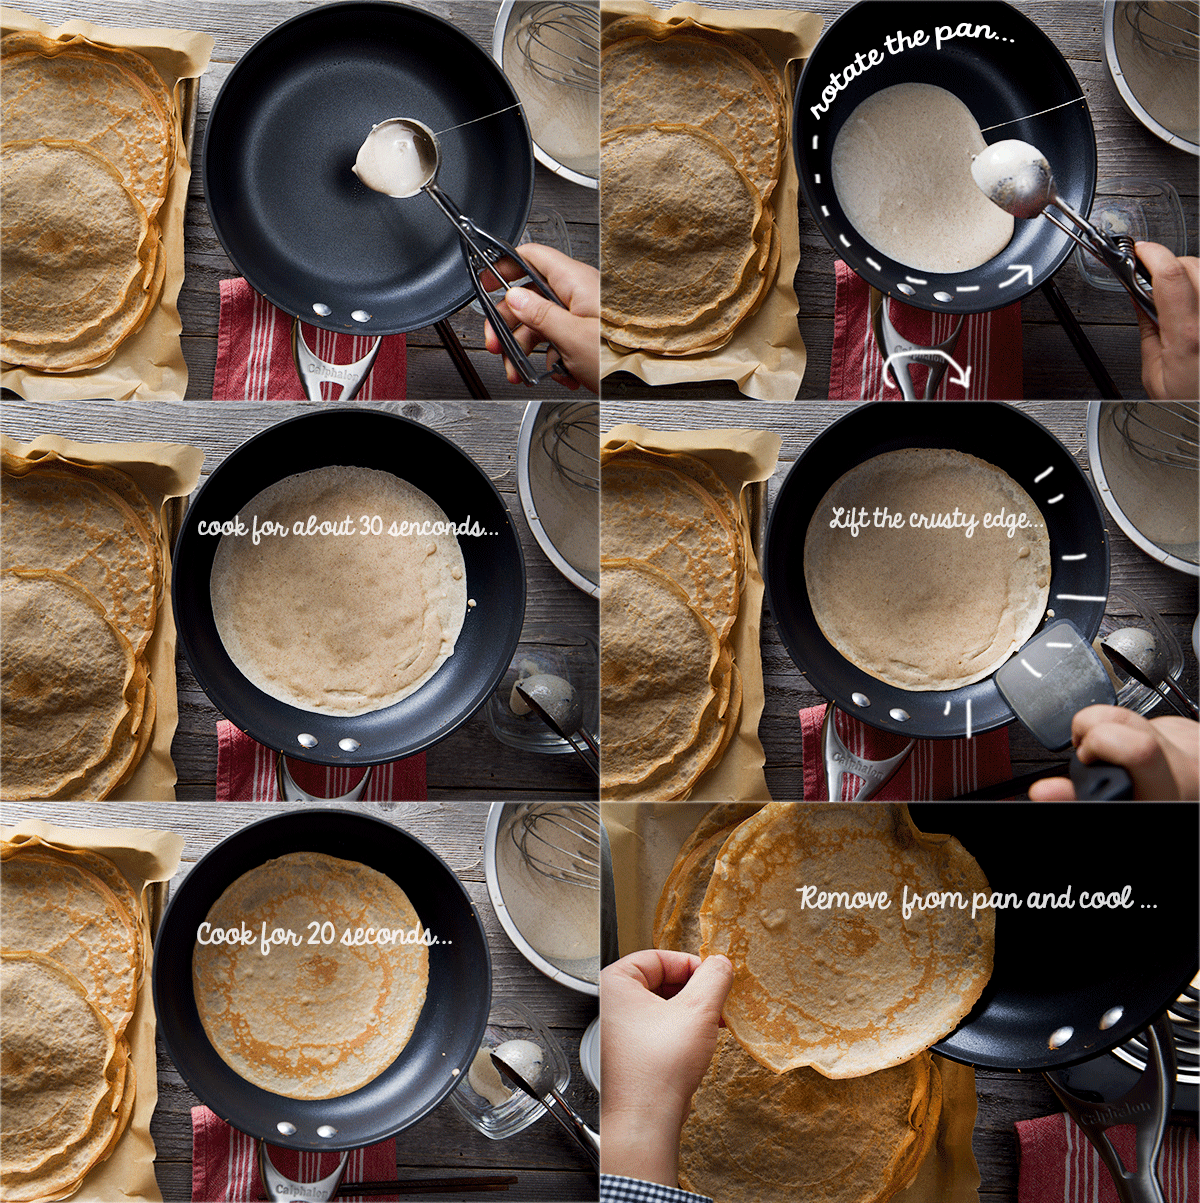
3. Once your batter has rested, pull it out f the refrigerator and allow to come to room temperature, whisk a little and start preparing to make the crepes. Pre-heat your 8” nonstick pan over medium heat. Add a little dab of butter until melted and remove excess with a folded paper towel. Poor about 1.5 to 2 ounces of batter into the center of the pan immediately swirl the pan all around to spread the batter on an evenly coat that covers all the bottom of the pan. Cook for about 30 seconds until the edges start releasing when you pull them with the help of a spatula. At this point flip. And cook for another 10 to 15 seconds, transfer to the baking sheet, lay them out flat and allow them to cool. Continue with the same procedure, using the buttered paper towel in between crepes works great, you do not have to add butter every time to the pan, a small coat from the napkin will do it. Continue until your batter is gone.

Tips and Notes to the crêpe maker:
– I use an Ice cream scooper to portion the batter, this allow me to have equal thickness every time. a small ladle will work too.
-The first crêpe is not always the prettiest, usually is the test drive; it allows you to adjust the temperature in your pan and rectify the heat.
– If this is your first time making crepes please do not get discouraged, it gets better as you go. Once you get the groove on it is fun and the smell on your kitchen is heavenly!

Apple-Buckwheat-Crepe_How-to-make-crepes_Yes,-more-please!

4. Once you finish making all the crepes, allow them to cool, and make your mascarpone filling. Combine all the ingredients in a small bowl and whip them for 2-3 minutes with a hand blender until smooth and well combined.
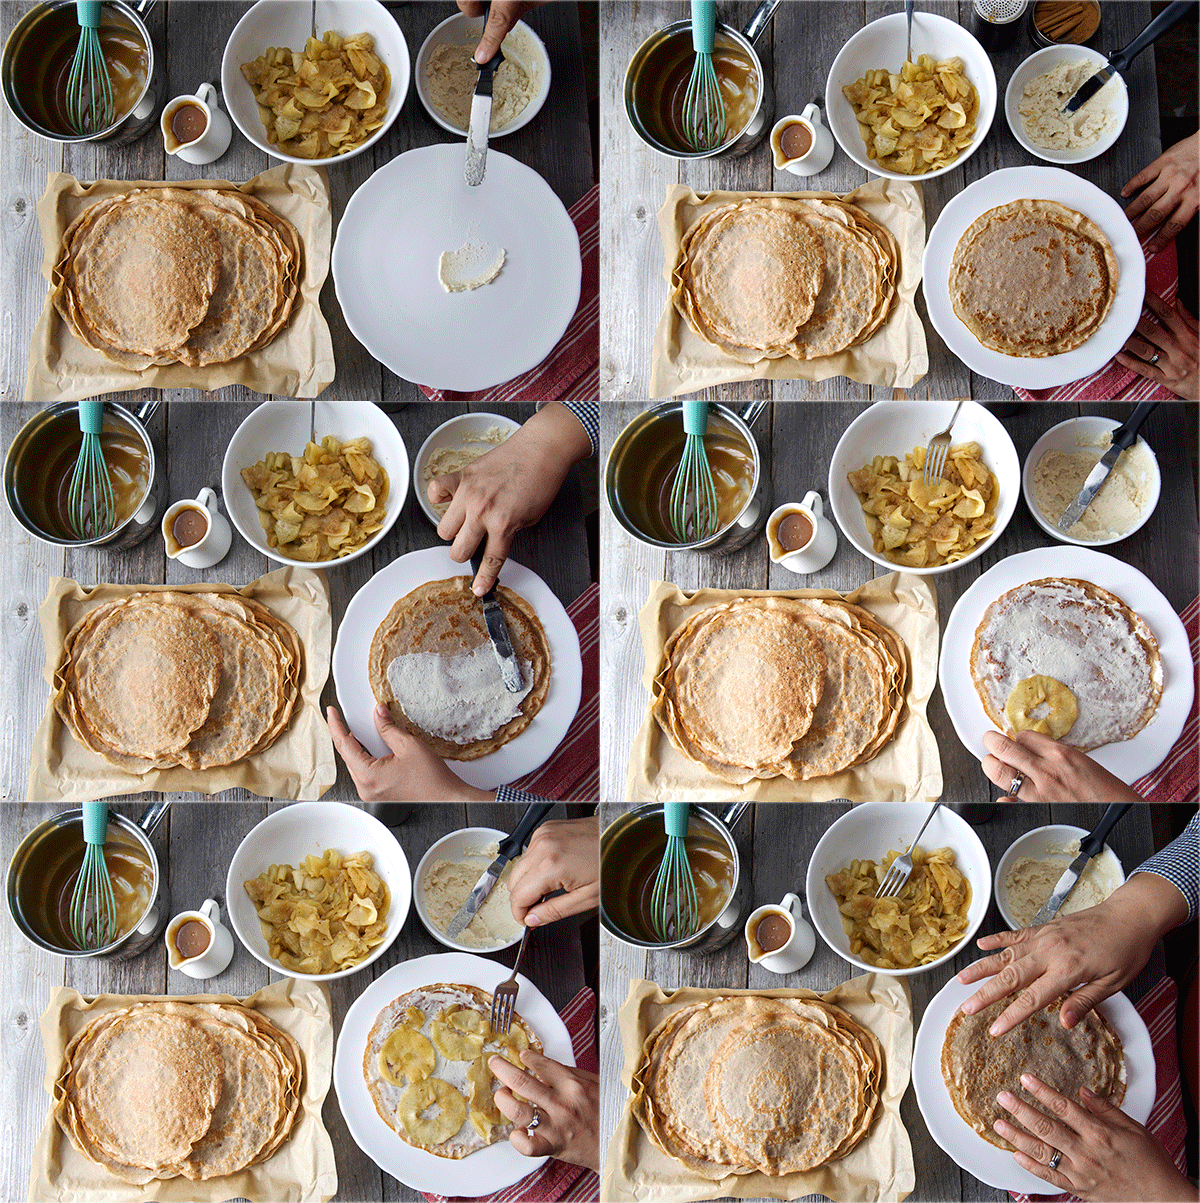
5. Now that you have all the components start assembling, on a flat platter or a cake stand, place a dollop of the cheese and place your first crêpe, arrange a single even layer of the sautéed apples unfolding the slices if tangled, then add a crêpe, then a thin layer of mascarpone cheese, apples. Between, crêpe and crêpe, gently press to ensure you have even layers. Continue until you are done with the crepes and filling, ending with a crêpe. Cover the cake with some plastic wrap and place it in the refrigerator for 30 minutes so the layers can set.  Mean time make the caramel sauce.

Apple-Buckwheat-Crepe-Cake-assambling-sequence
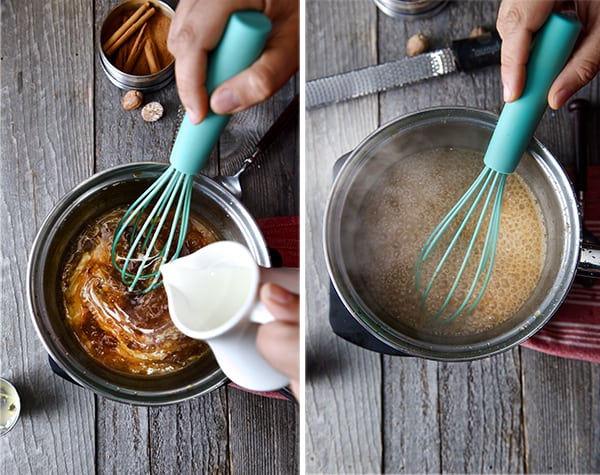
6. On a small heavy bottom pot, add the apple cider, sugar, honey and butter. Bring to a rapid simmer, you want o evaporate as much water on the sauce. This will take around 15-20 minutes until reduced by half. You will see the formation of big bubbles, and the consistency of the sauce is thicker it resembles more like a syrup.
At this point add the heavy cream whisking at all times, until all is incorporated. Add the Calvados and let it simmer for another 10-15 minutes until the consistency of a caramel sauce. Remove sauce from heat. And transfer into a small poring jar. Allow to cool before drizzling on the cake.

Apple-Buckwheat-Crepe-Cake_apple-cider-caramel-sauce
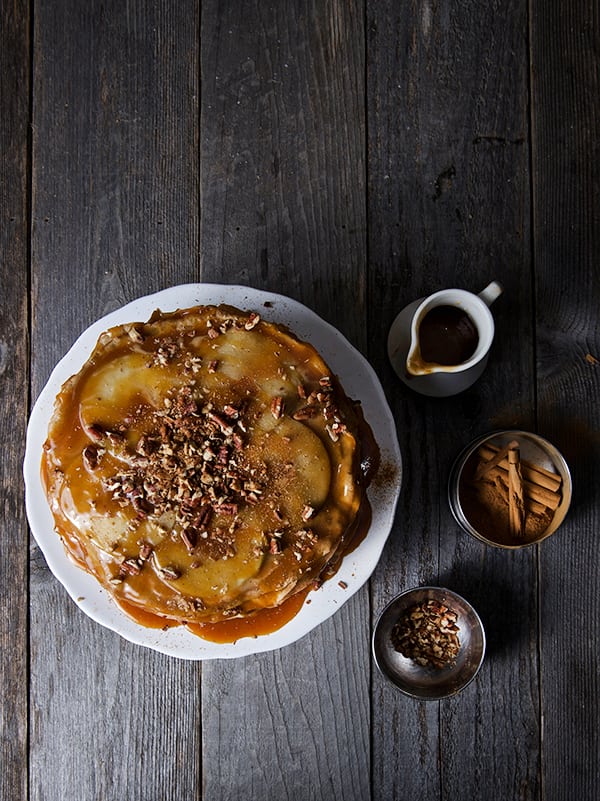
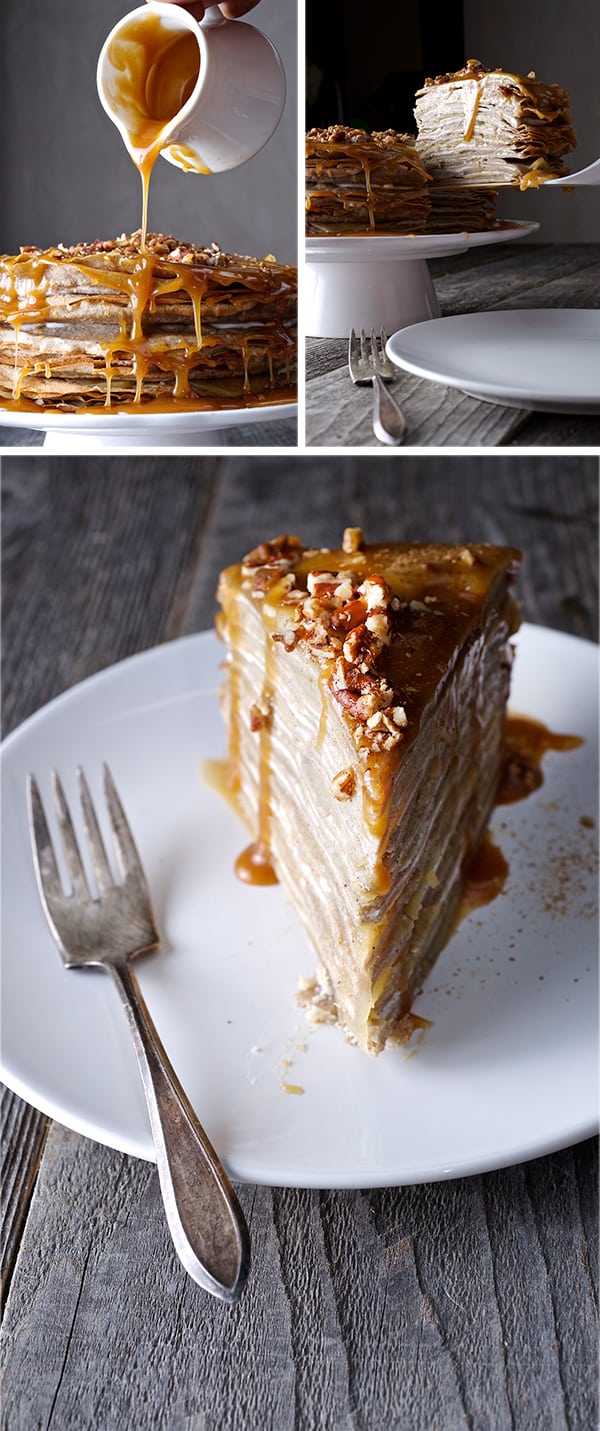
7. Pull the cake out of the refrigerator, place the reserved pretty slices of sautéed apples and decorate the top, once the caramel has cool down a little, pour some of the caramel sauce all over the cake drizzle all edges and sprinkle with the toasted pecans.
8. Make sure you reserve at least half of the sauce to drizzle some extra when the cake is served. Enjoy.

Apple-buckwheat-crepe-with-Cider-caramel-Sauce_Yes,-more-please!

Apple-buckwheat-crepe-slice_Yes,-more-please!Apple-buckwheat-crepe-back_Yes,-more-please!Apple-buckwheat-crepe-sliced-cake_Yes,-more-please!

Apple Buckwheat Crepe Cake

with Cider Caramel Sauce

Music Pairing: Erik Satie – The Essential Collection

View Post or View Comments 3

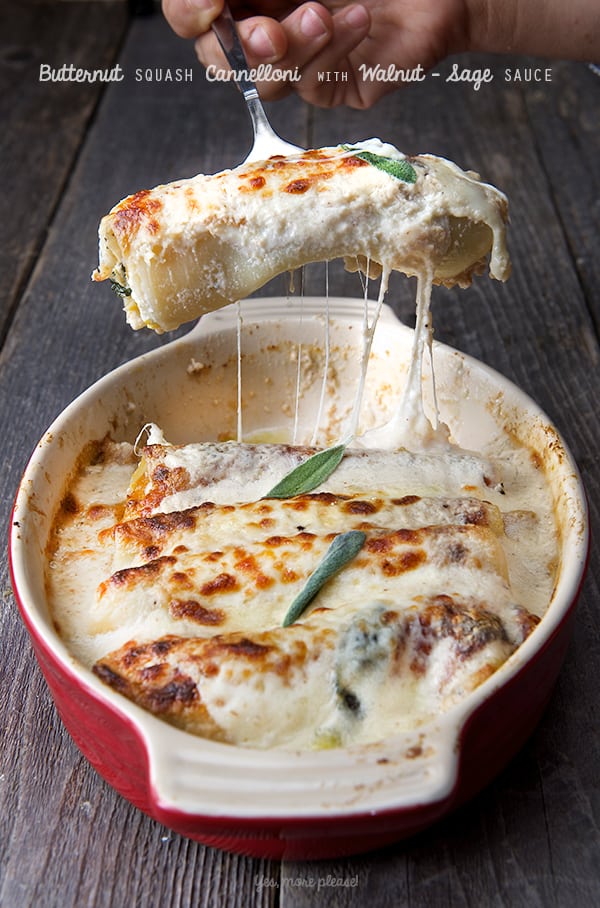
Butternut squash Cannelloni with Walnut-Sage Béchamel Sauce

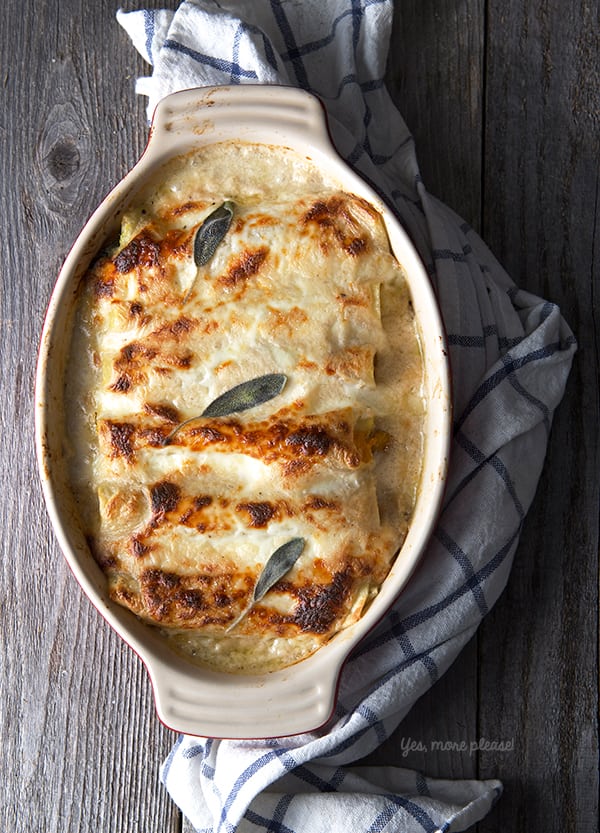
Butternut-Squash-Cannelloni-with-Walnut-Sage-Sauce_Yes,-more-please!Its warm in the Lone Star State. We’re still waiting in Texas for some cool Autumn weather. We are still in the 80’s around here if you know what I mean. The only indication of Fall, besides the calendar, are the beautiful pumpkins, squashes, sweet potatoes, root vegetables and leafy greens at the markets.
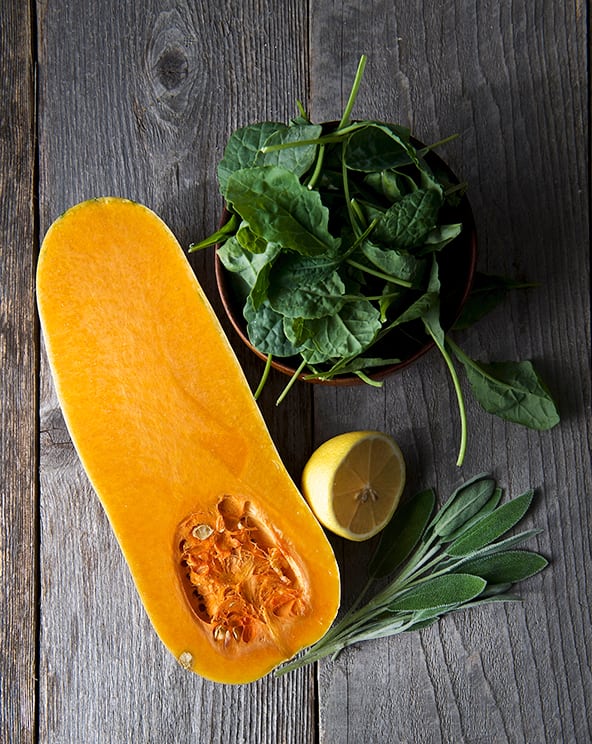
This last Sunday, I found small butternut squash, acorn squash, and some white mini pumpkins. While some people are turning them into candle holders, I think they are the perfect individual size for dinner. They cook fast and leave no left-overs.

Buternut-squash-Cannelloni_the-vegetables

With this in mind, and the romantic idea of having a Fall season, I turned my oven on and thought about the most autumn dish I could bake, and this is what I came up with: Butternut Squash Cannelloni with a Walnut-Sage Bechamel sauce. Dreamy. This recipe has a long name and a short preparation. It is not hard to Imagine pasta sheets filled with delicate butternut squash, baby spinach, onions and goat cheese; rolled and smothered with a light creamy, nutty walnut-sage béchamel sauce, some mozzarella on top and.. Kazam! You have Fall on a plate. Nutty, creamy, warm, cheesy, the kind of dinner you want to snuggle with…In Texas we snuggle in shorts and t-shirts. Or you can fake it and watch a movie with maple trees, and turn your A/C to 64F grab a little blanket and for a few hours pretend is Fall….Not that we have done this…ehem, ehem.

Mean time we will patiently wait in shorts and T-shirts for the winter… maybe I should make Margaritas instead!… Enjoy the recipe.

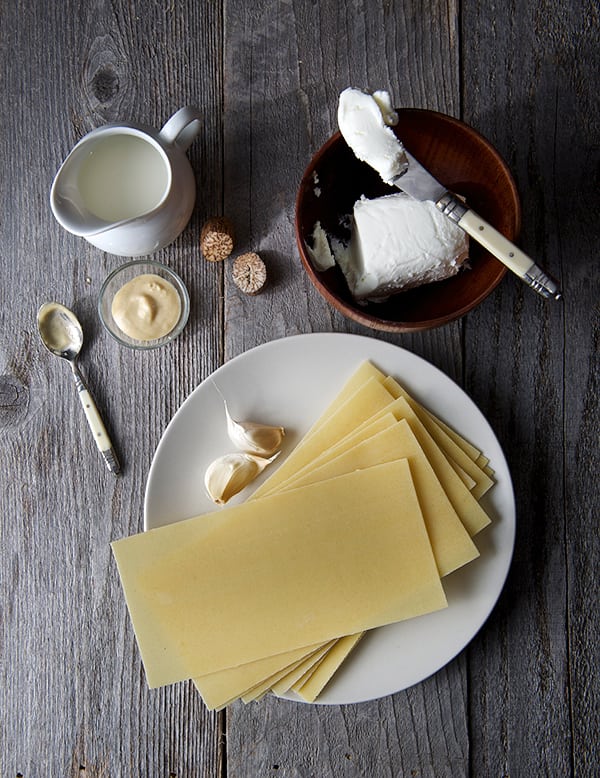
Buternut-squash-Cannelloni_pasta-and-sauce-ingredients

Butternut squash Cannelloni with Walnut-Sage Bechamel Sauce.

Serves 4

12 cannelloni pasta tubes or 12 lasagna sheets.

For the filling:

1 small butternut squash peeled and cut into small cubes
2 cups baby spinach or baby kale
1/2 medium onion small diced.
1 glug extra virgin olive oil
2 pinches of nutmeg
Salt and pepper to taste
4 oz. Chèvre Goat cheese

For the sauce:

1/2 cup blanched and toasted walnuts
2 cups milk
2 tablespoons flour
4 tablespoons butter
Zest 1/2 lemon
1-2 pinches nutmeg (freshly grated preferred )
2-3 Sage leaves whole*
1/2 teaspoon salt
4-6 cranks of fresh ground black pepper

Fresh mozzarella ( liberal amounts upon your preference)

3-4 Sage leaves to garnish

*Note: Sage its a powerful herb, I levee it whole to just perfume the sauce and leave it whole as garnish also enhances the dish and brings out delicious aromas. I prefer not to chop the sage on dishes like this, because it becomes a bit bitter, and is not very pleasant to bite into them, they will overwhelm the delicate flavor of the butternut squash. However, If you love sage and its a flavor you enjoy, feel free to adjust to your taste.

Preparation:

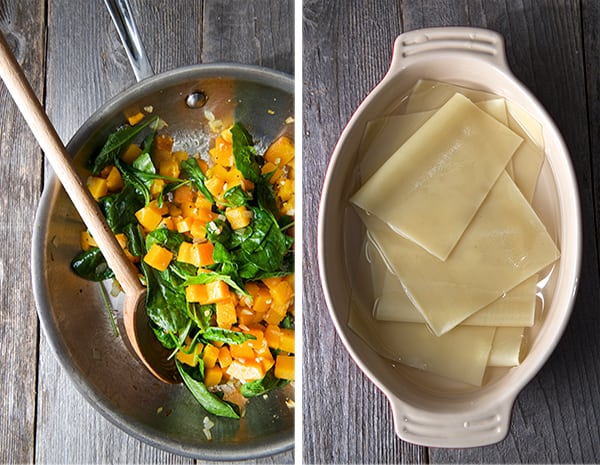
1. Using a little glug of olive oil Sauté the onions and butternut squash until tender. Finally add spinach salt, pepper and nutmeg; toss well then remove from stove and let it cool down. Add the goat cheese in crumbles once the filling is cool, toss gently.
2. Pre-cook your pasta sheets according the directions on your package. Remember to salt your water to flavor the pasta. Remove the sheets from boiling water 3-4 minutes before, according to directions. Shock them in iced water to stop cooking, and avoid to stick together.

Buternut-squash-Cannelloni_pasta-and-sauce-preparation
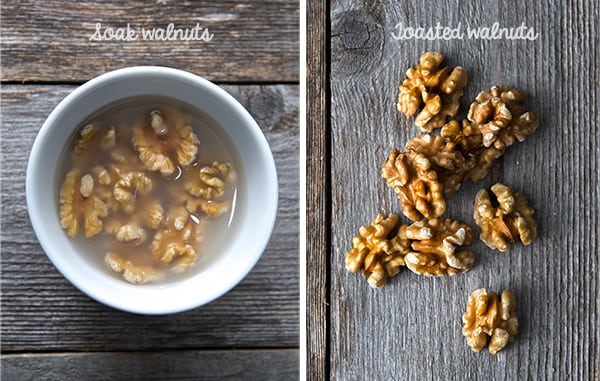
3. Make the sauce.  Start by blanching the walnuts in warm water for 5 minutes, this will eliminate any bitterness from the walnut skins. Drain the walnuts and toast them on a large skillet for a few minutes. Blend the walnuts with 1/2 cup of the milk until smooth. Then incorporate with the rest of the milk.

Walnuts
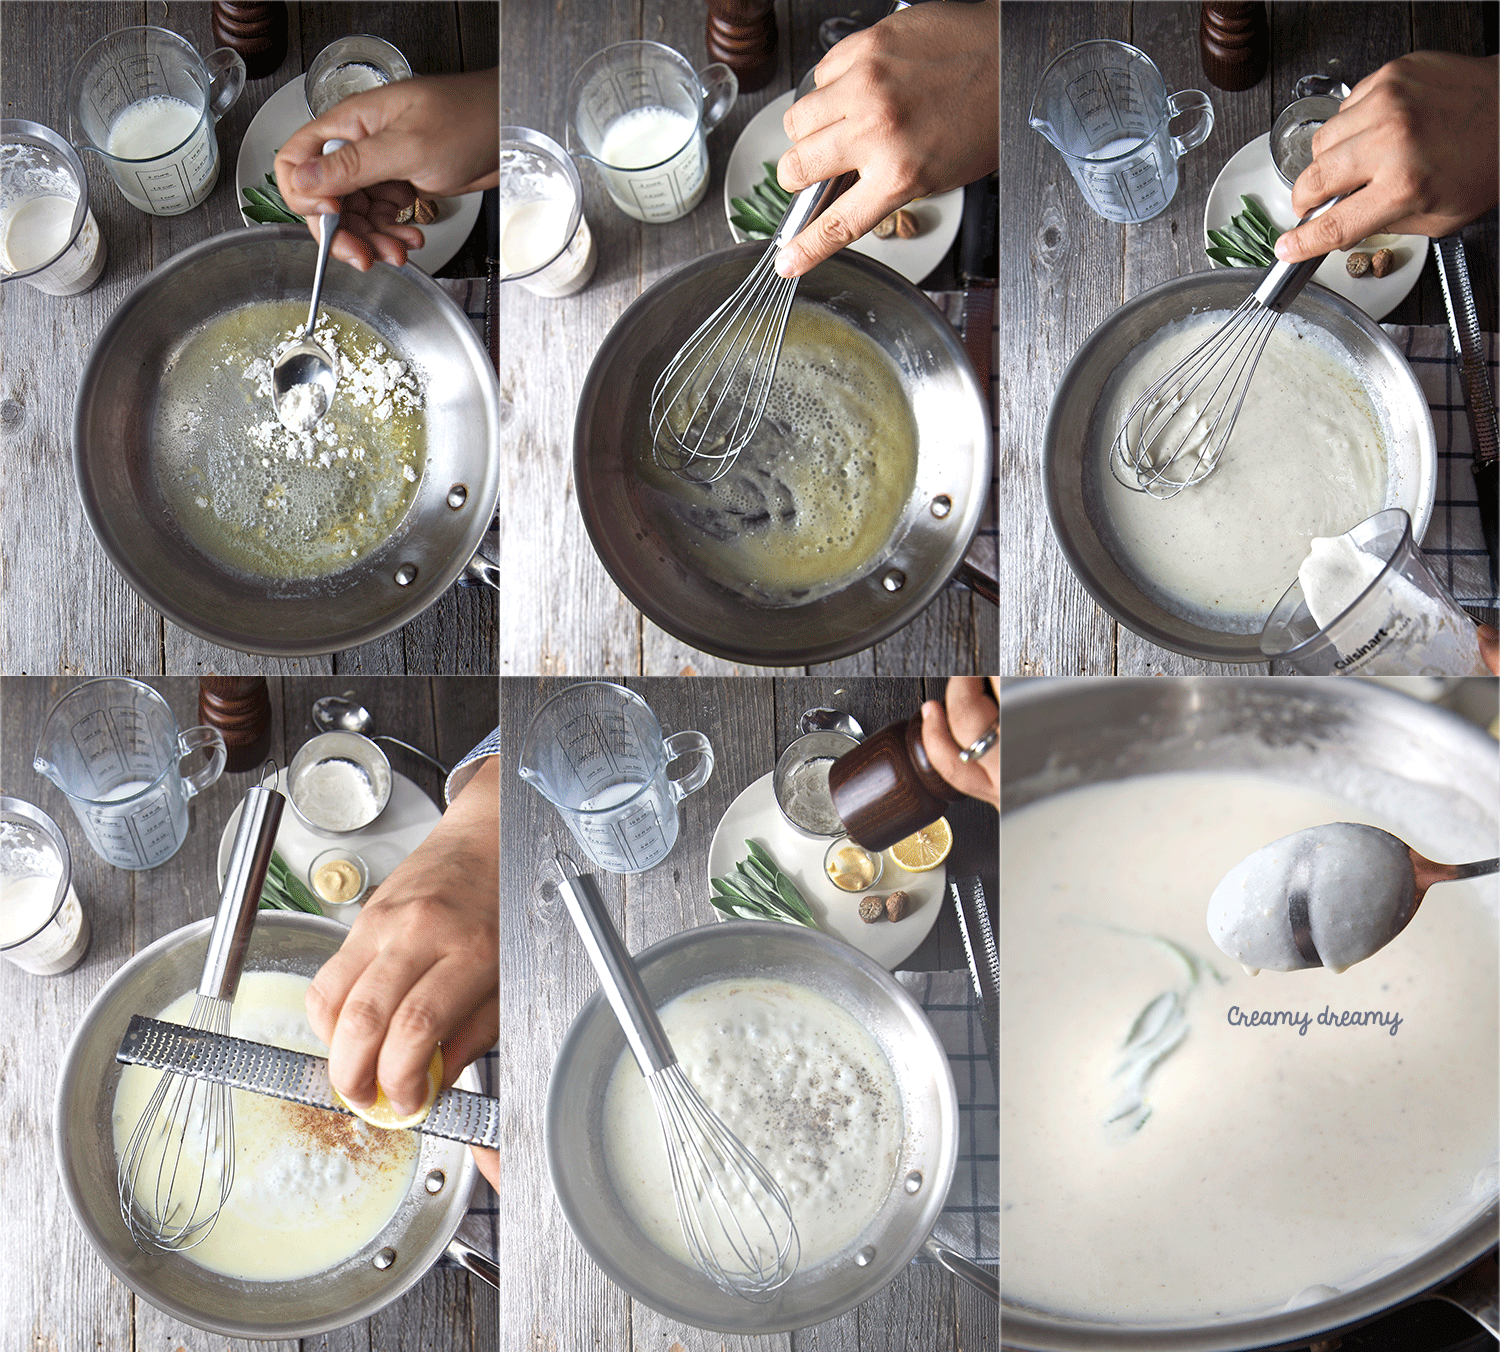
4. In the same large skillet, over medium heat, place the butter until melted and bubbly. Add the flour and whisk well to combine until no lumps and the buttered flour looks light golden-yellow in color. Start adding the walnut-milk in smaller additions and whisk at all times to avoid lumps, until the 2 cups of milk are incorporated. You might need to reduce the heat to medium low while whisking. After all the milk is incorporated season with salt, pepper, and nutmeg and sage leaves. Bring too a slow simmer and remove from heat. The consistency should be of a light creamy thickness, if to thick, add more milk, to lose, place it back to the heat and whisk until desired consistency.
It should cover the back of a spoon see picture below.

Butternut-Squash-Cannelloni_how-to-make-bechamel-walnut-sage-sauce
3. Prepare a baking dish with butter, or a little olive oil, add a bit  of the sauce on the bottom.
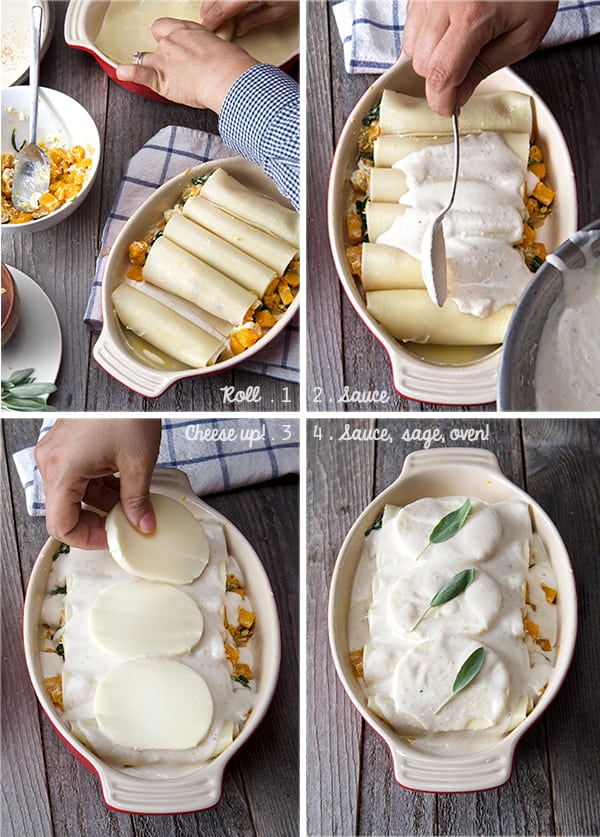
4. Start by filling the cannelloni’s pasta tubes or by placing the filling on one end of the precooked pasta sheets and roll them up tightly. Proceed to do the same with each pasta sheet. Place the cannelloni rolls into your baking dish as you go.
5. Cover all the pasta rolls with the walnut-sage sauce, reserve some of the sauce.
6. Cover with mozzarella slices, then pour the remainder of the sauce, top with some sage leaves.

Butternut-Squash-Cannelloniwith-sage-and-walnut-sauce_assambling-the-rolls
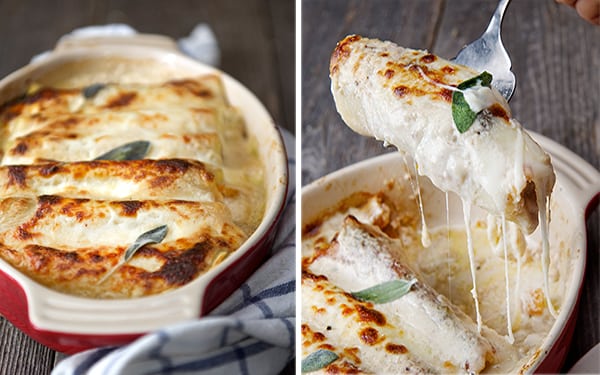
7. Bake at 375F for 20-30 minutes until cheese is melted and top is blistered.
8. Let it rest for 10 minutes before serving. Enjoy!

Note: Not too fond of rolling? make it into lasagna layers, you also can add some cooked ground turkey or sausage to the butternut -spinash filling and it will be equally delicious. I just love the way the Cannellonis portions out. Enjoy!

Butternut-squash-Cannelloni-with-Walnut-Sage-Sauce_out-of-the-oven-

Butternut-squash-Cannelloni-with-Walnut-Sage-Sauce_Yes,-more-please!-

 Music Pairing: Autum Leaves – Miles Davis

View Post or View Comments 2

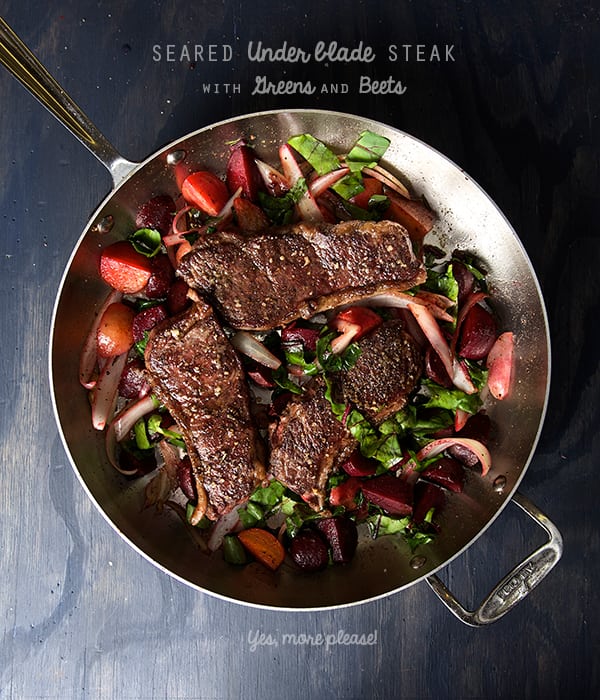
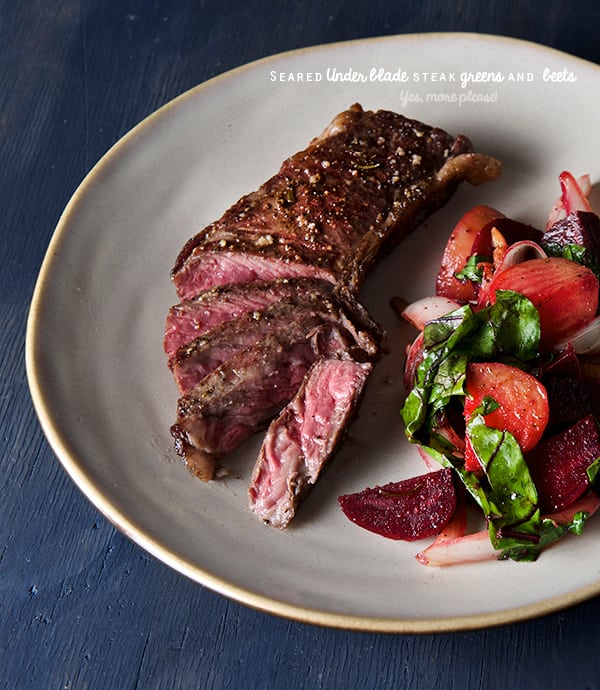
Seared Under Blade Steak Greens and Beets

Underblade-steak-&-beets

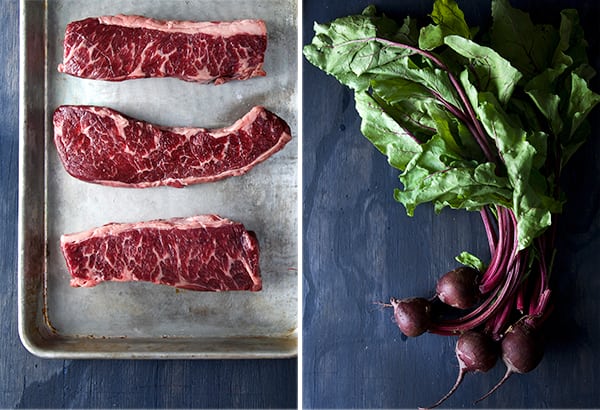
I got these fabulous under blade steaks similar to the infamous Denver steak. The Under Blade Steak comes from the same muscle as the Denver steak, however the under blade steak is cut against the grain for better texture. Where did I get these beauties? At one of my favorite butcher shops here in Austin, Salt &Time. These steaks are full of flavor with great texture, and very fairly priced for their amazing punch of flavor they are good for you and your wallet. My friend Kristen (who I met at volunteering at Boggy Creek Farm) currently manages Salt & Time. She has always recommended awesome cuts to try. Besides the under blade we have sampled the Flat iron steak, Hanger steak, and next on my list the Babette…I hope it is as good as the last supper scene in “Babette’s Feast”. By the way if you are a foodie or food movie aficionado this is a good film to watch, just to enjoy seeing the woman cooking the feast of a lifetime.. keep in mind… Also ask for Kristen if you happen to visit the amazing Butcher shop & Salumeria known as Salt & Time, in Austin, Texas.

Any how, with this fabulous under blade steaks in my possession, one quote came to my mind,
“To eat steak rare… represents both a nature and a morality.”
―Roland Barthes

I believe this man knows his semiotics well. I believe that under cooking a steak is an easy repair and forgivable, but over cooking a steak it’s a sin. By the nature laws and morality, I would like to reply to Roland Barthes quote, “ To the cook: when you are cooking a steak, please don’t kill twice” Cooking a steak it’s a serious matter to me. Few foods are so misunderstood like the steak. Forget the marinades, glazes, grilling seasonings and all those powders, and lets concentrate on the matter “maximus meat flavor” that’s how I want to eat my steak.

Under blade steaks taste best if cooked, medium to medium rare, especially if you are pan searing them. I would say that if you like your steak more on the done side, this cut may not be for you since it can get a little tough.( But to tell you the truth I have not meet a well done steak that is not tough, heheh…)

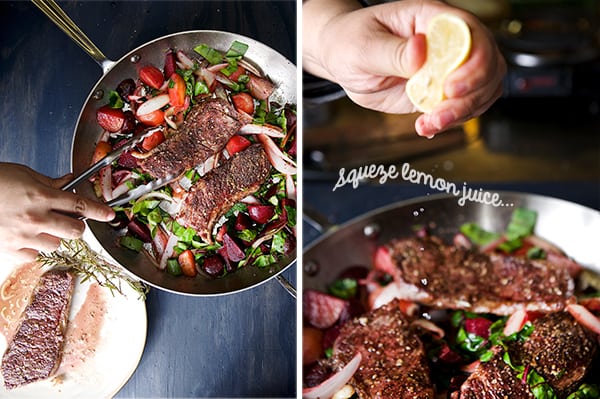
After I cooked the steaks, I could not resist to leave all the good delicious bits of meaty flavor plus butter garlic and rosemary left in the bottom of the pan; so I decided to throw some vegetables I had in hand, yellow onions, beets, beet greens, added a pinch of cinnamon quick sautéed all and add a squeeze of lemon at the end for a punch of acidity. I put back my steaks and served straight out of the pan to the table…. one pan easy dinner, your protein and vegetables all happy together. Seared Under Blade Steak Greens and Beets It was epic!

Music Pairing: Sin, Sing, sing, Benny Goodman

Let’s cook!

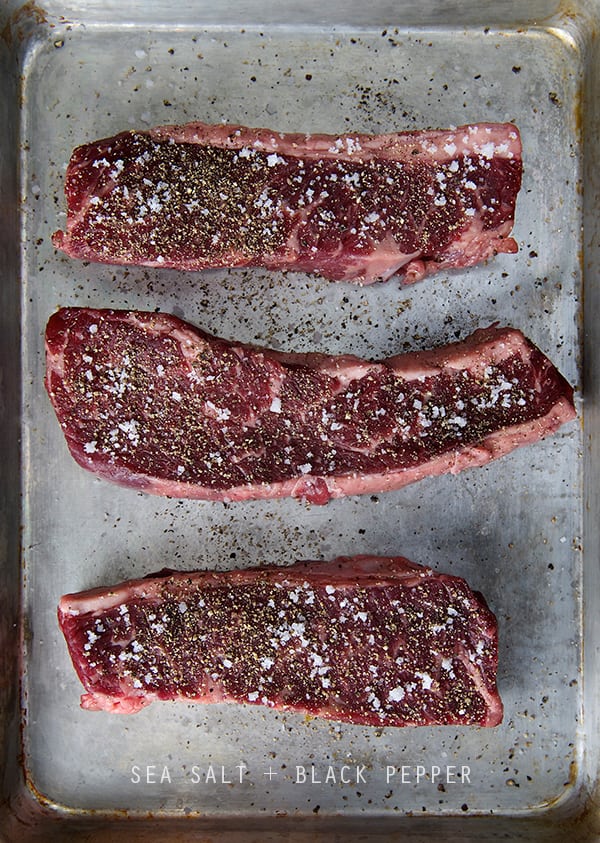
Underblade-steak-&-beets_season-under-blade-steak

Seared Under Blade Steak Greens and Beets

Serves 4

4 under blade steaks (also known as Denver steak) room temperature
1 glug extra virgin olive oil
2-4 tablespoons of butter
2 garlic cloves crushed
4-5 sprigs of rosemary
Sea salt
Freshly ground black pepper

For the Onions, Greens and Beets:

5-6 organic baby beets per person combine yellow, chioggia, red, or any kind you have available, Save the leafy greens if your beets are organic, we will sauté them along,

they are delicious and a great source of beta carotene, vitamin C, vitamin K, Calcium, Iron and Magnesium.

2 cups beet greens (spinach, kale, any green of your affection will work too)
1 medium yellow onion sliced in wedges.
2 sprigs of fresh rosemary
2-4 good pinches of cinnamon
4-5 cranks of fresh ground black pepper
1 good pinch of sea salt
The zest and juice of ½ lemon

Preparation:

1. Remove your steak from refrigerator and leave it on a fresh area of your counter. Allow them to come to room temperature for 20-30 minutes before cooking.
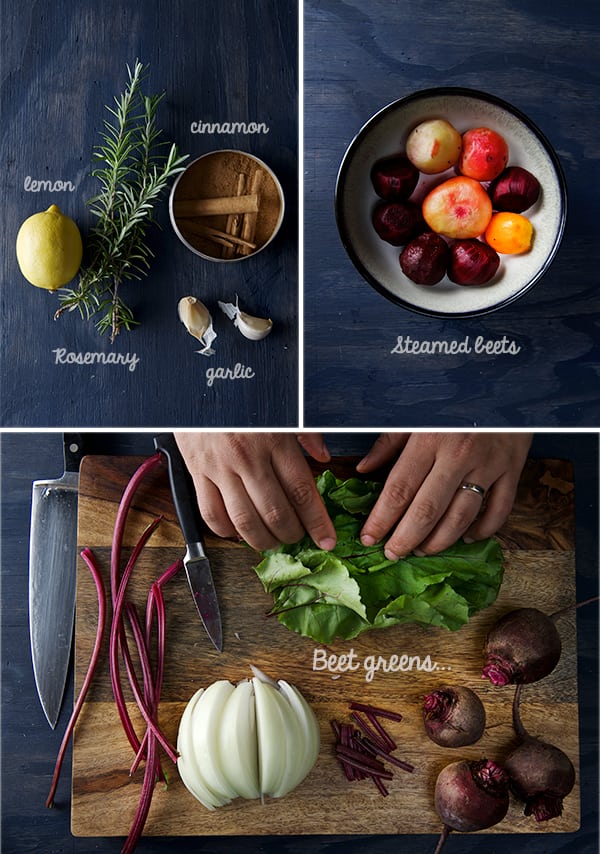
2. Mean time wash and remove the rough parts of the tops, leave the skin. Steam your beets until al-dente. 20-25 minutes depending on the size. Once cooked, under the water remove the skin very easily with your thumbs or using a paring knife. Cut into quarters.
3. Save and wash the leafy greens of your beets, make a leafy bundle and slice into a wide chiffonade.
4. Slice the onion into wedges.

underblade-steak-and-beets_cinnamon-lemon,-beet-greens,-babybeets
5. Once you have all the prep done on your vegetables start by heating your skillet. Use a heavy bottom stainless steel or a cast iron pan will work best.
6. Pat dry your steaks if needed, Season with a good pinch of sea salt and fresh black pepper on both sides. Be generous, do not be afraid of seasoning well.
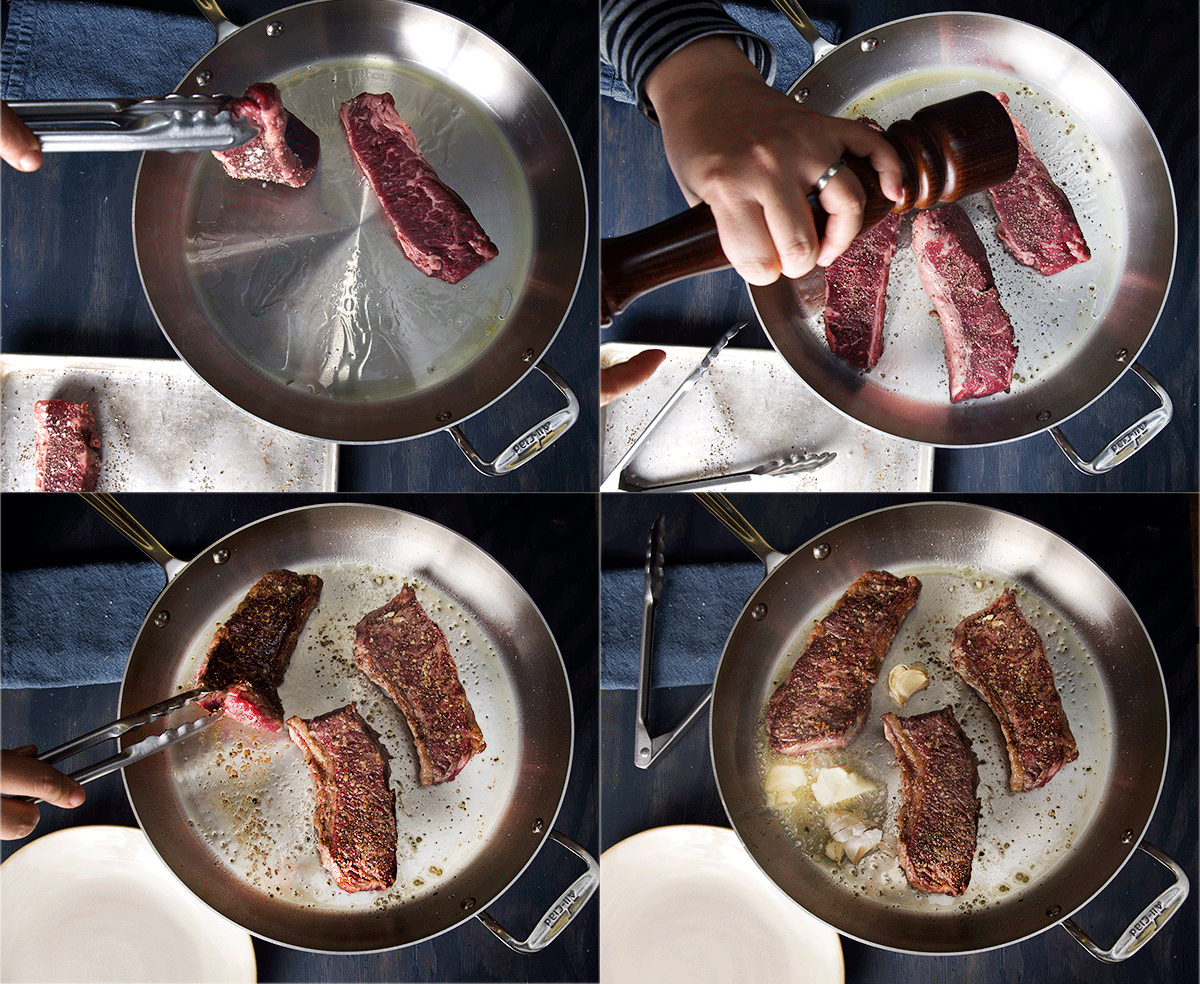
7. Once your skillet is screaming hot, add a glug of olive oil. The oil should be rippling hot, then proceed to place the steaks. Remember not to overcrowd your pan. (I used a 12” skillet for 3 small steaks)

Underblade-steak-&-Beets_how-to-cook-a-steak_Yes,-more-please!
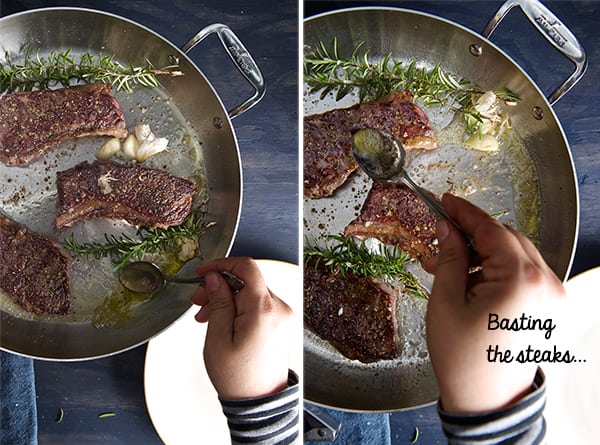
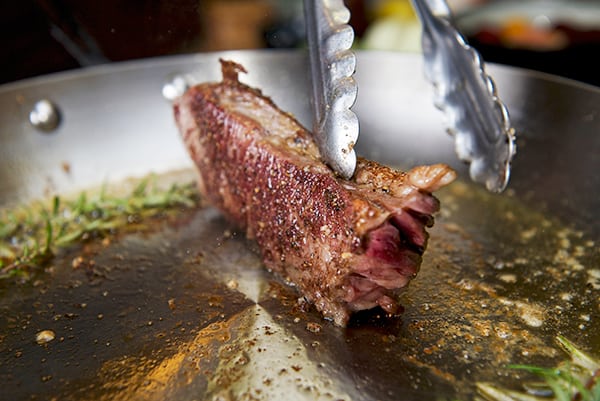
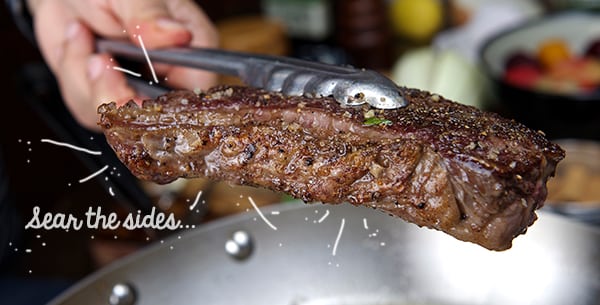
8. Give 4-5 minutes on each side, then once you turn on the second side, add the butter, the rosemary, and crushed garlic to the pan. Tip the pan and start basting the steaks with the melted butter. Using some tongs stand up the steaks to cook and caramelized and crustify the edges of the steak.

Underblade-steak-&-beets_basting-a-steak

Underblade-steak-&-beets_sear-the-sides


Underblade-steak-&-beets_basting-a-steak_sear-the-sides
9. Check for doneness, medium rare about 4-5 minutes on each side, medium 6-7 turn 4 times for the extra 2 minutes to cook evenly, add the butter and herbs during the last 2 minutes, baste. Use your thermometer to check the temperature. Usually I will remove them a bit early than the maximum read on the desired doneness, the residual heat can keep cooking your steaks about 3-4 more degrees once the meat is resting.
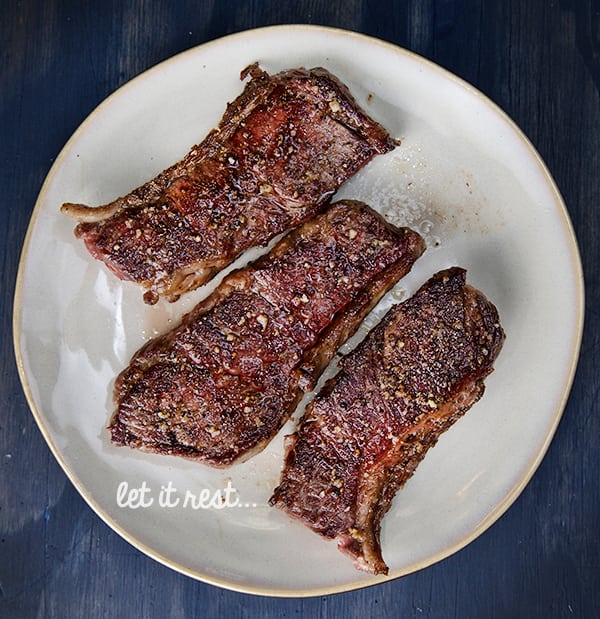
10. Once your steak is cook to your desired doneness, transfer to a platter and let it rest.

Underblade-steak-&-beets_reasting-the-steak

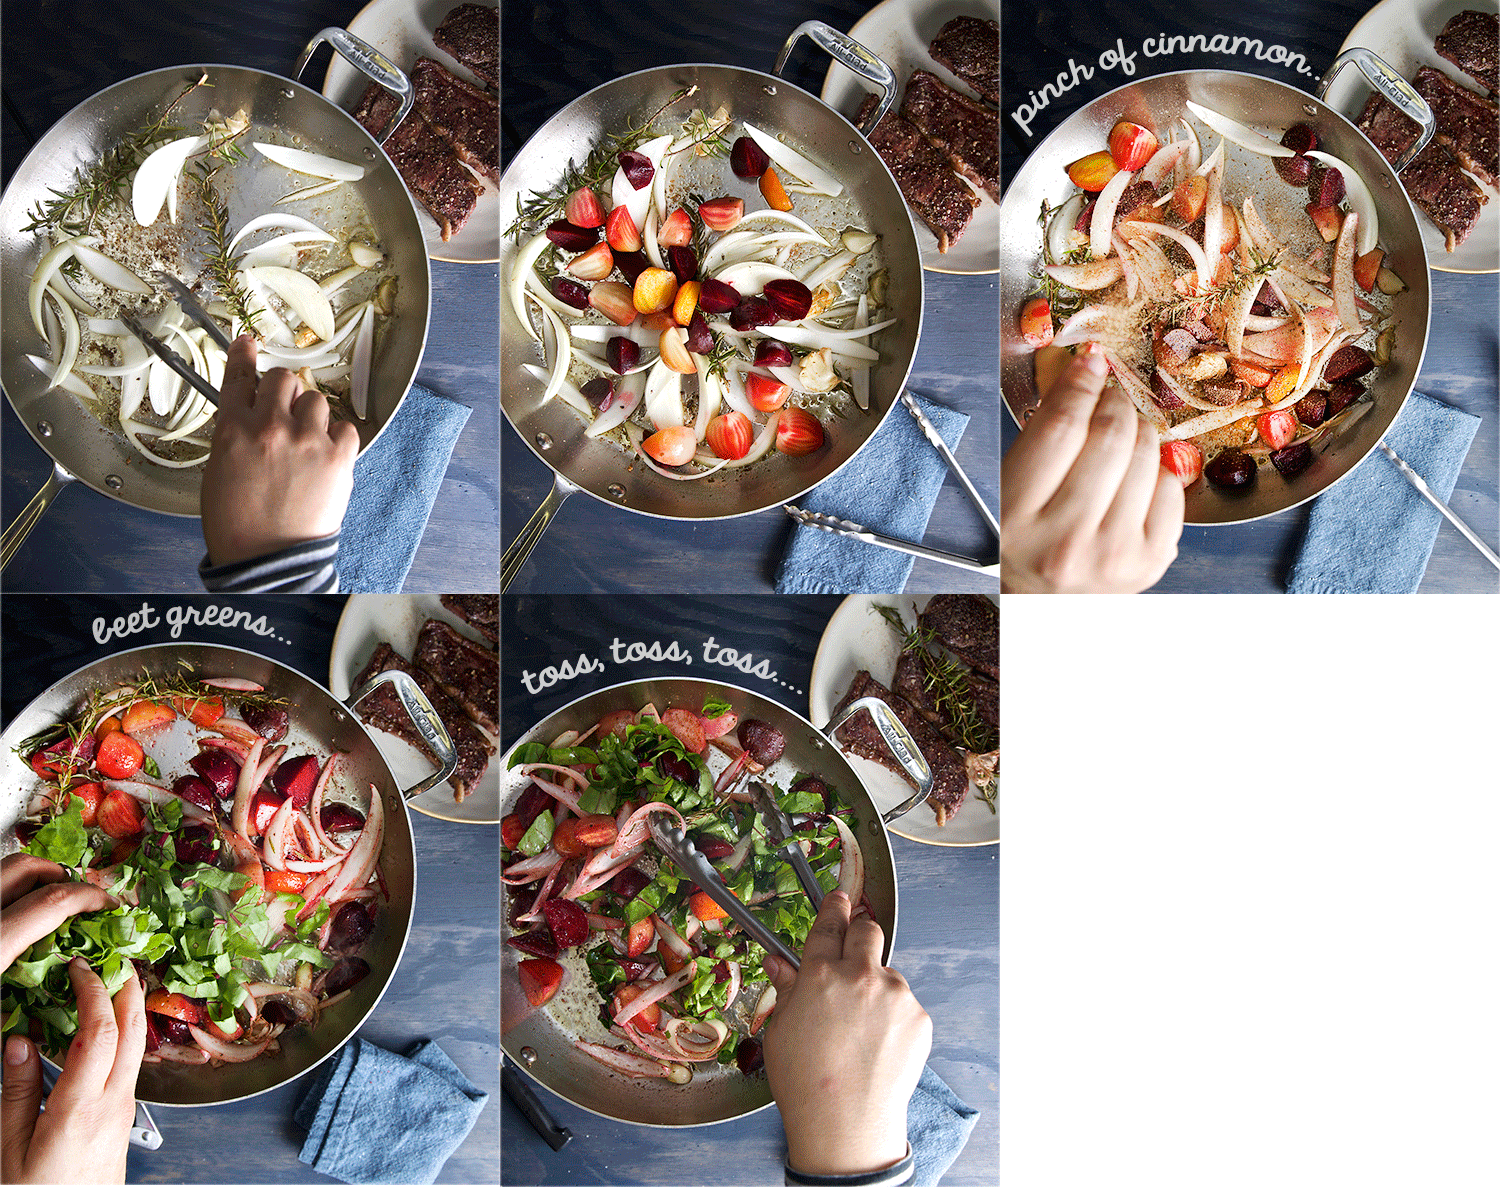
11. Meantime in the same pan, add the onions and sauté for 2-3 minutes, add beets and toss for a quick sauté, season with a pinch of salt, fresh black pepper, and 3-4 good pinches of ground cinnamon, keep tossing until the onions are tender . Then add the greens and toss and shake for 2 more minutes. Place the steak back into the pan over the beets and onions, squeeze some lemon juice all over and grate some lemon zest. Serve immediately. Enjoy! 

Note: Get creative, you can trow any vegetable combinations, sweet potatoes, little new potatoes,spinach, kale, chard,  zucchini, okra, mushrooms, cipollini onions, peppers, shishito peppers, serranos, jalapeños,… just rock it out!)

Under-blade-Steak_sauteing-green-beets,-beets,-onions

Under-blade-steak,-final-touches

Underblade-steak--with-greens-and-beets-Yes,-more-please!

Seared-Under-Blade-Steak-greens-and-beets_Yes,-more-please!

 Sing, sing, sing, this  is the new steak of the goddess…

Seared Under Blade Steak Greens and Beets one pan epic dinner!!

View Post or View Comments 0

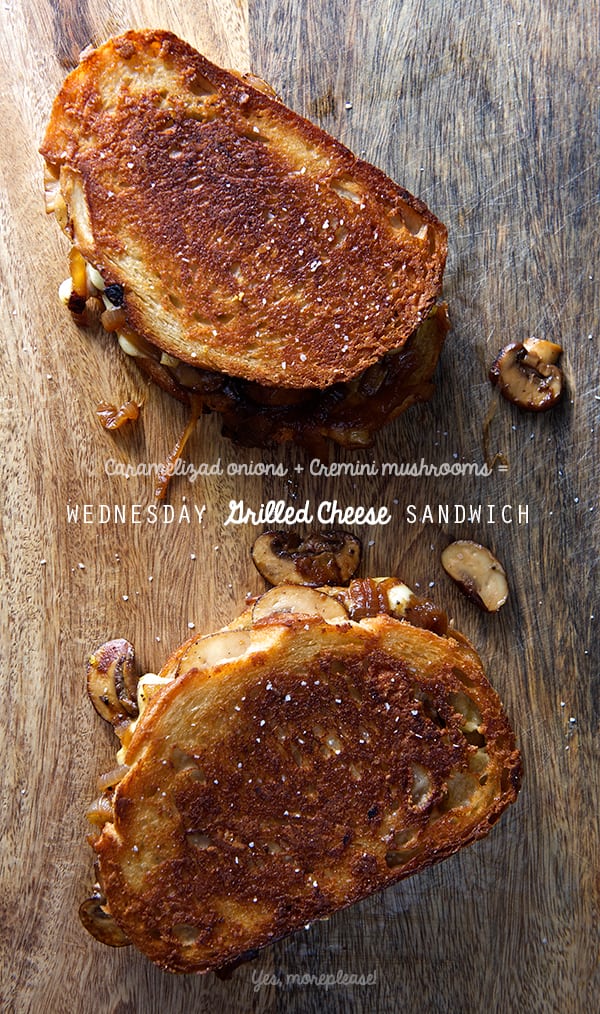
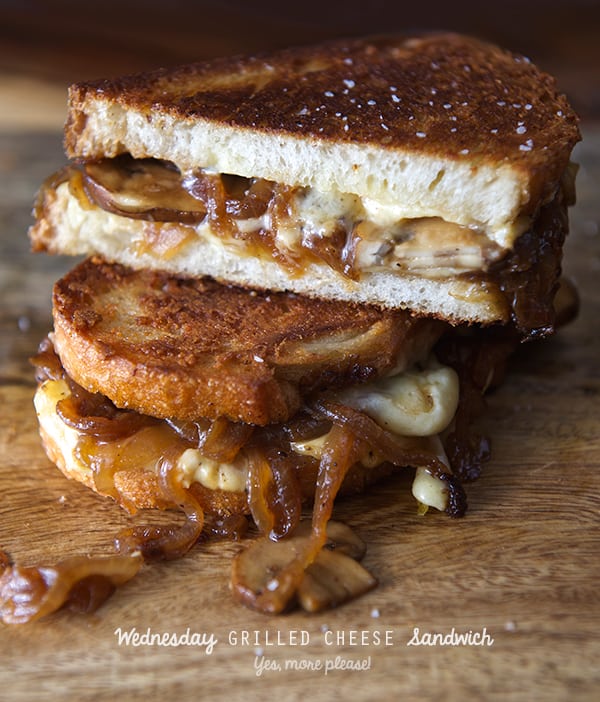
Wednesday Grilled Cheese Sandwich

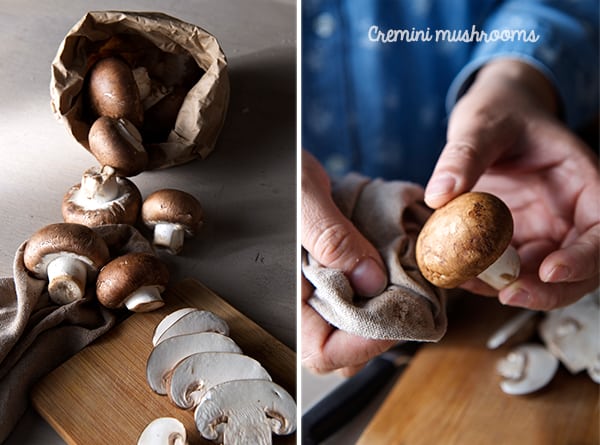
Wednesday-Grilled-cheese-sandwichWednesday-Grilled-cheese-sandwich_cremini-mushrooms

A grilled cheese sandwich with a side of green salad, this is my love letter to the grilled cheese sandwich.
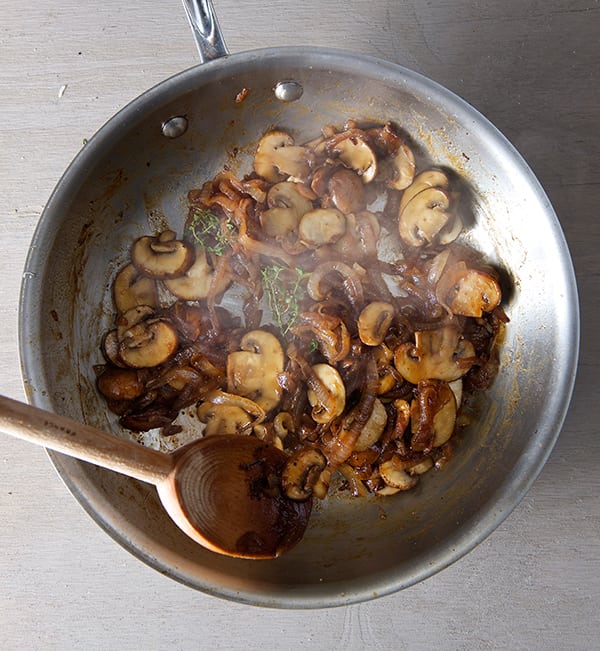
Sautéed Mushrooms, caramelized onions, and rich fragrant cheese in between two slices of toasted buttery bread; this is my kind of togetherness and solidarity. This is the one that hump day screams for. Let’s stick the whole week together with melted cheese plus mushrooms and onions and make our Wednesday memorable. After all it is certain that the small things in life give happiness and comfort. Wednesday Grilled Cheese Sandwiches like this have one mission , to turn any humpy or lumpy day into a little happy memory. Enjoy.

Wednesday-Grilled-cheese-sandwich--Caramelized-onions-+-cremini-mushrooms

Wednesday Grilled Cheese Sandwich.

Makes 2 sandwiches

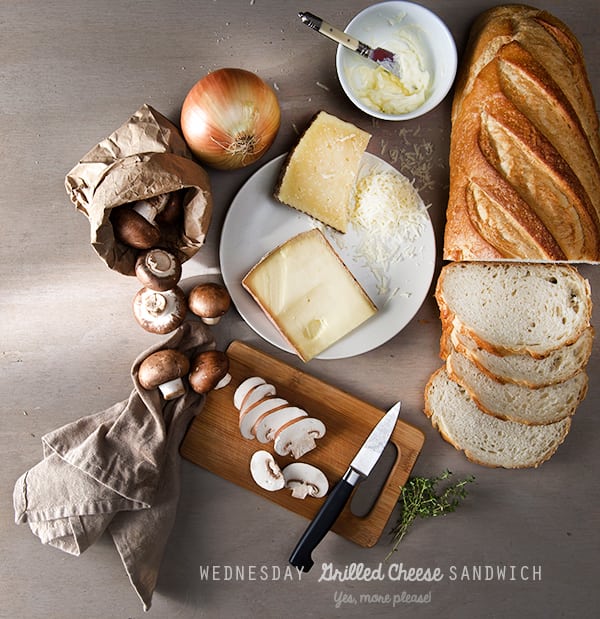
4 slices of artisanal, rustic bread
1/4 pound of Challerhocker Swiss cheese. (Gouda, Swiss, Emmental will work fantastic as well)
8-10 Cremini Mushrooms wiped with a damp clean towel and sliced. 
1 small medium yellow onion 1/4 “thick sliced
1 sprig of fresh thyme
1 teaspoon olive oil
2 tablespoons of butter for sauté
1/4 cup or 2 glugs of any leftover white wine. no white wine…chicken stock will work…
2-4 dashes of Sherry Vinegar.
Salt and Black Pepper to taste.

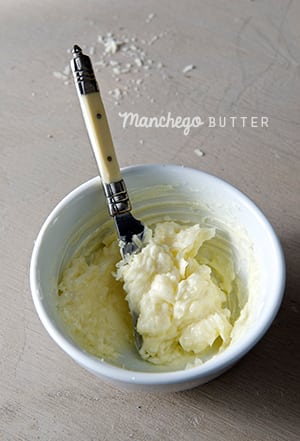
Wednesday-Grilled-cheese-sandwich_Manchego-butter


Manchego Butter Spread:

2 tablespoons of 1 year aged Manchego cheese, grated.
4 tablespoons butter softened

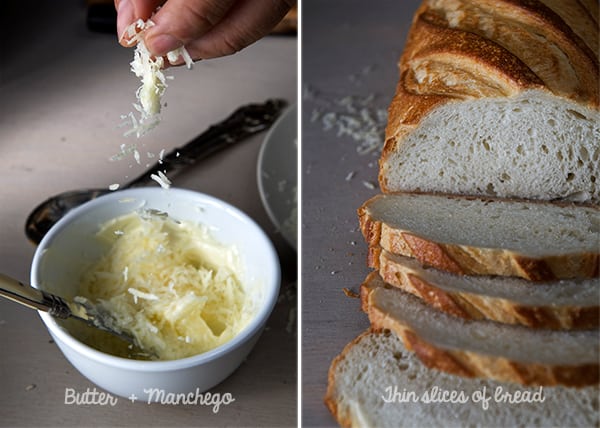
1. In a little bowl combine this two ingredients until you have a spreadable consistency.

What I love the most a bout this sandwich? the Manchego Butter Spread, once the sandwich hit the pan, this spread makes the most utterly croquant and buttery grilled cheese, you ever had… I suggest you can make any substitutions on the inside of the sandwich, but this spread is irreplaceable.

Wednesday-Grilled-cheese-sandwich_Butter-and-manchego-spread-for-bread

Preparation:

1. Over medium heat on a sautee pan add olive oil, 2 tablespoons of butter, sliced onions, salt pepper and a pinch of turbinado sugar. sweet the onions until translucent and they start to get some golden edges and color. At this point add the sliced mushrooms and sautee for about 3-4 minutes, until the mushrooms start to get some color too. about 6-7 minutes.
2. By now the bottom of your pan is starting to show some crusty brown bits. The onions and mushrooms are soft and golden brown caramelized color, Away fro the stove add two good splashes of white wine, and 2-4 dashes of the sherry vinegar, and a fresh sprig of thyme. Bring back the pan to the stove and wait until the liquids reduce. Set aside.

Wednesday-Grilled-cheese-sandwich-caramelized-onions-and-cremini-mushrooms 3. Evenly spread one side of each of the bread slices with the Manchego-butter spread.
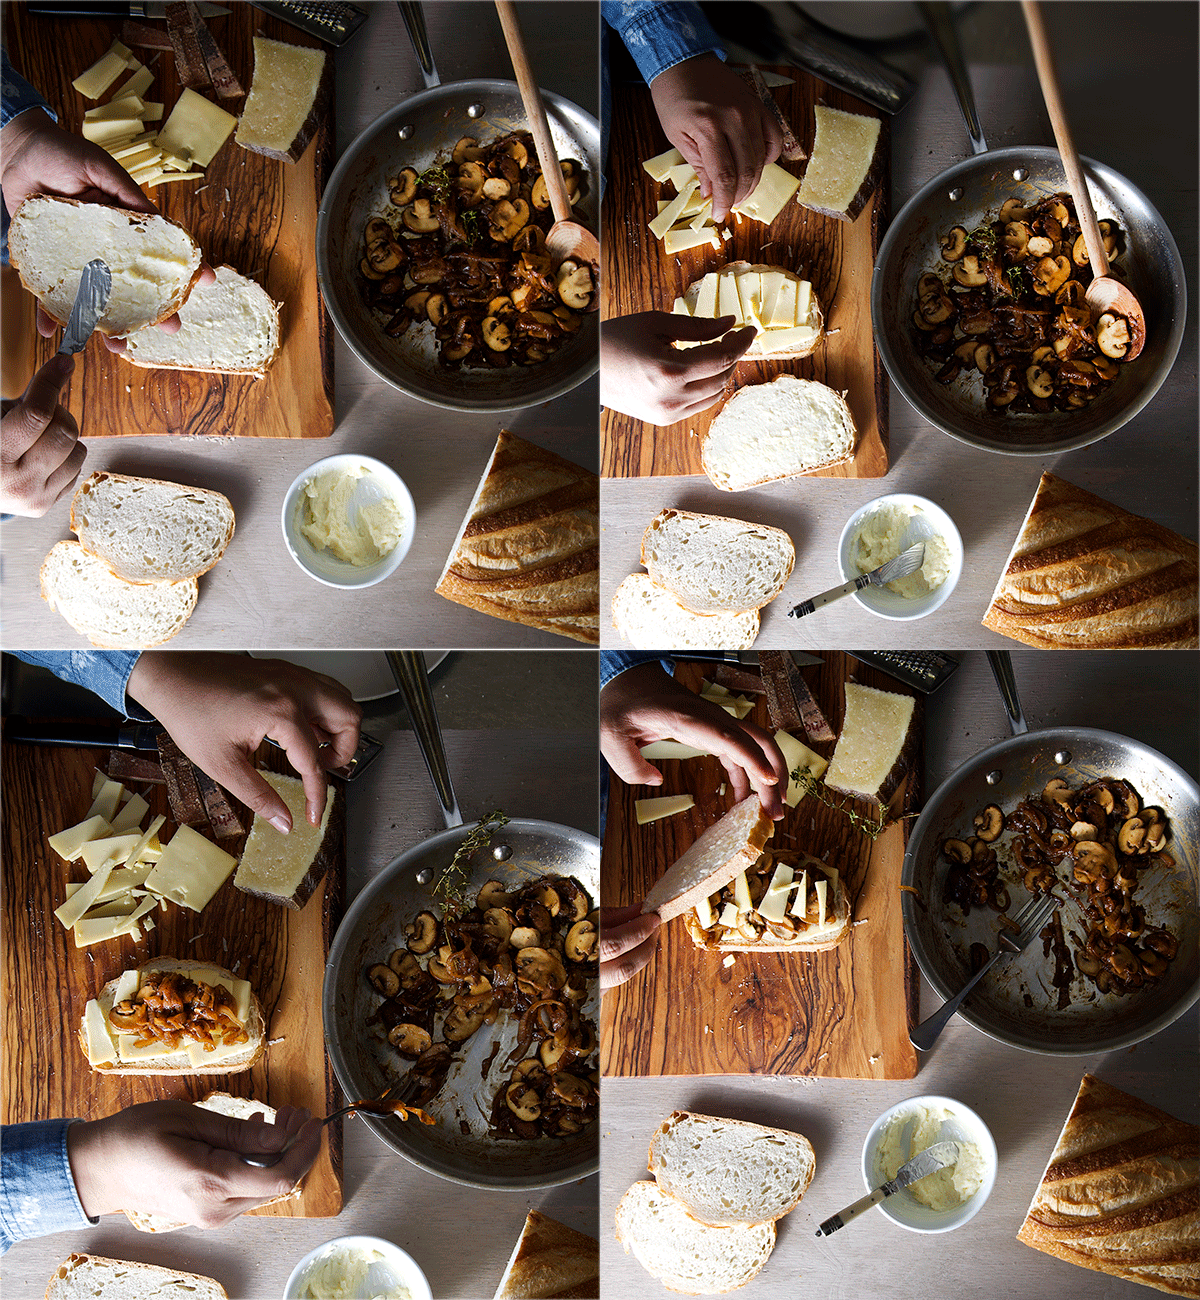
4. On the no spread side, place a layer of thinly sliced or grated Challerhocker cheese, then a layer of the caramelized onions and mushrooms, and top with more cheese. Cover with the other bread lid, butter spread side up.

Wednesday-Grilled-Cheese-Sandwich_Yes,-more-please! 5. On a medium heat warm up a non-stick pan, cast iron pan or plancha. Once is hot, place both of your sandwiches and grill for about 4 minutes each side, until mahogany golden brown, and the cheese is melted.
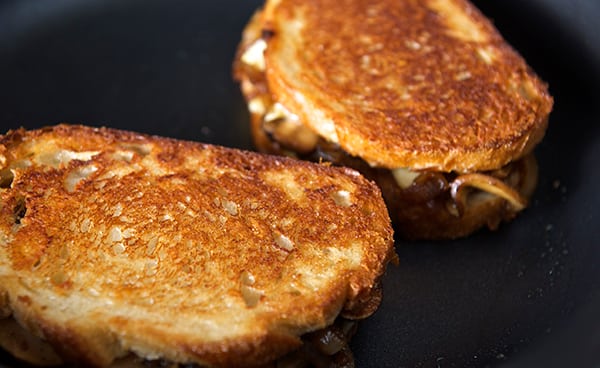
Wednesday-Grilled-cheese-sandwich_-on-the-pan 6. Remove from pan into a cutting board and slice in half.
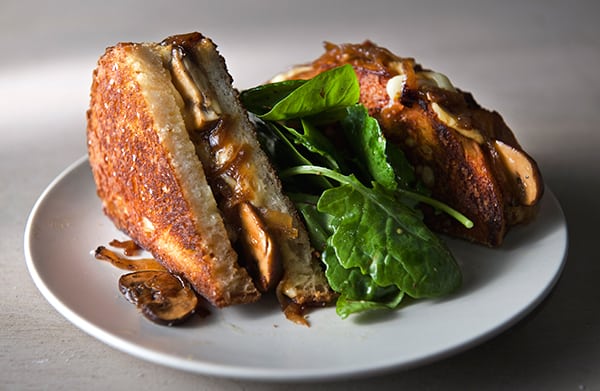
7. Toss some baby spinach and salad greens with a bit of lemon juice, extra virgin olive oil, salt and pepper, serve your sandwich on the side.
Enjoy!Wednesday-Grilled-cheese-sandwich_sliced


Wednesday-Grilled-cheese-sandwich_don't-forget-your-greens!

Always remember to eat your greens!

View Post or View Comments 2

Matcha Streusel Pumpkin Bread

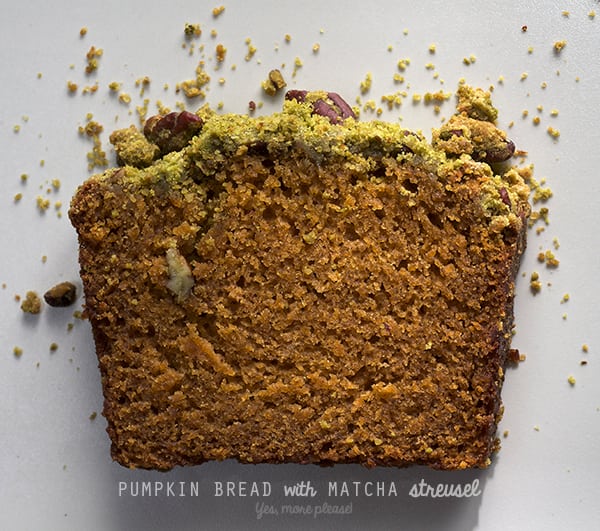
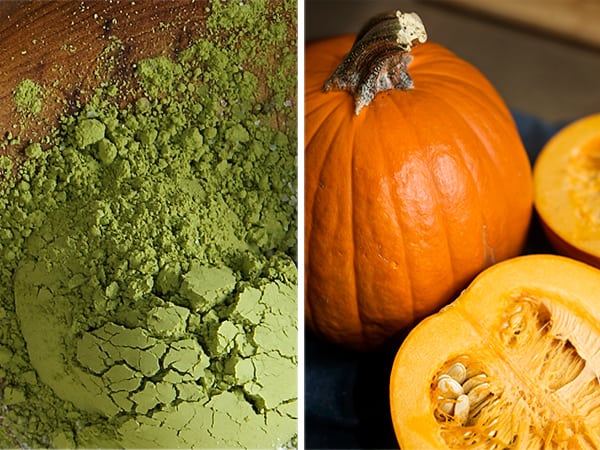
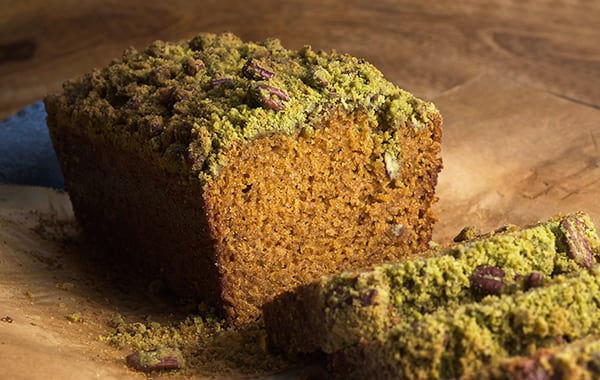
PUMPKIN-BREAD-with-MATCHA-Streusel-Yes,-more-please!textures


October is here and I can’t wait for pumpkinized everything. My primary pumpkin craving is pumpkin bread (delicious moist and spiced). So, here is my spin for this season. Its delicious and a new flavor combination for you to try.

The pumpkin flavor with Matcha is like having tea within your slice. The Matcha green tea powder, tames the sweet sweet notes and enhances the pumpkin, and the spices. These are the ingredients that ordinarily don’t meet in a recipe and come from opposite sides of the planet. Sometimes thats the kind of combo that we need. Matcha Streusel Pumpkin Bread will pumpkinize your tea time. Enjoy!

Happy Fall and stay tuned for Octoberfest! Pretzels, sausage, and beer recipes coming up soon!

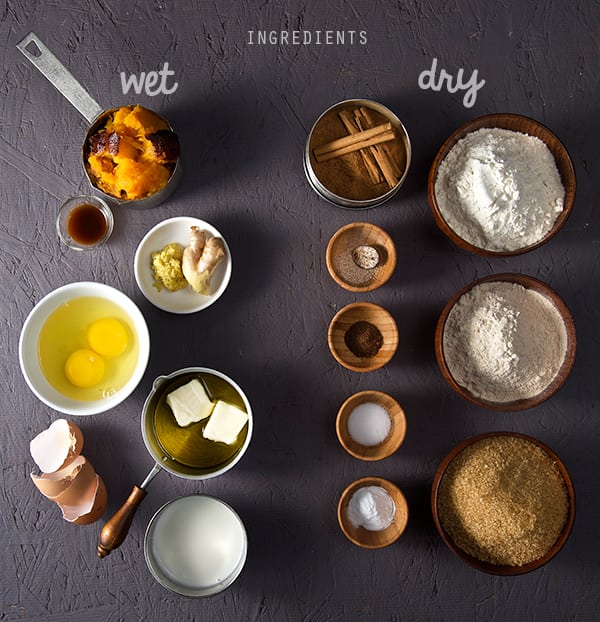
PUMPKIN-BREAD_INGREDIENTS


Matcha Streusel Pumpkin Bread

Makes 1 loaf 9″x5″ or 10″x5″ or  about 24 muffins

Dry ingredients:

1 Unbleached all-purpose flour
3/4 whole wheat flour
1 cup of turbinado sugar
1 teaspoon salt
1 -1/2 teaspoon baking soda
1 teaspoon ground cinnamon
1/2 teaspoon ground all spice
1/2 teaspoon nutmeg

Wet ingredients:

1-1/2 cups roasted pumpkin
2 eggs room temperature
1/4 cup olive oil
1/4 cup melted butter
1/3 cup natural Bulgarian yogurt
1 teaspoon fresh grated ginger
1 teaspoon vanilla extract

For the streusel:

1/2 cup Unbleached all purpose flour
1/8 cup packed light brown sugar
2 tablespoons turbinado sugar
1/4 teaspoon kosher salt
2 teaspoons organic Matcha powder
1/4 cup roughly chopped pecans
6 tablespoons butter room temperature.

Directions:

Preheat oven at 375F
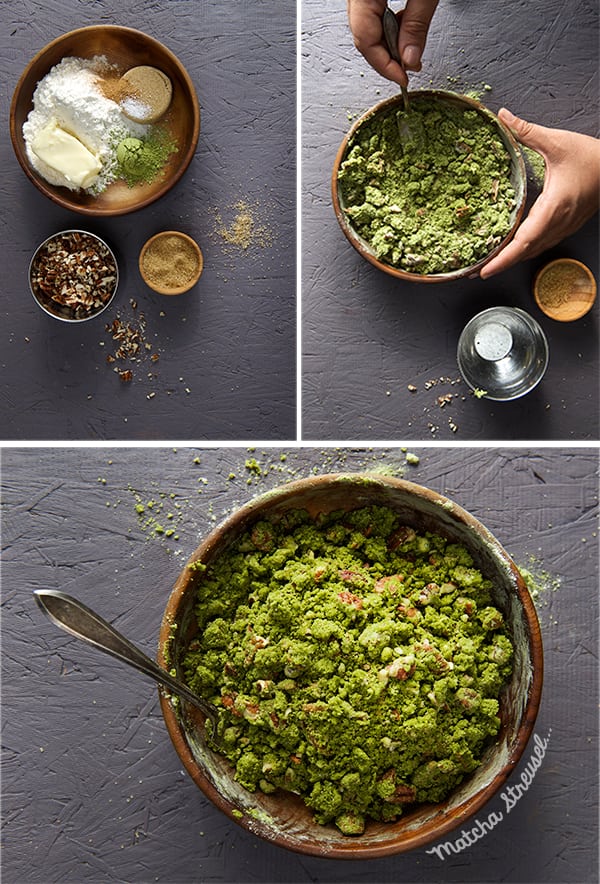
1. Prepare the matcha streusel, with a fork, combine all the ingredients with the softened butter until the mixture resembles a coarse lumpy dough. refrigerate while you prepare the rest…

PUMPKIN-BREAD-with-MATCHA-STREUSEL
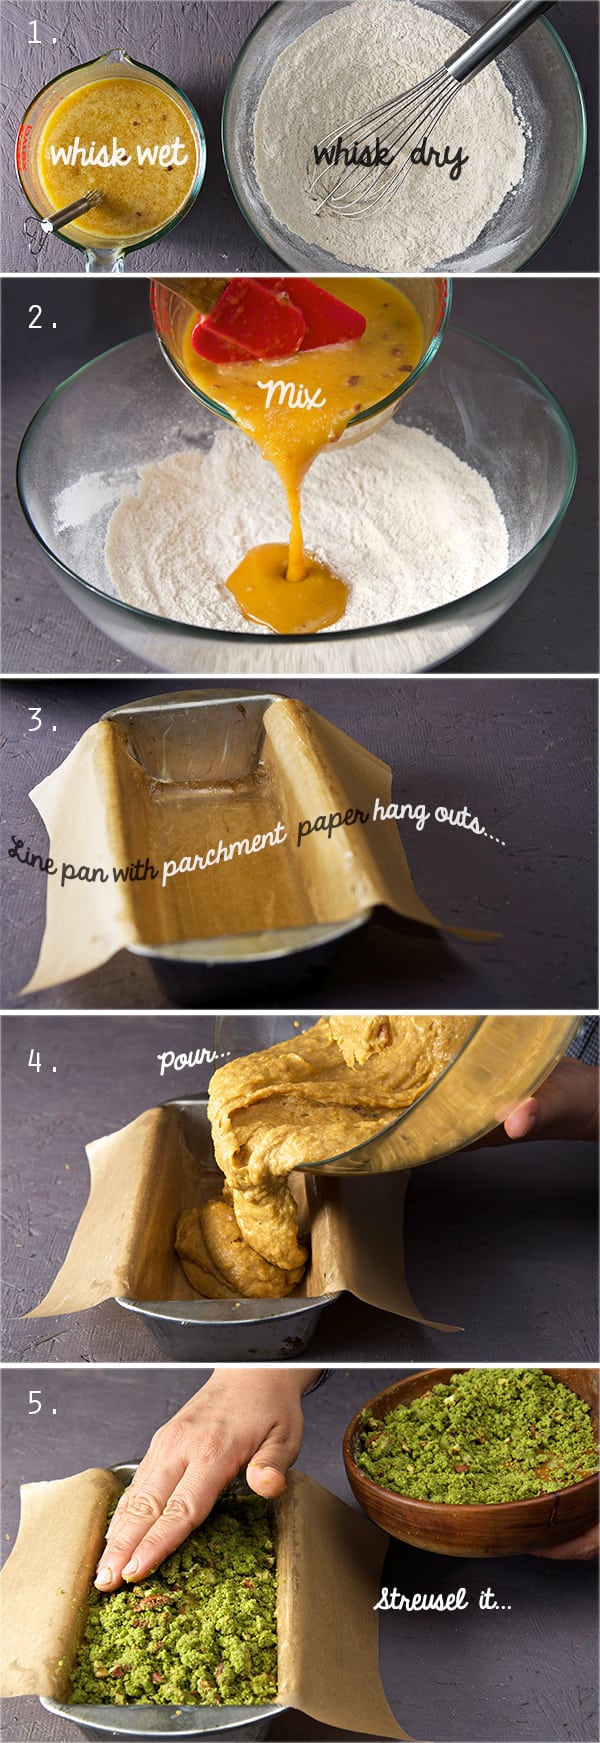
2. In a large mixing bowl combine all dry ingredients. Whisk.
3. On a medium size bowl combine all wet ingredients, mix well until well combined.
4. Combine wet into dry and fold until well incorporated being carefull of not over mixiing the batter.
5. Butter up a 10″x 5″ loaf pan, lined up with a piece of parchment paper long enough to hang about 4-5 inches on each side. (See picture below)
6. Pour batter into the mold and cover completely with the matcha streusel mixture. Lightly press so the crumbs stay attached to the top.

PUMPKIN-BREAD-with-matcha-streusel,-mixing-steps
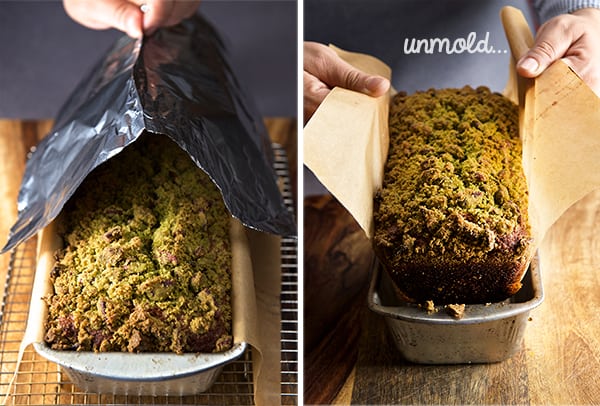
7. Bake at 350F for the first 30 min.- Check your bread at 30 minutes mark and tent it with a piece of aluminum foil shiny side up, to prevent he streusel to over-brown . Lower the temperature to 325F and bake for another 25-30 minutes.
8. Passed the 50 minutes mark, check near the center with a toothpick to check for doneness. Toothpick should come out clean with a few moist crumbs attached.
Remove from oven and cool it on a rack for 20 minutes, before slicing.
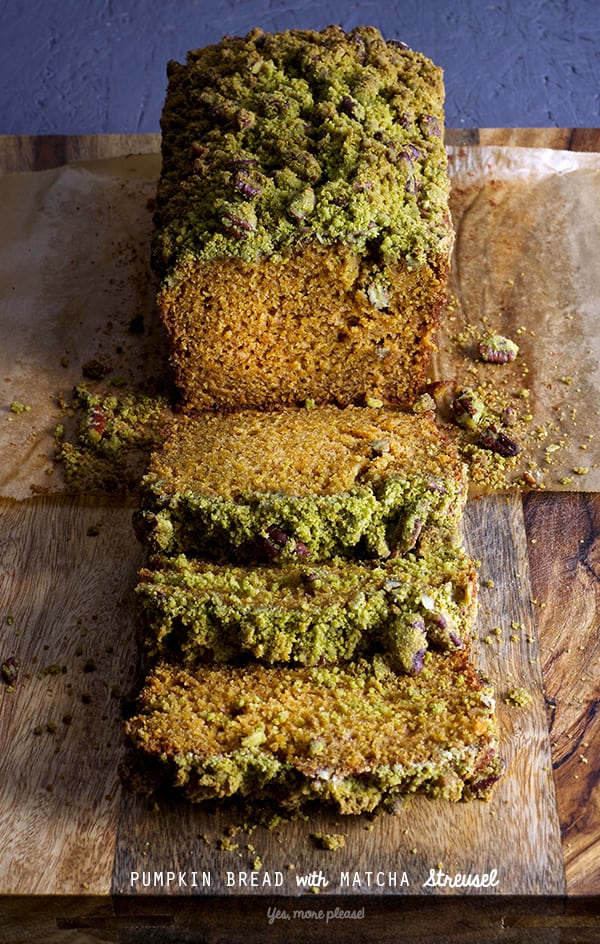
Once cool, slice it and enjoy!!!

Pumpkin-bread-with-matcha-streusel_unmolding-the-breadPUMPKIN-BREAD-with-MATCHA-Streusel-sliced_green-tea-Yes,-more-please!


Notes:

Store the bread in a piece of parchment paper and plastic wrap. It tastes better the next day!!!.. keep it safe and away from temptation… It will last for about a week, no need to refrigerate.
This recipe will work for muffins. Divide the batter into cupcake molds lined with cupcake liners, fill up a bit over 1/2 way and add 1 heaping tablespoon of matcha streusel, you will need to make a double batch of the streusel. Bake at 325F for about 20-25 minutes.PUMPKIN-BREAD-with-MATCHA-STREUSEL_slices

Music Pairing: The Smashing Pumpkins – Tonight, tonight

Matcha Streusel Pumpkin Bread

This Pumpkin Bread is extra moist, has a fine crumb, great spice flavor with our masking the natural pumpkin flavors. The crumbly matcha streusel is a top-notch addition.

Makes 1 loaf 9″x5″ or 10″x5″ or about 24 muffins


Course Breakfast
Cuisine wholesome

Ingredients

Dry ingredients:

  • 1 Unbleached all-purpose flour
  • 3/4 whole wheat flour
  • 1 cup of turbinado sugar
  • 1 teaspoon salt
  • 1 -1/2 teaspoon baking soda
  • 1 teaspoon ground cinnamon
  • 1/2 teaspoon ground all-spice
  • 1/2 teaspoon nutmeg

Wet ingredients:

  • 1-1/2 cups roasted pumpkin
  • 2 eggs room temperature
  • 1/4 cup olive oil
  • 1/4 cup melted butter
  • 1/3 cup natural Bulgarian yogurt
  • 1 teaspoon fresh grated ginger
  • 1 teaspoon vanilla extract

For the streusel:

  • 1/2 cup Unbleached all purpose flour
  • 1/8 cup packed light brown sugar
  • 2 tablespoons turbinado sugar
  • 1/4 teaspoon kosher salt
  • 2 teaspoons organic Matcha powder
  • 1/4 cup roughly chopped pecans
  • 6 tablespoons butter room temperature.

Instructions

Directions:

  1. Preheat oven at 375F
  2. Prepare the matcha streusel, with a fork, combine all the ingredients with the softened butter until the mixture resembles a coarse lumpy dough. refrigerate while you prepare the rest…
  3. In a large mixing bowl combine all dry ingredients. Whisk.
  4. In a medium-size bowl combine all wet ingredients, mix well until well combined.
  5. Combine wet into dry and fold until well incorporated being careful of not over mixing the batter.
  6. Butter up a 10″x 5″ loaf pan lined up with a piece of parchment paper long enough to hang about 4-5 inches on each side. (See picture below)
  7. Pour batter into the mold and cover completely with the matcha streusel mixture. Lightly press so the crumbs stay attached to the top.
  8. Bake at 350F for the first 30 min.- Check your bread at 30 minutes mark and tent it with a piece of aluminum foil shiny side up, to prevent the streusel to over-brown. Lower the temperature to 325F and bake for another 25-30 minutes.
  9. Passed the 50 minutes mark, check near the center with a toothpick to check for doneness. Toothpick should come out clean with a few moist crumbs attached.
  10. Remove from oven and cool it on a rack for 20 minutes, before slicing.
  11. Once cool, slice it and enjoy!!!

Substitutuions:

  1. Any combination of oils like: melted coconut oil, canola oil, will work. 

    For the sugar: use a combination of coconut sugar and turnbinado, or brown sugar and turbinado, always use half and half to obtain a better crumb.

    For Eggs you can make a vegan egg using 1 tablespoon of ground flaxseeds and 3 tablespoons of water. Mix this well until frothy, this amount will make the equivalent of 1 egg. 


Recipe Notes

Notes: Store the bread on a piece of parchment paper and plastic wrap. It tastes better the next day!!!.. Keep it safe and away from temptation… It will last for about a week, no need to refrigerate. This recipe will work for muffins. Divide the batter into cupcake molds lined with cupcake liners, fill up a bit over 1/2 way and add 1 heaping tablespoon of matcha streusel, you will need to make a double batch of the streusel. Bake at 325-350F for about 20-25 minutes.

View Post or View Comments 5

Spiced Poached Pears

Spiced-poached-pears_and-mascarpone_Yes,-more-please!

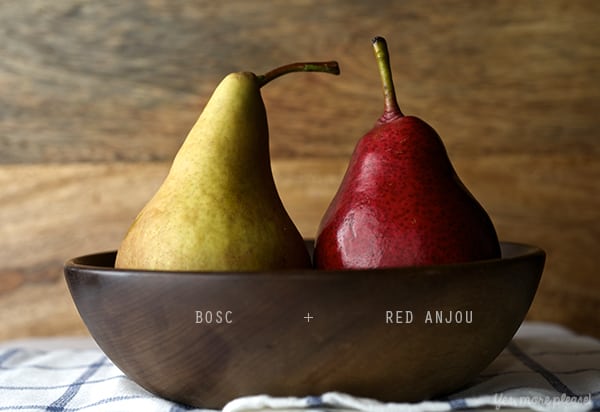
Stone fruits are in season, I found beautiful pears at the market, Bosc and Red Anjou.  I will describe the Red Anjou pears as aromatic, juicy, fresh and sweet: while the Bosc pears are crisp, woodsy and  have a honey-sweet light flavor.
I could not decide which ones to bring home for this recipe…so I used both and the characteristics of each pear gave a great flavor to this simple recipe. Poached pears sounds so boring right? A dessert out of the 70’s…well its not and done right and with aromatics and the right cooking method its a great fruit dessert, the perfect end to a rich dinner like Thanksgiving… Or just for a simple treat on a rainy day…

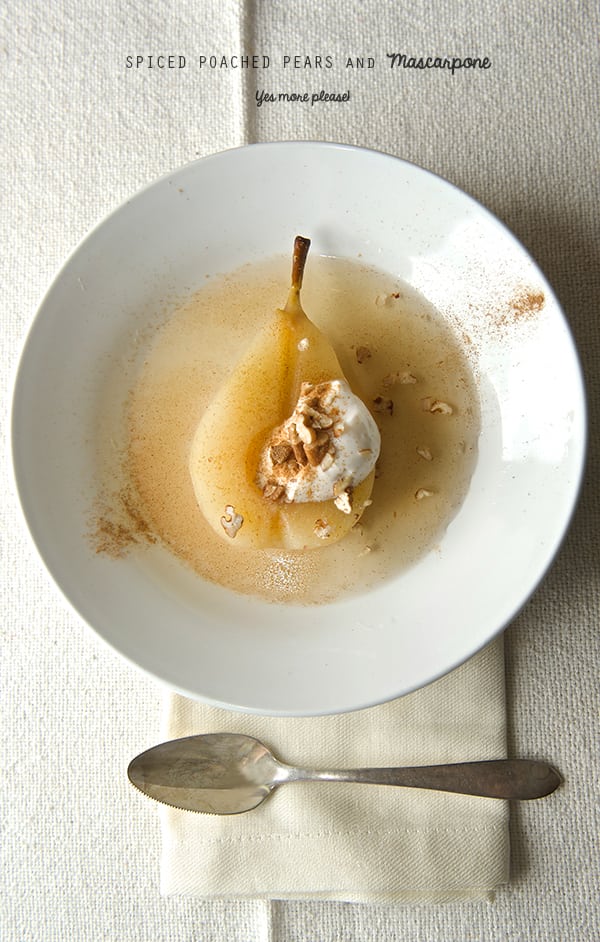
The rum and the spices add warmth and great flavor to the light syrup, which is not overly sweet. The alcohol evaporates leaving all the good woodsy rum flavors in the fruit. A little dollop of whipped mascarpone cheese and honey add the perfect creamy  balance that makes these spiced poached pears irresistible.

This is one of those recipes with plenty of freedom for adjustment, and have the certainty that its gonna come out great. I like the light flavors and the delicate pear flavor is the star of the show. One of the best parts when you are cooking this recipe is the smell that your house is infused with…*sigh*..
Enjoy!

Spiced-poached-pears_BOSC-+RED-ANJOU

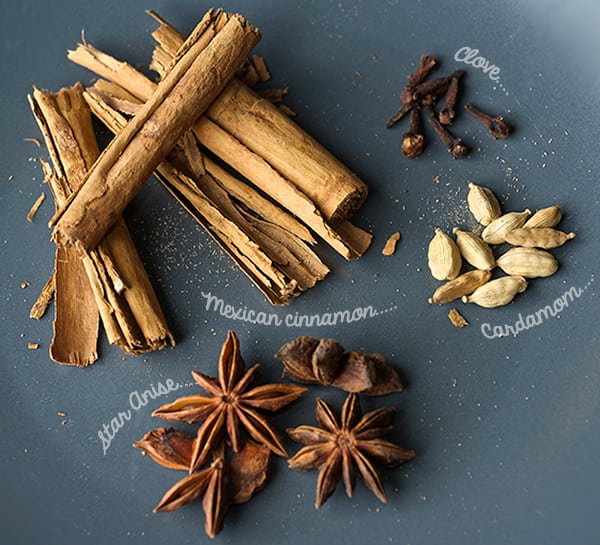
Spiced-poached-pears_spices

Spiced Poached Pears

Serves 6

3 Red Anjou Pears peeled, halved, removed the seeds and steam.
3 Bosc Pears peeled, halved, removed the seeds and steam.
4 cups water
½ to 3/4 cup spiced rum…up to you!
4 lime or lemon slices
1/2 cup turbinado sugar
½ cup honey
( you can substitute the total amount of sugar and honey for ¾ agave nectar, or nectrase)

Aromatics:

5 sticks Mexican Cinnamon
6 cloves
5 star anise
6 cardamom pods smashed
1/8 teaspoon grated nutmeg

Parchment paper

Garnish with:

Whipped mascarpone and honey
About ½ cup of mascarpone and 2 tablespoons of honey, whip them together until light and fluffy.

Toasted chopped pecans
Ground cinnamon

Directions:

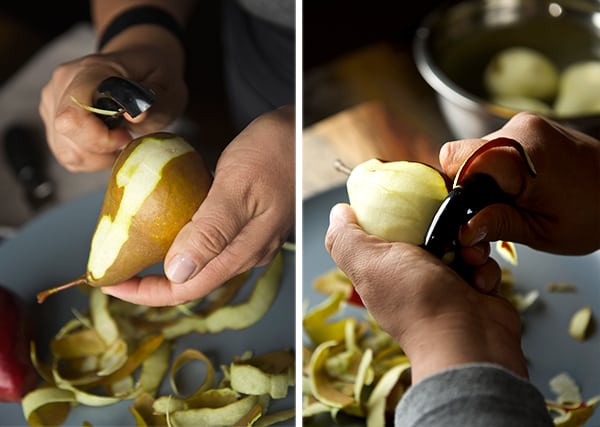
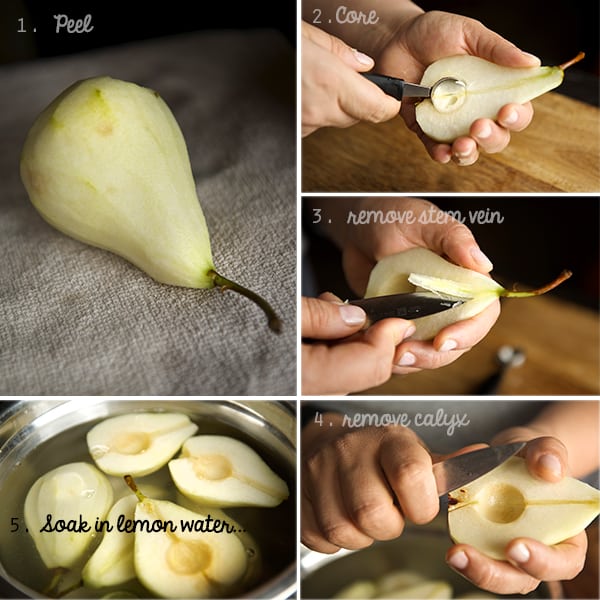
1. Peel, half, remove core and stem in the pears. Keep them in a bowl with water and a few drops of lemon juice to avoid oxidation. (see picture below)

Spiced-poached-pears_peeling-pears_Yes,-more-please!Spiced-poached-pears_preparing-the-pears
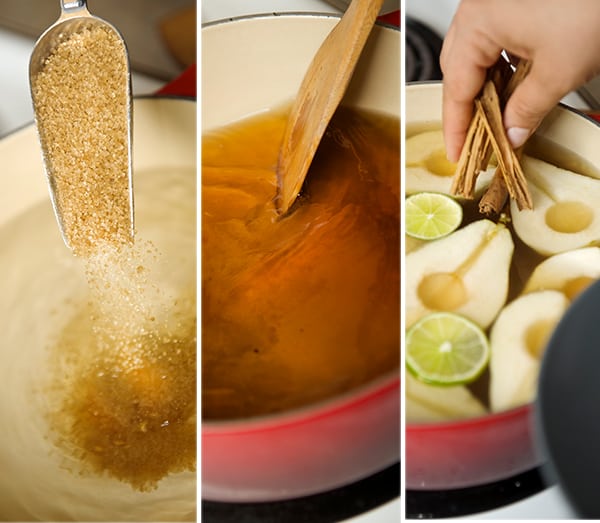
2. In a medium size pot over medium high heat add water, turbinado sugar and honey to dissolve.

Spiced-poached-pears_dissolve-the-sugar
3. Once the water is simmering and sugar is dissolved, add rum, spices and simmer for 7 minutes.
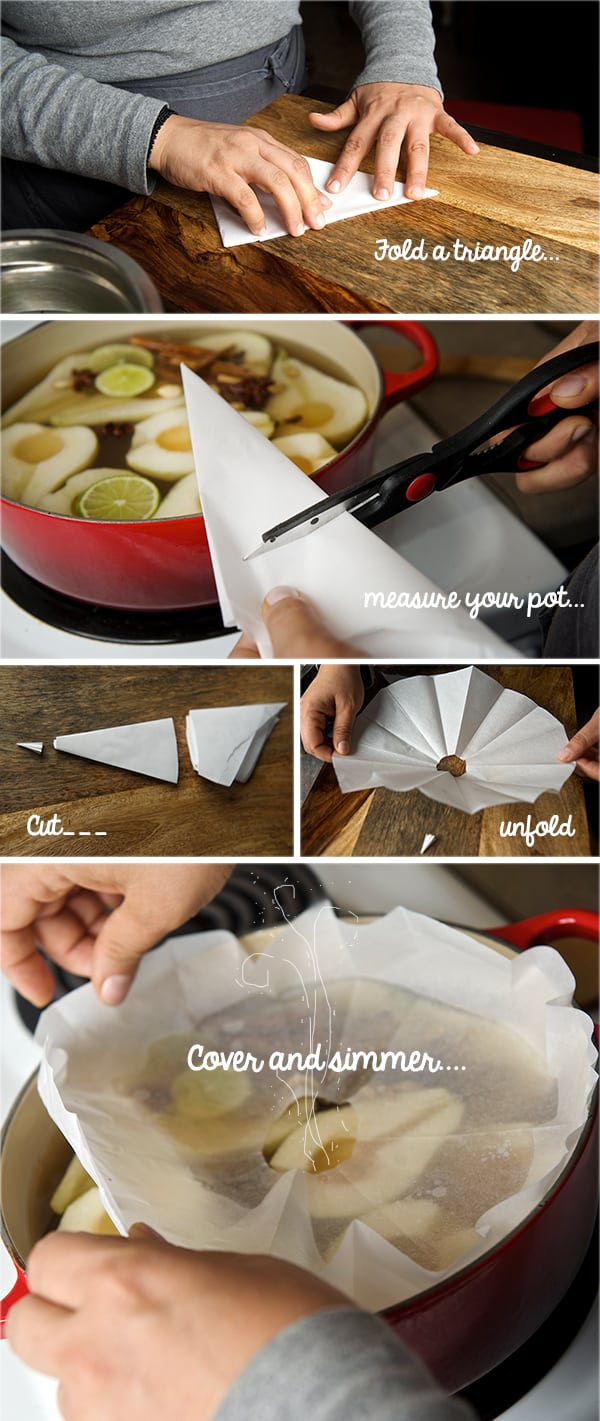
4. Make a parchment paper square, fold it into a triangle, measure your pot radius and cut. Once you unfold the triangle you’ll have a nice circle to cover the pot.
5. Add Pears into the simmering liquid and cover with the parchment paper.Make sure the paper is touching the water to avoid the pears from any discoloration.
6. Simmer in low for about 20-25 minutes, or until the pears are tender when a knife is inserted.
Spiced-poached-pears_how-to
7. Turn off the heat and Let them cool for about 30 minutes. Remove pears from liquid. Heat up the liquid and reduce by half. It should have the viscosity of a light syrup. At this point you can adjust the flavors by adding more honey or more cinnamon if you desire.
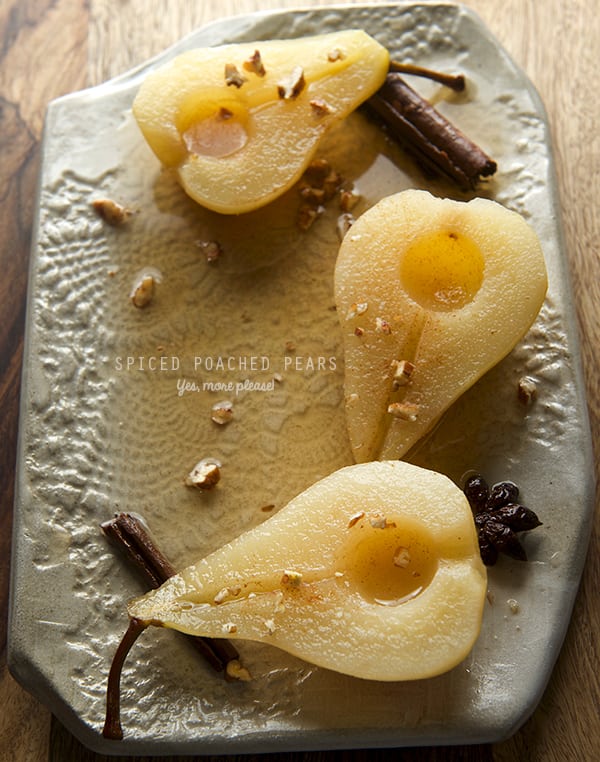
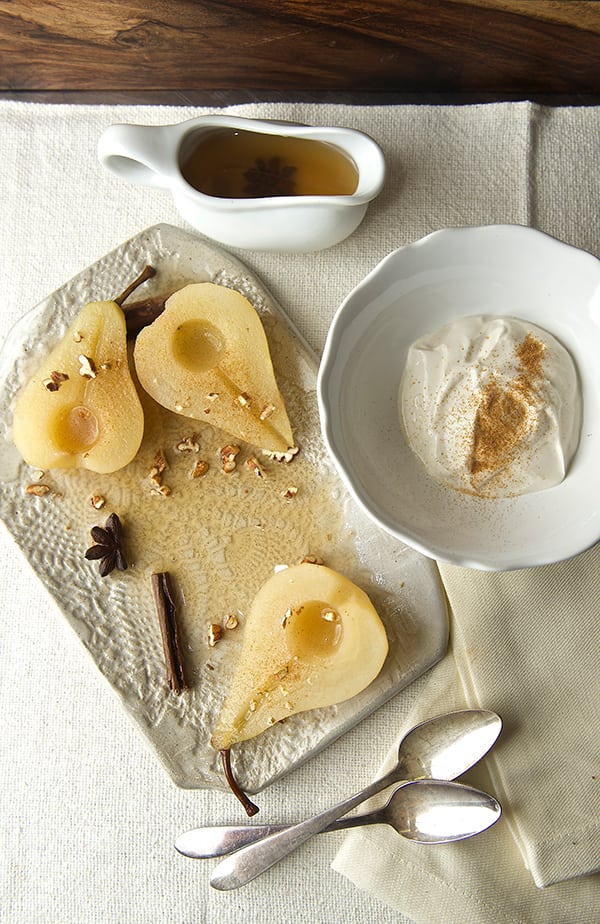
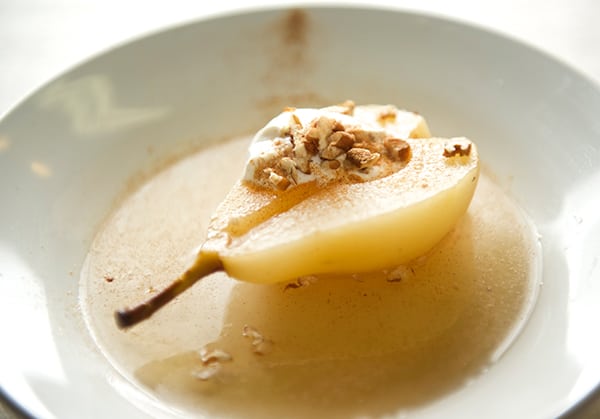
8. Plate the warm pears individually or on a platter. Keep the syrup on a little serving pitcher to add the warm syrup when served. Top with a dollop of whipped mascarpone and honey, toasted pecans, sprinkle some cinnamon. Enjoy!

Note: This dessert can be made ahead. Just keep the pears inside of the syrup, and reduce the syrup until the next day. The pears will taste even better the day after is made. It’s a crowd pleaser dessert fit for Vegans, if the mascarpone is omitted, gluten-free and a light sweet bite to end a nice dinner…. Enjoy!

Spiced-poached-pears_Yes,-more-please!

Spiced-poached-pears_and-mascarpone_ready-to-serve

Spiced-poached-pears_and-mascarpone_plated

ENJOY!

Music Pairing: Nat King Cole – I love you for Sentimental Reasons

View Post or View Comments 6

Swirly butternut squash and kale soup

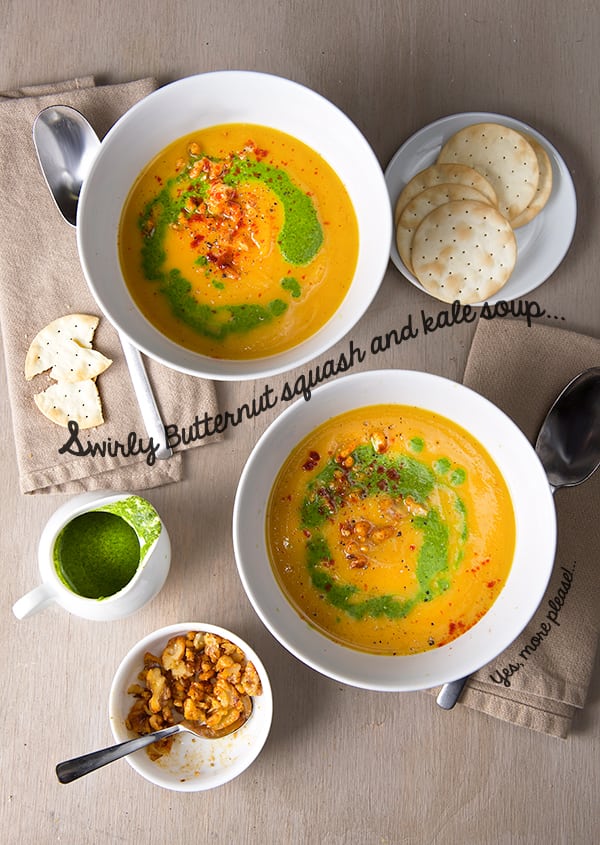
Swirly-butternut-squash-and-kale-soup_Yes,-more-please!

Butternut squash is my favorite squash. Autumn has arrived and I could not wait for the cold to make this soup. This nutty winter squash has the creamiest texture and tastes like a delicate pumpkin with mild citrus aroma. In my opinion Butternut squash makes the velvetiest soup in the world!…..

Now, you know how I feel about vegetable creams or pureed soups.
I do not want my squash soup to taste of chicken therefore vegetable stock is my preference. This vegan soup enhances all the pure flavors of the kale and the butternut squash by roasting them and letting those flavors stand out. I roasted the squash and steamed the kale with coconut milk to empower their own flavors.

I love the fusion of flavors in soups, but for me there is nothing better that the awareness of the fusion. What do I mean by that? Well these two ingredients are in harmony but they do not mix until you take a spoonful in your mouth then you taste the delicious swirl and contrast in colors, textures, flavors, and even in temperature. The kale and coconut milk add an herbal note without being overwhelming. The velvety roasted butternut squash adds sweetness and evokes the Autumn season.

This swirly butternut squash and kale soup is fun to make its easy and it looks appetizingly gorgeous. Whether its lunch with you alone, your friends, or a family get-together this soup is easy to portion and delicious…and it happens to be vegan! Enjoy!

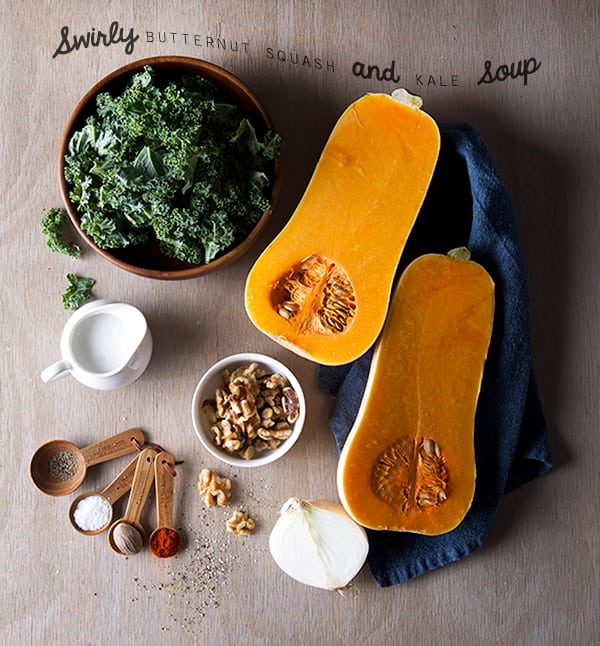
Swirly-butternut-squash-and-kale-soup_ingredients

Swirly butternut squash and kale soup

Serves 4 bears or 2 mom and pop bears..

For the Butternut squash soup:

1 medium Butternut squash cut into cubes
½ medium size yellow or white onion
1-2 glugs of mild extra virgin olive oil
4-5 cups Vegetable stock
1 teaspoon kosher salt
½-1 teaspoon freshly grated nutmeg (start with 1/2 teaspoon taste and add more if you like… I love it with 1 whole teaspoon!)
1 pinch of cayenne pepper (optional)
Freshly black pepper to taste.

For the Kale swirl:

8 Curly-leaf kale leaves deveined.
¼ medium yellow or white onion
¾-1 cup coconut milk
½ teaspoon kosher salt

Toppings:

Roasted Walnuts roughly chopped
1-2 pinches Smoked paprika

Preparation Method:

Preheat oven at 450F
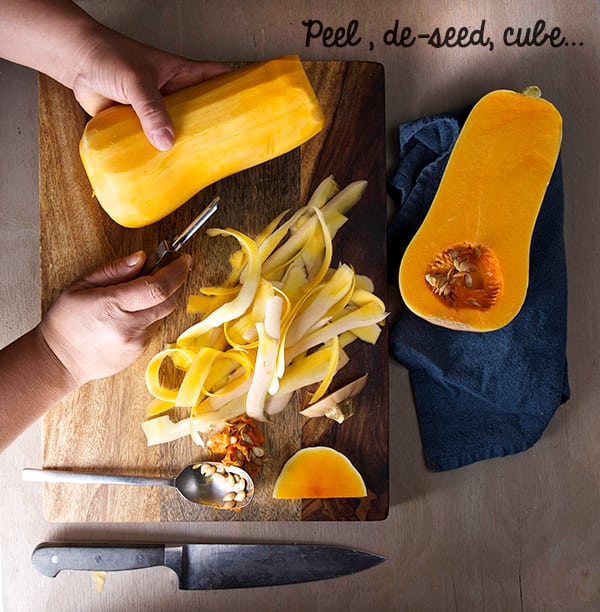
1. Peel and cut into small cubes the Butternut squash. Slice the onion.

Swirly-butternut-squash-and-kale-soup_peel-de-seed-cube
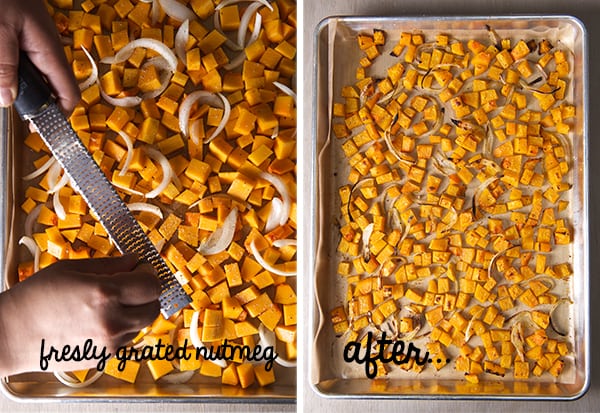
2. On a baking pan lined with aluminum foil or parchment paper, toss the Butternut squash, onions, salt pepper nutmeg and one glug of olive oil all in one layer. Roast in the oven at 425F for about 30-35 minutes, shake the pan every now and then, until the little cubes are fork tender, and toasty.
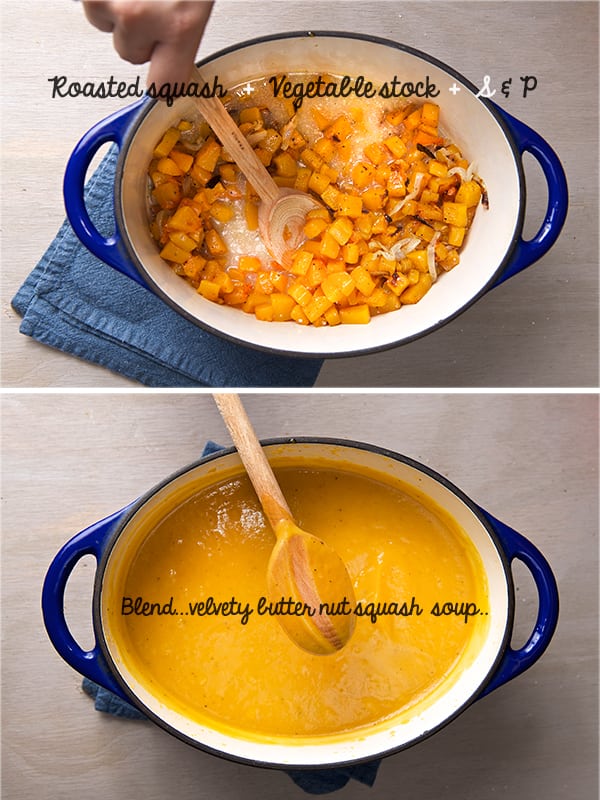
3. Remove pan from the oven, and in a medium size deep pot, add the roasted butternut squash, add the 4 cups of vegetable stock, salt, nutmeg, pepper, and puree with the help of an immersion blender, or use a regular blender.
4. Check for thickness and if needed add another cup of vegetable stock. This is up to your preference, however I like my soup with a lot of body, and therefore I usually use 4-5 cups. Feel free to add a little more if its too thick or to add some almond milk for an extra nutty flavor.
5. Let your soup warm up on a low low heat, and stir constantly.

Swirly-butternut-squash-and-kale-soup_roasted-butternut-squash

Swirly-butternut-squash-and-kale-soup_velvety-butternutsquash-soup
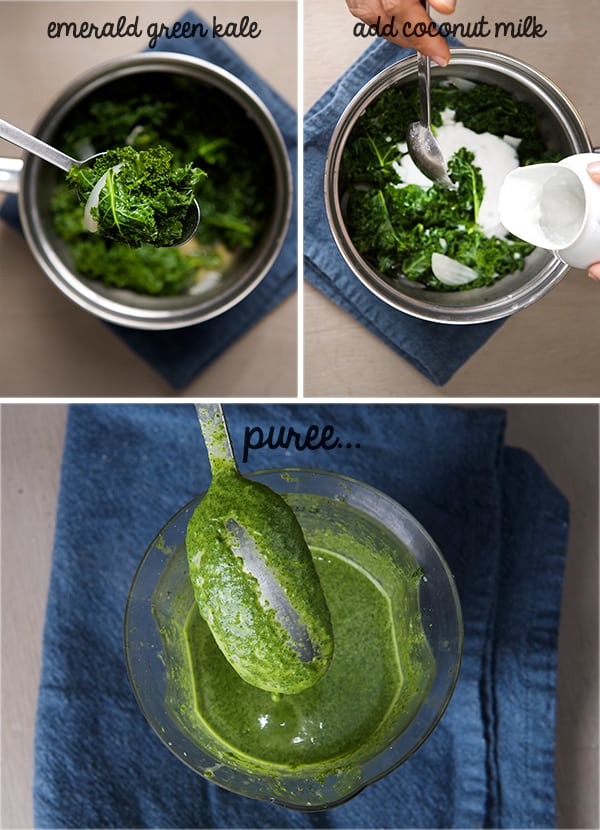
6. For the kale swirl: in a small pot place the leafy parts of the kale, discarding the main vein.
Add the coconut milk, roughly chopped piece of onion, garlic, salt and pepper.
7. Cover the pot over a slow simmer for about 7-10 minutes until the kale feels soft, and turns bright green. You can taste a little piece to check for doneness, you want it soft and cooked but not over cooked.
8. Remove from the stove and using an immersion blender to puree the kale mixture. Adjust seasoning with salt and pepper. The consistency should be creamy and light. It should look like a deep bright emerald green.

Swirly-butternut-squash-and-kale-soup_kale-swirl-soup
9. Roast the walnuts, sprinkle a little smoked paprika and salt.
10. Serve 2-3 ladles of the butternut squash on each bowl and then add the kale swirl. Sprinkle some roasted walnuts, and a pinch of smoked spanish paprika for best flavor. Enjoy!

Note: Remaining soup keeps well for 3-4 days and although it diminishes in flavor, extra portions can be frozen and stored for 30 days or so; this minimizes waste if you happen to make too much or have a desire for homemade soup next time you’re too busy to cook.

Swirly-butternut-squash-and-kale-soup_swirl!Swirly-butternut-squash-and-kale-soup_ready-to-serve_Yes,-more-please!

Enjoy!

Music Pairing: For this recipe our dear friend Ana Ferper plays

a beautifully classic guitar melodie by  J.S Bach Allemande Suite No.1

View Post or View Comments 6

Privacy Policy Contact Us Yes, more please!