Walnuts RSS feed for this section

Fig Honey Kefir Tart with Pecan Date Crust

Summer-Fig-Tart_Yes,-more-please!

Figs…an  inverted flower fruit, sweet, with a sexy shape. I often crave their flowery delicate sweetness and incredible texture. I remember the first time I had a fig I was at a little orchard on a “Family Sunday Comida” in a little town out side the city. My Grandpa Alfredo had a cousin with a great house, a ridiculously oversized pool, and a fruit orchard. You can imagine that for a kid this combination was heaven. I had a place to run, to swim, discover fruits, plants while the adults were too busy playing dominos, cards, laughing out loud, and macerating their happy Sunday souls in Tequila. Hehehe… no worries Mexican mothers were always around watching over us.  Moms, aunts, great-aunts were in the kitchen serving food plates, and every so often screamed at us “Be careful!, get down from that tree!, No more!, A comer!… you get the family situation.

Trino, was my Grandpa’s cousin’s name. I remember he gathered all the kids and told us we could cut every fruit we want, as long we ate it. Then he cut a handful of figs and handed one fig to each kid, whiled he explained what we needed to look for on a ripe fig; “Look for a dark purple color and a honey smell”. With that little said, we all kids had a mission, but first we tried the figs he handed us. At first I did not know what to do, how to eat it, or what to think about this strange looking black-purpled fruit, but when I decided to bite into it, my eyes opened wide and my taste buds went crazy.  After one fig bite, I wondered where have figs  been all my short life and why don’t all fruits taste like figs. Soft and warm from the sun, utterly sweet and floral, all in one cosmic bite; it made me think that the bees around the area could start chasing me if I kept eating the figs from the tree.

Summer-Fig-Tart_Fresh-figs,-Kefir-Cheese,-Dates,-Pecans-Gluten-free-crust,-free-bake-tart_

Since then figs have stolen my heart. I look for them when in season, if possible. Black Mission figs are my favorite because of their flavor, texture, color and because it brings back these memories. Figs are one of the few things I like in purple. Texas has a brief fig season June-July mostly. It is August I know but I ran into these California Mission figs and I could not say no to them.

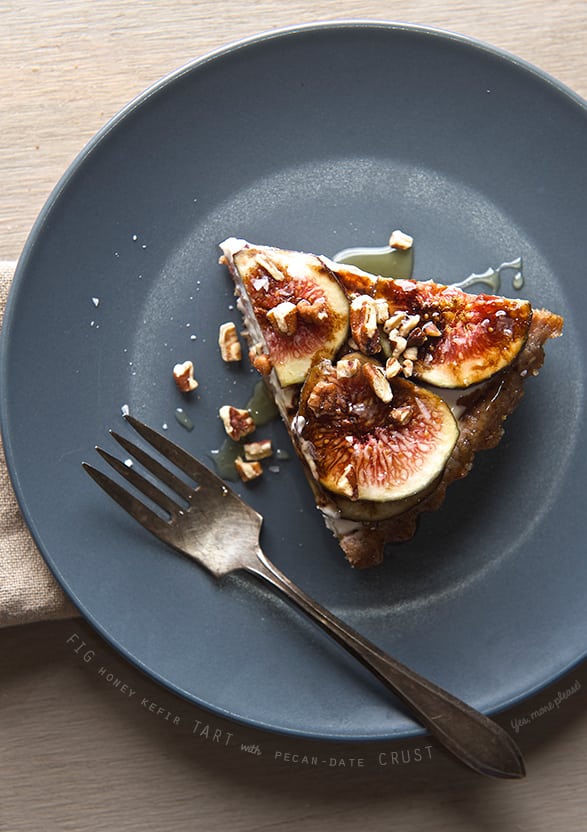
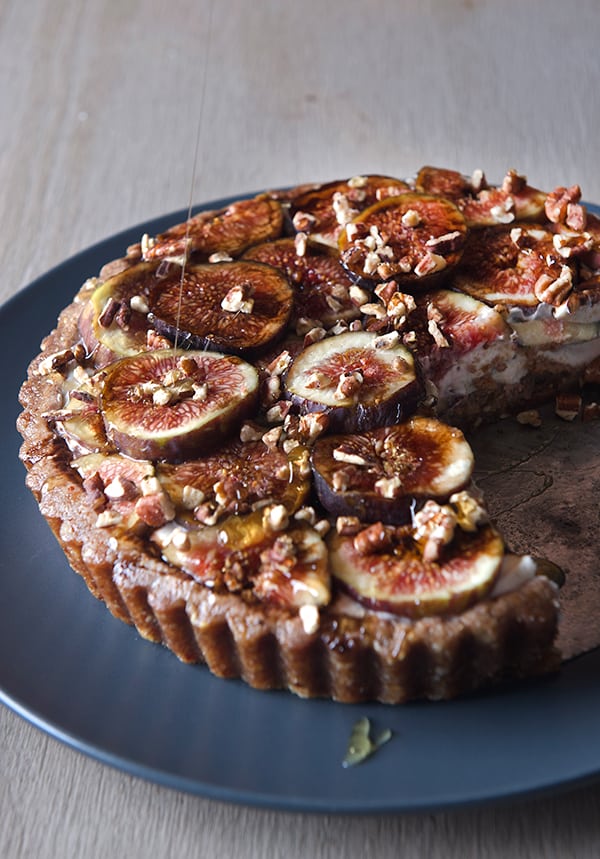
This tart is a no-bake fresh dessert. It combines all what I love in a Summer dessert; fresh fruit, something light, creamy, and cold with out being overly sweet. The crust its a combination of Pecans and Walnuts, dates cardamom and orange blossom water. A breeze to make with the help of a food processor. Despite the use of dates, this crust is just sweet enough. For the creamy component I chose Kefir Cheese and a drizzle of honey mixed into it. This makes a silky and tangy cloud for the fig slices to snuggle.  Two layers of fresh fig slices, chopped, toasted pecans, salt flakes, a drizzle of honey or Balsamic, make this irresistible. Besides it is a really good source of delicious healthy treat. Despite the figs and the dates, this little tart is made with 8-10 dates which amounts around one date per person, A good handful of nuts and good oils, and the tastiest creamy, dreamy, probiotic Kefir cheese its a must! sorry I would not dare to suggest a substitution on this one, trust me.

An incredible dessert and simple to make this Summer, this Fig Tart is truly love at first bite.

Summer-Fig-Tart_ingredients_easy-dessert

Just make it its delicious!, for the recipe you will need….

Continue Reading →

View Post or View Comments 4

Butternut squash Cannelloni with Walnut-Sage Béchamel Sauce

Butternut-Squash-Cannelloni-with-Walnut-Sage-Sauce_Yes,-more-please!
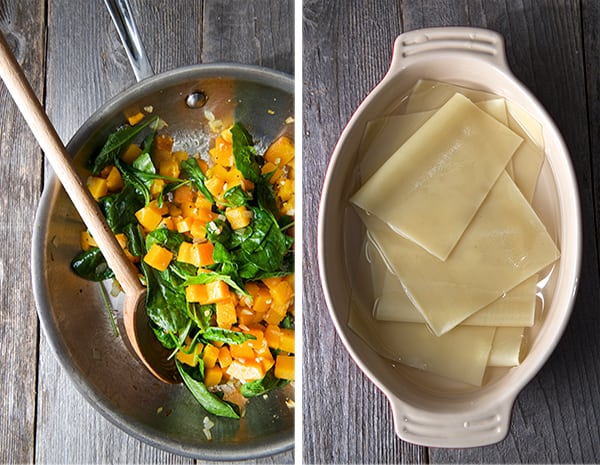
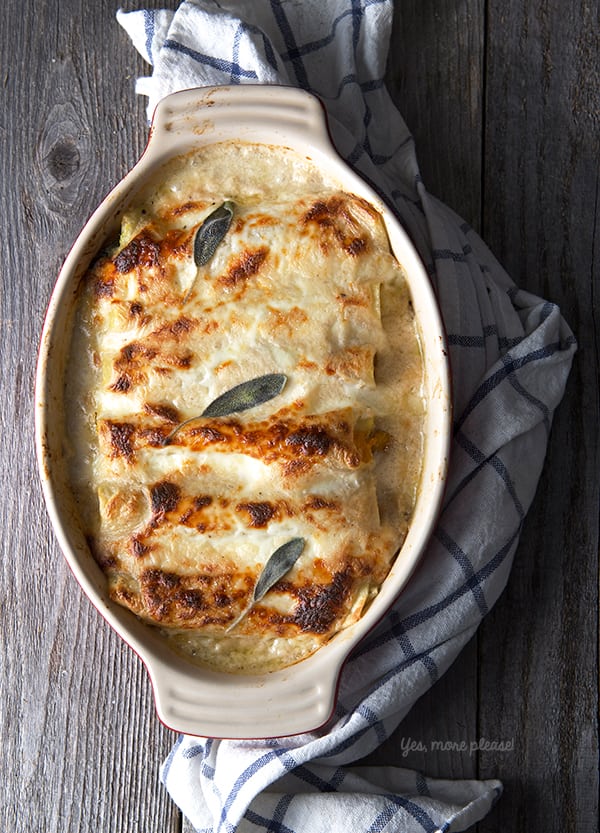
Its warm in the Lone Star State. We’re still waiting in Texas for some cool Autumn weather. We are still in the 80’s around here if you know what I mean. The only indication of Fall, besides the calendar, are the beautiful pumpkins, squashes, sweet potatoes, root vegetables and leafy greens at the markets.
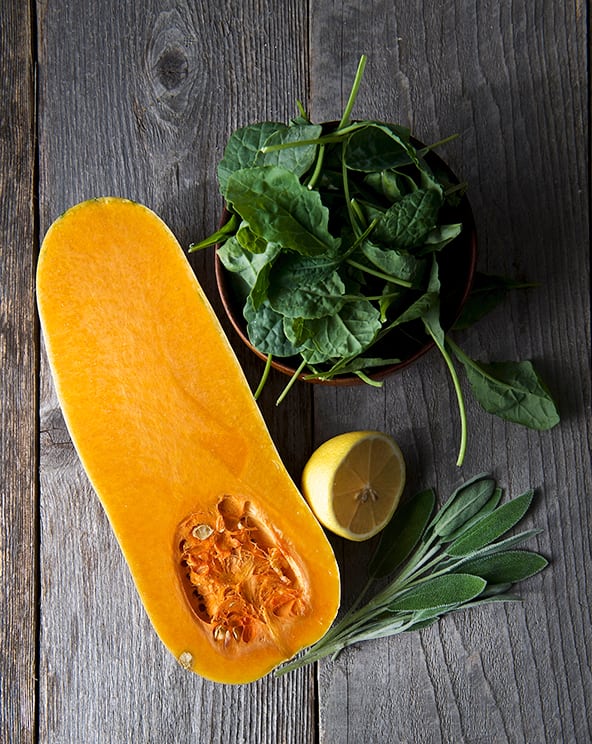
This last Sunday, I found small butternut squash, acorn squash, and some white mini pumpkins. While some people are turning them into candle holders, I think they are the perfect individual size for dinner. They cook fast and leave no left-overs.

Buternut-squash-Cannelloni_the-vegetables

With this in mind, and the romantic idea of having a Fall season, I turned my oven on and thought about the most autumn dish I could bake, and this is what I came up with: Butternut Squash Cannelloni with a Walnut-Sage Bechamel sauce. Dreamy. This recipe has a long name and a short preparation. It is not hard to Imagine pasta sheets filled with delicate butternut squash, baby spinach, onions and goat cheese; rolled and smothered with a light creamy, nutty walnut-sage béchamel sauce, some mozzarella on top and.. Kazam! You have Fall on a plate. Nutty, creamy, warm, cheesy, the kind of dinner you want to snuggle with…In Texas we snuggle in shorts and t-shirts. Or you can fake it and watch a movie with maple trees, and turn your A/C to 64F grab a little blanket and for a few hours pretend is Fall….Not that we have done this…ehem, ehem.

Mean time we will patiently wait in shorts and T-shirts for the winter… maybe I should make Margaritas instead!… Enjoy the recipe.

Buternut-squash-Cannelloni_pasta-and-sauce-ingredients

Butternut squash Cannelloni with Walnut-Sage Bechamel Sauce.

Serves 4

12 cannelloni pasta tubes or 12 lasagna sheets.

For the filling:

1 small butternut squash peeled and cut into small cubes
2 cups baby spinach or baby kale
1/2 medium onion small diced.
1 glug extra virgin olive oil
2 pinches of nutmeg
Salt and pepper to taste
4 oz. Chèvre Goat cheese

For the sauce:

1/2 cup blanched and toasted walnuts
2 cups milk
2 tablespoons flour
4 tablespoons butter
Zest 1/2 lemon
1-2 pinches nutmeg (freshly grated preferred )
2-3 Sage leaves whole*
1/2 teaspoon salt
4-6 cranks of fresh ground black pepper

Fresh mozzarella ( liberal amounts upon your preference)

3-4 Sage leaves to garnish

*Note: Sage its a powerful herb, I levee it whole to just perfume the sauce and leave it whole as garnish also enhances the dish and brings out delicious aromas. I prefer not to chop the sage on dishes like this, because it becomes a bit bitter, and is not very pleasant to bite into them, they will overwhelm the delicate flavor of the butternut squash. However, If you love sage and its a flavor you enjoy, feel free to adjust to your taste.

Preparation:

1. Using a little glug of olive oil Sauté the onions and butternut squash until tender. Finally add spinach salt, pepper and nutmeg; toss well then remove from stove and let it cool down. Add the goat cheese in crumbles once the filling is cool, toss gently.
2. Pre-cook your pasta sheets according the directions on your package. Remember to salt your water to flavor the pasta. Remove the sheets from boiling water 3-4 minutes before, according to directions. Shock them in iced water to stop cooking, and avoid to stick together.

Buternut-squash-Cannelloni_pasta-and-sauce-preparation
3. Make the sauce.  Start by blanching the walnuts in warm water for 5 minutes, this will eliminate any bitterness from the walnut skins. Drain the walnuts and toast them on a large skillet for a few minutes. Blend the walnuts with 1/2 cup of the milk until smooth. Then incorporate with the rest of the milk.

Walnuts
4. In the same large skillet, over medium heat, place the butter until melted and bubbly. Add the flour and whisk well to combine until no lumps and the buttered flour looks light golden-yellow in color. Start adding the walnut-milk in smaller additions and whisk at all times to avoid lumps, until the 2 cups of milk are incorporated. You might need to reduce the heat to medium low while whisking. After all the milk is incorporated season with salt, pepper, and nutmeg and sage leaves. Bring too a slow simmer and remove from heat. The consistency should be of a light creamy thickness, if to thick, add more milk, to lose, place it back to the heat and whisk until desired consistency.
It should cover the back of a spoon see picture below.

Butternut-Squash-Cannelloni_how-to-make-bechamel-walnut-sage-sauce
3. Prepare a baking dish with butter, or a little olive oil, add a bit  of the sauce on the bottom.
4. Start by filling the cannelloni’s pasta tubes or by placing the filling on one end of the precooked pasta sheets and roll them up tightly. Proceed to do the same with each pasta sheet. Place the cannelloni rolls into your baking dish as you go.
5. Cover all the pasta rolls with the walnut-sage sauce, reserve some of the sauce.
6. Cover with mozzarella slices, then pour the remainder of the sauce, top with some sage leaves.

Butternut-Squash-Cannelloniwith-sage-and-walnut-sauce_assambling-the-rolls
7. Bake at 375F for 20-30 minutes until cheese is melted and top is blistered.
8. Let it rest for 10 minutes before serving. Enjoy!

Note: Not too fond of rolling? make it into lasagna layers, you also can add some cooked ground turkey or sausage to the butternut -spinash filling and it will be equally delicious. I just love the way the Cannellonis portions out. Enjoy!

Butternut-squash-Cannelloni-with-Walnut-Sage-Sauce_out-of-the-oven-

Butternut-squash-Cannelloni-with-Walnut-Sage-Sauce_Yes,-more-please!-

 Music Pairing: Autum Leaves – Miles Davis

View Post or View Comments 2

Zucchini Ginger Brown Rice Bowls

Zucchini-Ginger-Brown-Rice-bowls_ready-to-serve-Yes,-more-please!

Light and refreshing is what best describes this recipe. A one bowl meal! It’s no fuss, maximum flavor, raw zucchini with a gingery-soy sauce over a nutty sesame seasoned brown rice. This Zucchini Asian flare recipe, is so light, refreshing and savory, you are going to want to eat it more than once a day.
I know what Brown rice does not have a great reputation among the grains because it tends to be mushy and it can taste like cardboard… Well my friend, I have you covered on this one, you will love the quick easy method that I use. Cook the brown rice as you would cook pasta. Use  a large pot with plenty of water and pinch or two of sea salt. The brown rice boils loosely for about 25-30 minutes; stir often and check for an al-dente consistency. When is up to my desired doneness I strain it and the heat of the steam dries the excess water in the brown rice,  leaving you with perfectly cooked,  fluffy individual grains, with great texture cooked trough and slightly  al-dente.

Using this method, I cook larger batches of brown rice and use them later for a quick sautéed, salads, soups or in this case; this humble and refreshing Zucchini Ginger Brown Rice bowl.

As you can see there is hope for this misunderstood grain. I assure you once you try this method you will love brown rice again.

Enjoy the bountiful zucchini season and stay fresh!

Zucchini-Ginger-Brown-Rice-bowls_ingredientsZucchini-Ginger-Brown-Rice-bowls_short-grain-brown-rice

Zucchini Ginger Brown Rice Bowls

Makes 2 meal bowls

3 medium size zucchini any color is up to your preference.
1/2 cup toasted and finely chopped cashews or walnuts
2 green scallions finely chopped
1 tablespoon toasted sesame seeds (any color)
1 tablespoon of fresh grated ginger.
1 small garlic clove grated

For the dressing:

1 Tablespoon soy sauce
2 Tablespoons sesame seed oil
2 Tablespoon Rice Vinegar

For the rice:

1 cup short grain brown rice
8 cups of water
2 pinches of salt.

Season the rice with:

1 Tablespoon sesame seed oil
1 Tablespoon sesame seeds
2 Tablespoons seasoned rice vinegar.

Preparation Method:

1. Bring to a boil a large pot filled with 8 cups of water and 2 good pinches of sea salt. Once is boiling add the brown rice, bring back to a boil, and then lower the temperature for a slow simmer. Simmer for about 25-30 minutes. Stirring occasionally.
2. While your rice is cooking, shred your zucchini, ~omit the seed core on the zucchinis~ I used one of my favorite uni-taskers, I absolutely adore this julienne peeler! you can get it any cooking supply store or get it on-line. Toast your walnuts, chop the scallions, grate your ginger and garlic.

Zucchini-Ginger-Brown-Rice-bowls_julienne-peeler
3. In a large bowl combine the shredded zucchini and one good pinch of salt, toss well and let it stand for a few minutes. This will draw out some of the excess water out of the zucchini.Toss water from bowl and place zucchini on a clean kitchen towel and gently squeeze with your hands as much water as possible. remove from towel and with your hands fluff up the shredded zoodles. This step is very important, because avoids watering down your vinaigrette.
4. In a large bowl Combine the drain shredded zucchini, finely chopped toasted walnuts, toasted sesame seeds, green scallions, grated ginger, grated garlic.
5. Combine the soy sauce, sesame seed oil, rice vinegar. Set a side you will dress your zucchini right before serving. Please check on your rice.

Zucchini-Ginger-Brown-Rice-bowls_fresh-grated-ginger
6. Check for rice doneness. I usually look for a soft but firm grain, that tastes cooked and has a god bite. Usually is around 25-30 minutes, the doneness I prefer. See the picture below.If you want to go a little further on cooking is up to your preference, give the rice another 5 minutes, re-check and taste; always taste!
7. Once your rice is cooked, with the help of a colander or a sieve, strain the rice. Allow the hot steam to dry the extra water, give it around 5-7 minutes. Once all the excess water is drained and still warm, transfer the rice into a bowl and season with the sesame oil, sesame seeds and rice vinegar toss until well combined.

Zucchini-Ginger-Brown-Rice-bowls_how-to-cook-brown-rice
8. Once your rice is seasoned, Add the Soy sauce sesame seed oil, and rice vinegar dressing to the zucchini mixture. Toss well.

Zucchini-Ginger-Brown-Rice-bowls_add-dressing

Zucchini-Ginger-Brown-Rice-bowls_tosswell
9. Using two deep bowls, divide the rice and top it with the zucchini mixture. Sprinkle some extra sesame seeds and for spice maybe some Thai pepper, red pepper flakes, or some Sriracha-hot sauce! Enjoy!

Zucchini-Ginger-Brown-Rice-bowls_assambling-the-bowls

Zucchini-Ginger-Brown-Rice-bowls_ready-to-servel

Fresh, light, easy lunch or dinner…

Music Pairing: Nanobots – They Might be Giants


View Post or View Comments 3

Cranberry Walnut Bran Muffins

Cranberry Walnut Bran Muffins_so close you can smell it!

These cranberry walnut Bran muffins are a delicious source of fiber and because of its high fiber content and wheat germ they are a great source of folic acid. They deliver approximately 14-15 carbs per muffin and loads of antioxidants from the dry fruit and nuts.
I like these muffins instead of toast for breakfast with some yogurt or fruit.  As a snack they reduce cravings for refined breads or cookies especially in the middle of the afternoon…  They give me plenty of energy and keep me very full from afer lunch until dinner.
The texture is a bit more dense than your regular muffin, but despite all the fiber content the flaxseed acts like a binder and moisten the inside giving it a soft crumb easy to eat and digest. The cinnamon adds the perfect aroma when you bake them the house smells like apple pie (with out the calories).
These muffins are so versatile; you can create any flavor combination so you won’t get bored, there are infinite combinations; like raisins & walnuts, dates& pecans, golden raisins & orange zest, cinnamon & apples, candied ginger and cashews, anchovies & peanut butter….okay, well almost anything… They are so easy and quick to make and to bake that once you have the recipe you can whip a batch of these babies in no time.
I usually bake this muffins once a month,  The recipe it’s so fast to prepare and freeze friendly if 16-18 are to many for you, you can freeze half a batch, and reheat them in the toaster oven.
So fall in love with them and start baking a batch!!!

Cranberry-Walnut-Bran-Muffins_Fiber-never-tasted-so-good!

Cranberry Walnut Bran Muffins_I love them!

Cranberry- Walnut Bran Muffins

Makes 16-18 muffins -Vegan friendly!!!

4 tablespoons ground flaxseeds
3/4 cup water
2 cups wheat bran
1 ½ cups whole wheat flour
½ cup wheat germ
1 pinch of cinnamon
¾ cup brown sugar, firmly packed
2 ½ teaspoons baking soda
1 teaspoon salt
1 cup non-dairy milk (soy, almond, coconut, rice)
1/3 cup canola oil
1 teaspoon vanilla extract
½ cup cranberries
½ cup walnuts

Sprinkle with:

1/2 cup raw sugar cane

Directions:

1.-

Preheat the oven at 400F/200C
Line with cupcake liners or lightly grease muffin tins.
Measure all your ingredients. (it helps a lot when you are baking so you don’t forget any of them! it is worth the step at least the first couple of times you are making them)

Cranberry Walnut Bran Muffins_mise en place

2.-

Whisk the flaxseed and ½ cup of water until foamy.

Cranberry Walnut Bran Muffins_whipping the ground flaxseed

3.-

Combine dry ingredients.(except for the cranberries and walnuts)
Combine wet ingredients until smooth and creamy.
Add together wet and dry until well combined (do not over mix).
Add Cranberries and walnuts fold gently.

Cranberry Walnut Bran Muffins_Dry ingredients and mixing

Cranberry Walnut Bran Muffins_muffin batter and folding the cranberries and nuts

4.-

Scoop into muffin pan, each 2/3 full and sprinkle with some raw sugar cane.
Bake for 12-15 minutes.

Cranberry Walnut Bran Muffins_scooping muffins

Cranberry-Walnut-Bran-Muffins_raw-sugar-sprinkled

5.-

Wash the dishes while they are baking….

Cranberry Walnut Bran Muffins_Wash your dishes while the muffins are in the oven!

6.-

Cool on a rack…

Cranberry Walnut Bran Muffins_muffins on cooling rack

Cranberry Walnut Bran Muffins_spread some vegqan butter

Eat them a little warm with some vegan spread…delicious!


View Post or View Comments 0

Kale and Lentil Salad with Honey- Mustard Vinaigrette

Kale and Lentil Salad with Honey- Mustard Vinaigrette_kale purple leaf

Feeling blue?…Have some greens!. Kale is the number one power green, full of nutrients and rich in flavor.
If you wonder what the color green should taste like… it tastes just like kale.
It’s high percentage in Beta carotene, Vitamin K, vitamin A, Vitamin C, manganese, iron, potassium, calcium and fiber, make it the king of the greens. The season for this green is Autumn and Winter.
Kale salad will lift up your mood and give you plenty of energy through out the day.
There is Curly Kale, Dino Kale, Premier, Redboar, Siberian, Walking stick kale, Red russian, Kamome red, *sight and I assure you I’m missing more varieties, this are just a few of the ones I know and I’ve tried.
I remember the first time I tried Kale it was a bit intimidating, I felt like I was eating some prehistorical plant; it is a bit hard to chew when is raw and most of the varieties develop their nutrients and are easier to digest when they are steamed.
I’ve tried different cooking methods, some favorites of mine: Curly and Dino kale make great baked chips, Kamome is great for steaming it holds its shape beautifully, and the Redbor Kale I love it in salads like this because it adds great texture, I usually cut it or tier it in small pieces because is easier to chew, the vinaigrette helps to tenderize the leafy texture and what is great is that kale will not wilt when you add the vinaigrette.
Kale and Lentil Salad with Honey- Mustard Vinaigrette is a nutritious  and delicious combination. Kale, lentils, walnuts for some crunch is just what you need to boost your energy. This salad Makes a great Lunch or a light dinner side dish.

Kale and lentil salad with honey mustard vinaigrette_red kale

Kale and Lentil Salad with Honey- Mustard Vinaigrette_healthy and delicious

Kale and Lentil Salad with Honey- Mustard Vinaigrette.

Serves 4

4 cups of Redbor kale (washed and pad dry) ( you can use Dino Kale )
2-3 cups of cooked green lentils*
1 small red onion finely chopped
1 red bell pepper finely diced
1/4 cup chopped walnuts
1 tablespoon of finely chopped parsley
A couple of tablespoons of Bulgarian Feta cheese

Honey- Mustard vinaigrette

2 teaspoons of whole grain mustard
2 tablespoons Extra virgin Olive oil
¼ cup rice vinegar
3 tablespoons of honey or ambar agave nectar.
the juice and zest of ½ lime or lemon.
Fresh ground pepper to taste.

*How to cook Lentils?

These green Lentils are best cook in lots of salted water, just like pasta. Bring water to a boil add 1 generous teaspoon of kosher salt and a Bay leaf. Add the lentils, bring back to a boil and cook for 5 minutes, then lower the heat to low and gentle simmer you barely want to see little bubbles on the top. Cook for another 15-20 minutes with no lid. after 15 minutes check on doneness. I like mine al-dente, specially for a salad like this, I want them with a bite. So I usually remove from heat at 15 minutes and cover them for another 10 minutes. Strain them and let them air dry for a few minutes on a single layer in flat tray.  I usually serve this salad with barely warm lentils, I love the texture and comfort.

Directions:

Start by removing the stems of the kale leaves and breaking the pieces into small bite size. In a small bowl whisk the vinaigrette ingredients. In a platter, layer the kale, lentils, chopped onions, red bell pepper, parsley and walnuts. Drizzle over the mustard vinaigrette. Mix and top it all with crumbled feta cheese.
Serve the salad at room temperature. It is also great in a pita with some Greek yogurt or served in avocado halves!!!Kale-and-Lentil-Salad-with-Honey--Mustard-Vinaigrette_ingredients-layout

Kale and Lentil Salad with Honey- Mustard Vinaigrette_vegetarian_healthy dinner

Kale-and-lentil-salad-with-honey-mustard-vinaigrette_Yes,-more-please!

Enjoy!

Music Pairing: Don’t Worry be happy – Bob Marley

View Post or View Comments 2

Chiles en Nogada – Poblano Peppers with Farro and Walnut Sauce…Vegetarian Style

Chiles en Nogada-Poblano Peppers stuffed~ Yes, more please!_seasonal ingredients

The month of September is the time in Mexico when we celebrate Independence Day, Viva Mexico Goat creatures! That’s the way we shout and celebrate along with lots of tequila and food. There are many traditional dishes that are prepared for this celebration, but the one that represent the season and the first celebration of independence is the Chiles en Nogada.

Chiles en Nogada is a regional culinary dish from Puebla. It’s origin dates from 18th century and it is considered a recipe of Baroque style, because of the amount of ingredients and the elaborate and detailed preparation. Many tales and stories argue the origin of this dish. In my curiosity of knowing the most accurate story, I found an article written by Eduardo Merlo Juarez*, from the Investigation Center of INAH-Puebla (INAH-“National Institute of Anthropology and History in Mexico) which I found very credible and congruent. He explains that this dish was made in the Viceroyalty period in Mexican history as a dessert. It was created in the month of August with seasonal ingredients from the region; like Poblano peppers, Nueces de Castilla (walnuts), pomegranates, and stone fruits like peaches, apples, pears that the Friars cultivate in the orchards.

The nuns, Madres Agustinas Recoletas of the Convent of Santa Monica were the ones who originally prepared this dish for the dinner that was given in honor of the Military Commander Agustin de Iturbide, who entered the city of Puebla in triumph after signing the Treaty of Cordova in Veracruz. This event granted the Mexican Independence from Spain. For such an important celebration the nuns used as garnish for the first time, parsley for the green and pomegranate for the red to symbolize the colors of the Mexican Flag.

This dish was probably served as dessert, roasted poblano pepper filled with a concoction of delicious stone fruits, that tamed the spiciness of the chile and the creamy sauce to marry the flavors. As in today the chiles are stuffed with a combination of the stone fruits and a 50% ground pork and beef.

There has been no way to track who added the ground pork and beef to make the sweet picadillo which is now traditionally used as filling. Many arguments have been raised about whether they should or should not be covered in the egg batter as in Chile Relleno style; the truth is you can find them both ways based upon preference. The original sauce was made with walnuts, Goat cheese, a little bit of milk, and a dash of sherry vinegar. It is preferable to serve them at room temperature and the sauce is always best served cold.

In this recipe I wanted to keep the essence of the dish and simplify the preparation time without compromising the flavors, I prepared the filling using Farro to make it lighter (and because it has a meaty texture that resembles to ground pork). I maintain the use of stone fruits and spices. And versus the original long cooking method, I added the fruits later on in the cooking process to have contrast in textures. I believe that this recipe is simple enough to make and results in a light entrée for you to serve, rich in flavors, culture and tradition.

Viva Mexico!!!

Chiles en Nogada-Poblano Peppers stuffed~ Yes, more please!

Chiles en Nogada – Poblano Peppers stuffed with Farro and Walnut Sauce Vegetarian

Serves 4

Roasting the Chiles:

4 Poblano peppers roasted, deveined, and de-seeded* (reference in below photos)
In a baking sheet pan lined with aluminum foil place the poblano peppers and rub them with a little canola oil and sprinkle some sea salt. Roast them for about 3-4 minutes per side at a 450 F pre-heated oven. It is best to char them on the stove over direct flame because it gives them more flavor. In this case I do not own a gas stove or a torch (sad, sad…but the oven method works great to easily remove the skins) I did not grill them. I think the flavor of the smoke charcoal would be too overwhelming for the filling.

Chiles en Nogada-Poblano Peppers stuffed~ Yes, more please!_Chiles skined sequence
Making the Filling:

2 cups of cooked Farro (or brown rice will work too)
1 apple chopped in small cubes
1 Bosc Pear chopped in small cubes
1 Peach chopped in small cubes
1 apricot chopped in small cubes
½ cup golden raisins
½ cup roasted almonds
½ medium size red onion finely diced
1 garlic clove
2-3 tablespoons canola oil
1 teaspoon of sherry vinegar.
Mexican cinnamon ground
a pinch of ground clove.
A pinch of white pepper.

Directions:

Start by adding your Farro to a small sauce pan with a little canola oil and sauté it until slightly golden brown. Add 2 cups of water and let it come to a boil, then reduce the heat, cover and let it simmer. Add a pinch of salt. Keep an eye on it since you want to leave it a little under done for the best texture and flavor. Once it is cooked, spread the Farro on a platter to stop the cooking process and to release some of the moisture. Let it cool for about 10-15 minutes.

Meantime, chop the rest of the ingredients. Now that you have everything ready, heat a sauté pan with about 2 tablespoons of canola oil, sauté onions and garlic and cook for about 2 minutes. Next, add apples, pears, almonds, raisins, sherry and spices cook for 2 minutes. Add the Farro and sauté for another 2 minutes. Then add the peaches and apricots. Adjust salt and pepper. Remove from stove and let it cool to room temperature before stuffing the roasted poblano pepper.

Chiles en Nogada-Poblano Peppers stuffed with Farro and walnut sauce_ stuffing ingredients
For the Walnut Sauce:

6-8 ounces of Goat cheese
1 ½ cup of Walnut halves soaked and twice rinsed.
1/4-1/2 cup of milk
a dash of sherry vinegar
a pinch of sugar.

Directions:

Blend everything until smooth and refrigerate for about 30 min. before serving
The traditional recipe calls for peeling each walnut by hand…I have not a lot of patience for this process, however I found that if you soak the walnuts in hot water for 20 minutes, and rinse them twice,it removes almost all the bitterness from the skins.(see picture below)

Chiles en Nogada-Poblano Peppers stuffed~ Yes, more please!_Walnut sequenceChiles en Nogada-Poblano Peppers stuffed~ Yes, more please!_Walnut sauce
Garnish with:

Finely chopped Parsley
Pomegranate Kernels (see photos for easy peel and kernels extraction pomegranate)

Chiles en Nogada-Poblano Peppers stuffed~ Yes, more please!_Pomegranate sequence
To serve:

Start by stuffing the poblanos, arrange them on a platter or in individual plates, cover them with the walnut sauce, garnish with pomegranate kernels and finely chopped parsley.
Traditionally they are serve in Talavera plates from the state of Puebla.
I chose this beautiful stoneware plate with an iridescent brown-black glaze made by a Local Artist her name is Barbara Breyfogle she has her own studio and makes one of a kind handmade stoneware pottery. She has been making pottery since 1974. In some of her pieces she uses lace and nature to stamp some designs on her plates and serving platers.You can find her and her beautiful creations at Boggy Creek Farms on Saturdays from 8-1 pm. Or send her an e-mail: [email protected]……Thank you Barbara!!

Chiles en Nogada-Poblano Peppers stuffed with Farro and Walnut Sauce_serving
VIVA MEXICO!!!

* Source of the historical facts:  http://www.elfinanciero.com.mx/secciones/estilo-de-vida/28659-debe-mantenerse-receta-original-del-chile-en-nogada-investigador.html

View Post or View Comments 8

Privacy Policy Contact Us Yes, more please!