Recipes, Cooking & Art Direction: Mariana Nuño Ruiz McEnroe | Photography: Ian McEnroe |
Published: July 1, 2016
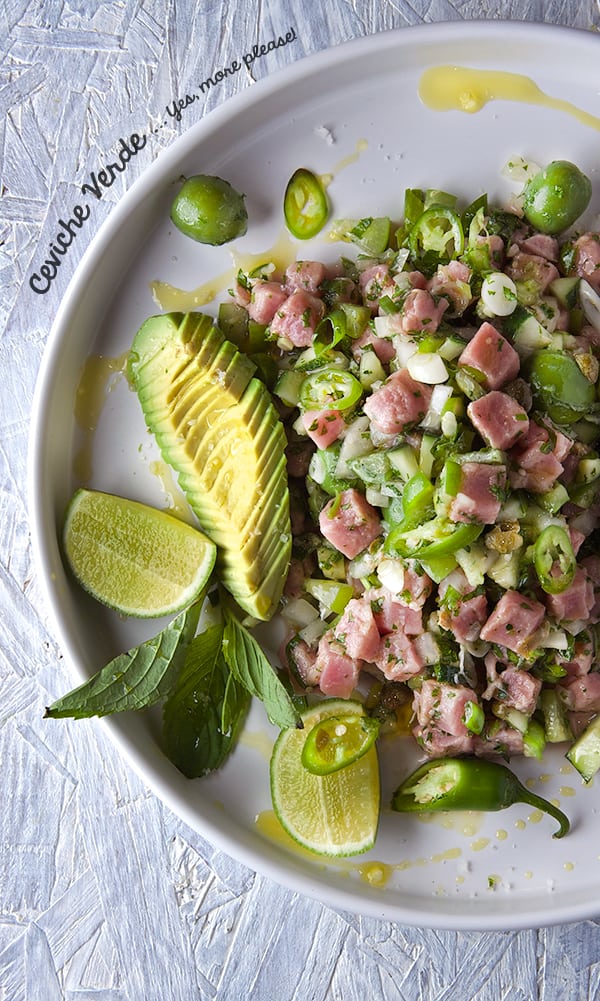
To hot to cook fish? Let the Limes do it. This Ceviche Verde, is refreshing, light, green, tangy, zesty, crisp and crunchy vegetables, tender tuna marinated in lime juice, surrounded by creamy avocados… are you with me?…Yes!
Ceviche is an original dish from Peru. Peruvians are the kings of making the best out of fresh fish. To corroborate this statement you need to know about Peruvian Chef Gastón Acurio. Chef Gastón has placed Peru, their culture, and Ceviche at another level in his country and internationally, all through a labor of love that started in the kitchen, that for me, no other chef has achieved with his cooking.
Recipes, Cooking & Art Direction: Mariana Nuño Ruiz McEnroe | Photography: Ian McEnroe |
Published: June 1, 2016
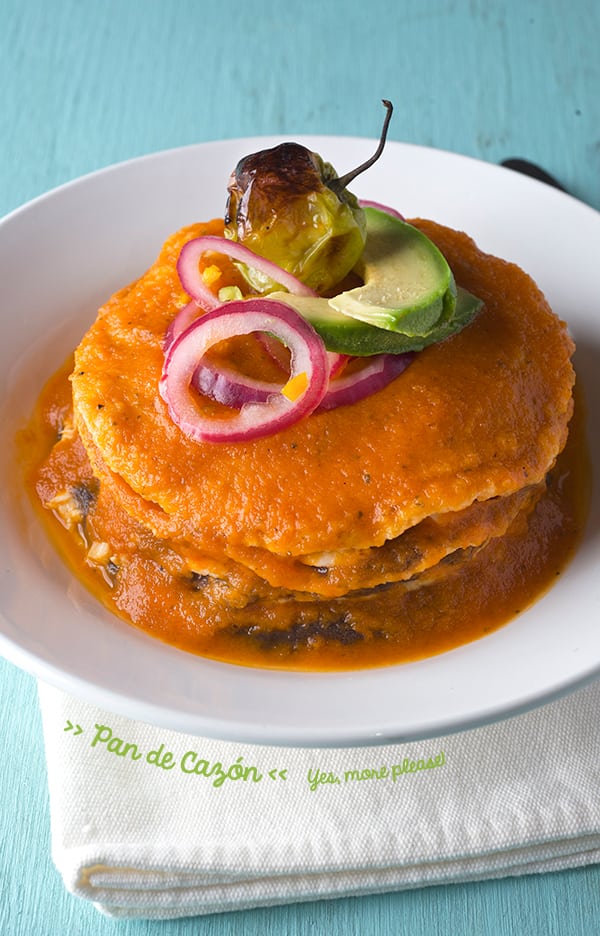
The first time I had Pan de Cazón in Campeche México it was a revelation to me.
I was traveling in Mexico with two of my best friends and architecture colleagues back in our student days, circa 1998. We were in Campeche on a very honorable mission of developing a great project for the City: The “Biblioteca Universo Maya” -“Mayan Universe Library”. The architectural dream project of every student. A constructive binomial, a Church and Monastery, from the sixteenth century that was going to hold the biggest collection of Mayan information in Mexico. I remember the first day in the city we met people and acquired information, details, measurements, and blueprints. We needed every single piece of information in order to start the project.
Between meetings and planning, the morning went fast and soon enough it was lunch time- “comida”. In the blink of an eye, we were guided to a restaurant to cool down. I remember not coping well with the humid hot weather of this beautiful city. Hungry and thirsty, we sat at a restaurant and started receiving some recommendations from the waiter and the friend who brought us. They both made the same recommendation: “Pan de Cazón”.
Recipes, Cooking & Art Direction: Mariana Nuño Ruiz McEnroe | Photography: Ian McEnroe |
Published: August 28, 2015
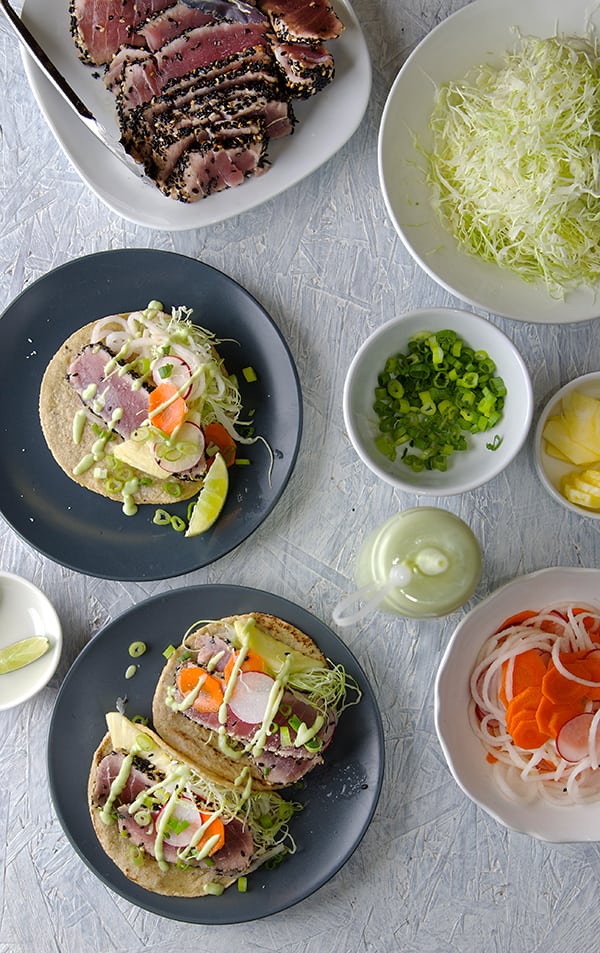
I’ve been craving Fish Tacos. But not any kind of Fish Taco, I mean Ensenada, Baja California Mexico Fish Tacos. The real deal. These “the” original fish tacos are often imitated, and sad to say but rarely duplicated. How can something so simple in principle, can be so hard to replicate? I really believe its all in the ingredients and the particular sazon of the cook. Have you ever tried the authentic Baja tacos?… If not, please do. Tale says that the Baja tacos were created by the street stand “Tacos El Fenix” in Ensenada Baja California, Mexico. What is so special about a Baja taco? Well, let me describe it. Imagine a tempura-like battered piece of the freshest morning pacific caught white flesh flaky fish, on a Mexican corn tortilla, light mayo-crema, shredded cabbage, pico de gallo, and a spoonful of spicy green or red spicy salsa and a squeeze of lime. The bite is ethereal, crunchy, tender, fresh, savory, acid, spicy your tastebuds go on ecstasy.
I have not eaten Baja Fish Tacos in almost 10 years!, would you believe that?…No?, me neither.
Recreating a craving from a memory of flavor could be a little daunting. I did not want to even attempt to relay into my 10-year taste buds memories to try to replicate these unique Baja tacos.
So I opted for a 360 degree of separation alternative recipe to tease and ease up my Fish Taco craving. I made these Black Sesame Seared Tuna Tacos. Sometimes my taste buds act in mischievous ways. On these tacos, I opted to seared Ahi Tuna steaks covered in Black sesame seeds instead of the deep frying battered fish.
Recipes, Cooking & Art Direction: Mariana Nuño Ruiz McEnroe | Photography: Ian McEnroe |
Published: April 14, 2015
Valencia is one of the most beautiful cities in Spain. Great architecture, culture, and cuisine gather together in this little gem of a city that faces the Balearic sea.
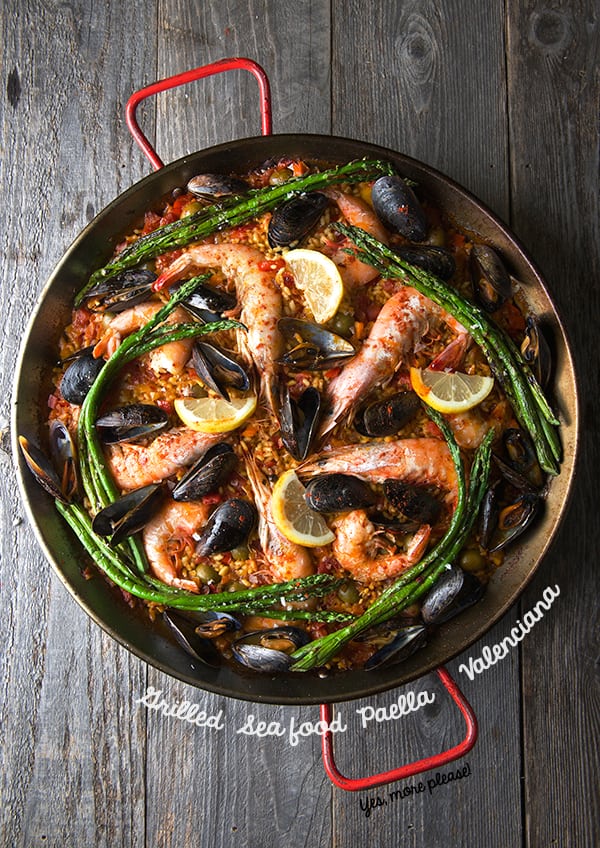
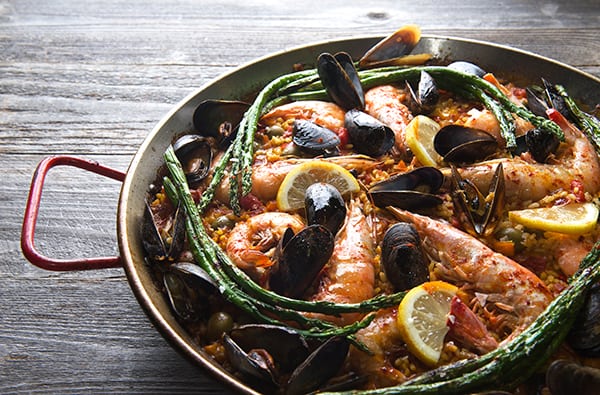
Throughout history Valencia’s splendid location attracted cultures contributing to this fantastic region character. Moors brought new ingredients to the region like rice, sugar cane, oranges, almonds, and spices. The Romans brought the utensils to cook with. This kind of influences, shaped one of the most iconic Spanish dishes, Paella Valenciana. The original Valencian Paella recipe consists of a combination of chicken, rabbit, rice, green vegetables, artichokes, peppers, bomba rice, white runner beans, saffron, fresh rosemary, sweet paprika, garlic and lemon. It sounds divine, right? And also a little far off from the Paella Mixta we know in America.
I had the opportunity to travel around Spain with my Grandma Ana. One of the cities we visited was Valencia. We had a blast, and of course every time I tried some remarkable food I wanted to know the origin of the dish. I love to hear about different stories about what people believe and their traditions. For me, this is an enriching way to know a culture; by their stomachs! So I took this info at face value and what I discovered is that Valencianos prefer to make their Paella with one category of meat at a time and not mixing them. Hey, since they are the Paella creators, I will go with their advice!,… And it make sense, seafood ingredients available in the near coast, they use shrimp, langoustines, mussels, clams, and squid. Areas more inland use land creatures, rabbit, chicken. What ever freshest available always taste best.
Throughout Spain, other variations have been adapted for inland areas creating the infamous Paella Mixta which combines a variety of white meats, seafood, sausage and chorizo. But, just remember that Valencians are very proud of their dish and they do not recognize this Paella Mixta as Original Paella Valenciana. So watch out what you call Paella Valenciana unless you want to get in to a heated argument.
Every country has their nationalistic pride when it comes to Cuisine, and in this case there is no exception since Paella is Spain National dish. Every culture has their memories linked around a particular dish, ingredient or preparation that was carried by generations, runs in the family, or evokes a moment in time. And It is admirable when people stand by their beliefs and roots. I do respect that.
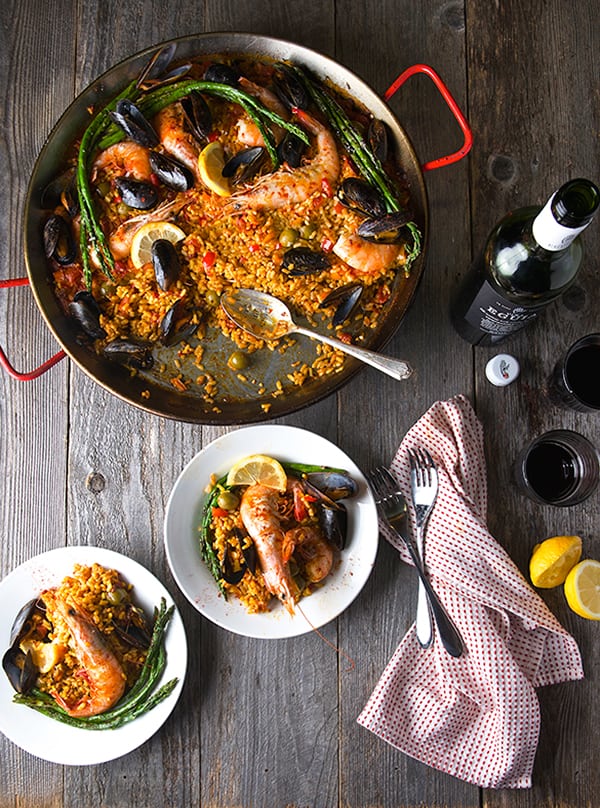
I hope knowing all these facts makes you less intimidated, after all they say knowledge is power. I would say in this case, knowledge is inspiration. I truly believe that everybody has a little of a cook inside. I would love to encourage you to be comfortable with the idea of cooking and enjoying the process. Have some red wine, Rioja if possible, and music on the side to let that cook come out. Whether you are preparing the best butter on a toast or a dish with a lot of history and tradition like this Seafood Paella Valenciana, just have fun and be curious about it.
Honoring the authentic Paella Valenciana, I made it strictly with seafood. We live in Texas, and have some access to great shrimp from the gulf, beautiful fresh rosemary in abundance and delicious Spring vegetables, and Texans know all the whereabouts to build a wood fire and that’s one of the key ingredient on the Valencian Paella, since it was created by people on the mountain.
I took the main components of the traditional recipe and added Spring vegetables like asparagus and green peas. I truly wanted to add some artichokes but I could not find good looking ones for some reason; anyway If you find some artichokes it would be a divine addition, if not, no biggy, it is a delicious recipe any way. This seafood Paella Valenciana can be done in about 2 hours total including the prepping. It is definitely a dish that makes it perfect for small to medium gatherings. It is a fun crowd pleaser. With this fabulous weather, cooking outside and grilling this Spring or Summer its one of the best things to do.
Recipes, Cooking & Art Direction: Mariana Nuño Ruiz McEnroe | Photography: Ian McEnroe |
Published: September 10, 2014
This makes for a versatile dish: appetizer, summer dinner, or lunch; place it in any part of a summer’s day. If you just want something lighter, easy, and extremely tasty, with a little Mexican flair, this is your recipe to go!.
Forget for a bit about the tired guacamole and chips or ceviche. I know they are delicious, but this is going to turn on your appetizer-snack light bulb. There are so many other ingredients in Mexican cuisine, and so many fusions that can take place, that this dish stroked me last night and it was a delicious dinner…Yes, yes we had this for dinner, along with a couple of pomegranate Margaritas…if you want the recipe for them leave me a comment and I will post it next week…
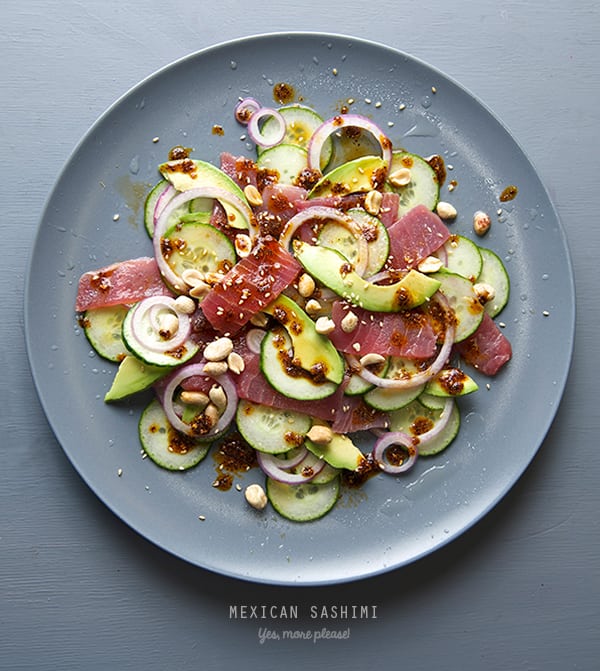
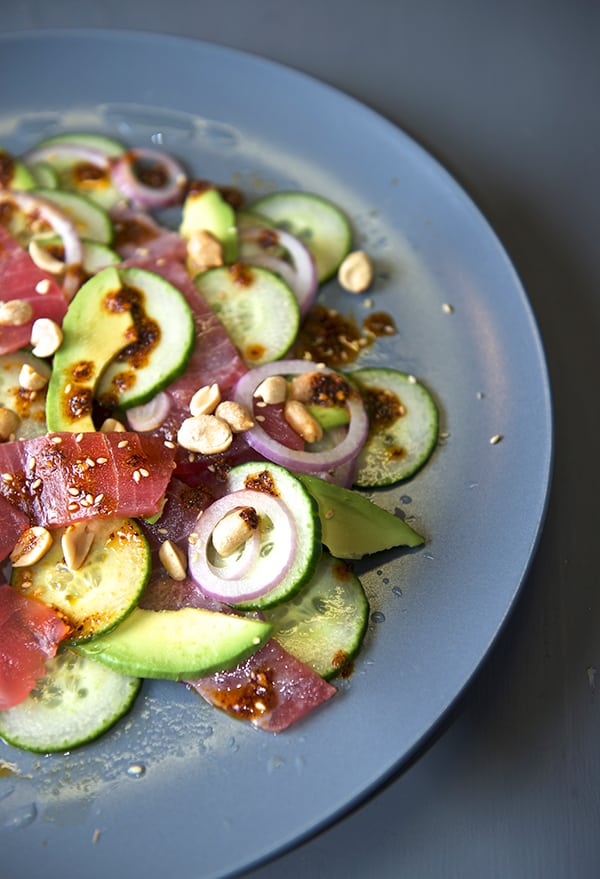
Let me introduce you to my version of Mexican Tuna Sashimi. In Mexico there is a kind of sashimi preparation named Agua chile. Agua Chile is a quick appetizer in which shrimp, octopus, are partially cooked in lime juice and a fresh serrano pepper and a couple of dashes of a well known dark sauce seasoning starting with “M” are added. It is ridiculously simple and delicious.
With this Agua chile dish in mind and Masaharu Morimoto whispering in my ear: “Tuna Sashimi”~
I fused a couple of ideas and created this scrumptious appetizer, summer lunch, Desperate Housewives re-runs, or foodie football game night.
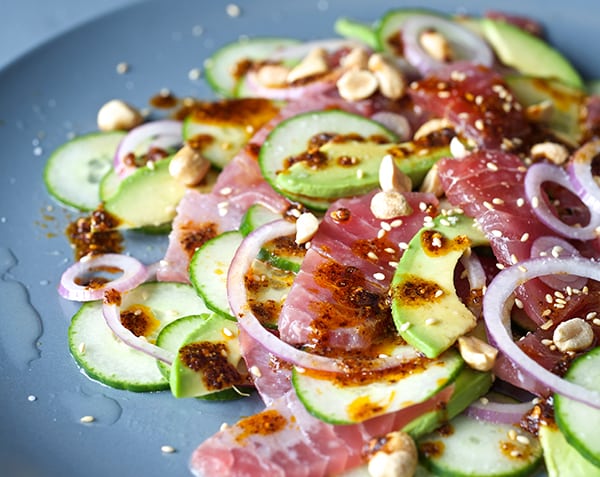
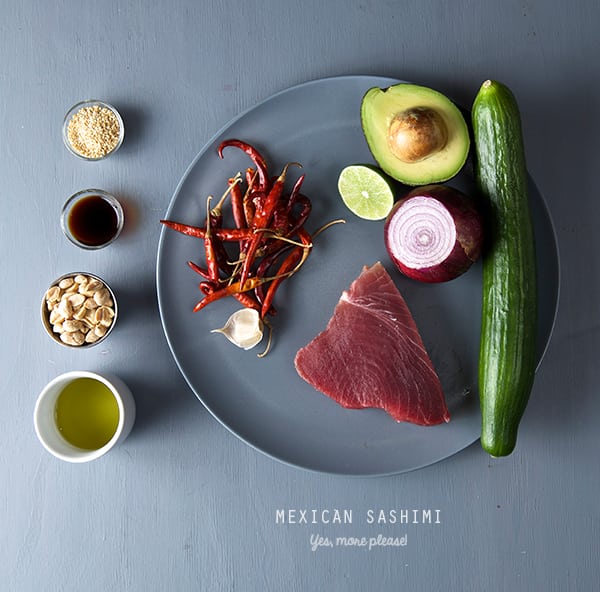
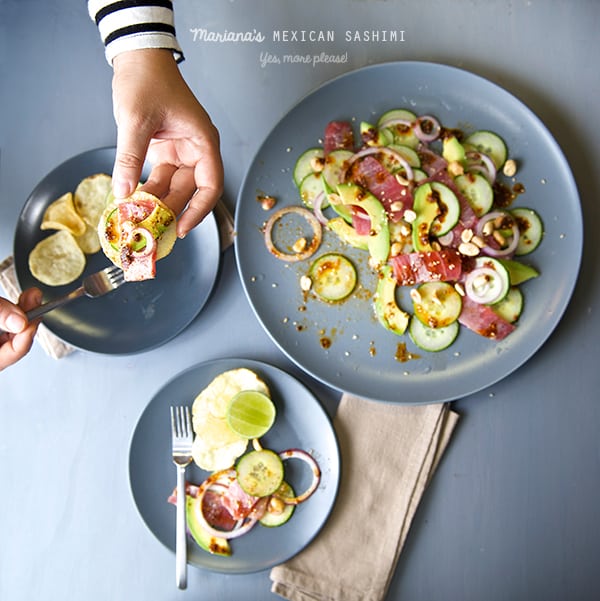
For the recipe sushi grade tuna, a crisp English cucumber, creamy avocado, red onion, lemon juice, soy sauce are plated and combined with my weapon of choice: a red toasted chile de arbol oil sauce. To add some fun and crunch factor, Kettle potato chips or some salty crispy rice chips are delicious on the side to complement the ingredients in this crazy adventure.
The result is a cosmic bite that takes you to Japan and back to play at a mariachi band! Please, you must try this. Share and repeat.
You will find your self craving this appetizer often. Just like we now do…
Mariana’s Mexican Tuna Sashimi
Serves 2 or 4.
½ lb tuna steak, sashimi quality, from sustainable sources, ask your fishmonger for best available.
½ English cucumber thinly sliced
½ small red onion thinly sliced
½ Mexican Hass avocado
1 lemon
1-2 teaspoons mirin
2 teaspoons tamari sauce or soy sauce
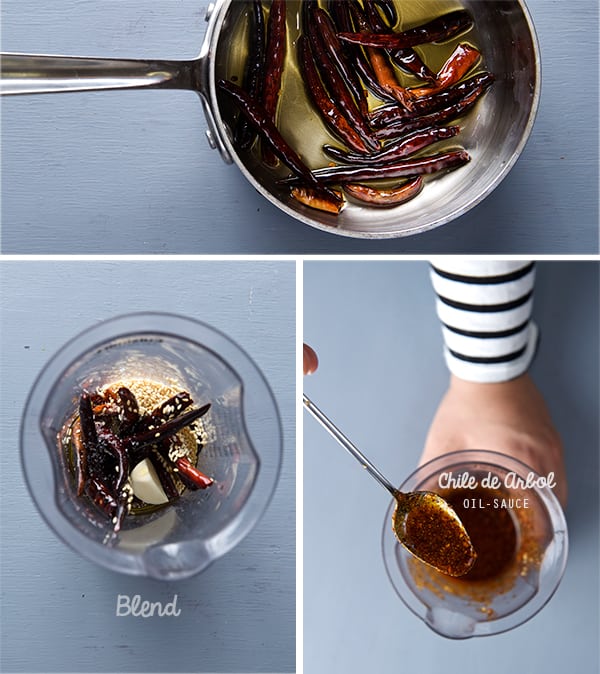
For the Chile de Arbol oil-sauce :
12 dry Chiles de Arbol remove stems if any.
1 garlic clove
2 good pinches of sea salt
¼ cup grape seed oil
1 teaspoon toasted sesame seeds.
Garnish with:
2 tablespoons unsalted roasted peanuts
toasted golden sesame seeds.
Preparation:
1. First make the sauce. In a small pot heat up the oil and chiles on medium-low, until the chiles are deep dark red, almost black. Set aside and let it cool. Once its cooled down blend the chiles, the oil, sesame seeds, garlic, and salt until you have thick chili oil. Feel free to add a bit more oil if it is too thick. Set aside.
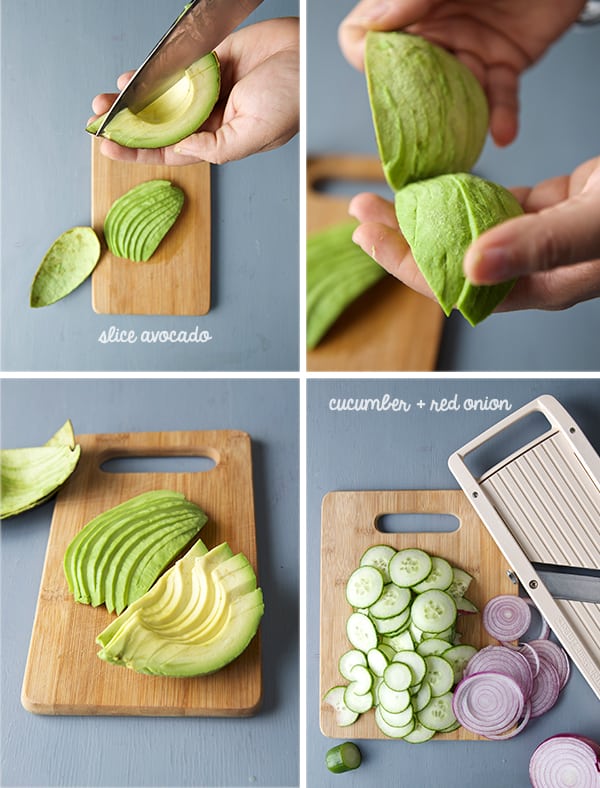
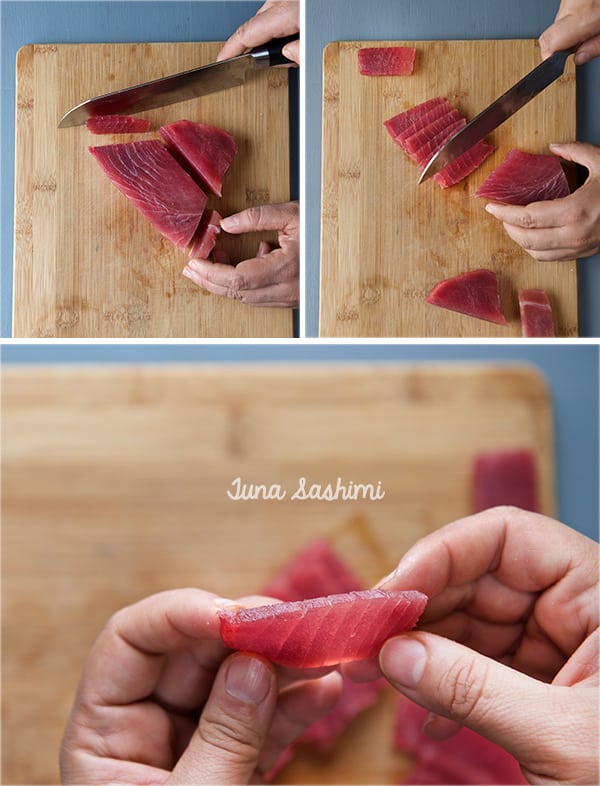
2. Now, place your tuna steak in the freezer for about 10 minutes before slicing, this way it will slice easily. I usually set up a timer so I don’t forget its there and you end up with a tuna lollipop! 3. Meantime, with a Mandolin or a sharp knife, thinly slice: cucumber, red onion, avocado.
4. Remove the tuna from freezer and slice with the sharpest knives you have. It can be a filet knife, a fish knife, if you own a sashimi knife you are my idol!… Me, I used what I was confident would make a great thin slices, My Santoku knife…I know a lot of people will be reading this and they would want to hang my neck for this… The only person that I could feel I need to apologize to is Masaharo Morimoto… “sorry Chef… I had to”
So yes, using my sharp confidence knife I proceed to slice my tuna steak. It is very important you follow the picture below, on how you cut your tuna steak to avoid a tuna massacre.
There is just a few points to follow:
– Cut the tip of the triangle that is separated by a silver tissue.
– remove the opposite tip of the triangle, the one that looks darker in color and it almost have no visible grain. This is the most tender and delicious part of the tuna steak, its the little corner that it is closer to the vertebra, therefore its tender. Save it to make two special bites if you want.
– Once you remove the two tips, your tuna steak will look more like a rectangular shape.
– Start slicing your tuna from the shortest side of the rectangular shape. Making sure you use just one slide motion on your knife like if you are cutting air. Sway the knife to get the cleanest cut possible.
5. Now the fun part begins, layering the flavors. In a large plate or platter, start layering the cucumber slices, onion, avocado and tuna. Squeeze some lime juice, soy sauce, mirin, sesame seeds, and little drops of the chili oil. Start another layer, until you finish with your vegetables and tuna.
Note: You will have lots of chile de arbol oil left. You can use it on stir fried dishes, shrimp, fish, or save it in a air-tight container in the refrigerator and it will be good for at least 4 weeks.
6. To finish up sprinkle the roughly chopped roasted peanuts on top of the plated items, grab you kettle potato chips, a nice pomegranate margarita, or any drink of your choice, sake, Japanese or Mexican beer will work too!
And enjoy!
Recipes, Cooking & Art Direction: Mariana Nuño Ruiz McEnroe | Photography: Ian McEnroe |
Published: May 21, 2014
What a weekend we had of great cooking adventures!; On Sunday we visited one great Korean market here in Austin, recommended by my good friend Andrea. It was lots of fun. We found great ingredients and an awesome little food court with the most incredible Dolsot Bibimbap and the location of the Kin and Comfort . The menu looks divine, peppered beef tongue?, taro hush puppies!, mac and cheese with curry, coconut cabbage slaw… we have homework, but well that is a whole different episode, this post is all about the fish.
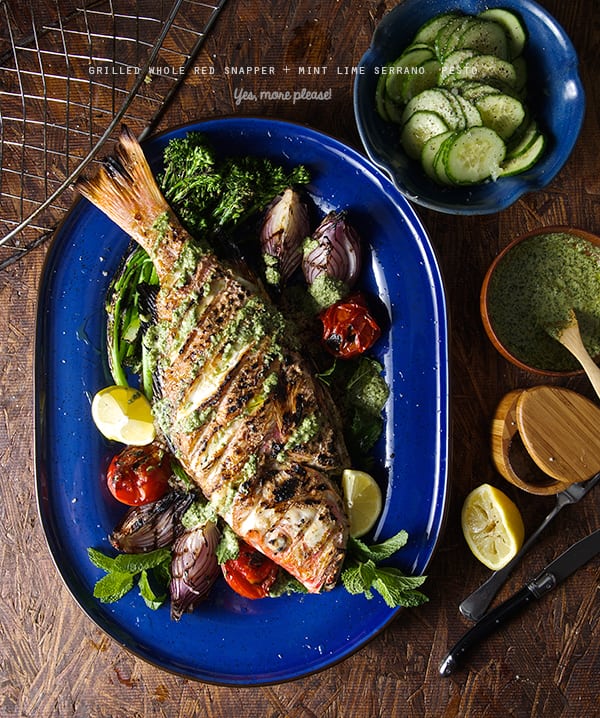
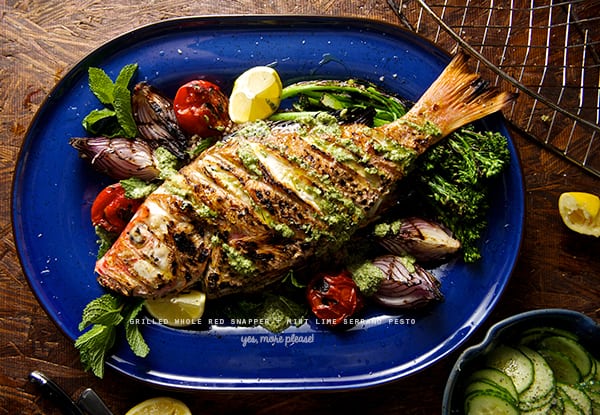
Our mission was to find a great whole fish to grill. And as soon as we entered the fish market area there he was waiting for us; a handsome fresh whole Red Snapper with gorgeous eyes looking at me. Sold! I saw it and I knew it was going to be great.
Now, how do you pick a good looking fish? I will share with you my must have fish shopping list. When I’m choosing whole fresh fish it must be odorless, must have plump clear shiny eyes, scales on, bright red gills, flesh that springs back and a perky tale. If the fish is missing one of these… I will be having pork chops instead. How big of a fish you should buy? If you go by weight, a whole Red Snapper wild yield in meat almost half of the weight. This weight tip is a good point of reference to consider, when you are buying whole fish. We bought a 2 Lb. fish and it was good for two people.(in fact, the fish turned out so good that maybe next time I will get a 3 pounder for sure!) At the market, the fish monger cleaned our fish, removed scales, and butterflied it for us. It was clean and ready to cook when we arrived home.
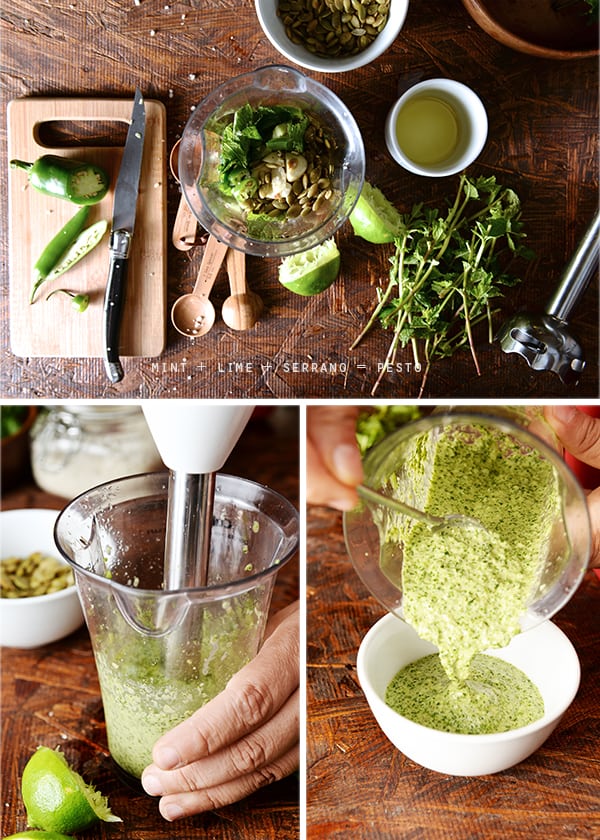
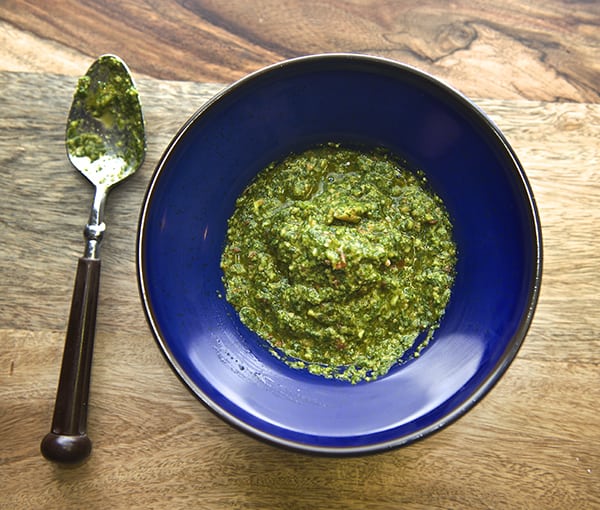
Ian is the fire master at our house so he lit up the charcoal, while I was preparing the pesto. Red Snapper has great flavor and white flaky flesh. It is a little bony but if you follow the flesh grain it is easy to eat whole. For the preparation of this baby, I went for light fresh herbs to go with the freshness of the fish. I grabbed some mint, lime juice, garlic, olive oil, and a little serrano to add some kick and brighten up the flavor. The pumpkin seeds gave a nutty note and body to the pesto. this pesto paired perfect with the charred-grilled fish flavor.
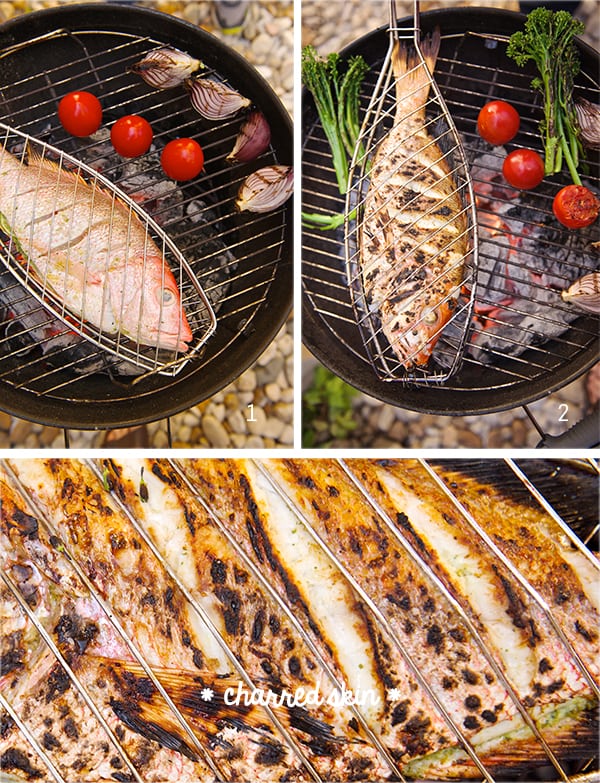
Now, let’s talk about grilling. The grilling style that is close to my heart I inherited from an Argentinian chef, Francis Mallmann. I had the opportunity to meet him at a book signing here in Austin where I was helping to host his Seven Fires book presentation. I was amused by his premise about grilling. For Chef Mallmann it’s all about developing char. Char adds character and flavor to meats, poultry, fish, vegetables and fruit when grilled. I remember the first time we grilled following instructions from his book, and we were thinking all along we had burnt the dinner, and when we tried those charred vegetables it changed our grilling perspective. So since then, when we grill we use his technique.
For fish like Red Snapper when it’s grilled, it develops a delicious crusty salty and slightly fatty flavor, charred areas add deep of flavor and character to the fish it’s just utterly delicious. If you never have had a whole grilled fish you are missing big time flavor, and a great cooking adventure from your cooking repertoire, I betcha 100% you’ll love fish even more after this recipe. Enjoy!
Grilled Whole Red Snapper + Mint Lime Pesto
Serves 2, recipe can easily be double or tripled if needed.
1 whole Red Snapper 2lbs. approximately.
1 Lemon
1 Lime
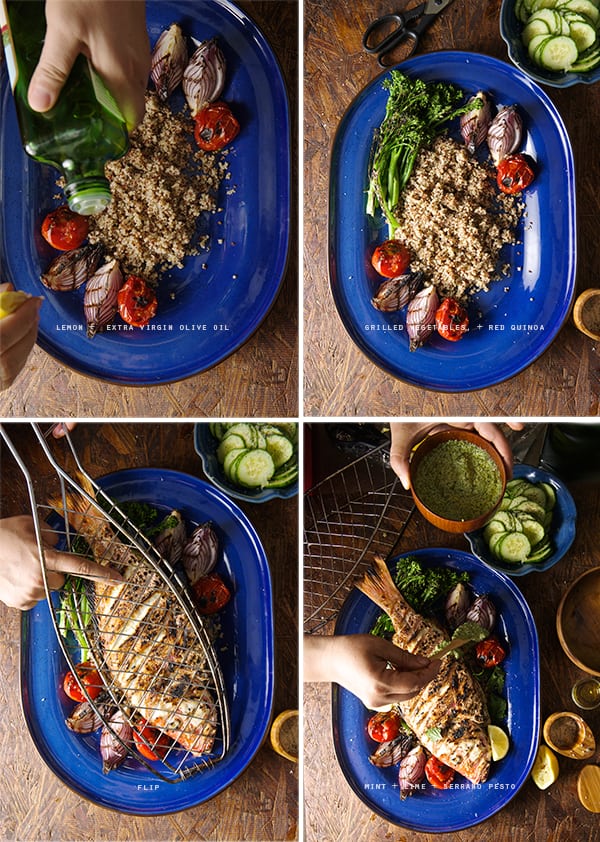
1-2 extra virgin olive oil glugs
Sea salt & Pepper to taste.
Serve with: Red quinoa, rice or couscous. Vegetables of your affection. In this case I grilled red onions, red tomatoes, broccolini, and cucumber slices, dressed with lime salt and pepper.
Natural charcoal
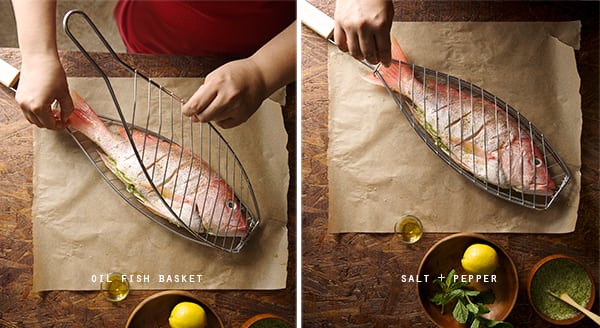
A large grill fish basket, with wood handle. It is so easy to use one of these baskets and also is prevents your fish from sticking to the gill. You can flip it in a more secure manner with out tearing it apart and it cooks evenly and its safer to handle, a great inexpensive grill gear investment.
Mint Lime Serrano Pesto
1 packed cup fresh mint leaves or mexican hierba buena leaves
(about a medium size mint bunch will yield a packed cup of leaves)
1 small serrano or jalapeno if you prefer.
2 garlic cloves
2 tablespoons salted toasted pumpkin seeds
the juice of two limes
the zest of one lime
1/3 cup extra virgin olive oil
½ teaspoon sea salt
Preparation Method:
1. First prepare the Pesto. Place every pesto ingredient in an immersion blender glass or food processor until pureed. The consistency should be like a loose paste. If too pasty add a bit more extra virgin olive oil and an extra squeeze of lime. Adjust salt and pepper if needed.
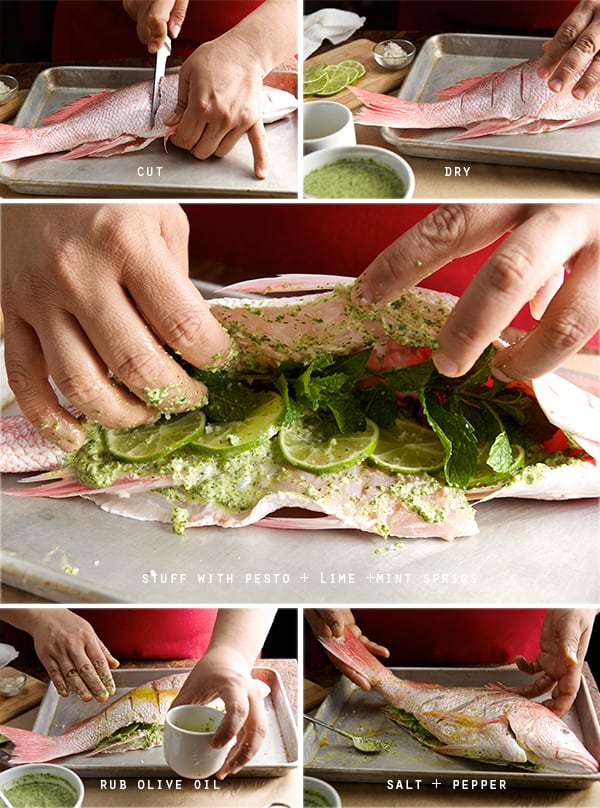
2. Prepare your fish. Rinse and wash your fish really well. With a paper towel path dry your fish inside out. With a knife make some slits on the skin of your fish so it cooks evenly.(See picture below)
3. Spread about 2 tablespoons of the pesto in the fish cavity, add some lime slices, and mint sprigs
4. Oil your fish basket with a bit of olive oil. Place the whole fish into the fish basket. Make sure to secure the lock.
5. Light up your charcoal. I always prefer to use natural charcoal because it adds great flavor to the grilling and it avoids the use of chemicals that in my opinion when used transfer an odd flavor to the food. The easiest way I found to start the natural charcoal is by using a charcoal chimney.
6. Once your charcoal is hot and ashed over place the fish on the grill. It will take about 6-7 minutes per side to cook depending on the size of your fish. For a salt water fish like red snapper thermometer should read between 110-120F when cooked.
7. Serve with vegetables of your affection, we grilled red onions, tomatoes, and broccolini.
Serve over tricolor quinoa. Drizzle more pesto on the fish when plated an extra squeeze of lime or lemon, eat with abandon…
Eat good, enjoy the ride!
Cooking Music Pairing: Ultra Lounge- Bossanova Ville
Recipes, Cooking & Art Direction: Mariana Nuño Ruiz McEnroe | Photography: Ian McEnroe |
Published: December 24, 2013
Scottish Potato Scones, or Potato Tatties are simply delicious clouds of light and fluffy potatoes baked in a griddle. They are especially popular in Scotland and the Isle of Man as a breakfast staple.
Ian introduced me to this simply delicious Scottish scones. The recipe has been in his family for a long time. His grandma passed the recipe onto his mother and his mother used to make them when he was a little child. Ian remembers dearly how Betsy used to make this Potato Scones for him and his siblings. Eating them with butter and strawberry jam was a delicious treat!
Based on this childhood memory we were determined to find the recipe and make them…Of course with no luck on our side, we could not find any trace of recipe, so we had to start by scratch. I think I made about 11 batches of these puppies before Ian said” that’s it”, these are the ones, these taste like the ones she used to make!…Hurray!!! I was thrilled that based on a memory of flavor, taste and texture we were able to found the recipe. We felt so happy, that from now on we will embrace this as our Christmas breakfast.
There are many, many ways to make a Scottish Potato Scone, believe me, we tried every single ratio of potato-flour-butter. Until Ian said: this it it! they taste just like the one’s Betsy made! (Im sure they are not as good as the ones she made, moms have their special touch, but I will keep practicing!) In this recipe case, they are a little thinner than the average ones, they have soft and light consistency, its like a pillowy thicker potato-flour tortilla, not salty, nor sweet, which makes it the ideal breakfast scone.
To make them as a whole breakfast, we decided to serve them with Ian’s fantastic creamy eggs and smoked salmon. We put a little twist on one of our favorite breakfast recipes from Gordon Ramsey, he makes this similar creamy eggs and serve them on a toasted croissant topped with smoked salmon. what’s not to like right?… well, wait until you try this scones, I think it is a great and dainty pairing.
What we wanted to achieve with this recipe is to recreate a hearted memory. We both come from small families and sometimes is hard to get together; people are far away, work can distract. And when it comes this time of the year, there’s always the need to create our own memories and make things that remind us that no matter what, the people we love will always be with us in memory and heart.
Every Christmas we try to make something special to remember Ian’s mother, Betsy, who left us on a Christmas Eve. She absolutely adored Christmas time, she used to find us thrifty quirky funny presents that will make us laugh or need the un-needable! she also loved decorating and cooking for the family. Since then, we have been making a special dish, decoration and playing music to commemorate her. We love and miss you Betsy!
This year this is our tribute to her, and we proudly wanted to share the recipe with you.
Merry Christmas!, Happy Holidays!
May this season be filled with love and great memories.
Ian and Mariana
Betsy’s Scottish Potato Scones
Makes about 16 triangles, serves 4 or 2 Celtic creatures
2 medium size potato (Equivalent to 2 cups when mashed) like Maris Piper, King Edward or Yellow potato.
1 cup all purpose flour + more to dust and roll
4 oz good irish butter I used Kerrygold, or Organic Valley
1/2 teaspoon baking powder
2 healthy kosher salt pinches
Method:
1. Steam the potato, skin it, cut in cubes and with the help of a strainer or a ricer puree the potato into a medium size bowl.
2. Add Butter and mix with your hand until incorporated
3. Add Salt and Flour and mix with a wooden spatula until you feel you need to use your hands in order to get all the flour incorporated to the dough.
4. In a lightly flour dusted surface, softly Knead the Dough in folded movements for about 2 minutes. Shape it into a ball and divide into 4 equal pieces. Roll each piece about 6” diameter and 1/8-1/4 inch thick disk. With a pizza or ravioli cutter, gently cut the disk into four pieces.
4. Warm a cast Iron Griddle using medium-low heat. Oil a paper towel and lightly grease the griddle. Place the 4 triangle Scones and cook them about 3-4 minutes per side. The way to know when to flip them is when they start forming air pockets, watch your heat, they cook better in medium low, some cast iron pans can hold a lot of heat so you might have to adjust for a lower setting during the cooking. Is kind of like Pancakes, The first batch is not so good, and after that everything cooks beautifully!
5. Serve warm.
“Betsy’s scones where soft , light and pillowed, with a bit of chewy like a flour tortilla”
…That’s how Ian describe them.
Ian’s Creamy Eggs:
Serves 2
When it comes to eggs it really does makes the difference to use the best quality you can.
Organic free range , thats what we use, Smith & Smith farms, Boggy Creek Farm if you are in Austin this are ones of the best!
4 large Eggs
1-2 Tablespoons butter
A splash ah-roo of heavy cream.
Salt and fresh cracker pepper to taste.
These eggs are really easy to make, but they require all your attention, its all about stirring slowly at all times until they start to curdle. Be sure to start the eggs at last. Once you have your table set up, the scones made, plates warm, smoked salmon in the table, chives ready, coffee on the table. Yes it is this crucial you have everything ready, so you can enjoy the eggs as creamy and warm as possible, since they change their consistency as you eat them. The consistency of these eggs is like a creamy custard with small curdles of egg, soft and tender, they just melt in your mouth. Salt and pepper is added at last to prevent though egg whites.
So, -ready-; set …GO!
Method:
In a small-medium non-stick pot, over a low heat melt 1 tablespoon of butter very gently.
Add the 4 eggs and whisk gently until well incorporated.
With a wood or rubber spatula, start stirring the eggs in circles, at all times.( As if you where gently whisking)
Until they start to curdle, add the second tablespoon of butter keep stirring, remove from heat and add a small splash of the heavy cream ( keep stirring) place them back into the heat, for about 6-8 seconds, and transfer them into a warm ramekin or ceramic dish. Serve immediately Add salt and pepper to taste.
Serve: Over 2 or 3 scones, a couple of tablespoons of egg and top it with the smoked salmon and chives. Enjoy!
Recipes, Cooking & Art Direction: Mariana Nuño Ruiz McEnroe | Photography: Ian McEnroe |
Published: July 31, 2013
This summer my basil plants have not done really well. I think my mistake was not being able to see that I had 3 plants in the same pot. Oh well! I separated them, but they are a bit annoyed with me at this time. If just they knew I love them. The reason I planted them is because I love pesto and without basil my next favorite herb for pesto is cilantro.
Cilantro is really hard to grow but easy to find fresh at the store or market so I decided to give it a shot and it seems I came up with a pretty exciting recipe. It is like a cross between pesto and the Argentinean chimichurri; not too creamy not too oily, right in the middle. I’m loving it. I used fresh cilantro, peanuts, and chilies. A hint of lemon zest and Extra Virgin Olive Oil. I skipped the Parmigiano cheese and still It’s creamy and light at the same time.
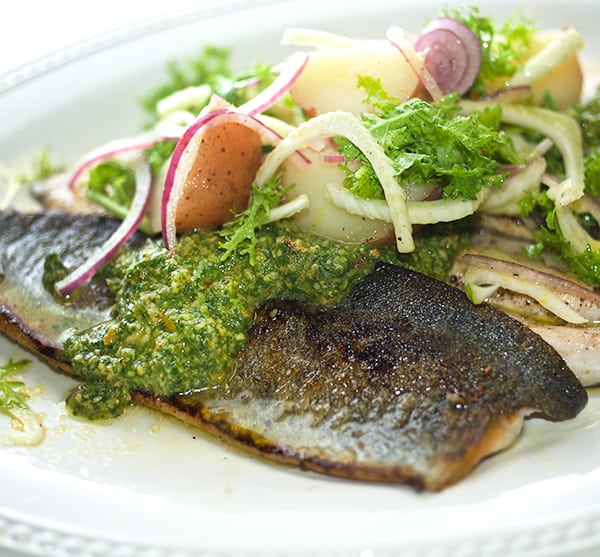
With this premise, I went to the seafood market and run into this gorgeous Rainbow Trout Fillets. Done deal! the perfect pairing for my pesto. Rainbow trout is a delicate fish but with enough character to old up the herb and zesty flavors. Trouts belong to the family of Salmon, so it has a firm flesh and good fatty acids, Therefore lots of flavors.
Fish intimidates a lot of people, and oh my God, “Fishskin” forget it!. Well, it is time for you to get out of your comfort zone and just do it. Get resources, talk to your vendor, fisherman, fish aficionado, how to choose fish, where to get it in your city, how to choose a good one. For me, there are two clues to go by smell and texture. I do not buy fish that smell like fish and the flesh to the touch needs to be firm. The next intimidating factor comes from the not knowing how to cook it or which method works better. My friends, if you follow these simple instructions you are on your way to have a feast of kings!
4 cups about 2 bunches of Cilantro include stems
1/2 cup roasted peanuts
3-4 chilies 2 serranos, 2 red sweet peppers (you can interchange chilies, like habanero, jalapeño, shishito, just add one at a time so you can control the spice level)
3-4 garlic cloves
1/2 – 3/4 cup of Extra Virgin Olive Oil
The juice and zest of 1 lemon
1 teaspoon of salt
1/2 teaspoon of fresh cracked black pepper
Preparation:
Add everything to the blender or food processor, blending and pulsing to desired consistency. You can live it more chunky or smooth is up to you.*
For the Left Over Pesto: I’ve been using it in avocado sandwiches, pasta, and cucumber salad is a hit!. This recipe makes about 2-1 1/2 cups and stays good for about a week. Keep it in an airtight container and cover with plastic wrap touching the surface of the pesto. This will prevent air from oxidizing it and turn it dark gray.
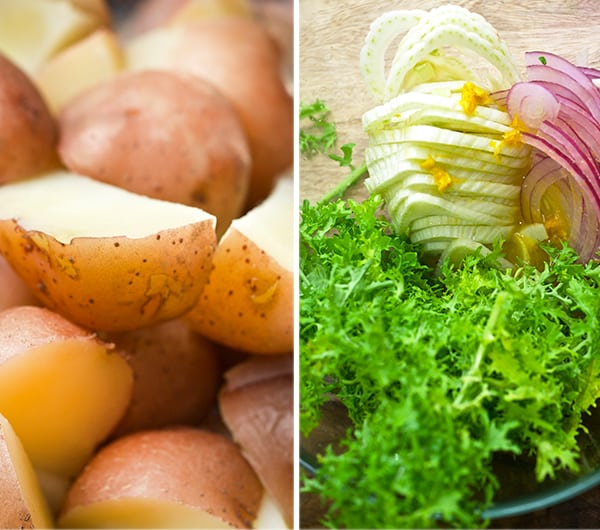
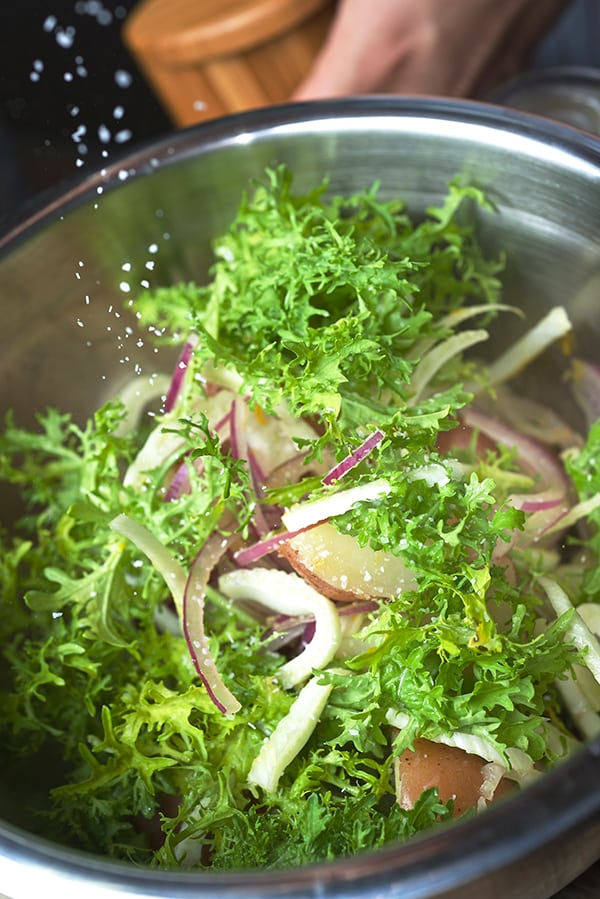
For the Potato Fennel Salad:
4-6 medium-small New red potatoes cook al dente.
1/2 a large bulb of fennel finely sliced
1/2 small red onion finely sliced.
1-2 handfuls of frisse (or arugula)
The juice of one medium orange.
A splash of Rice Vinegar
A splash of Extra Virgin Olive Oil.
Salt & Black pepper to taste
Preparation:
Place all salad ingredients in a bowl. Toss well a few minutes before serving so the potatoes can absorb some of the vinaigrette.
For the Seared Rainbow Trout:
4 Rainbow trout fillets skin on.
Kosher Salt & fresh cracked Black Pepper
Extra Virgin Olive Oil.
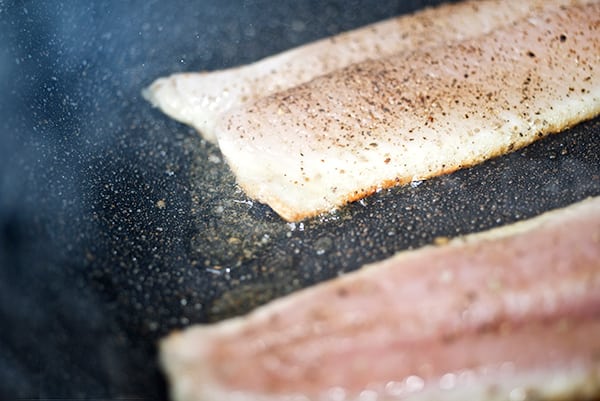
There are five rules to leave by when you are searing skin on trout fillets:
1- HOT skillet, I mean sizzling hot; water droplets dance in the skillet at this temperature.
2- Room temperature fish. Pull the fish out of the refrigerator at least 20 minutes before you gonna start cooking.
3- Pad dry the fish before seasoning.
4-Proper seasoning salt & pepper both sides of the fillet.
5- Skin side hits the pan first. One flip. That’s it! yes, one flip you read it well. So let’s start cooking…
Preparation:
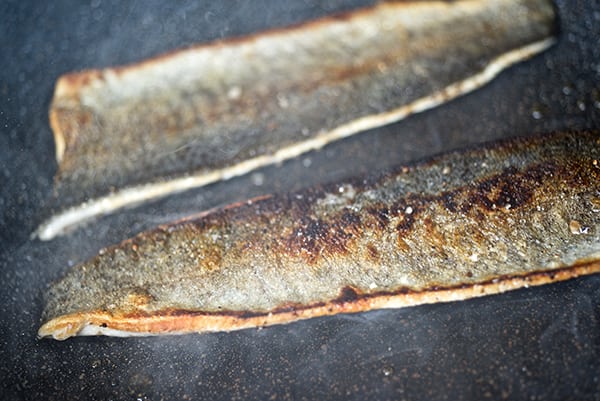
Heat up a non-stick skillet. Place seasoned trout fillets skin side down into the very hot skillet. Do not crowd the pan, so you can ensure the skin of the trout is seared and crispy. Now, avoid the temptation, do not Look at it, don’t flip it, do not move it around. Don’t please!. Wait 1 and a half to 2 minutes, as soon as you start to see that the edges of the fillet are turning white (like a halo all around the perimeter) then carefully flip it with all your conviction in the knowing that ONE flip is enough.
The skin should be golden brown and crispy edges. Once you flip it is over. Give your fillets an extra 1 to 2 minutes tops.
Remove from heat let it rest a bit 40-60 seconds. And your fillets are Ready to serve.
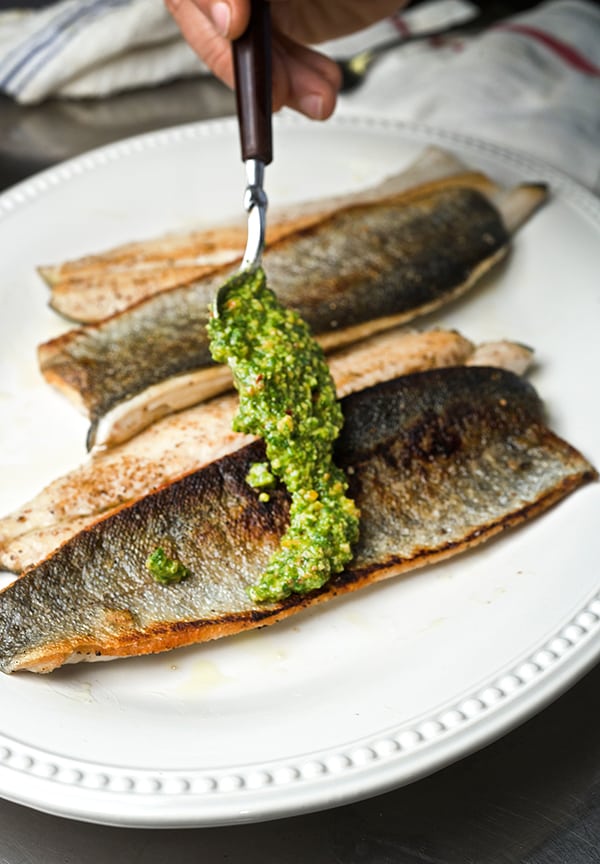
Serve trout skin side up so stays crispy, top it with a generous spoonful of the pesto, roasted chopped peanuts and drizzle some lemon juice to finish it.
Top the trout with the red new potato and fennel salad. You can also serve this dish family style all arranged on a serving platter, take it to the table and A Comer! Serve immediately accompanied by a good glass of Vinho Verdhe like Casal Garcia from Portugal, or an Albarino 2009 La Cana, from Galicia Spain.
Enjoy!
Enjoy!
Music Pairing: Ibrahim Ferrer- Buena Vista Social Club
Serves 4 There are five rules to leave by when you are searing skin on trout fillets: 1- HOT skillet, I mean sizzling hot; water droplets dance in the skillet at this temperature. 2- Room temperature fish. Pull the fish out of the refrigerator at least 20 minutes before you gonna start cooking. 3- Pad dry the fish fillets before seasoning. 4-Proper seasoning salt & pepper both sides of the fillet. 5- Skin side hits the pan first. One flip. That’s it! yes one flip you read it well.
Course
dinner
Cuisine
FUSION
Prep Time20minutes
Cook Time35minutes
Total Time55minutes
AuthorMariana McEnroe
Ingredients
For the Cilantro Pesto:
4cupsabout 2 bunches of Cilantro
1/2cuproasted peanuts
3-4chilies 2 Serrano peppers2 red sweet peppers (you can interchange chilies, like habanero, jalapeño, shishito, just add one at a time so you can control the spice level.)
3-4garlic cloves
1/2– 3/4 cup of Extra Virgin Olive Oil.
The juice and zest of 1 lemon.
1teaspoonof salt
1/2teaspoonof fresh ground black pepper.
For the Potato Fennel Salad:
4-6medium-small New red potatoes cook al dente.
1/2a large bulb of fennel finely sliced
1/2small red onion finely sliced.
1-2handfuls of frisseor arugula
The juice of one medium orange.
A splash of Rice Vinegar
A splash of Extra Virgin Olive Oil.
Salt & Black pepper to taste
For the Seared Rainbow Trout:
4Rainbow trout fillets skin on.
Kosher Salt & Fresh Cracked Pepper
Extra Virgin Olive Oil.
Instructions
Make the pesto: Add every pesto ingredient to the blender or food processor, blending and pulsing until a rough paste. Pulse it more times for a smoother consistency. I like it a bit more chunky, small pieces of peanuts still show and the herbs are roughly chopped, but not completely pureed.
For the Left Over Pesto: I’ve been using it on avocado sandwiches, pasta, and cucumber salad is a hit!. This recipe makes about 2-1 1/2 cups and stays good for about a week. Keep it in an airtight container and cover with plastic wrap touching the surface of the pesto. This will prevent air from oxidizing it and turn it dark gray.
Make the potato salad: place all salad ingredients in a bowl and gently toss well a few minutes before serving so the potatoes can absorb some of the vinaigrette.
Sear the fish:
Heat up a non-stick skillet. Place trout fillets into the very hot skillet remember the fish enters the pan skin side down. Do not crowd the pan, so you can ensure the skin of the trout is seared and crispy. Now, avoid the temptation, do not Look at it, don’t flip it, do not move it around. Don’t please!. Wait 1 and a half to 2 minutes, as soon as you start to see that the edges of the fillet are turning white (like a halo all around the perimeter) then carefully flip it with all your conviction in the knowing that ONE flip is enough.
The skin should be golden brown and crispy edges. Once you flip it is over. Give your fillets an extra 1 to 2 minutes tops.
Remove from heat let it rest a bit 40-60 seconds. And your fillets are Ready to serve.
Serve trout skin side up so stays crispy, top it with a generous spoonful of the pesto, roasted chopped peanuts and drizzle some lemon juice to finish it.
Top the trout with the red new potato and fennel salad. You can also serve this dish family style all arranged on a serving platter, take it to the table and A Comer!
Serve immediately accompanied by a good glass of Vinho Verdhe like Casal Garcia from Portugal, or an Albarino 2009 La Cana, from Galicia Spain.


