VEGETARIAN RSS feed for this section

Roasted Pumpkin-Poblano Soup

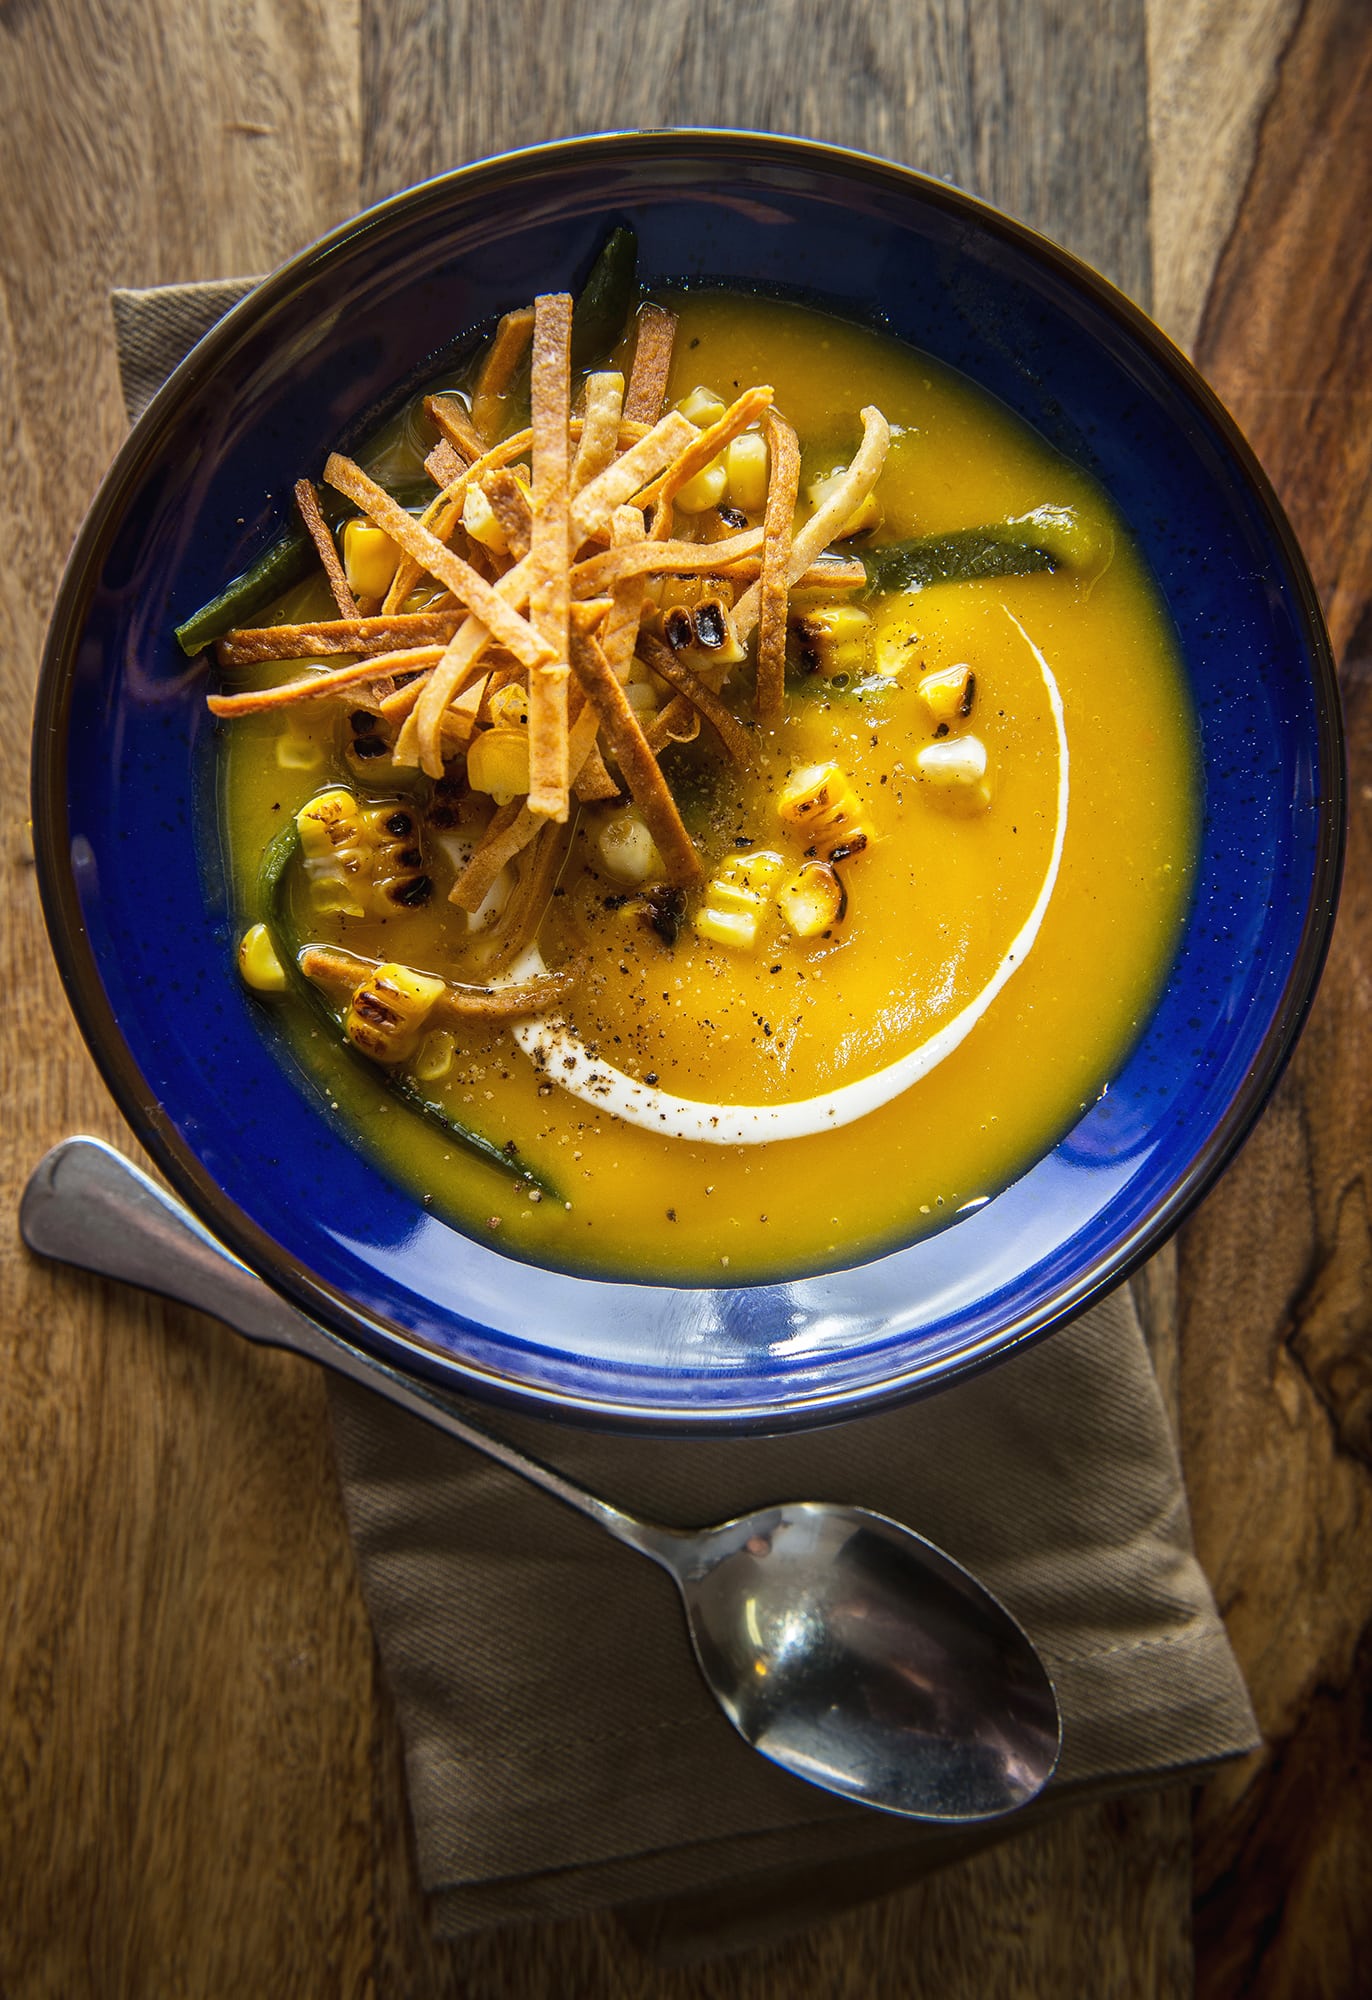
Warm and velvety and with a hint of roasted sweetness….It is inevitable to succumb to the cliche of pumpkin soup. I assure you there are 1,000 recipes out there with all different combinations spices, creamy, vegan, vegetarian…This version is my humble version of the Roasted pumpkin-poblano soup.

For the past few years, I’ve been making my vegetable soups under one principle: “do not add chicken stock”. Yes, it is that simple. I don’t want, under any circumstance, my broccoli soup to taste like chicken (or my potatoes, carrots, or any vegetable to taste like the bird). I want to savor the flavor of the vegetable. It is certainly a challenge to follow this principle because our inner chicken stock flavored souls desperately want to add more “depth of flavor”. For me, this is totally wrong. The way I make my vegetable soups are by enhancing the vegetables using different cooking methods like roasting, grilling, braising; all these cooking methods bring out the vegetable qualities, enhance the sweetness and flavor concentration to the soup. And yes, at times just a little help from other vegetable friends can harmonize the flavor.

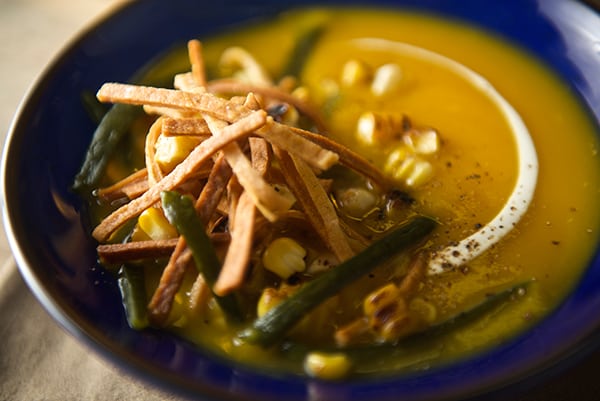
Pumpkin has a delicate flavor so it is easy to mask, yet easier to harmonize. I love roasting or braizing. In this case, I chose to roast the pumpkin and add some caramelized sweet onions to bring out the sweet and earthy flavor of the pumpkin. Roasted poblanos, charred sweet corn, and some tortilla crisps play perfectly in this soup and add contrast in texture. With no doubt, it is one of my favorite soups to make, so easy and comforting. It freezes well if you want to store it for a quick-thaw meal and I just can tell you that after the photo shooting this soup was our good comforting dinner…

Roasted_Pumpkin_soup_ roasting&pureeRoasted_Pumpkin-Poblano_Soup_puree

Roasting pumpkin is easy and so rewarding, I love the way the house smells, it’s a welcoming to fall. When getting ready for the pumpkin season, I usually pick 2 small pumpkins the size of a volley-ball or smaller. They are easier to cut in half and they cook faster than the bigger ones. Once I cut them in half, I scrape all the inner seeds, save them for feature roasting if I feel like-, and I place the pumpkin halves flat side down on a full sheet tray covered with foil rubbed with some oil to avoid from sticking. I bake them on the lower rack in the oven at high-temperature 450F for 25-35 minutes or until a paring knife inserts easily through the skin. Remove them from oven and let them cool off. Using a spoon I scrape all the pumpkin ~this is my favorite part so I don’t have to peel the pumpkin, which is hard and lots of work~.  Once I scrape all pumpkin into a bowl, I use my handy-dandy immersion blender to puree the pumpkin. About each pumpkin half yields 1 to 1.5 cups or puree depending on the size of the pumpkin, then I make little reusable bags with 1 or 2 cups of the puree depending on the recipes I want to make, and freeze. 2 pumpkins is usually all the pumpkin I need and I’m ready for the season! Click on this link to check a How to roast a pumpkin tutorial with step by step photos and how to make a delicious pumpkin seed snack!

Roasted Pumpkin-Poblano soup

Serves 2 hungry persons as the main dish for dinner or 4 starter soups.

2 cups roasted pumpkin purée (I do prefer natural and roasting my own, you will need about 1 small pumpkin the size of a softball. You can use canned, about 2- 8oz cans, but it is definitely not my favorite option)
4 cups water
1 small sweet yellow onion caramelized
1 tablespoon butter
1 tablespoon olive oil
1 teaspoon salt
1/2 teaspoon white pepper
1/4 -1/2 teaspoon grated nutmeg

Garnish with:

2 poblanos roasted, skin, devein and cut into strips
1 cup of charred corn kernels, about 1-2 ears of corn depending on size
¼ cup of Mexican cream or Greek yogurt, If using Greek yogurt dilute with a bit of water and add a pinch of salt.
2 corn tortillas, thinly cut into strips, baked or fried

Roasted_Pumpkin-Poblano_Soup_Garnish-Toppings

Directions:

Over medium-high heat using a heavy bottom soup pot, place the oil the onions and a pinch of salt. Cook until they are soft and translucent. Lower the heat and keep on cooking until deep golden brown and caramelized.
Add pumpkin puree, water salt, pepper nutmeg. With the help of an immersion blender blend the soup until smooth.Let it simmer until bubbly hot. Adjust the liquids and salt if needed, for desired consistency and taste. At last, right before serving, add the tablespoon of butter and stir until melted and incorporated.

Roasted_Pumpkin_Poblano_Soup_caramelized onions-fried tortilla strips

Serve warm in a soup bowl and garnish with the warm poblanos, charred corn, and thinly fried tortilla strips.
You can add a dollop of Greek yogurt or a swirl of cream.

For vegan:

Use: vegan butter and replace cream swirl with any soy or coconut or almond based cream.

Roasted_Pumpkin-Poblano_Soup_serving presentation

Music Pairing: The smashing Pumpkins, Tonight, Tonight


Roasted Pumpkin-Poblano Soup

Warm up with this cozy Mexican spin on a fall pumpkin soup!

Course Soup
Cuisine Mexican
Prep Time 35 minutes
Cook Time 20 minutes
Total Time 55 minutes
Servings 4 people
Author Mariana McEnroe

Ingredients

  • 2 cups roasted pumpkin purée I do prefer natural and roasting my own, you will need about 1 small pumpkin the size of a softball. You can use canned, about 2- 8oz cans, but it is definitely not my favorite option
  • 4 cups water or vegetable stock
  • 1 small sweet onion, caramelized
  • 1 tablesspoon butter
  • 1 tablespoon extra virgin olive oil
  • 1 teaspoon sea salt
  • 1/2 teaspoon white pepper
  • 1/4 -1/2 teaspoon grated nutmeg

Garnish with:

  • 2 large roasted poblanos, skin, deveined and cut into strips
  • 1 cup charred corn kernels, about 2 small ears of corn depending on size
  • 1/4 cup Greek yogurt, diluted with some milk or water and pinch of salt
  • 2 pieces corn tortillas, thinly cut into strips, baked or fried.

Instructions

  1. Over medium-high heat in a soup pot, place the oil the onions and a pinch of salt. Cook until they are soft and translucent. Lower the heat and let them become brown and caramelized. About 7-8 minutes.

    Add pumpkin puree, water/or/vegetable stock, salt, white pepper, nutmeg. Let it simmer until bubbly hot. Adjust the liquids for desired consistency. 

    At last, add the tablespoon of butter and stir until melted and incorporated.

    Serve warm in a soup bowl and garnish with the poblanos, charred corn, and thinly fried tortilla strips.

    You can add a dollop of Greek yogurt or a swirl of Mexican crema. Enjoy!


View Post or View Comments 4

Kale and Lentil Salad with Honey- Mustard Vinaigrette

Kale and Lentil Salad with Honey- Mustard Vinaigrette_kale purple leaf

Feeling blue?…Have some greens!. Kale is the number one power green, full of nutrients and rich in flavor.
If you wonder what the color green should taste like… it tastes just like kale.
It’s high percentage in Beta carotene, Vitamin K, vitamin A, Vitamin C, manganese, iron, potassium, calcium and fiber, make it the king of the greens. The season for this green is Autumn and Winter.
Kale salad will lift up your mood and give you plenty of energy through out the day.
There is Curly Kale, Dino Kale, Premier, Redboar, Siberian, Walking stick kale, Red russian, Kamome red, *sight and I assure you I’m missing more varieties, this are just a few of the ones I know and I’ve tried.
I remember the first time I tried Kale it was a bit intimidating, I felt like I was eating some prehistorical plant; it is a bit hard to chew when is raw and most of the varieties develop their nutrients and are easier to digest when they are steamed.
I’ve tried different cooking methods, some favorites of mine: Curly and Dino kale make great baked chips, Kamome is great for steaming it holds its shape beautifully, and the Redbor Kale I love it in salads like this because it adds great texture, I usually cut it or tier it in small pieces because is easier to chew, the vinaigrette helps to tenderize the leafy texture and what is great is that kale will not wilt when you add the vinaigrette.
Kale and Lentil Salad with Honey- Mustard Vinaigrette is a nutritious  and delicious combination. Kale, lentils, walnuts for some crunch is just what you need to boost your energy. This salad Makes a great Lunch or a light dinner side dish.

Kale and lentil salad with honey mustard vinaigrette_red kale

Kale and Lentil Salad with Honey- Mustard Vinaigrette_healthy and delicious

Kale and Lentil Salad with Honey- Mustard Vinaigrette.

Serves 4

4 cups of Redbor kale (washed and pad dry) ( you can use Dino Kale )
2-3 cups of cooked green lentils*
1 small red onion finely chopped
1 red bell pepper finely diced
1/4 cup chopped walnuts
1 tablespoon of finely chopped parsley
A couple of tablespoons of Bulgarian Feta cheese

Honey- Mustard vinaigrette

2 teaspoons of whole grain mustard
2 tablespoons Extra virgin Olive oil
¼ cup rice vinegar
3 tablespoons of honey or ambar agave nectar.
the juice and zest of ½ lime or lemon.
Fresh ground pepper to taste.

*How to cook Lentils?

These green Lentils are best cook in lots of salted water, just like pasta. Bring water to a boil add 1 generous teaspoon of kosher salt and a Bay leaf. Add the lentils, bring back to a boil and cook for 5 minutes, then lower the heat to low and gentle simmer you barely want to see little bubbles on the top. Cook for another 15-20 minutes with no lid. after 15 minutes check on doneness. I like mine al-dente, specially for a salad like this, I want them with a bite. So I usually remove from heat at 15 minutes and cover them for another 10 minutes. Strain them and let them air dry for a few minutes on a single layer in flat tray.  I usually serve this salad with barely warm lentils, I love the texture and comfort.

Directions:

Start by removing the stems of the kale leaves and breaking the pieces into small bite size. In a small bowl whisk the vinaigrette ingredients. In a platter, layer the kale, lentils, chopped onions, red bell pepper, parsley and walnuts. Drizzle over the mustard vinaigrette. Mix and top it all with crumbled feta cheese.
Serve the salad at room temperature. It is also great in a pita with some Greek yogurt or served in avocado halves!!!Kale-and-Lentil-Salad-with-Honey--Mustard-Vinaigrette_ingredients-layout

Kale and Lentil Salad with Honey- Mustard Vinaigrette_vegetarian_healthy dinner

Kale-and-lentil-salad-with-honey-mustard-vinaigrette_Yes,-more-please!

Enjoy!

Music Pairing: Don’t Worry be happy – Bob Marley

View Post or View Comments 2

Escabeche Pickled Vegetables

Escabeche-Pickled-Vegetables_-Mason-Jar_Yes,-more-please!

 What makes a sandwich great? The bread, the mustard, meat, or cheese? There are all kind of protagonist components that contribute to such a production. But, how about the supporting cast? Potato chips, salads and “the pickle” that green creature on the side of the plate almost invisible and that after the 3 bite of your sandwich you start looking for it.. where is it? Under the waxy paper? Far away in the refrigerator, last shelf oops! We are out of pickles! Suddenly you are missing him badly… If the word sandwich had an accent or a semicolon it will definitely be the “pickle”.

That’s what this recipe is all about, the supporting cast. That accent of a meal, sandwich, sea food, any fried concoction, needs a balance of a crunchy salty acidic note to spice up your meal.
Escabeche is one of hundreds of pickled recipes the Spaniards introduced to Mexico after having borrowed them from the Arabs and Persians. It has many different variations. In Mexico it is more commonly served with seafood, fish, or pork. And yes, the well known street food “the torta”(which is the equivalent of the american sandwich) that is almost always accompanied by the well-known infamous pickled jalapeño that comes with carrots and onions.

Escabeche-Pickled-Vegetables_Yes,-more-please!

This Escabeche vegetable medley recipe is all the “supporting cast” I desire when I’m eating a sandwich: potatoes, pearl onions, mushrooms, carrots and jalapeños. Sweet, starchy, crunchy, spicy mix all marinated in a tangy spiced slightly sweet vinegar. And please don’t limit your self this cast; okra, cauliflower, green beans, can be included…what ever rocks your boat. You can serve this over a bed of spinach and Romaine lettuce combining the vinegar with some extra virgin olive oil for a vinaigrette as a first course salad. Or as a simple informal appetizer with a beer on the side. You can marinate some cooked shrimp, a side for fried fish… I can go on and on…
Now, this is a refrigerator pickling method and its best to let it marinate over night. It will last in the refrigerator for about 3-4 weeks (if you are a self controlled person); Because for me every time I open the refrigerator my saliva glands start to contract my mouth waters, my tong shrinks just by looking at them, and before I know I have a fork in my hand to snack on them… so let’s get started…

Escabeche-Pickled-Vegetables_pickling-spices_Yes,-more-please!

Escabeche Pickled Vegetables

Makes about 6 -8oz  jars or  1 large 48oz jar.

1 lb. little red new potatoes cut in halves and cook al-dente.
4-6 carrots cut in ¼” thick round slices, blanched and drain.
1 lb. button white mushrooms or cremini cut in halves
1 lb. white pearl onions, peeled and halve the larger ones.
6-8 Fresh jalapeños cut into 1/4” round slices

Cauliflower florets, green beans, can also be added to this vegetable escabeche. The proportions between chiles and vegetables is up to you, just consider that the more chiles the more spicy the vegetables will be. 

For the pickling brine:

1/3 cup  Sun flower, or Grape seed oil or any mild flavor oil

1 cup of Apple Cider vinegar or Rice vinegar.
1 cup of distill Vinegar
1 -1/2 cups of water
4 garlic cloves
4 Bay leafs
4 sprigs fresh Thyme or 1/2 teaspoon dry thyme
2 sprigs fresh Oregano or 1/2 teaspoon dry Oregano
1 teaspoon black peppercorns.
3  Tablespoons of pickling spices
1/4 cup of turbinado sugar or white sugar, taste it, some people likes the brine tangier or sweeter.
1 tablesspoon sea salt, adjust salt to your taste.

Method:

In a large pot sauté with oil the pearl onions and garlic for about 2-3 minutes. Add the chiles Jalapeños and sauté until bright green. Add water, vinegar, salt, sugar and spices bring it to a simmer until sugar dissolves. Turn off add the fresh herbs, cover and let it steep for 5 minutes. Add the carrots, potatoes mushrooms and cauliflower florets. Let it rest for 30-45 minutes, once is cool down place it into a jar or glass container. (it is always best to use glass) Keep in the refrigerator, give them a little shake-arooh very now and then. These Escabeche Pickled Vegetables get better with time, wait for at least 1-2 days before ready to eat. Enjoy!

Escabeche-Pickled-Vegetables_making-the-pickled-vinegar_Yes,-more-please!

Escabeche-Pickled-Vegetables_ready-to-cook_red-le-creuset_Yes,-more-please!

Escabeche-Pickled-Vegetables_pooring-into-mason-jar_Yes,-more-please!

Escabeche_Pickled_ Vegetables_on a jar

~ Escabeche Pickled Vegetables are a  great little nibbling with a beer ~

Escabeche-Pickled-Vegetables_ready-to-serve_Yes,-more-please!

Music Pairing: Cafe Tacuba- Maria

View Post or View Comments 4

Sauteed Broccolini & Lemon Quinoa

Sauteed Broccolini & Lemon Quinoa_Yes,more please!

After the weekend taco indulgence, I’m craving Green! Green! Green!
Broccolini it is a Hybrid between Broccoli and Kai-Lan commonly known by the name of Chinese Broccoli. Broccolini inherited the best part of the broccoli, the little mini flowery tops and the long steams of the Kai-Lan.
The flavor profile is like eating broccoli and asparagus at the same time!. Sweet broccoli and crunchy yet delicate and full of tender green flavor. The best way to cook it is with absolutely no doubt sauteing. A high temperature quick saute turns it bright green, the heat cooks the tops and the steams stay a bit crunchy. What do I have on my produce basket tonight?… cherry tomatoes,lemons, and garlic. In the pantry I have some roasted almonds and quinoa. I ran out of Parmigiano but I had some Manchego cheese and it worked great, nutty and creamy with the quinoa. On the side green salad…I think this will make a great light and comforting dinner for tonight…a piece of fish or chicken on the side will go fantastic too…for us, sauteed broccoloni and lemon quinoa-vegetable night is enough…

Sauteed Broccolini & Lemon Quinoa_cutting steems

Sauteed-Broccolini-&-Lemon-Quinoa_healthy-and-delicious_Yes,more-please!

Sauteed Broccolini and Lemon Quinoa

Serves 2 for dinner or 4 as a side dish

1 Broccolini Bunch
1 cup of cherry tomatoes
4 tablespoons of extra virgin olive oil
1 tablespoon of butter (or soy butter if vegan)
3 cloves of garlic
The juice and the zest of one lemon.
Salt and Black pepper to taste

1 cup of Quinoa
1 garlic clove
The zest of one lemon
2 cups of water
salt

Garnish with:

Roasted Almonds chopped
Manchego or Parmesan cheese shavings or even crumbled Feta cheese will work too.*
Squeeze some lime juice right before serving.adjust salt and pepper.
*eliminate the cheese if you are Vegan.

Directions:

Quinoa cooks just like rice, is 2-1 ratio. In a medium size pot bring the water to boil add the garlic cut in half add the salt . Once water is boiling add the quinoa, lower the temperature to medium, and cook for about 18-22 minutes, at this point add the lemon zest and cover with a lid remove from stove and let it cook with the residual heat.

To avoid the blanching step, cut the broccolini stems in half-length wise (see photo above*). Heat up a large saute pan, add the extra virgin olive oil and add the broccolini. Toss and within 2 minutes, add the garlic, salt and pepper. Wait 1 minute, add the cherry tomatoes, lemon zest and squeeze some lemon juice. Keep moving the pan and toss the vegetables around. Once the tomatoes look like they are going to burst remove from fire add the tablespoon of butter, and toss. Fluff your quinoa with a fork, drizzle a little olive oil add salt and pepper to your taste. Promptly, on a large platter, serve the cooked quinoa topped with the sautéed broccolini and chopped roasted almonds, Manchego or Parmesan cheese shavings. Adjust with salt and pepper squeeze some lemon and drizzle a little more extra virgin olive oil to finish the dish.

Sauteed Broccolini & Lemon Quinoa_fluffy quinoa

Sauteed-Broccolini-&-Lemon-Quinoa_shaving-manchego

Sauteed Broccolini & Lemon Quinoa_healthy and delicious


View Post or View Comments 1

Summer Soba Noodles

Summer Soba Noodles_healthy and delicious

Lusciously light noodles, that’s my description for this dish. Cold soba noodles are a popular summer dish in Japan. The Japanese people are very wise by eating like this; light, savory, vegetable based; a good way to stay cool. The traditional way to serve them is without toppings; just the delicate flavor of the noodle with some dipping sauce on the side. You dip them as you go.
In my version I decided to give the dish a little kick and add some fresh vegetables and tofu. We usually have this for lunch or a light summery dinner. The combination of fresh crunchy vegetables, sweet-savory sauce and creamy tofu cubes, pairs really well with the tender noodle. The preparation could not be easier, and if we measure preparation time versus rewarding flavors it is a winner.
If you think this dish looks complicated, don’t worry, its easy to make. To save you some prep time I recommend you invest on a little kitchen gadget: get yourself a julienne peeler. It is one of my favorite tools. Its fun, easy to use, and easy to clean. You can use this peeler for any other vegetable or fruit. One of the best kitchen gadgets to have. Let’s cook!

Summer Soba Noodles_ sauce ingredientsSummer Soba Noodles_ ingredientsSummer Soba Noodles_Yes,more please!

Summer Soba Noodles

Serves 2-4

3-6  Soba noodle bundles approximately 1 bundle per person. I recommend you to get the Japanese kind. You can get them at any Asian specialty aisle of a supermarket…
2-4  green onions/scallions, finely sliced
2  carrots, shredded, julienned or grated
1  seedless English cucumber, julienned or thinly sliced
1  avocado
1/4-1/2 cup  unshelled and cooked edamame beans, optional
1 block of extra firm Tofu, remove the excess water patting it with paper towels and cut into small cubes

For the sauce:

3  tablespoons soy sauce.
3  tablespoons seasoned rice vinegar
2  tablespoons sesame oil + one extra tablespoon for finishing
2  tablespoons of honey or agave nectar
1  tablespoon brown sugar
1  tablespoon grated fresh ginger
1  garlic clove grated
the juice and the zest of one small orange

In a bowl Whisk all the ingredients. Reserve 1/3 of the sauce to marinate the tofu squares.

Garnish with:

Thai Basil to garnish
Black or gold sesame seeds
1 red Thai or Serrano chili, thinly sliced

Directions:

1. Start by making your sauce. Place all its ingredients in a bowl and whisk. Set aside 1/3 of the sauce and marinate the tofu. While the tofu is absorbing all the flavors, proceed to cut and prepare your vegetables and garnishes.

2. Bring a large pot of water up to a boil. Unlike regular pasta, you do not need to salt the water. Once the water is boiling place the noodles and monitor constantly, using a pasta spoon to prevent the noodles sticking. Bring the water up to simmering. Do not let it boil. Follow the instructions in the package, taste, it should have some elasticity to it. Usually takes around 4-5 minutes because they cook through quickly . Keep an eye on them to avoid over cooking. When the pasta is ready drain the noodles into a colander. Immediately return them to the pot and fill the pot with cold water. Leave the water running into the pot a bit until the noodles cool down. Gently with your hands rinse the noodles in threads.*( see picture below) until they feel less starchy. Drain them again into a colander and allow them to drain. You can transfer them to a bamboo mat, to remove the excess water.

Summer Soba Noodles_How to prepare soba noodles

3.  In a non-stick pan proceed to saute the marinated tofu until golden brown. A little scorching doesn’t hurt either.
In a large bowl season the noodles with a tablespoon of sesame oil and add sesame seeds.

Summer Soba Noodles_Sautee_marinated_Tofu

4. Divide all noodles evenly into 2 or 4 bowls, garnish with the Juliane carrots, cucumbers, avocado, sautéed tofu, edamame, red chilli.
Serve a small sauce bowl per person for extra dipping the noodles.

Summer Soba Noodles_for two

~Enjoy!~

Music Pairing: Pizzicato Five: Twiggy Twiggy

Summer Soba Noodles

Serves 2-4
Course Brunch, dinner, Lunch
Cuisine Japanese
Prep Time 20 minutes
Cook Time 10 minutes
Total Time 30 minutes
Servings 4

Ingredients

  • 3-6 Soba noodle bundles approximately 1 bundle per person I recommend you to get the Japanese kind. You can get them at any Asian specialty aisle of a supermarket
  • 2-4 green onions/chives – finely sliced
  • 2 carrots shredded, julienne or grated
  • 1 seedless cucumber julienne or thinly sliced
  • ½ avocado
  • 1/4-1/2 cup unshelled and cooked edamame beans optional
  • 1 block of extra firm Tofu remove the excess water patting it with paper towels and cut into small cubes.

For the sauce:

  • 3 tablespoons soy sauce.
  • 3 tablespoons seasoned rice vinegar
  • 2 tablespoons sesame oil + one extra tablespoon for finishing.
  • 2 tablespoons of honey or agave nectar.
  • 1 tablespoon brown sugar
  • 1 tablespoon grated fresh ginger
  • 1 garlic clove grated
  • the juice and the zest of one small orange.

Garnish with:

  • Thai Basil to garnish
  • Black or gold sesame seeds
  • 1 Red chili thinly sliced

Instructions

  1. In a bowl whisk all the sauce ingredients. Reserve 1/3 of the sauce to marinate the tofu squares.
  2. Start by making your sauce. Place all its ingredients in a bowl and whisk. Set aside 1/3 of the sauce and marinate the tofu. While the tofu is absorbing all the flavors, proceed to cut and prepare your vegetables and garnishes.
  3. Bring a large pot of water up to a boil. Unlike regular pasta, you do not need to salt the water. Once the water is boiling place the noodles and monitor constantly, using a pasta spoon to prevent the noodles sticking. Bring the water up to simmering. Do not let it boil. Follow the instructions in the package, taste, it should have some elasticity to it. Usually takes around 4-5 minutes because they cook through quickly. Keep an eye on them to avoid overcooking. When the pasta is ready drain the noodles into a colander. Immediately return them to the pot and fill the pot with cold water. Leave the water running into the pot a bit until the noodles cool down. Gently with your hands rinse the noodles in threads.*( see picture below) until they feel less starchy. Drain them again in a colander and allow them to drain. You can transfer them to a bamboo mat, to remove the excess water.
  4. In a non-stick pan proceed to saute the marinated tofu until golden brown. A little scorching on the edges adds great flavor.

  5. In a large bowl season the noodles with a tablespoon of sesame oil and the sesame seeds.

  6. Divide all noodles evenly into 2 or 4 bowls, garnish with the Juliane carrots, cucumbers, avocado, sautéed tofu, edamame, red chili.
  7. Serve a small sauce bowl per person for extra dipping the noodles. Enjoy!
View Post or View Comments 1

Beet Salad, Avocado spread & Pumpernickel crostini

Beet-Salad_avocado-spread_pumpernickel-crostini_table-ready

This weekend Ian and I had really good eats. Beets are one of my favorite root vegetables, My mom used to make steamed beets sliced with a squeeze of lime and salt and served as an afternoon snack for my brother and I when we where kids. As a grownup, I love them in all preparations; raw, shredded over salads, ROASTED, steamed, in soups, chips and one of my favorites is to pickle them. Sometimes I don’t have the patience to wait until they are pickled, so I refer to a recipe like this and it works like a charm.
I made this Beet Salad, with avocado spread and pumpernickel crostini last Sunday with the type of beets they had available at the farmers market, beautiful Golden and Chioggia Red beets. I believe some are sweeter than others; to me, golden beets taste less earthy and less sweet compared to Red beets. Every kind of beet is extremely healthful and full of anti-oxidants, phytonutrients, so use any kind you have available. They can lift up any simple green salad, or become a meal as in this instance. This light vinaigrette works like a charm in combination with the following cooking method: I steamed them for a short time until just al dente, with a little crunch. The contrast in textures between the bread and the avocado spread and the sweet-tangy beet salad is what grabs me the most. The vinaigrette is light and tangy with bright fresh herbs…. done! This is a very easy and full-flavored recipe. You can serve this as an appetizer, light lunch, or with the addition of the avocado in slices and some pecans as a great side salad.

Beet-Salad_avocado-spread_pumpernickel-crostini_-Golden-and-Chioggia-Red-beets.

Beet-Salad_avocado-spread_pumpernickel-crostini_sunnny-winter-salad

Beet Salad, Avocado spread & pumpernickel crostini

Serves 2-4

1 Golden Beet
1 Red Beet
1 small sweet potato ( it adds contrast and creamy texture)
¼ cup seasoned rice vinegar
2 tablespoons of Extra Virgin Olive Oil
1-2 Tablespoons of fresh thyme, tarragon and mint.
(you can replace any of these for dry, but at least use one fresh herb if you can.)

Avocado spread:

1 small avocado smashed
1 small clove of garlic grated
Lemon Juice, salt and pepper.
Pumpernickel Bread
Some butter or extra virgin olive oil to grill the crostini.

Beet-Salad_avocado-spread_pumpernickel-crostini_Tosted-with-butter

Directions:

Scrub and rinse really well. In a double boiler steam the beets whole do not cut them, for 15- 18 minutes*
set them aside and allow them to cool. Once cool, peel them and slice them thin. ( a little less than ¼” inch.) Place them in a Bowl, add the herbs, rice vinegar, oil, salt and pepper. Gently toss these together and set a side.
Smash the avocado with a fork in a small bowl. Add grated garlic, and a squeeze of lemon, with salt and pepper to taste.
For the Crostinis: on a medium-high heat nonstick skillet, add a dab of butter and toast about 4-6 pieces of bread, both sides. ( I highly recommend the butter , it plays so well with the bred and the tangy notes from the beets!… However, the vegetarian or vegan version using the extra virgin olive oil also tastes terrific. Enjoy!
For service there are two options: assemble to serve or serve everything separately and assemble as you eat.(the second option is more fun, and it prevents your crostini from getting soggy.
* note: if you keep your root vegetables in the refrigerator, allow them to come to room temperature before you start cooking them, to ensure they cook evenly.

Beet-Salad_avocado-spread_pumpernickel-crostini

Beet-Salad_avocado-spread_pumpernickel-crostini_table-ready-to-eat!

Beet-Salad_avocado-spread_pumpernickel-crostini_-Golden-and-Chioggia-Red-beets_under-the-sun

~ Enjoy under the sun ~

Music Pairing: THe las Beat of my heart – DeVotchka

https://youtu.be/knsDmfmOnas

Beet Salad, Avocado spread & pumpernickel crostini

Serves 2-4
Course Brunch, Lunch, Snack
Cuisine vegetarian, wholesome
Prep Time 15 minutes
Cook Time 25 minutes
Total Time 40 minutes

Ingredients

  • 1 Golden Beet
  • 1 Red Beet
  • 1 small sweet potato it adds contrast and creamy texture
  • ¼ cup seasoned rice vinegar
  • 2 tablespoons of Extra Virgin Olive Oil
  • 1-2 Tablespoons of fresh thyme tarragon and mint.
  • you can replace any of these for dry, but at least use one fresh herb if you can.

Avocado spread:

  • 1 small avocado smashed
  • 1 small clove of garlic grated
  • Lemon Juice salt and pepper.
  • Pumpernickel Bread
  • Some butter or extra virgin olive oil to grill the crostini.

Instructions

  1. Scrub and rinse really well. In a double boiler steam, the beets whole do not cut them, for 15- 18 minutes* set them aside and allow them to cool. Once cool, peel them and slice them thin. ( a little less than ¼” inch.) Place them in a Bowl, add the herbs, rice vinegar, oil, salt and fresh ground black pepper. Gently toss these together and set aside.
  2. Smash the avocado with a fork in a small bowl. Add grated garlic, and a squeeze of lemon, salt, and fresh ground black pepper to taste.

For the Crostinis:

  1. In a medium-high heat nonstick skillet, add a dab of butter and toast about 4-6 pieces of bread, both sides. ( I highly recommend the butter, it plays so well with the bred and the tangy notes from the beets!… However, the vegetarian or vegan version using the extra virgin olive oil also tastes terrific. Enjoy!
  2. For service there are two options: assemble to serve or serve everything separately and assemble as you eat.(the second option is more fun, and it prevents your crostini from getting soggy.

Recipe Notes

* note: if you keep your root vegetables in the refrigerator, allow them to come to room temperature before you start cooking them, to ensure they cook evenly.

View Post or View Comments 0

Cauliflower Ceviche

Cauliflower Ceviche_Tostada ready to eat!

The full summer weather is here! Austin, Texas is burning hot! 101-106 Fahrenheit. With this kind of summer temperatures, I can’t even conceive the idea of “grilling”. Can you imagine being outside with 101 on the thermometer in front of a grill trying to light up the charcoal?…Not my cup of tea I prefer the tundra if you ask me. But well these weather conditions fire up the indoors freshly made meals; light, crisp and lots of veggie action.

Cauliflower-Ceviche_cauliflower-florets

I tried to make this ceviche once in my years of college, not so good; it was really mushy and flavorless… but I loved the concept of using the beloved Cauliflower. Cauliflower is the vegetable everybody loves now because of its versatile flavor. It is evident that Cauliflower has a love affair with butter and cream. Mashed cauliflower can replace a good pile of mashed potatoes, cauliflower gratin, cauliflower chowder, griller, roasted, among my favorites. But what I crave in a Summery hot day is something light easy to digest, fresh and no oven or a long cooking time required.

So with this said, I revamped the cauliflower ceviche recipe from my College years by adding diced crunchy vegetables, steaming the cauliflower and lots of good fresh and dry herbs plus a punch of citrus goodness to add extra flavor. That acid, salty umami note that just makes your mouth water, as soon you start reading the recipe…

Cauliflower Ceviche is a great summery meal, for Vegetarian, Vegans and Carnivorus that won’t even care about the difference once they have the first bite!

Margaritas on the side?…Yes, please!…Enjoy!

Cauliflower-Ceviche_ingredients_Yes,-more-please!

Cauliflower Ceviche

Serves 4

1 Cauliflower head, medium size. Remove the core and small diced florets.

Small diced:

2 carrots
1 tomato
½ medium size red onion
2 green onions including the green part.
1 cucumber seedless
1 long celery stalk
1 habanero, or 1 jalapeno, or 1 serrano. (Remove the seeds for a less spicy version.)
2 Tablespoons of finely chopped fresh cilantro
2 Tablespoons of finely chopped fresh parsley
2-3 pinches of dried oregano

The juice of:

2 Limes
1 Lemon
The juice and zest of ½ Orange
2 tablespoon apple cider vinegar
4 tablespoons Extra Virgin Olive Oil
1 teaspoon celery salt
1 teaspoon of  sea salt
Black crushed pepper to taste.

Garnish with:

Radishes, Avocado Slices, Pumpkin seeds, Ketchup,( weird but delicious, it adds some sweet and tangy note)
Cholula hot Sauce, Limes. Serve with Tostadas or crackers.

Directions:

In a medium size pot steam the small diced Cauliflower florets until al-dente, for about 3-5 minutes. Remove from steamer place them on a tray in one single layer and let them cool off. Mean time chop all the vegetables. Place them on a big salad bowl, add the herbs, extra virgin olive oil, the citrus juices and S&P, toss well.  Once the cauliflower florets have cool down, add them to the mix, toss well and let it marinate for 20-45 minutes. Taste and adjust salt and pepper if necessary. Serve with tostadas or crackers, avocado Slices, radish slices, and toasted pepitas (pumpkin seeds), and a dash of your favorite hot sauce…

Cauliflower-Ceviche-Summer-Vegetarian-Vegan-Bliss_-Yes,-more,-please!

Refreshing, Vegetarian Ceviche, Enjoy!

Music Pairing: Mini Skirt, ESQUIVEL- Metropole Orkest

Cauliflower Ceviche

Serves 4-6
Course Brunch, Lunch, Main Course
Cuisine FUSION, Mexican, wholesome
Prep Time 30 minutes
Cook Time 10 minutes
Total Time 40 minutes
Author Mariana McEnroe

Ingredients

  • 1 Cauliflower head medium size. Remove the core and small diced florets.

Small diced:

  • 2 carrots
  • 1 to mato
  • ½ medium size red onion
  • 2 green onions including the green part.
  • 1 cucumber seedless
  • 1 long celery stalk
  • 1 habanero or 1 jalapeno, or 1 serrano. (Remove the seeds for a less spicy version.)
  • 2 Tablespoons of finely chopped fresh cilantro
  • 2 Tablespoons of finely chopped fresh parsley
  • 2-3 pinches of dried oregano

The juice of:

  • 2 Limes
  • 1 Lemon
  • The juice and zest of ½ Orange
  • 2 tablespoon apple cider vinegar
  • 4 tablespoons Extra Virgin Olive Oil
  • 1 teaspoon celery salt
  • 1 teaspoon of sea salt
  • Black crushed pepper to taste.

Garnish with:

  • Radishes Avocado Slices, Pumpkin seeds, Ketchup,( weird but delicious, it adds some sweet and tangy note)
  • Cholula hot Sauce Limes. Serve with Tostadas or crackers.

Instructions

Directions:

  1. In a medium size pot steam the small diced Cauliflower florets until al-dente, for about 3-5 minutes. Remove from steamer place them on a tray in one single layer and let them cool off. Mean time chop all the vegetables. Place them on a big salad bowl, add the herbs, extra virgin olive oil, the citrus juices and S&P, toss well. Once the cauliflower florets have cool down, add them to the mix, toss well and let it marinate for 20-45 minutes. Taste and adjust salt and pepper if necessary. Serve with tostadas or crackers, avocado Slices, radish slices, and toasted pepitas (pumpkin seeds), and a dash of your favorite hot sauce…
View Post or View Comments 3

Heirloom Tomato Crostata

Heirloom-Tomatoe-Crostata-Yes,-more-please!

This is one of the recipes I being waiting to make with the gorgeous tomatoes from the market, Heirloom tomato Crostata!…Last time I went to Boggy Creek Farm,( my favorite urban farm here in Austin, TX.)  I bought about 5 different kinds I could not resist! (honestly, If you have 3-2 or even just one kinds it will be great too) Looking at all this colors and shapes made me turn my sweet crostata dough into a savory one. I read about this tomato pie with Corn Meal, and honestly I’m not very fond of Pies, I love crostata because of the dough-filling ratio. In a pie usually you have thin crusted and lots of filling versus a crostata in which you have little more crust-less filling (which makes it lighter and balanced to eat. The exposed fruit or vegetables or in this case the tomatoes can get a little roasted and it adds lots of character to it.  I hope you like it. Enjoy!Heirloom-Tomatoes-Variety_Corn-Meal-Crostata_Yes,-more-please!

Tomatoe-Crostata_heirloom-tomatoes,-thyme,-great-fresh-seasonal-ingredients

Heirloom Tomato Crostata

Serves 6-8

For the Dough:

2 Cups of Unbleached All-purpose flour
¾ Cup Corn Meal (I used Larry’s Corn Meal from Boggy Creek Farm, I highly recommend to look for a good quality Organic no GMO coarse ground cornmeal it really makes the difference!)
1 teaspoon of kosher salt
1 teaspoon of sugar
2 sticks (1 cup) unsalted butter, cold and cut into small cubes.
1 tablespoon of Greek yogurt
¼ to ½ cup iced water

How to make the crust:

Measure all your ingredients, and place all the dry ingredients in a bowl and mix. Place bowl in the freezer. Meantime cut your cold butter, and Iced water ready to measure. Remove the bowl of dry ingredients from freezer and add the butter. With a pastry blender incorporate the butter and flour until the mixture resembles to a coarse meal, and the butter pieces are small like the size of a pea. Slowly add the cold water and carefully with your hands form a dough that just holds together. Do not work the dough.
Once that the dough barely holds together cut a piece of plastic wrap and place your dough. Wrap it and shape it into a disk.
Refrigerate for at least 1 hour, 4-6 is best.(see pictures )

Tomatoe-Crostata-how-to-make-the-dough-step-by-step!

How-Dough-Texture-should-look-like-for-a-Crostata,-galette-or-free-form-pie

When the dough is ready Preheat Oven at 400 F/ 205C
On a clean work surface, dusted with flour unwrap the dough let sit for a couple of minutes and roll the dough into a 20-22” round and about 1/8 “ thick. Once is rolled place it into a sheet pan lined with parchment paper.

Tomatoe-Crostata_Rolling-the-dough

For the Filling:

4 medium size heirloom tomatoes cut into ¼ inch tomato slices, from at least 2 kinds of heirloom tomatoes. I used green zebra, yellow Oaxacan, prudence and Cherokee. Use whatever is best fresh available at your farmers market.
1/2 cup cherry gold or cherry tomatoes

I used:
1/3 cup of goat cheese.
3 fresh sprigs of thyme.
Sea Salt, freshly ground pepper.
A small drizzle of Extra virgin Olive Oil.

Directions:

Spread ½ of the Goat cheese into the rolled dough, place the tomato slices, thyme, rest of the cheese, sea salt, black pepper and drizzle Extra Virgin Olive Oil all over the tomatoes. Fold the dough edges into circle creating a 2” border.

Brush the edges with egg wash and sprinkle sea salt all around the edge.

Bake at 400 F/ 200C for 35-45 minutes. Serve warm.

Heirloom-Tomato-Crostata_How-to-make-a-Crostata,-Gallete,-Free-form-savory-pie

Heirloom-Tomatoe-Crostata_Tomato-Season-Cornmealcrust

Heirloom Tomatoe Crostata

Music Pairing: Pink Martini- Hang on Little Tomatoe

Heirloom Tomato Crostata

Serves 6-8
Course bakegoods, Brunch, Lunch, Main Course, vegetarian
Cuisine vegetarian, wholesome
Prep Time 20 minutes
Cook Time 35 minutes
Total Time 55 minutes
Author Mariana McEnroe

Ingredients

For the Dough:

  • 2 Cups of Unbleached All-purpose flour
  • ¾ Cup Corn Meal I used Larry’s Corn Meal from Boggy Creek Farm, I highly recommend to look for a good quality Organic no GMO coarse ground cornmeal it makes a huge difference.
  • 1 teaspoon of kosher salt
  • 1 teaspoon of sugar
  • 2 sticks 1 cup unsalted butter, cold and cut into small cubes.
  • 1 tablespoon of Greek yogurt
  • ¼ to ½ cup iced water

For the Filling:

  • 4 medium size heirloom tomatoes cut into ¼ inch tomato slices from at least 2 kinds of heirloom tomatoes. I used green zebra, yellow Oaxacan, prudence, and Cherokee. Use whatever is best fresh available at your farmers market.
  • 1/2 cup cherry gold or cherry tomatoes
  • I used:
  • 1/3 cup of goat cheese.
  • 3 fresh sprigs of thyme.
  • Sea Salt freshly ground black pepper.
  • A small drizzle of Extra virgin Olive Oil.

Instructions

How to make the crust:

  1. Measure all your ingredients, and place all the dry ingredients in a bowl and mix. Place bowl in the freezer. Meantime cut your cold butter, and Iced water ready to measure. Remove the bowl of dry ingredients from frezzer and add the butter. With a pastry blender incorporate the butter and flour until the mixture resembles a coarse meal, and the butter pieces are small like the size of a pea. Slowly add the cold water and carefully with your hands form a dough that just holds together. Do not work the dough.
  2. Once that the dough barely holds together cut a piece of plastic wrap and place your dough. Wrap it and shape it into a disk.
  3. Refrigerate for at least 1 hour.

When the dough is ready Preheat Oven at 400F / 205C

  1. In clean work surface, dusted with flour unwrap the dough let sit for a couple of minutes and roll the dough into a 20-22” round and about 1/8 “ thick. Once is rolled place it into a sheet pan lined with parchment paper.

Assemble the Crostata:

  1. Spread ½ of the Goat cheese into the round rolled dough leaving a 2-3" outside border. Place the tomato slices and halves, fresh thyme, rest of the goat cheese, sea salt and add a few cranks of fresh ground black pepper. Drizzle Extra Virgin Olive Oil all over the tomatoes. Fold the dough edges into the circle, creating a 2” dough border. Brush the edges with egg wash and sprinkle some sea salt all around the edge. 

  2. Bake at 400 F/ 200C for 35-45 minutes. Serve warm.

View Post or View Comments 0

Privacy Policy Contact Us Yes, more please!