Recipes, Cooking & Art Direction: Mariana Nuño Ruiz McEnroe | Photography: Ian McEnroe |
Published: July 27, 2016
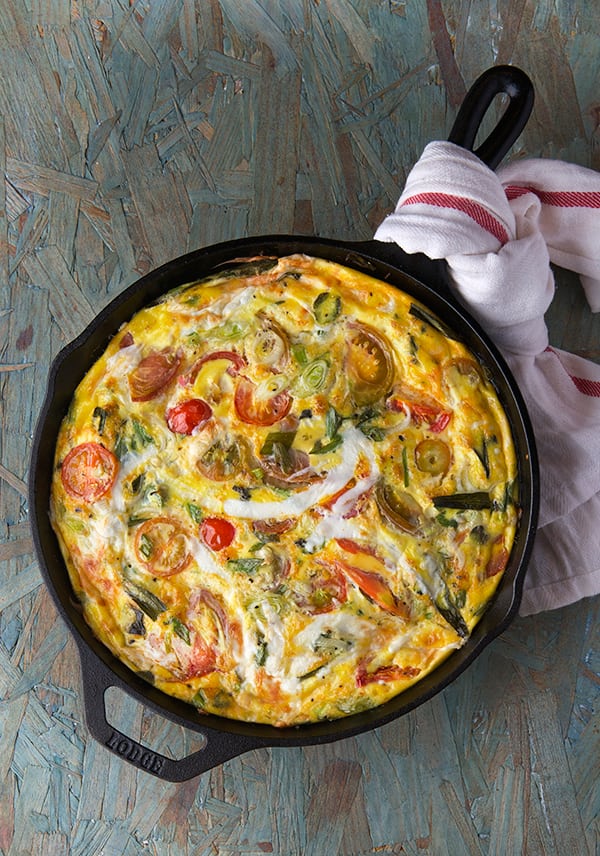
Frittatas are the best way to transform simple ingredients into a magnificent meal. It’s the goodness of pie without the crust. With their lightly crusty edges, creamy soft centers, easy comfort, and the fact that almost every ingredient can play and sing along embedded in custardy creamy eggs, frittatas are the perfect Summer companion, and this Oaxacan Frittata is the one you want this summer by your side.
This Frittata is all about the Oaxacan Jewel tomatoes I grew in my little garden. I love how the combination of custardy eggs and “Quesillo” a.k.a Oaxaca Cheese, compliment the flavor of the tomatoes with out masking them. Even when cooked, the tomatoes hold their fresh and juicy flavor. The melted strings of Oaxacan cheese along with fresh herbs and a sprinkle of flaky sea salt make this Frittata the object of my Summer affection.
Recipes, Cooking & Art Direction: Mariana Nuño Ruiz McEnroe | Photography: Ian McEnroe |
Published: December 2, 2015
Probably this recipe may offend a few of our Texas cooks. Please don’t let the title of this recipe scare you away… Bare with me, you, dear Texans.
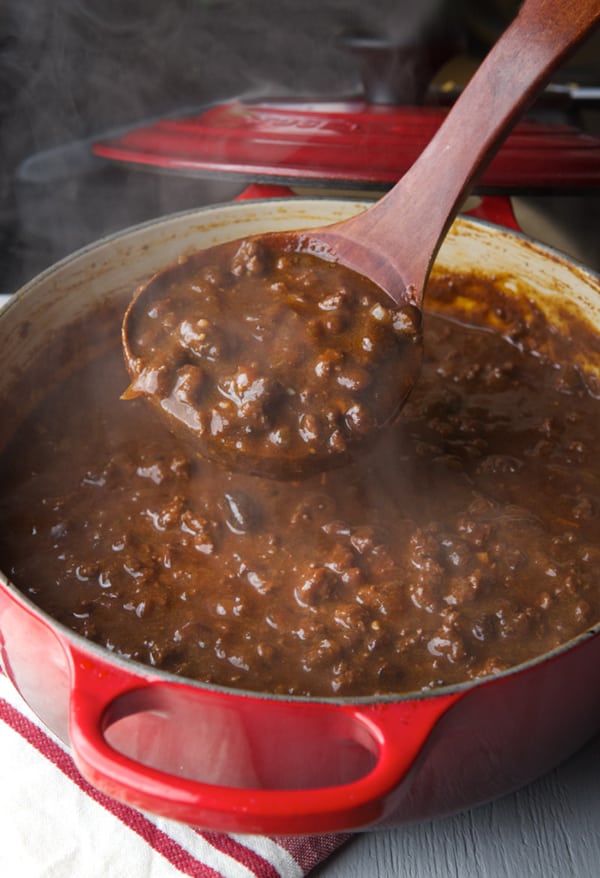
This chili with beans recipe is what results of a marriage, between a South Mexican girl and a Northern Michigan boy. My chili has to have beans. As you know we live in Texas, which I believe there must be a written law somewhere about no beans in chili. We hope we don’t get into trouble, but if we do, with all your respect, heck yeah!, I want a pot of this trouble for any given Texan winter night.
I’m using Ground Bison full of rich meaty flavor, lots of character and the right amount of fat. To complement the ground bison, I used a type of black bean called Rio Zape. They are a bit larger than black beans, meatier, creamy and with a very earthy flavor, than when cook it produces the most delicious cloudy broth. I love this bean flavor win combination with all the chili spices. A dash of Apple cider vinegar to brighten up the chili powders it’s must. Garnish with sour cream, onions, and Colby cheese. A side of freshly baked cornbread is the perfect accomplice. This Yankee-Mex chili has a great depth of flavor, from the ancho chile, a bright mild spiciness from New Mexico chili powder and a hint of lingering spice from a dash of cayenne pepper. Its well balanced flavors and the right consistency will warm up your inside out. Let’s cook!
Recipes, Cooking & Art Direction: Mariana Nuño Ruiz McEnroe | Photography: Ian McEnroe |
Published: November 4, 2015
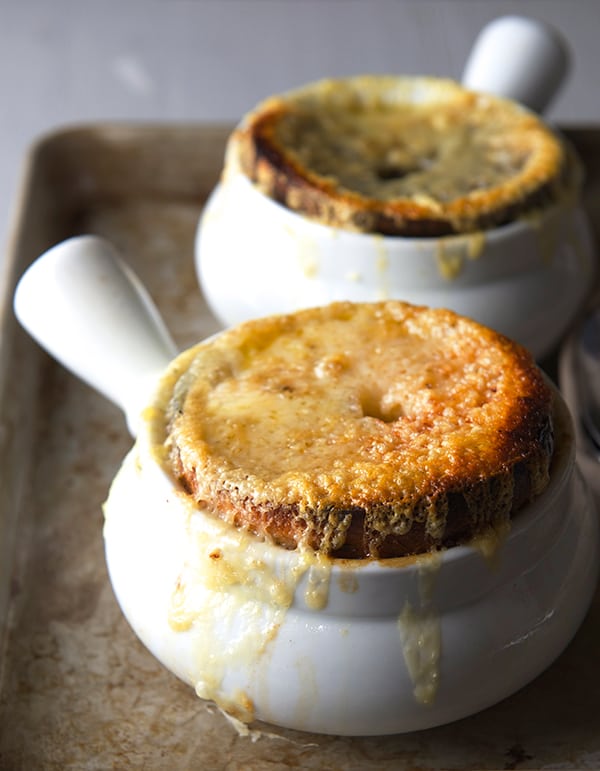
Soup season it’s here and the soup I’m craving: French Onion Soup, a classic of classics, deep mahogany broth, soft sweet onions, and that crusty bread soaking all the juices and keeping afloat the most amazing crusty cheesy cloud on top of the soup. A wintery elixir. There is something cosmic about a cold day and simmering pot of soup on the stove. The House is warm with a cozy smell, a sweater, some crusty bread, warming your hands by holding the cup is just one of the best feelings…wiiihkkk…Now can you hear the wicked record on the back?… I just remembered we live in Texas.
This “El Niño” is driving me crazy. Almost 6 months of summer here in Austin to much Summer for me I wish I could be in Yakutsk for the weekend and then come back to be able to appreciate this Texas weather… But for now I’m just in need of cool down so I can make soup, lots of soup.
Dreaming with cold weather while the thermometer reads 80 F… I’m making soup anyway…We will crank down the AC just for tonight and pretend it’s cold outside… Adjust your AC accordingly. Now with the right temperature (thermometer reads 70F), Lets cook!…
Well, here we are revamping the unrevampable, and I thought about giving this classic French onion soup a little twist. I used a bagel instead of the crusty bread. Yes, a crusty chewy pumpernickel bagel toasted, with a bellybutton that helps the steam escape from the soup and let’s the oozing cheese talk to the soft onions below. The good thing about using a bagel is that stays crunchy for longer and it madly absorbs the oniony broth. It is ridiculously good and satisfying.
Through out the recipe you will find a couple of tips and tricks that I’ve learned to use when making onion soup. I know they will help you make the best onion soup you can make, or to improve the one you already make.
For now, this is all what I can tell you about one of my favorite soups…
Just relax and cook. I promise all your efforts will be rewarded on the first spoonful, and there will be no words just slurps.
Recipes, Cooking & Art Direction: Mariana Nuño Ruiz McEnroe | Photography: Ian McEnroe |
Published: October 23, 2014
Its warm in the Lone Star State. We’re still waiting in Texas for some cool Autumn weather. We are still in the 80’s around here if you know what I mean. The only indication of Fall, besides the calendar, are the beautiful pumpkins, squashes, sweet potatoes, root vegetables and leafy greens at the markets.
This last Sunday, I found small butternut squash, acorn squash, and some white mini pumpkins. While some people are turning them into candle holders, I think they are the perfect individual size for dinner. They cook fast and leave no left-overs.
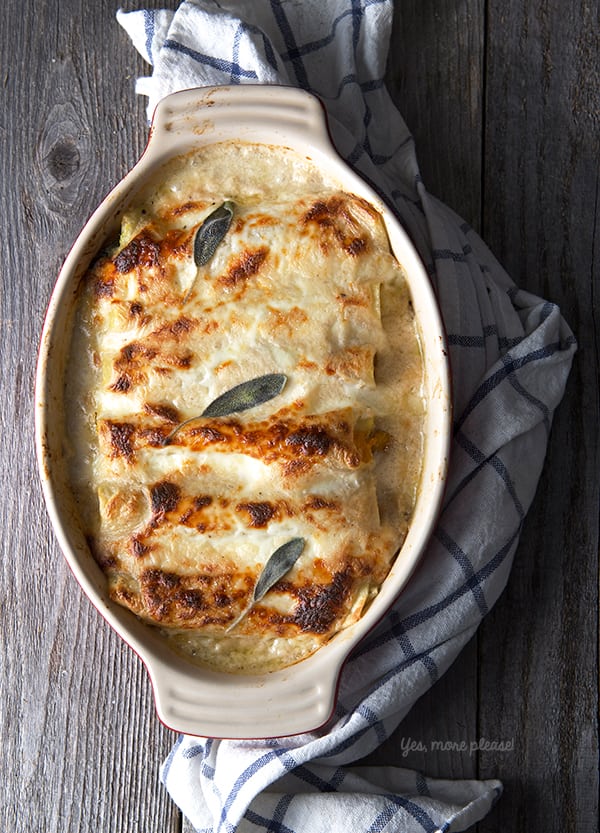
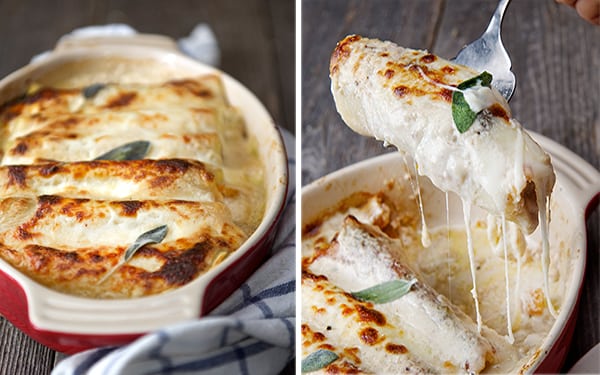
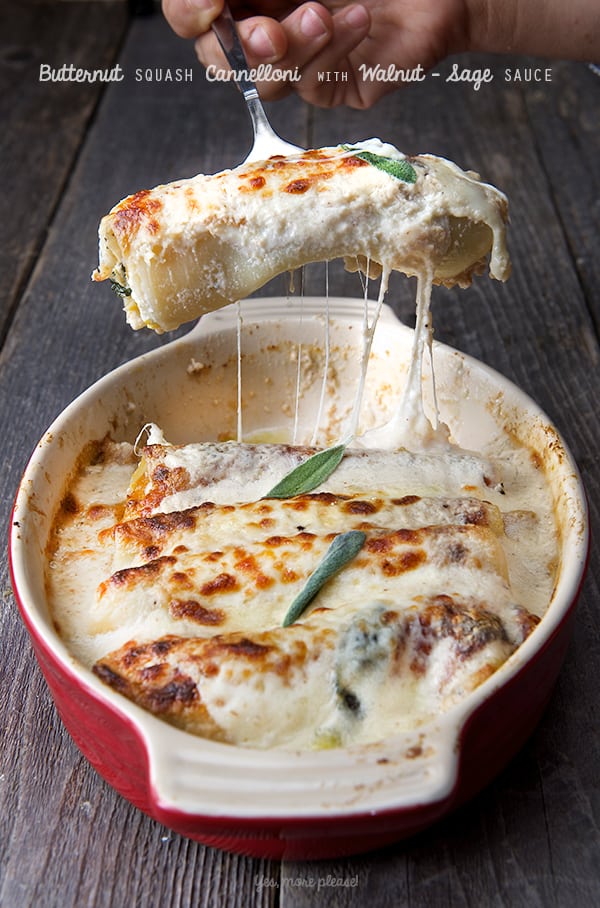
With this in mind, and the romantic idea of having a Fall season, I turned my oven on and thought about the most autumn dish I could bake, and this is what I came up with: Butternut Squash Cannelloni with a Walnut-Sage Bechamel sauce. Dreamy. This recipe has a long name and a short preparation. It is not hard to Imagine pasta sheets filled with delicate butternut squash, baby spinach, onions and goat cheese; rolled and smothered with a light creamy, nutty walnut-sage béchamel sauce, some mozzarella on top and.. Kazam! You have Fall on a plate. Nutty, creamy, warm, cheesy, the kind of dinner you want to snuggle with…In Texas we snuggle in shorts and t-shirts. Or you can fake it and watch a movie with maple trees, and turn your A/C to 64F grab a little blanket and for a few hours pretend is Fall….Not that we have done this…ehem, ehem.
Mean time we will patiently wait in shorts and T-shirts for the winter… maybe I should make Margaritas instead!… Enjoy the recipe.
Butternut squash Cannelloni with Walnut-Sage Bechamel Sauce.
Serves 4
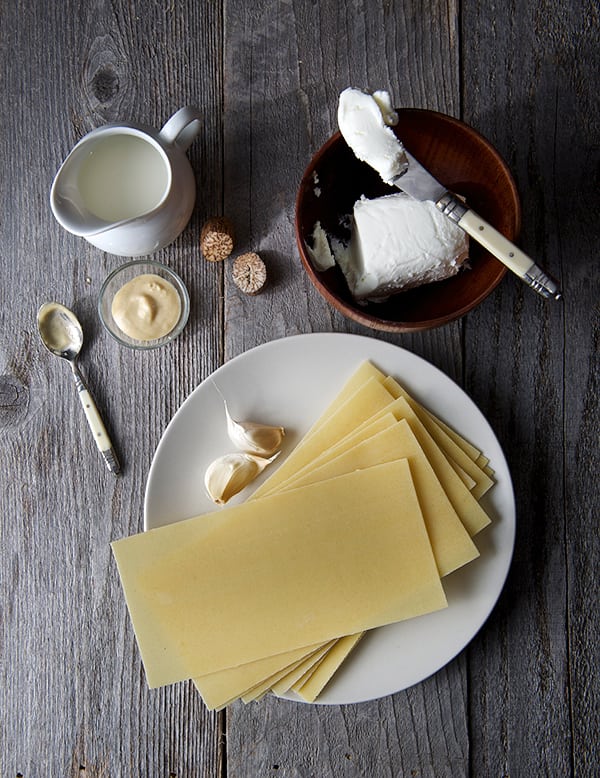
12 cannelloni pasta tubes or 12 lasagna sheets.
For the filling:
1 small butternut squash peeled and cut into small cubes
2 cups baby spinach or baby kale
1/2 medium onion small diced.
1 glug extra virgin olive oil
2 pinches of nutmeg
Salt and pepper to taste
4 oz. Chèvre Goat cheese
For the sauce:
1/2 cup blanched and toasted walnuts
2 cups milk
2 tablespoons flour
4 tablespoons butter
Zest 1/2 lemon
1-2 pinches nutmeg (freshly grated preferred )
2-3 Sage leaves whole*
1/2 teaspoon salt
4-6 cranks of fresh ground black pepper
Fresh mozzarella ( liberal amounts upon your preference)
3-4 Sage leaves to garnish
*Note: Sage its a powerful herb, I levee it whole to just perfume the sauce and leave it whole as garnish also enhances the dish and brings out delicious aromas. I prefer not to chop the sage on dishes like this, because it becomes a bit bitter, and is not very pleasant to bite into them, they will overwhelm the delicate flavor of the butternut squash. However, If you love sage and its a flavor you enjoy, feel free to adjust to your taste.
Preparation:
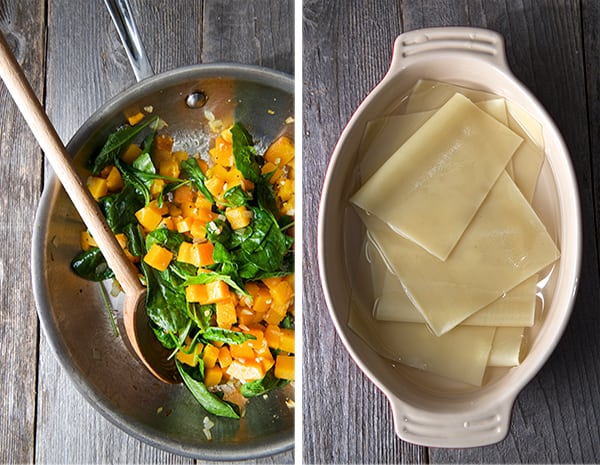
1. Using a little glug of olive oil Sauté the onions and butternut squash until tender. Finally add spinach salt, pepper and nutmeg; toss well then remove from stove and let it cool down. Add the goat cheese in crumbles once the filling is cool, toss gently. 2. Pre-cook your pasta sheets according the directions on your package. Remember to salt your water to flavor the pasta. Remove the sheets from boiling water 3-4 minutes before, according to directions. Shock them in iced water to stop cooking, and avoid to stick together.
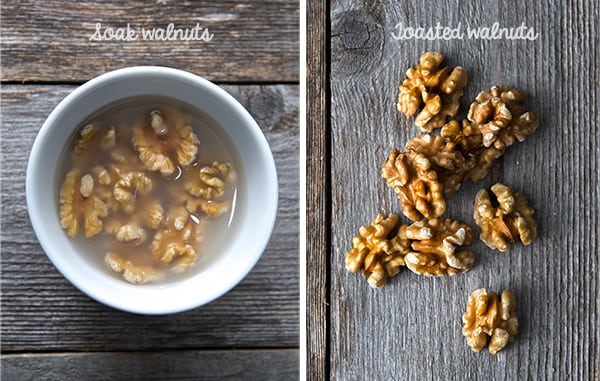
3. Make the sauce. Start by blanching the walnuts in warm water for 5 minutes, this will eliminate any bitterness from the walnut skins. Drain the walnuts and toast them on a large skillet for a few minutes. Blend the walnuts with 1/2 cup of the milk until smooth. Then incorporate with the rest of the milk.
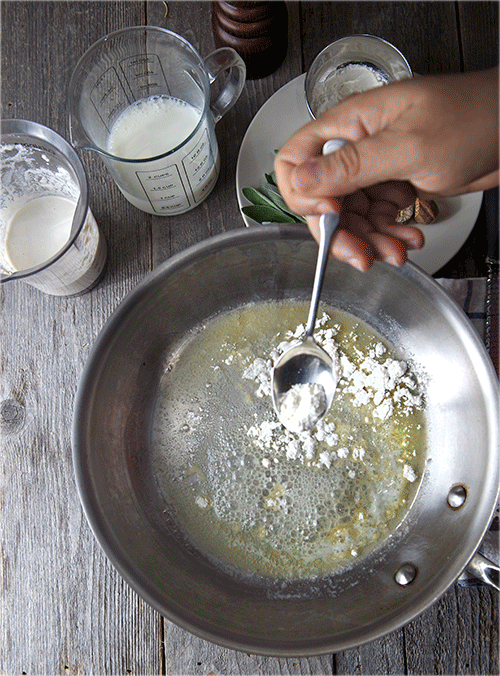
4. In the same large skillet, over medium heat, place the butter until melted and bubbly. Add the flour and whisk well to combine until no lumps and the buttered flour looks light golden-yellow in color. Start adding the walnut-milk in smaller additions and whisk at all times to avoid lumps, until the 2 cups of milk are incorporated. You might need to reduce the heat to medium low while whisking. After all the milk is incorporated season with salt, pepper, and nutmeg and sage leaves. Bring too a slow simmer and remove from heat. The consistency should be of a light creamy thickness, if to thick, add more milk, to lose, place it back to the heat and whisk until desired consistency.
It should cover the back of a spoon see picture below.
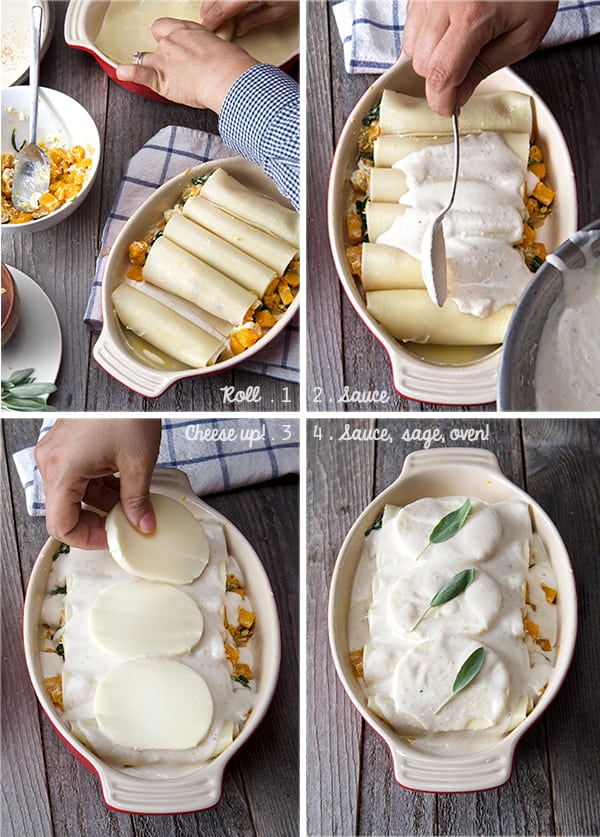
3. Prepare a baking dish with butter, or a little olive oil, add a bit of the sauce on the bottom. 4. Start by filling the cannelloni’s pasta tubes or by placing the filling on one end of the precooked pasta sheets and roll them up tightly. Proceed to do the same with each pasta sheet. Place the cannelloni rolls into your baking dish as you go. 5. Cover all the pasta rolls with the walnut-sage sauce, reserve some of the sauce. 6. Cover with mozzarella slices, then pour the remainder of the sauce, top with some sage leaves.
7. Bake at 375F for 20-30 minutes until cheese is melted and top is blistered. 8. Let it rest for 10 minutes before serving. Enjoy!
Note: Not too fond of rolling? make it into lasagna layers, you also can add some cooked ground turkey or sausage to the butternut -spinash filling and it will be equally delicious. I just love the way the Cannellonis portions out. Enjoy!
Recipes, Cooking & Art Direction: Mariana Nuño Ruiz McEnroe | Photography: Ian McEnroe |
Published: October 8, 2014
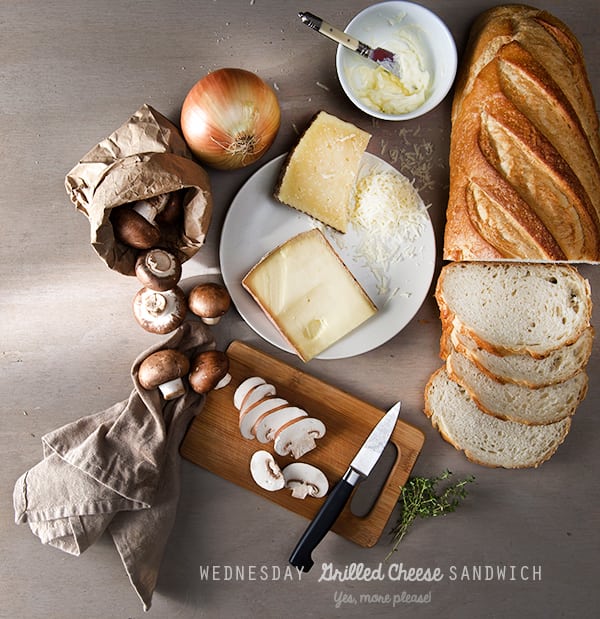
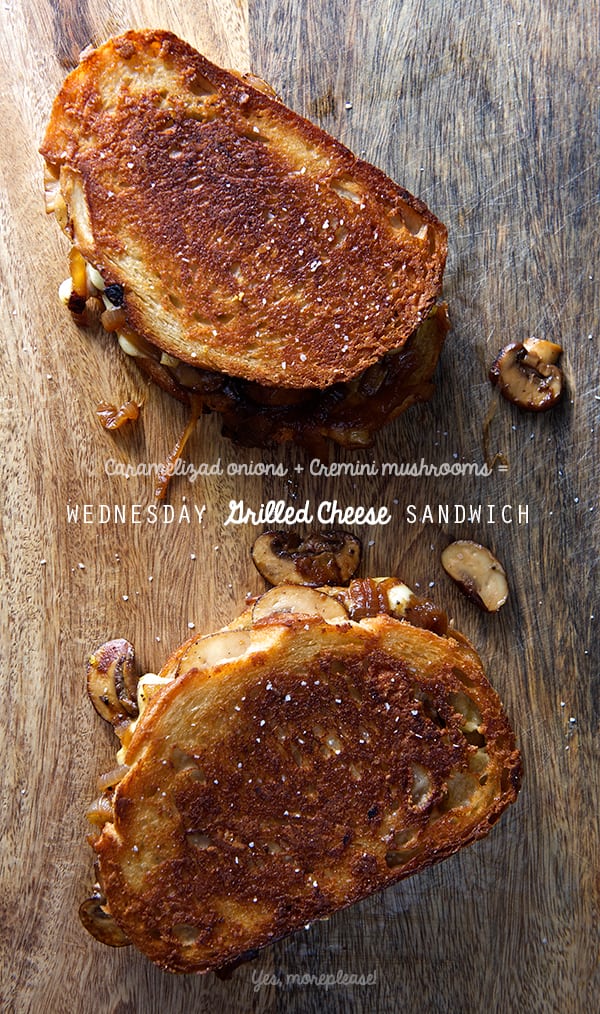
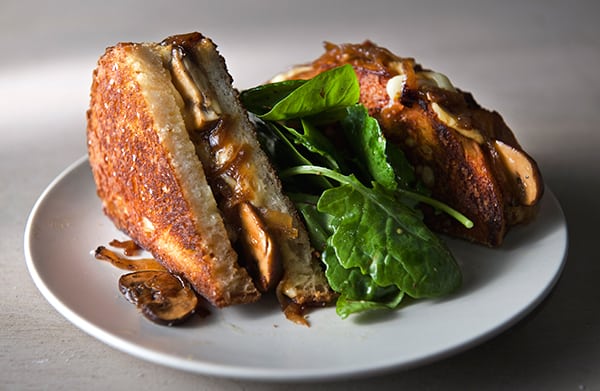
A grilled cheese sandwich with a side of green salad, this is my love letter to the grilled cheese sandwich.
Sautéed Mushrooms, caramelized onions, and rich fragrant cheese in between two slices of toasted buttery bread; this is my kind of togetherness and solidarity. This is the one that hump day screams for. Let’s stick the whole week together with melted cheese plus mushrooms and onions and make our Wednesday memorable. After all it is certain that the small things in life give happiness and comfort. Wednesday Grilled Cheese Sandwiches like this have one mission , to turn any humpy or lumpy day into a little happy memory. Enjoy.
Wednesday Grilled Cheese Sandwich.
Makes 2 sandwiches
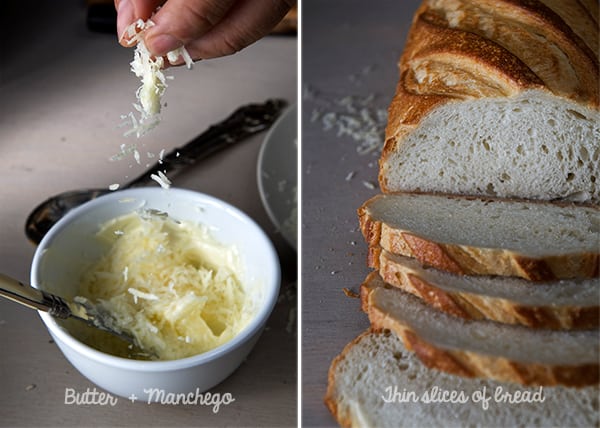
4 slices of artisanal, rustic bread
1/4 pound of Challerhocker Swiss cheese. (Gouda, Swiss, Emmental will work fantastic as well)
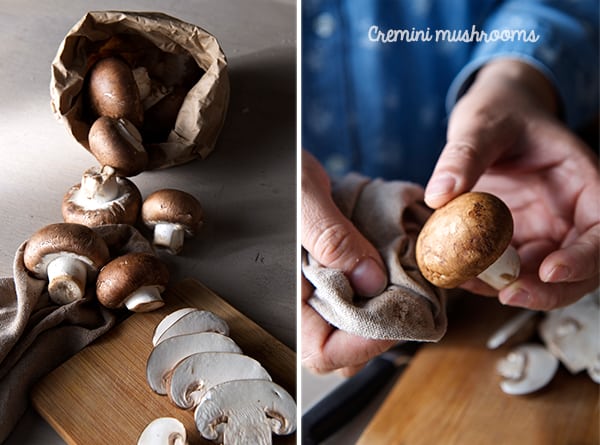
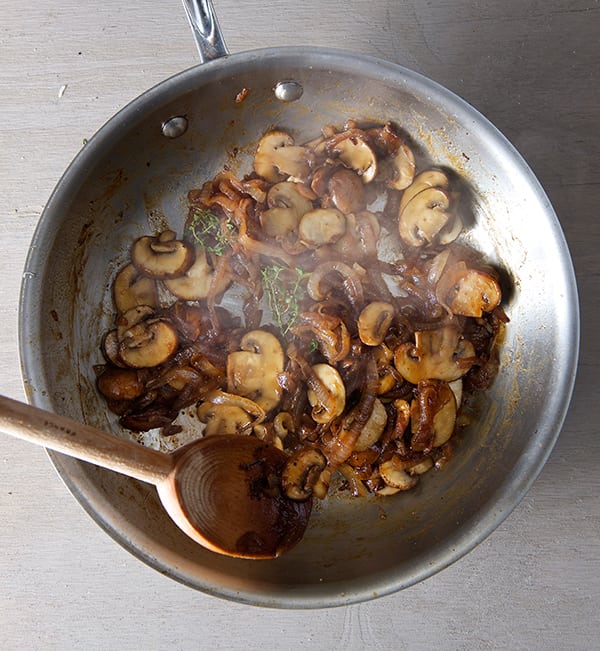
8-10 Cremini Mushrooms wiped with a damp clean towel and sliced.
1 small medium yellow onion 1/4 “thick sliced
1 sprig of fresh thyme
1 teaspoon olive oil
2 tablespoons of butter for sauté
1/4 cup or 2 glugs of any leftover white wine. no white wine…chicken stock will work…
2-4 dashes of Sherry Vinegar.
Salt and Black Pepper to taste.
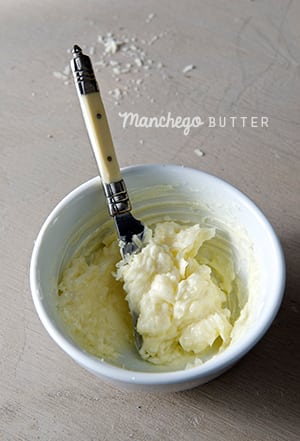
Manchego Butter Spread:
2 tablespoons of 1 year aged Manchego cheese, grated.
4 tablespoons butter softened
1. In a little bowl combine this two ingredients until you have a spreadable consistency.
What I love the most a bout this sandwich? the Manchego Butter Spread, once the sandwich hit the pan, this spread makes the most utterly croquant and buttery grilled cheese, you ever had… I suggest you can make any substitutions on the inside of the sandwich, but this spread is irreplaceable.
Preparation:
1. Over medium heat on a sautee pan add olive oil, 2 tablespoons of butter, sliced onions, salt pepper and a pinch of turbinado sugar. sweet the onions until translucent and they start to get some golden edges and color. At this point add the sliced mushrooms and sautee for about 3-4 minutes, until the mushrooms start to get some color too. about 6-7 minutes. 2. By now the bottom of your pan is starting to show some crusty brown bits. The onions and mushrooms are soft and golden brown caramelized color, Away fro the stove add two good splashes of white wine, and 2-4 dashes of the sherry vinegar, and a fresh sprig of thyme. Bring back the pan to the stove and wait until the liquids reduce. Set aside.
3. Evenly spread one side of each of the bread slices with the Manchego-butter spread. 4. On the no spread side, place a layer of thinly sliced or grated Challerhocker cheese, then a layer of the caramelized onions and mushrooms, and top with more cheese. Cover with the other bread lid, butter spread side up.
5. On a medium heat warm up a non-stick pan, cast iron pan or plancha. Once is hot, place both of your sandwiches and grill for about 4 minutes each side, until mahogany golden brown, and the cheese is melted.
6. Remove from pan into a cutting board and slice in half. 7. Toss some baby spinach and salad greens with a bit of lemon juice, extra virgin olive oil, salt and pepper, serve your sandwich on the side.
Enjoy!
Recipes, Cooking & Art Direction: Mariana Nuño Ruiz McEnroe | Photography: Ian McEnroe |
Published: August 12, 2014
It’s a pizza!…no!
It’s a casserole!….no! It’s a tamale?!…..no!
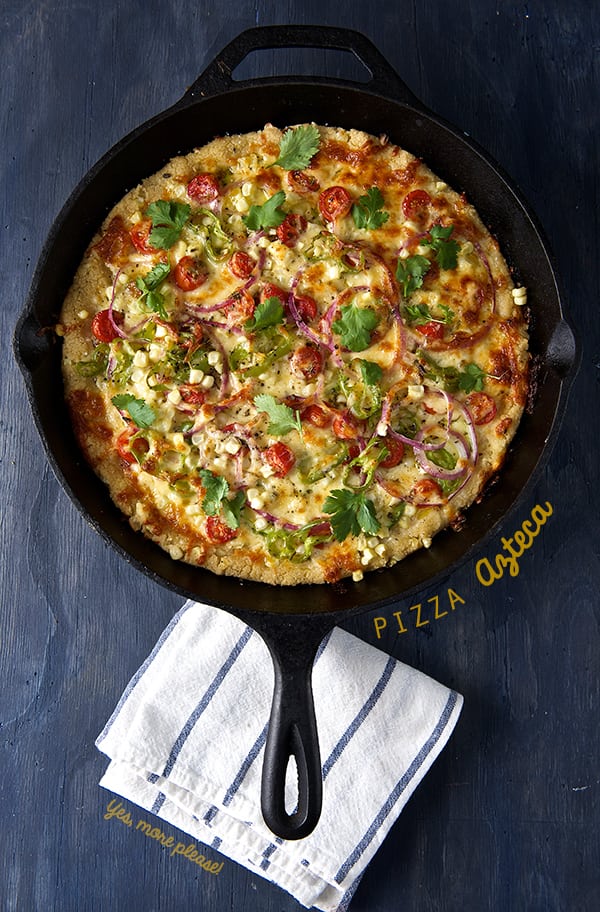
It’s a Corn Masa Pizza Pie!….Yes!
As silly as it sounds, it is ridiculously delicious!
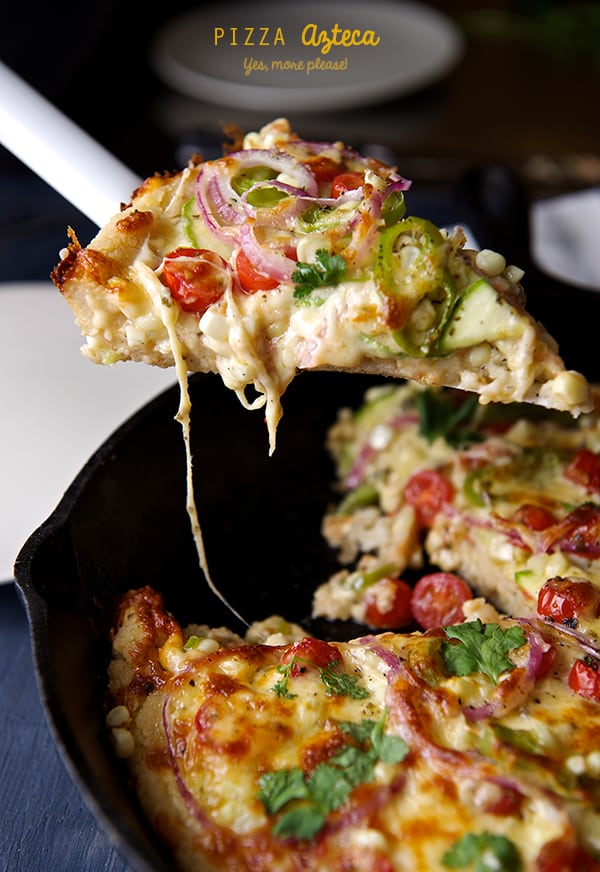
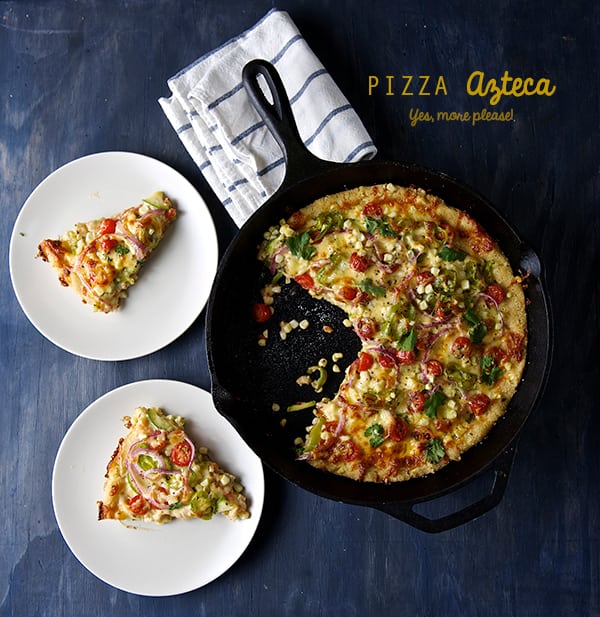
Call it what you like: Mexican pizza, Corn Masa pizza; Pizza Azteca-its the ultimate summer one pan wonder. This is a great quick meal solution too! To get pizza on board it takes no more than 35 minutes since the masa does not rely on yeast or waiting time to rise.
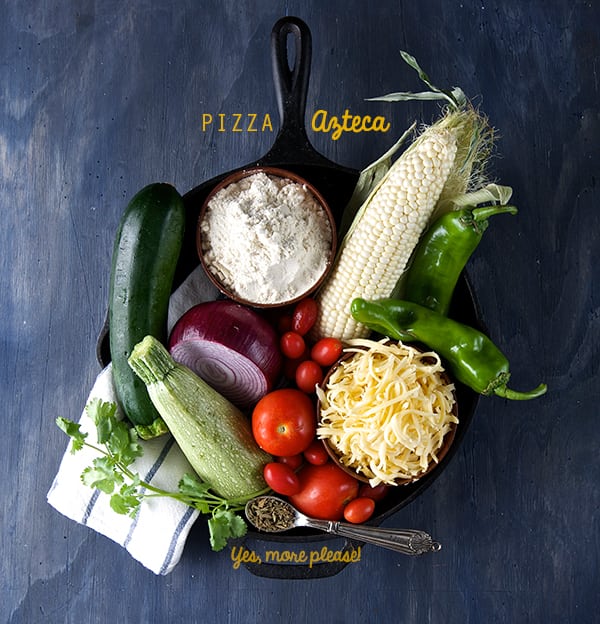
Let me describe this pizza for you… Imagine a hot cast iron pan filled with corn masa crust, when baked the bottom gets crusty with soft delicious nutty corn masa. Fresh corn kernels add texture, enhance the corn flavor and add moisture to the crust. The top layer load with summer vegetables like zucchini, fresh corn, tomatoes, red onions, hatch peppers, and loads of melty cheese layered on top. The summer vegetables pair great with the flavor of the corn masa, the oregano on the fresh quick base sauce adds the perfect herb note. I made the pizza sauce by grating some fresh tomatoes which adds extra freshness to the pizza. I baked everything on the king of pans, “the cast iron pan”.
When this pizza comes out of the oven you will be fill with warmth and happiness as you experience the comforting smell of cooked corn masa and fresh vegetables. Pizza Azteca is best served with a fresh green salad on the side and will be a sure crowd pleaser.
This Pizza Azteca is what I would offer Moctezuma on a summer afternoon… Pizza Azteca is a meal fit for kings!
Enjoy!
Pizza Azteca
Makes 1 round 12” pizza, yields 8-10 slices.
For the crust:
2 cups corn masa- Maseca is the brand I like, if you can get fresh masa, use it! you will be in heaven.
2 to 2-1/2 cups warm water
½ teaspoon kosher salt
½ cup fresh corn kernels (white or yellow corn is ok)
For the sauce:
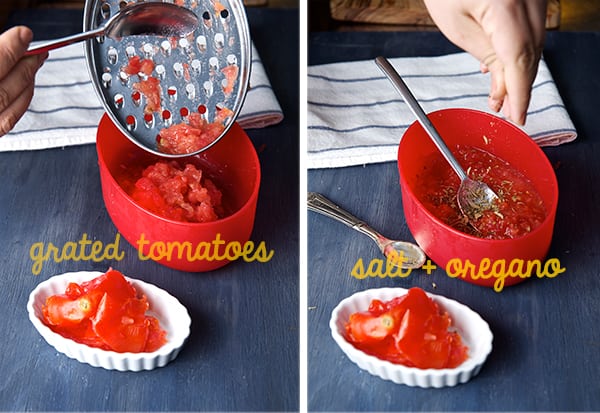
3 medium roma tomatoes grated
1 tablespoon tomato paste
1 teaspoon dry oregano
1 garlic clove grated
1 tablespoon extra virgin olive oil
1 teaspoon kosher salt
Fresh cracked pepper to taste
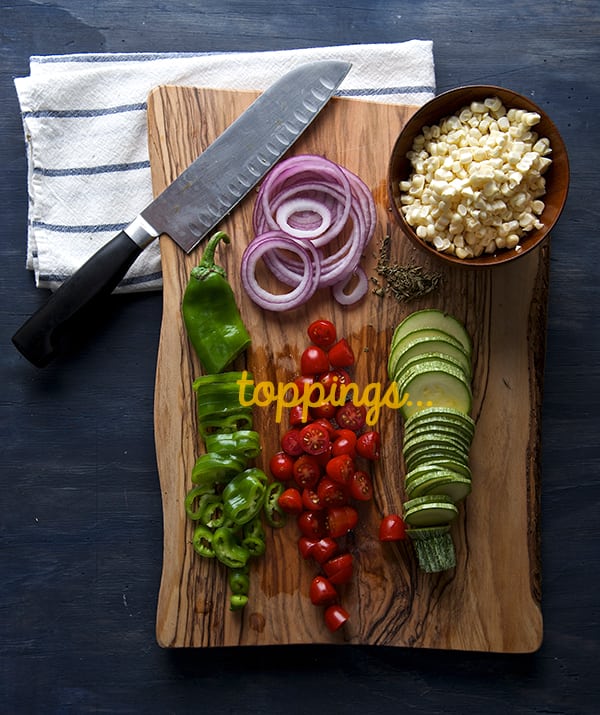
For the toppings:
1 large or 2 medium zucchini thinly sliced.
1 ear of corn worth of kernels
1 hatch pepper or substitute for 1 good pinch of red pepper flakes.
Use roasted red peppers if you do not care for spicy.
1 cup cherry, sun golds or grape tomatoes sliced in half.
2 cups of grated cheese like Adobera, Oaxaca, Gouda, Mozzarella or Monterrey jack.
Use the cheese you like the most, as long it melts and has a mild flavor so you can taste the rest of the ingredients.
Salt and pepper to taste a little extra virgin olive oil for drizzle.
Preparation:
Preparing the masa:
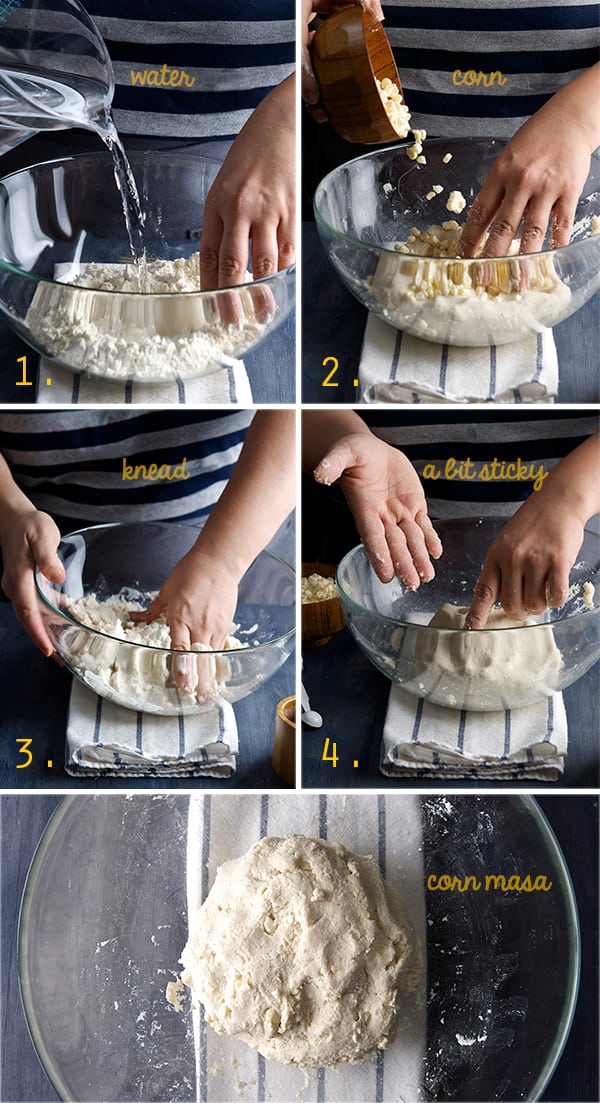
1. Start by preparing the masa dough. Dissolve the salt into the 2 cups of warm water. 2. In a large bowl place your dry corn masa flour, make a well in the center add half of the water, and start incorporating the flour from the sides. Add corn kernels and the rest of the water. Knead for 2-3 minutes until water is well absorbed by the masa. 3. The masa should feel moist a bit sticky to the touch. You should be able to shape it into a ball and cover with plastic wrap, set aside let it rest while you prepare the rest of your vegetables. 4. Preheat Oven at 450F/ 230F
5. Prepare and slice all your vegetables, grate your cheese and prepare your tomato sauce by grating the tomatoes and adding the oregano, salt, garlic, black pepper and extra virgin olive oil. Set aside.
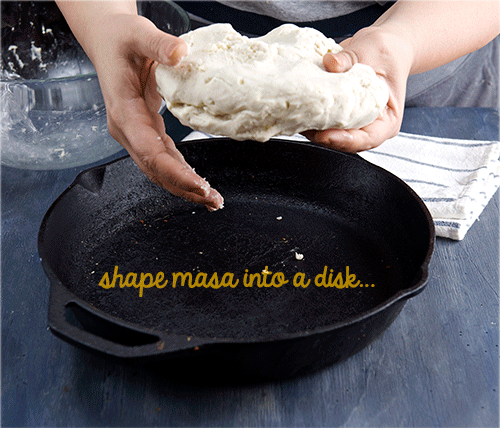
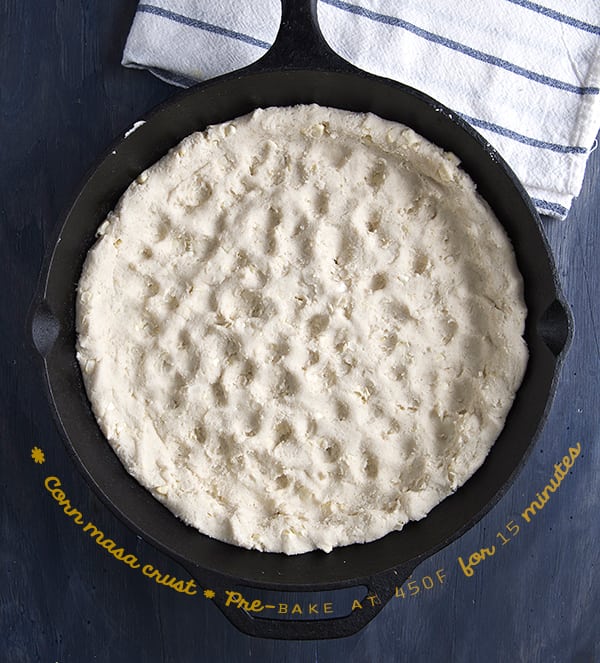
6. At this point your masa should be well hydrated and ready to shape into the cast iron pan. Using a 11-12” Cast Iron Pan place your masa dough in the center and with wet hands start by evenly shaping the masa into the pan. Create a higher rim on the edge of the pan. see photo.
Note: If your cast iron pan is well seasoned do not worry about the crust it will not stick to the pan, if not just apply some neutral oil on a napkin and grease the pan before shaping your crust.
7. Once you have an even layer with a bit of a rim on the outside edges, Place skillet with the crust in the oven, on the bottom rack. Bake for 15 minutes lowering the oven temperature to 425F as soon the crust is in the oven.
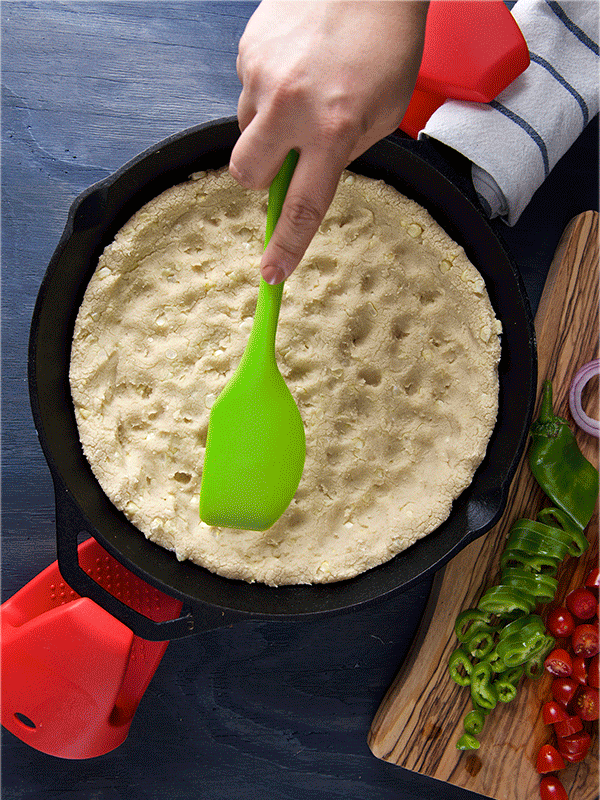
8. Carefully remove the skillet from the oven, place it on top of the stove or a metal trivet and start layering your pizza ingredients. Note: leave the pot holders into the cast iron pan handles at all times!, this will prevent you to try to grab the hot pan by mistake!…believe me I’ve been there…ouch! 9. Layer the ingredients same way you do like on a pizza, starting with tomato sauce on the bottom, half of the cheese, zucchini, corn, onions, tomatoes, peppers, and the rest of the cheese. A pinch of salt and some fresh cracked pepper. 10. Place the cast iron pan into the oven for another 20-25 minutes until cheese is melted and the pizza has some gratin golden brown blisters.
11. Remove from oven, place the pan on a trivet and wait 5 minutes to cool off a bit before cutting. Sprinkle some fresh cilantro for garnish. 12. Serve and Enjoy!
Enjoy!
Silly, silly music pairing: Brak’s Pizza Song with the Space ghost…
Recipes, Cooking & Art Direction: Mariana Nuño Ruiz McEnroe | Photography: Ian McEnroe |
Published: July 18, 2014
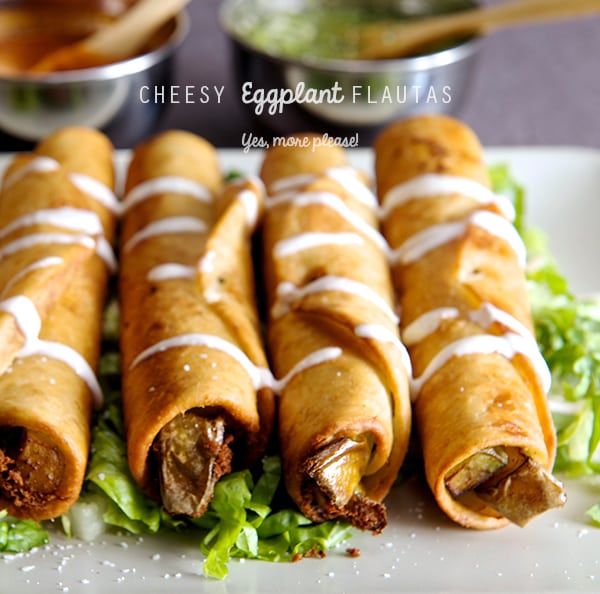
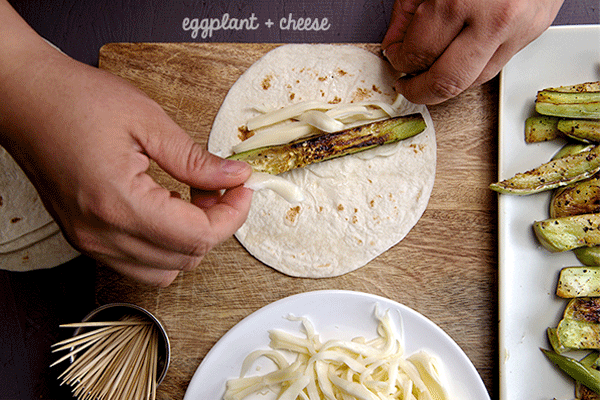
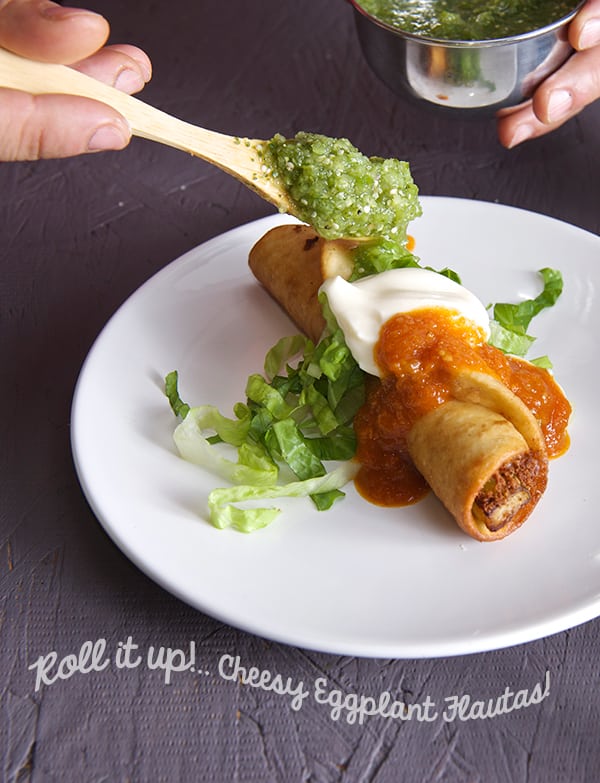
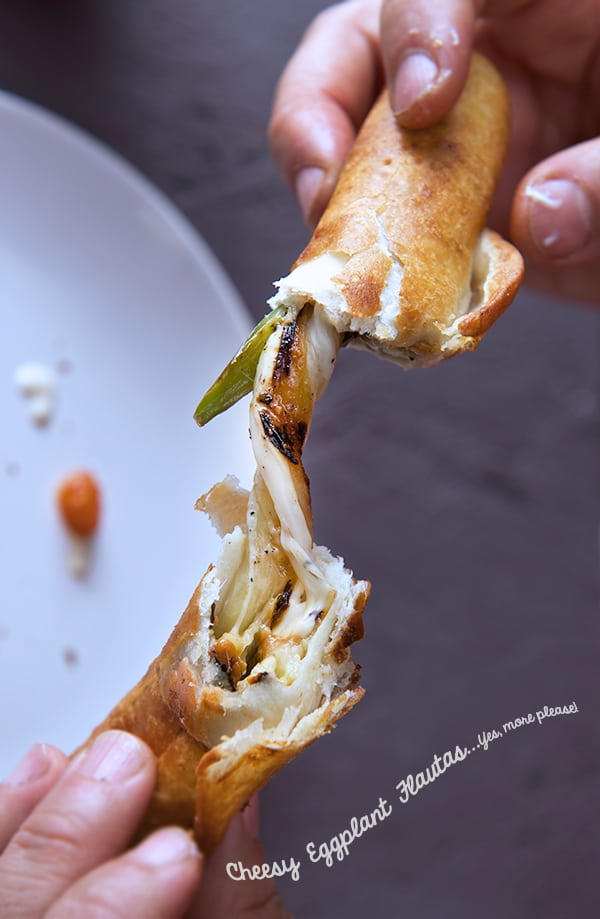
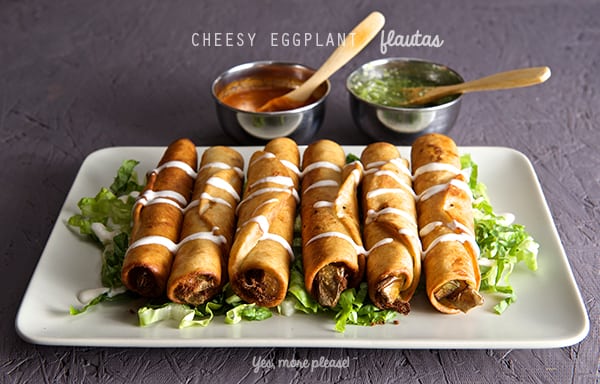
Roll e’m up, folks! These Flautas ~a.k.a~ rolled tacos are scrumptious! They are filled with quickly sauteed eggplant and a strip of Oaxaca stringy cheese in a thin flour tortilla. THis recipe is quite different from your regular eggplant recipes. The eggplant marries to the cheese inside of the crunchy warm rolled-up flour tortilla, making the filling into utterly creamy vegetable goodness.
They are best served on a bed of crisp fresh lettuce, drizzled with some liquid sour cream or Mexican cream. You can make my fabulous Tomato-Cinnamon sauce for dipping it is slightly spicy and sweet, the cinnamon warms up the tomato flavor is a match made in heaven with the eggplant. A Salsa Verde also works divine… you choose, or make them both, why not?!
I struggle to find a great variety of quick dishes for eggplant. Cheesy Eggplant Flautas are a great way to utilize those extra eggplants and a fun vegetable option that makes for a great, simple and delicious entree.
Don’t feel like frying?…then brush the rolled flautas with some vegetable oil and bake them!…
Now, get those eggplants rolling. Have fun!
Cheesy Eggplant Flautas
Makes 8 Flautas
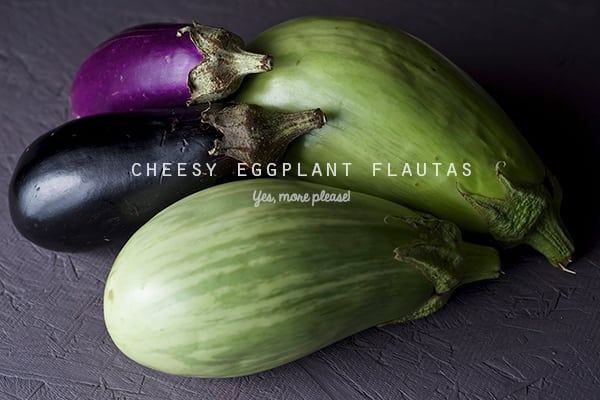
1 large eggplant cut into thick strips.
½ pound of Oaxaca cheese.
8 thin flour tortillas
4 cups of corn oil for frying.
1-2 cups of finely shredded Romain lettuce.
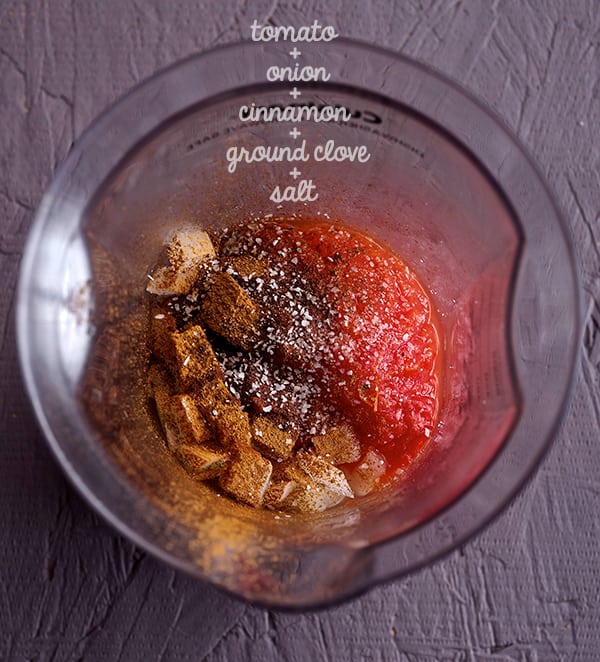
For the Tomato – Cinnamon salsa:
1 large red tomato such as red prudence or 2 Roma tomatoes will do too.
¼ cup fine diced sweet onion.
1 pinch of ground clove
1 pinch red pepper flakes or one dry chile de arbol
½ teaspoon ground cinnamon.
½ teaspoon salt
½ teaspoon sugar
1 tablespoon of apple cider vinegar
1 small glug of grape seed oil or mild olive oil.
2. Boil the tomato and puree it. 3. In a small pot add oil and saute the onions until soft and translucent. 4. Add the spices and salt stir until well combined and fragrant. 5. Add the tomato puree and the sugar and cook for 3-5 minutes. 6. Turn off the heat and add the apple cider vinegar, adjust seasonings.
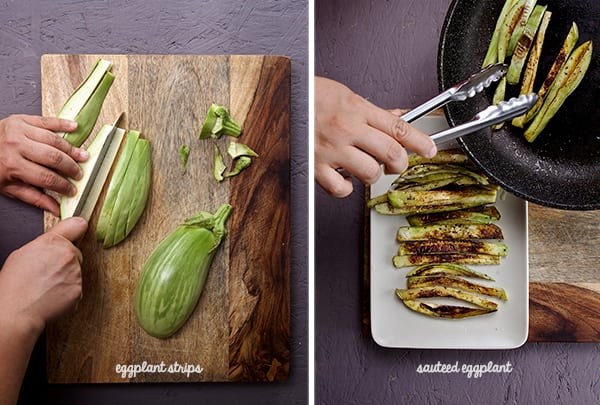
Make the Flautas: 1. Saute the thick eggplant stripes using a little olive oil, season salt and pepper. Set aside.
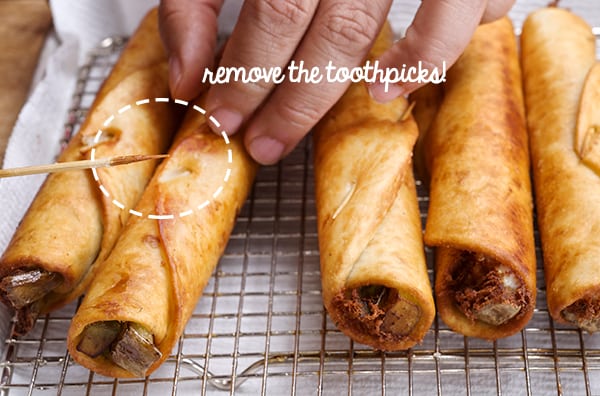
2. String the cheese into a thinner stripes. 3. Slightly warm up the flour tortillas, place one or 2 eggplant stripes and some cheese strings roll it tightly and secure the end with a wooden toothpick. Proceed with the rest.
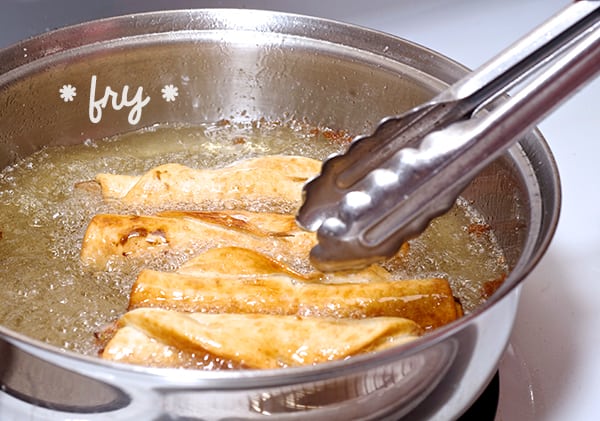
4. In a medium size heavy bottom pan add the 4 cups of oil and warm up until your thermometer reaches between 350-375 degrees. NOTE: Take care while frying to avoid any skin contact with hot oil. Watch the pan and carefully monitor the temperature. Avoid all distractions since these flautas cook very quickly. 5. Fry the flautas until evenly golden brown around 2-3 minutes or less. Watch them at all times.
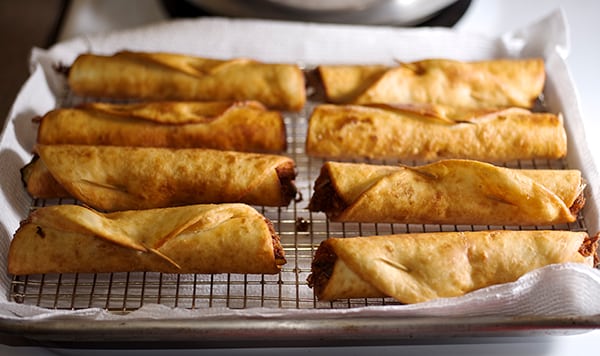
6. Pull them out on a cooling wire rack
7. Serve immediately on a bed of lettuce, drizzle the crema, dip into the salsa roja or verde…. bite, dip-bite-repeat. Enjoy!
Recipes, Cooking & Art Direction: Mariana Nuño Ruiz McEnroe | Photography: Ian McEnroe |
Published: June 12, 2014
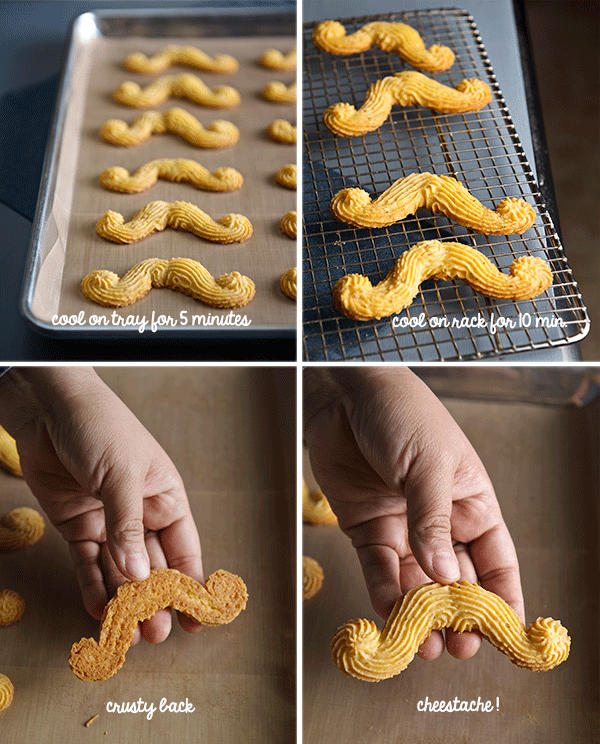
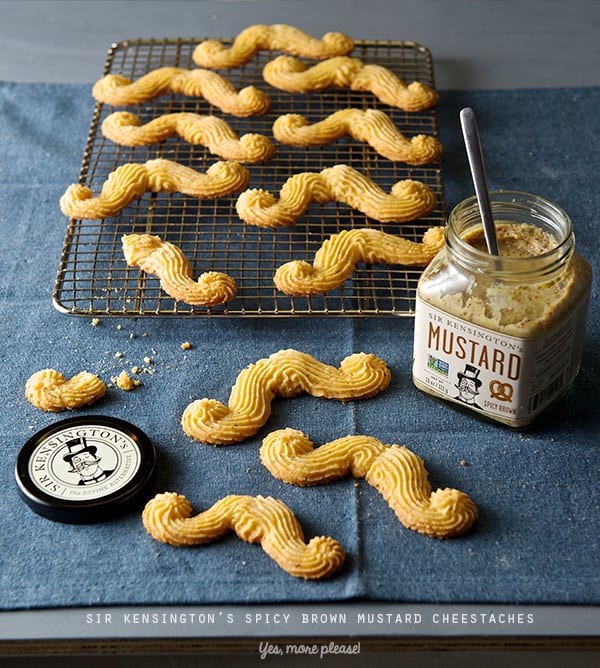
Not too long ago, roaming around whole foods supermarket aisles, I discovered on the shelves the magical Sir Kensington’s ketchup. Looking at me rom the wide mouth glass jar I noticed Sir Kensington’s top hat personality and I fell in love with his aristocratic moustache. That was my very first impression. But the man behind the monocle had way more to offer than just an attractive moustache. As I grabbed the jar and started to read the label my jaw just dropped, Non- GMO, 50% less sugar, 33%less sodium, and a short list of ingredients in which whole tomatoes take the first place ingredient. I was totally in love.
You all know my love affair with tomatoes, so you must know what this discovery meant to me. In my opinion this is the best ketchup I’ve had. Shortly after I discovered the whole condiment collection, mayo, chipotle mayo, spicy ketchup and their recent addition “The” Sir Kensington’s Spicy Brown Mustard. I’ve tried them all. You should, too. Period.
A condiment revolution is here! With all natural ingredients, this spicy brown mustard already has a place in the Mustard Museum with a silver medal on the 2014 world-wide competition. The distinctive spicy mustard flavor has a hint of maple syrup. I have smothered it on everything. I decided to come up with a recipe that enhanced the mustard flavor, and a tribute to Sir Kensington’s Moustache.
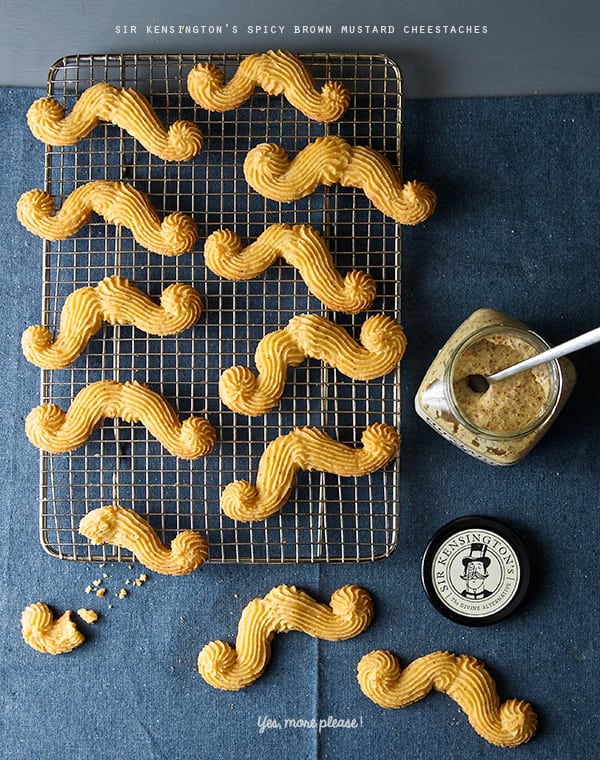
This is how this recipe was born. These cheese straws are the ‘piped’ kind you can squeeze from a piping bag or a cookie gun. Not to be confused with the twisted puff-pastry kind. These buttery, cheesy, crumbly, savory cheestaches have a spicy brown mustard kick!
Mild cheddar pairs fantastically with this spicy brown mustard. This easy and fun to make recipe has five ingredients and the result are this cheesy and spicy, utterly delicious moustaches. Most anyone with a love for creamy cheddar cheese and spicy brown mustard will appreciate a treat like this. This fun snack is a great treat to pamper your Dad on Father’s Day. Even if your Dad does not have a mustache!
Apple juice, a cold glass of beer or a cold iced tea will be the perfect match for this Cheestaches on a summer afternoon. Top notch!
Enjoy!
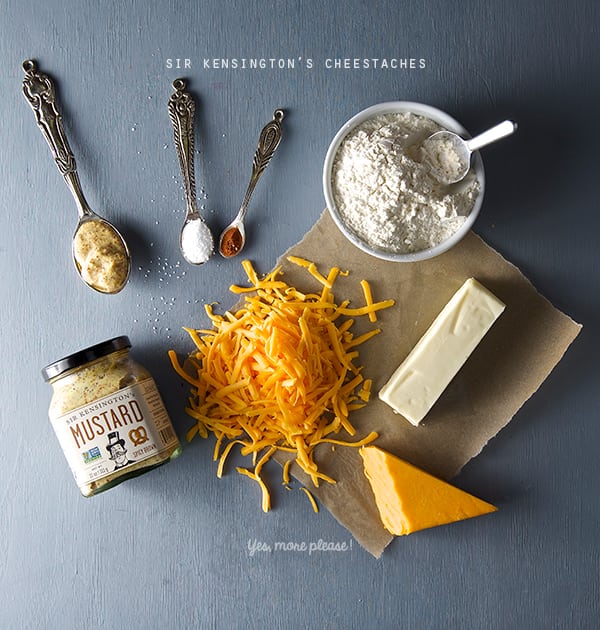
Sir Kensington’s Spicy Brown Mustard Cheestaches
Makes 24 cheestaches
4 oz mild cheddar shredded and at room temperature
4 oz (1stick) unsalted butter room temperature
1 heaping Tablespoon of Sir Kensington’s Brown Spicy Mustard
1/8 teaspoon Cayenne pepper
1/2 teaspoon kosher salt
1+1/2 cups unbleached all purpose flour.
1 medium 12” piping bag
Metal decorating tip # 32 available at any craft store.
1 cookie sheet, parchment paper.
Preparation Method
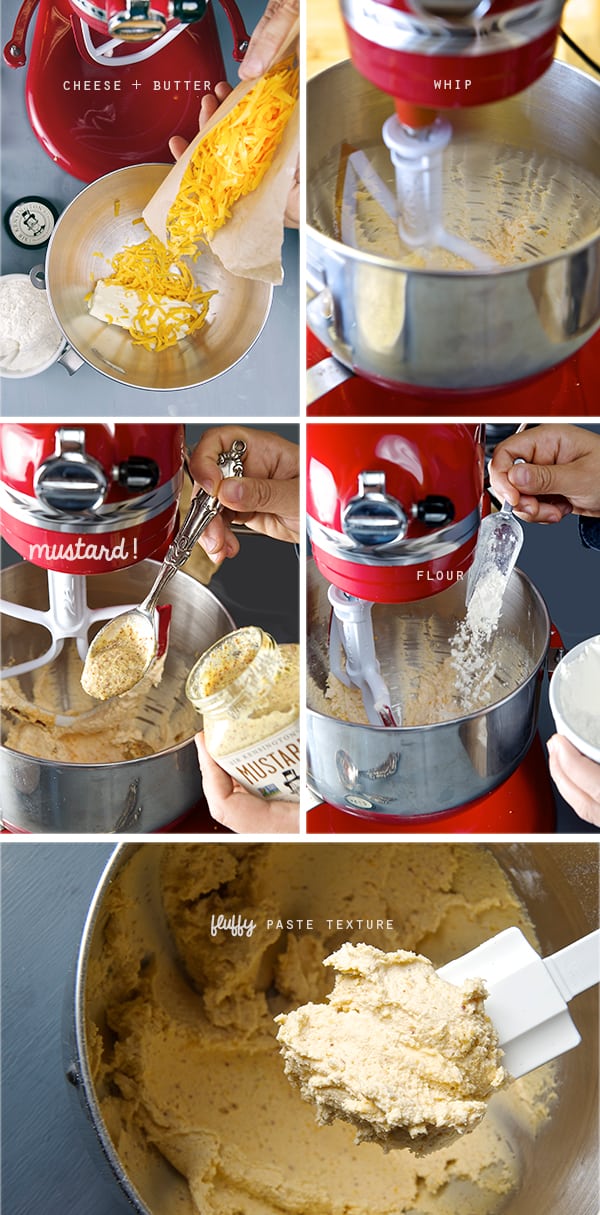
1. In the bowl of a mixer fitted with a paddle attachment, whip the butter for about 4-5 minutes until the butter looks lighter color.
2. Add the shredded cheddar cheese mix for another 3-4 minutes. until you just see small speckles of cheese and the butter is fluffy and looks whipped.
3. Stop mixer, add the spicy brown mustard, cayenne and salt. Mix until combined. 1-2 minutes.
4. Stop the mixer and add the flour in two stages, mixing on medium low until well incorporated.
5. Mix on medium high for 2 minutes. the batter should look like a paste. (if the dough is to stiff, add a bit more mustard and bout a tablespoon more of butter. whip.)
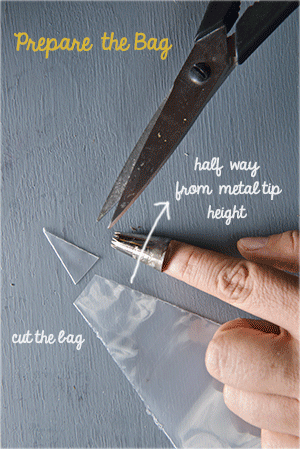
6. Prepare the piping bag, follow instructions below.
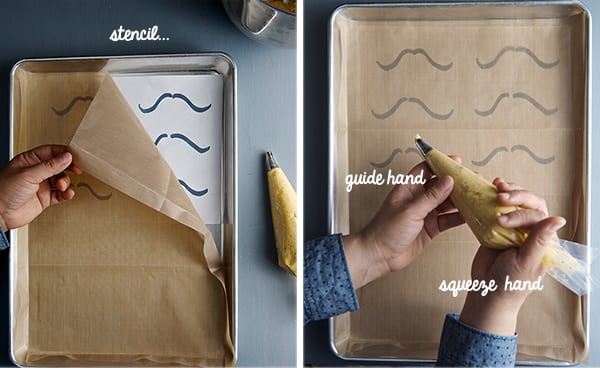
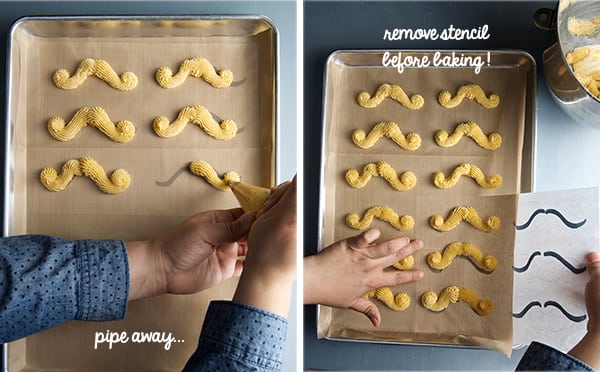
7.Line a Baking sheet with parchment paper, a silpad or reusable-parchment, mi favorite!; place the mustache stencil under the parchment.
I made a mustache stencil you can print for easy piping, you can look it up, down load it our Yes, more please! Facebook page click here to get it! Not in the mood of mustaches?.. pipe 3”- 4” stripes and bake for about 12 minutes.
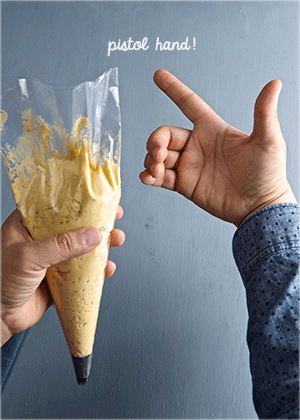
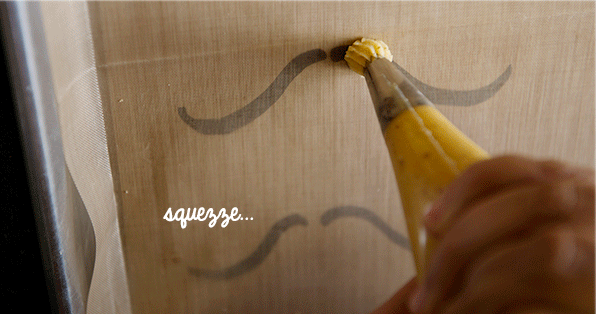
8. Now the fun begins!…Pipe the cheese- mustaches follow the instructions on the picture below, but first take a quick look on my easy way to handle a piping bag.
9. Once you pipe the mustaches place the baking sheet in the refrigerator for at least 15- 25 minutes.
10. Preheat your oven at 350 F.
11. Bake cheese straws for 12-14 minutes, until the tips and base of the mustaches start looking golden brown on the edges.
12. Remove from oven, let them cool on the cooking tray for 4-5 minutes on the tray. Then with the help of a flat spatula transfer them to a cooling rack.
13. This cheese mustaches can be dipped on a bit extra of spicy brown mustard if desired for more kick. But to tell you the truth they are great as they are!..and they taste fantastic the day after.
Serve with a nice cold glass of beer or Iced Tea. Enjoy!
This recipe post was sponsored by Sir Kensington’s brand condiments and the mustard used was furnished by the good folks at Sir Kensington’s.
 Its warm in the Lone Star State. We’re still waiting in Texas for some cool Autumn weather. We are still in the 80’s around here if you know what I mean. The only indication of Fall, besides the calendar, are the beautiful pumpkins, squashes, sweet potatoes, root vegetables and leafy greens at the markets.
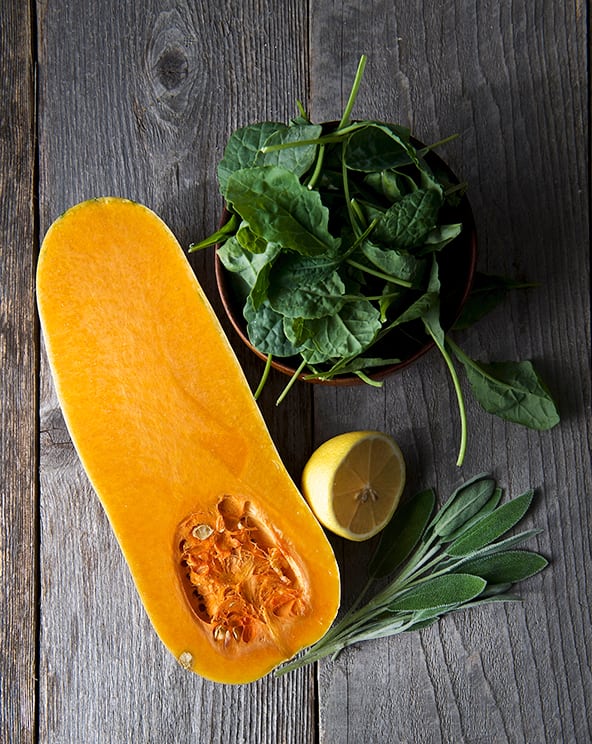
 3. Evenly spread one side of each of the bread slices with the Manchego-butter spread.
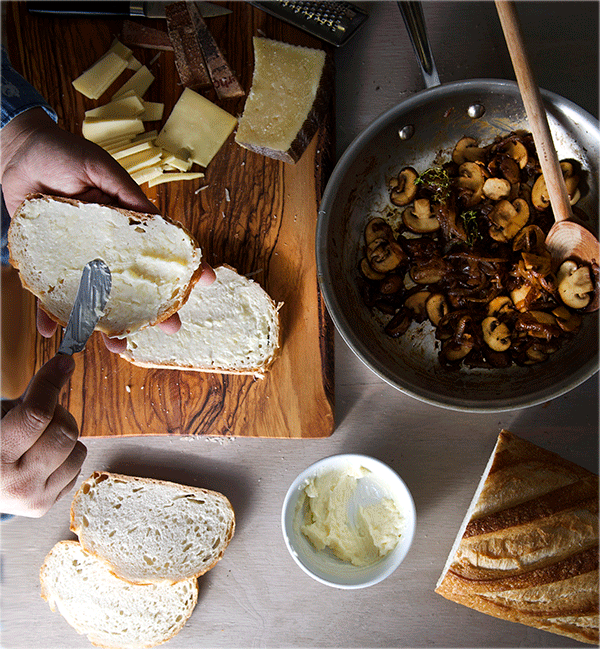 5. On a medium heat warm up a non-stick pan, cast iron pan or plancha. Once is hot, place both of your sandwiches and grill for about 4 minutes each side, until mahogany golden brown, and the cheese is melted.
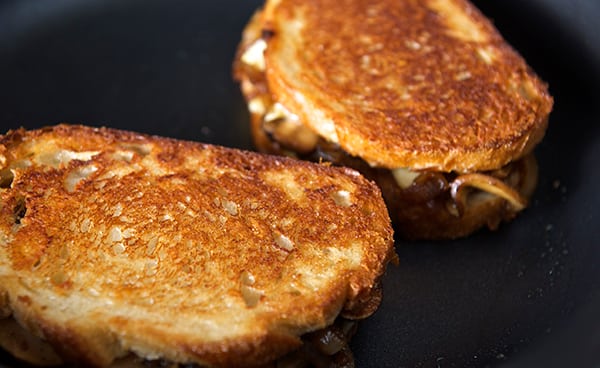 6. Remove from pan into a cutting board and slice in half.
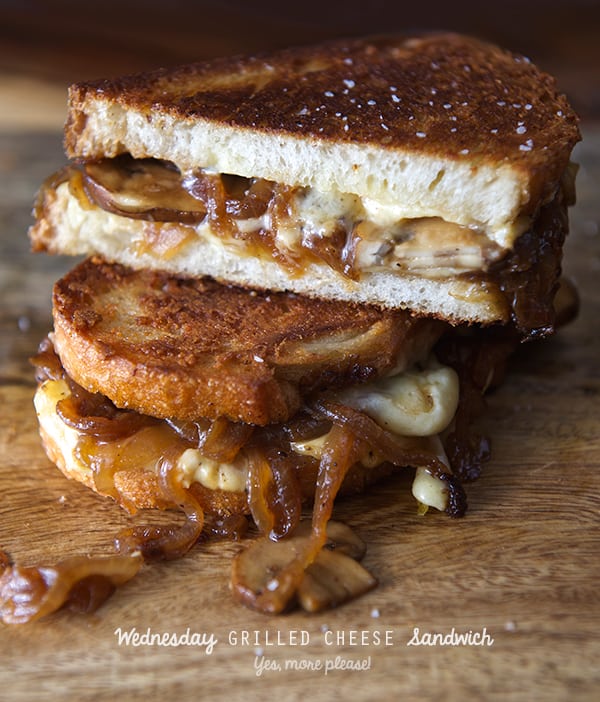

