Avocado RSS feed for this section

Chicken Tortilla Soup “Mariana Style”

Chicken-Tortilla-Soup-'mariana-style'`Yes,-more-please!

In this global world we are living, what is authentic anyway?…

I think as I get to know more people from different backgrounds, cities, expatriates, cultures, beliefs, culinary eccentrics, purist, creators; the more I conclude that authenticity is not a place, a language, a heritage, a culture, or a belief.
I think authenticity comes from within. Who you are at this right moment, in this place and at this time; and the one that you want to become…. that’s authenticity for me.

It reminds me of a monolog phrase in the movie “All about my mother” from Almodovar’s
and one of the characters in the movie quotes the following:
“… because you are more authentic the more you resemble what you’ve dreamed of being” – “La Agrado’s” monologue (All About My Mother) Almodovar.

And you are wondering what does this has to do with tortilla soup?,
In the culinary world, I’ve always questioned myself about  what is considered an authentic dish? Perhaps it is the dish that resembles more to the people who created it?
For example, If you are from Mexico; is the soup that your grandma prepares more authentic, than my grandma’s soup?.. No, I really don’t think so.
I believe you embrace the flavors that make you happy and satisfy, that make you re- create a memory a flavor, an aroma and you create the soup you want to eat and share with your loved ones… It will be hard to imagine Mexican grandmas cooking for the authenticity sake! I believe you can cook along the way with tradition and make it your own with a few touches.

In this Chicken Tortilla Soup, I wanted to evoke the aromas, textures, flavors, freshness, from the cooking style in Guadalajara, Jalisco the city I’m originally from. This soup re-creates a little memory of my home city, easy on the condiments and full of flavor…
I hope you like the soup as much as I do. So let’s cook!. Enjoy.

Chicken-Tortilla-Soup-'mariana-style'ingredients

Chicken Tortilla Soup “Mariana Style”

Serves 4-6

For the chicken stock:

1 whole chicken 3.5-4 lbs. I’m in love with the chickens from Smith & Smith Farms
1 medium size with onion
2 carrots
2 celery stalks
1 roma tomato
1 head of garlic
3-4 sprigs of thyme
2-3 sprigs of fresh oregano
1 teaspoon dry epazote or mint
1 tablespoon of salt
1/4 teaspoon black pepper

2 ears of corn- cut the corn of the cob
(my preference is white corn if I can find it, but yellow is ok too)

For the sauce:

2-3 dry Pasilla chiles slightly toasted
4-6 dry Guajillo chiles slightly toasted
1-2 dry Arbol Chiles slightly toasted
4 Roma tomatoes
¼ piece of onion
1 garlic clove
4 tablespoons of corn or sunflower Oil
Salt and pepper.

4-5 cups Chicken stock previously made… or the best option you have available.

Garnish with

8-10 Corn Tortillas cut into 1/2-1/4” wide strips.
½ to ¾ cup Canola Oil

1 ripe avocado, cut in slices or cubes
1 cup queso fresco crumbled
½ cup Mexican style crema or Creme fraiche
½ cup diced onion
2-3 Limes
2-4 dry Arbol Chiles toasted with a little bit of oil, until they look dark. (see photo below)


Preparation:

1. Start by preparing your chicken stock on a 7-8 qt pot. Place the whole chicken and add all the stock ingredients, add water enough to cover the chicken. Bring to boil and then lower down the heat to a slow simmer cover with a lid and cook for about 45 minutes.

Chicken-Tortilla-Soup-'mariana-style'

2. Mean time slightly toast your chillies on a pan, small comal or cast iron pan.
3. In a small pot boil the toasted chillies and the tomatoes.
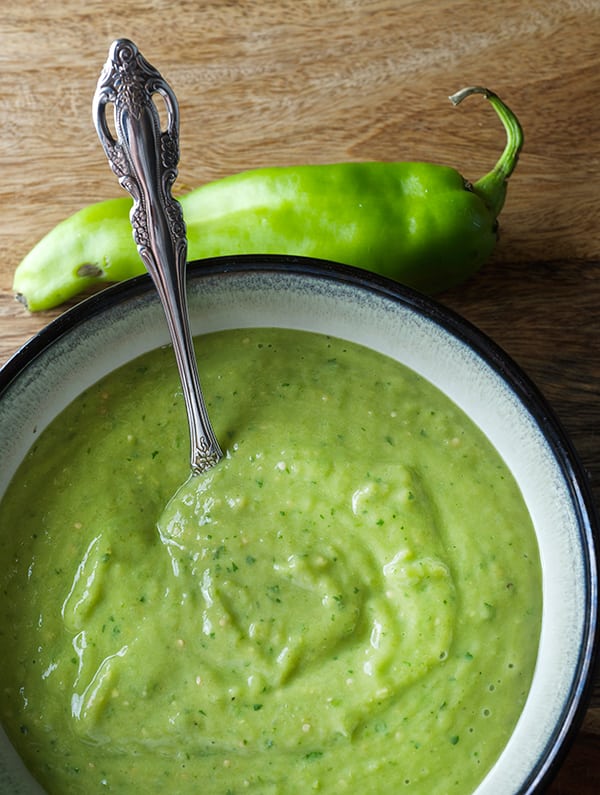
4. Once they are soft, place the chillies, tomatoes, onion & garlic into a blender or food processor and puree.
5. Using a strainer, strain the chilli puree to eliminate the seeds and pieces of skin. (see picture below)

Chicken-Tortilla-Soup-'mariana-style'how-to-make-the-broth

6. Cut and Fry the tortilla strips. Once fried place them on a plate with a paper towel to remove the oil excess. Sprinkle with salt while they’re warm.

Chicken-Tortilla-Soup'Mariana-Style'-frying-tortilla-strips
7. Check on your chicken stock, the broth should look translucent, no foam on the top, vegetables soft and onion translucent, chicken fork tender. If it is done remove at least 4 cups of chicken stock and strain. Take out the chicken, place it on a bowl and cover with some aluminum foil wait a bit until ready to handle, remove the skin and shred the chicken.
I usually use about ½ a chicken to serve 4. you can save the rest for tomorrow’s enchiladas…hehehe
8. In a medium size pot add 4 tablespoon of canola, or sunflower oil, once is rippling hot add your chilli-tomato puree, and cook the sauce in medium low for about 4-5 minutes.
9. Add chicken stock, and corn kernels season with salt and simmer for about 10-15 minutes.
10. Taste the soup for salt and paper.

Chicken-Tortilla-Soup-'mariana-style'_making-the-soup

11. Chop and prepare your garnishes

Chicken-Tortilla-Soup-'mariana-style'-Garnishes
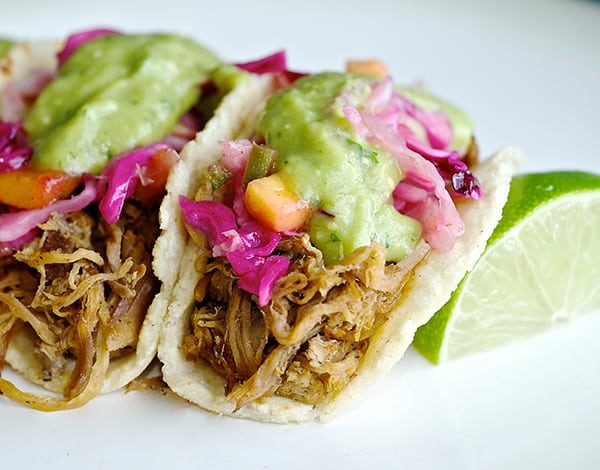
12. Serve on a deep bowl place the shredded chicken 2 to 3 ladles of the chilli broth place a good handful of the fried tortilla strips, and garnish with the cream, crumble cheese, avocados, and some of the chile de arbol fresh or toasted with a little oil for more heat.


Chicken-Tortilla-Soup'Mariana-Style'-close-up

Chicken-Tortilla-Soup'Mariana-Style'-bowl~yes,-more-please!

Chicken-Tortilla-Soup'Mariana-Style'-ready-to-eat~yes,-more-please!

ENJOY!!!

Smith&smith-chicken I’m in love with the chickens from Smith & Smith Farms, it is a small family operated farm, they specialize in  pasture raised meats that are hormone and antibiotic free. They  raise Dorper Lambs, all different breeds of laying hens, Cornish Rock meat chickens, Red wattle hogs, and Broad Breasted White Turkeys. All of the animals on their farm are free range and roam around every where! They are all as happy as can be, and you can taste the happines when you cook them. Delicious!

If you live in Austin, check their website for hours and farmers markets locations at: http://smithandsmithfarms.webs.com

View Post or View Comments 5

Salmon Sliders with yogurt-cucumber-dill sauce

salmon-sliders-with-yogurt-cucumber-dill-sauceyes-more-please

The title says it all, Salmon Sliders… what’s not to like about a small handmade bun filled with seared salmon and topped with yogurt, cucumber, dill sauce? That’s what I call a healthy way to have my buns. This recipe is great for entertaining, pool parties, or a late brunch. They taste great room temperature or right out of the oven.
Making the buns might sound very elaborate, well it’s not! 45 minutes, so easy you will love to make them. You do have to plan ahead of time, but like I said the results are incredible, 100 % worth it to make them. These mini buns are so light and flavorful you are not gonna want to use store-bought any more…
It is so relaxing to knead the dough by hand and enjoy the process. While the dough is proofing you can finish up the prepping for the burgers and in less than you think you will have the best sliders ever. Baking this babies one day before will work too…the beauty of slow cooking.
The buns recipe make about 12-14 mini buns, feel free to combine sizes, I made 2 -5”inches diameter and 8-3”mini buns. I wrapped the extra buns in plastic wrap and freeze them I think the will be good for about 4 to 6 weeks on the freezer, for future Salmon Sliders.
I hope you enjoy making them as much as I did! Have fun.

Salmon Sliders with yogurt-cucumber-dill sauce_delicious mini burgers

Salmon Sliders with yogurt-cucumber-dill sauce

To make 4- 8 mini sliders

1 – 2 pound Salmon fillets cut into 2”x 4” pieces or the best size you can(see picture below)
Path them dry and salt and pepper them both sides right before cooking.
1 recipe of Mini slider buns ( see below)
½ red onion
4-6 Radishes
2 tablespoons of rice vinegar , salt and pepper to taste
1 ripe avocado in slices
3-4 Lettuce leaves
¼ cup Kalamata Olives
6-8 Long bamboo skewers

For the yogurt sauce:

1 cup Greek yogurt
½ English or pickling cucumber
1 tablespoon of dry dill or 2 tablespoons of fresh.
½ teaspoon fresh ground pepper
¼ teaspoon sea salt
¼ teaspoon celery salt
1 small garlic clove
the zest of one yellow lemon
Place everything on a blender or using a hand blender purée into well combined. Keep it chilled.

Salmon Sliders with yogurt-cucumber-dill sauce_ yogurth sauce ingredientsSalmon Sliders with yogurt-cucumber-dill sauce_making yougurt sauce

Slider Buns

Makes 12-14 / 3”- mini buns

½ cup luke water
½ cup luke warm whole milk
1 tablespoon active dry-yeast
2 tablespoons of sugar
1 teaspoon kosher salt
1 large egg room temperature
3 tablespoons of sunflower oil (butter, coconut oil, extra virgin olive oil are good substitutions)
3 1/2 cups unbleached all purpose flour
2 tablespoons of butter

Directions:

1. In a Large metal bowl pour the warm water.Sprinkle the active dry-yeast and sugar. Let it stand for 5 minutes until yeast is dissolved.
2.In a medium size bowl combine the luke warm milk, egg, oil, salt whisk well. Add this mixture to the yeast and combine.
3.Add the flour to this mixture one cup at the time while mixing with your hand or in a stand mixer fitted with a dough hook. Knead for 3 minutes until mostly combined.
4. Place the dough ball into a surface dusted with flour and start kneading it with your hands against the counter in folding movements for about 5-8 minutes min. The dough ball should look smooth and soft. (I’ve find the hand method works best. you can tell when the dough is ready by feeling it and the warmth of your hands helps develop the yeast.)
5.Proceed to shape the dough into a ball, and divide into 12-14 pieces. Shape each piece into a ball. Start by forming a tight ball with each piece using your hand like a scoop against the counter, making circular movements. Place them about 2-3 inches apart into a baking sheet lined with parchment paper giving them enough room for proofing. Cover with a clean cotton kitchen towel and let them rise for about 30 minutes.
6. Preheat the oven 400F/200C
7.Once they have doubled in size, brush them with egg wash and sprinkle some sesame seeds. If you don’t care for sesame seeds, just brush them with butter or olive oil.
8.Place baking sheet on the middle rack of your oven and bake the buns for about 12-14 minutes or until deep golden brown tops and bottom.

Your kitchen by now smells like heaven!!!
Pull them out of the oven let them rest for 2-3 minutes on the tray and then transfer them into a cooling rack.Salmon Sliders with yogurt-cucumber-dill sauce_Homemade buns

To Assemble:

On a very hot skillet sauté the Salmon fillets about 2-3 minutes per side leaving the centers slightly pink. Set them aside.
Thinly slice the red onion and radishes and combine them in a small bowl adding a little rice vinegar salt and pepper.
Cut the slider buns in half and slightly toast them , start assembling the sliders.
Place the bottom bun , lettuce , salmon , yogurt –cucumber-dill sauce, radishes and onions place the bun top and with a long skewer passing and olive through it and secure the mini buns…. Time to eat!
*Assembling the sliders in this order will prevent the bun to get soggy. Always use the lettuce as bun protector.

Salmon Sliders with yogurt-cucumber-dill sauce_seared-salmonSalmon Sliders with yogurt-cucumber-dill sauce_building your salmon sliderSalmon Sliders with yogurt-cucumber-dill sauce_toppingssalmon-sliders-healthy-burger-yes-more-please

Salmon Sliders with yogurt-cucumber-dill sauce ~ Yes, more please!


View Post or View Comments 7

Pulled Pork Tacos & Hatch-banero Mango Slaw

Pulled-Pork-Tacos-&-Hatch-banero-Mango-Slaw-Green-Tomatillo-and-Avocado-Salsa-~Yes,-more-please!

I consider myself a part-time vegetarian but every now and then my carnivorous side knocks at my door. In this case I was craving for a good fresh pork taco. This is an lengthy description right?    Good – fresh – pork – taco? Let me explain myself. “Good”: high quality meat well prepared and well seasoned. “Fresh” : I make it from scratch no short cuts. I want something that is really gonna satisfy my craving. I could go to buy a taco but its better when you make them. Its easy to follow these few steps and….. Done! The formula is ready so you can have the best tacos in town, because you made them!
Being from Mexico, its been hard for me to find good tacos in town (how come something so simple can get so screwed up at the restaurants?). I think the best ones I had here in Austin were prepared in my kitchen. Why? Not because I’m a taco genius, its do to a simple easy equation: handmade tortilla + quality meat cook properly + fresh salsa = the best taco. Want to make fresh corn tortillas?… check our step by step tutorial click here.

In this case, this is more like an adaptation taco recipe, I used the pork shoulder, or pork butt, because its a good substantial cut of meat. It has a balanced percentage of fat and meat and is great for braising. Yes I wish I could have a copper pot with a huge wooden spoon and cook the pork in hot lard (like carnitas style) and also a huge powerful vent in my tiny kitchen for the smell to go away!. Yes, I love tacos but the smelly vapors in my house? Not so much. Therefore I’m using my handy dandy slow cooker. I place a little table outside in my patio and leave it there for about 3-6 hours, depending on how many lbs. of meat I’m cooking. The result is the neighbors want my fork tender juicy meat. (See pictures below). Its such a great method because it allows you to go to work come back with dinner ready! If you are planning a dinner party its also a really easy one pot wonder, everybody happily assembles their tacos.

In this case I wanted to make some sweet and sour cole slaw instead of the traditional cilantro and onions or pickled red onions. I added some mango for sweetness and spicy hatch chilies.For the salsa I used creamy avocado and green tomatillos to balance the acidity from the spicy mango slaw (as I’m writing my mouth is watering). These are good fresh pork tacos to me, for now let the pictures do the talking…
This is three recipes in one all fairly easy considering the pork cooks by itself, a Taco Feast that will satisfy any crowd… Enjoy!

Pulled-Pork-Tacos-&-Hatch-banero-Mango-Slaw-crowd-pleaser-how-to-make-tacos~Yes,-more-please!

Pulled Pork Tacos & Hatch-banero Mango Slaw

Serves 6-8 mexicans, 8-12 americans, 12-16 french.

Ingredients:

3-5 lbs pork shoulder or pork butt roast
1 orange ½ juiced the other half cut in thick slices
4-6 garlic cloves
½ medium size onion cut into thick rings
2 bay leaf
1 teaspoon of whole black pepper corns
6 whole cloves
2 tablespoons of dry chile powder
1 tablespoon dry mexican oregano
2 tablespoons of sea salt
2 red habanero peppers
3/4 cup of apple cider vinegar
2 tablespoons brown sugar
½ cup water

Preparation:

On the bottom of the slow cooker sprinkle some salt , half of the pepper corns, half cloves, 2-3 crushed garlic cloves add vinegar and water. Remove some of the excess fat then place the pork roast in the slow cooker. Sprinkle all the rest of the aromatic ingredients on top, add onion rings, orange slices, chili powder, brown sugar, red habanero peppers, garlic cloves. Cover with a lid and follow the instructions for your slow cooker. I cooked this amount of meat in 4 hours (the 3 first hours in high, the last hour on low). Cook until the center of your meat reaches 145F / 62C measured with a meat thermometer. Once your meat is ready turn off the slow cooker and let it rest for about 30-45 min.
Remove all the topping spices and pieces of orange, onion and bay leaf. Transfer the meat into a bowl, and then proceed to fish out all the peppercorns and cloves once you remove all the aromatics, Remove some of the extra fat, but not too much (Leave some for flavor). Place the meat back into the juices and with the help of 2 forks start shredding the meat. It will be easy since the meat has been cooking for so long. Leave it in the pot to keep it warm.

Pulled-Pork-Tacos-&-Hatch-banero-Mango-Slaw_Pork-cooked_step-by-step~Yes,-more-please!

On the bottom of the slow cooker sprinkle some salt , half of the pepper corns, half cloves, 2-3 crushed garlic cloves add vinegar and water. Remove some of the excess fat then place the pork roast in the slow cooker. Sprinkle all the rest of the aromatic ingredients on top, add onion rings, orange slices, chili powder, brown sugar, red habanero peppers, garlic cloves. Cover with a lid and follow the instructions for your slow cooker. I cooked this amount of meat in 4 hours (the 3 first hours in high, the last hour on low). Cook until the center of your meat reaches 145F / 62C measured with a meat thermometer. Once your meat is ready turn off the slow cooker and let it rest for about 30-45 min.
Remove all the topping spices and pieces of orange, onion and bay leaf. Transfer the meat into a bowl, and then proceed to fish out all the peppercorns and cloves once you remove all the aromatics, Remove some of the extra fat, but not too much (Leave some for flavor). Place the meat back into the juices and with the help of 2 forks start shredding the meat. It will be easy since the meat has been cooking for so long. Leave it in the pot to keep it warm.

Spicy Hatch & Habanero Mango Cole Slaw

Serves 6-8
Hatch-banero-Mango-Slaw-~-Yes,-more-please!

Ingredients:

2 cups or ½ small size red cabbage
4 cups or ½ medium size green cabbage
1.5-2 cups 1 big mango 2 medium size peeled and medium diced
3 green onions finely chopped
½ red onion finely chopped
¼ cup cilantro finely chopped
1 Hatch pepper seeded and finely chopped* ( you can replace the hatch for fresh jalapeños )
1 red habbanero pepper seeded and finely chopped*
*Rub a little canola oil in your hands specially your finger tips before start cutting the peppers, this will help avoid burning your hands.

Vinaigrette:

1/3 cup of canola Oil
½ cup of apple cider vinegar
1 tablespoon brown sugar
2 tablespoons honey
1 teaspoon sea salt
1 teaspoon of dry oregano
½ teaspoon of celery salt
½ lime juice
½ lemon juice

Preparation:

In a large bowl whisk all the vinaigrette ingredients. Add the 2 types of cabbage and the rest of the chopped ingredients. Mix well set a side let it get happy for about 20-30 minutes.

Mango_ColeSlaw_02

Green Tomatillo and Avocado Salsa

Pulled-Pork-Tacos-_Green_avocado_Salsa-how-to-make-~Yes,-more-please!

Ingredients:

6-8 Small fresh green tomatillos
2 hatch peppers roasted skinned and seeded
1 ripe Hass avocado
3-4 cilantro sprigs
juice of ½ lemon
¼ cup of water
salt and pepper to taste

Method:

In a stand blender or using a hand blender, puree all ingredients until smooth and creamy consistency. Adjust for salt and pepper.

Pulled-Pork-Tacos-_Green_avocado_Salsa-~Yes,-more-please!

How does all this work together?…

Place everything on the table like a buffet style, warm up your tortillas, keep the shredded pork warm on the slow cooker, cut some extra limes, some Cholula red sauce, or any of your preference. Layout the coleslaw, the green avocado salsa and let everybody assemble their own tacos. Open a cold bottle of amber beer like Victoria (this beer is from Mexico but now available in Austin!!!) squeeze a lime juice and Salud!…Share with friends!

Pulled-Pork-Tacos-&-Hatch-banero-Mango-Slaw-~Yes,-more-please!

Pulled-Pork-Tacos-&-Hatch-banero-Mango-Slaw_bite!--~-Yes,-more-please!

Enjoy!

View Post or View Comments 6

Beet Salad, Avocado spread & Pumpernickel crostini

Beet-Salad_avocado-spread_pumpernickel-crostini_table-ready

This weekend Ian and I had really good eats. Beets are one of my favorite root vegetables, My mom used to make steamed beets sliced with a squeeze of lime and salt and served as an afternoon snack for my brother and I when we where kids. As a grownup, I love them in all preparations; raw, shredded over salads, ROASTED, steamed, in soups, chips and one of my favorites is to pickle them. Sometimes I don’t have the patience to wait until they are pickled, so I refer to a recipe like this and it works like a charm.
I made this Beet Salad, with avocado spread and pumpernickel crostini last Sunday with the type of beets they had available at the farmers market, beautiful Golden and Chioggia Red beets. I believe some are sweeter than others; to me, golden beets taste less earthy and less sweet compared to Red beets. Every kind of beet is extremely healthful and full of anti-oxidants, phytonutrients, so use any kind you have available. They can lift up any simple green salad, or become a meal as in this instance. This light vinaigrette works like a charm in combination with the following cooking method: I steamed them for a short time until just al dente, with a little crunch. The contrast in textures between the bread and the avocado spread and the sweet-tangy beet salad is what grabs me the most. The vinaigrette is light and tangy with bright fresh herbs…. done! This is a very easy and full-flavored recipe. You can serve this as an appetizer, light lunch, or with the addition of the avocado in slices and some pecans as a great side salad.

Beet-Salad_avocado-spread_pumpernickel-crostini_-Golden-and-Chioggia-Red-beets.

Beet-Salad_avocado-spread_pumpernickel-crostini_sunnny-winter-salad

Beet Salad, Avocado spread & pumpernickel crostini

Serves 2-4

1 Golden Beet
1 Red Beet
1 small sweet potato ( it adds contrast and creamy texture)
¼ cup seasoned rice vinegar
2 tablespoons of Extra Virgin Olive Oil
1-2 Tablespoons of fresh thyme, tarragon and mint.
(you can replace any of these for dry, but at least use one fresh herb if you can.)

Avocado spread:

1 small avocado smashed
1 small clove of garlic grated
Lemon Juice, salt and pepper.
Pumpernickel Bread
Some butter or extra virgin olive oil to grill the crostini.

Beet-Salad_avocado-spread_pumpernickel-crostini_Tosted-with-butter

Directions:

Scrub and rinse really well. In a double boiler steam the beets whole do not cut them, for 15- 18 minutes*
set them aside and allow them to cool. Once cool, peel them and slice them thin. ( a little less than ¼” inch.) Place them in a Bowl, add the herbs, rice vinegar, oil, salt and pepper. Gently toss these together and set a side.
Smash the avocado with a fork in a small bowl. Add grated garlic, and a squeeze of lemon, with salt and pepper to taste.
For the Crostinis: on a medium-high heat nonstick skillet, add a dab of butter and toast about 4-6 pieces of bread, both sides. ( I highly recommend the butter , it plays so well with the bred and the tangy notes from the beets!… However, the vegetarian or vegan version using the extra virgin olive oil also tastes terrific. Enjoy!
For service there are two options: assemble to serve or serve everything separately and assemble as you eat.(the second option is more fun, and it prevents your crostini from getting soggy.
* note: if you keep your root vegetables in the refrigerator, allow them to come to room temperature before you start cooking them, to ensure they cook evenly.

Beet-Salad_avocado-spread_pumpernickel-crostini

Beet-Salad_avocado-spread_pumpernickel-crostini_table-ready-to-eat!

Beet-Salad_avocado-spread_pumpernickel-crostini_-Golden-and-Chioggia-Red-beets_under-the-sun

~ Enjoy under the sun ~

Music Pairing: THe las Beat of my heart – DeVotchka

https://youtu.be/knsDmfmOnas

Beet Salad, Avocado spread & pumpernickel crostini

Serves 2-4
Course Brunch, Lunch, Snack
Cuisine vegetarian, wholesome
Prep Time 15 minutes
Cook Time 25 minutes
Total Time 40 minutes

Ingredients

  • 1 Golden Beet
  • 1 Red Beet
  • 1 small sweet potato it adds contrast and creamy texture
  • ¼ cup seasoned rice vinegar
  • 2 tablespoons of Extra Virgin Olive Oil
  • 1-2 Tablespoons of fresh thyme tarragon and mint.
  • you can replace any of these for dry, but at least use one fresh herb if you can.

Avocado spread:

  • 1 small avocado smashed
  • 1 small clove of garlic grated
  • Lemon Juice salt and pepper.
  • Pumpernickel Bread
  • Some butter or extra virgin olive oil to grill the crostini.

Instructions

  1. Scrub and rinse really well. In a double boiler steam, the beets whole do not cut them, for 15- 18 minutes* set them aside and allow them to cool. Once cool, peel them and slice them thin. ( a little less than ¼” inch.) Place them in a Bowl, add the herbs, rice vinegar, oil, salt and fresh ground black pepper. Gently toss these together and set aside.
  2. Smash the avocado with a fork in a small bowl. Add grated garlic, and a squeeze of lemon, salt, and fresh ground black pepper to taste.

For the Crostinis:

  1. In a medium-high heat nonstick skillet, add a dab of butter and toast about 4-6 pieces of bread, both sides. ( I highly recommend the butter, it plays so well with the bred and the tangy notes from the beets!… However, the vegetarian or vegan version using the extra virgin olive oil also tastes terrific. Enjoy!
  2. For service there are two options: assemble to serve or serve everything separately and assemble as you eat.(the second option is more fun, and it prevents your crostini from getting soggy.

Recipe Notes

* note: if you keep your root vegetables in the refrigerator, allow them to come to room temperature before you start cooking them, to ensure they cook evenly.

View Post or View Comments 0

Privacy Policy Contact Us Yes, more please!