Recipes, Cooking & Art Direction: Mariana Nuño Ruiz McEnroe | Photography: Ian McEnroe |
Published: November 15, 2013
Have you ever tried hibiscus?… hibiscus is a flower from a tall plant that when dried makes the most fabulous aromatic and vitamin C loaded tea or cold beverage. It is one of my favorite ingredients.
I’m from Mexico and Hibiscus is called “Jamaica” and it is pronounced Ha-my-cah, not to get it confused with the Island. Hibiscus is used in many different preparations, the most common is to prepare “agua fresca”flavored water. Jamaica it is very floral and refreshing, its our natural instant beverage.
It is also used in candy making in Mexico on the Chapala Lake Riviera, in Jalisco. There they make delicious sweet and tart hard candy pieces. If I was to describe the hibiscus flavor, it resembles a little to cranberry. The difference: Hibiscus has this floral notes that makes it so remarkable.
I was thinking of a little spin on Thanksgiving for people who find cranberry too tart so I thought of Jamaica. Then, what to do besides agua fresca and candy? Chutney?.. no… Glaze!
Oh yes I experimented last week glazing some Cornish Hens and it tastes delicious. My original thought was to glaze some quail, but I look for a good source of quail here in Austin and I was with out luck… so I cooked Cornish Hens…and what a treat!
The results?… Well you have to try it. It’s floral, tart, sweet and I added a hint of orange zest, and ancho powder to give a little spicy kick….Ian loved it!.. and yes I liked it too.. I definitely want to share the recipe with you, let me know what you think!
Try it with Quail if you or some soul around reading this can find some. I think it will be wonderful and if not it’s great on Cornish Hen! And if you are already a Hibiscus Lover, try our recipe Martini dos Flores… you will fall in love with it! https://yes-moreplease.com/2013/08/martini-dos-flores/
Hibiscus-Orange Glazed Cornish Hens
Serves 2-4
2 cornish Hens, about 18 to 22 oz each
4 sage leaves
4 bay leaf Sea salt and black pepper
Directions:
To roast the perfect cornish hens, I always follow the following steps:
1. Bring the Cornish Hens to room temperature. Take them out of the refrigerator at least 30 minutes before start cooking. 2. Preheat the Oven at 450 F/ 232 C – cook at 425 F/ 218 C 3. Using paper towels pat dry the hens. Salt, pepper and add 2 bay leaves and 2 sage leaves to each bird cavity. 4. Truss the birds, ensuring legs are tight and the tips of wings are behind the body just like if the bird is taking a nap in the sun. Trussing the Cornish Hens make a more even mass, so they cook more evenly. 5. Place them on a baking sheet or a heavy bottom roasting pan and roast for 30-25 minutes until a meat thermometer, inserted in between the breast and thigh reads 165 F/ 70 C anf juices run clear. 0While the hens are in the oven, make the glaze.
Hibiscus-Orange Glaze
The first time I made this dish I tried to make the glaze using the Cornish Hens drippings from the pan and de-glaze de pan like when you are making a gravy. I did not like this, the delicate floral flavors from the hibiscus were masked by the chicken fat so I made the glaze separate to keep the floral notes alive.
1 cup dry Hibiscus flowers
the zest of ½ medium size valencia orange
½ cone piloncillo, grated
1 aromatic clove
1 chile de arbol
1 teaspoon ancho powder
4-6 sprigs of thyme
1 tablespoon of butter
pinch of sea salt
Directions:
Steep 1 cup dry hibiscus flowers in about 1 ½ cups of simmering water for about 8-10 minutes.
In a small sauce pan add the concentrated hibiscus tea, piloncillo, clove, chile de arbol, ancho chili powder, orange zest, and thyme. Bring to a slow simmer, simmer for 4-6 minutes.
Remove the sprigs of thyme clove and chilies. Bring the glaze to a rapid simmer stir constantly, until the glaze is reduced by half. Check the consistency by dipping a spoon into the glaze and running your finger tip across. If the line stays put, your glaze is ready (see picture below). At this point add 1 tablespoon of butter until melted and well incorporated, set aside.
Check cornish Hens at 35 minutes. If the thermometer reads 160F/70C start glazing.
Use a pastry brush or a rubber brush to varnish them. Apply 1 coat and keep baking for about 2 minutes, apply 2 or 3 glaze coats in total. If necessary turn on the broil on the oven and broil for 1 minute for a shiny glaze finish.7. Check temperature until reads 165F/74C and juices run clear.
Remove from the oven and let them rest for 10-12 minutes before serving.
Serve over a bed of herbed farro or buttery rice, recipe follows…
Quick herb-orange farro
Serves 2
½ cup farro perlato
2 cups water or chicken stock
¼ cup finely chopped parsley
1 teaspoon orange zest
1 tablespoon butter (or you can use some of the chicken fat from the roasting pan)
salt & pepper to taste.
In a small sauce pan, bring water to boil and add farro. Reduce heat to a low simmer.
Cook for about 20-25 minutes. Check for doneness. It usually takes 30-35 to be al dente,
at this point add butter, chopped parsley, orange zest, salt and pepper. Toss well, remove from heat and cover with a lid for 5 minutes. Serve warm. Note: I love farro done this way, I like it a little al dente, not too mushy, and I like to add the herbs, at the end to keep the flavors fresh and colors vibrant.
Recipes, Cooking & Art Direction: Mariana Nuño Ruiz McEnroe | Photography: Ian McEnroe |
Published: October 25, 2013
Dia de los muertos translates into “Day of the Dead”.
The tradition of celebrating Day of the Dead dates from Pre-Columbian times, when the natives of Mexico focused a great deal on the manner in which someone died and rituals were created to commune with the dead and deities from those ancient times. As often happens when two cultures meet, the Spaniards combined the native rituals with their own beliefs which produced a festival that assimilated the ideology, religion, art, agriculture and all the ingredients of the existing culture and resulted in our modern “Dia de los Muertos”.
In 2003 The Day of the Dead, was named by UNESCO as a patrimony intangible of humanity. It is a symbol of Mexico’s cult to the dead and the fascination for the unknown. It is a remembrance of life and the necessity to keep our bounds that seem so impossible to achieve and maintain when our loved ones depart. It is of great importance to remember and maintain these traditions of a rich and colorful culture. Mexico has a lot of good traditions to share with the world…
In Mexico, Day of the Dead is celebrated over three days starting October 31st. November 1 day of all saints, and November 2nd day of all souls. We celebrate the people who departed in hope that they might come back and visit to celebrate with us. And if they are coming all the way from a different dimension we better have some feast worth the trip!
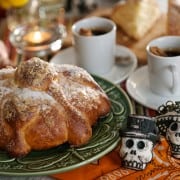
Family altars are decorated with the remembered ones’ favorite foods, photographs, possessions,sugar skulls, drinks and flowers. Candles are placed to illuminate the way for a safe journey back home. This phenomenon it is assimilated with respect and irony, defying the dead as they laugh about her. With a sarcastic bitter-sweet humor Mexicans celebrate the ones that are no longer with us but with the biggest respect they built altars to commemorate them singing, drinking and praying. Now a days people also makes altars for their Favourite historical characters, artist, singers, anybody who means or have influenced in some way your life, or that you just simple admire.
Our Altar in the picture above is made for the 2 most representative artist in Mexico, Frida Kahlo and Diego Rivera which I admire the most.
Pan de Muerto is one of the elements that can not be missed on an altar, a bread that resembles a skull with bones. Enjoy it with a cup of hot cocoa, warmed up and sweeten up the memories of the ones that are no longer with us. It is a good excuse to make this delightful bread and maybe… acquire a tasty tradition…
And ofcourse you need some music to go with it… who is better than Chavela Vargas to accompany this recipe and also to sing to their friends…I hope you enjoy… This song talks about the simple things in life, about love and time…http://youtu.be/-mnZcErj-SA
PAN DE MUERTO
Makes 3 -6” round loaves or 4- 4” liltte round loaves.
Printing recipe at the end of the post
1 lb / 500 gr. unbleached all purpose flour* plus 1/2-3/4 of a cup more flour for dusting when shaping and kneading.
¾ cup / 200gr. Sugar.
¾ cup / 200 gr. Butter room temperature and cut into small chunks.
½ cup / 125ml. Whole milk
2 teaspoons dry active yeast or one little dry active yeast package of 7gr.
3 whole eggs
2 yolks, save the whites for egg wash later…
1 teaspoon salt
1 teaspoon orange blossom water /extracto de flor de azhar
1 teaspoon ground anise seeds
1 teaspoon ground mexican cinnamon
the zest of one small orange
For the Egg wash:
2 left over egg whites you saved when making the dough…
A dash of milk
Coming out of the oven :
1 tablespoon melted butter
1/4 cup granulated sugar
1 pinch of cinnamon
Directions:
Day one:
1. Measure and gather all your ingredients.
2. Start by warming the milk just about luke warm, add a teaspoon of sugar and sprinkle the yeast until bloom. About 10-15 minutes. The yeast should look foamy and creamy. 3. Meantime, on a clean flat surface make a “wheel” with the flour using your bowl to make a perfect circle. 4. Sprinkle the sugar around the flour wheel. In the center add the eggs, egg yolks, spices, extracts, anise, cinnamon, salt. Check on your yeast and if its ready add it to the center of the wheel. Mix all this ingredients using the tips of your fingers or a fork.
5. With your hand in a spider position, start incorporating little by little the flour from the edges. Be careful and gentle not to break the flour ring. Start in circular motions all around the inner flour circle until you have fully incorporated all the flour and almost all the sugar.
6. Now using both hands start incorporating the butter. At this point you can decide, kneading the dough by hand for about 20-25 minutes, it is hard work, but I love the way the dough develops as the warm of your hands soften the dough and help the yeast making the dough smooth and shiny. This efforts shown when the bread is baked, it comes out with a tender finer crumb. The other option, using your mixer with a dough hook for about 10-15 minutes. Both routes work is just about preference and time. ~for me, the key to making a good dough is to feel the dough, that’s why I prefer to mix it by hand~
As dough is kneaded, you can add up to 1/2 cup more flour if needed, if after kneading, the dough feels to sticky, sprinkle 1/4 cup and knead, until your dough feels soft, moist, smooth,and has a shine to it. This dough is very easy to make and as soon the kneading develops the right texture you will know. It will feel soft and it looks a bit shiny, as you can see on the last picture below. So be patient, give the love and knead gently and confident that everything will come out at the right time.
7. Once the dough is ready dust a large bowl with flour, place the dough in the bowl, cover with plastic wrap and a towel and place it in the refrigerator over night. I’ve tried different methods and the bread did not come out as tender and buttery as traditional good bread. 8 to 10 hours over night gives the right time for the dough to develop flavor.
Day two:
1. Pull dough out of refrigerator, punch your dough and reshape kneading gently and briefely. 2.Flour a clean surface and cut into 4 equal parts. Shape each part using your hands creating a concave shape, gently surround the dough with your hand like a little cave, and gently, create circular motion with the dough rubbing against the table until you have formed a smooth round ball. Place each ball into a baking sheet lined with parchment paper, cover gently with a piece of plastic wrap dusted with flour and a clean kitchen towel.
3. Shape 3 parts of the dough and save one to make the bones and skulls for the tops. Divide this ball into 6 stripes and 3 small 1” balls equal sizes. 4.With your fingers make a little cylinder strip and gently pressing in between your fingers make the bones. (see picture below)
5. Place the bone strips, forming a cross and then place the a small ball in the middle, flattening a little making sure it sticks with the rest of the dough. 6. Cover the tray with a piece of plastic wrap dusted with flour to prevent to stick. Let the bread rise for a second time for about 45-60 minutes or until doubled in size. Once they are doubled apply the egg wash evenly.
7. Preheat the oven at 375F / 190C Place tray in the oven, and lower the temperature to 350F/ 175C .Bake for 25-30 minutes.Until golden brown and hollow sound.
8. Remove from oven, brush them with melted butter and drench in sugar. Cool bread on a rack. Prepare the hot cocoa, a cafe de olla and be ready to celebrate!
Enjoy your Pan de Muerto and Celebrate life!
* * *
Altar dedicated to Frida Kahlo and Diego Rivera
Traditional Sugar skulls are made with sugar and in the shape of skulls. One of my favorites Mexican cartoonist illustrator artists is José Guadalupe Posada who is the autor of the Famous Calavera Catrina. If you want to know more about him: http://publicdomainreview.org/2012/11/02/the-calaveras-of-jose-guadalupe-posada/
How to make Sugar Skulls its easy and fun, you can decorate with sugar icing , sprinkles, candy, colored sugar crystals anything that rocks your imagination, have fun!
Course
Snack
Cuisine
Mexican
Prep Time10minutes
Cook Time1hour
Total Time1hour10minutes
Servings82"x 3" small flat skulls
Ingredients
Royal Icing, for decorating:
1cuppowder sugar
1teaspoonmeringue powder
1-3teaspoonswarm water
2-4 drops of natural food coloring of your choice,start with one drop at the time until you achieve the desired color saturation.
For the sugar skulls:
3cupgranulated sugar
1egg white,from a large egg
Instructions
1. Mix troughly until you have a mixture that resembles like sand.
2. Using a plastic mold pack the sugar into the mold really well and level it. Un mold carefully placing a piece of tick cardboard behind the mold, flip and remove the plastic mold carefully. Place cardboard on top of a baking tray and Bake for at least 1 hour on 200F/90C. Remove from oven carefully. Leave tray on a safe place and let them air dry for an extra day.
3. Proceed and decorate with royal Icing and a little black coloring or melted dark chocolate.
This sugar skulls are not meant to be eaten, it is just for decoration since they will just taste like plain sugar…But you are welcome to eat them if you have a strong sugar tooth, have fun!
You can buy this awesome Guadalupe Posadas Skull Molds and many more on the following link: Mexican Sugar Skulls
This recipe is for traditional style Pan de Muerto. The bread, is buttery and the egg yolks give a beautiful rich color and flavor to the bread. Anise and orange zest give this bread a unique aroma and flavor. The texture is soft and with a strong crumb to hold up to one of we mexicans favorite thing to do: "Dunking the bread in to a cup of chocolate caliente-hot-cocoa" ~Enjoy!
1lb /500gr.Unbleached all purpose flour,plus 1/2 cup more for dusting and kneading
3/4cup/200gr.granulated sugar
3/4cup/200gr.Butter,room temp and cut in small chunks
1/2cup/125gr.whole milk
2teaspoonsdry active yeast,equivalent to 1 7gr.package.
3whole eggs
2yolks
1teaspoonsalt
1teaspoonorange blossom water/ extract de flor de azhar
1teaspoonground anise seeds
1teaspoonground mexican cinnamon
1the zest of one small orange
Instructions
DAY ONE:
1.Measure and gather all your ingredients.
2. Start by warming the milk just about luke warm, add a teaspoon of sugar and sprinkle the yeast until blossom. About 10-15 minutes. The yeast should look foamy and creamy.
3.Meantime, on a clean flat surface make a “wheel” with the flour using your bowl to make a perfect circle.
4.Sprinkle the sugar around the flour wheel.
5. In the center add the eggs, egg yolks, spices, extracts, orange zest, anise, cinnamon, salt.
6.Check on your yeast and if its ready,looks "foamy and creamy" add it to the center of the wheel.
7.Mix all these ingredients with a fork.
8.With your hand in a spider position, start incorporating little by little the flour from the edges. Be careful and gentle not to break the flour ring.
9.Start in circular motions all around the inner flour circle until you have fully incorporated all the flour and all the sugar.
10.Now using both hands start kneading into the butter. At this point you can decide, mixing your dough by hand, or using a mixer. I prefer kneading the dough by hand because the warm of your hands softens the dough as you knead, making it really smooth and shiny. Knead for about 20-25 minutes, until dough forms a smooth ball. If using your mixer, place a dough hook and mix for about 10-15 minutes. Both routes work is just about preference and time. The key to making a good dough is to feel the dough. That’s why I prefer to mix it by hand, I can tell when its ready and avoid over mixing. You can add up to 1/2 cup more flour if needed, if after a bit of kneading it feels to sticky, sprinkle 1/4 cup and knead, until your dough feels soft, smooth, and tender. This dough is very easy to make and as soon is the right texture you will know. It will feel not sticky and it looks a bit shiny, as you can see on the last picture below. So be patient, give the love and knead gently and confident that everything will come out at the right time.
11.Once the dough is ready grease the inside of a bowl with butter and place the dough ball, and cover with plastic wrap and a towel and place it in the refrigerator over night. I’ve tried different methods and the bread did not come out as tender and buttery as traditional good bread. 10-12 hours over night is great, the dough develops flavor and texture.
DAY TWO:
For the Egg wash:
1 egg slightly beaten, or those egg whites you saved when making the dough!
a dash of heavy cream
For the Glaze:
1 teaspoon flour
1/4 cup milk
1 egg
For sprinkle the bread
1/2 -3/4 cup of sugar
1/2 teaspoon of ground cinnamon
Directions:
Take the doug out of the refrigerator and let it come to room temperature, about 1-2 hours, before shaping.
1. Punch your dough and reshape dough kneading gently and briefely.
2. Dust with flour a clean surface and cut dough into 4 equal parts.
3. Shape each part in circular motions. Until you have formed a round ball. Place it into a baking sheet lined with parchment paper.
4. Shape 3 parts and save one to make the bones and skulls for the tops. Divide the 4th ball into 9 stripes and 3 small 1” balls equal sizes.
5.With your fingers make a little cilinder and gently pressing in between your fingers make the bones. (see picture above)
6.Proceed to place the bone stripes on top of the bread as picture above.
8.Cover the tray with a piece of plastic wrap dusted with flour to prevent to stick. Let the bread rise for a second time for about 30 minutes, or until double in size. When proofed, brush the the bread lightly with egg wash.
9. Preheat the oven at 375F / 190C once the bread is in the oven lower it to 350F/ 175C and bake for 25-30 minutes.
10.Remove from oven and quickly brush them with the flour glaze and sprinkle with sugar/cinammon mixture, place the bread bake in the oven and bake for 5-7 more minutes. Pull them out of the oven check the center for doneness. Cool them on a rack.
Note: If you don't, want to use the glaze, omit the egg wash and the glaze step. Bake the bread with out egg wash for 25-35 minutes. When bread comes out of the oven and cool slightly, brush the bread with melted butter and sprinkle the bread with the sugar and cinnamon mixture, until fully covered.
You can plan ahead and make the dough the night before, over the weekend. Wake up Sunday or Saturday and shape and bake your bread in the morning and have it for breakfast with a cup of warm chocolate ~ hot-cocoa, a coffee, or cafe de olla.
Enjoy your well deserved Pan de Muerto and Celebrate life!
Recipes, Cooking & Art Direction: Mariana Nuño Ruiz McEnroe | Photography: Ian McEnroe |
Published: August 2, 2013
Playing with leftovers can be fun. Ian my husband, is a master of drinks and beverages. He can make awesome concoctions in the blink of an eye. Last weekend what we had in our liquor cabinet was not very promising. But sure enough, Ian saw lots of possibilities and he came up with this awesome drink. We named it “Dos Flores” for obvious reasons, the Hibiscus tea and the Elderberry flowers liquor. After drinking the first martini we started joking about the combination of Elderberry flowers and “Jamaica” (in Mexico pronounced -Ha-my-cuh) which is very widely used for Aguas Frescas, popsicles, sauces you name it. Then we started to make comparisons and talking about history. One thing lead to another, and suddenly we where just thinking that this Martini would have been just the thing to drink if Benito Juarez ran into the Emperatriz Carlota; something a little sweet and sour to smooth out the edges of the time of the monarchy back in the day.
Anyway, we were just being silly and it made us laugh to the point that I have to share my mental image. What I know for sure is that it will smooth out the edges of any Friday. Have a great weekend *cling!* cheers!
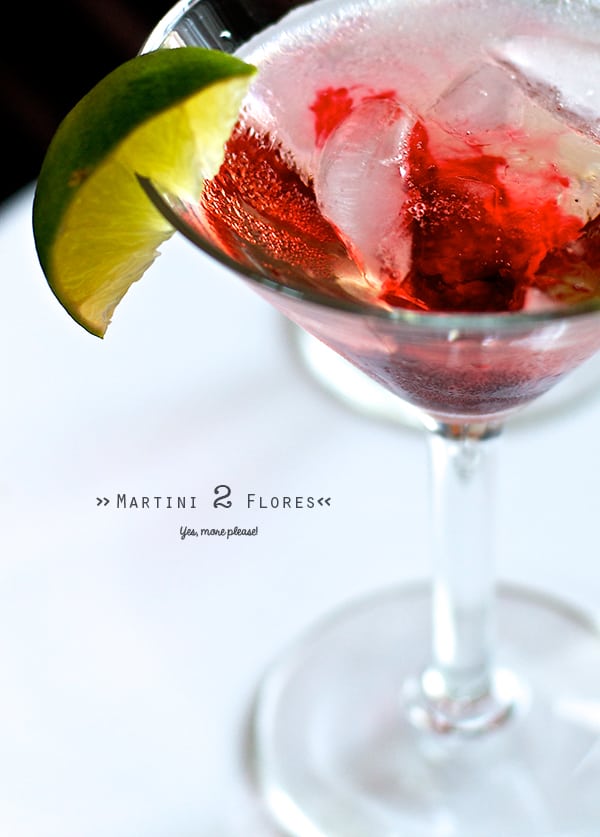
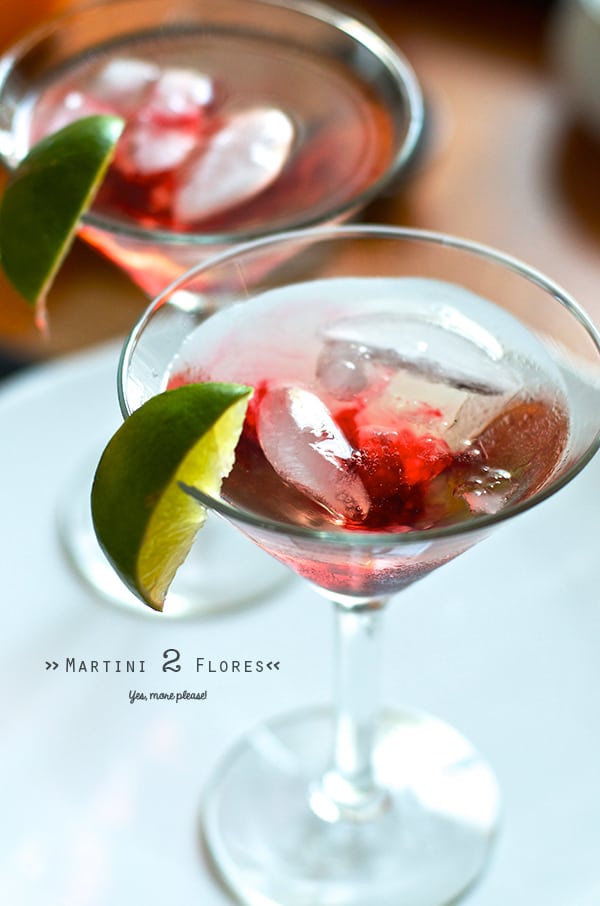
Martini Dos Flores
1 part Vodka
1 part Extra dry Vermouth
1 part Elderberry Liquor I used St. Germain Liqueur
A splash of concentrated Jamaica “hibiscus tea”, instructions below…
Splash of bitters
Squeeze of Lime
Ice
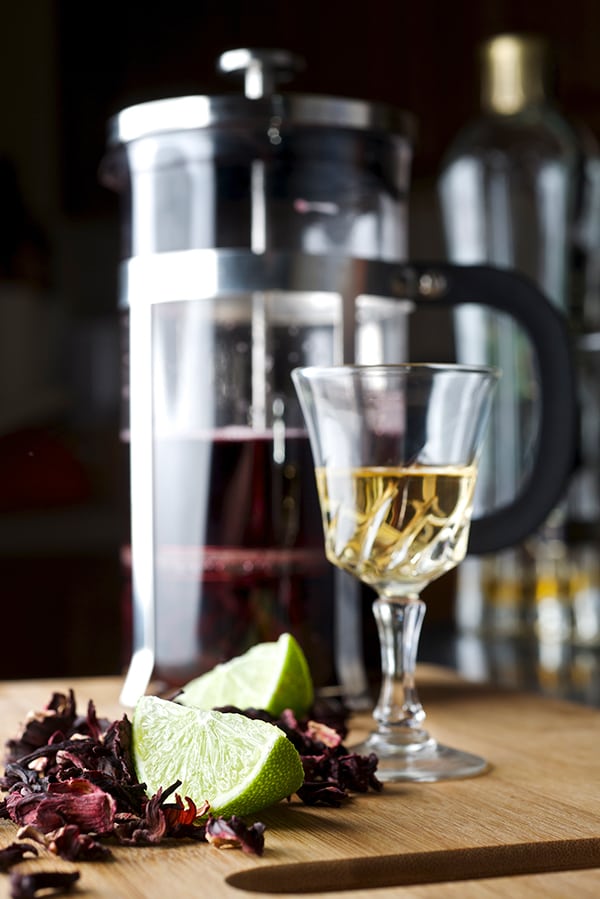
Jamaica- Hibiscus concentrated tea:
1/4 cup of hibiscus dry flowers
1 cup of boiling water
Proceed to steep the tea for about 3-4 min.Using a french press makes it really easy, is you don’t own one just make a tea and pass it trough a sieve.
Cool for about 20-30 minutes.
Garnish :
Lime wedges
1 Rehydrated hibiscus flower left over from the concentrated tea making. (optional)
Proceed to:
In a shaker, pour the Vodka, Vermouth, Elderberry liquor, squeeze of lime and the bitters with plenty of ice. Shake vigorously and strain into a chilled martini glass.
Garnish with Lime wedge and pour the concentrated hibiscus tea slowly into the center of the glass to create the marbling effect.
(Add a couple of extra ice cubes, especially if you are in Austin Texas Summer)
Serve in a chilled martini glass. Enjoy!
Cheers!
Music Pairing: Danzon No.2 Marquez Alondra dela Parra


