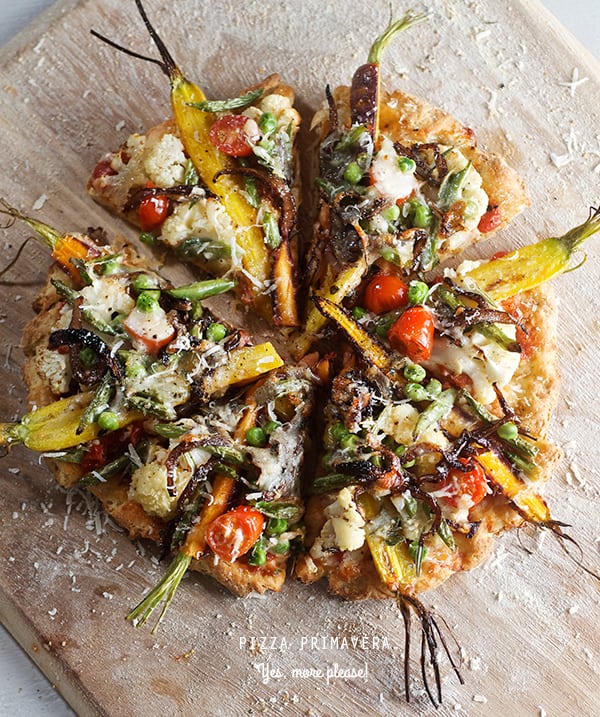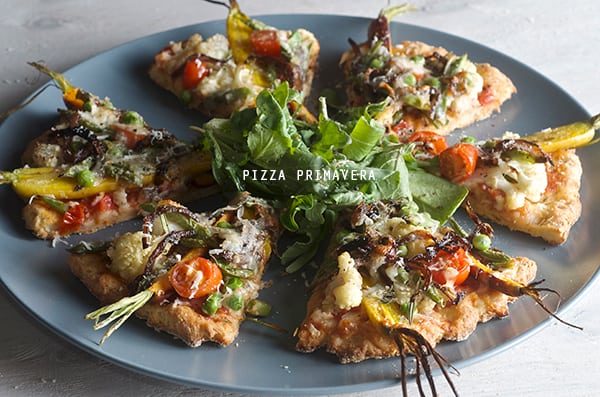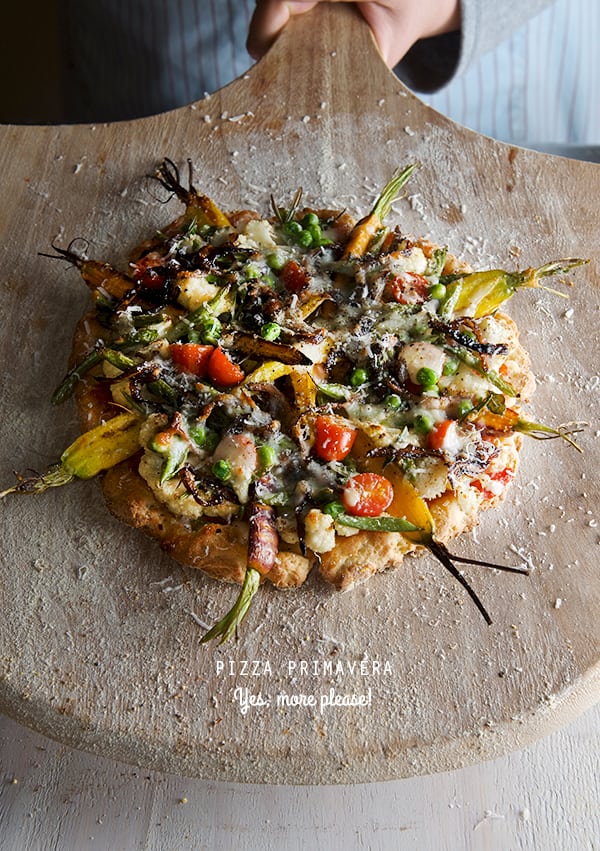
Pizza Primavera is a celebration of Spring! Using all the tender, sweet, crisp and fresh vegetables that the season gives us and inspired by all those beautiful shapes, colors, and textures this pizza has a refreshing taste of renewal. For me renewal translates as experimenting and trying ingredients and flavors that come with the new season.
Recently I’ve been experimenting with different gluten free flours, like oatmeal, brown rice, potato starch, tapioca, garbanzo, and quinoa. The fact that lately a lot of people have been diagnosed with a gluten intolerant condition means more are in need of extending their cooking horizons. Even if you don’t have gluten intolerance you should try this for its variation in flavor and texture.
Recently I baked an Irish Soda bread using 1/2-1/2 whole wheat and oat meal flour, which gave to the bread so much flavor than regular all purpose flour. That got me excited and I started to experiment with the not so easy task to come up with a gluten free pizza dough. For this pizza crust I experimented with different ratios, of brown rice flour, tapioca, potato and millet flour. The results were delicious and flavorful. However it ended up a bit overpriced for what a pizza dough should cost. I used 3-4 different types of flours each one had a mission to give the right texture to the crust, great achivement, but not very practical. So in my quest for a more reasonable option I stumbled upon a great mix, Bob Red Mill Gluten Free Organic Pizza Dough. I read the ingredients and to my surprise this mix is based on almost the same combination of 4 different flours I was trying to combine. The difference: I bought one bag. This simplifies the whole process for a fraction of the cost, and in my case pantry space. (I have a tiny pantry).
Next, I gave myself the task to make this crust using this mix… and it was great!. Flavor and texture were spot on. When trying new things you have to see with new eyes, and tastebuds. The texture of a regular crust has a certain chewiness for which gluten is the responsible. When you have no gluten, other textures and flavor come to replace that chew factor. This crust has a lovely light texture, great flavor, and crunch, with a tender bite, making it easy to love. The tender light crusty and crunchy crust is the perfect canvas for the sweet delicate Spring vegetables. The mix is ready in 5 minutes and it does not requires kneading. Proofing time is 20 minutes and it bakes in 12 minutes total. It’s fun to make and I loved trying something new. This crust is a keeper!
For this Pizza Primavera, pre-roasting the vegetables is a must. They add extra flavor deep to the pizza. I love to leave the carrots al-dente, they add a bit extra crunch and texture to the pizza. Cheese?…my advice: go light on the cheese you want to be able to taste the vegetables. I chose a smoked provolone to balance the sweetness on the roasted vegetables. You must try this pizza, I assure you, you will fall in love with it. Give your self the chance to explore and renew your taste buds, perhaps for your next dinner party or get together… and have fun welcoming Spring!
Pizza Primavera
A pizza with spring vegetables and a delicious gluten free crust…
Makes 4 – 8” pizzas
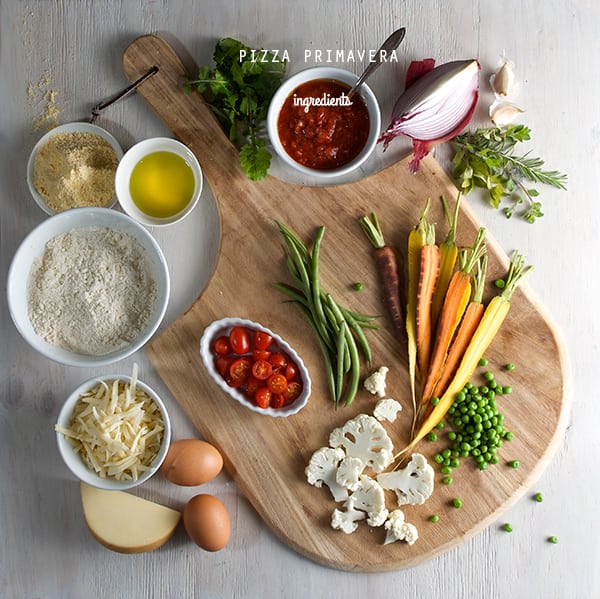
Vegetables:
12-16 small spring carrots cut in half.
2-3 bunches thin sweet green beans cut on a bias.
2 cups Sliced Cauliflower florets.
½ cup fresh peas
1 cup cherry or grape tomatoes halved
For the caramelized onions:
1 large red onion thinly sliced
a glug of extra virgin olive oil
2 tablespoons of balsamic vinegar
a pinch of salt and fresh cracked pepper.
For the sauce:
2 cups roasted crushed tomato sauce.
2 grated garlic
2 tablespoons extra virgin olive oil
Salt and pepper to taste.
2-4 sprigs of fresh herbs, like oregano, rosemary or basil.
Cheese:
3 cups grated smoked provolone cheese or tofu for a vegan option.
Grated parmigiano regiano cheese.
Pizza crust:
1 package of Bob’s Red Mill Gluten Free pizza Dough
(The mix includes an envelope of dry active yeast, how awesome is that!)
1-1/2 warm water
2 eggs or 2 tablespoons of flaxseeds and 8 tablespoons of water for vegan option.
Follow the instructions on the package.
Gadgets and utensils:
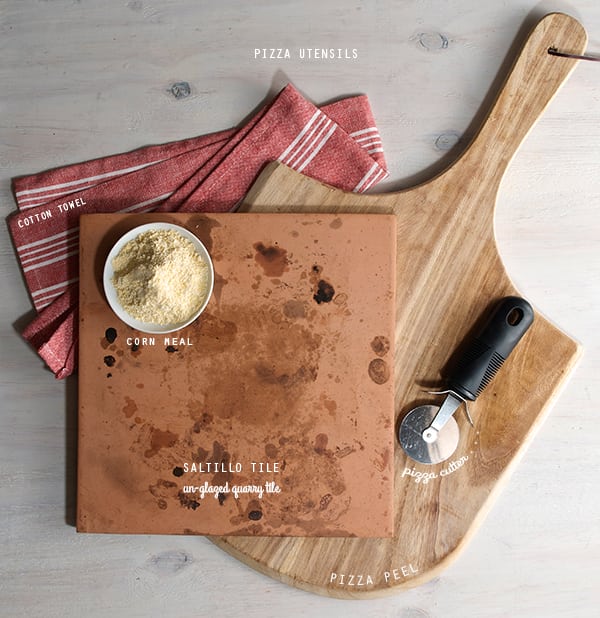
Pizza peel: It’s a must!, its so much fun to use and since it has a long handle keeps you safe from the oven heat. (I like this wood kind)
Pizza Stone or Saltillo tile*
You can use a cookie sheet or a metal round pizza tray that will work too. I recommend, if you are a pizza lover, a pizza stone or the Saltillo tile, are a great investment. The crust gets a fantastic color, and it gets crunchier when is cooked onto a stone surface.
*How or where to get a Saltillo tile?
At your local home improvement store. You must make sure its and unglazed quarry tile.Usually the name is Saltillo tile, from the region in Mexico. They come in two sizes, I prefer the 11×11. Usually you can fit 4 into your oven, if you are planing to make a big pizza, For us 1 or 2 tiles are enough. A smaller size pizza like an 8” will cook great and evenly onto an 11x 11. The magic of these tiles is that you can use them in the oven and over the grill, if you feel like you want a grilled pizza, this works like a charm, price-wise we paid around 1-3 dollars per tile. This is a good solution if you don’t happen to have a pizza stone. And regarding durability: we’ve been using the same tile for six years!
To prepare the tiles for baking: Presoak them in water the day before, and let them air dry. Once they are totally dry they are ready to use. Be careful not to heat them wet to avoid cracking and of course let them cool before removing them from the oven or cleaning them.
Preparation Method:
Preheat your over at 450F/ 232C
Place your pizza stone or Saltillo tile into the oven to start warming up.
(This step is crucial, to get a great crusty crust, the hotter the surface the crustier it will get.)
Pizza dough:
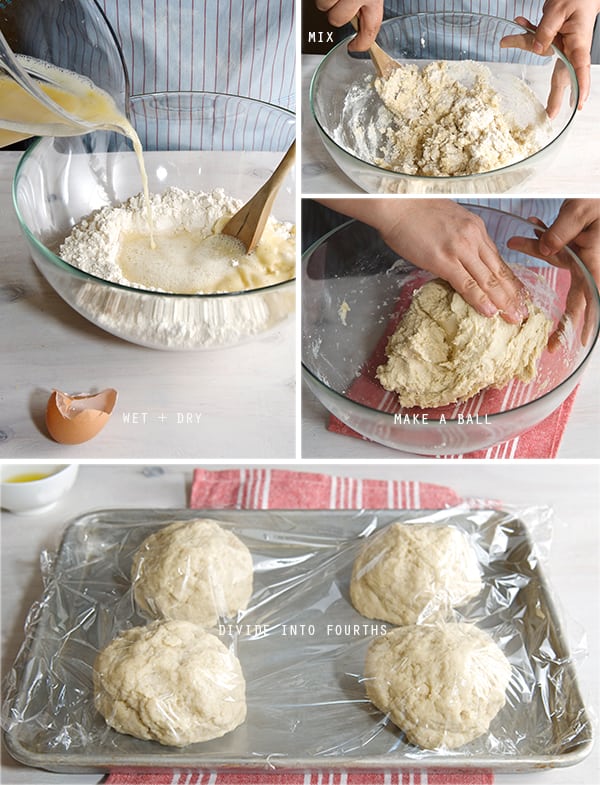
Start by making your pizza dough. Follow the instructions on the package, I did not use the mixer, I used a wood spatula and kneaded by hand for a bout 2 minutes. Divide the dough in 4 equal parts, pre shape into 4 balls, cover with plastic wrap and let it proof at rom temperature for about 20 minutes.
While your dough is resting, prepare your toppings:
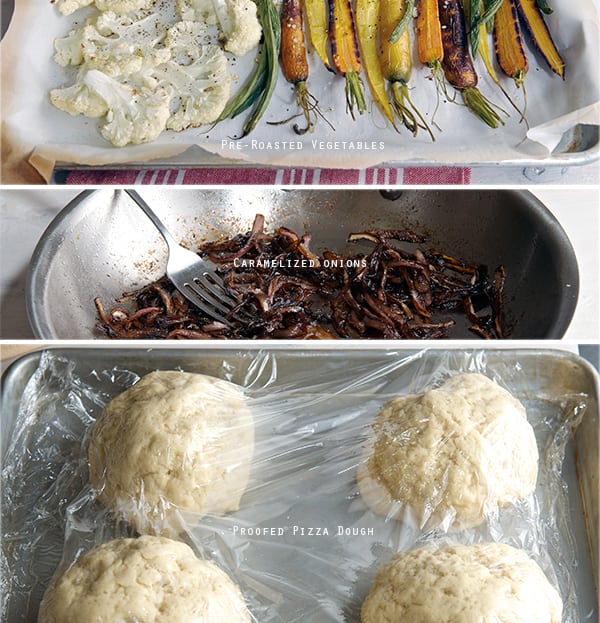
- In a sheet pan, lined with some parchment paper, place the carrots, cauliflower and green beans, drizzle with a bit of olive oil salt pepper and roast at 450 F for about 5-7 minutes. The vegetables should look not completely roasted, as they will continuously cook when placed on the pizza. You want the vegetables, tender with a bite.
- Meantime in a saute pan add a glug of extra virgin olive oil and the red onions and saute on medium heat for about 5 minutes, add some salt and pepper. Reduce the heat to low and add about 2 tablespoons of balsamic vinegar. Leave them on low heat tossing occasional for about 15 minutes or until tender and caramelized. (see picture below)
- Mix all your sauce ingredients, adjust salt and pepper, and warm for a few minutes to marry the flavors.
- Cut your tomatoes, grate the cheese, season your sauce, pre-roasted vegetables, have everything ready to have fun topping your pizza!
The making!
- Crank up the oven temperature to 500F. This gets the crust crunchy when it cooks on the hot pizza stone.
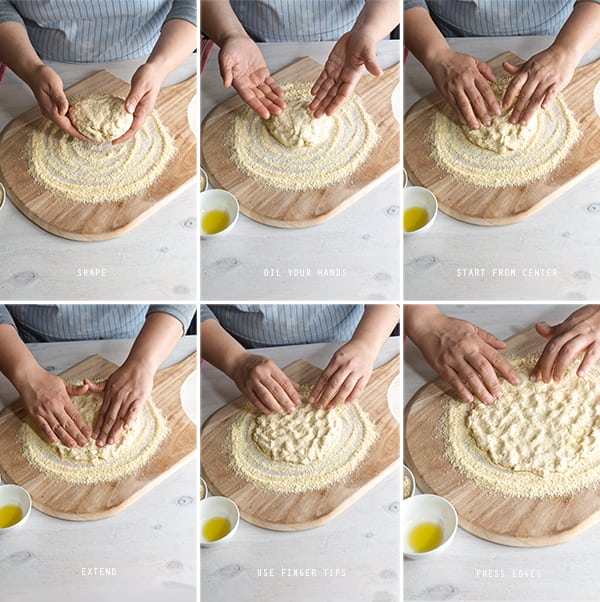
- Add a generous amount of corn meal onto the pizza peel. Apply some extra virgin olive oil in your hands and take one portion of pizza dough. Shape it into a disk and place it in the middle of the pizza peel. With the tip of your fingers, starting from the center out gently massage and start flatten and shape the dough into an 8-9” disk. (see picture below)
- Once you have the 8-9”round pizza dough, make sure its lose, by gently shaking the pizza peel in horizontal motion. The dough should scoot around easily.
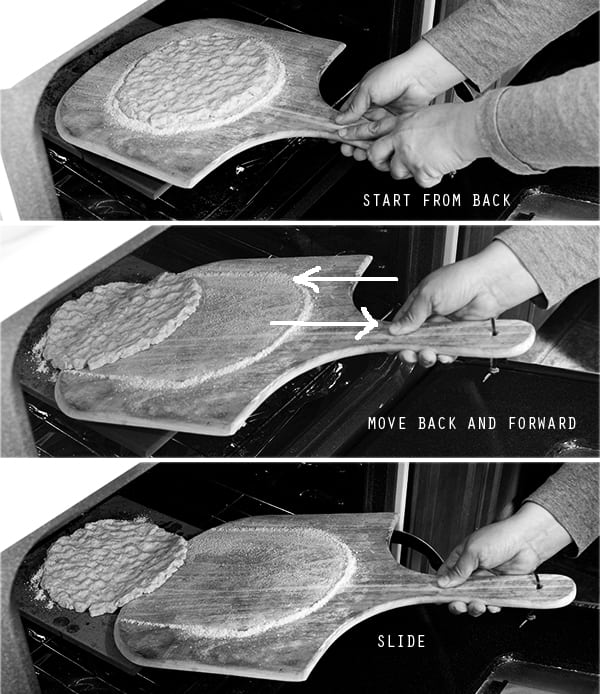
- Place the pizza peel onto the pizza stone. Gently shake the wood peel back an gently forward to slide the pizza crust onto the pizza stone. See picture below. Be as quick as you can so the oven does not loose temperature.
- Immediately close oven door. And adjust oven temperature to 450.Bake crust for 5-7 minutes until slightly golden brown.
- With the help of the pizza peel remove the crust from the oven and proceed to place the toppings.
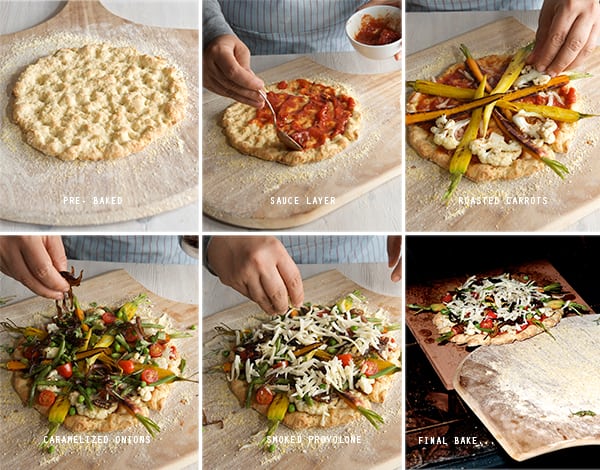
- Start with a thin layer of tomato sauce, and place the roasted carrots and veggies along the radius of the pizza crust. Add the caramelized onions, top with grated cheese, and sprinkle fresh herbs.
- Place the pizza back into the oven for another 7-8 minutes, or until the cheese is melted and it has some color. With the help of the peel pull out the pizza into a wood board. Let it rest for 1-2 minutes, and proceed to cut. You can use a pizza cutter or a chef’s knife.
Serve immediately.
Top with arugula, a drizzle of extra virgin olive oil, squeeze of lemon salt and pepper…
