BUCKWHEAT RSS feed for this section

Apple Buckwheat Crepe Cake with Cider Caramel Sauce

Apple-buckwheat-crepe-front_Yes,-more-please!

“With an apple I will astonish Paris.”
~ Paul Cezanne ~

This cake is for the person who loves to cook and who enjoys the process of creating, and building something from scratch; layering flavors, textures, and aromas. This cake taught me patience. From the conception, to the making I learned all the way. I learned that fast and easy are not always worth it. I was reminded of the “virtuous” character of patience. We can use it when we desire the outcome we imagine. To enjoy making this cake, reserve time, and relax. There is something about craftsmanship in this recipe that I love, especially the gratification of assembling the components. The results of such efforts are worth every step.

Time, and patience are the main ingredients. Apples, buckwheat flour ,butter and apple cider are the witnesses to the madness. The smells are insane once you start to cook; peeling the green apples, that crisp sweetness from breaking the skins, to the nutty and buttery aromas that fill the kitchen with a warm cloud when making the buckwheat crepes.

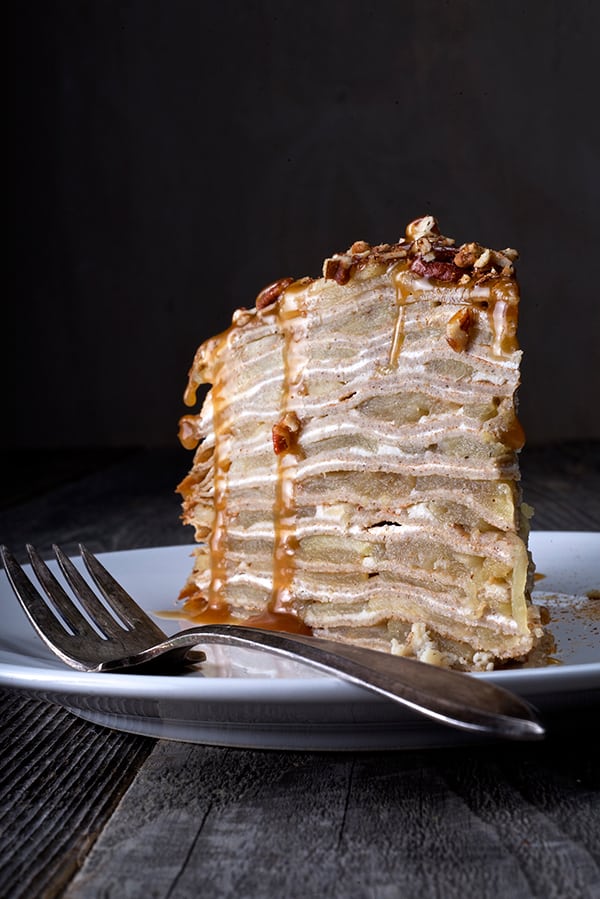
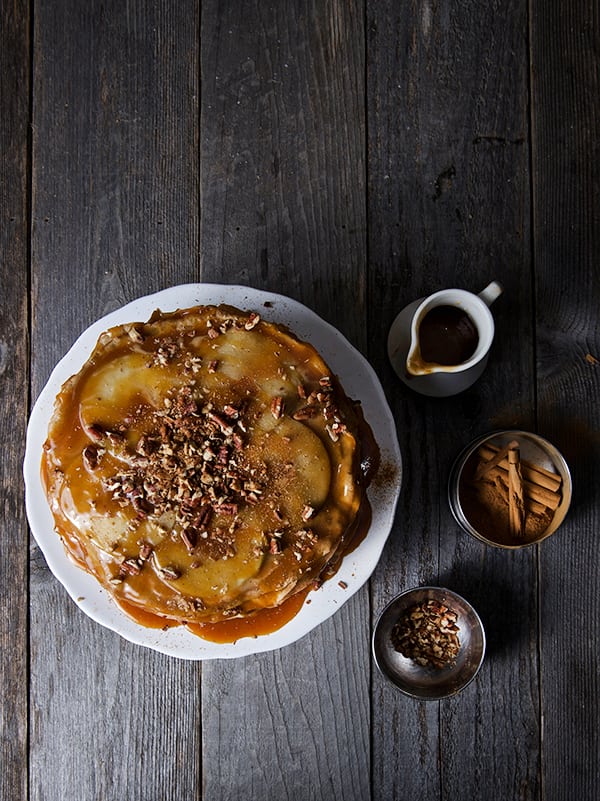
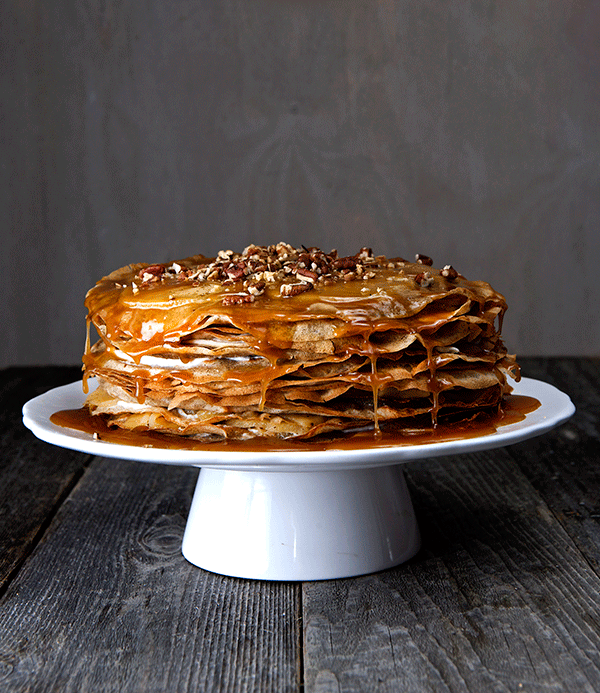
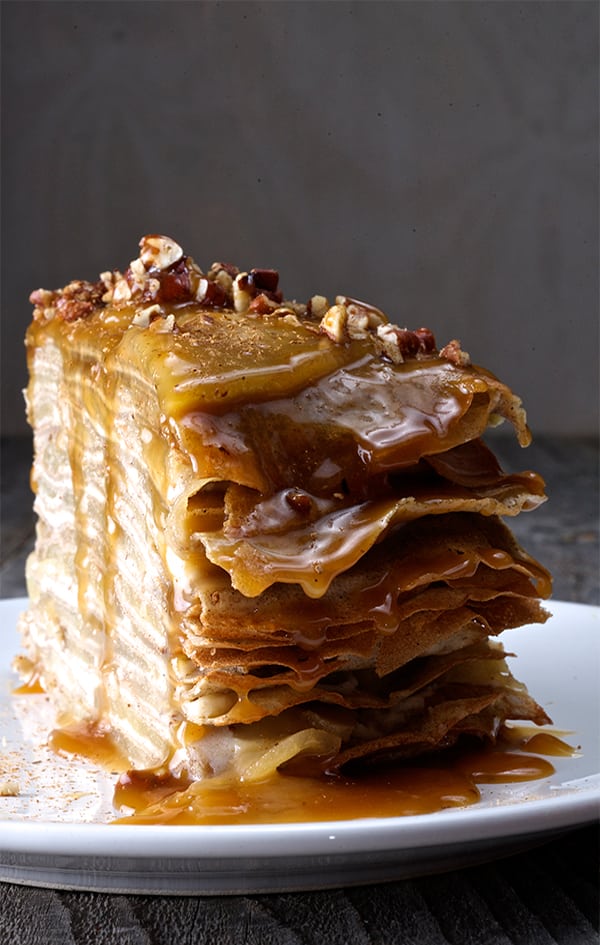
Imagine 26 soft silky layers of light, thin, buttery and nutty buckwheat crepes carefully layered with thinly sliced tart green apples sautéed with cinnamon and honey, mascarpone cinnamon cheese spread between layers. Add toasted pecans and a tipsy cider caramel sauce that sinuously hangs from the crispy feathery crêpe edges…This is the ultimate tribute to the apple and buckwheat love affair.

When you cut the first slice of this cake, your work shows, it makes you feel like a better person and all that patience and love invested in the creation it is absolutely worth it for a slice of this cake.

Fifty percent apples plus cheese and a bit of flour make it almost guiltless and mildly sweet, do not get the appearance trick you.

If you want to enjoy an apple cake this season, something memorable, and not so overly sweet, Apple Buckwheat Crepe Cake with Cider Caramel Sauce is the dessert you been waiting for.
Make time for this love affair and prepare to astonish.

Apple-buckwheat-crepe-Yes,-more-please!

Apple-Buckwheat-Crepe-Cake_ingredients

Apple Buckwheat Crepe Cake with Cider Caramel Sauce

Serves 8-10

For the Crepes:

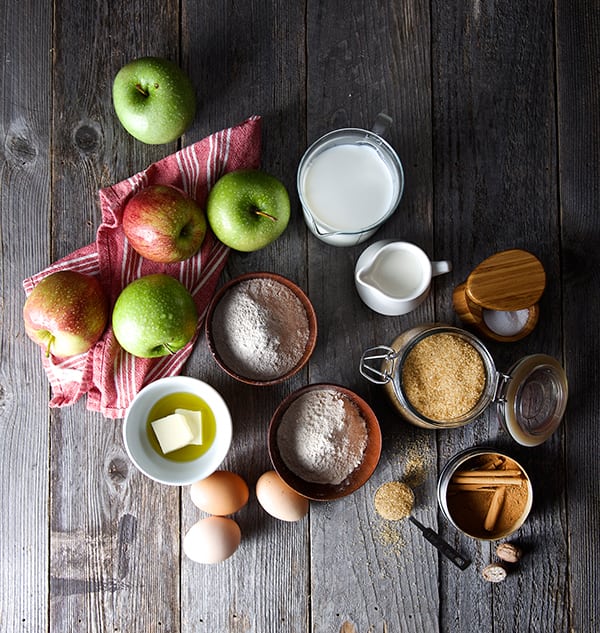
11/2 cups buckwheat flour
½ cup unbleached all-purpose flour
1 ½ tablespoons turbinado sugar or agave nectar.
¾ teaspoon fine salt
1 pinch of cinnamon

3 cups of milk
4 Large eggs
3 tablespoons of melted butter
2 tablespoons mild extra virgin olive oil

Plus about 3 more tablespoons of butter to cook the crepes.
1 – 8” non-stick pan
1 Ice cream scooper
1 baking sheet or cookie sheet tray

For the Apples:

7 medium size green tart Granny smith apples*
3 medium size Braeburn apples*
½ cup honey
1/2 cup turbinado sugar
½ teaspoon salt
1 tablespoon cinnamon
¼ teaspoon nutmeg
1 teaspoon lemon juice
¼ teaspoon lemon zest
2 tablespoons butter
2 teaspoons cornstarch
¼ cup apple cider

Note:  I’m combining two different types of apples, green tart wich are super crisp and hold their texture when sautéed, and the Braeburn wich are sweet and fragrant and wich also hold their texture when they are cooked. Once balance the others, I did not wanted to use a lot of sugar, since the cake will be drizzled with a cider caramel sauce. My advice is please, taste your apples: If they are to sweet or two tart you might need to add more sugar or honey is up to your preference and your sweet tooth.

For the Mascarpone filling:

2 cups mascarpone cheese
¼ cup honey
½ teaspoon cinnamon

For the Apple Cider Caramel Sauce:

2 cups apple cider
½ cup turbinado sugar
¼ cup honey
4 tablespoons butter
1 cup heavy cream
1/4 cup calvados.

1/2 cup roughly chopped toasted pecans.

Directions:

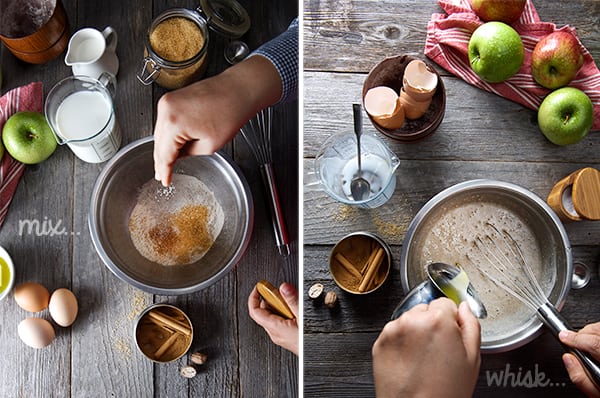
1. Start by preparing your Crepe batter. Combine all dry ingredients, Combine all wet ingredients and add them little by little to the dy ingredients whisking throughly until well combined and no lumps. Cover your batter with plastic wrap, making sure the plastic is touching the mixture, to avoid a skin to form. Refrigerate for at least 1 hour. You can make it the night before or in the morning and make the crepes at night. The batter will keep for about 48 hours.

Apple-Buckwheat-crepe-cake_making-crepe-batter
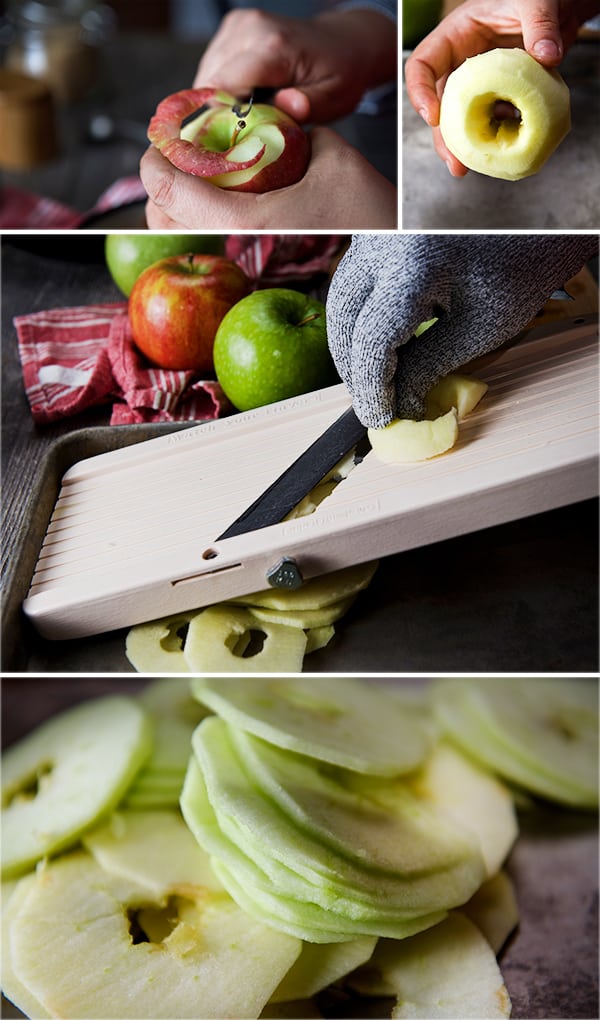
2. Mean time your crêpe batter is resting, prepare your apples. Peel them, core them as you peel and core them place the apples on a bowl with water and lemon juice to prevent the apples turning brown. Slice the apples about an 1/8 inch thin using a mandolin or the food processor. When using a mandolin, I always use a metal mesh glove, it is safe and comfortable when slicing, than the plastic apparatus that come with the mandolin set.

Apple-Buckwheat-Crepe-Cake_preparing-apples
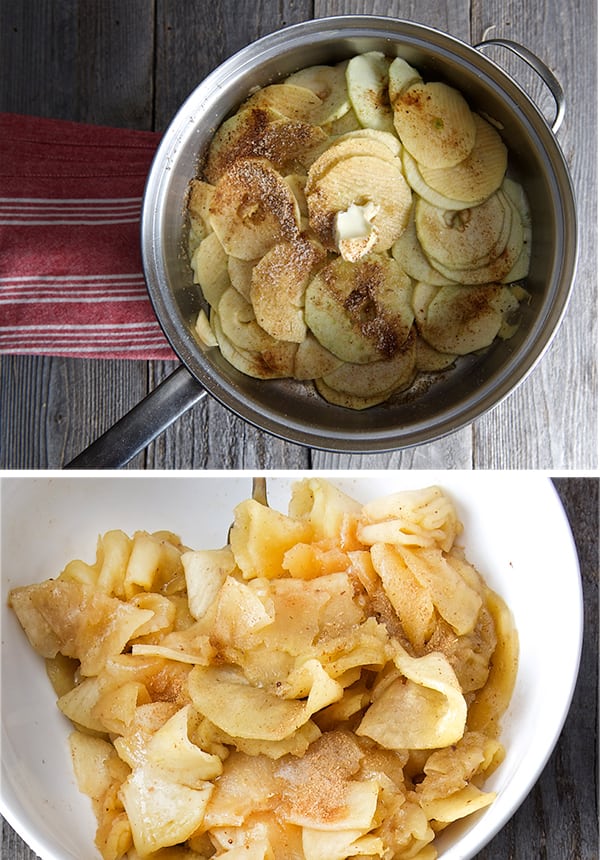
3. Place them on a bowl and toss them with the honey, sugar, salt cinnamon, nutmeg, lemon juice lemon zest. On a large pot over medium high heat melt the butter and add the tossed apples. Mix the cold apple cider with the cornstarch to avoid lumps, and add to the apples. Saute the apples tossing gently for about 6-7 minutes until they are tender, but not mushy, they have a glistening light brown color the juices are reduced. Taste for sweetness, add more sugar if needed. Set aside, to allow to cool. Reserve some of the best looking round slices to decorate the top layer.

Apple-Buckwheat-Crepe-Cake_sautee-apples
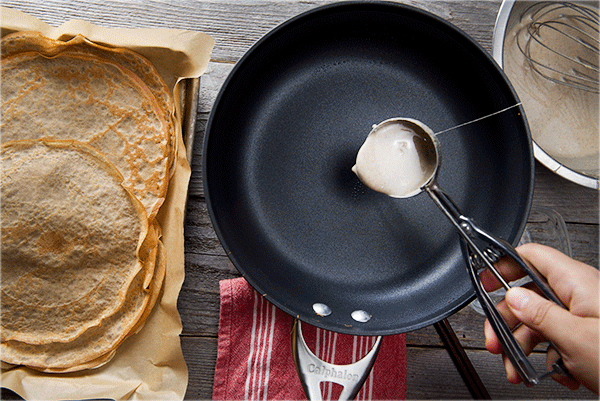
3. Once your batter has rested, pull it out f the refrigerator and allow to come to room temperature, whisk a little and start preparing to make the crepes. Pre-heat your 8” nonstick pan over medium heat. Add a little dab of butter until melted and remove excess with a folded paper towel. Poor about 1.5 to 2 ounces of batter into the center of the pan immediately swirl the pan all around to spread the batter on an evenly coat that covers all the bottom of the pan. Cook for about 30 seconds until the edges start releasing when you pull them with the help of a spatula. At this point flip. And cook for another 10 to 15 seconds, transfer to the baking sheet, lay them out flat and allow them to cool. Continue with the same procedure, using the buttered paper towel in between crepes works great, you do not have to add butter every time to the pan, a small coat from the napkin will do it. Continue until your batter is gone.

Tips and Notes to the crêpe maker:
– I use an Ice cream scooper to portion the batter, this allow me to have equal thickness every time. a small ladle will work too.
-The first crêpe is not always the prettiest, usually is the test drive; it allows you to adjust the temperature in your pan and rectify the heat.
– If this is your first time making crepes please do not get discouraged, it gets better as you go. Once you get the groove on it is fun and the smell on your kitchen is heavenly!

Apple-Buckwheat-Crepe_How-to-make-crepes_Yes,-more-please!

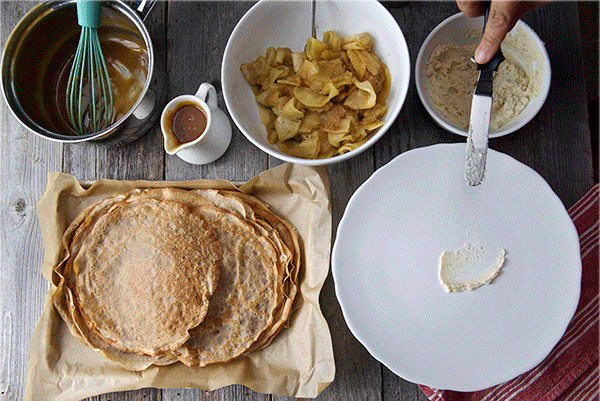
4. Once you finish making all the crepes, allow them to cool, and make your mascarpone filling. Combine all the ingredients in a small bowl and whip them for 2-3 minutes with a hand blender until smooth and well combined.
5. Now that you have all the components start assembling, on a flat platter or a cake stand, place a dollop of the cheese and place your first crêpe, arrange a single even layer of the sautéed apples unfolding the slices if tangled, then add a crêpe, then a thin layer of mascarpone cheese, apples. Between, crêpe and crêpe, gently press to ensure you have even layers. Continue until you are done with the crepes and filling, ending with a crêpe. Cover the cake with some plastic wrap and place it in the refrigerator for 30 minutes so the layers can set.  Mean time make the caramel sauce.

Apple-Buckwheat-Crepe-Cake-assambling-sequence
6. On a small heavy bottom pot, add the apple cider, sugar, honey and butter. Bring to a rapid simmer, you want o evaporate as much water on the sauce. This will take around 15-20 minutes until reduced by half. You will see the formation of big bubbles, and the consistency of the sauce is thicker it resembles more like a syrup.
At this point add the heavy cream whisking at all times, until all is incorporated. Add the Calvados and let it simmer for another 10-15 minutes until the consistency of a caramel sauce. Remove sauce from heat. And transfer into a small poring jar. Allow to cool before drizzling on the cake.

Apple-Buckwheat-Crepe-Cake_apple-cider-caramel-sauce
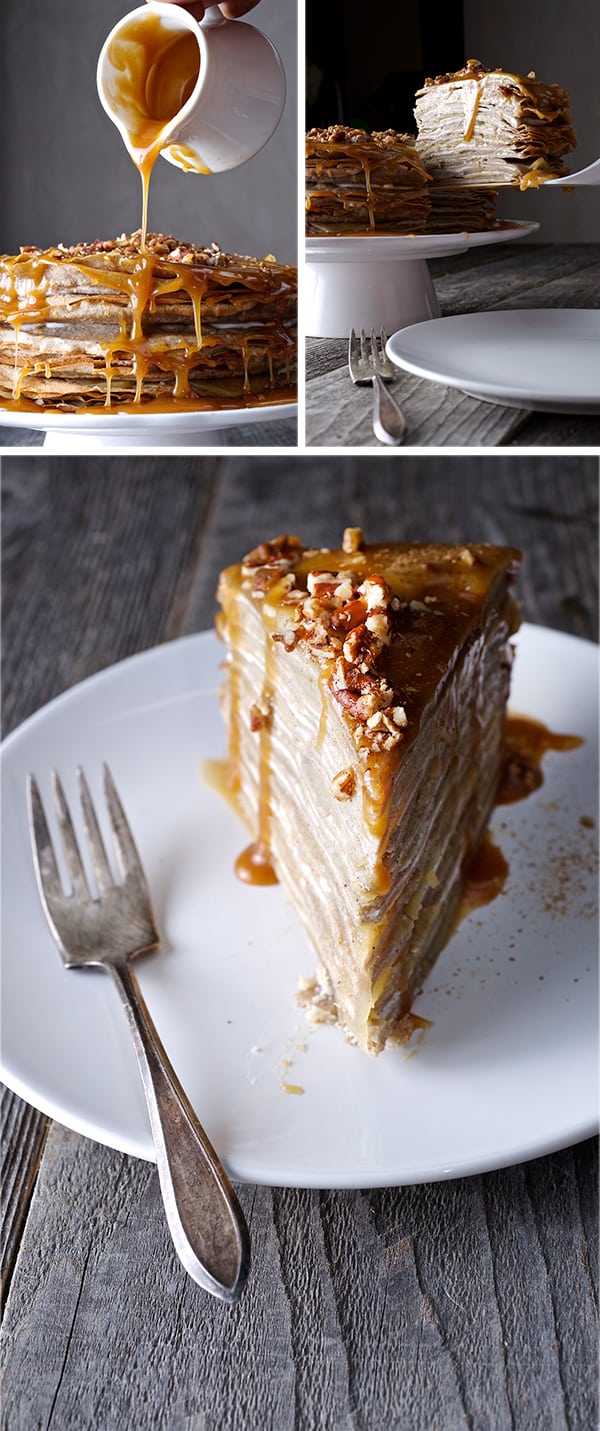
7. Pull the cake out of the refrigerator, place the reserved pretty slices of sautéed apples and decorate the top, once the caramel has cool down a little, pour some of the caramel sauce all over the cake drizzle all edges and sprinkle with the toasted pecans.
8. Make sure you reserve at least half of the sauce to drizzle some extra when the cake is served. Enjoy.

Apple-buckwheat-crepe-with-Cider-caramel-Sauce_Yes,-more-please!

Apple-buckwheat-crepe-slice_Yes,-more-please!Apple-buckwheat-crepe-back_Yes,-more-please!Apple-buckwheat-crepe-sliced-cake_Yes,-more-please!

Apple Buckwheat Crepe Cake

with Cider Caramel Sauce

Music Pairing: Erik Satie – The Essential Collection

View Post or View Comments 3

Summer Soba Noodles

Summer Soba Noodles_healthy and delicious

Lusciously light noodles, that’s my description for this dish. Cold soba noodles are a popular summer dish in Japan. The Japanese people are very wise by eating like this; light, savory, vegetable based; a good way to stay cool. The traditional way to serve them is without toppings; just the delicate flavor of the noodle with some dipping sauce on the side. You dip them as you go.
In my version I decided to give the dish a little kick and add some fresh vegetables and tofu. We usually have this for lunch or a light summery dinner. The combination of fresh crunchy vegetables, sweet-savory sauce and creamy tofu cubes, pairs really well with the tender noodle. The preparation could not be easier, and if we measure preparation time versus rewarding flavors it is a winner.
If you think this dish looks complicated, don’t worry, its easy to make. To save you some prep time I recommend you invest on a little kitchen gadget: get yourself a julienne peeler. It is one of my favorite tools. Its fun, easy to use, and easy to clean. You can use this peeler for any other vegetable or fruit. One of the best kitchen gadgets to have. Let’s cook!

Summer Soba Noodles_ sauce ingredientsSummer Soba Noodles_ ingredientsSummer Soba Noodles_Yes,more please!

Summer Soba Noodles

Serves 2-4

3-6  Soba noodle bundles approximately 1 bundle per person. I recommend you to get the Japanese kind. You can get them at any Asian specialty aisle of a supermarket…
2-4  green onions/scallions, finely sliced
2  carrots, shredded, julienned or grated
1  seedless English cucumber, julienned or thinly sliced
1  avocado
1/4-1/2 cup  unshelled and cooked edamame beans, optional
1 block of extra firm Tofu, remove the excess water patting it with paper towels and cut into small cubes

For the sauce:

3  tablespoons soy sauce.
3  tablespoons seasoned rice vinegar
2  tablespoons sesame oil + one extra tablespoon for finishing
2  tablespoons of honey or agave nectar
1  tablespoon brown sugar
1  tablespoon grated fresh ginger
1  garlic clove grated
the juice and the zest of one small orange

In a bowl Whisk all the ingredients. Reserve 1/3 of the sauce to marinate the tofu squares.

Garnish with:

Thai Basil to garnish
Black or gold sesame seeds
1 red Thai or Serrano chili, thinly sliced

Directions:

1. Start by making your sauce. Place all its ingredients in a bowl and whisk. Set aside 1/3 of the sauce and marinate the tofu. While the tofu is absorbing all the flavors, proceed to cut and prepare your vegetables and garnishes.

2. Bring a large pot of water up to a boil. Unlike regular pasta, you do not need to salt the water. Once the water is boiling place the noodles and monitor constantly, using a pasta spoon to prevent the noodles sticking. Bring the water up to simmering. Do not let it boil. Follow the instructions in the package, taste, it should have some elasticity to it. Usually takes around 4-5 minutes because they cook through quickly . Keep an eye on them to avoid over cooking. When the pasta is ready drain the noodles into a colander. Immediately return them to the pot and fill the pot with cold water. Leave the water running into the pot a bit until the noodles cool down. Gently with your hands rinse the noodles in threads.*( see picture below) until they feel less starchy. Drain them again into a colander and allow them to drain. You can transfer them to a bamboo mat, to remove the excess water.

Summer Soba Noodles_How to prepare soba noodles

3.  In a non-stick pan proceed to saute the marinated tofu until golden brown. A little scorching doesn’t hurt either.
In a large bowl season the noodles with a tablespoon of sesame oil and add sesame seeds.

Summer Soba Noodles_Sautee_marinated_Tofu

4. Divide all noodles evenly into 2 or 4 bowls, garnish with the Juliane carrots, cucumbers, avocado, sautéed tofu, edamame, red chilli.
Serve a small sauce bowl per person for extra dipping the noodles.

Summer Soba Noodles_for two

~Enjoy!~

Music Pairing: Pizzicato Five: Twiggy Twiggy

Summer Soba Noodles

Serves 2-4
Course Brunch, dinner, Lunch
Cuisine Japanese
Prep Time 20 minutes
Cook Time 10 minutes
Total Time 30 minutes
Servings 4

Ingredients

  • 3-6 Soba noodle bundles approximately 1 bundle per person I recommend you to get the Japanese kind. You can get them at any Asian specialty aisle of a supermarket
  • 2-4 green onions/chives – finely sliced
  • 2 carrots shredded, julienne or grated
  • 1 seedless cucumber julienne or thinly sliced
  • ½ avocado
  • 1/4-1/2 cup unshelled and cooked edamame beans optional
  • 1 block of extra firm Tofu remove the excess water patting it with paper towels and cut into small cubes.

For the sauce:

  • 3 tablespoons soy sauce.
  • 3 tablespoons seasoned rice vinegar
  • 2 tablespoons sesame oil + one extra tablespoon for finishing.
  • 2 tablespoons of honey or agave nectar.
  • 1 tablespoon brown sugar
  • 1 tablespoon grated fresh ginger
  • 1 garlic clove grated
  • the juice and the zest of one small orange.

Garnish with:

  • Thai Basil to garnish
  • Black or gold sesame seeds
  • 1 Red chili thinly sliced

Instructions

  1. In a bowl whisk all the sauce ingredients. Reserve 1/3 of the sauce to marinate the tofu squares.
  2. Start by making your sauce. Place all its ingredients in a bowl and whisk. Set aside 1/3 of the sauce and marinate the tofu. While the tofu is absorbing all the flavors, proceed to cut and prepare your vegetables and garnishes.
  3. Bring a large pot of water up to a boil. Unlike regular pasta, you do not need to salt the water. Once the water is boiling place the noodles and monitor constantly, using a pasta spoon to prevent the noodles sticking. Bring the water up to simmering. Do not let it boil. Follow the instructions in the package, taste, it should have some elasticity to it. Usually takes around 4-5 minutes because they cook through quickly. Keep an eye on them to avoid overcooking. When the pasta is ready drain the noodles into a colander. Immediately return them to the pot and fill the pot with cold water. Leave the water running into the pot a bit until the noodles cool down. Gently with your hands rinse the noodles in threads.*( see picture below) until they feel less starchy. Drain them again in a colander and allow them to drain. You can transfer them to a bamboo mat, to remove the excess water.
  4. In a non-stick pan proceed to saute the marinated tofu until golden brown. A little scorching on the edges adds great flavor.

  5. In a large bowl season the noodles with a tablespoon of sesame oil and the sesame seeds.

  6. Divide all noodles evenly into 2 or 4 bowls, garnish with the Juliane carrots, cucumbers, avocado, sautéed tofu, edamame, red chili.
  7. Serve a small sauce bowl per person for extra dipping the noodles. Enjoy!
View Post or View Comments 1

Blueberry-Orange Buckwheat Pancakes

Blue Berry Orange Buckwheat Pancakes ~ Yes, more please!

 If I have to choose between pancakes and French toast, I will choose French toast, except when it comes to Buckwheat pancakes. Everything changed the day I tried Buckwheat flour. I’m not gluten intolerant, but in the recent years I’ve noticed how much better I feel when I omit processed white flour. This is huge for me because at one point in time I was really committed to baking as a full time career; I even considered opening a business. Life takes you in mysterious ways, and my body did not like to be in a daily contact with a high content of sugars, white flour, or saturated fats. I always think of the analogy of an alcoholic opening a bar or being a bartender… not the best choice right?…So in my research, changing my habits to better quality foods and whole grains, I stumbled upon buckwheat while I was watching an episode of “No Reservations” with Anthony Bourdain. He was visiting Brittany, France (it is a great episode you should look it up).  It featured the beautiful French peninsula surrounded by the English channel, the Celtic Sea, Atlantic Ocean and the Bay of Biscay; lots of amazing scenery. Buckwheat is a staple of this region, pancakes, galettes, and crepes are made with this type of flour. If I remember well, he was served a galette and my mouth just dropped!. So there I was, trying to find Buckwheat flour and not a lot of stores carry it. I found a brand that I still buy and love: Organic and Whole Grain Bob’s Red Mill Organic Buckwheat Flour. For my friends in Mexico it is “Harina de Alforfón or Trigo Negro”( Im sure you can find it in an ecotienda or Mamá Coneja).
Despite the name, buckwheat is not wheat; not a grain but a fruit seed, It is high in Omega-6, protein, fiber, all the B vitamins, Magnasium, Potassium, Rutin and Selenium. It is easy to digest, and GLUTEN FREE!!! So if you have experienced a burst of sleepiness after eating a short stack of regular white flour pancakes, try this recipe. You will feel great and energized after eating them. No bloating, no crawling for the antacid.
Buckwheat flour makes light and fluffy pancakes with a nutty flavor that goes very well with any fruit, maple syrup, or agave nectar.  This recipe is easy. Listed below is the standard recipe followed by the vegan version, with substitutions. I hope you like it as much as I do!

Pancake abstract ~ Yes, more please!

Blueberry-Orange Buckwheat Pancakes

Makes 6-8 4” small pancakes

dry:

1 cup of buckwheat flour
2 teaspoons of Baking powder
2 tablespoons of coconut sugar
1 good pinch of kosher salt

wet:

1 cup of unsweetened coconut cream
1 egg
2 tablespoons of melted coconut oil, melted butter or a mild extra virgin olive oil.
1/2 teaspoon of vanilla extract
The zest of one whole small orange.
The squeezed juice of ½ an orange, save the other half you will need it later!
Little extra butter for the pan. (You can use soy spread if vegan)
For Vegan pancakes: substitute:
1 tablespoon of ground flax seed + 3 tablespoons of water= 1 egg
1 cup of Soy milk or Almond milk will replace the total dairy.
Other variations: Add a pinch of cinnamon and nutmeg instead of the Orange zest.

Method:

1. In a medium size bowl mix all dry ingredients. Next, whisk all wet ingredients. Proceed and mix wet and dry until well combined; small lumps in the batter are ok. THis batter is a bit on the thicker side, If is too tick feel free to add bot of  water, milk or any non-dairy free will work great.
2. In a separate bowl, rinse and dry blueberries. I usually don’t mix them into the batter, I prefer to place them individually so I can distribute them evenly.
3. Cut fresh strawberries and macerate with the juice of the other ½ orange.
4. Have your Ice cream scooper ready!. I’m a free shape pancake maker, never perfectly round!… but I find it helps portion and shape by pouring the batter with a ice cream scooper *(see picture below) , especially with this batter since its a bit thicker than regular pancake batter.
5. Over a medium heat non-stick pan, proceed and start cooking the pancakes. Add a little butter to pan, wait until bubbly and melted. Place one scoop of batter wait 10 seconds and start adding the blueberries. It takes approximately 1-2 minutes per side, when you start to see burst bubbles on the edge of the pancake is ready to flip. Continue to cook until golden brown. Proceed with the rest of the batter.

Note: Because of the darker color nature of the flour, you will have to monitor the heat a little more than normal, and do not worry if they look a little more than golden brown.

Blue Berry Orange Buckwheat Pancakes _step by step ~ Yes, more please!

Blue Berry Orange Buckwheat Pancakes_you are so fluffy!!! ~ Yes, more please!

Warm up your Maple syrup and serve with the macerated strawberries, fresh blueberries and pistachios.

I love the contrast in flavor between cooked and fresh blueberries so don’t hesitate to double up on them! 

 Can you smell the love?

Blue Berry Orange Buckwheat Pancakes ~ Yes, more please!

Sorry, but I have to say that I will never miss

the refined white flour… No More!… Enjoy!

Blue Berry Orange Buckwheat Pancakes_no bites left! ~ Yes, more please! Music Pairing: The essential-Dave Brubeck

Blueberry-Orange Buckwheat Pancakes

Makes 6-8 4” small pancakes
Course Breakfast, Brunch, dinner
Cuisine wholesome
Prep Time 15 minutes
Cook Time 25 minutes
Total Time 40 minutes
Author Mariana McEnroe

Ingredients

dry:

  • 1 cup of buckwheat flour
  • 2 teaspoons of Baking powder
  • 2 tablespoons of coconut sugar
  • 1 good pinch of kosher salt

wet:

  • 1 cup of unsweetened coconut cream
  • 1 egg
  • 2 tablespoons of melted coconut oil melted butter or a mild extra virgin olive oil.
  • 1/2 teaspoon of vanilla extract
  • The zest of one whole small orange.
  • The squeezed juice of ½ an orange save the other half you will need it later!
  • Little extra butter for the pan. You can use soy spread if vegan
  • For Vegan pancakes: substitute:
  • 1 tablespoon of ground flax seed + 3 tablespoons of water= 1 egg
  • 1 cup of Soy milk or Almond milk will replace the total dairy.
  • Other variations: Add a pinch of cinnamon and nutmeg instead of the Orange zest.

Instructions

  1. In a medium size bowl mix all dry ingredients. Next, whisk all wet ingredients. Proceed and mix wet and dry until well combined; small lumps in the batter are ok. This batter is a bit on the thicker side, If is too tick feel free to add a bit of water, milk or any non-dairy free will work great.
  2. In a separate bowl, rinse and dry blueberries. I usually don’t mix them into the batter, I prefer to place them individually so I can distribute them evenly.
  3. Cut fresh strawberries and macerate with the juice of the other ½ orange.
  4. Have your Ice cream scooper ready!. I’m a free shape pancake maker, never perfectly round!… but I find it helps portion and shape by pouring the batter with an ice cream scooper *(see picture below), especially with this batter since its a bit thicker than regular pancake batter.
  5. Over a medium heat non-stick pan, proceed and start cooking the pancakes. Add a little butter to the pan, wait until bubbly and melted. Place one scoop of batter wait 10 seconds and start adding the blueberries. It takes approximately 1-2 minutes per side when you start to see burst bubbles on the edge of the pancake is ready to flip. Continue to cook until golden brown. Proceed with the rest of the batter.
View Post or View Comments 2

Privacy Policy Contact Us Yes, more please!