Recipes, Cooking & Art Direction: Mariana Nuño Ruiz McEnroe | Photography: Ian McEnroe |
Published: July 29, 2014
“So we grew together like to a double cherry, seeming parted, but yet an union in partition, two lovely berries molded on one stem.”
― William Shakespeare, A Midsummer Night’s Dream
Before the season ends take this stone fruit so plentiful in the summertime and make it delicious and refreshing. I love frozen yogurt in all its rich flavors and smooth texture as my favorite hot weather indulgence to beat to cool off my palate. I often like to go to one of the many frozen yogurt shops and take advantage of the endless number of flavors and toppings. This is the best time of the year to prepare your own and you might be surprised that you just need a freezer and a blender or food processor to make frozen yogurt at home.
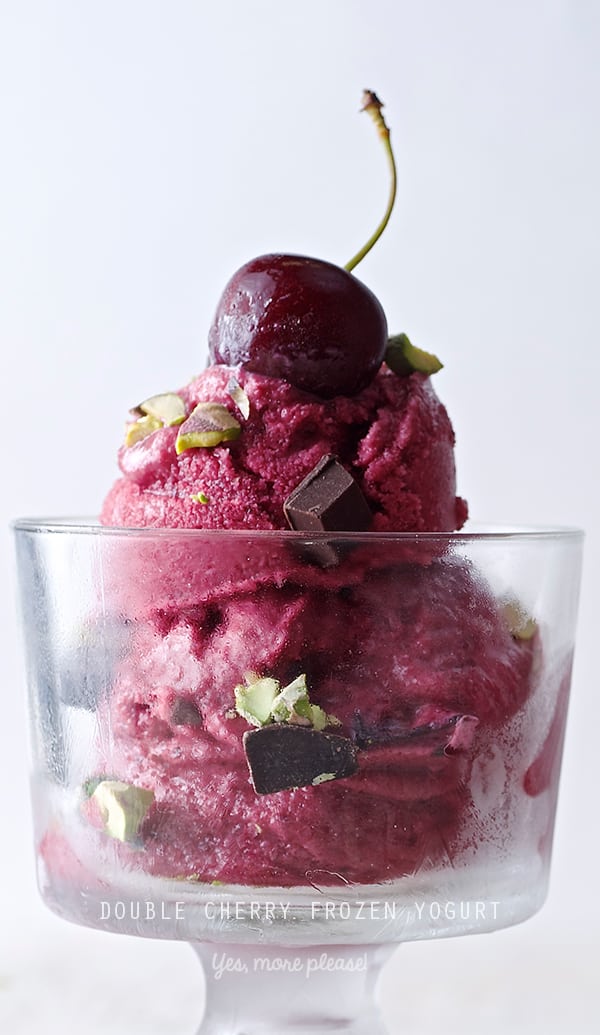
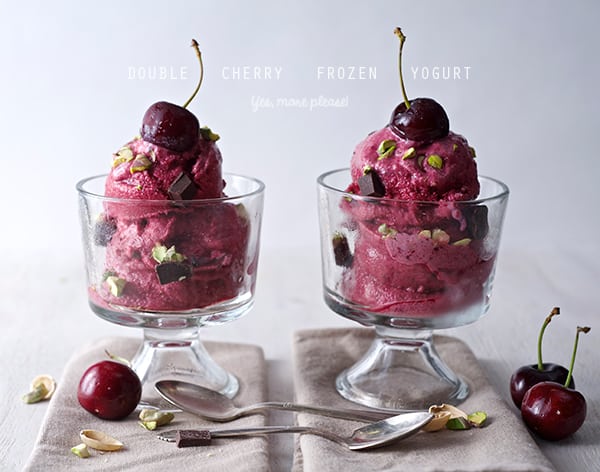
Red cherries have a sweet and tart flavor which is intense and works well for a yogurt flavor. By de-stoning several plump fresh cherries you can freeze the fruit and combine it with yogurt frozen in cube form in a blender or food processor to create a soft and creamy rich dessert. To further enhance the flavor, I added a cherry liquor of good pedigree. This becomes even more decadent with …wait for it…. dark chocolate morsels. Sorry for those of you clinging dearly to ‘simple’ because here comes the topping…nothing less than roasted and chopped pistachios. Once these have landed on top of a couple scoops of this romance you will certainly experience nothing short of Cherry Ecstasy followed by perfect summertime bliss.
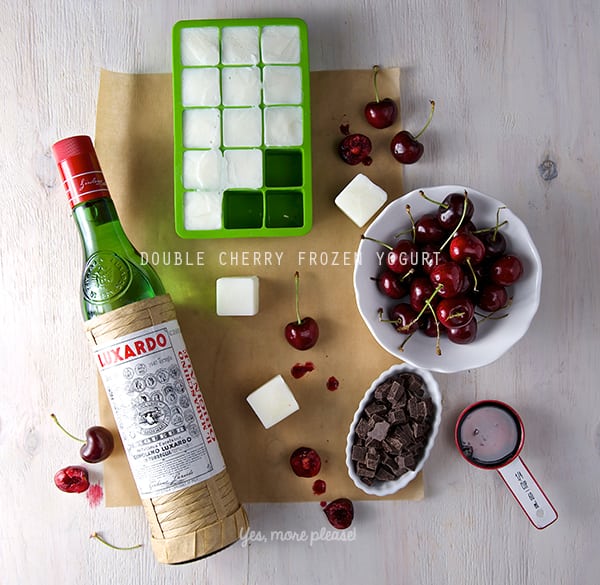
Double Cherry Frozen Yogurt
Serves 4-6 on a midsummer afternoon…
2 cups greek yogurt frozen into ice cubes tray.
1 1/2 cups fresh cherries, pitted and frozen.
1/4 cup agave nectar
1-2 ounces LUXARDO Il Maraschino Originale
Toppings:
1/2 cup dark chocolate chunks, I used Scharffen Berger Chocolate, Fine Artisan Dark, Baking Chunks, Semisweet
1/4 cup Roasted pistachios
Preparation Method:
1. Using an ice cube tray pour the yogurt and freeze. You can do this step one day in advance. During summer time I always have yogurt ice cubes handy to make a quick frozen treat, they are life savers when you are in a snack attack mode! I like to use this rubber ice cube trays they are super easy to pull out.
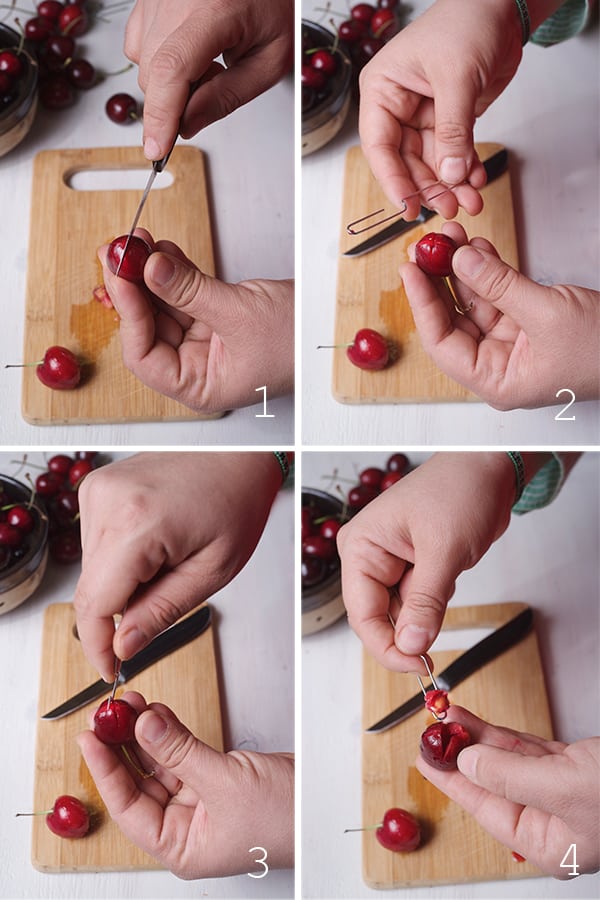
2. Cut in halves and Pitt the Cherries. If you do not own a cherry pitter I’ve heard good comments on this one, or since you are just pitting a small amount you can use my super easy “clip” method check this out:
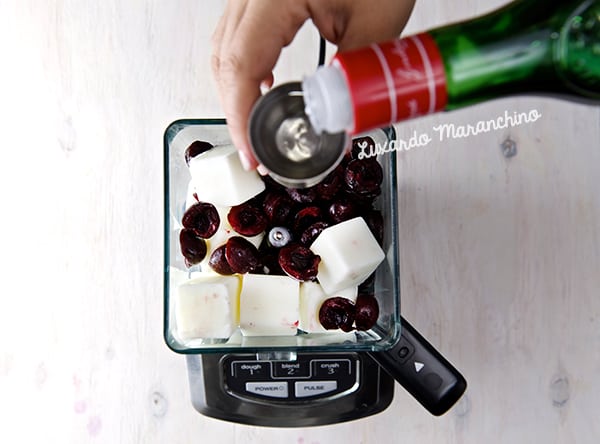
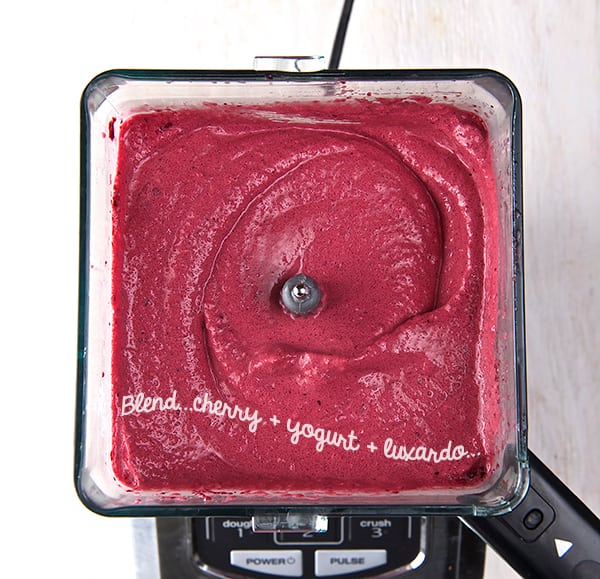
3. Once you have every frozen item you need, place the yogurt ice cubes, frozen cherries, agave, and one ounce of the LUXARDO liquor and blend well until smooth. Taste, and if you want to go ahead and add the other ounce of liquor is up to your taste. The Maranchino cherry liquor enhance the cherry flavor with some almond and honey notes, it is the perfect complement to this frozen treat. If you do not care about this liquor, just add 1/2 teaspoon of almond extract.
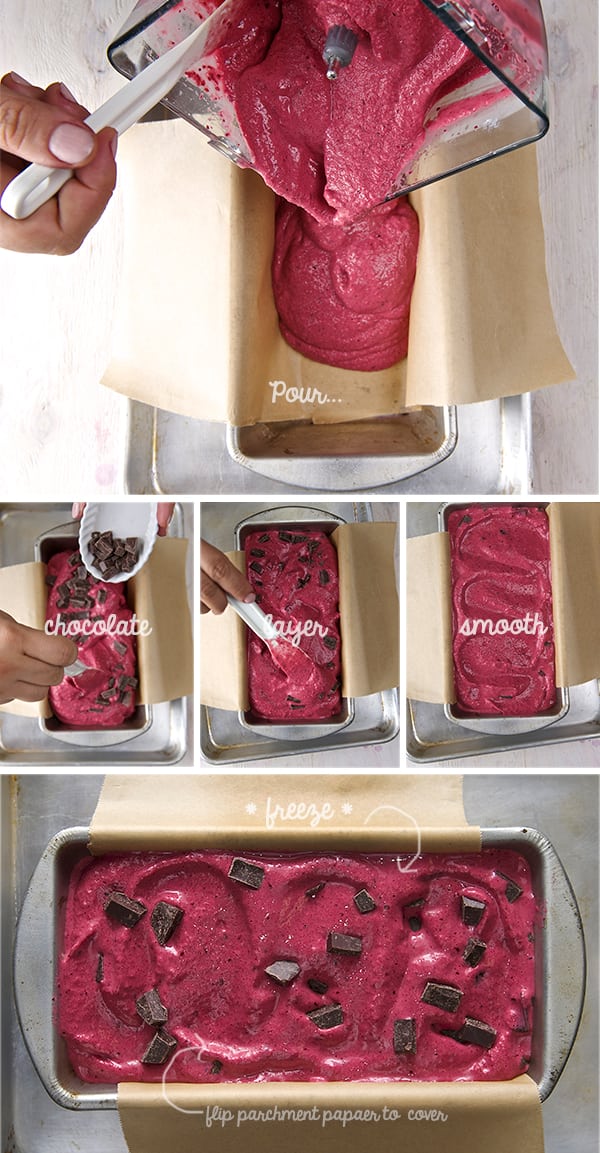
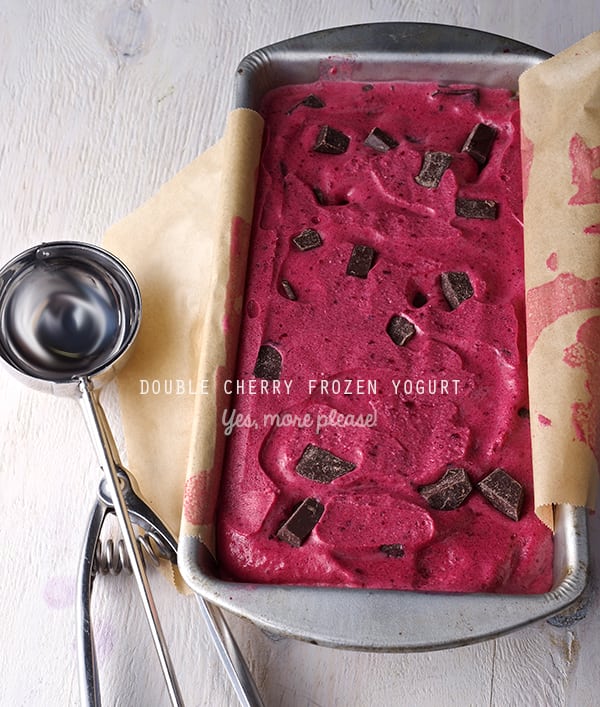
4. Line up a loaf metal pan with parchment paper and poor half of the cherry frozen yogurt, sprinkle some chocolate chunks, cover with the rest of the frozen yogurt. and cover with parchment paper making sure it makes contact with the mixture, to avoid freezer burn.
5. Place in Freezer for about 2 hours. Serve and sprinkle with some chopped roasted pistachios. Enjoy!
Recipes, Cooking & Art Direction: Mariana Nuño Ruiz McEnroe | Photography: Ian McEnroe |
Published: July 25, 2014
I must say that some times is not about reinventing the wheel it’s just about perfecting it.
That’s what this recipe-non recipe is all about.
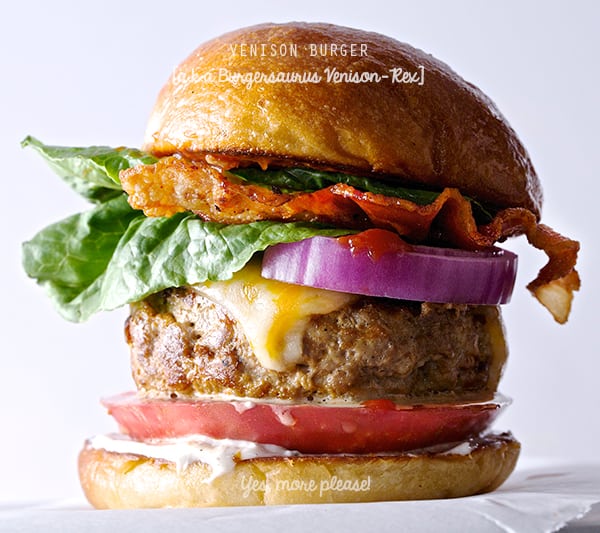
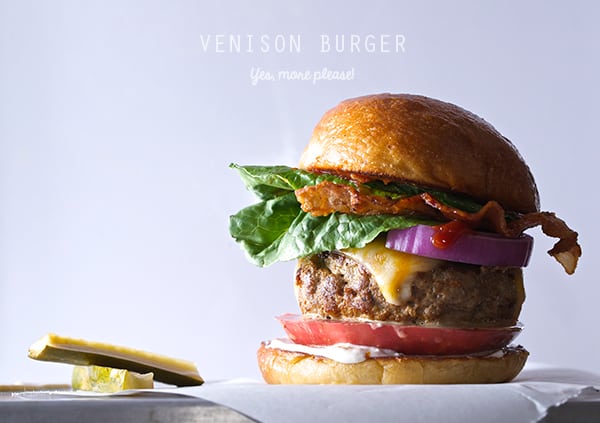
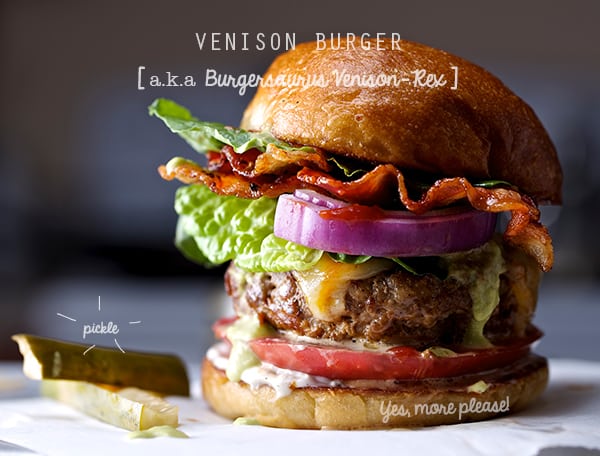
Just look at it! Isn’t it gorgeous?…It’s not only very attractive, it’s packed with amazing flavor.
It’s my dream burger…*sigh*
Like I said, this recipe is about making a burger in the better way possible. What makes this burger special? The HOW to.
The big question I asked myself when starting this recipe: What’s in a classic burger and how can I make it better when I’m at home?
The quest started and this are my requisites for a “mo betta! burger”…
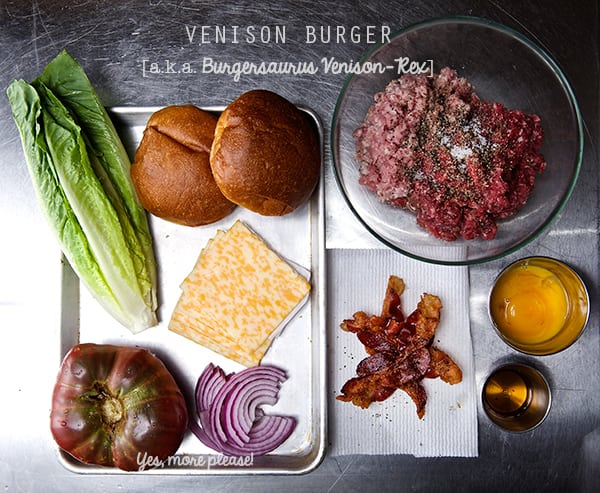
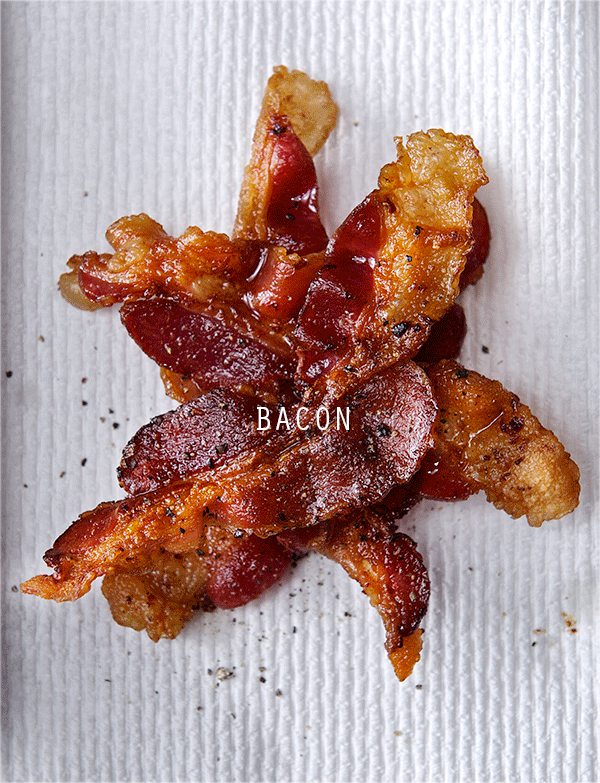
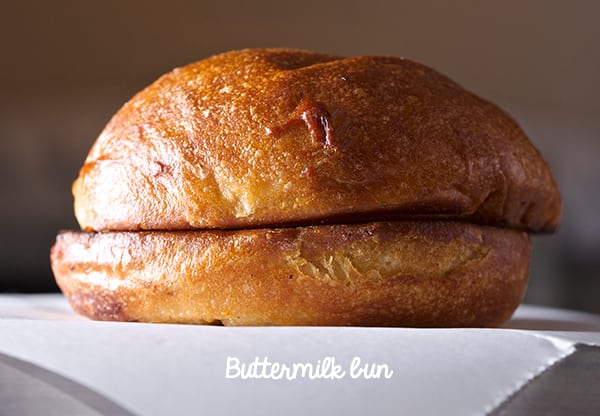
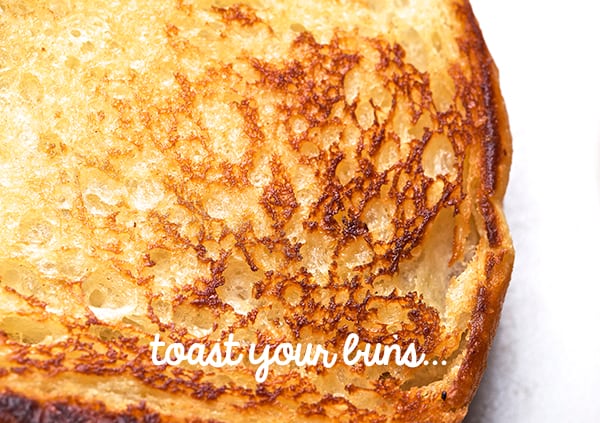
1.Great Buns: A bun that holds your burger, but lifts and hugs her like a koala hugs a tree, like a bra that lifts and push beautifully. Do yourself a favor, toast your buns makes a big difference. I used buttermilk buns. 2.Tomato: Instead of using a wimpy thin mushy tomato slice…How about a luscious thick slice of a juicy, meaty, heirloom tomato goddess. Why settle for a flavorless tomato right? 3.Onion: Onion place a great role on the burger it adds that bite that contrast between the sweet ketchup, sharp salty mustard and plays so well the crunchy juicy roll in it. So I will go with red onion. Besides being sharp adds color, and visual appeal. Note: Be kind to your guests and family members by rinsing the onion slices. 4. Lettuce: this leafy green is not only for decoration and color, the lettuce play an important role on the burger, adds a crisp bite, where the meaty fatty molecules from the patty and bacon expand and maximize the flavor. 5.Bacon: You love bacon, I love Bacon, we love bacon, everybody loves bacon.“Love is all you need” 6. Condiments: For me, a burger is not complete without the trilogy: mustard, mayo, ketchup. My absolute favorite condiments: Sir Kensington’s. 7.Pickle: Always the best Burger co-pilot will be the Pickle. I love Thomas Keller’s recipe for sweet quick refrigerator pickles. Check it out if you want to make your own. 8.Cheese: Mild Cheddar, or Colby that’s what I prefer on my burger, it has enough character, but does not overwhelm the burger. 9. The PATTY: Let’s talk about meat. Classic Burger mix usually mixes a fatty cut for flavor and moisture and a leaner cut for yield, shape and texture. What ever is your choice of meats make sure you are using 80% of the leaner cut to 20% fatty cut. Blends that I recommend: Sirloin and Chuck steak, Turkey and Pork, Lamb and Sirloin, Venison and Pork.
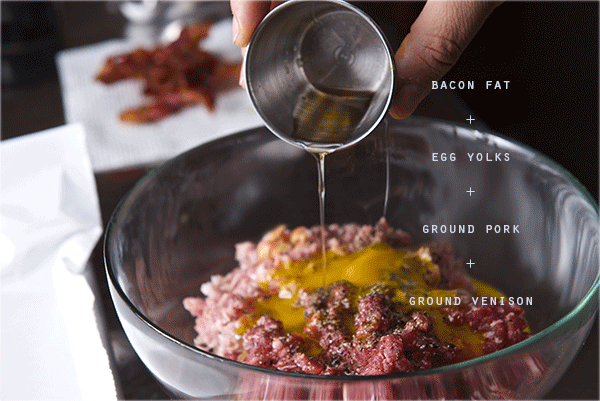
In this case to indulge we had ground Venison, provided by our good friend Marc “the hunter” he was very generous and share with us his fabulous ground Venison. I know is hard to get this precious meat, but if you are in Texas you are blessed. There are many places you can easily buy some of this delicious meat. I added some links at the end of this post for your convenience. The delicate meaty venison flavor is worth going the extra mile on this burger.
There are a couple of tricks I’ve learned, to improve and make the best moist, airy and flavorful patty, here they go:
Shaping:
When mixing your ground meat do not over work it. Use forks to “fluffen”the meat morsels to incorporate the ingredients. Shape the patties, but don’t compress. Think of tenderly thoughts when making the rounds, you just want the meat to stay together with out pressing to hard. What ever you do please, do not treat your meat mixture like play doh.
Make an indentation in the middle, it works like a charm. Your patties will cook more evenly, with no bump in the middle. A totally acquired method to the hump madness, thank you Rachel!. After I shape my patties, I place them in a tray lined up with some parchment paper and put them in the freezer for about 10-12 minutes. This chill helps the patty to hold its shape better when is time to cook them…watch out though, you don’t want to go to far and freeze them!
When cooking the patties:
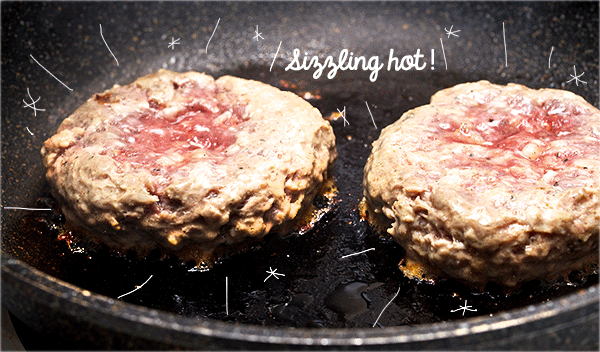
Your pan, grill or griddle has to be screaming hot to create a nice crust and sear! The sear will keep the patty moist on the inside while giving a crusty crust on the outside.
Please respect the patty!, once you place it into the pan, do not move it, no poking or pressing down with a spatula! You are just squeezing out the juices… be gentle and patient.
Turn the patty just once. This will ensure you’ll have a moist inside and no though interior.
Hold your seasoning horses! Try Salt and Black Pepper. For me this is enough. I want my patty to taste like meat to the max!… the rest of the accoutrements come later.
Last but not least, listen to good music while you cook, have fun, be ready for a great burger love, and make it awesome.
Any way friends, this is my version os a crazy good homemade burger…fries?.. that’s a whole other chapter. Meantime, keep yourself busy with this VENISON BURGER (a.k.a Burgersaurus Venison-Rex).
VENISON BURGER (a.k.a Burgersaurus Venison-Rex)
Makes 4 Burgersaurus
For the Patties:
14 oz Ground Venison
6 oz Ground Pork 80%-20%
2 egg yolks
Salt and pepper to taste.
4 Buttermilk Buns (I used Whole Foods brand they are fantastic!)
a little butter to toast your buns.
Accoutrements:
1 Large Heirloom tomato.
4 thick slices of red onion rinsed and pat dry.
6-8 leaves of Romain, Iceberg or your favorite kind.
8 thin slices of crisp bacon
4 slices of mild cheddar cheese or Colby-cheddar
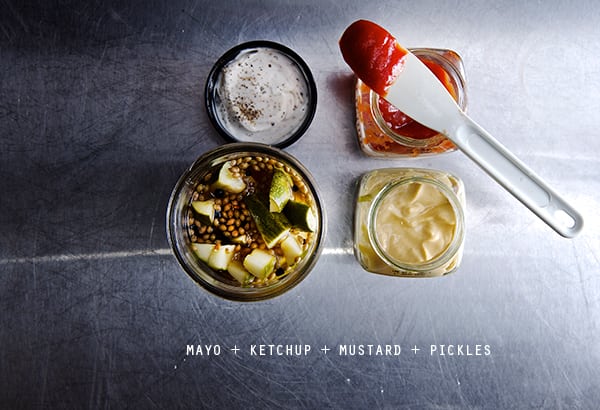
Condiments:
Mayo, Mustard, Ketchup, Pickles.
Preparation Method:
1. Prepare all your lettuce, tomato and onion slices. Gather all your condiments and spread spatulas. 2. Crisp up your bacon. Reserve 1 tablespoon of the bacon fat. 3. Cut your buns and spread some butter, have them ready when the time comes to toast them.
4. Prepare your meat, In a chilled bowl combine the ground venison, ground pork, 2 egg yolks and the tablespoon of reserved bacon fat. Using to forks combine all the ingredients, remember not to over work the mixture. Venison is a very lean meat, therefore I’ve added some egg yolks and a little bacon fat to keep them moist. 5. Line up a tray with parchment paper and divide your ground mixture into 4 and shape your patties, be gentle and do not compress. Place them on the tray and make a concave indentation in the middle (see photo below). Place them on the freezer for 10-12 minutes.
6. On a screaming hot griddle, cast iron skillet or grill place your patties at least 1-2 inches apart. Remember, do not crowd the pan, use a bigger skillet, and place one patty at a time. Wait for about 1 minute interval between placing the next patty into the pan to give a chance to the pan to bring the temperature up to screaming hot. 7. Each patty will take around 3-4 minutes the first side. Flip them until you can see that brown crust is formed.Once you flip them, place the cheese slice on top. It will take a little less time like 2-3 minutes to finish cooking. Venison cooks faster than meat, check your burgers at all time, adjusting the temperature if they are browning to fast. If you are using other mix of meat please adjust the cooking time maybe by adding an extra 1 or 2 more minutes upon how well done you want your burger.
8. Once they are ready place them aside and let them rest for a bit. Meantime toast your buns. I spread a thin layer of some good old butter, and toasted on a medium hot skillet until they look like this…
9. Time to assemble:
Now do you remember that Math rule that goes “Changing the order of the factors does not change the product” When building a Burger for me the order of factors DOES change the product. The condiments for me are the glue, I use them like so, between layers to hold the burger. Here is how I start:
Apply mayo on the bottom of the toasted bun, then tomato slice, patty, bacon, onion , ketchup, lettuce, spread some mustard on the top bun. Press a little, pickle on the side to munch on every other bite…done! Please, do what ever you want to do, do not listen to me on this one, this is just the way I like it!
Recipes, Cooking & Art Direction: Mariana Nuño Ruiz McEnroe | Photography: Ian McEnroe |
Published: July 22, 2014
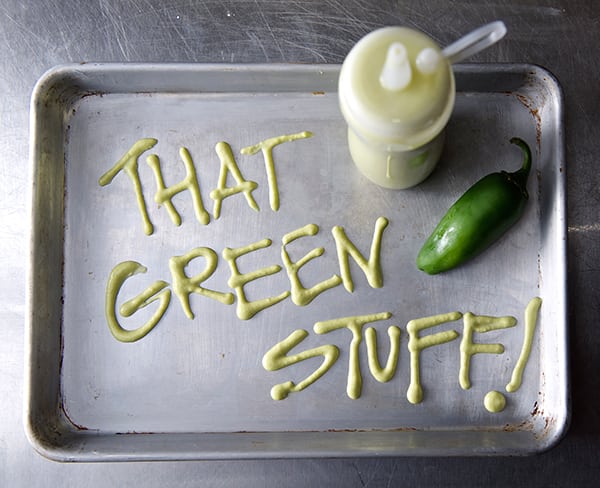
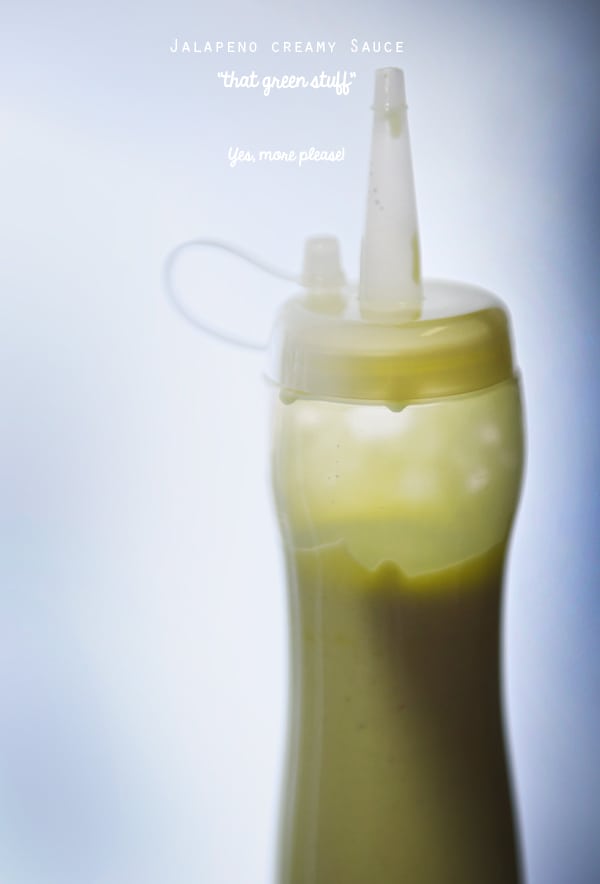
I know you’ve seen and tasted this creamy, spicy, light green sauce at taco stands, Mexican and Tex Mex restaurants here in Texas. This creamy green sauce is incredibly good and addictive. It’s tangy and spicy profile is irresistible. Why “green stuff” ? Its ingredients are a mystery when you taste it. The creamy texture makes you believe it has avocado or maybe some sort of cream or mayonnaise. I’ve tried to make this sauce many times with no success, until now. I even tried to buy this sauce at a super market chain here in Austin that started to sell it. After trying this supermarket version with its whopping thirty-one ingredients which did not even taste or resemble the creamy tangy spicy “green stuff sauce”.
Determined to make my own, I decided to take action and start my research. This traditional Mexican salsa was not easy to figure out, although I had sampled it many times in my life in Mexico, a very common condiment for tacos, and street food. My first encounter with this sauce was in Baja at a fish taco stand. I experimented with 3 or 4 recipes that I was given by different taco stands and restaurants. I had to eat a lot of tacos in order to get the flavors and ingredients correct or to even attempt to ask how it was made. Such are the sacrifices I make for my readers…Oh well.
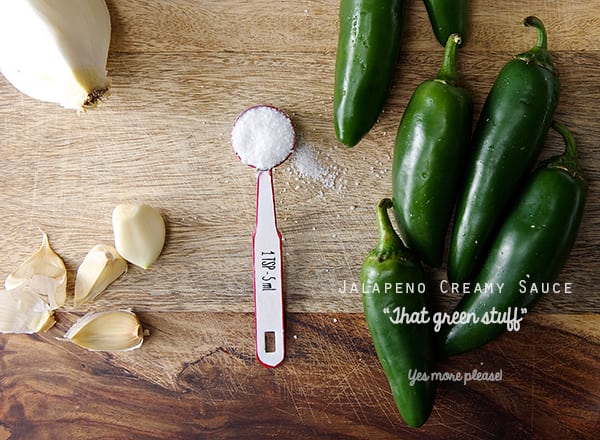
After asking a few different sources, I learned the principle of how the creamy sauce was made and to my shock and surprise I discovered that this green creamy sauce is made with just five ingredients! Not a single drop of dairy, cream or avocado is used. Now my mission was figuring out the amounts. It knew it was going to be a matter of trial and error. I started to play with the five ingredients: Fresh Jalapenos, Onion, Garlic, Corn Oil and Salt . I combined them in the most sensible way possible. I attempted to recreate the recipe about three or four times by adjusting the spicy and creamy taste I had in my memory.
I tried different methods like roasting, pan frying, blistering, and boiling the chiles as referenced by my sources. Finally on the final attempt I got it! The green creamy sauce is here before your eyes and I’m sharing it with you with no edits. Easy as 1-2-3-4 steps and five ingredients.
You can make this epic sauce for a fraction of the cost and a thousand times greater in flavor in a blink of an eye. Bettter news yet, it is good for all my Vegan friends, because there is not a single drop of dairy in it.
What can you use this sauce on? EVERYTHING, from ANY taco(on fish tacos..amazing!), carne asada, fish, pork, lamb, roasted chicken, tofu, quesadillas, eggs, sandwiches, burgers, chips, roasted veggies, BAKED SWEET POTATOE FRIES (did I said, baked sweet potato fries?), roasted potatoes, pizza, hot-dogs, you can even combine this sauce with some sour cream and transform it into a dip for chips.. you name it.
Go wild!…I’m in total love with it and so glad I can share it with you. I hope you fall for it too!
Jalapeno Creamy Sauce “That Green stuff”
Makes about 2 – 2-1/2 cups.
6 large fresh Jalapeño chiles. Mine weighed about 7 oz / 200 gr. give it or take.. you can make it half a pound why not!
¼ of a large yellow onion
2 large garlic cloves
½ to 3/4 of a cup corn oil, grapeseed oil, sunflower oil or extra virgin olive oil, or a combination of two.
1 teaspoon kosher salt
Note: depending on how spicy are your chiles, adjust using a little splash of apple cider vinegar to brighten up the flavor. Remember you can use any other chile you prefer, like Serranos, Poblanos, Habaneros, Bell peppers, Anaheims, Gueros, California, Hatch… or a combination of them!
Preparation Method:
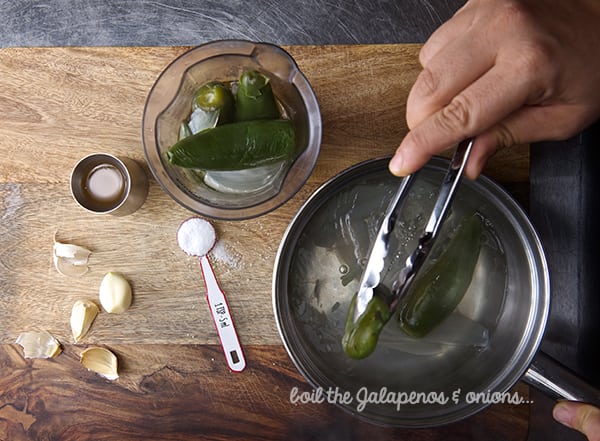
1. In a small pot bring water to a boil, enough water to cover the chiles and piece of onion. Simmer the jalapenos and onions for about 15-20 minutes until they change in color and are fork tender, but not mushy. Carfuly remove stems after they cool down a bit and strain some of the excess water.
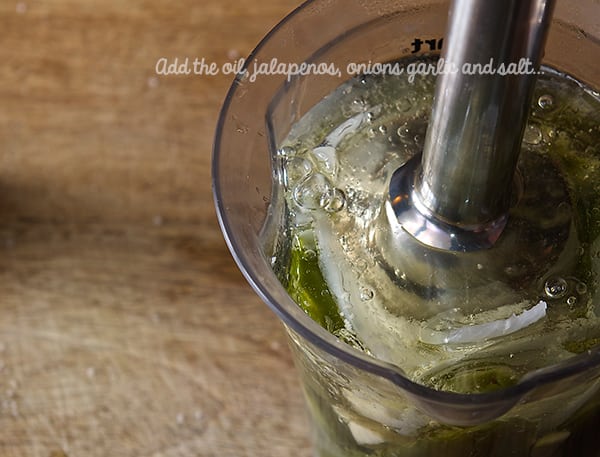
2. Using an immersion blender, a food processor or a regular blender, combine the corn oil, garlic cloves, strained jalapeños onions and salt.
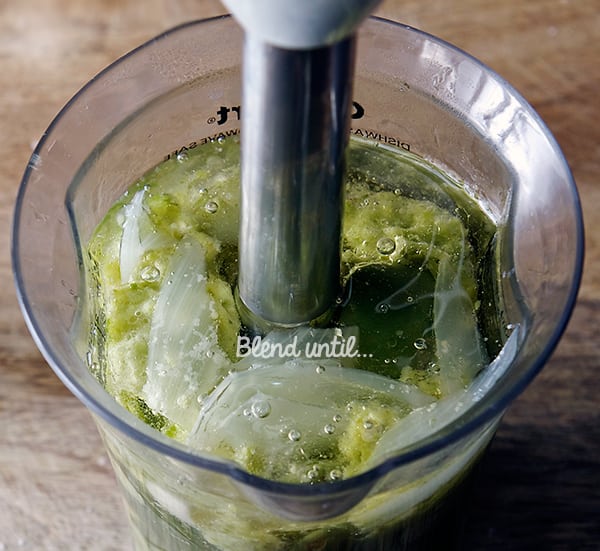
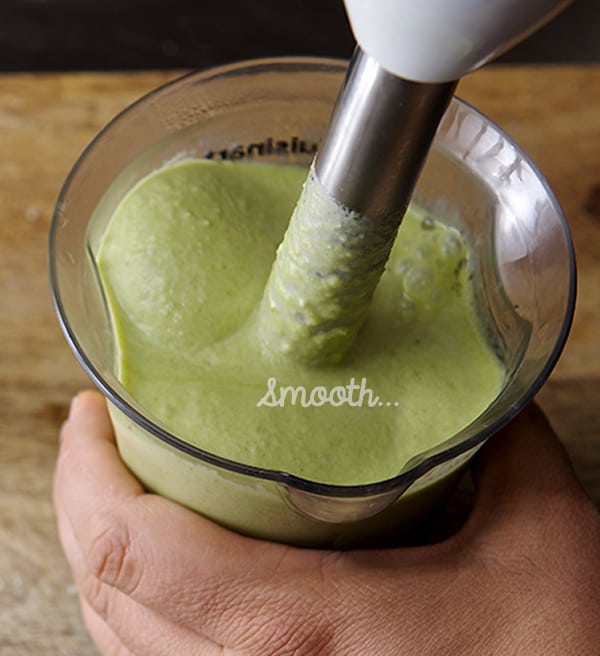
3. Blend until smooth and creamy, about 3-4 minutes using an inversion blender, about 5-6 minutes on a blender or food processor, until it looks frothy, creamy and pale green.
4. Taste for salt, adjust if necessary. Transfer to a squeeze bottle, and refrigerate. It will last for about a week… If you can contain your self!…. Enjoy!
Warning and Notes:
*This sauce is really spicy when is warm. Please, do not panic, once the sauce cools down and its refrigerated, the extra spiciness will settle and will have a comfortable mild bright spicy flavor.
**If sauce is to thick add bit of the water in which the jalapeños were cooked, or a dash of apple cider vinegar. It always its more lose when recently made, once its refrigerated it tends to congeal, just give it a couple of nice shakes and it will be alright.
Keep in the refrigerator. It last about 2 weeks… if you are lucky!
6 Jalapenos too much for you?…
Substitute 3 jalapeños for 1 large or 2 small poblano peppers, remove seeds and veins. Add a teaspoon of apple cider vinegar to brighten up the flavor. Blend, Enjoy!
1/2-3/4cupCorn Oil, Sunflower oil, OR Grape seed oil
1teaspoonKosher or sea salt
Instructions
1. In a small pot bring water to a boil, enough water to cover the chiles and piece of onion. Simmer the jalapenos and onions for about 15-20 minutes until they change in color and are fork tender, but not mushy. Carfuly remove stems after they cool down a bit and strain some of the excess water.
2. Using an immersion blender, a food processor or a regular blender, combine the corn oil, garlic cloves, strained jalapeños onions and salt.
3. Blend until smooth and creamy, about 3-4 minutes using an inversion blender, about 5-6 minutes on a blender or food processor, until it looks frothy, creamy and pale green.
4. Taste for salt, adjust if necessary. Transfer to a squeeze bottle, and refrigerate. It will last for about a week… If you can contain your self!…. Enjoy!
Recipe Notes
Warning and Notes:
*This sauce is really spicy when is warm. Please, do not panic, once the sauce cools down and its refrigerated, the extra spiciness will settle and will have a comfortable mild bright spicy flavor.
**If sauce is to thick add bit of the water in which the jalapeños were cooked, or a dash of apple cider vinegar. It always its more lose when recently made, once its refrigerated it tends to congeal, just give it a couple of nice shakes and it will be alright.
Keep in the refrigerator. It last about 2 weeks… if you are lucky!
6 Jalapenos too much for you?… Substitute 3 jalapeños for 1 large or 2 small poblano peppers, remove seeds and veins. Add a teaspoon of apple cider vinegar to brighten up the flavor. Blend, Enjoy!
***Depending on how spicy are your chiles, adjust using a little splash of apple cider vinegar to brighten up the flavor. Remember you can use any other chiles you prefer, like Serranos, Poblanos, Habaneros, Bell peppers, Anaheims, Gueros, California, Hatch… or a combination of them!
Recipes, Cooking & Art Direction: Mariana Nuño Ruiz McEnroe | Photography: Ian McEnroe |
Published: July 18, 2014
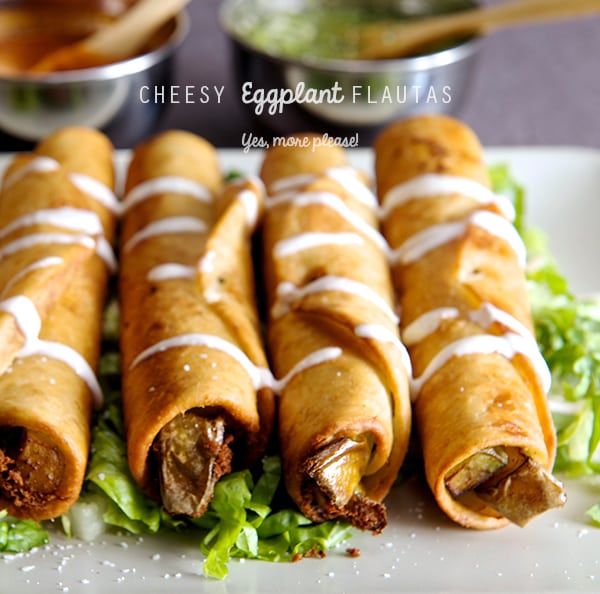
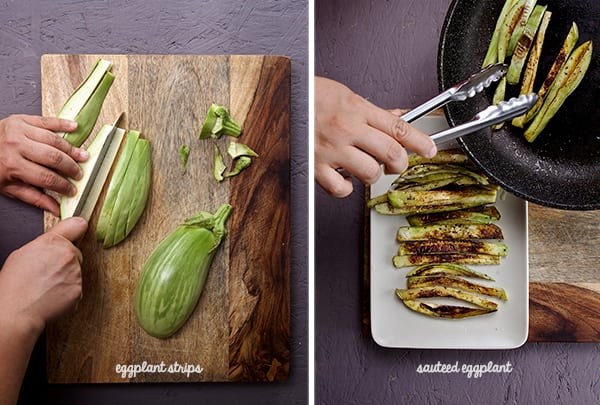
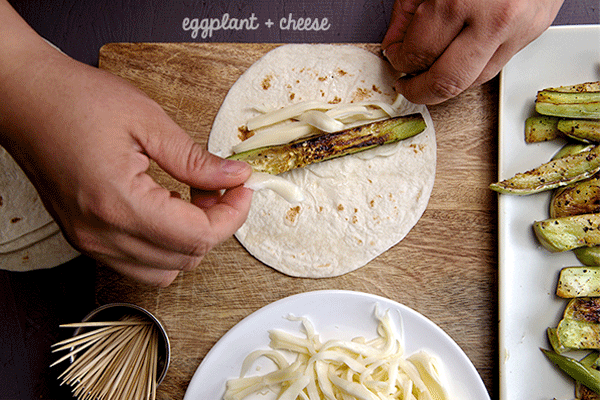
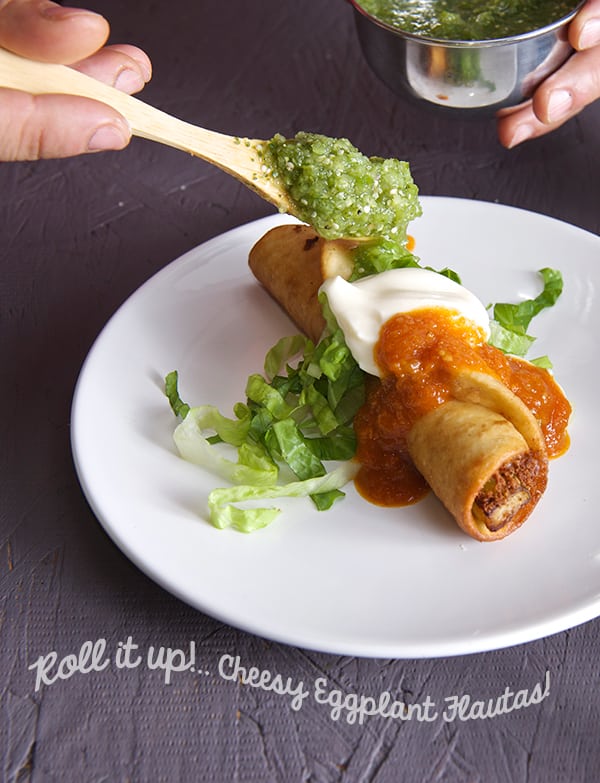
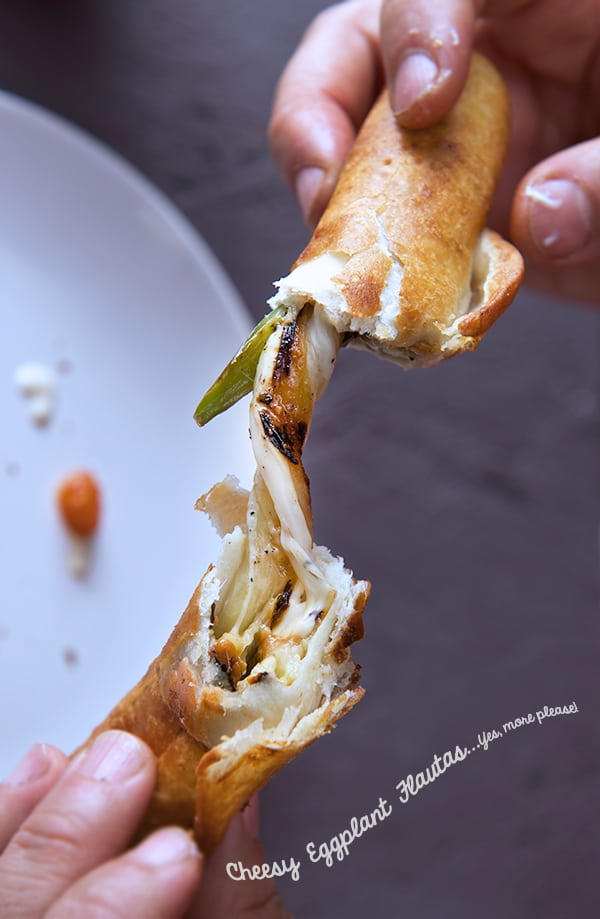
Roll e’m up, folks! These Flautas ~a.k.a~ rolled tacos are scrumptious! They are filled with quickly sauteed eggplant and a strip of Oaxaca stringy cheese in a thin flour tortilla. THis recipe is quite different from your regular eggplant recipes. The eggplant marries to the cheese inside of the crunchy warm rolled-up flour tortilla, making the filling into utterly creamy vegetable goodness.
They are best served on a bed of crisp fresh lettuce, drizzled with some liquid sour cream or Mexican cream. You can make my fabulous Tomato-Cinnamon sauce for dipping it is slightly spicy and sweet, the cinnamon warms up the tomato flavor is a match made in heaven with the eggplant. A Salsa Verde also works divine… you choose, or make them both, why not?!
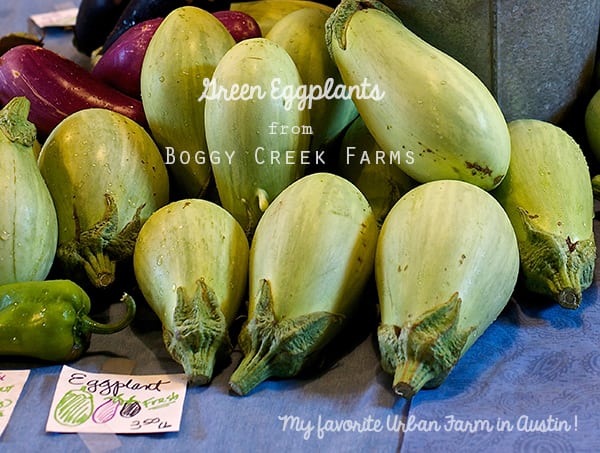
I struggle to find a great variety of quick dishes for eggplant. Cheesy Eggplant Flautas are a great way to utilize those extra eggplants and a fun vegetable option that makes for a great, simple and delicious entree.
Don’t feel like frying?…then brush the rolled flautas with some vegetable oil and bake them!…
Now, get those eggplants rolling. Have fun!
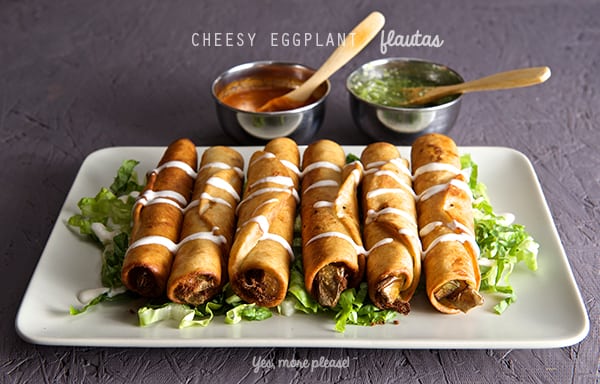
Cheesy Eggplant Flautas
Makes 8 Flautas
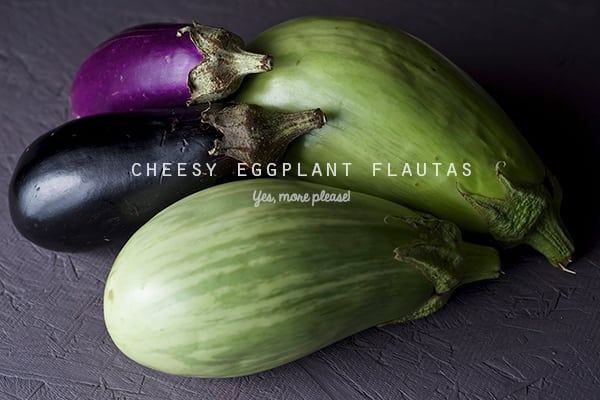
1 large eggplant cut into thick strips.
½ pound of Oaxaca cheese.
8 thin flour tortillas
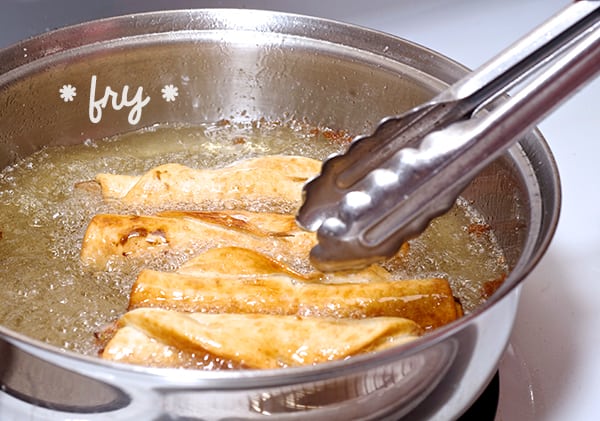
4 cups of corn oil for frying.
1-2 cups of finely shredded Romain lettuce.
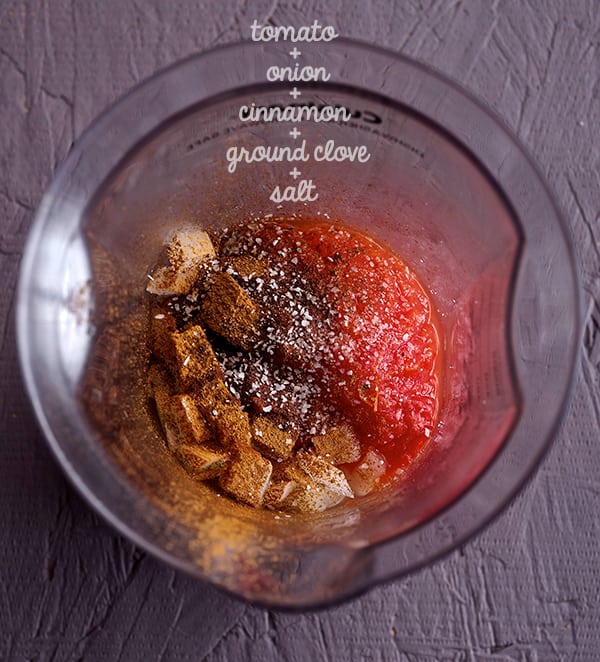
For the Tomato – Cinnamon salsa:
1 large red tomato such as red prudence or 2 Roma tomatoes will do too.
¼ cup fine diced sweet onion.
1 pinch of ground clove
1 pinch red pepper flakes or one dry chile de arbol
½ teaspoon ground cinnamon.
½ teaspoon salt
½ teaspoon sugar
1 tablespoon of apple cider vinegar
1 small glug of grape seed oil or mild olive oil.
2. Boil the tomato and puree it. 3. In a small pot add oil and saute the onions until soft and translucent. 4. Add the spices and salt stir until well combined and fragrant. 5. Add the tomato puree and the sugar and cook for 3-5 minutes. 6. Turn off the heat and add the apple cider vinegar, adjust seasonings.
Make the Flautas: 1. Saute the thick eggplant stripes using a little olive oil, season salt and pepper. Set aside.
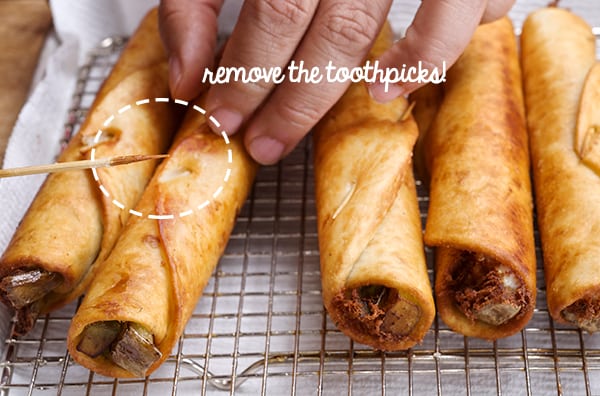
2. String the cheese into a thinner stripes. 3. Slightly warm up the flour tortillas, place one or 2 eggplant stripes and some cheese strings roll it tightly and secure the end with a wooden toothpick. Proceed with the rest.
4. In a medium size heavy bottom pan add the 4 cups of oil and warm up until your thermometer reaches between 350-375 degrees. NOTE: Take care while frying to avoid any skin contact with hot oil. Watch the pan and carefully monitor the temperature. Avoid all distractions since these flautas cook very quickly. 5. Fry the flautas until evenly golden brown around 2-3 minutes or less. Watch them at all times.
6. Pull them out on a cooling wire rack
7. Serve immediately on a bed of lettuce, drizzle the crema, dip into the salsa roja or verde…. bite, dip-bite-repeat. Enjoy!
Recipes, Cooking & Art Direction: Mariana Nuño Ruiz McEnroe | Photography: Ian McEnroe |
Published: July 11, 2014
Its time to CELEBRATE. We are thrilled to have accomplished one year of blogging with you!
We truly cannot believe it’s been one year already. This year has been an intense with constant learning and exploring in every sense. I remember a year ago I was in urgent need of a career change. Ian and I would talk for long nights and days trying to decide what to do and how to start pursuing a career that let us develop our passions. We knew we wanted to do something together that involved our skills and our love for visual arts and food. Not a restaurant, nor a food truck was not on our minds. We like to produce things but we wanted the option to create a new recipe every day. We preferred not to become accountants and administrators. Something good had to come out out of our years of college and acquired skills. Between Ian’s Fine Arts bachelor plus his 14 year photography experience and my Bachelor in Architecture and a Culinary Arts two year certificate we felt we had good ingredients to start creating.
A Tale of Three Gabys…
So discarding the would-not’s, we started filling the “YES” gaps on our list. But we could not figure out our what these conclusions amounted to!?…
I have three friends named Gaby ( yes I know, way too many Gaby’s). They are close friends from my early years; each of whom I’m grateful to have in my life. When I talk to Ian about them I have to refer them by the city of which they live; Gaby-Barcelona, Gaby-Madrid, Gaby-Guadalajara. I keep in touch with them all through Facebook where I would often post photos of the dinners I made before I began blogging. I had great comments from my friends and they often asked for my recipes. On one occasion many of their comments synchronized. My dear friend Gaby-Barcelona, said “you should start a cooking blog” and I received the same comment twice more from each of the other two Gaby’s.
~ Could I pull off a cooking blog? Who would look at it? Isn’t my kitchen is too tiny? I hardly ever follow recipes!…You can imagine all the ‘not’s’ and knots in my head. One night I had a dream about it. The next day I woke up and knew what to do. I quit my unfulfilling job and the next day I planned the first recipe. Ian was on board and fully supportive of the idea and the project, although a bit ‘confuzzled’ as to how we would make it happen (~believe me no more confused and puzzled than me!~). In our relationship, Ian is always the more thoughtful and careful character… He likes to “analyze and investigate” which is great as long as you do not get stuck in the search. I’m the crazy one, impulsive and the “lets’ go and do it now” type of thinker which is also helpful but sometimes naïve. Nonetheless, despite these two extremes of character, we make a great team. We just decided to take the plunge into blog adventure.
Let’s get started!
After we decided on the name of our blog and cooking theme (and this process deserves it’s own post~ heheh), for more than two weeks I immersed myself into the tech-world of how to design and understand the “cosa nostra” of the WordPress world. This process is complicated for some one who has not been in contact with web technology for a long time. Eager and fully committed until my brain was about to explode… I kept going. I remember Ian leaving for work in the morning and he would come back home and we would celebrate the fact that I figured out how to change the color of the font on the titles!!!~Wha! Once that I recognized I was staring idly at the screen I knew I needed extra help. Tutorials were helpful but I did not speak “tech” and I had to look up two words out of three. Bottom line: I needed help. That’s when my dear friend Andrea came to my rescue. She was my angel of mercy. She taught me with great patience and care. I will always be in debt to her. ~Love you Andrea!~ Now I was getting the ball rolling! Then I started to work on the logo. I made at least 37 logos with various fonts, colors, and names. The first one I finished did not look at all at “our”current logo. Even now we are thinking of refreshing it… oh boy! But at the time the most important part for us was to just get started and keep going.
The 1st shooting…
Our first shooting day was a long one; we spent at least 5 continuous hours. We had to figure out light quality, photo angles, and the composition. The recipe was the easy part. I have tested the recipe before and we have had it many times for dinner or lunch. A simple and delicious Jalapeno honey cornbread and tomato salad. Since it was tomato season I could not have being happier for a tomato recipe to be our first post. The best reward after the shooting was the recipe for lunch, and that’s still true today. We shoot live. When I say “what you see is what we eat” it literally it is. In manny occasions we are so tired after the shooting that we just take the whole display board to the table and eat the “beauty shot” as we call the final image. That’s when I do my final recipe adjustments if needed. Ian is my best judge.
The first post…
So with bits and ends on a Thursday July 11th of 2013, I managed to assemble our first live published post. It was terrifying and liberating. It felt like sending a message to the universe, with no answer but once we saw it on the screen. We felt really good about it. With crickets chirping in the background and our friends and family, we began to get views and a great little response. Our first day we had 153 views!lol!.. But how do you eat an elephant? One bite at a time right?
On the go!
So, we have kept going and shooting and creating recipes. We have had the worst fights of our life and the best happy feelings and joy at the same time. We have argued over a piece of radish, cutlery on the side of the plate, light placement, flavors, textures, colors, dishes, all in an effort to always give you the best recipes we can share with you.
The recipes represent who we are, what we ate, and what we are craving. I’ve learned tons about photography and Ian has learned lots about cooking. Its been the most intense year of our lives and one heck of a ride! And I’m sure we would not trade it for anything.
We can not put into words how rewarding it is to get to know new people and knowing they are enjoying the recipes. Our friends and family write comments that keep us going. Sharing who we are through our food and our visual journey is what we love to do. In total we have posted 84 times and around 82 recipes in 52 weeks. We have hundreds of viewers who visit every day in over 17 countries (shout out to Finland!). Food is a great universal language.
We aspire to inspire YOU to cook, to live up the experience and to enjoy the cooking process. Preparing a meal whether it is for one, or two, or two hundred will make your day a better day and when you share food with family and friends you are building up great memories for tomorrow. We believe homemade meals taste better when you put a little extra love to the cooking process.
To serve you cyber food its our great pleasure and we will continue sharing the love of food with you.
Thank you for being here with us all year long! Cheers for the next one to come!
Ian and Mariana
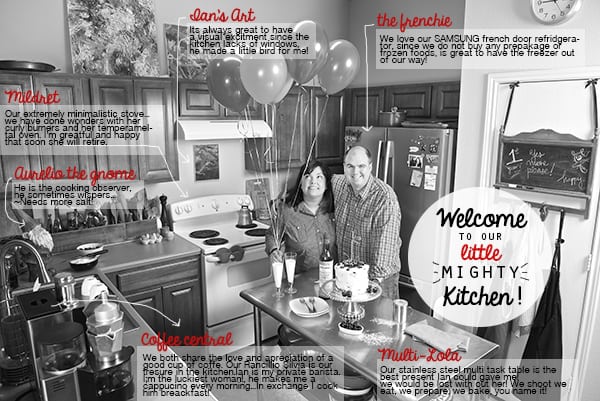
Our Headquarters !!!
Check out our little kitchen. If we can cook, eat, shoot, dance, fight and have fun in this little happy place you can do it to! Nothing is stopping you to have an awesome time enjoying and making the most of what you have.
~ Let’s cook!
We wish we could of invited you all… but as you can see it would be a bit crowded; hey! maybe next time you could come and cook with us?! Shoot us an e-mail if you want to be our guest, you are welcome any time.
Meantime welcome to our little happy place…
What the new year will bring us?
New web design coming soon…a refreshed look, printable recipes, tutorials, a section of our favorite ingredients, gadgets, books, and a more accessible music pairing gallery…stay tuned!
We are marinating the idea of publishing a book. Any ideas, contacts, or publishers are welcomed. ; )
We would love to travel our cooking, so invite us to your city, we will cook for you!
We would love to be closer to you!
The screen is our medium so shoot us a comment, tell us what you would like to see this year, what you need, what rocks your boat, what music or spice are you hooked on! We are here for and because of you!.. Don’t be shy and please share your thoughts.
All along this year we had people who helped us to become better bloggers,
to all of you readers and followers THANK YOU so very much!
Musika! One of our favorite local bands : Spoon!!
Extra Special thanks to all the people who helped us to put the extra cherry on the cake!
My friend Drea for her continuous help, support, and friendship!
Thomas for all the patience in the world and great support on the “cosa nostra” of the WordPress. For teaching me valuable tips and hints and for rescuing me every time I had to do a back up! ~Keep calm and ask Thomas~
To all our friends who helped us with the frantic voting for The Kitchn, “Homies awards 2014″contest, hehehe, it was an unexpected and fun experience.
To The Kitchn website editors… for picking our blog as an Editor’s choice in the contest.
My Mother and our families who always have been our best cheerleaders!
Our number one follower Tamra!!! I think she has done almost all the recipes on the blog… if not all … almost close. Thank you!!!
Our Friends and bloggers from Austin Food Blogger Alliance, Adri and Matt, Maggie Perkins, Kristin Sheppard, Megan Myers, Katryn Hutchison they do an awesome work as leaders for the AFBA and in helping spread the Austin blog love! This is a great group of people in pursuit of good food and good information. I’m looking forward to a great year of active blogging adventures!
Our Special Supporters:
Sharlie Douglass from Nikon , Paul and Natalie Bardagjy unconditional friends and recipe lovers, Kirk Tuck , Mandy Earnshaw and all the good folks at Precision Camera and Video here in Austin, TX.
Our Farmers Market Friends from:
Boggy Creek Farms
My favorite happy-enchanted place in Austin, hands down they have the best vegetables in the city!
Carol Ann, Stephen, Dana, Lorig, Tina.
Johnson Back Yard Garden at the Sunday’s Muller Farmers Market,
Hector (Chef Boyardee) for always receiving us with a big smile at the farmers market stand, Thank you Hector!
Smith and Smith Farms
Great delicious eggs and the best chicken to roast. Thank you so much Colby!
Gilbert Market in Arizona
Thanks for loving sharing our recipes!!! We hope to visit you soon!!!
Recipes, Cooking & Art Direction: Mariana Nuño Ruiz McEnroe | Photography: Ian McEnroe |
Published: July 6, 2014
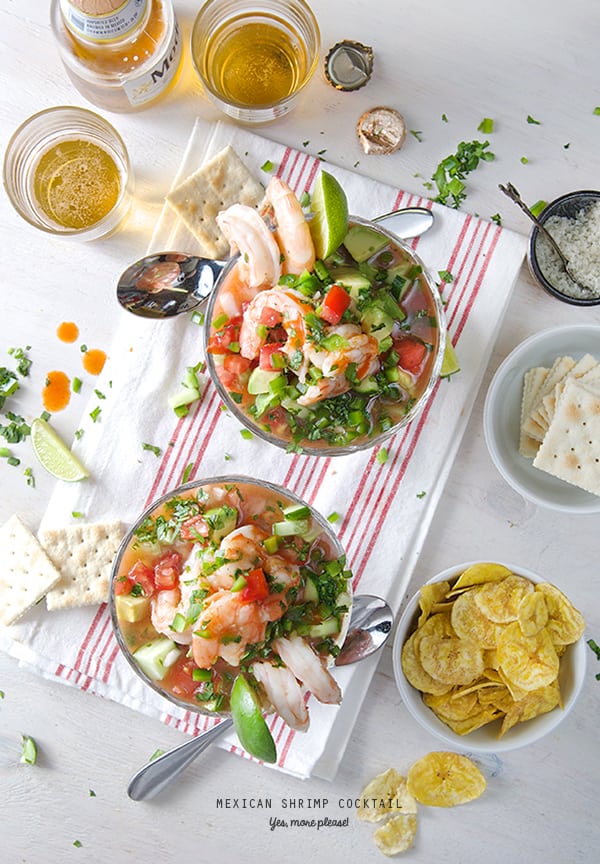
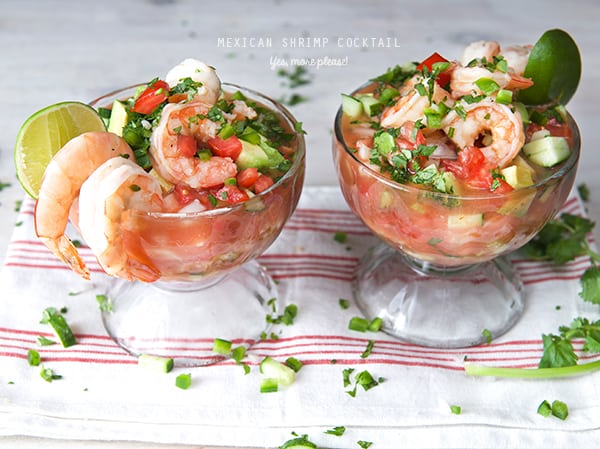
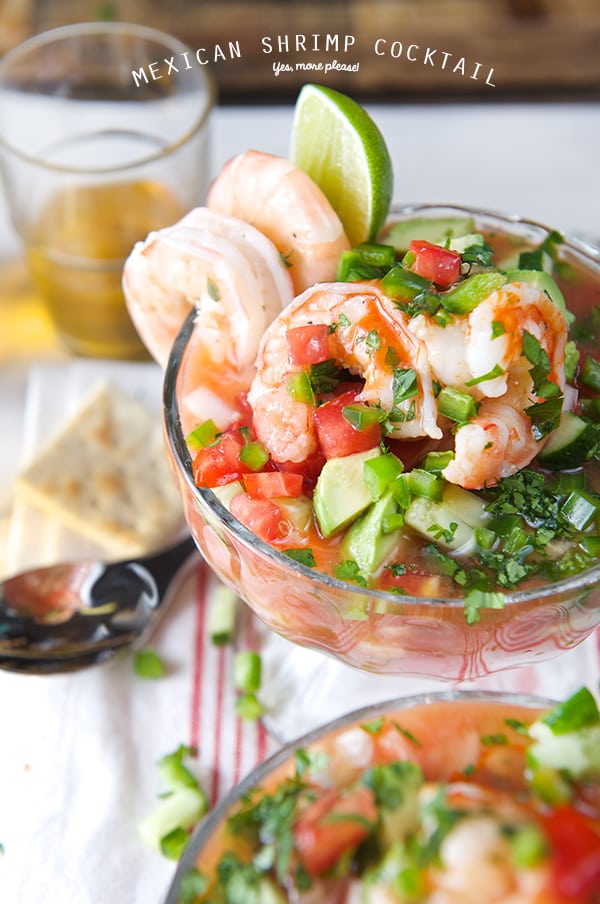
Hold your horses! Hide the children! What you are about to see is food rated “R” at its best! My Mexican Shrimp Cocktail is to die for. Fresh, delicious, and savory; it’s the perfect simple light meal for a hot summer afternoon. This juicy cold and light savory cocktail is a meal in itself. What makes it Mexican style? Well the whole combination of vegetables, accoutrement, and the cold broth. It’s a savory broth made with shrimp shells and seasoned with fresh orange and lime juice, ketchup, and some dashes of hot sauce. The result is this light fresh savory broth that goes incredibly well with the shrimp. In my opinion there’s no need to buy those bottled clam juices when you can get the most natural flavor out of your shrimp!
This Mexican Shrimp Cocktail is an entrée rather than an appetizer with a dipping sauce as served in the States. In Mexico, this cocktail is typically served on the coastal cities as an iconic refreshing staple and a must have if you are spending your day on the beach. In the city, shrimp cocktail is widely known as the number one ‘hangover elixir.’
There are many variations in which more than one shellfish is added to this concoction. Common ingredients include octopus, clams, oysters, baby scallops. It is called “Vuelve a la vida” which translates to “come back to life” because its invigorating attributes. That, I can not guarantee, however I assure you that it will refresh and invigorate you on a summer afternoon. In my case, I just love the simplicity of flavors and the way the shrimp skins cooked as a base produce a magic broth with depth and character!
Prepare this dreamy cocktail for yourself ! You can make it in advance, since it is served cold on chilled glasses. For parties you can serve it with all the vegetable accoutrement on the side which allows your guests to customize their own. Keep it ice-cold at all times. It is truly a great summer crowd pleaser. Enjoy!
I can assure you this recipe will be part of your repertoire for many years to come.
Happy Summer, Enjoy!
Mexican Shrimp Cocktail
Serrves 2 sailors 4 mermaids
This cocktail is light and refreshing, it can serve two as a meal or four to six as an appetizer. This recipe can easily be doubled or tripled upon family size, or a friendly party crowd.
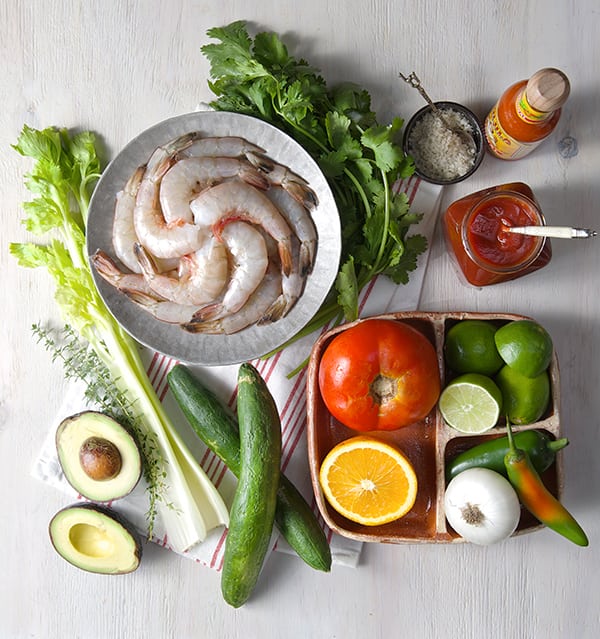
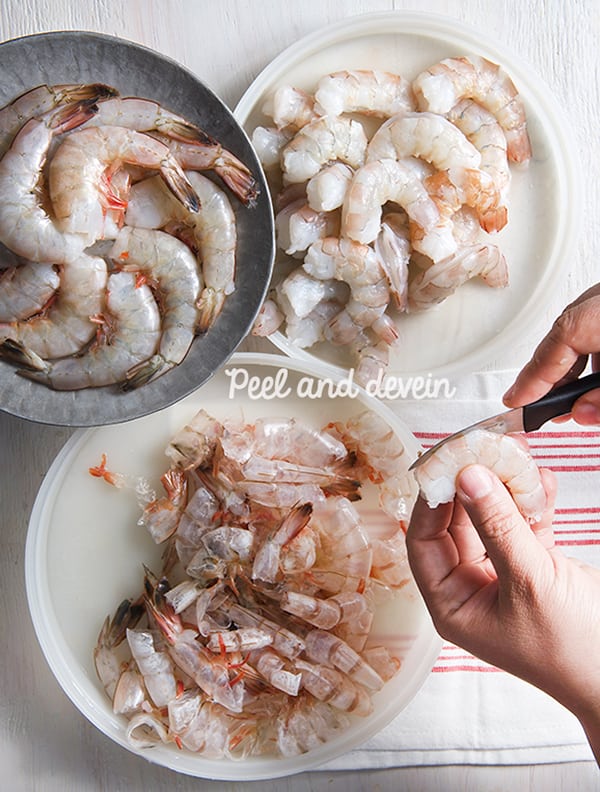
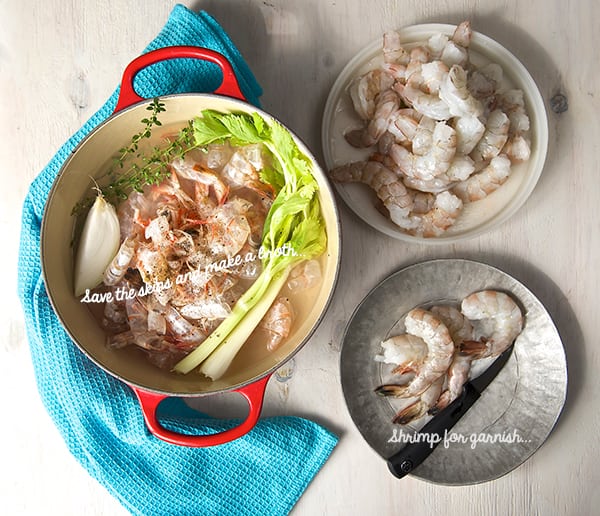
1 – ½ lbs. Jumbo or medium large shrimp, peeled save the skinsand deveined.
For the shrimp stock:
The reserved skins from the shrimp.
2 celery stalks
¼ wedge of a white onion.
2-3 sprigs of fresh thyme
1/2 teaspoon Sea salt
¼ teaspoon black pepper
Seasonings for the cold cocktail broth:
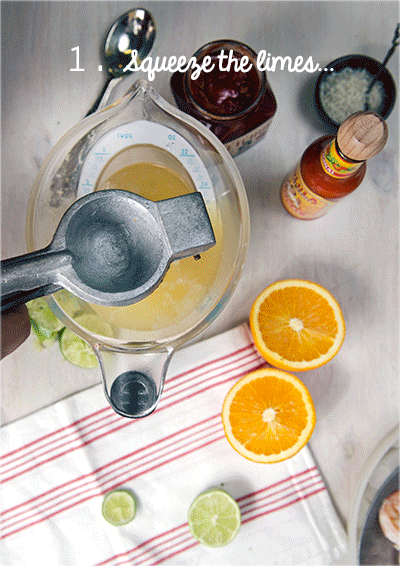
The juice of one small Valencia orange
3 large limes + 1 or 2 more to garnish.
¼-1/2 cup ketchup sauce
A few dashes of your favorite Mexican Bottled Hot Sauce, I prefer Cholula, Valentina or Huichol.
Prepare cocktail with:
2 roma tomatoes, small diced
1 small white or purple onion, small diced
1 medium cucumber seedless such as jade or English cucumber, small diced.
¼ cup finely chopped cilantro
1 chile Serrano or Jalapeno with seeds.
1 small Hass avocado
Serve with:
Saltine crackers or Tostadas
Plantain Chips
And a really cold light Mexican beer (I prefer Modelo Especial or Victoria oh yeah!)
Preparation Method:
1. Place two glass serving bowls in the freezer. (Mason jars, or glass mugs will work too.) 2. Peel and de-vein the shrimp, reserve the skins and leave 4-6 unpeeled, tail-on shrimp for garnish. 3. In a non-reactive pan place the shrimp skins, along with the celery stalks, onion wedge, thyme, a pinch of sea salt and some cracked black pepper. Add 3 cups of water and simmer for about 15- 20 minutes.
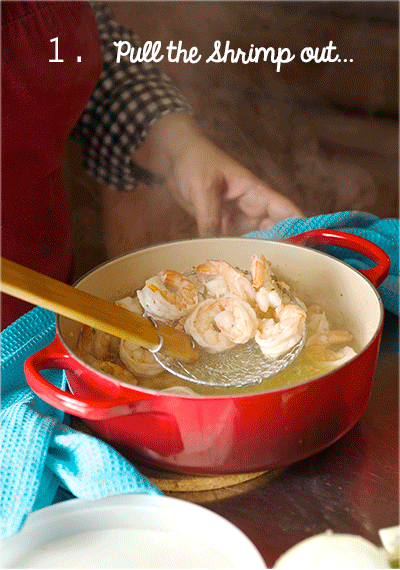
4. Meantime, prepare all your vegetable accoutrement. Dice and chop the tomato, cucumber, onion, serrano or jalapeno peppers, limes, avocado and cilantro. Set aside. 5. Check on your broth. With a slotted spoon, remove the skins and all the vegetables from the broth. Add the peeled and deveined shrimp to the hot broth and simmer the shrimp for about 2-3 minutes or until they change color and curl up.~Shrimp cook very fast so be attentive! You do not want rubbery overcooked shrimp!~
6. With a slotted spoon, pull out the shrimp a little before you think they are ready. They will keep cooking with their residual heat. Place the shrimp on a plate with ice underneath. (see picture below). 7. Fill a bowl halfway with ice and place a metal or glass bowl on top of the ice. Place a fine sieve on top of the bowl and drain the broth. With a wooden spoon, start whisking to cool off the broth until the temperature of the broth feels fresh and cooler.
8. You should have around 2 to 2-1/2 cups of broth left, transfer the broth into a liquid measuring cup if you have more than 2 ½ cups discard the extra broth. 9. Start seasoning the broth. Squeeze the juice of 3 limes, the juice of 1 small Valencia Orange, add Ketchup (I used my favorite: Sir Kensington’s spicy ketchup!) add a couple of dashes of hot sauce, the sea salt, and whisk. Taste and adjust flavor for salt or pepper.
10. Pull out the frozen glass serving bowls and start arranging your cocktail. Start by layering the ingredients and add the seasoned broth at the end. No rules here! You can add as much or as little veggies as you want. Avocado is a must, highly necessary!, A little extra squeeze of lime juice, sprinkle some cilantro and an extra dash of hot sauce…Prepare for the stampede!.. you are gonna love it. Enjoy!
Refreshing, light this Mexican cocktail its perfect for a pool party or a weekend of leisure at home. remember to have a very very cold beer, Ceveza bien fria! Enjoy!
Course
Brunch, Lunch, Main Course
Cuisine
Mexican
Prep Time30minutes
Cook Time12minutes
Total Time42minutes
Servings4sailors or 4 mermaids
Ingredients
1-1/2ibs.Jumbo Shrimp, peeled, save the peels and deveined
For the shrimp stock:
2celery stalks
2-3sprigsfresh thyme
1/4wedge of a white onion.
1/4teaspoonblack pepper
1/2teaspoonsea salt
Seasonings for the cocktail broth:
1the juice of one small Valencia orange
3largelimes,plus 1 or 2 more to garnish.
1/4-1/2cupketchup sauce
A few dashes of your favorite Mexican Bottled Hot Sauce, I prefer Cholula, Valentina or Huichol.
Garnish with:
2roma tomatoessmall diced
1smallwhite or red onion,small diced
1mediumcucumber, such as jade or English cucumber.small diced
1/4cupCilantro,finely chopped
1-2Chiles Serranos or jalapeño,finely chopped
1smallHass avocado
Serve with:
Saltine crackers or Tostadas
Plantain Chips
And a really cold light Mexican beer (I prefer Modelo Especial or Victoria oh yeah!)
Instructions
1. Place two glass serving bowls in the freezer. (Mason jars, or glass mugs will work too.)
2. Peel and de-vein the shrimp, reserve the skins and leave 4-6 unpeeled, tail-on shrimp for garnish.
3. In a non-reactive pan place the shrimp skins, along with the celery stalks, onion wedge, thyme, a pinch of sea salt and some cracked black pepper. Add 3 cups of water and simmer for about 15- 20 minutes.
4. Meantime, prepare all your vegetable accoutrement. Dice and chop the tomato, cucumber, onion, serrano or jalapeno peppers, limes, avocado and cilantro. Set aside.
5. Check on your broth. With a slotted spoon, remove the skins and all the vegetables from the broth. Add the peeled and deveined shrimp to the hot broth and simmer the shrimp for about 2-3 minutes or until they change color and curl up.~Shrimp cook very fast so be attentive! You do not want rubbery overcooked shrimp!~
6. With a slotted spoon, pull out the shrimp a little before you think they are ready. They will keep cooking with their residual heat. Place the shrimp on a plate with ice underneath. (see picture below).
7. Fill a bowl halfway with ice and place a metal or glass bowl on top of the ice. Place a fine sieve on top of the bowl and drain the broth. With a wooden spoon, start whisking to cool off the broth until the temperature of the broth feels fresh and cooler.
8. You should have around 2 to 2-1/2 cups of broth left, transfer the broth into a liquid measuring cup if you have more than 2 ½ cups discard the extra broth.
9. Start seasoning the broth. Squeeze the juice of 3 limes, the juice of 1 small Valencia Orange, add Ketchup (I used my favorite: Sir Kensington’s spicy ketchup!) add a couple of dashes of hot sauce, the sea salt, and whisk. Taste and adjust flavor for salt or pepper.
Pull out the frozen glass serving bowls and start arranging your cocktail. Start by layering the ingredients and add the seasoned broth at the end. No rules here! You can add as much or as little veggies as you want. Avocado is a must, highly necessary!, A little extra squeeze of lime juice, sprinkle some cilantro and an extra dash of hot sauce…Prepare for the stampede!.. you are gonna love it. Enjoy!
Recipes, Cooking & Art Direction: Mariana Nuño Ruiz McEnroe | Photography: Ian McEnroe |
Published: July 1, 2014
Tomato Season in full bloom, but we have to move quick because here in Austin, July is the end of it. These red jewels do not handle triple digit temperatures. We have been eating them faster than I can come up with recipes to share; adding them to omelets, frittatas, salads, or as simple as slicing them with a bit of lemon juice and sea salt. Yes, I love them that much! I’m in tomato season heaven.
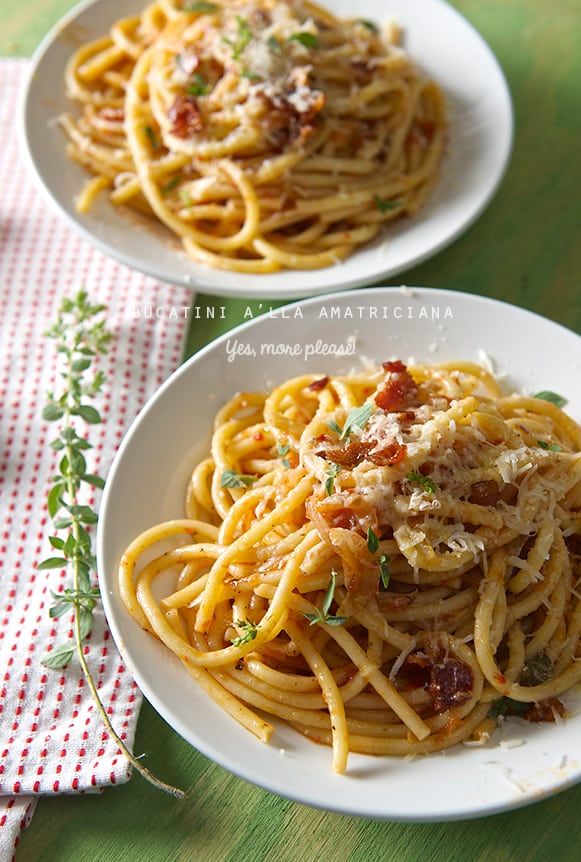
So the search for tomato inspiration involved going through my cookbooks. In search of a classic tomato recipe I ran into this pasta recipe that is very dear to my heart, Bucatini a’ll Amatriciana.
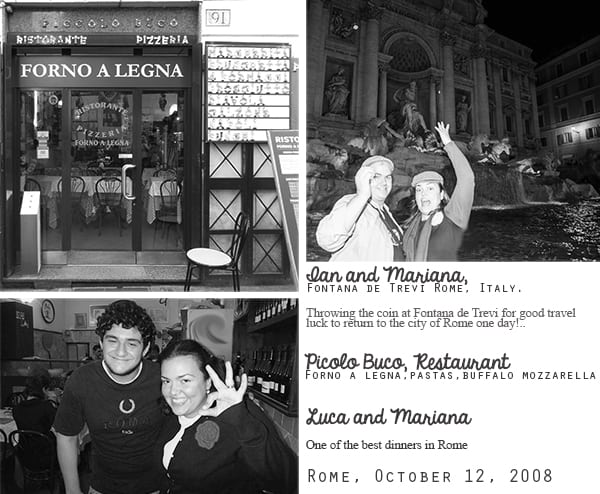
The first time we had this Roman classic, the way Italians intended, was in Rome. We spend almost one whole day at the Vatican Galleries walking and absorbing every single piece of art from the loooong corridors, from sculptures, tapestries, paintings, murals, jewels, did I say sculptures, murals, paintings? We finished the day at the Sistine Chapel, and Saint Pietro. Oh, my! we had an Art binge that day. After more than 6 hours, trapped and surrounded by the most amazing pieces of art and history we grew a voracious appetite. We felt like liberated lions in the Coliseum! Our stomachs were growling, we were in ‘art coma’. Hungry, thirsty and desperate, we noticed that we were surrounded by religious and souvenir stores…but we wanted food!!! We walked and walked the narrow Roman streets, searching for a non touristy dinner… And suddenly we were lost. Oh no, that was not good at all! Hunger does not let you think and makes you disoriented. We were getting grouchy and tired.
But as you know there is no harm that lasts a hundred years. Suddenly we saw a place with a big sign that said “Forno a Legna”, the most incredible arousing smell coming out of the door and a young man with a great smile (and the word buffalo mozzarella pizza). We felt like we had found the oasis on the desert, hypnotized and in a state of art coma, we sat down and this great polite man received us. We just told him “We need food; you feed us.” We had Caprese Buffalo Mozzarella Salad, Wood Fired Pizza Capricciosa, a Green Salad and we trusted him to bring us his favorite pasta.
When food arrived to the table it was incredible, everything looked and smelled so good, except for the pasta which did not looked very promising. At first sight it looked like “that famous Italian chef canned pasta” were the tomato sauce is kind of scattered and looked a bit under sauced. The noodles where very thick and they had sprinkled it with copious amounts of Pecorino Romano. I thought he was pulling a tourist pasta on us… I was so hungry that we did not care at that point.
To our big surprise the first bite of that pasta was a revelation. I felt like the whole Vatican art collection pasted a slide show in my head. That pasta was the best pasta I’ve ever had. Bucatini a’ll Amatriciana. Ian and I looked at each other incredulous of this amazing feast, we kept eating and making sounds of extremely joy and comfort. When we finished, all sort of questions were bombarding my head. This was by far the best pasta we ever had. Perfectly cooked, this thick spaghetti-looking pasta had a hole in the middle that was filled with all the juices from the sauce. The most luscious, salty and tomatoey sauce I ever had. And as we ate it we tasted the occasional piece of rendered guanciale, a cured meat. The Pecorino Romano added a perfect texture, and the pasta was silky and had the perfect balance of utterly delicious tomato flavor. This pasta would be best described as an Aria to tomato flavor.
At the end of our dinner, Ian and I just looked at each other amazed by what we just had eaten. I wanted to know everything about this pasta. I called the young man and he introduced himself. His name was Luca and he was the son of the owner of the restaurant. Like in most cases this restaurant was family owned. Luca told us all about the pasta; Bucatini a’ll Amatriciana, his favorite pasta. He described the preparation and the ingredients. I was in awe of the fact that there where just four ingredients. This conversation brought me full understanding of the importance of pasta-sauce ratio, the importance of pasta shape and sauce type relationship, best pasta conversation of my life!.
We will always be grateful of Luca to have shared his pasta wisdom with us, to had been such a great hostess and to have enlightened us with this amazing experience.
This Bucatini a’ll Amatriciana brings us lots of great memories and what a best season to make this recipe than tomato season. Please Enjoy!
If you would like to visit Luca in Rome:
Piccolo Buco
Via del lavatore n.91, Rome Italy (Trevi area)
Yes, this place have some funny lettering on the outside … nevertheless please do not measure food quality by this matter…hehehe
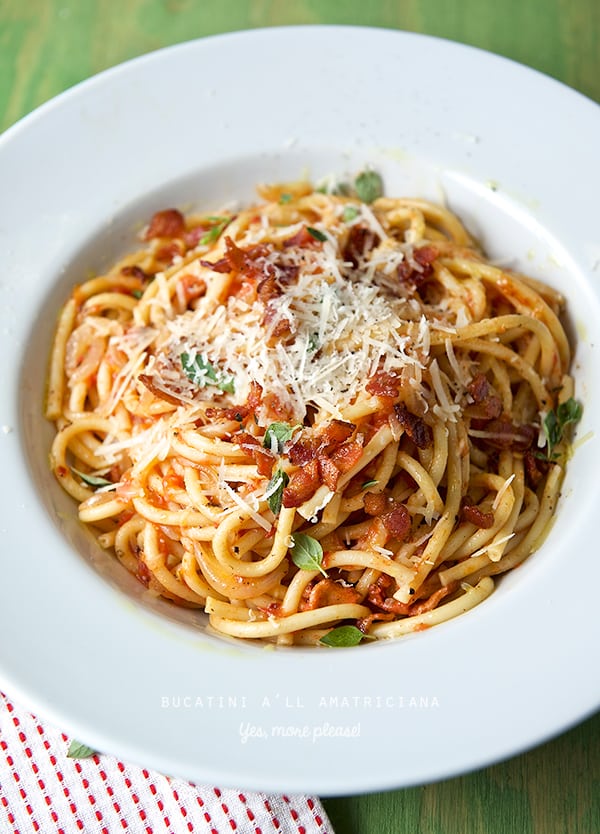
Bucatini a’ll Amatriciana a Roman story…
Serves 4 or 2 hungry, lost souls.
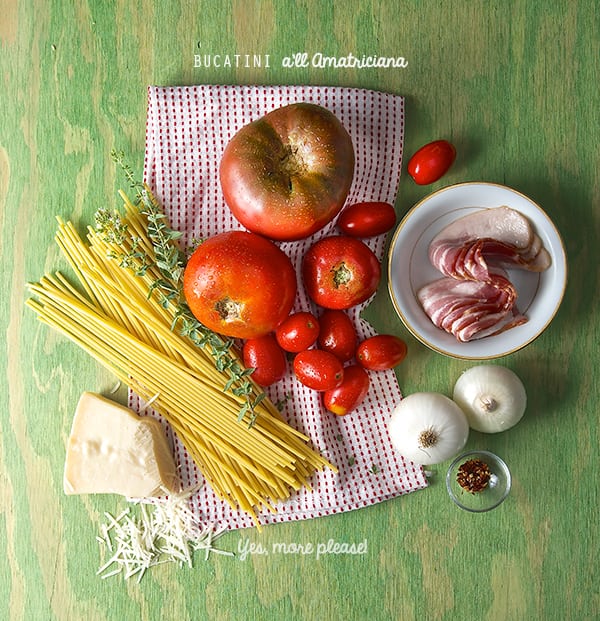
1 lb. bucatini pasta, I used Rustichella d’Abruzzo, De Cecco, Del Verde, Garofalo, Barilla will be all good options.
4 slices of thick not smoked-cured bacon or pancetta or guanciale, diced. Best option of the tree: Guanciale. I used Bacon that was what I had available.
1 lb. fresh ripe tomatoes, I used a combination of heirloom and red plum tomatoes, San Marzano will be idyllic, I just wanted to use what is in season and it turned out fantastic!
1 small or half a white sweet onion, thinly sliced or diced.
2 pinches of red pepper flakes
1/4 cup olive oil
½ cup of freshly grated Pecorino Romano.
1 sprig of fresh oregano. (if you can not get fresh oregano omit it, dry oregano has too strong flavor profile for this recipe.)
Notes: Italians traditionally make Amatriciana sauce with Guanciale, salt-cured pork jowl. It is similar to pancetta, but not as lean, and therefore has a richer flavor. Pancetta is the second option and a little more meaty. The third option is cured / NON-smoked bacon. I used the bacon of a well-known organic brand that makes a great cured/non-smoked delicious and leaner bacon.
Preparation:
1. In a large pot, start by heating up your pasta water and a couple of good sea salt pinches.
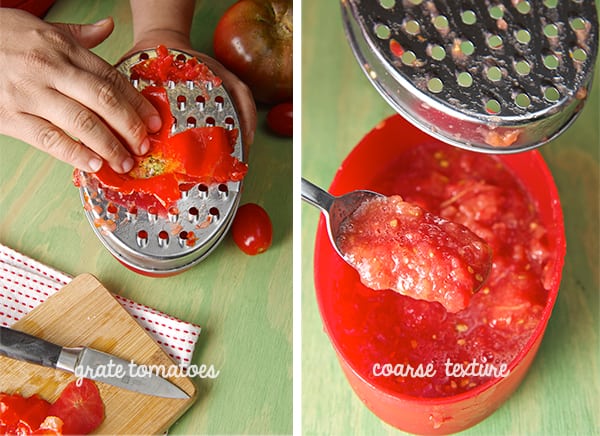
2. Mean time, with the help of a cheese grater, grate your tomatoes, omitting the skins.
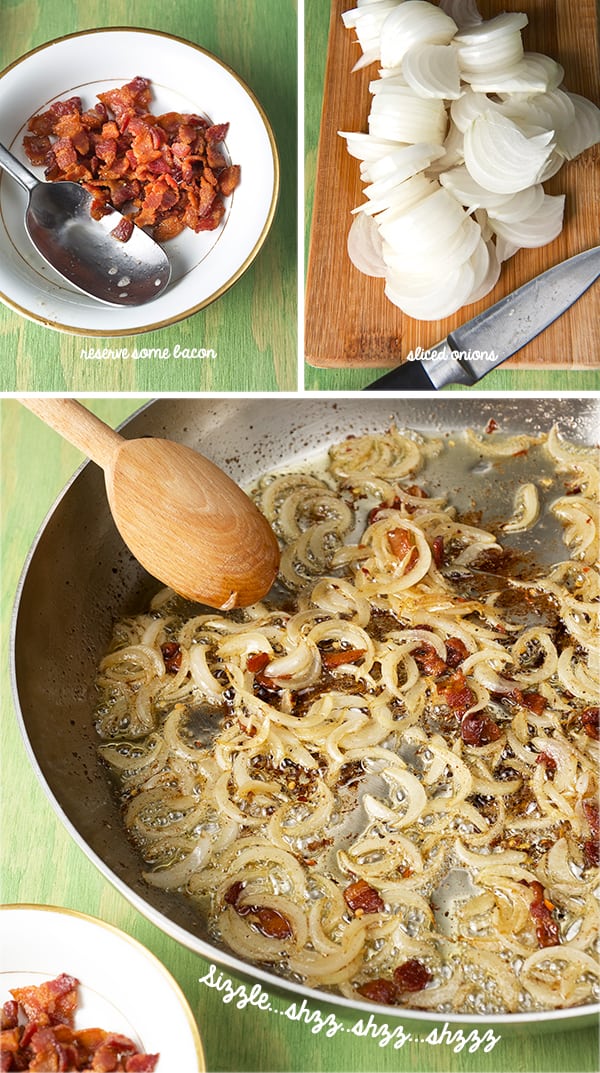
3. Cut your onions and Bacon.
4. In a non-reactive heavy bottom pan or a stainless steel pan add half of your olive oil and cook your bacon, pancetta or guanciale until crispy. Remove half of the crispy bits and add the onions.
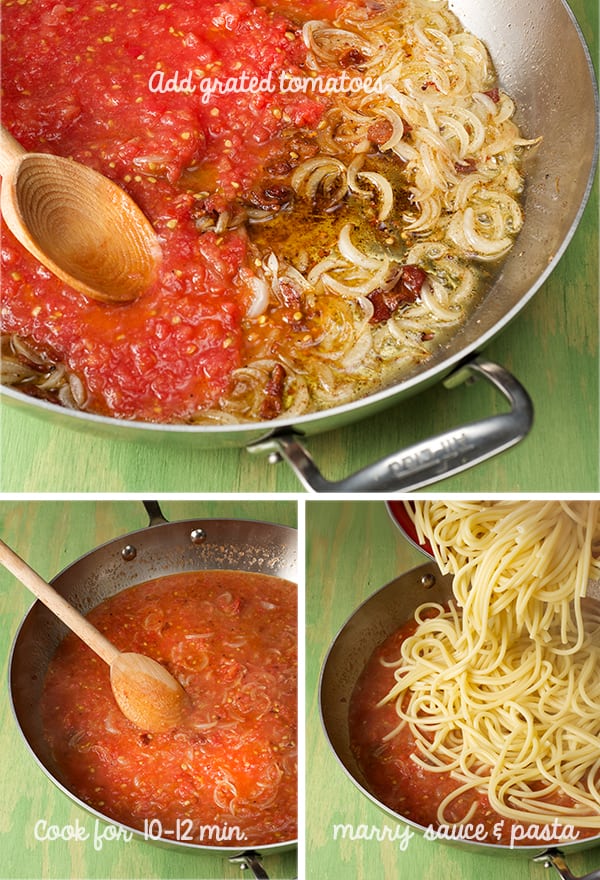
5. Cook the onions until soft. And add the pinch of red pepper flakes. (see picture below)
6. Add your grated tomatoes, oregano sprig and cook for the same amount of time that it will take to cook your pasta.
7. Add your pasta to the boiling water and cook following the directions on the package to be ardent approximately 6-7 minutes or other wise.
8. Reserve some pasta water. Drain your pasta, and add the pasta to the sauce, add some pasta water if needed, add the rest of the oil and reserved bacon, adjust seasoning.
9. Marry the pasta by cooking for another 2 minutes…
10. Serve immediately and sprinkle with generous amounts of grated pecorino Romano.
*Sprinkle some fresh oregano leaves if desired…Roman people will kill me I know…but it tastes so good!
Recipes, Cooking & Art Direction: Mariana Nuño Ruiz McEnroe | Photography: Ian McEnroe |
Published: June 21, 2014
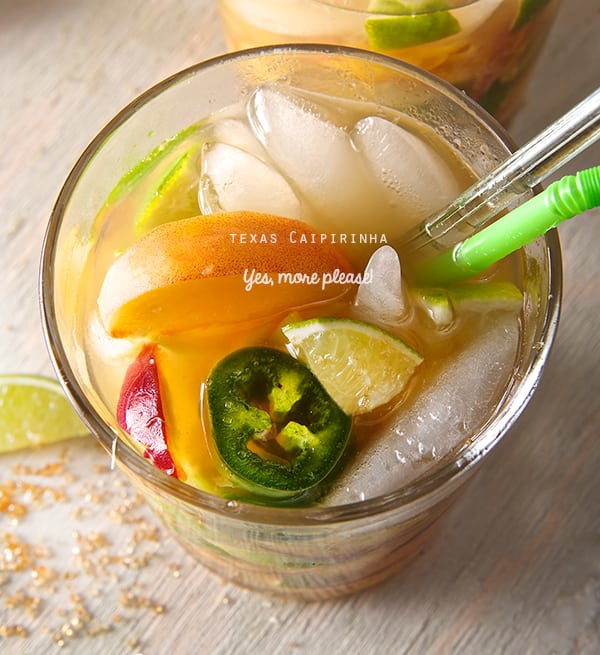
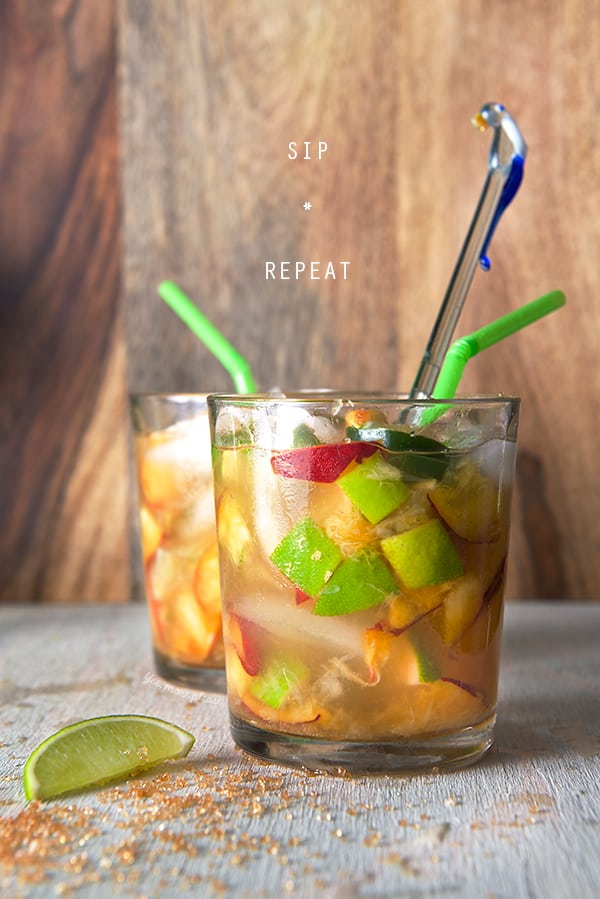
Summer is here, and with it the longest day of the year. Why not enjoy the extra day time by making these delicious Texas Caipirinhas with the best company there is: a great bowl of fresh chopped salsa and chips…Oh yes, my friends this is one of the best ways to start your Summer!
Brazil’s national cocktail “Caipirinha”is an easy and refreshing cocktail. This recipe has great twist that makes it Texan all the way. It will knock your socks off! ~which is about time is summer bring out the sandals!~ You are gonna love this Peachy Caipirinhas. Now instead of talking about them, just start making them, you’ll see what I mean pictures speak more than a thousand words on this recipe. Company? I got you covered “chips and salsa”. I made a Cucumber-Avocado Pico de Gallo, it’s refreshing and a cross between your regular Pico and Guacamole. I’m sharing my salsa tips with you. Making salsa is so easy when you know the little tricks. I’m sure these tips will make your salsa dance and taste even better.
Cheers to a happy Summer, have a great weekend!
Peach Jalapeño Texas Caipirinhas
Makes 2…because a drink always taste better when you are in company!
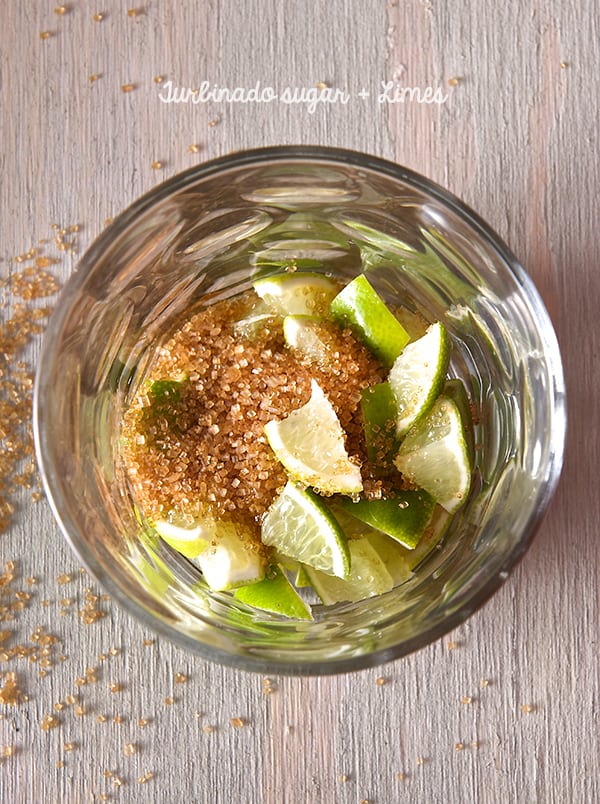
2 large lime cut in pieces
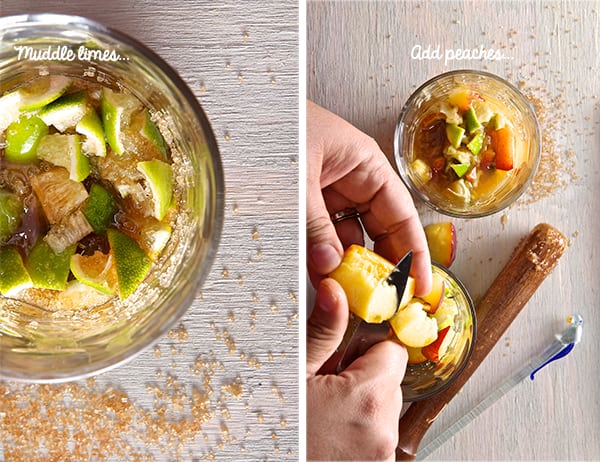
1 small ripe Texas Peach
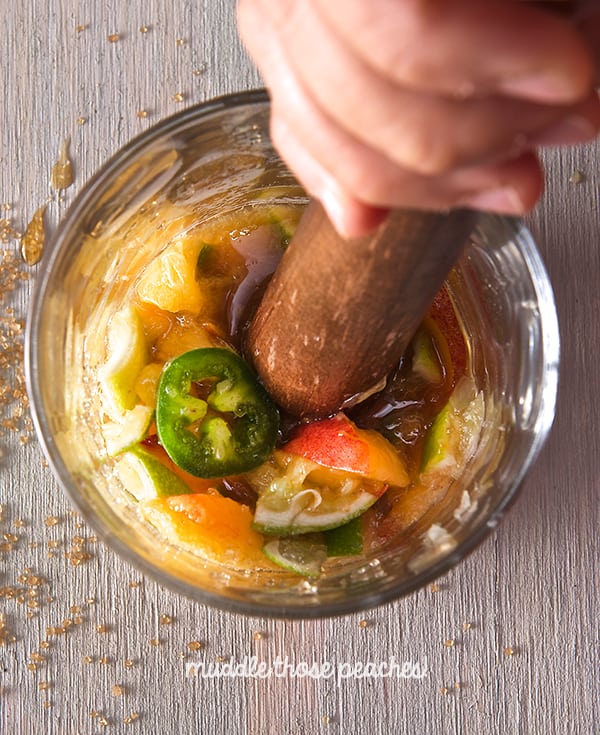
2 jalapeño slices no seeds!!!
3 teaspoons turbinado sugar (1-1/2 for each glass.)
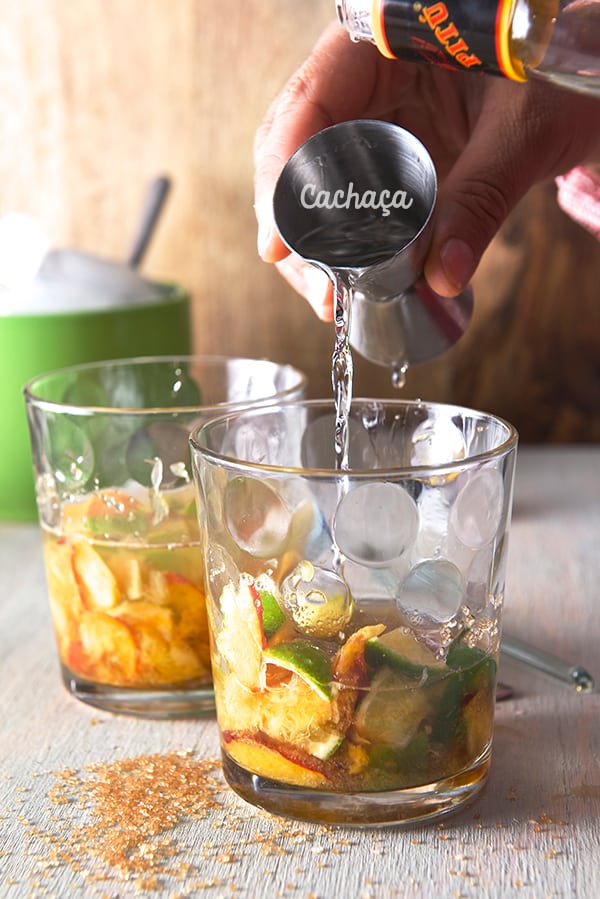
4 ounces of Cachaça Pitu or Yurioca My favorites.
Plenty Ice cubes
Preparation:
1. In a short wide glass place pieces of 1 lime, the sugar and muddle with a wood pestle.
2. Add ½ a peach on each glass and muddle.
3. Add 1 jalapeño slice into each glass and muddle just enough to release the spicy juices.
4. Pour the 2 ounces of Cachaça into each glass. Stir.
5. Fill glasses with ice
Stir well. Sip. Repeat.


