Recipes, Cooking & Art Direction: Mariana Nuño Ruiz McEnroe | Photography: Ian McEnroe |
Published: February 27, 2016
“Feelings…. nothing more than Fillings”… Hello friends, we’re back.We have been on a roller coaster; from a vacation in Mexico, to Slow Wine Festival, meeting new people, giving cooking classes, Ian giving lots of photography classes…we have been busy, but you have always been on our minds.
Visiting my Mexico after more than eight years was reinvigorating. Being back in my birth country was very fulfilling and I felt my roots strongly. We were welcomed at the airport with a big familiar smile and , thankfully, we did not have to get in the long customs line. During the visit we could eat and breathe the delicious in-season ingredients that Baja produces; from papayas, to avocados, chiles, lettuce, pineapples, limes, guanabanas, tomatoes, chard, radishes, you name it!. I just felt like a fish back in the water, especially walking along the pristine coastline. Now I’m melancholic… its hard to forget the people, the laughs, the air and the sea… and the food. From freshness, flavor, aroma, ingredients, preparations, sazones… can you imagine? Good thing we just visited one little town…Phew!
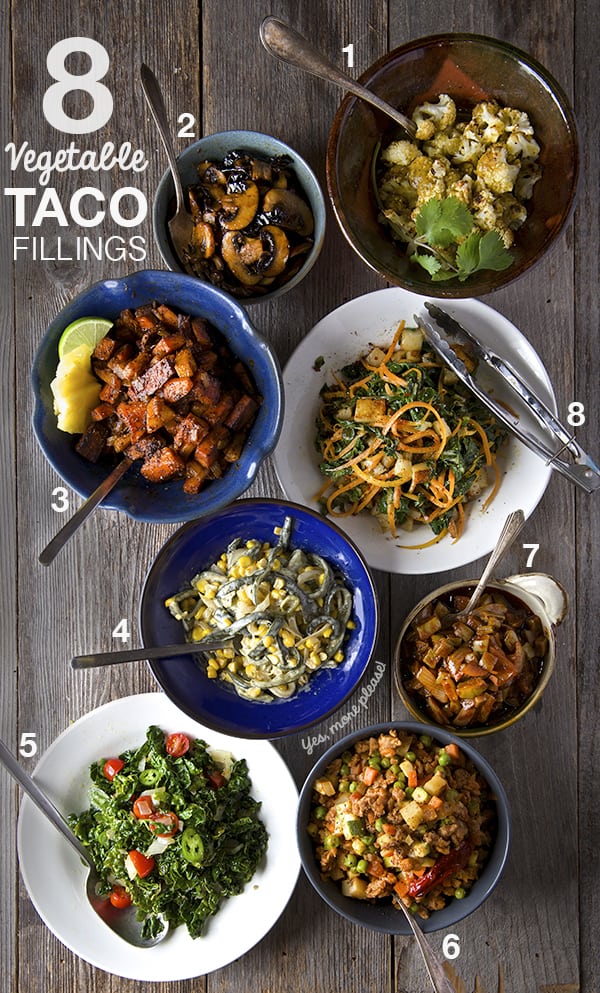
I have harnessed the melancholy and channeled it into a love letter to every Vegan and Vegetarian who has felt neglected by the Taco Love. Yes baby, not one, not two, but EIGHT vegetable fillings that will add vitamin “V” (vegetable) on any Taco night!
Recipes, Cooking & Art Direction: Mariana Nuño Ruiz McEnroe | Photography: Ian McEnroe |
Published: January 3, 2015
After enjoying these days of caloric ecstasy and extravagances, it’s hard to immediately switch to the light and healthier road. It feels like you are giving a kid a candy and 5 minutes later you change that to a cucumber… it is just plain hard. All my taste buds are still in frantic mode and my serotonin levels are a roll a coaster. But Nature is wise, and perhaps knows these facts by sprouting a great Winter abundance of greens, root vegetables, cabbages and cauliflowers among other vegetables.
These are my saviors for this caloric transitional period. I need soup to warm me up and fill up my belly with out the extra filling out of my pants.. ahem.
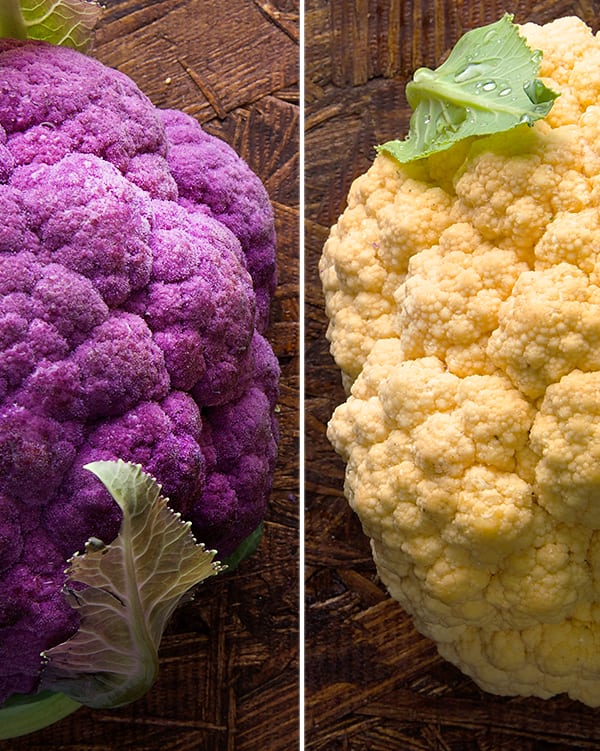
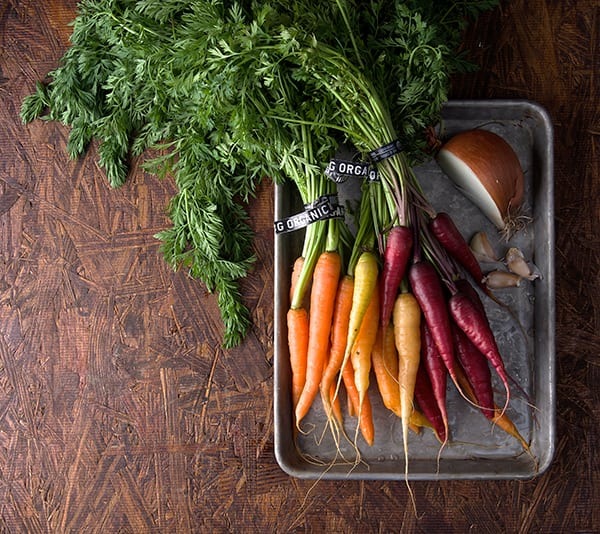
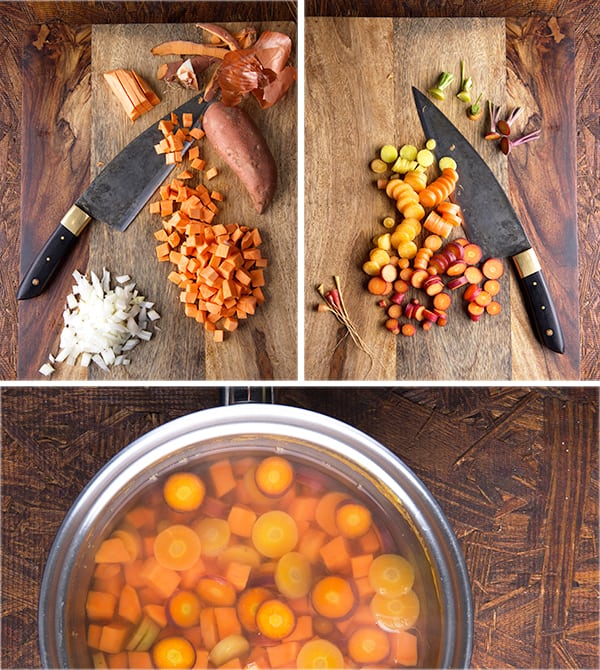
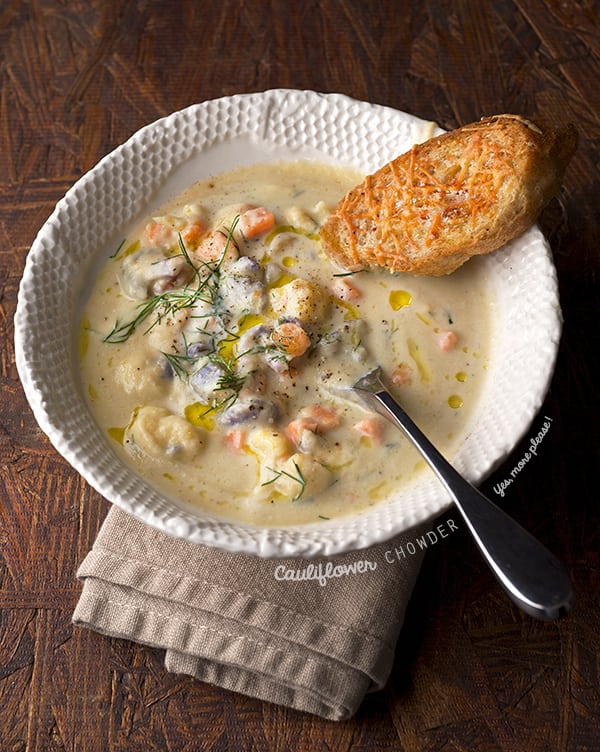
Last weekend at my farmers market I ran into these beauties, a warm yellow and a purple cauliflower, rainbow carrots, sweet potatoes and fresh dill. How can you not be inspired when you see all this colors? Soup it is, I was craving the creamy textures and luxurious caloric meals, but with no guilt. So I decided to make an all vegetable chowder using all these winter bounty.
Cauliflower has a delicate flavor. When it is cooked and pureed it resembles potatoes. You would be surprised how close you can prepare it to mimic the potato. I’m sure you’ve heard of cauliflower mashed, cauliflower rice or cauliflower mac & cheese in which this humble Brassica acts like a carb-chameleon. With this premise I started my vegetable chowder by cooking and pureeing part of the cauliflower as the soup base to give that rich starchy like consistency that characterizes a chowder. I reserved some of the cauliflower into little florets which are added latter to the soup to add texture and enhance the cauliflower flavor. The extra creamy chowderiness comes from unsweetened coconut milk which gives this soup the luxurious velvety chowder texture and it adds lots of good healthy fats that are well needed at this point of the healthy road transition. Do not fear about the coconut over taking the flavor on the soup, you barely can tell is here. Carrots, sweet potatoes and onions add sweetness, texture and light flavor. Fresh dill adds a great herbal aroma to the soup and complements the cauliflower flavor in a very delicate way.
I recommend organically grown vegetables if possible. I know that’s not easy, but increasingly supermarkets are adding those options if you don’t have access to a farmer’s market. In my opinion the flavor is better and I think with a lightly seasoned dish like this one, those flavors are going to shine through.
This Cauliflower chowder will warm you up, fulfill your starchy desires, and settle down your taste buds. I would say this soup is the ticket to redemption road. Time to tame the growling carb lions…
If you want to know more about the wonderful benefits of Cauliflower, please check out this unique and complete article, written by Helen Nichols, 28 Science-Backed Health Benefits of Cauliflower Enjoy!
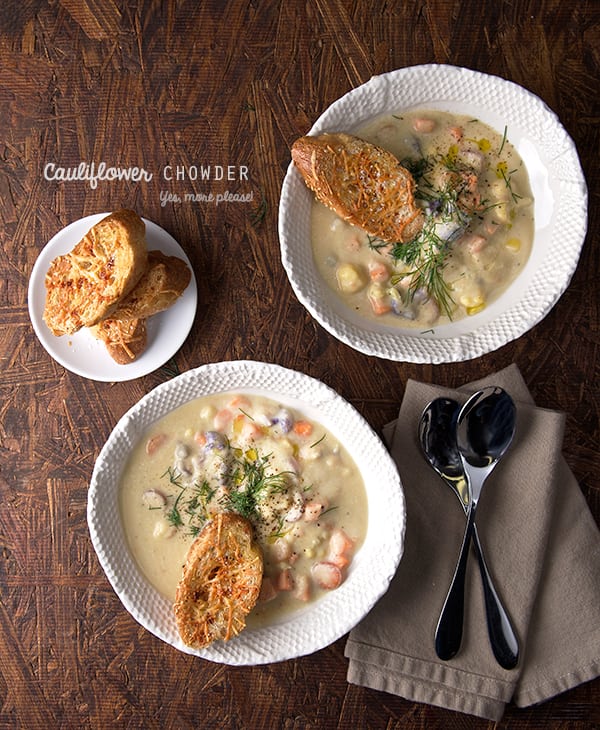
Cauliflower Chowder
Serves 4 or 2 hungry Vegans.
2 small or 1 medium Cauliflower heads. Any color is great about 6-7 cups of small cauliflower florets total, use organic if possible they have the best flavor.
6-7 small carrots, diced or sliced into rounds.
I used red, yellow, and orange, use what ever is freshest available at your market.
1 medium sweet potato peeled and diced.
1/2 large sweet onion
2 garlic cloves
3 tablespoons extra virgin olive oil
3 cups vegetable stock
1 – 14oz can unsweetened coconut milk/cream
1 bay leaf
1/4 teaspoon thyme
1 sprig fresh dill, or 1/4 to 1/2 teaspoon if using dry and upon your taste.
1/2 teaspoon celery salt
1/4 teaspoon smoked paprika or 2 sundry tomatoes**
6-8 good cranks of fresh black pepper
1 teaspoon Sea salt
Garnish with:
Fresh dill/not fan of dill?… Basil, Thyme, Chives, Tarragon are great substitutions.
smoked paprika
(Crostini or toast drizzled with olive oil and Parmesan cheese optional)
*I used water instead of vegetable stock, because I wanted the cauliflower flavor to come through. The first time I made this soup I used vegetable stock and I felt it masked the cauliflower flavor to much. Feel free to use whatever you prefer.
** Recently I made this soup adding 2 sundry tomatoes. It was a delicious variation, it gave the chowder a slight tint of color and deep of flavor.If using sundry tomatoes add them on step four so they can soften up before pureeing the chowder.
Preparation method:
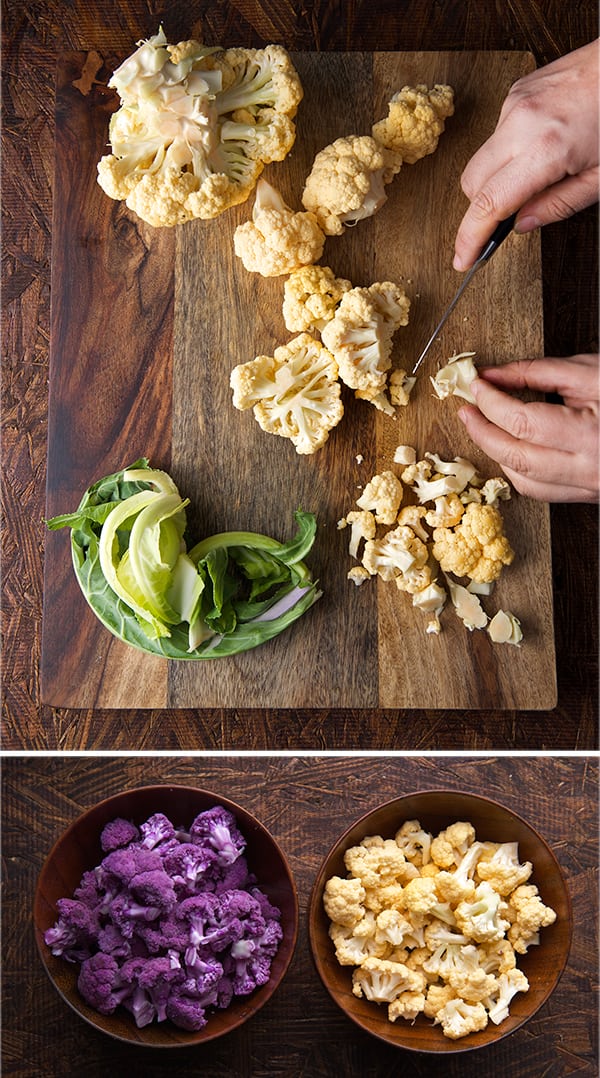
1. Chop and diced your vegetables. With a small paring knife cut the cauliflower into small florets. Reserve about 2 cups of the little florets to add to the soup at last. For this soup I used the yellow cauliflower for the soup base and the purple florets to add whole to the soup, it adds eye appeal.
2. In a small pot, bring 4 cups of salted water to a boil. Pre-cook the diced carrots and sweet potatoes for 4-5 minutes, until al-dente, rinse with cold water. Set aside. 3. Over medium-low heat in a medium size pot, add the extra virgin olive oil, and sauté the chopped onions and garlic until translucent, season with salt and pepper. 4. Once the onions are translucent, add ¾ of the cauliflower florets. Toss and add 2 cups of vegetable stock or just enough to cover the florets. Add bay leaf, thyme, fresh sprig of dill/or dry, salt, and pepper, cover with a lid and let them cook for 7-8 minutes or until very soft and tender. Once cooked, purée them in a food processor, blender, or use an immersion blender until smooth. 5. Place this cauliflower purée back into the pot, add the coconut milk and stir well until blended. Season with celery salt, salt, paprika and black pepper. Add a bit more vegetable stock if the consistency is too thick. 6. Add the reserved mini cauliflower florets, and the pre-cooked carrots and sweet potatoes. Cover with a lid and bring to a slow simmer cook for 5 minutes. Taste and adjust the salt and pepper if necessary. Check for doneness on the vegetables; I like my vegetables on the al-dente side, not hard but not mushy. Taste them and decide if you like them softer keep cooking them for another 2-3 minutes.
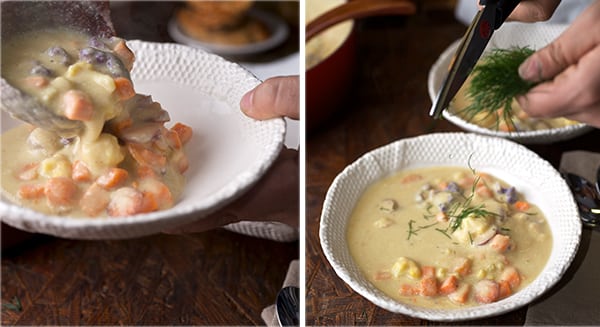
Serve immediately into warm bowls, sprinkle fresh dill, a little drizzle of olive oil, salt, and fresh cracked pepper. One or two whole wheat crostinis won’t hurt right?… Enjoy!
2smallCauliflower heads,Any color is great about 6-7 cups of small cauliflower florets total, use organic if possible they have the best flavor.
6-7smallCarrots,diced or sliced into rounds.
1mediumSweet potato,peeled and diced.
1/2largeSweet oniondiced
2mediumGarlic cloves
3tablespoonsExtra virgin olive oil
3cupsVegetable stock*
114-0z canUnsweetened coconut milk/cream
1bay leaf
1/4 teaspoonthyme, dry or fresh
1sprigfresh dill,1/4 to 1/2 teaspoon if using dry upon your taste
1/2teaspoonCelery salt
1/4teaspoonSmoked Paprika or 2 sundry tomatoes
6-8cranksFresh Black pepper
1teaspoonSea Salt, or more upon your taste
Instructions
1. Chop and diced your vegetables. With a small pairing knife cut the cauliflower into small florets. Reserve about 2 cups of the little florets to add to the soup at last. For this soup I used the yellow cauliflower for the soup base and the purple florets to add whole to the soup, it adds eye appeal.
2. In a small pot, bring 4 cups of salted water to a boil. Pre-cook the diced carrots and sweet potatoes for 4-5 minutes, until al-dente, rinse with cold water. Set aside.
3. Over medium low heat in a medium size pot, add the extra virgin olive oil, and sauté the chopped onions and garlic until translucent, season with salt and pepper.
4. Once the onions are translucent, add ¾ of the cauliflower florets. Toss and add 2 cups of vegetable stock or just enough to cover the florets. Add bay leaf, thyme, fresh sprig of dill or dry, salt and pepper, cover with a lid and let them cook for 7-8 minutes or until very soft and tender. Once cooked, purée them in a food processor, blender, or use an immersion blender until smooth.
5. Place this cauliflower purée back into the pot, add the coconut milk and stir well until blended. Season with celery salt, salt, paprika and black pepper. Add a bit more vegetable stock if the consistency is to thick.
6. Add the reserved mini cauliflower florets, and the pre cooked carrots and sweet potatoes. Cover with a lid and bring to a slow simmer cook for 5 minutes. Taste and adjust the salt and pepper if necessary. Check for doneness on the vegetables; I like my vegetables on the al-dente side, not hard but not mushy. Taste them and decide if you like them softer keep cooking them for another 2-3 minutes.
*If using sundry tomatoes add them on step 4 so they can soften before pureeing the chowder.
Recipes, Cooking & Art Direction: Mariana Nuño Ruiz McEnroe | Photography: Ian McEnroe |
Published: May 30, 2014
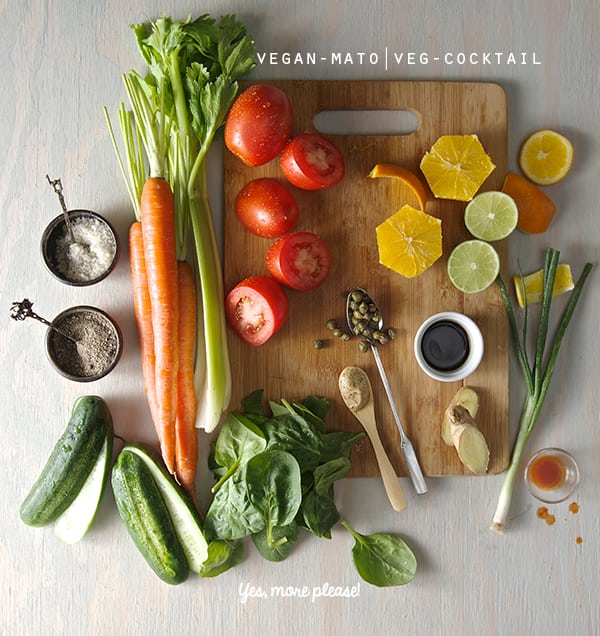
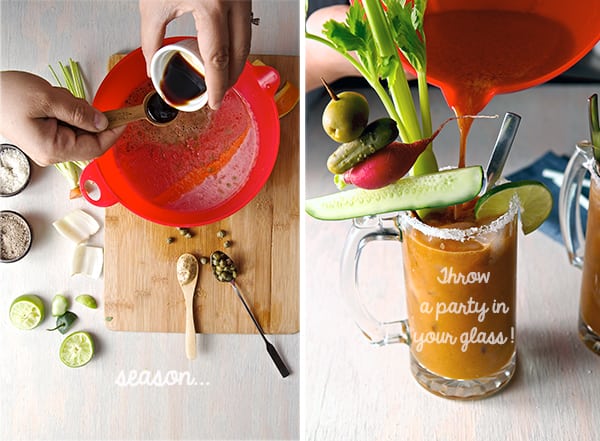
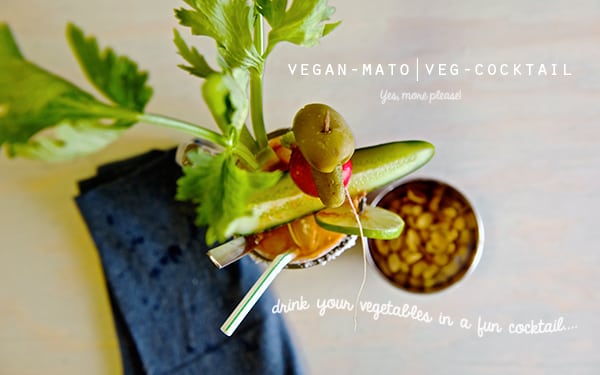
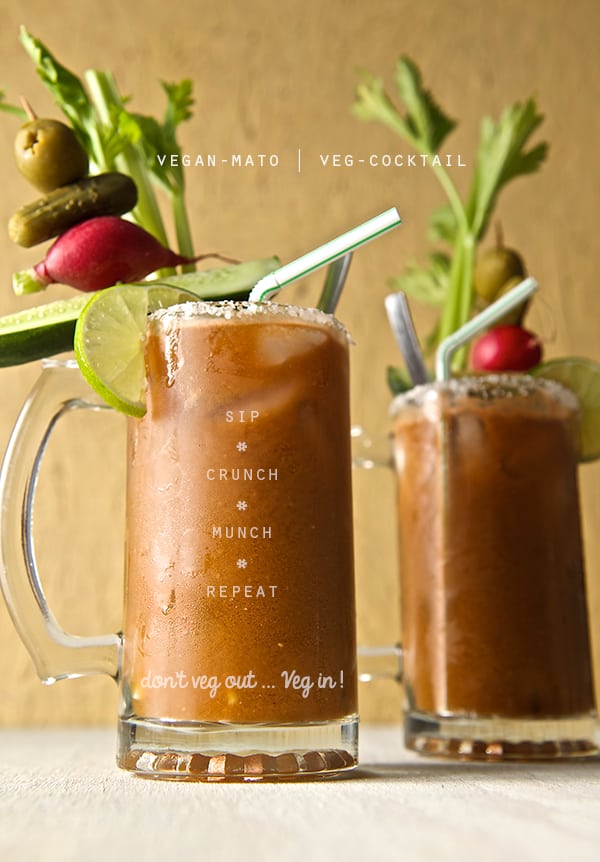
Need some veggies in your life? Let’s veg-out!, I mean Veg-in, Vegan-mato is a vegetable cocktail that delivers a fun way to drink and eat your vegetables. Let’s throw a party in a glass!
Sometimes you just need something that boost your inner health and some vegetable motivation in liquid form is the way to go. Not sure what to do with left overs veggies of the week? juice it up!
This Vegan-mato is waiting for you, perfect summer power drink, made with fresh vegetables, all natural, extremely flavorful and fun to make.
It can’t be easier than to throw all the veggies on a food processor, season, squeeze some lime juice, sea salt, a little hot sauce kick, some ice, a straw and some extra veggies to munch and crunch.
This Vegetable-non alcoholic cocktail is one of the best ways to drink you veggies.
Have a great weekend…Enjoy!
Do you need an umbrella to go with this cocktail? Perhaps, perhaps, perhaps…
Check our music gallery for our music-recipe pairings…
Vegan-mato a Vegetable Cocktail
Serves 2 large mugs or 4 short glasses.
4 Roma tomatoes
3 large carrots
1 medium orange peeled
2-3 small cucumbers
1 spinach handful
2 large celery stalks including the leafy tops (celery leafy tops are a great source of magnesium do not waste them! Drink them, include them on your salads.)
1 sprig of parsley
1 green onion
2 inches of fresh ginger
Season with:
the juice of 2 limes
2 teaspoons soy sauce
1 teaspoon sea salt
1 pinch of celery salt
2 pinches of freshly ground black pepper
1 teaspoon of spicy brown mustard
2, 3, 4 dashes of your favorite hot sauce.
Garnish with:
2 bamboo skewers
Celery stalks
Martini Olives, jumbo pepper stuffed olives or Jalapeno stuffed olives.
Pickles
Fresh cucumber wedges
Cherry tomatoes
Radishes and chopped capers
Some extra sea salt and a half of lime to cover the rim of the mug.
Note: It is very important to me to make emphasis on how important it is to buy organic produce when juicing. Flavor, nutritional value is superb when organic vegetables are used; believe me you don’t want to be drinking pesticides. Please take this in consideration…
Directions:
1. Chill your Mugs, by placing them on the freezer.
2. Wash and cut the hard ends of vegetables.
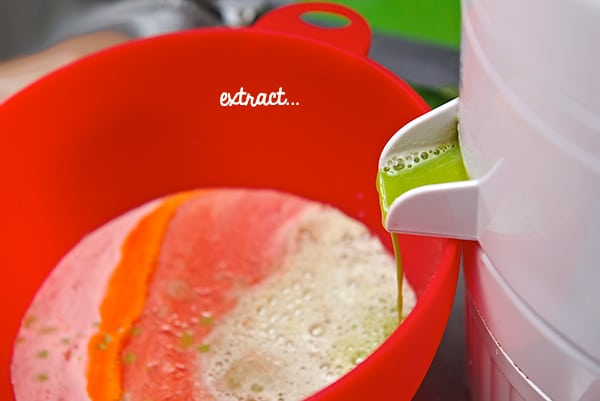
3. With the help of an electric juicer, juice all your vegetables first and add the orange last. The juicy orange will help to clean up all bits of vegetable flavor on your juicer.
4. To this juice, add the soy sauce, sea salt, pepper, spicy brown mustard, a few dashes of hot sauce, and the juice of two limes. WHISK!!! until well combined. Taste to adjust the flavor.
5. Make your vegetable skewers, using what ever you prefer for garnish, cherry tomatoes, radishes,caper-berries, olives, pickles the limit is your imagination.
6. Take the mugs out of the freezer, rub some lemon on the rim and dip it in salt. Add lots of ice.
7. Add your celery stalk, a garnish skewer, a straw, umbrella, sandals, a sunny porch and some great music check our music pairings here!
Cooking music Pairing: Guardians of the Galaxy- Awesome Mix Vol. 1
Recipes, Cooking & Art Direction: Mariana Nuño Ruiz McEnroe | Photography: Ian McEnroe |
Published: April 26, 2014
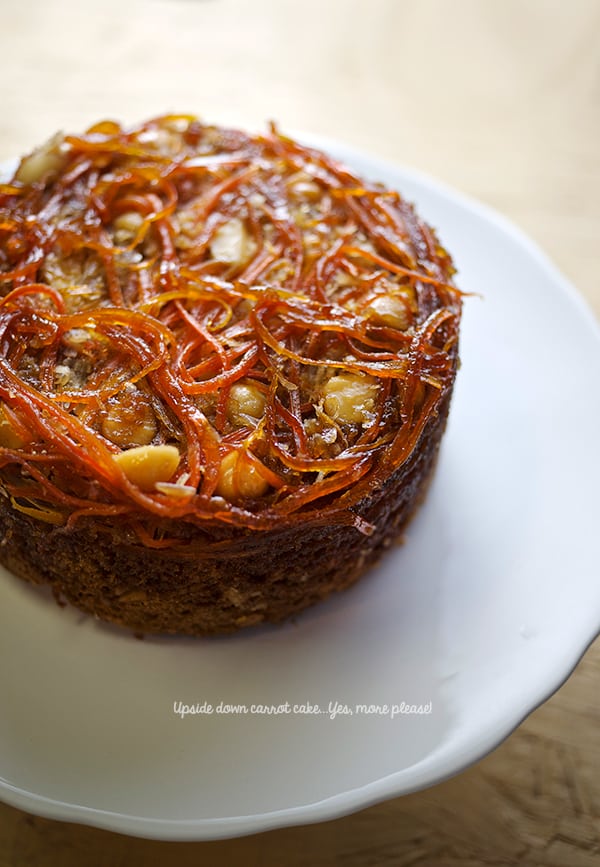
Lately everything in my world seems upside-down, but the little wacky moments in everyday life can be fun. Being playful in the kitchen is my kind of fun. And boy, if this cake screams upside-down, I’m seeing life straight up now!~
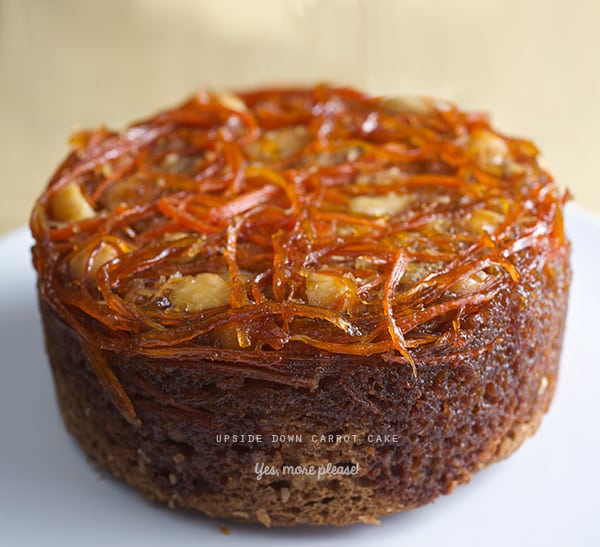
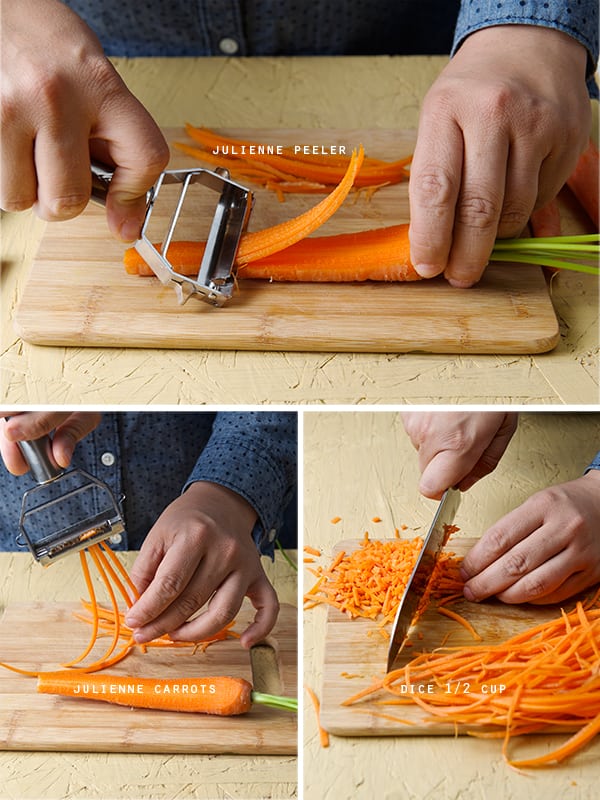
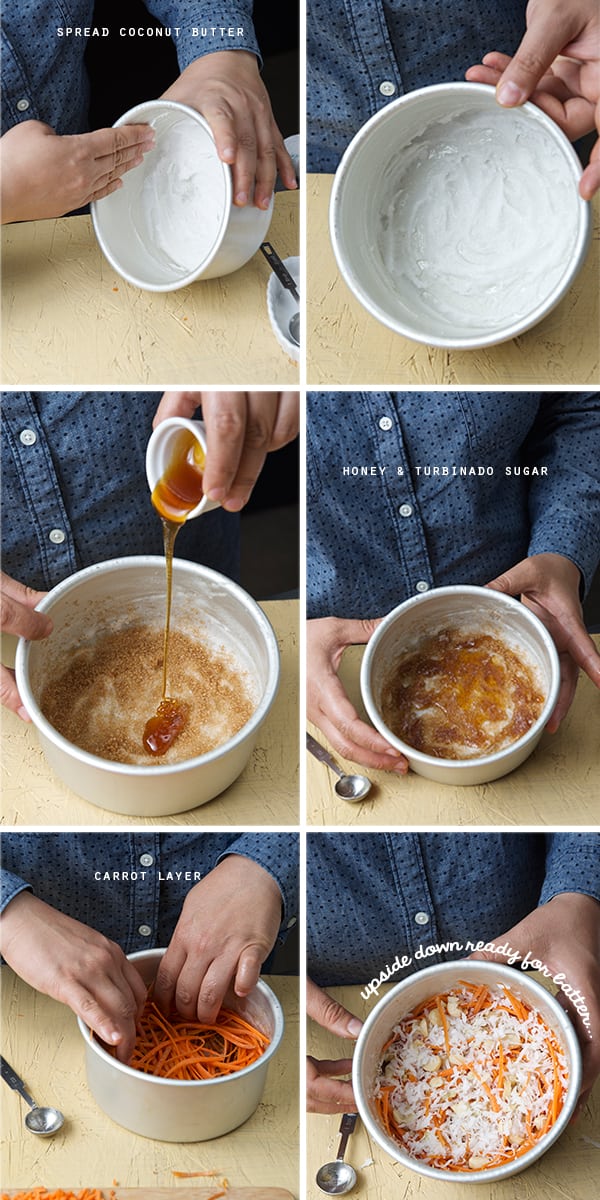
After making the Leek and Potato Tarte tatin, a light bulb turned on in my head and crisscrossed with the idea of a carrot cake. What if I apply almost the same concept of a pineapple cake to the carrot cake? Without hesitation I made ½ of a recipe, and it turned into a delicious unexpected result. I placed the carrots on the bottom of the pan and used coconut butter instead of regular butter to create a coating. I added some honey and turbinado sugar which caramelized beautifully on the bottom. Adding some freshly ground ginger was the final touch; fragrant with a spicy lemony note.
I think Ian looked at me funny when I told him I was baking an upside-down carrot cake. He probably though I was crazy…and then when he saw the cake, he just smiled and understood, and when he tried it he asked: “When are we shooting this?”… So I guess he liked it!
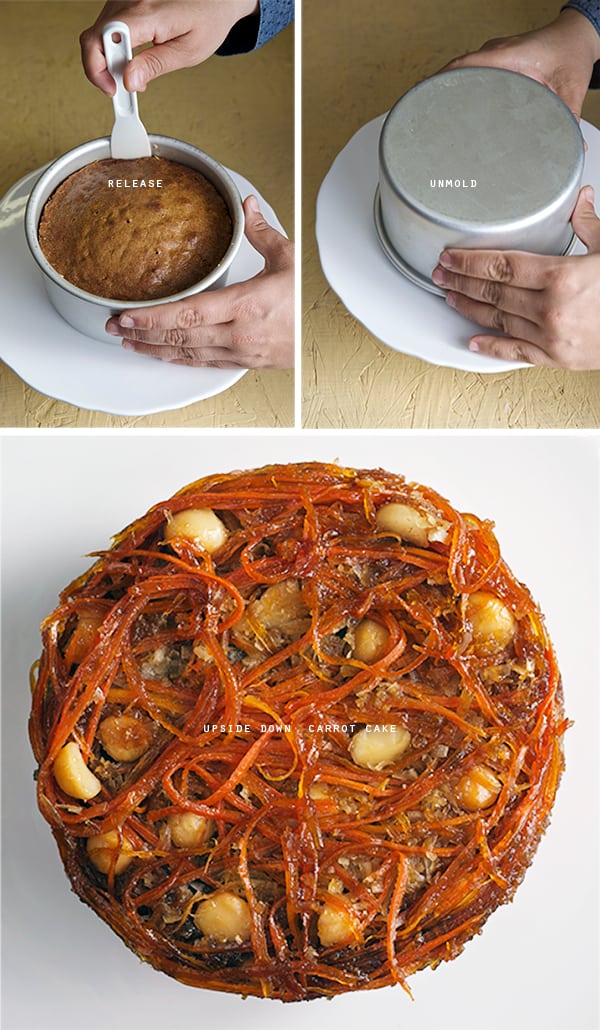
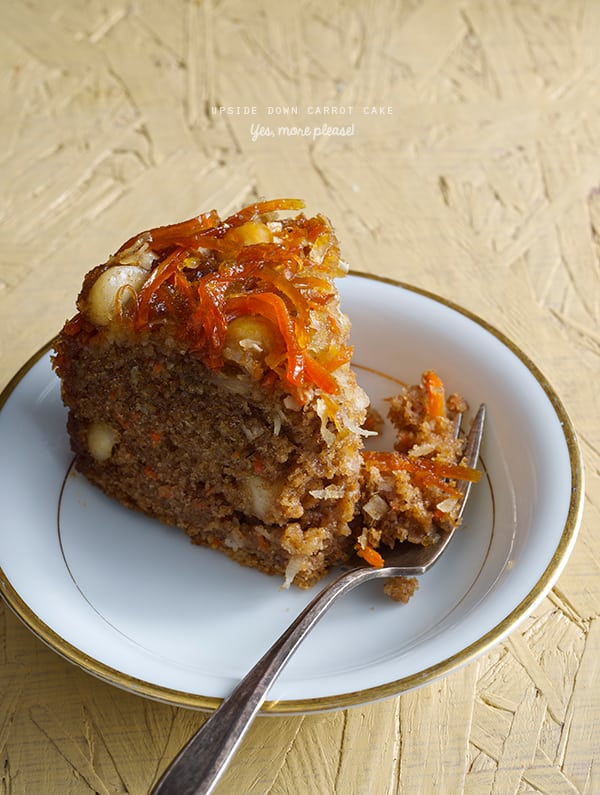
The cake is mildly sweet. The caramelized carrots add the sweetness and texture to this scrumptious cake, without being overly sweet. It is more of a coffee cake than the classic carrot cake with cream cheese icing, (which I adore) but, in this case, the no frosting makes the idea of baking and eating cake for breakfast more…manageable…*hehehe*
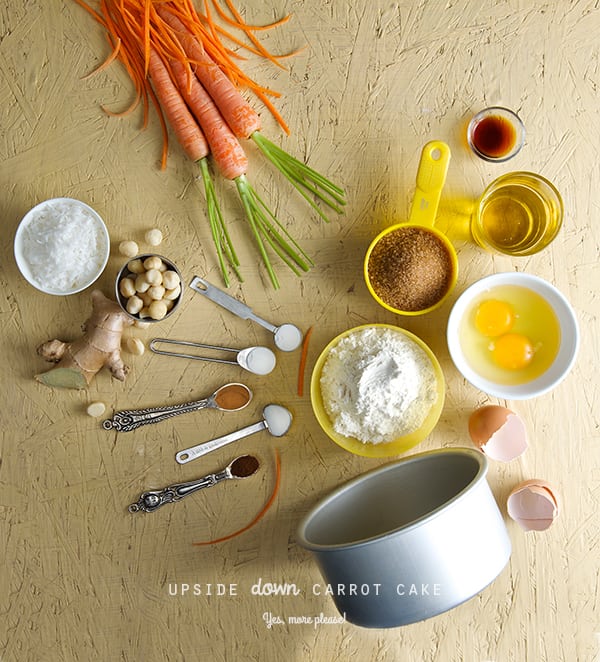
This recipe I wrote is for a small 6” cake, since is just Ian and I it is more than plenty. You can easily double it and bake a 9”-10”. for bigger crowds. This upside down carrot+coconut+ginger cake will make a fantastic bake good for brunch or a simple delicious birthday. I’m really hopping you enjoy this recipe, shoot us a comment, we’d love to hear from you!
Upside down Carrot Cake
Makes 1- 6” cake, serves 4-6
Dry:
1 cup all-purpose flour
½ teaspoon baking soda
½ teaspoon baking powder
1 teaspoon cinnamon
½ teaspoon nutmeg
¼ teaspoon ground clove
½ cup shredded carrots
¼ cup shredded coconut
¼ cup roasted Macadamia nuts, roughly chopped
Wet:
1 tablespoon freshly ground ginger
¾ cup turbinado sugar
½ cup safflower oil
2 eggs
For the bottom of the cake pan:
4 tablespoons solid extra virgin coconut oil I used this kind or butter if you prefer
3 tablespoons turbinado sugar
4 tablespoons honey
1-1 1/2 cups of long shredded carrots
¼ cup shredded coconut
½ tablespoon freshly ground ginger
¼ cup roasted macadamia nuts halves or whole.
1. In a 6”x 4”tall pan, spread an even thick coat of the solid coconut oil.
Thinly grease the sides of the pan as well.
2. Scatter evenly the sugar and honey
3. Layer the shredded carrots evenly
4. Sprinkle the roasted macadamia nuts halves
5. Sprinkle the shredded coconut in an even layer.
6. Set aside in a cool place
7. In a medium size bowl whisk together all the dry ingredients.
8. Add the ½ cup shredded carrots, shredded coconut, and roasted macadamia nuts.
9. In a small size bowl whisk first oil, sugar and ginger, then add the eggs one at a time and whisk until well combined.
10. With a spatula, mix wet ingredients into dry ingredients until well combined.
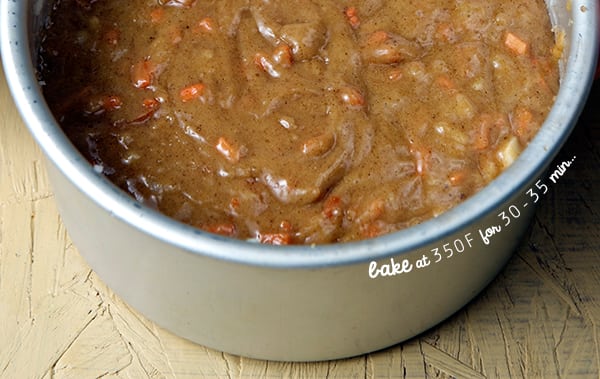
11. Poor the batter on top of the carrot layer, and bake for about 30-35 minutes. Until a toothpick in the center comes up clean.
12. Cool on a rack for 20 minutes and un-mold the cake before its completely cool.
Knife… Ready, set go!… first slice is mine!…Enjoy!
Recipes, Cooking & Art Direction: Mariana Nuño Ruiz McEnroe | Photography: Ian McEnroe |
Published: April 13, 2014
So many carrots too little time… Its carrot bonanza season, rabbits everywhere, and have you started to turn orange yet?… Well I hope not, because this recipe is gonna drive you insane. As you know, despite all the wholesomeness I believe in, I have a weakness for a certain processed food… hot dogs…I know, its terrible isn’t it? I know every fact of how the industry introduced us into this strange tubular meat, but yet I’m still hooked.
So in the search for a less processed option, a friend told me about this place in L.A where they serve sous-vided carrots and make vegetarian hot dogs, how crazy good does that sound?
That’s when I had a revelation: How about creating a corn dog, with carrots? Kaz-zam! Done deal. I made them. No, I do not own a sous-vide machine and nor the rest of the mortal cooking souls on earth but if you do , call me we can hang out!; So I oven roasted the carrots, to give some extra flavor and also to pre-cook the carrot. I made the most basic recipe for the batter. But they needed a little extra luv. I wanted a contrast in textures, that thing you crave in a fried object, the crusty salty outside and soft inside.
To that end I added 1 part of rice flour, peas, green onions and corn kernels into the batter.
The result is crazy good!… when you deep fry these babies, they get crusty outside, soft inside, and the peas and corn kernels pop in your mouth with a burst of extra flavor. The carrot center is stellar.
Don’t be nervous about deep-frying, using the proper technique will ensure you great success. I do not deep fry food very often, so I do not own a deep fryer and I do just fine.
You can easily get great results with the following tips:
Get a thermometer for crying out loud!
They cost around $9-14 no need to break the bank and it is one of the best kitchen investments.
Buy Peanut Oil:
It is the best oil to deep fry, no saturated fats, no smells, no greasy food.
Now a days you can buy small amounts of peanut oil at the super market.
Use a heavy bottom, 6″-8″ diameter deep enamel or aluminum pot. Straight sides for easy thermometer attachment.
And remember safety always come first when dealing with hot oil.*
This carrot corn dogs are great for kiddos and vegetarian adults in need of a little indulgence, Enjoy!
Carrot Corn dogs
Makes 12-16 / 3” mini carrot corn dogs.
6-8 Long, medium thick carrots.
You will need about 12-16 of 3’” long pieces.
2 tablespoons honey
1 large egg
1/2 cup milk or unsweetened coconut milk
1 teaspoon apple cider vinegar
1 scallion finely chopped
½ cup fresh corn kernels
¼ cup fresh peas or frozen if you must.
16 oz Peanut Oil for deep-frying.
16 wooden or bamboo sticks.
Utensils:
Long tongs, deep fryer, or candy thermometer, 6”-8”diameter pot with straight walls for deep-frying, cooling rack.
Preparation Method:
1. Cut carrots into 3”- 4” long. Place them on a roasting pan, season them salt and pepper do not drizzle oil. Roast them at 400F for about 12-15 minutes.
Carrots should not be soft, al dente centers is best, since they gonna keep cooking when frying.
2. When ready, set the carrots aside let them cool completely, then proceed to insert the bamboo sticks.
3. Meantime in a medium size bowl, mix all the dry ingredients, then add all the wet ingredients, mix until well incorporated , small lumps are ok. Fold into the batter corn kernels and peas. Refrigerate for about 10-15 minutes
4. Place your chilled batter into a tall glass or jar, this will allow you to easily submerge the carrots into the batter.
5. Prepare your utensils and have everything ready, tongs, cooling rack, batter in a glass, see picture below.
6. Start heating the oil. Check the oil temperature 360-375 degrees / 185-190 Celsius.
7. Dip the carrots into the batter, one at a time, holding the carrots from the stick with tongs, carefully and slowly drop it into the hot oil.
8. Monitor the temperature, it should not drop more than 15 degrees, when placing the corn dogs.
9. Do not crowd the pan. Fry 3-4 corn dogs at the time. This will ensure you evenly golden brown and well cooked batter.
10. How to know when they are cooked and ready to come out of the oil? Corn dogs are floating, look evenly golden brown color, the bubbles around them are smaller.
11. Use tongs to take them out. Place them onto a cooling rack. Keep them warm in the oven.
12. Serve warm, with the dipping sauces, or simple ketchup and mustard. Enjoy!.
*Be aware, hot oil at this temperature can inflict a lot of pain and injury so use a back burner on your stove if possible and keep the cooking pot (and its handle) away from children. In fact, I think its best to keep younger children away from the whole process and never let the frying pot leave your attention so you can monitor the oil’s temperature and keep the food from over cooking. Deep frying this batter, or anything else, some oil is bound to spatter so use long tongs or a spider to handle the food. This will prevent you from getting burns too. Focus and be on a Zen frying mode. The reward is scrumptiously good.
Recipes, Cooking & Art Direction: Mariana Nuño Ruiz McEnroe | Photography: Ian McEnroe |
Published: March 25, 2014
Pizza Primavera is a celebration of Spring! Using all the tender, sweet, crisp and fresh vegetables that the season gives us and inspired by all those beautiful shapes, colors, and textures this pizza has a refreshing taste of renewal. For me renewal translates as experimenting and trying ingredients and flavors that come with the new season.
Recently I’ve been experimenting with different gluten free flours, like oatmeal, brown rice, potato starch, tapioca, garbanzo, and quinoa. The fact that lately a lot of people have been diagnosed with a gluten intolerant condition means more are in need of extending their cooking horizons. Even if you don’t have gluten intolerance you should try this for its variation in flavor and texture.
Recently I baked an Irish Soda breadusing 1/2-1/2 whole wheat and oat meal flour, which gave to the bread so much flavor than regular all purpose flour. That got me excited and I started to experiment with the not so easy task to come up with a gluten free pizza dough. For this pizza crust I experimented with different ratios, of brown rice flour, tapioca, potato and millet flour. The results were delicious and flavorful. However it ended up a bit overpriced for what a pizza dough should cost. I used 3-4 different types of flours each one had a mission to give the right texture to the crust, great achivement, but not very practical. So in my quest for a more reasonable option I stumbled upon a great mix, Bob Red Mill Gluten Free Organic Pizza Dough. I read the ingredients and to my surprise this mix is based on almost the same combination of 4 different flours I was trying to combine. The difference: I bought one bag. This simplifies the whole process for a fraction of the cost, and in my case pantry space. (I have a tiny pantry).
Next, I gave myself the task to make this crust using this mix… and it was great!. Flavor and texture were spot on. When trying new things you have to see with new eyes, and tastebuds. The texture of a regular crust has a certain chewiness for which gluten is the responsible. When you have no gluten, other textures and flavor come to replace that chew factor. This crust has a lovely light texture, great flavor, and crunch, with a tender bite, making it easy to love. The tender light crusty and crunchy crust is the perfect canvas for the sweet delicate Spring vegetables. The mix is ready in 5 minutes and it does not requires kneading. Proofing time is 20 minutes and it bakes in 12 minutes total. It’s fun to make and I loved trying something new. This crust is a keeper!
For this Pizza Primavera, pre-roasting the vegetables is a must. They add extra flavor deep to the pizza. I love to leave the carrots al-dente, they add a bit extra crunch and texture to the pizza. Cheese?…my advice: go light on the cheese you want to be able to taste the vegetables. I chose a smoked provolone to balance the sweetness on the roasted vegetables. You must try this pizza, I assure you, you will fall in love with it. Give your self the chance to explore and renew your taste buds, perhaps for your next dinner party or get together… and have fun welcoming Spring!
Pizza Primavera
A pizza with spring vegetables and a delicious gluten free crust…
Makes 4 – 8” pizzas
Vegetables:
12-16 small spring carrots cut in half.
2-3 bunches thin sweet green beans cut on a bias.
2 cups Sliced Cauliflower florets.
½ cup fresh peas
1 cup cherry or grape tomatoes halved
For the caramelized onions:
1 large red onion thinly sliced
a glug of extra virgin olive oil
2 tablespoons of balsamic vinegar
a pinch of salt and fresh cracked pepper.
For the sauce:
2 cups roasted crushed tomato sauce.
2 grated garlic
2 tablespoons extra virgin olive oil
Salt and pepper to taste.
2-4 sprigs of fresh herbs, like oregano, rosemary or basil.
Cheese:
3 cups grated smoked provolone cheese or tofu for a vegan option.
(The mix includes an envelope of dry active yeast, how awesome is that!)
1-1/2 warm water
2 eggs or 2 tablespoons of flaxseeds and 8 tablespoons of water for vegan option.
Follow the instructions on the package.
Gadgets and utensils:
Pizza peel: It’s a must!, its so much fun to use and since it has a long handle keeps you safe from the oven heat. (I like this wood kind)
Pizza Stone or Saltillo tile*
You can use a cookie sheet or a metal round pizza tray that will work too. I recommend, if you are a pizza lover, a pizza stone or the Saltillo tile, are a great investment. The crust gets a fantastic color, and it gets crunchier when is cooked onto a stone surface.
*How or where to get a Saltillo tile?
At your local home improvement store. You must make sure its and unglazed quarry tile.Usually the name is Saltillo tile, from the region in Mexico. They come in two sizes, I prefer the 11×11. Usually you can fit 4 into your oven, if you are planing to make a big pizza, For us 1 or 2 tiles are enough. A smaller size pizza like an 8” will cook great and evenly onto an 11x 11. The magic of these tiles is that you can use them in the oven and over the grill, if you feel like you want a grilled pizza, this works like a charm, price-wise we paid around 1-3 dollars per tile. This is a good solution if you don’t happen to have a pizza stone. And regarding durability: we’ve been using the same tile for six years!
To prepare the tiles for baking: Presoak them in water the day before, and let them air dry. Once they are totally dry they are ready to use. Be careful not to heat them wet to avoid cracking and of course let them cool before removing them from the oven or cleaning them.
Preparation Method:
Preheat your over at 450F/ 232C
Place your pizza stone or Saltillo tile into the oven to start warming up.
(This step is crucial, to get a great crusty crust, the hotter the surface the crustier it will get.)
Pizza dough:
Start by making your pizza dough. Follow the instructions on the package, I did not use the mixer, I used a wood spatula and kneaded by hand for a bout 2 minutes. Divide the dough in 4 equal parts, pre shape into 4 balls, cover with plastic wrap and let it proof at rom temperature for about 20 minutes.
While your dough is resting, prepare your toppings:
In a sheet pan, lined with some parchment paper, place the carrots, cauliflower and green beans, drizzle with a bit of olive oil salt pepper and roast at 450 F for about 5-7 minutes. The vegetables should look not completely roasted, as they will continuously cook when placed on the pizza. You want the vegetables, tender with a bite.
Meantime in a saute pan add a glug of extra virgin olive oil and the red onions and saute on medium heat for about 5 minutes, add some salt and pepper. Reduce the heat to low and add about 2 tablespoons of balsamic vinegar. Leave them on low heat tossing occasional for about 15 minutes or until tender and caramelized. (see picture below)
Mix all your sauce ingredients, adjust salt and pepper, and warm for a few minutes to marry the flavors.
Cut your tomatoes, grate the cheese, season your sauce, pre-roasted vegetables, have everything ready to have fun topping your pizza!
The making!
Crank up the oven temperature to 500F. This gets the crust crunchy when it cooks on the hot pizza stone.
Add a generous amount of corn meal onto the pizza peel. Apply some extra virgin olive oil in your hands and take one portion of pizza dough. Shape it into a disk and place it in the middle of the pizza peel. With the tip of your fingers, starting from the center out gently massage and start flatten and shape the dough into an 8-9” disk. (see picture below)
Once you have the 8-9”round pizza dough, make sure its lose, by gently shaking the pizza peel in horizontal motion. The dough should scoot around easily.
Place the pizza peel onto the pizza stone. Gently shake the wood peel back an gently forward to slide the pizza crust onto the pizza stone. See picture below. Be as quick as you can so the oven does not loose temperature.
Immediately close oven door. And adjust oven temperature to 450.Bake crust for 5-7 minutes until slightly golden brown.
With the help of the pizza peel remove the crust from the oven and proceed to place the toppings.
Start with a thin layer of tomato sauce, and place the roasted carrots and veggies along the radius of the pizza crust. Add the caramelized onions, top with grated cheese, and sprinkle fresh herbs.
Place the pizza back into the oven for another 7-8 minutes, or until the cheese is melted and it has some color. With the help of the peel pull out the pizza into a wood board. Let it rest for 1-2 minutes, and proceed to cut. You can use a pizza cutter or a chef’s knife.
Serve immediately.
Top with arugula, a drizzle of extra virgin olive oil, squeeze of lemon salt and pepper…
Recipes, Cooking & Art Direction: Mariana Nuño Ruiz McEnroe | Photography: Ian McEnroe |
Published: February 15, 2014
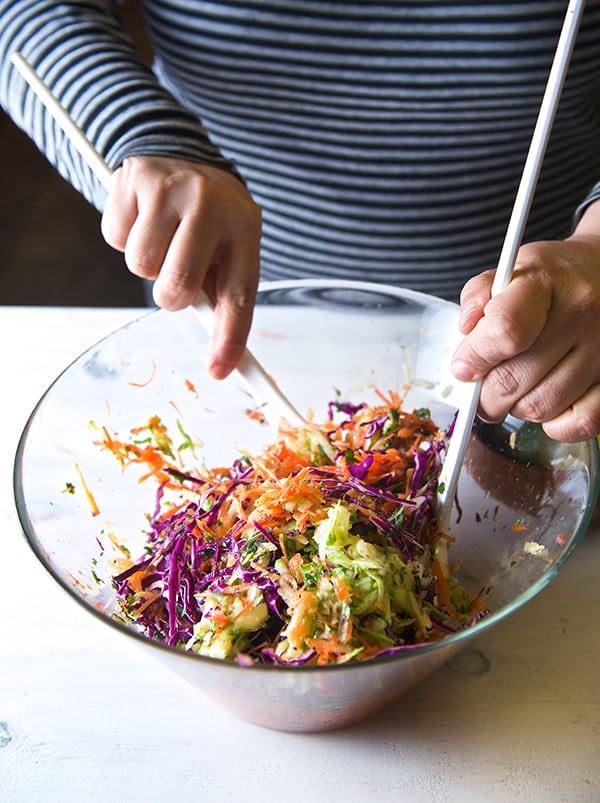
Is it Spring time yet?… I think we are almost there. This Raw Veggie Tostadas scream welcome spring!, Spring is about renewal, everything in nature starts again, a new cycle that makes me feel like eating fresh,crunchy root vegetables. There is an abundance of them right now, lots of cabbage, carrots, radishes at the farmers market. For me is time to set aside the roasting pans, lets eat them raw. Raw vegetables have an earthy and unique flavor, they are juicy and sweet. I’ve learned to loved them when I shred them, it is so easy to eat them raw and when you combine them in a salad they are also so attractive to the eye and all together make a crunchy symphony texture, simply amazing.
This recipe screams “easy”, you can whip this up for a week dinner or an easy-laid back weekend lunch. This recipe its one of my favorites, Ian and I used to have them almost once a week for our veggie night or our MM, Meat-less Monday. Have fun and enjoy!
Raw Veggie Tostadas
Makes 4-6 Tostadas
Ingredients:
6 tostada shells*
(Baked or Milagro brand if you are her in Austin, definitely the best..)
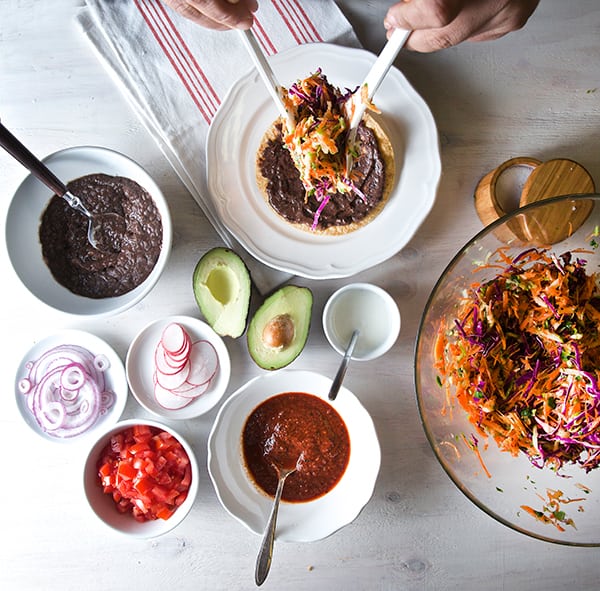
1 cup of black beans cooked and smashed
4 shredded carrots…any color any variety.
2 shredded mexican zucchini (light green kind preferable)
¼ head of red cabbage, shredded
2-3 tablespoons finely chopped cilantro
1 lime
1 lemon
2 tablespoons Extra Virgin Olive Oil
1/2 – 1 teaspoon sea salt (upon your taste)
fresh ground black pepper to taste
Garnish with:
2 tomatoes diced or in slices
4 thinly slices of red onion
1 avocado
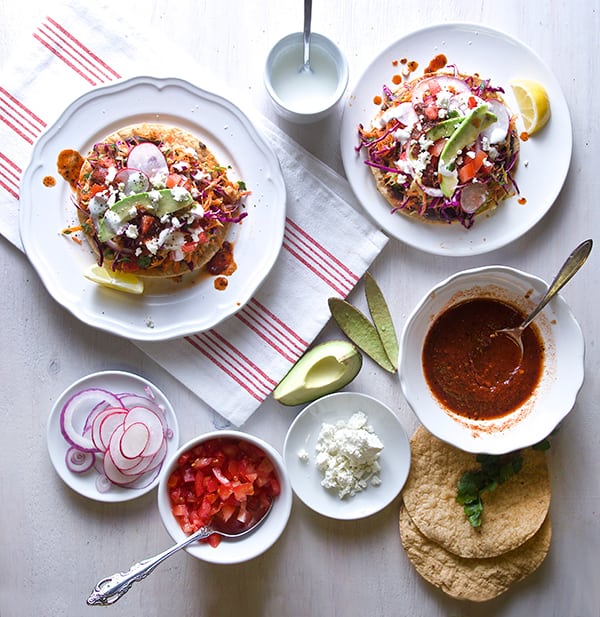
3 tablespoons of greek plain yogurt + 1-2 tablespoon of milk + pinch of salt.
Whisk until well combined, to create a lighter creamy sauce. (for vegan options use tofu yogurt)
2 Tablespoons queso fresco or feta cheese crumbled or small diced firm tofu.
Red Roasted Tomato Salsa(recipe follows)
Red Roasted Tomato Salsa:
2-3 medium size tomatoes roasted and peeled.
6-8 toasted chiles de arbol.
2 toasted chiles cascabel (remove seeds)
1 medium garlic clove
1 teaspoon sea salt
Place all the ingredients in the food processor, until well blended, add a little warm water if needed for consistency. The salsa should reassemble a lose puree.
Preparation method:
1. Warm up the beans, you can use refried beans if you like. 2. In a large bowl, combine carrots, zucchini, cabbage, cilantro, the juice of lime, lemon, salt and pepper to taste, toss well.
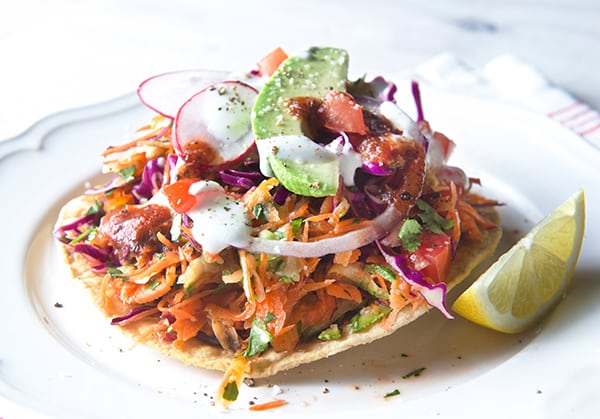
3. Make your Salsa…I made this Salsa Roja Asada click for recipe here. 4. Prepare your garnishes. 5. Assemble the tostadas, spread a light coat of beans on the tostada (this will be your glue!) and then a generous amount of the vegetable concoction. Top with slices of onion, avocado, drizzle some of the yogurt sauce, and some salsa. Serve immediately. Enjoy!
Have you had your rainbow today?
Cook with music! Music always sets the mood for cooking, My music pairing for this recipe:
Recipes, Cooking & Art Direction: Mariana Nuño Ruiz McEnroe | Photography: Ian McEnroe |
Published: January 18, 2014
January brings the roots out. Its a fun time at the farmers market a great variety of root vegetables. What caught my attention this time were the carrots. Great variety of colors, from red, orange, yellow and pale cream color. How can you not get inspired from all this colors? So I bought a bunch of the red carrots including the greens. Carrot greens are really tasty and a great source of vitamin C, potassium, calcium and vitamin K and are also high in protein. Flavor-wise they taste a bit peppery and resemble parsley. They are also a great addition to any salad and you can make pesto or tabbouleh with them… in fact!… that might be the next recipe I will attempt. When you are buying carrots and carrot greens, make sure your source is organic. There is a bit of controversy about eating the tops or the carrot skins and other non-organic vegetables. Know your source and enjoy your carrot greens with no worries.
For me, roasting is one of the best ways to bring out the sweet flavor of the carrots. The skin gets caramelized while inside it remains tender and all the ‘carrotness’ flavor is contained in a little cute pencil shape. Delicious! For the vinaigrette I took the same spices you will use to make hummus and I mix them with some sesame oil, extra virgin olive oil, and lemon juice. This Roasted Carrot Salad with Hummus Vinaigrette Its easy to make, and very comforting. Enjoy!
Roasted Carrot Salad with Hummus Vinaigrette
Serves 2 as main course, 4 as side dish or 1 wabbit feast.
2 bunches of carrots red, orange yellow any kind will work.
½ cup carrot tops washed and leafs cut.
4 cups mustard greens washed and hand cut in pieces
½ small onion cut in slivers
½ cup garbanzos cooked.
For the Vinaigrette:
¼ cup sesame oil
¼ cup extra virgin olive oil
¼ cup apple cider vinegar
1 teaspoon agave nectar or honey
The juice and zest of half a lemon
½ teaspoon smoked paprika
½ teaspoon ground cumin
1 tablespoon toasted sesame seeds
2 tablespoons tahini
2-3 grated garlic cloves
2 good pinches of salt
Freshly ground black pepper to taste
Preparation:
Preheat the oven at 450F/230C
Wash and pad dry your carrots upon size, slice carrots in half or quarters for evenly roast.
In a baking sheet lined with parchment paper place the carrots, onions, garbanzos, drizzle a bit of olive oil and sea salt. Roast them for about 10-15 minutes or until caramelized and fork tender.
Mean time prepare your vinaigrette by simply combining all the vinaigrette ingredients in a small bowl whisk until well combined. Set aside.
Check on your carrots. If they look done they will show golden tones and edges a bit charred and fork tender.
Remove them from the oven and in the same tray toss the mustard greens and half of the vinaigrette, toss and place back in the oven for about 1-2 minutes which will slightly warm up the mustard greens.
Serve immediately and drizzle the rest of the dressing, adjust salt and pepper, squeeze more lemon, sprinkle a few more toasted sesame seeds if desired.
Serve with toasted pita bread and a dollop of yogurt on the side. Enjoy!


